
Throughout the book so far, I’ve focused on the most common setup between your computer and the Apple TV: synchronization. After you get everything connected, the standard process is to copy the iTunes library from your computer to the Apple TV’s hard disk.
But what if your library takes up more disk space than is available? Or what if you want to avoid hearing Christmas music in June when playing tunes on shuffle mode? Suppose you want to watch a movie that’s on another computer in the house? The answers lie in configuring the sync settings in iTunes and choosing sources on the Apple TV itself.
To make things easy, the Apple TV acts as a mirror of your iTunes library. The alternative, streaming, transfers media as it’s being played without storing a copy of the item on the Apple TV’s hard disk. I’ve covered the initial sync during setup in Chapter 1, so now let’s talk about how to fine-tune the sync selections. I’ll get to streaming in the latter half of this chapter.
When the Apple TV was first previewed (with the codename “iTV”), it wasn’t clear whether the box even included a hard drive. Upon release, the Apple TV turned out to include a 40 GB hard disk—only half the capacity of the top-of-the-line iPod. I don’t know about you, but my media folder currently occupies 48 GB, and that’s a low number compared to the libraries of some people I know.
Note
Of that 40 GB capacity, roughly 7 GB is used by the Apple TV’s operating system, leaving about 32 GB of available space for your media.
To compensate, the Apple TV employs a hierarchical cutoff system. All your movies are copied first, followed by TV shows, music, and podcasts (photos are disabled initially). When the hard disk fills up, nothing else is copied. However, you can manage the content that gets transferred, as we’ll soon see.
Tip
If 40 GB is too restrictive, you have options. Keep in mind that the Apple TV is, at heart, a Mac OS X computer that uses standard components. If you’re handy with a screwdriver and palette knife (and are willing to void your warranty), you can pull the factory drive and install a replacement 2.5-inch ATA (not SATA) hard drive. For a step-by-step walkthrough of the process (which isn’t trivial), see www.macworld.com/2007/03/secrets/appletvharddrive/. Companies such as Weaknees.com can also perform the installation for you for a fee.
If the hard disk is full and you add more content, such as downloading new TV shows, the Apple TV makes room by deleting content at the end of the hierarchy.
If your computer contains protected content but is not authorized to play it, iTunes displays an error indicating which items are problematic (FIGURE 8.1). Those are not copied to the Apple TV.
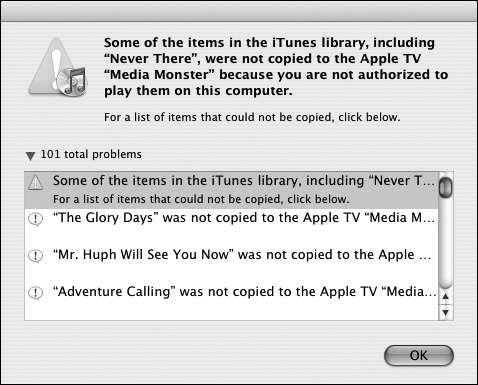
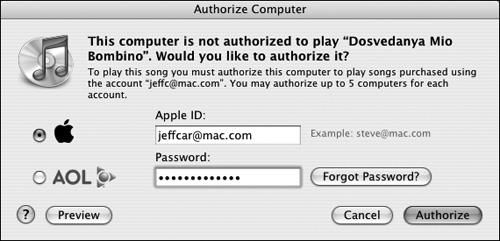
To fix the problem, choose Store > Authorize Computer and enter your Apple ID and password (FIGURE 8.2). At the next sync, your protected content is copied over.
Tip
Another way to authorize the computer is to simply start playing a protected track in iTunes. The software will ask for your authorization.
Tip
The Apple TV does not count against the five FairPlay authorizations included with your Apple ID.
Your computer can contain a mix of protected music belonging to different people. My wife and I, for example, store all of our music on a hard drive attached to an older laptop. To make sure the Apple TV plays songs we’ve both purchased under our own accounts, we simply authorized the computer twice: once with my account info and once with hers.
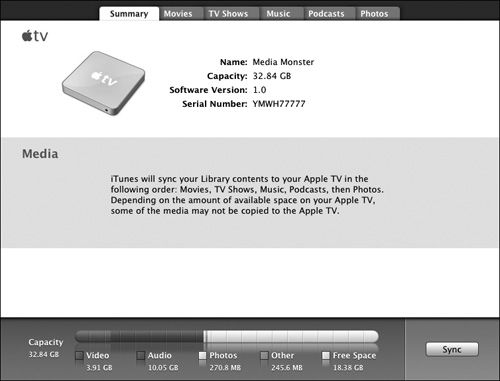
When the Apple TV is set to sync with your computer, it appears in the iTunes Devices list. Selecting its icon displays the Apple TV’s settings (FIGURE 8.3).
Note
The Apple TV item in the Devices list sports a disclosure triangle. Clicking it reveals the categories on the device (Movies, TV Shows, and so on), and selecting those displays the contents that are saved to the Apple TV’s disk. However, you can only see the tracks, not play them. If you’re not sure that a piece of media was successfully synced, look for it here.
The bar at the bottom provides a graphic representation of the hard disk’s contents, while the tabs at the top lead to the sync settings for each media type. In each media tab, you can disable the Sync checkbox to turn off syncing for that type entirely.
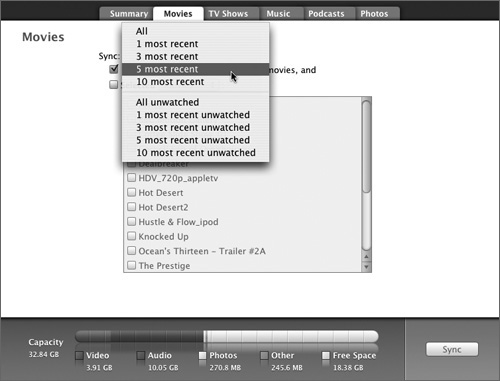
Movies are by far the largest files in your library—a feature film from the iTunes Store weighs in at about 1.3 GB, for example. When you click the Movies tab, you see that the Apple TV initially limits the sync to the five most recent movies.
To change that number, click the first pop-up menu and choose a number from one of two categories: most recent and unwatched (FIGURE 8.4). As newer videos are synchronized or after you watch movies, depending on your setting, they are removed from the list to make room for more.
Of course, you may have some movies you want to keep on the Apple TV for repeat viewing. That’s where the second checkbox and pop-up menu come in. Mark the box and choose specific movies or playlists containing video to keep them on the Apple TV’s hard disk.
If you change the settings, click the Apply button to make them stick and sync with the Apple TV.
Tip
Just as you can create Smart Playlists of music (see Chapter 6), you can build Smart Playlists that include video. Option-click (Mac) or Shift+click (Windows) the new playlist button at the lower left corner of the iTunes interface and set your criteria. For example, suppose you want to create a playlist containing movies that are between 15 and 30 minutes in duration. Set one selector as Video Kind > is > Movie; then, set another selector as Time > is in the range > 15:00 to 30:00.
Similar to the options for movies, the TV Shows settings let you sync recent or unwatched episodes of all your TV shows or selected titles you choose. Or, build playlists that are TV-specific for more control.
In addition to letting you choose between syncing all songs and playlists or just selected playlists, the Music settings tab includes a checkbox to include music videos. If you’re tight on disk space and don’t watch music videos regularly (especially since a bug in the first version of the Apple TV limits playback to just one music video at a time), disable this option.
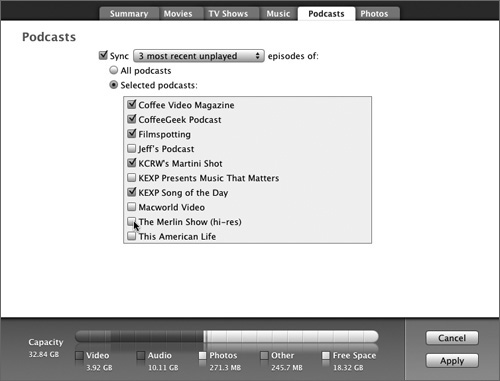
Podcasts operate like TV shows and movies, even though podcasts can be a mixture of audio and video. Choose the number of unplayed or unwatched episodes and which podcasts to keep updated (FIGURE 8.5).
Tip
As noted in Chapter 5, the blue sphere icon that appears next to an unwatched TV show or podcast episode indicates the file is not only unwatched but hasn’t yet been accessed; viewing part of the episode removes the icon, but the Apple TV still considers it unwatched until you reach the end of the program. Well, if you want to restore the icon to remind yourself to watch something from the beginning, it’s easy: Select the item in iTunes and bring up the contextual menu (right-click or Ctrl-click on a Mac with a one-button mouse). Then, choose Mark as New to reset its watched state.
I covered syncing photos in Chapter 7 (since photo syncing is initially turned off). This is where you can choose which photo library to use, such as iPhoto or your My Pictures folder and select the photo albums to include. Another feature available in the Photos settings tab is the capability to rearrange the list of albums—for example, if you want to put your showcase albums at the top of the list. Click an album name and drag it to a new position in the list, and then release the mouse button.
iTunes syncs between your computer and the Apple TV, but it also keeps an eye out for video-capable iPods, if you own them. As long as your computer is the machine paired with the iPod, iTunes keeps both devices up to date.
The connection is most evident in movies, TV shows, and podcasts. Let’s say you watch half of a movie on your Apple TV but you need to stop and pack for a business trip. To be able to watch the rest of the movie on your iPod while on the plane, do the following:
On the Apple TV, press the Menu button to stop playback and go back to the previous screen. (A sync won’t occur if video is still playing.)
In iTunes, click the Apple TV icon in the Devices list to view the sync settings.
Click the Sync button. iTunes synchronizes with the Apple TV.
Plug in the iPod, which should mount and synchronize automatically. Information about the point at which you stopped playback in the movie is carried over to iTunes and the iPod so you can pick up where you left off (FIGURE 8.6).

When you return, the most recent state information (the iPod, in this case) is synced back to the Apple TV.
You’re not locked into synchronizing with just one computer once you’ve set up the Apple TV. However, the catch is that you can only sync with one at a time. If you want to sync with another computer on the network, do the following:
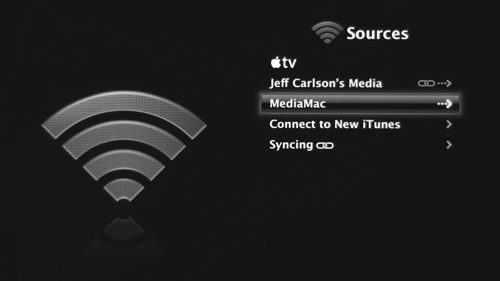
From the Apple TV’s main screen, choose Sources and press the Select button. The Sources screen appears, with the Apple TV (or
 TV) selected to indicate that the current media source is the internal hard disk (FIGURE 8.7). The next item in the list is the sync source, indicated by a chain link icon.
Scroll down to Syncing and press Select.
On the Syncing screen that appears, choose Change iTunes Library.
Be aware that specifying a new sync source erases the media on the Apple TV’s hard disk. With that in mind, choose Continue on the next screen.
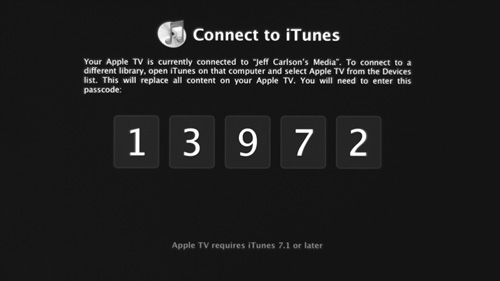
Does this look familiar (FIGURE 8.8)?

Tip
Pressing the Menu button at this screen takes you back to the previous screen with your original sync source intact.
On the new computer that you want to sync with, open iTunes and click the Apple TV item in the Devices list, and then enter the code that appears on the Apple TV.
The sync source is changed, and the process of copying media from the new computer to the Apple TV begins.
If you own more than one television, you may be tempted to attach a separate Apple TV to each one. The kids can watch their TV shows in one room while you listen to music or catch a movie in another room. Fortunately, each Apple TV doesn’t require its own media source—all the Apple TVs can point to one computer’s media. Here’s how to set them up:
Configure the first Apple TV for syncing, as described in Chapter 1.
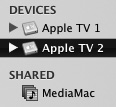
On the second Apple TV, follow the steps outlined on the previous page to set a new sync source (unless this is the first time you’re running the unit, in which case follow the instructions in Chapter 1). The new Apple TV shows up in the Devices list in iTunes next to its housemate and starts to synchronize your media (FIGURE 8.9).
Repeat the steps above for other Apple TVs that you own.
To break the connection between the computer and one of the Apple TVs, you have three options. On the Apple TV, you can specify a new sync source; or choose Turn Off Syncing on the Syncing screen, which makes the Apple TV receive content only via streaming. You can also remove the Apple TV from the list of units that iTunes recognizes:
In iTunes, open the program’s preferences: on the Mac, choose iTunes > Preferences or press Command-, (comma); under Windows, choose Edit > Preferences (Ctrl+,).
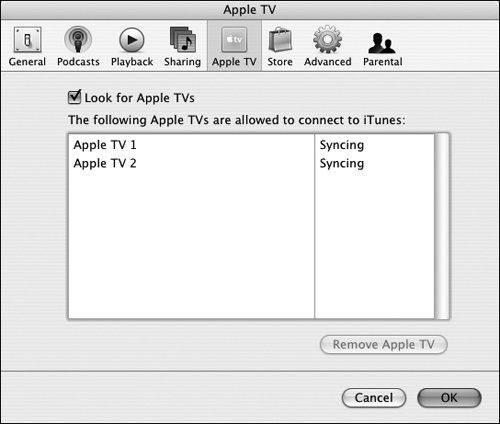
Click the Apple TV icon or tab (FIGURE 8.10).
Select the Apple TV you want to remove and click the Remove Apple TV button.
Click OK to exit the preferences. Syncing is turned off for that Apple TV and its media is erased.
Syncing works really well when you have one Apple TV and one computer, because the Apple TV acts as an extension of your media. And because the content is stored on the Apple TV’s hard disk, you can take away the sync source (such as a laptop) and still be able to watch programs on the television.
However, it’s increasingly common to find households with more than one computer. As I mentioned earlier, my wife and I have separate laptops and separate accounts with the iTunes Store. Our tastes in movies also sometimes differ. If syncing were the only option, she would have to sync her computer to the Apple TV every time she wanted to watch something from her computer.
Note
I’ve also mentioned that we have a third computer that acts as a media server, which is what is normally synced to the Apple TV. However, the same issue remains: if she downloads a TV show on her laptop, she would still need to copy it over to the media server and add it to that computer’s iTunes library before she could watch it on the television. That’s just too much work.
Instead, she can stream the media from her computer. The data is transferred over the network and played as it’s received, just as you would watch broadcast television.
Tip
Actually, some of the media is saved to the Apple TV’s hard disk as a buffer to ensure decent playback, but that’s just temporary storage.
Streaming is also an easy way to watch someone else’s content without a lot of setup. Suppose a friend is visiting from out of town and he has a movie on his laptop that you both want to watch. You can specify his computer (running iTunes) as a streaming source and watch the movie—no copying or disc burning or hassle involved.
Up to five computers can be set up as streaming sources for one Apple TV. (Counting the unit’s sync source, that means you can have up to six connected computers.) Here’s how to add a machine to the mix:
On the Apple TV, go to the Sources screen.
Choose Connect to New iTunes.
On the computer you wish to connect, launch iTunes and select the Apple TV item that appears in the Devices list.
Enter the five-digit code displayed on the TV screen. iTunes verifies and establishes the connection with the Apple TV.
That computer is set up to stream and appears on the Apple TV’s Sources screen with an arrow icon (-->) indicating that it’s a streaming source (FIGURE 8.11).
After you’ve set up computers to stream, you need to instruct the Apple TV to use their content. To do so, specify the streaming computer as the active content source:
On the Apple TV, go to the Sources screen.
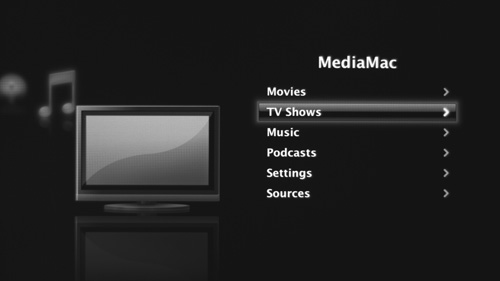
Select the computer you want to stream from and press the Select button. The Apple TV loads information about that computer’s iTunes library and takes you back to the main screen.
What’s important to notice is the main screen’s title (FIGURE 8.12). Instead of ![]() TV, the title is the current streaming source. The menu items all point to content from that computer until you change the streaming source again.
TV, the title is the current streaming source. The menu items all point to content from that computer until you change the streaming source again.
For the most part, you shouldn’t encounter much difference between content viewed from the Apple TV’s hard drive and media streamed from another computer. A few situations are worth mentioning, though:
When watching movies, TV shows, and video podcasts, the video is continuously being copied in the background to provide a playback buffer. If you skip ahead or scan through the video to a section that hasn’t yet been copied, you’ll experience a brief lag while the Apple TV catches up.
With music, you shouldn’t notice any difference unless your network is particularly slow. Unfortunately, while you can stream music, podcasts, and audiobooks, online radio stations (which stream to your computer from the Internet) are not supported.
Streaming performance can also depend on the capabilities of the computers serving the media and the speed of your network. This is especially true if one computer is acting as the streaming source for multiple Apple TVs.
To sever the link between the Apple TV and a streaming computer, do the following:
In iTunes, open the program’s preferences: on the Mac, choose iTunes > Preferences or press Command-, (comma); under Windows, choose Edit > Preferences (Ctrl+,).
Click the Apple TV icon or tab.
Select the Apple TV you want to remove and click the Remove Apple TV button.
Click OK to exit the preferences.