

Caroline Zimmermann began painting in oils at age 6, earned her Bachelor of Fine Arts degree in Illustration from California State University at Fullerton in 1989, and obtained her Master of Fine Arts in Painting from the California College of the Arts and Crafts in Oakland in 1994. She currently resides in the artists’ community of Laguna Beach, California, where she has lived, surfed, and painted for more than 18 years. Caroline travels extensively and enjoys painting abroad, most notably in Italy. She has also exhibited at the Laguna Beach Festival of the Arts for 15 years. Her work is featured in California galleries in Laguna Beach, as well as in Mono County in the Sierras, Sonoma, and Mammoth Lakes.
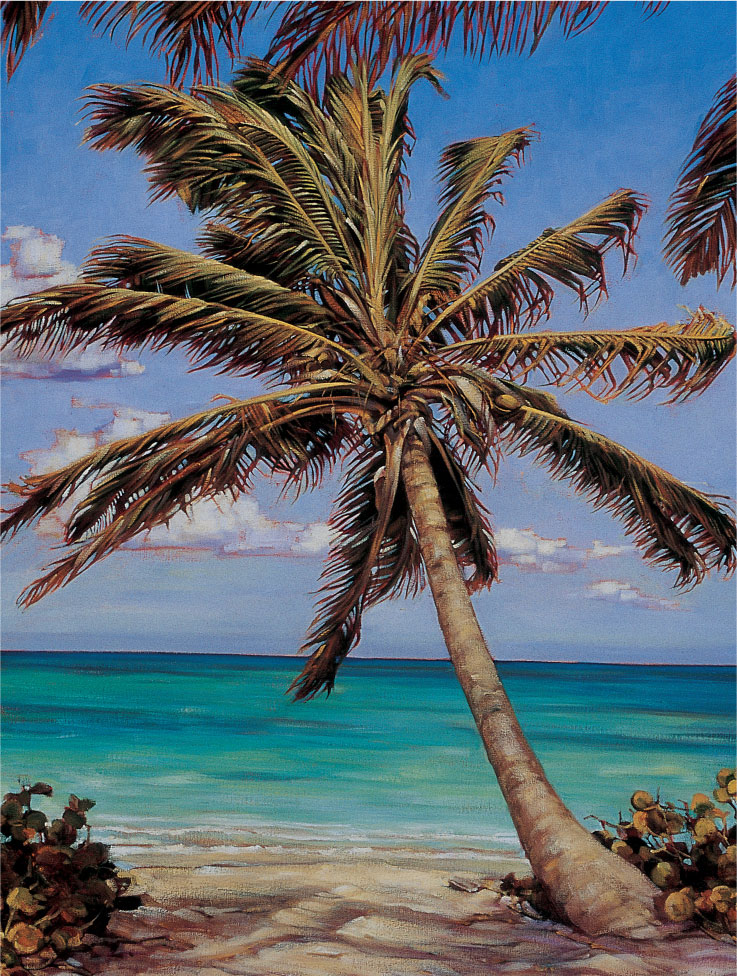
TROPICAL PALM

STEP ONE
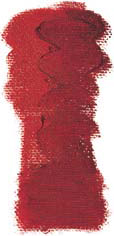
To create a contrasting underpainting, I use a mix of alizarin crimson, dioxazine purple, Indian yellow, transparent orange, and magenta. I thin the mixture with turpentine and apply the wash with a medium brush. I will be dedicating the top 2/3 of the canvas to the sky, so I decide to add more orange in the sky area, as orange is the complement of blue. I do this with a mix of Indian yellow, transparent orange, and quinacridone pink. Then I let the paint dry before continuing to the next step.

STEP TWO
First I mix alizarin crimson with a little dioxazine purple. Then I sketch the scene, establishing the horizon and the lines of the palm tree’s trunk. I make dots where I will place the ends of the leaves and connect the dots to create the palm’s shape. I finish blocking in my basic shapes by adding more purple to the crimson mixture and placing the darker areas of the trunk, the leaves in the bushes, and the shadows below the tree. (To create the palm tree’s leaves, see the detail on page 97.)

STEP THREE
The color of the water changes as the depth changes, becoming darker as the water gets deeper. I begin with the darkest areas of water at the horizon, using broad strokes of ultramarine blue with dabs of phthalo blue and phthalo green. I work toward the shore, mixing in tints of phthalo blue and green and gradually adding white as the water becomes more shallow. I keep lightening the mixture until there is very little green pigment left, and I add a touch of lemon yellow for the shallowest areas. I paint the sand and any bits of flotsam on the beach with white mixed with transparent orange, Indian yellow, and dioxazine purple. I add dark colors to the foliage of the shrubs with a mixture of ultramarine blue, dioxazine purple, and sap green. I block in the dark parts of the clouds with a mixture of dioxazine purple, ultramarine blue, and a little white, and then I outline the general cloud shapes. I don’t emphasize them too much as they’re merely the backdrop, and I don’t want them to conflict with my main subject.

STEP FOUR
Now I block in the colors of the sky. I mix one part ultramarine blue to three parts white and just a dab of phthalo blue. When painting the sky, I “cut in” around the palm leaves, meaning that I create the shapes of the leaves by painting the sky around and between them. (This technique is called “negative painting,” because you define an object by painting the negative space around it rather than painting the object itself.) Next I add more variation to the color of the water using light blue mixtures of phthalo green and phthalo blue. For the shallowest water, I use white mixed with a dab of dioxazine purple and Indian yellow. Then I add a bit more yellow and orange to the white and develop the highlights on the sand. I paint the dark areas of the palm leaves with sap green mixed with alizarin crimson and allow the painting to dry before I continue to the next stage.
Foliage

Sap green and lemon yellow

Sap green and alizarin crimson

Step One
While the paint is wet, I block in the palm leaves by removing paint instead of adding it. To do this, I clean my brush with solvent, blot it on a rag, and lift the color away to indicate where the highlights will be. This is a forgiving technique for indicating lighter areas without the mess of adding white paint.

Step Two
I create the shapes of the palm fronds by painting the sky and clouds in and around them, as described in step four on page 96. Then I use my small flat brush and short, deliberate strokes to create the tips of the leaves. I start at the center of the branch and stroke outward, lifting my brush at the end to create the sharp point.

Step Three
Now I indicate the undersides of the palm leaves (in shadow) using a dark mixture of sap green and alizarin crimson. (I render each individual leaf with this color.) Then I paint the top sides of the leaves, continually adding more sap green to the mix until there is very little red pigment left in the mixture.

Step Four
Next I add the highlights using sap green mixed with varying amounts of each yellow color in my palette, plus transparent orange and white. I alternate between dark and light to define the details of the branches. I bring the lightest whites of the clouds into the leaves with the same cutting technique I used before.

STEP FIVE
Now I focus on the palm tree. I concentrate on showing the motion the wind creates as it blows through the leaves. I follow the steps outlined below to develop the palm fronds and then paint the center of the tree, making my strokes follow the round shape of the trunk. I paint the coconuts and the texture of the trunk with mixtures of dioxazine purple, transparent orange, and some of the green mixtures of detail step four.
STEP SIX
I apply the brightest highlights of the leaves, trunk, sand, water, and clouds at the very end of the painting so that these elements seem to shimmer in the tropical sunlight. I finish the painting by applying a glaze over the entire surface to unify the painting and adjust some of the colors. My goals are to deepen the top of the blue sky, tone down the red of the upper branches, and deepen the foreground shadows. So I prepare a glaze with a hint of ultramarine blue added to alkyd resin medium (a medium that speeds up the drying time of oil paints) and apply it to the upper areas and the foreground with a small brush. Then I coat the entire painting with a clear glaze of medium, rubbing away the excess with a flannel rag.
ROOSTER
STEP ONE
To accent and create contrast with the greens and yellows of the rooster, I apply an underpainting using a mixture of alizarin crimson, dioxazine purple, Indian yellow, transparent orange, and magenta. I paint loosely and boldly with a large brush, eliminating the white of the canvas. I make the top portion of the canvas warmer and lighter and the lower half cooler and darker.

STEP TWO
I sketch my composition with a medium bright brush and a thin mix of alizarin crimson and dioxazine purple. I work loosely and start developing the rooster’s feather patterns. I want him to be proud and upright, with a billowing tail. As I build the rooster from a series of oval shapes, I pay attention to the relationship between the head and the rest of his body and try to capture the feeling of motion in his legs. To simplify the background, I make the wall out of rocks, and loosely indicate cracks and lines.

STEP THREE
Next I develop the comb and the throat feathers with a medium flat brush, using a thin mixture of alizarin crimson, sap green, and magenta. Then, using a large flat brush, I work on the texture of the stucco wall, creating bits of stone and mortar and inventing patterns. I create my own brown mixtures using varied amounts of dioxazine purple, transparent orange, Indian yellow, and titanium white, scattering bits of rocks and sticks on the ground. I enjoy using my imagination, as it’s a pleasant change from constantly referring religiously to a photograph. I let the paint dry long enough to “set,” so that it’s tacky (but not necessarily dry) and won’t be easily smeared.
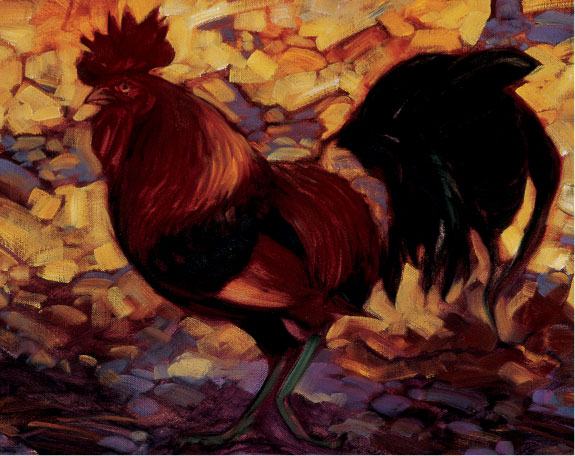
STEP FOUR
Using a large flat brush, I block in the darkest colors of the stones with a warm brown that I created from tints of purple and ultramarine blue mixed with transparent orange. I bring up the wall with white mixed with transparent orange, Indian yellow, cadmium yellow medium, and purple. I paint neck feathers (see color mixes on page 99) and block in the dark teal feathers with a mix of ultramarine blue and sap green. When I paint roosters or chickens, I use bold, wide brushstrokes and a lot of color to paint the feather.

STEP FIVE
Now I render the details, adding smaller stones near the base of his tail with lighter shades of purple. I apply highlights to the tail feathers and legs using various mixtures of phthalo green and white. I begin the eye with a dark mixture of alizarin crimson and transparent orange and paint the lighter area with a touch of cadmium yellow medium. I purposefully don’t use “earth colors”—such as raw umber, burnt sienna, or ochres—because I like to create these tones by combining complementary colors with more vibrant pigments. For example, I use the complements of purples and blues—variations of yellow and orange—tinted with white to make vivid browns.
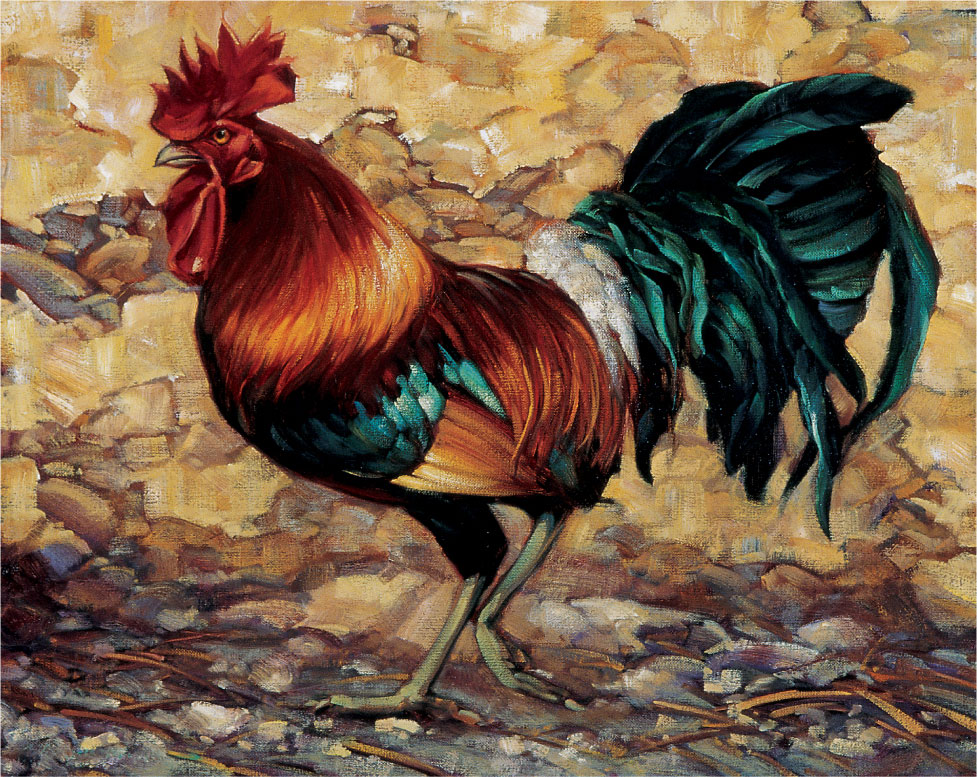
STEP SIX
I place a tiny speck of white on the upper part of the pupil. This simple touch makes the eye come to life. I add a tint of cadmium red medium to the rooster’s comb and use cadmium yellow light mixed with Indian yellow to accent the golden neck feathers and the tips of the back feathers. I mix phthalo green with lemon yellow tinted with white for the feet. To accentuate the rooster’s rich colors, I make the background recede with a transparent glaze of alkyd resin, ultramarine blue, a touch of dioxazine purple, and sap green. I use a soft flannel rag to wipe away areas that are too dark. Then I apply a light coating of alkyd resin medium tinted with transparent orange. When the glaze dries, I bring out the highlights again and continue this process of adding layers of highlights until I’m satisfied. For the finishing touches, I tint the feathers with light brushstrokes of white. I use a smaller brush for the delicate, small feathers and the pieces of hay under his feet. With a medium flat brush, I create the farmyard dirt and stones with varied mixes of sap green, dioxazine purple, ultramarine blue, and a small amount of white, leaving the area under his feet dark to indicate shadows. Using vertical strokes to create texture, I go over the background again with a mixture of white and yellow.
Neck Feathers

Transparent orange and cad. yellow medium

Transparent orange and dioxazine purple
Tail Feathers

Phthalo green and ultra blue

Phthalo green, lemon yellow, and white
Comb

Cad. red medium and white
Cad. red medium and alizarin crimson
RUSTIC STILL LIFE

STEP ONE
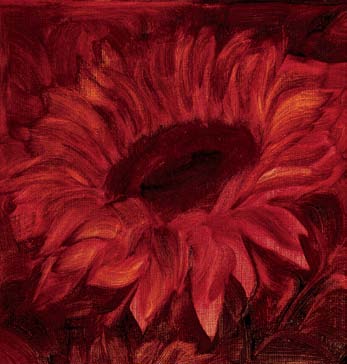
For most underpaintings, I instinctively use the complementary colors of the subject to create the most visual intensity—for example, red for a green plant or orange for a blue sky. However, in this sunflower painting, I am using the reds of the underpainting not only to contrast, but also to create depth in the darks of the background surrounding the flowers. I covered the white of the canvas with a mixture of alizarin crimson, dioxazine purple, Indian yellow, transparent orange, and magenta, thinning each pigment with a few drops of solvent to create a fluid, transparent mixture.

STEP TWO
I sketch the basic shapes with a combination of alizarin crimson and dioxazine purple mixed with solvent to create a fluid mix that lends itself to drawing with a brush. I create the general composition by drawing basic geometric shapes, keeping the definition to a minimum. Then I start blocking in the darkest areas, as shown.

STEP THREE
Once I am satisfied with the general harmony of my composition, I draw the objects in greater detail. Using thinned alizarin crimson, I plot out the textures and patterns of the various elements. The better the drawing, the easier and more fun the later stages become as I apply the opaque paint. I compare this stage to the creation of a cake: I’ve measured my ingredients, mixed them, and now I am preparing to bake. The success of my creation begins here, and taking shortcuts can lead to messy and time-consuming mistakes.
PAINTING THE SUNFLOWERS
Step One
In many paintings of sunflowers, the flowers are placed in a bright, sunlit setting. But I want to tone them down in my painting to enhance the mood, so I begin with a very dark mixture of cadmium yellow medium, transparent orange, and dioxazine purple.

Step Two
For the dark centers, I use a mixture of ultramarine blue, dioxazine purple, sap green, and alizarin crimson. I begin gradually lightening the petals with a mix of cadmium yellow light and transparent orange. This creates a rich, yet slightly lighter hue.

Step Three
Now I’ve laid in my darkest values and I’m ready to build up the lighter colors of the petals. I touch each petal with a mixture of lemon yellow and Indian yellow, stroking in the direction of the growth—from the center outward to the distinct points of the petals.

Step Four
Although I want my overall painting to be dark and moody, I still like the contrast of vivid highlights on the petals. This heightens the dramatic feeling of the painting. I add the final light touches to the petals with a slightly lighter version of the mix used in detail step three.
STEP FOUR
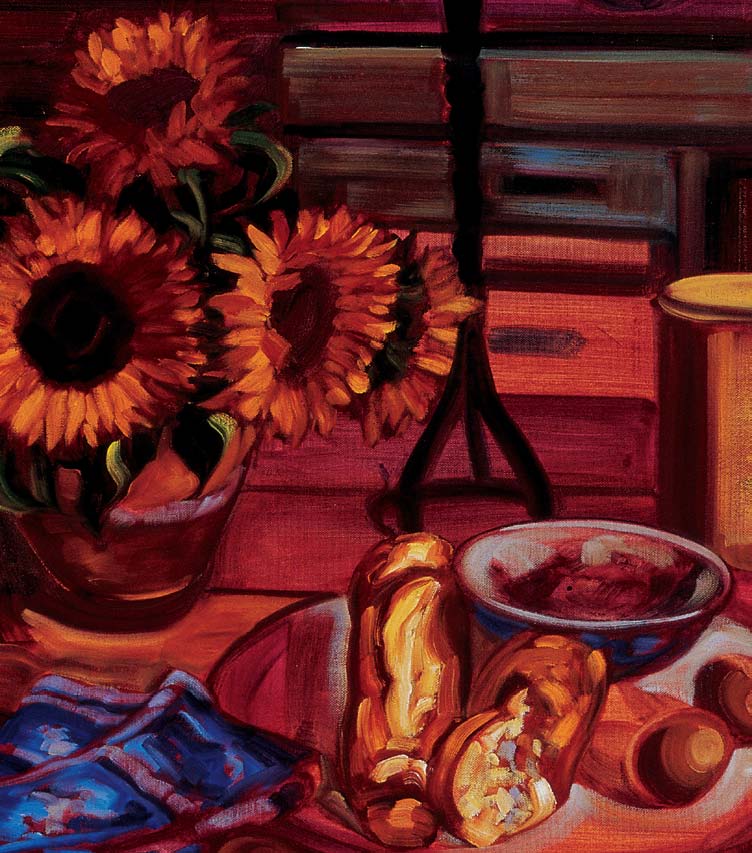
I combine cadmium yellow medium with transparent orange and a dash of dioxazine purple to begin the sunflower petals, working from dark to light. I define my underpainting with opaque pigments, blocking in the colors with bold strokes and a large flat brush. For the greens of the leaves, I mix various values of sap green and lemon yellow. I create the fabric of the towel with a combination of ultramarine blue, phthalo blue, and white, applying the darkest values first. I paint the darkest shadowed areas with variations of ultramarine blue, dioxazine purple, sap green, and alizarin crimson. I also use various mixes of this “black” for the centers of the flowers, the candelabra, and the background shadows. I let the painting dry completely before applying glazes.

STEP FIVE
In this painting, the glazes play a major part in developing details and creating mood. I think of glazing as pushing and pulling the subjects of my painting in and out of the picture plane. For example, I think the yellows of the sunflowers are too bright and need to recede into the background, so I push them back with a glaze of alkyd resin, ultramarine blue, sap green, and a touch of dioxazine purple. I use a soft flannel rag to wipe out areas I want to pull forward, leaving other areas dark, such as the bowl, the shadows, and the wooden drawers in the background. When the glaze dries, I bring out my highlights again and continue glazing and highlighting, creating more luminous depth with each layer.
Eggs and Bread Dark Values
Transparent orange and dioxazine purple
Transparent orange and cadmium yellow medium
Eggs and Bread Light Values

Transparent orange and lemon yellow
Transparent orange and white

STEP SIX
This is the step that I consider the most fun. I apply the brightest whites to the bowl, the platter, and the white crusts of bread. I add a subtle dab of white on each egg, the towel, and the canister to make the painting sparkle and give optimal depth. I add some final touches, applying a few more highlights to sharpen the foliage and flower petals.
MARTINI STILL LIFE
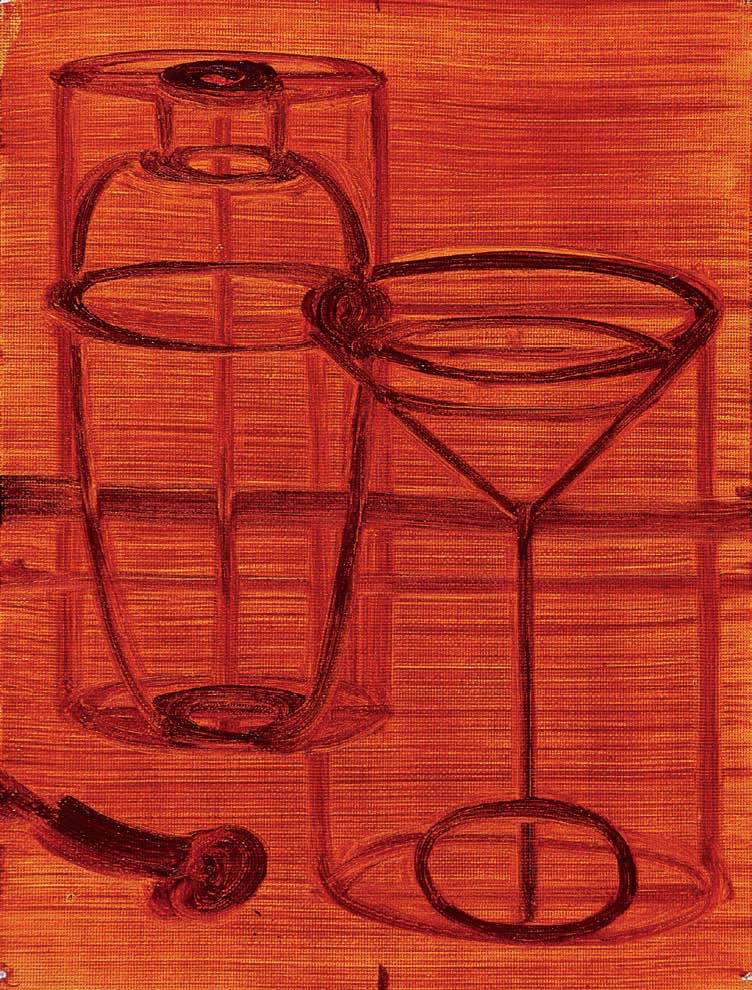
STEP ONE
I begin with transparent washes of Indian yellow, transparent orange, and magenta. Once the painting is completely dry, I loosely sketch in the composition, using a medium flat brush and a mix of alizarin crimson and dioxazine purple. I block in the basic shapes, sketching the martini glass and the shaker inside two cylinders to help define their forms.

STEP TWO
Once I am satisfied with the general harmony of the composition, I begin to draw the objects in more detail. I use alizarin crimson mixed with solvent and a medium flat brush to begin plotting out the forms of the glass and the reflective patterns on the silver shaker. It’s important to establish the correct perspective of the glass and the shaker at this point; as always, the better the drawing, the easier and more fun the later stages become!

STEP THREE
The best way to convey a reflective metal surface (such as the shaker) is to juxtapose light and dark shapes. I use a small flat brush and a mix of alizarin crimson, sap green, and magenta to add more detail. While the paint is still wet, I also paint in a “reductive” manner; I clean my brush with solvent, blot it on a rag, and lift away paint where the highlights will be. With this technique, I utilize the white of the canvas to indicate the highlights rather than relying on messy white paint.

STEP FOUR
Now I layer from dark to light to build a rich reflective surface. First I create foliage behind the shaker with mixtures of sap green and alizarin crimson. Then I add small amounts of cadmium yellow medium to combinations of alizarin crimson, sap green, and ultramarine blue to create the wood surfaces, adding a little more cadmium yellow medium for the panel in the background. For the dark areas of the silver and the glass, I use mixes of sap green, ultramarine blue, and alizarin crimson. I also block in the olives (see detail at right).

STEP FIVE
When painting glass and metal, keep in mind that you’re actually painting reflections of light. There are many variations in the grays of this scene; I use mixtures of complementary colors that are already on my palette, always adding a touch of white to create a muted tone. I mix the warm grays with lemon yellow and dioxazine purple and use a mix of ultramarine blue and transparent orange for the cool grays. I also use touches of cadmium yellow medium and white to form highlights, build up middle tones in the olives, and paint reflections in the glass.
PAINTING THE OLIVES

Step One
I loosely sketch the shape of the fork and the olive with alizarin crimson mixed with solvent.

Step Two
Next I block in the darks of the olives using a dark green, which is a combination of sap green and transparent orange.
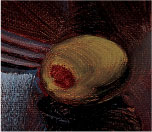
Step Three
Then I apply mixes of sap green and cadmium yellow medium to the light areas of the olives, using cadmium red medium and alizarin crimson for the pimentos.

Step Four
I use a mix of sap green and lemon yellow for the highlights, and then I add a final touch of white. Next I add the pimento highlights with a mix of cadmium red medium and cadmium yellow medium.

STEP SIX
Now I put some sparkle on the reflective surfaces and bring out the highlights. But to maintain the optical illusion of depth and reflection, I pay close attention to the darkest shapes. I apply the lightest values (white mixed with touches of the gray tones from step five) to the reflections on the shaker, the fork, and the liquid in the glass. Then, to create the thin white highlights, I drag the edge of a medium flat brush perpendicularly across the painting surface. Finally I add the final highlights to the olives and the painting is complete—cheers!