For the sake of simplicity, this first application will not use a database at all. This will let you explore the View and the Controller without having to worry about the complexities of the Model.
To begin, open a system prompt (on Windows, select the Start menu, and enter cmd into the Run or Search box). Navigate to a directory into which you intend to place your Rails applications. Let’s assume this is C:
ailsapps. Check that Rails is installed and that its home directory is on the system path. To do this, enter the following:
rails
If all is well, you should now see a screenful of help about using the rails command. If you don’t see this, there is a problem with your Rails installation that you need to fix before continuing. Refer to Installing Rails in Installing Rails.
Note
When there are any differences in the commands or code for Rails 2 and Rails 3, these will be indicated in the text with the Rails version number—Rails 2 or Rails 3—in the margin next to the example.
Assuming Rails is working, you can now create an application. Enter this:
Rails 3
rails new helloworld
Rails 2
rails helloworld
After a bit of whirring of your hard disk, you should see a list of the files that Rails has just created (the actual list is quite long, and some of the items created are different in Rails 2 and Rails 3):
create  app
create  app/controllers/application_controller.rb
create  app/helpers/application_helper.rb
create  app/mailers
create  app/models
create  app/views/layouts/application.html.erb
create  config
(etcetera)
Take a look at these files using your computer’s file manager. Beneath the directory in which you ran the Rails command (helloworld), you will see that several new directories have been created: app, config, db, and so on. Some of these have subdirectories. The app directory, for example, contains controllers, helpers, models, and views. The views directory itself contains a subdirectory, layouts.
The directory structure in a Rails application is far from random; the directories (or folders) and the names of the files they contain define the relationships between the various parts of the application. The idea behind this is that by adopting a well-defined file-and-folder structure, you can avoid the necessity of writing lots of configuration files to link the various bits of the application together. There is a simplified guide to the default directory structure of Rails in Digging Deeper in Digging Deeper.
Now, at the system prompt, change the directory to the top-level folder (helloworld) of your newly generated Rails application. Assuming you are still in the C: ailsapps directory and you named the Rails application helloworld, as suggested earlier, you would (on Windows) enter this command to change to that directory:
cd helloworld
Now run the server. If (like me) you are using WEBrick, you should enter the following:
Rails 3
rails server
Rails 2
ruby script/server
Note that servers other than WEBrick may be started in different ways, and if the previous does not work, you will need to consult the server’s documentation. You should now see something similar to the following:
=> Booting WEBrick...
=> Rails application started on http://0.0.0.0:3000
=> Ctrl-C to shutdown server; call with --help for options
[2006-11-20 13:46:01] INFO  WEBrick 1.3.1
[2006-11-20 13:46:01] INFO  ruby 1.8.4 (2005-12-24) [i386-mswin32]
[2006-11-20 13:46:01] INFO  WEBrick::HTTPServer#start: pid=4568 port=3000
Rails 3
Rails 2
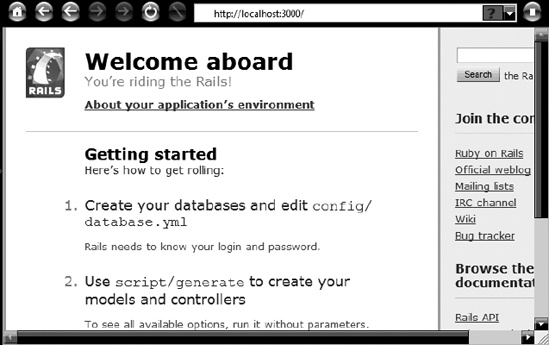
Now fire up a web browser. Enter the host name, followed by a colon and the port number, into its address bar. The host name should (normally) be localhost, and the port number should match the one used when starting the server, or else it defaults to 3000. Here is an example:
http://localhost:3000/
The browser should now display a page welcoming you aboard Rails. If not, verify that your server is running on the port specified in the URL.