
In this chapter, we’ll look at how to set up your computer system to host your working image files and your image archive. We will first take a look at the fundamentals of storage technologies and get an understanding of how they work and how to choose the right one. We will then look at some different generic configurations. Finally, we will look at some specific configurations that I use.
The methodology that I outline in this chapter will provide for a scalable system (one that can grow with you from a single hard drive of images up to many terabytes stored on a client/server network) that protects your photographs and provides you with quick and reliable access to your images.
Choosing the Appropriate Storage Media
Hard Drive 101
Purchasing a Hard Drive
Hard Drive Handling
Drive Configurations: JBOD, RAID, Drobo, or NAS?
Other Storage Media
Media Cards
Network
Monitors
Uninterruptible Power Supplies
System Configurations
You will need to configure hardware to store and back up your working files and your permanent image archive, and you will need to choose components to connect your system together. For maximum protection and cost efficiency, you’ll want to choose the right configuration for the task at hand. We’ll discuss the following components of your system in this chapter:
Working file storage. As we’ve discussed, working files are those images that are in progress; you are still working on them and they have not yet been archived. They are a smaller data set than the archive files. For the professional, working files have a very high value since they have not been delivered yet. All these characteristics mean that you should store working files on fast local drives—maybe internal drives or even RAID (Redundant Array of Independent Disks) devices.
Primary archive storage. Your archive is the permanent home for the images, put into a bucket structure as described in the previous chapter. The primary archive is the main copy (as opposed to a backup copy). Stability and easy expansion are significantly more important than speed and 24/7 uptime for most photographers. In many cases, a JBOD (just a bunch of disks) hard drive system will be the most appropriate solution because of its simplicity and easy expansion.
Backup media. In addition to the primary storage, you’ll need to decide what kind of media to use for backing up your files. For most readers, a backup hard drive or set of drives that can be taken offsite will be the most important backup. Best practices also require that you back up the files to an additional media type, such as optical disk or digital tape. We’ll look at those options and see how they fit into a storage system.
Other components. While the primary emphasis of this chapter is on the storage hardware, it would not be complete without some mention of other parts of the system, including media cards, networking hardware, and monitors.
Regardless of which technology is currently available, there are universal factors to consider when choosing your storage media. In determining whether a particular technology is appropriate to the task at hand, you’ll need to consider:
Speed. Can you move your files onto and off of the storage medium fast enough for the way you shoot, work with, and deliver files?
Scalability. What is the cost, in both time and trouble, involved in adding more storage capacity? Must you reconfigure the entire device/system, or can you simply add more storage? How does your system grow with your collection?
Reliability. What are the inherent risks of device failure? Can you reduce these risks by altering your setup, configuration, or behavior? How long should the components be expected to last?
Protection against hazards. Your digital data may be exposed to a limited set of known hazards, such as viruses, device failure, theft, and error. How well can the storage medium protect against these dangers?
Plays well with others. How do your various storage media complement each other? How easily can they be ported from one computer to another?
Mission-critical operations and components. Which parts of your system are mission-critical? That is, which parts of the system will, if they stop working, cause failure of the system?

One of the most important hardware decisions you’ll need to make is where all your “buckets” (discussed in Chapter 4) are going to live. When determining which storage configuration to use for your archive structure, consider these recommendations:
Keep all digital images on “live and local” hard drive storage.
Start your archive with a dedicated internal drive or a dedicated external (FireWire, USB2, or eSATA) drive, and expand storage as necessary.
Get an additional external drive to use as backup, and store it off-site, if possible.
Also burn backups of all archive buckets to write-once media or write to digital tape.
To me, the clearly superior storage solution is the live and local hard drive with two backup copies. Live indicates that your archive is not frozen by existing only on write-once media (such as DVD or Blu-ray). Local means that it is currently accessible by your computer—that is, stored on an internal drive (or drives), an external drive (or drives), or a local network file server.

Storing images on local hard drives has a number of significant benefits:
Faster archiving and retrieval. While reading and writing to a hard drive is a bit faster than using optical media (CD, DVD, or Blu-ray), it’s a lot faster once you factor in the time to find and load the optical disk. One of the greatest benefits of using digital photography is your ability to have the pictures at hand quickly. Hard drive storage is essential for this.
When they need to be migrated, your files will be available and at the ready. Eventually, you’ll want to do some kind of data migration—moving the files to new formats, storage media, or directory structure. If they are on a hard drive, this can be an easy and fast process.
You’ll be able to periodically check on the integrity of the files. If the primary versions of your files are stored locally, you can easily confirm that files are uncorrupted without having to load an optical disk (which, by the way, incurs a risk of handling damage every time you touch it). We’ll talk about this more in the data validation section in the next chapter.
You’ll be able to update the files as you work on them. Updating typically consists of manipulating either the image or the metadata. For instance, as future versions of your raw converter are introduced, better interpretations will be possible. You might want to rework important image files. You may want to store these new rendering instructions along with the files in the primary archive, either as XMP sidecar files or (preferably) embedded in DNG conversion files. Additionally, as you rate, group, and keyword your images, you will want to write much of that metadata back into the XMP or DNG files periodically. Think of the hassle of reburning CDs or DVDs each time you make a better conversion or after every keywording session—or the even greater nightmare of keeping track of which images have been updated, and which have not.
This live and local strategy provides an orderly framework for your primary archive, with only one each of the master original file and the master derivative file. It is an accessible, confirmable, migratable, and updatable system.
It’s alphabet soup time! Since hard drives will be the heart of most image storage systems for the foreseeable future, it’s important to understand a bit about how they work, what kind of variations there are, and associated terminology. Let’s take a look at these issues.
Figure 5-1 shows the inside of a hard disk drive. While the disk platter looks like a mirror, it’s actually composed of up to trillions of tiny magnets standing on end, arrayed in concentric circles. The polarity of the each magnet can be “up” or “down,” which indicates whether the bit is a 1 or a 0. The read/write head is like a record tonearm, which can flip the polarity of the magnet when it’s writing data, or read the polarity when it’s reading data.
The read/write head of the drive must skim very close to the disk platter but never touch it. Because the disk is spinning so fast (between 4800 and 15,000 RPMs), a cushion of air is squeezed between the platter and the head to keep the head just off the surface. If it ever touches the surface, it will ruin the part it touches and kick up enough debris to ruin every other part of the disk in very short order. This is called a head crash, which will generally be accompanied by a screeching sound.
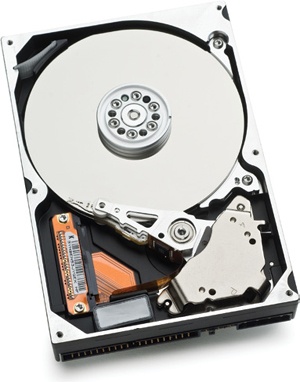
Figure 5-1. The inside of a hard disk drive. The data is stored on the reflective platter. Opening a drive up like this will introduce dust and ruin it forever.
The magnets in a hard disk are organized in concentric circles—as many as 250,000 rings on a 3.5-inch platter. The head skims back and forth at up to 10 meters/second, and must stop on a line 1/10 the width of a human hair, and then correctly read the polarity of each bit. It’s amazing that this is even possible, and even more amazing that it’s affordable.
A hard disk drive also has electronics to control the mechanism, to translate the data to a format that can be written to the disk, and to do error correction and analysis. Hard drives have a power connector that provides juice for the motor that spins the drive and for the controller circuitry. Each drive also has a data interface: IDE/ATA or SATA for desktop drives, and SCSI, Serial Attached SCSI (SAS) or Fibre Channel for enterprise drives.
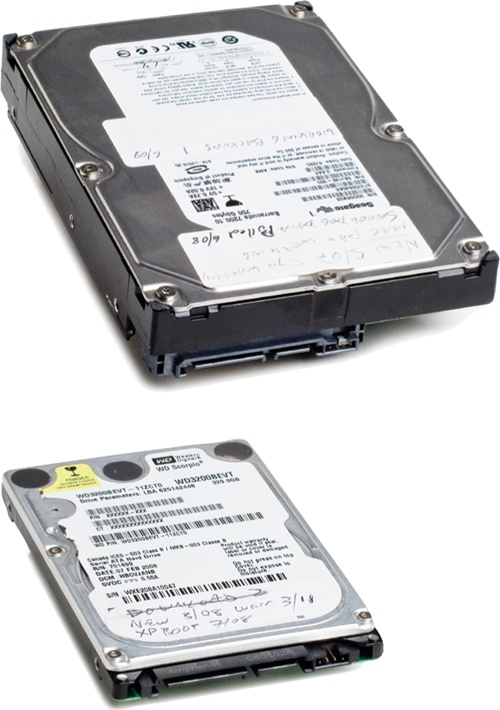
Hard drives come in two basic physical sizes: 2.5-inch and 3.5-inch, as shown in Figure 5-2. These sizes refer to the size of the data platters, not the size of the hard drive mechanism. Traditionally, 2.5-inch drives are used for laptops, and 3.5-inch drives are used for desktop computers. Some compact desktops also use the smaller drives to enable a smaller form factor for the computer. 2.5-inch drives generally spin slower, which means that they have slower data throughput. They also have a smaller data capacity and are more expensive per gigabyte.
The smaller drives do have several advantages, depending on the use. They are physically smaller, so they can fit in laptops and small portable enclosures. They need less power to spin, so they can generally be bus-powered, meaning they can draw power from a laptop without the use of an external power supply. And since they are designed to be portable, most of them do a better job of “parking the heads” than full-size drives do. This means they are better able to survive being shipped around or used in a moving environment.
Recent developments in 2.5-inch drives are changing how the small drives are used. A new class of 2.5-inch high-speed drives has emerged that can be used in enterprise and server environments. At the moment these drives are very expensive per gigabyte.
A new kind of storage device for computers is just beginning to show up in the marketplace. Instead of spinning disks, flash memory (like the stuff used in your camera’s memory card) is being used as primary storage. This type of device, called a solid-state drive (SSD), shown in Figure 5-3, offers some important advantages, including extra speed, shock resistance, and greatly reduced power draw. At the time of this writing, SSDs are only available in very limited capacity (less than half that of spinning disk) and they command a relatively high price— more than four times the cost-per-gigabyte of 2.5-inch disk.
This is an area of fast growth, and due to its advantages I expect that SSD will be a pretty commonplace device before too long in any level of portable computing. They will also be commonly used for boot drives and scratch disk in desktop environments, where greater speed makes a big difference.
The capacity of the drive is the amount of data it can hold. These days, capacity is measured in gigabytes or terabytes. Due to marketing reasons, the capacities listed on drive specifications are not calculated in the same way that your operating system calculates data sizes. So a drive sold as “500 GB” actually only contains 465 GB (actually, the 500 number is Gibibytes, and the 465 number is Gigabytes. Aren’t you glad you asked?).
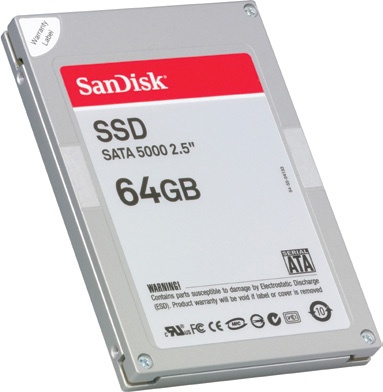
Figure 5-3. Solid state drives will likely become the drives of choice for portable computing due to speed and low power draw.
I generally suggest that it’s better to get the largest capacity you’re likely to need, at least for the next 6–12 months (if you’re on a RAID system, you’ll want a longer time frame—maybe two years—more on that later). Running fewer drives saves on space, power draw, and heat generation. It’s also easier to manage your drives if there are fewer of them.
Tip
If you have a spare internal drive bay, you may want to consider using a fast-spinning drive dedicated to storing Photoshop cache files. This can give a significant speed boost if Photoshop fills up available RAM and needs to swap data out to a disk. Photoshop’s cache settings can be found in its preferences.
Each hard drive has, as part of its specification, a speed at which the platter rotates, measured in RPMs. The faster the drive, the faster the throughput, since the head reads and writes the bits at a faster rate. 2.5-inch consumer drives spin at 4200, 5400, and 7200 RPMs. 7200 RPM drives are a good choice at the moment, but sometimes 7200 RPM drives have too large a power draw or generate too much heat for the portable devices they are contained in. The enterprise-class 2.5-inch drives currently spin at 10,000 or 15,000 RPMs.
3.5-inch drives generally come in 7200, 10,000, and 15,000 RPM models. The 7200 RPM models are good all-purpose drives and have the largest capacities. The faster drives are generally used for system or scratch disks, where fast disk-swapping speeds up the performance of programs like Photoshop, which often have to work with large files.
Hard drives come with one of several different connectors built in. When you buy a drive, it will specify which one is built into the drive. The five types are ATA/IDE and SATA for consumer-level drives, and SCSI, Serial Attached SCSI (SAS), and Fibre Channel for enterprise-class drives.
For many years, Advanced Technology Attachment (ATA) connections, shown in Figure 5-4, were the favored internal drive connection in PCs. Apple adopted ATA with the Blue and White G3 models. ATA drives must be configured as either a master or a slave when connecting. This is usually accomplished by the use of a hardware jumper or, more recently, through the use of a cable that can tell the drive to act as either a master or slave (Figure 5-5).
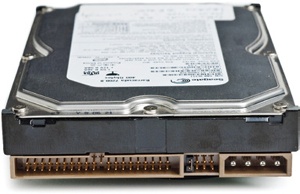
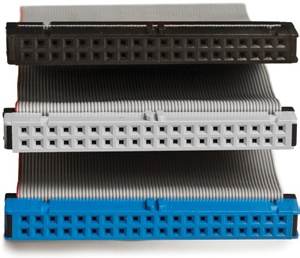
Figure 5-5. Most recent ATA drives have a setting for Cable Select that enables a special ATA cable to set the drive as a master or slave. These cables have a black connector for the master drive and a gray one for the slave. The blue one plugs in to the logic board of the computer.
ATA also goes by the name ATAPI, IDE, EIDE, and now, PATA, which stands for Parallel ATA. ATA is still in use in many computers today, but most drive manufacturers are switching over to SATA (Serial ATA). If you’re buying new enclosures, I’d suggest staying away from PATA in favor of SATA.
As of 2007, most new computers (Macs and PCs, laptops and desktops) use the newer SATA interface, shown in Figure 5-6. It has a number of advantages, including longer cables, faster throughput, multidrive support through port multiplier technology, and easier configuration. SATA drives can also be used with eSATA hardware (discussed later) to enable fast, inexpensive configuration as an external drive. Most people investing in new hard drive enclosures for photo storage should be using SATA drives.

SCSI, SAS, and Fibre Channel drives are rare in desktop computers, and are typically found in expensive enterprise-level storage systems. You can also find SAS drives (along with the necessary SAS controller cards) in video editing systems where maximum throughput is needed. Some of the faster drives, such as Western Digital Raptors, come with SAS connectors, so be aware when you mail-order one.
Digging Deeper
SMART Status
Computer and drive manufacturers have collaborated on a number of diagnostic tools that might be able to tell you that a drive is having trouble and is about to fail. The Self Monitoring, Analysis, and Reporting Technology (SMART) keeps track of some important statistics and can alert you to problems with the drive. It’s nowhere near foolproof, but certain factors are highly likely to indicate a dying drive. Reallocated sector count (or almost any error with “sector” in the name) is one of the most important indicators of impending failure, as are nonzero read error rates and spin retry rates.
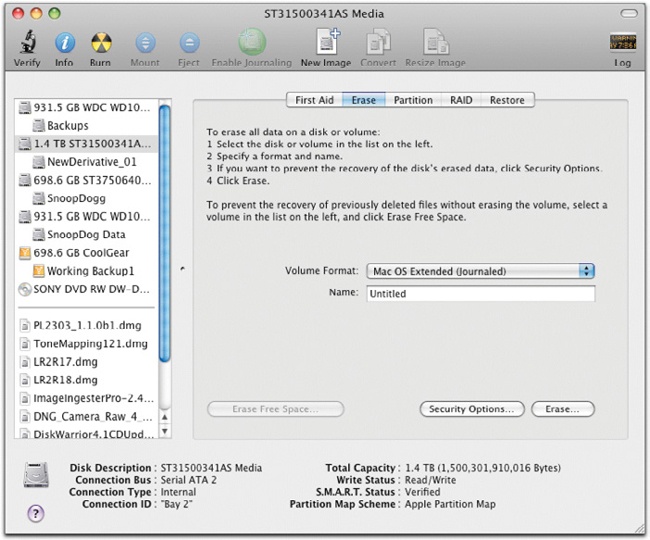
The initial SMART implementations were very cautious and used a low threshold to determine problems with drives. That caused a lot of consumers to return drives, and manufacturers have since raised the threshold for what constitutes failing, which means that now problems can be missed. Figure 5-7 shows a report from Apple’s disk utility, which reports a drive as having passed the SMART check. A second utility, SMART Reporter, looked at the same drive and saw a failing unit, as shown in Figure 5-8. The manufacturer (Seagate, in this case) recommended sending the drive in for replacement.
Digging Deeper
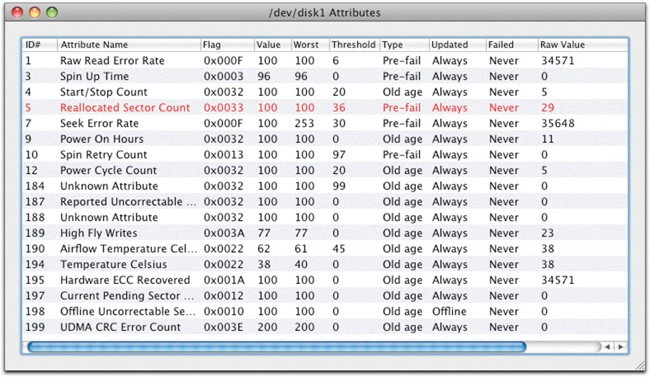
Figure 5-8. This screenshot from SMART Reporter shows a drive with a high reallocated sector count. That means there were a lot bad sectors on the drive. Since it was a new drive, it was returned before ever being put into service.
If you’re on PC, you can get a similar experience with SMART. The built-in utilities will do some monitoring, but the threshold for passing is pretty low, so passing does not prove anything. If, however, Vista alerts you to a SMART failure, you should take care of that drive immediately. You can add more thorough SMART reporting by using third-party utilities like Active Hard Disk Monitor from LSoft.
SMART reporting is generally available only with PATA and SATA drives directly connected to the computer’s motherboard (or connected through some eSATA ports). Connections made through FireWire or USB (Universal Serial Bus) don’t report the SMART status properly. If you like the idea of this additional information, your best option is to configure your external drives with eSATA connections. Check with the maker of your eSATA expansion card to see if it passes SMART data through.
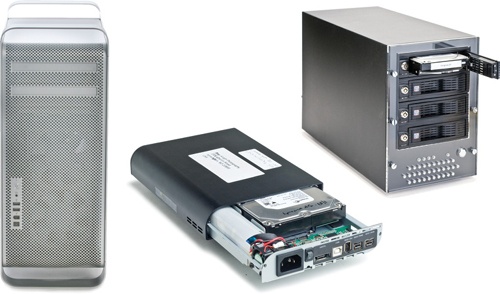
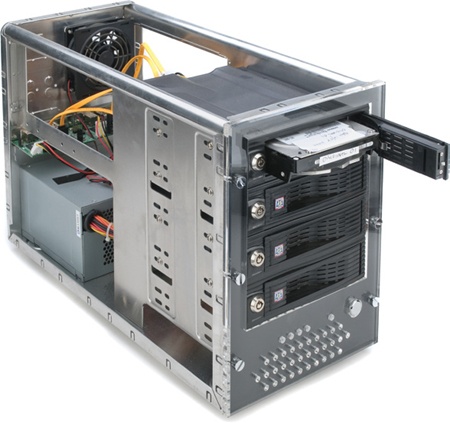
Now that we’ve gone over some characteristics of hard drive mechanisms, let’s consider where the drive can live. The enclosure for your hard drive can be the computer itself (for an internal drive), a single-drive external case, or a multiple-drive external case. Figure 5-9 illustrates each of these case types.
If you are using a tower computer to store your archive, it is likely that you have one or more empty drive bays inside the computer that can hold a new drive. Some advantages of using internal drives are that they are the cheapest way to add storage and they take up the least amount of room. They are also capable of connecting directly to the computer’s logic board, so they provide fast access. One drawback is that they aren’t as easy to swap out as external drives.
If you don’t have an empty drive bay, or if installing a new internal drive seems too daunting, it is usually very easy to add external drives to your computer using FireWire (IEEE1394 or IEEE1394b), USB2, or eSATA connections. External single-drive cases have the advantages of being easily portable and not increasing the demand on your computer’s cooling system. The drawbacks are the higher cost and extra clutter.
You can get single-drive externals in two ways. You can purchase an external drive as ready-made unit. These devices offer a quick and economical way to add storage to your system. You can also purchase a freestanding enclosure and an internal drive and put them together. I like this option because it offers more control over the components and because I can reuse the case when I outgrow the capacity of the drive.
Multiple-drive cases are an excellent solution for a large archive. Although they are larger, there’s less wiring clutter than you would get with several single-drive cases. And once you have bought a big drive box, you can fill it with less-expensive internal drives, which you can swap out for higher capacity drives as additional space is required. This is the arrangement that I currently favor.
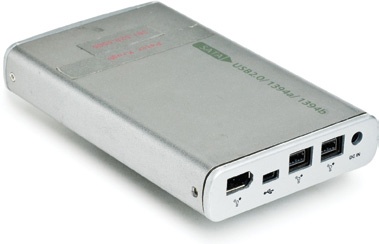
The hard drive mechanism has its internal interface (PATA, SATA, SAS, or Fibre Channel), and the enclosure has one or more external interfaces as well. The external interface determines how the drive enclosure connects to the computer. There are three principal ones in use, and a few additional ones that are used in high-end systems. Figure 5-10 shows a drive that has the three most common connection types.
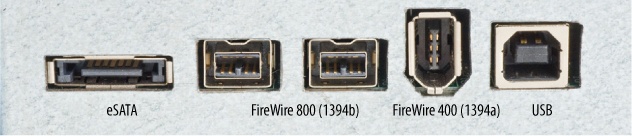
Figure 5-10. This drive enclosure has all of the principle connections in use for external hard drives—USB, FireWire, and eSATA.
Digging Deeper
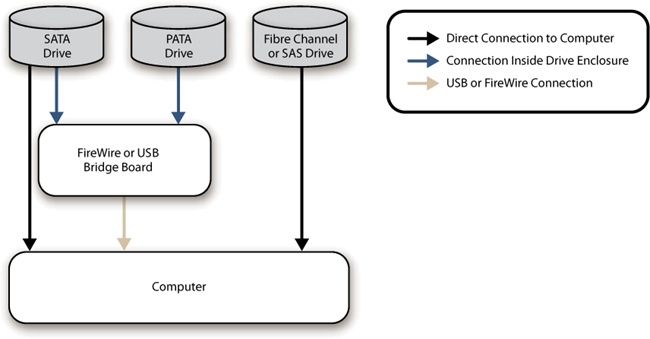
SATA, SAS, and Fibre Channel are all internal as well as external device connectors. When you plug one of these drives into a connector on your computer, the drive essentially establishes a direct connection to the computer’s logic board. When you use FireWire or USB, a bridgeboard translates the drive’s SATA or PATA internal connection to FireWire or USB, as shown in Figure 5-11. The quality of this bridgeboard affects the speed and reliability of the external drive.
USB is the most universal connection method for adding peripheral devices to computers. On the PC, USB 2 (stay away from USB 1 because of its slow speeds) is a good way to connect external drives. Data throughput is maxed out at a theoretical 60 megabytes per second. Due to the USB drivers in the Mac OS, USB is considerably slower on Apple machines. A USB 3.0 version is in the works and promises to offer a tenfold increase in theoretical performance. USB connectors can supply bus power to attached devices.
FireWire 400 and FireWire 800 (also known as IEEE1394 and IEE1394b) are more modern connection protocols than USB, with theoretical transfer maximums of 50 and 100 megabytes per second. FireWire devices can be daisy chained, allowing the use of multiple drives on a single port. Like USB, implementations differ between Mac and PC, with Mac generally making greater use of the speed capabilities than PC. FireWire also can offer bus power to run external drives if the FireWire port is a six-pin port. (Many PCs only offer four-pin ports.)
eSATA is a configuration that creates a SATA connection in an external enclosure. It’s a fast and stable connection, offering up to 150 or 300 megabytes per second. eSATA is only beginning to show up on computers as a built-in external interface. You can add eSATA to older computers by means of an expansion card. eSATA does not have the capability to bus-power hard drives, so you must use an external power source.
eSATA is often described as hot-swappable, meaning that you can disconnect and reconnect different drives without restarting the computer, but this is often not the case. The design of the host (the way the eSATA is connected to the logic board) will determine if the connection is really hot-swappable.
Digging Deeper
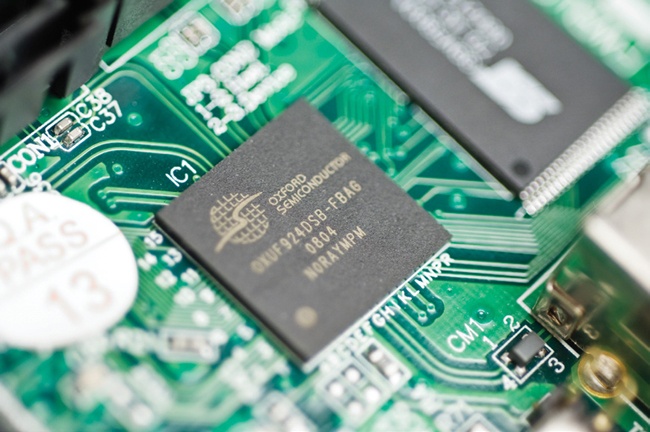
Whenever I buy an external enclosure for my hard drives, I look for an Oxford 924 (or later) chipset in the bridgeboard (Figure 5-12). This bridge handles FireWire 400 and 800, as well as USB. Retailers who know their products well will be able to say which bridgeboard is in the enclosure. If the retailer can’t tell me what it is, I generally assume that the manufacturer has not bothered to spend the money on a good bridge and has put a generic one in the box.
SAS connections can be internal or external. This fast connection is found mostly on enterprise-level hardware, like dedicated servers, RAID, and tape drive mechanisms. Throughput for SAS devices is similar to SATA II, in the neighborhood of 300 megabytes per second.
Fibre Channel is a technology that has migrated from supercomputers down to enterprise-level storage (big companies) and will likely be available for small office, home office (SOHO) users eventually. It offers a high throughput and the potential to be used over distances of several hundred feet. It can be used over copper cable as well as optical fiber. It is rated at up to 400 megabytes per second.
The power supply the drive will use depends on the case design. An internal drive added to a tower computer will use the computer’s power supply. This is tidier because you don’t have power cables running all over the place. It does tax the computer’s power supply, however, and that can lead to failure (watch out for an SPF).
The power supply for single-drive external cases is typically a power brick that sits outside of the case. If you are going to use these, try to always buy the same brand so that you have swappable components to test with if there is a problem.
The power supply for a multiple-drive case is usually inside the case, and is a lot like the power supply inside your computer. If it fails, you can often replace it with a generic one from a local computer store.
Portable drives with 2.5-inch disks inside often use the power in USB or FireWire cables to provide electricity to the drive. This is a real convenience for portable devices, but there are a few caveats. Some drives (particularly faster ones) require more current than is supplied by the port. In these cases, the drive will either not fully mount or might disappear when the power draw gets too large. Unfortunately, the only way to see if a drive works with your computer is to hook it up and give it a try.
There’s another note of caution that you should be aware of when using bus-powered drives. Too high a current draw can burn out the port that the drive is connected to. This seems to be typically associated with running multiple drives daisy chained off a laptop’s FireWire port. If you need to run more than one drive off a single port, you should buy one that will accept an external power adapter, as shown in Figure 5-13.
As you build a storage system, you’ll be confronted with a number of choices when buying components. Most of the technical specifications have been laid out above, but you’ll still have to make choices about which drives to buy and how much capacity to get. Outlined below are some thoughts about how to make these decisions.
When buying hard drives, many mail-order sites offer discounted drives labeled as OEM, or Original Equipment Manufacturer. Many manufacturers originally purchase OEM drives to be included in computers as they leave the factory. Often, manufacturers will end up with a surplus of drives at the end of the process, and these find their way into various retail channels. OEM drives can offer significant cost savings, but there are some things to watch out for.
OEM drives can have custom firmware loaded onto the drive’s controller circuitry. This can include optimizations for a particular brand of computer. Occasionally, this custom firmware can cause real problems when the drive is installed in a different computer.
While OEM drives are shipped to the manufacturer in an appropriately padded box, once they enter the retail channel they are often protected only by an antistatic bag. While this provides protection from electrostatic discharge, it does nothing to protect the drive from impact damage.
Retail drives are those that are intended for sale as individual drives in the retail marketplace. They are prepared for the most common computer configurations and are shipped in static and impact-resistant packaging (Figure 5-14). Thus, they are at least somewhat less likely to give you problems. While I have had trouble-free service from several OEM drives, I have decided against the further purchase of OEM drives for my own use if the drive is available in a retail outlet for a comparable price.
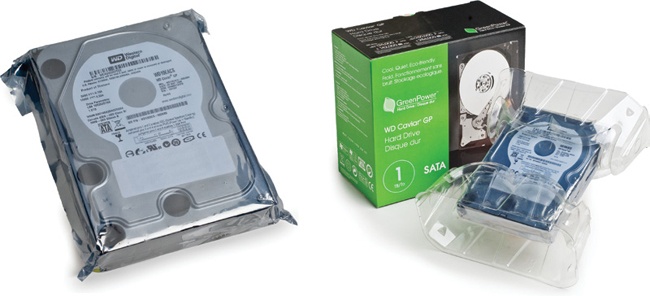
Figure 5-14. When you buy an OEM drive, it comes in minimal packaging (left), which may subject the drive to damage from physical impact. Retail packaging (right) is designed to protect the drive in shipping.
Whether you buy retail or OEM, I strongly suggest buying brand name drives, rather than “private label” or drives from obscure manufacturers. Hard drives are complex and finely tuned mechanisms, and I would not suggest being too cheap.
Warning
As I have worked with photographers over the last several years, I have seen some things repeatedly. One is that running out of space leads people to make mistakes that can lead to data loss. This happens in a couple ways. Drives that get too full can experience directory corruption and lose files. More common, however, is human error. In an attempt to make needed room in a hurry, people will accidentally delete files they intended to keep. Keep an eye on your storage needs and make sure you don’t put yourself in the position to delete things in a hurry, or before they have been adequately backed up. Get the drive space well before you need it—it’s a lot cheaper than data recovery.
Hard drives have steadily fallen in price over the last 20 years, keeping to a trend where storage drops to about half its current cost in 18 months or so. Given this trend, it does not make a lot of sense to spend money on drives that you won’t need in the next year. Buying it later will be cheaper than buying it now.
When I first started working with digital images in the early 1990s, hard drive storage cost $2,000 per gigabyte. Today you can purchase it for less than $.10 per gigabyte—a nearly two million percent increase in purchasing power. Storage solutions will continue to get cheaper, faster, physically smaller, more reliable, and higher in capacity in the future. Keep this in mind as you decide how to store your images now and how to configure future storage systems.
This calculation gets a little trickier if you are implementing a RAID system (discussed in the next section). Since you need to dismantle and rebuild the entire RAID system in order to add capacity, you won’t want to upgrade very often. You’ll probably want to set your RAID system up to provide at least two years of storage.
As my former network administrator friend Skip always says, buy the computer you need now, not what you will need in 18 months. I have found this to be very solid advice, ever since he gave it to me more than 18 years ago.
Digging Deeper
The advantages of the big drive box are:
It’s inexpensive. If you shop around, you can get the box itself for a reasonable price and you can fill it with the less expensive internal drives of your choice.
It’s easy to set up. Just put the drive in the bay, connect the cables, and fire it up.
It’s easy to upgrade. You can replace the drives with bigger ones when you want. If you use sleds, this can take only a few minutes.
Problems are easy to diagnose and repair. It’s a pretty simple machine with interchangeable parts, and you can swap out parts to diagnose problems. Power supplies are generally available at any computer store.
It’s user-serviceable. Unlike a single-drive external case, you don’t void the drive warranty by swapping out the drive itself to diagnose problems. Power users can mix and match interfaces. You can have several SATA bays for fast transfer and several FireWire bays for easy drive swapping.
You can outfit it with removable hard drive sleds, which makes for easy diagnosis, repairs, and upgrades.
The disadvantages of the big drive box are:
It can be big and noisy. There needs to be a lot of fan-powered cooling, and these may make quite a bit of noise when they are all running. Additionally, these drives can generate lots of heat if they are all spinning. As you think about where to put this box, remember these issues.
Hard drives are complex and delicate mechanisms. There are two kinds of shocks to be avoided—electrostatic discharge (ESD) and impact. I must admit that I have personally been pretty cavalier about both of these hazards, but they need to be discussed.
Static electricity, applied in the wrong place, can kill sensitive electronics in an instant. This applies to many of the components in your computer, including the controller circuit board on your hard drive. The most basic precaution you can take when handling electronics is to touch grounded metal (such as the chassis of your computer) before touching sensitive electronics, particularly if you are in a static-rich environment, like a low-humidity room with wool carpeting. If you want the utmost in nerdy fashion (as well as maximum protection), you can get a wrist strap like the one shown in Figure 5-16.
If you are going to be doing a lot of swapping of bare drives, you might want to consider a padded antistatic mat for your work area. You can find these by searching for “ESD mat electronic project” on the Internet. These mats have the added protection of padding the drive from impact as you work on it.
I also suggest that you put a label on your hard drives with some important information, as shown in Figure 5-17. I like to keep the volume name, the purchase date, and the warranty expiration date on all drives. For drives that back up my buckets, I write the names of the starting and ending buckets on the drive as well, along with dates when I periodically check the drive for functionality.
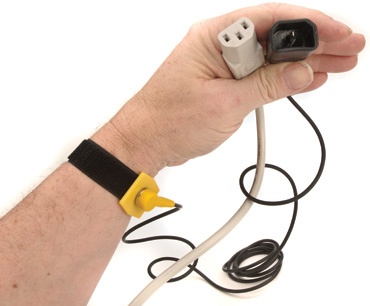
Figure 5-16. The safest way to handle electronics is by using a wrist strap to protect against ESD. This is most necessary if you are working in an environment with high static electricity, such a carpeted room in the middle of winter when humidity is low.
Storing hard drives that are used for backup files also requires some reasonable consideration. You’ll want to protect the drives from ESD and impact, as well as from moisture or heat damage. What you use to protect and store offline drives will depend on a number of factors: budget, how many drives you have, how to get them offsite, whether they are internal or external, and whether they are in caddies or bare.
Drives should be stored in some kind of ESD-protected environment. At the very least you can store them in an antistatic metallic bag (available at major computer stores). You should use this in combination with some kind of padding to protect from impact. Figure 5-18 shows the way I’ve been storing my off-site drives for the last several years. The drives are stored in an antistatic bag inside the clamshell that the drive was purchased in. I then place the drives in a camera bag for added padding.
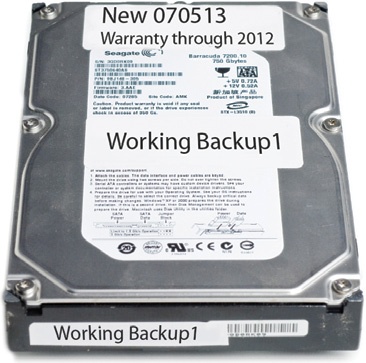
Figure 5-17. I put a label with some important information on my hard drives. Make sure you don’t cover up any breathing holes on the drive case, or you will suffocate the gnomes that live in the drive mechanism.

Figure 5-18. Different ways that hard drives can be stored. My offsite drives live in this camera bag.
I’ve recently found a product from Wiebetech that I really like for hard drive storage (Figure 5-19). These plastic boxes are fabricated specifically for hard drives, and offer ESD protection, as well as some level of shock protection. I now use these in my off-site storage bag.

When you buy new drives, you should do a little preparation to increase the likelihood of trouble-free service. If you zero all data on the drives, you make sure that every bit on the drive is touched. This will force the drive to do a thorough scan of the drive, finding bad sectors and marking them as “off limits.” If the drive is attached in such a way that you can access the SMART data for the drive, you can double-check the health of the drive mechanism before you transfer your data to it, or before you configure it for RAID.
As a digital photographer, you will be using the external ports for a number of temporary connections, such as your camera, card reader, and backup drives. This will involve a lot of plugging and unplugging during the life of the archive, and mistakes can happen—I find that when I use external drives connected to my workstation, I occasionally unplug or turn off the wrong drive inadvertently. This can lead to total data loss on the drive (particularly on Macintosh).
If you are going to use external drives for your primary archiving, make sure that you configure your computer’s physical space so as to minimize the chances of unplugging the wrong drive. I suggest using color-coded cables.
Also, while externals are ostensibly plug and play, manufacturers have different protocols for plugging and playing. Some require drives to be connected before powering up, while others require just the reverse. Make sure to pay attention to the owner’s manual on this point. You may want to affix a label to the drive indicating the preferred connection sequence.
Now that we know about drives and how they can physically be connected, we need to know about the logical configuration. When you install multiple drives on a computer, you can either configure them individually as JBOD or configure them to appear as a single RAID. Additionally, your logical configuration might be in the form of Drobo or Network Attached Storage (NAS).
Let’s take a look at each of these configurations.
JBOD is a configuration of multiple disks that retain their identity as individual disks. Each physical disk is a logical disk, as shown in Figure 5-20. It is the simplest arrangement and the easiest to configure, upgrade, and repair.
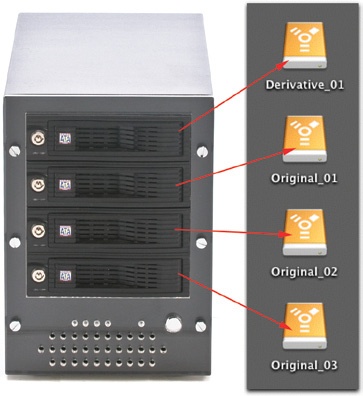
Figure 5-20. In a JBOD configuration, each disk shows up as an individual drive. This arrangement provides maximum flexibility in configuration and upgrade.
I prefer JBOD as the drive structure for archive files in the bucket system for several reasons:
It’s simple to purchase and set up. About the only real specification to look at is the bridgeboard (if you are setting up FireWire). Making an informed choice on the best RAID implementation, on the other hand, is not something that should be done without a good understanding of the hardware and software under the hood. Few photographers I know are well equipped to make this decision properly.
It’s generally much quicker and easier to upgrade capacity with JBOD. A traditional RAID setup must be completely rebuilt (all data moved off, all new drives installed) to upgrade storage size. This makes the upgrade process a difficult, time-consuming, and possible dangerous process. With JBOD, you simply add another drive or replace one drive with another drive of larger capacity.
It’s the most economical configuration.
Although RAID is theoretically safer, I know way too many people who have lost their entire RAID systems to be convinced that it is practically safer, at least with consumer-level RAID.
The amounts of energy used and heat generated are reduced, since only drives that are being accessed need to “spin up.” Drives housing older material can remain at rest when unneeded.
In a RAID setup, several drives are configured together to act as a single volume. The computer sees multiple drives as a single device, as shown in Figure 5-21. This can be desirable for reasons of speed and/or redundancy. You can control your RAID setup either by using a hardware controller (such as a PCI expansion card) or by using software.
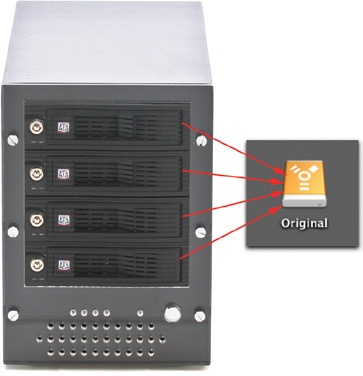
Figure 5-21. In a RAID setup, multiple disks are spanned to create one logical disk to add either speed, redundancy, or both.
You can configure RAID systems so that data is written to multiple drives with redundancy. This means that if a drive fails, all the data can still exist on the device. These mirrored or parity RAID setups can be a good choice to store working files in a mission-critical situation, such as a studio where there is lots of deadline pressure. And this kind of RAID is essential in a corporate environment where 24/7 uptime is necessary.
You can also configure RAID to produce significant gains in throughput, by reading from or writing to multiple drives simultaneously. This is useful in situations where there is a need for lots of throughput, such as in video editing. This can also help a photographer who routinely works with very large image files.
Let’s look at the various flavors of RAID and see what they do.
RAID Level 0 (striped RAID). Treats several drives as a single drive in order to speed up reading from and writing to the drive. Basically, it breaks up a file into several parts and writes those parts simultaneously to multiple drives at once. While it increases speed, it also increases risk. A failure of one drive destroys all the data. You can also use RAID 0 to create a single large volume.
RAID Level 1 (mirrored RAID). Writes the same data to multiple drives to help ensure seamless operation in the event of drive mechanism failure. Mirrored RAID is appropriate for operations that truly need 24/7 functionality, or for files that are works in progress and might represent a whole day’s work. Even with mirrored RAID, you still need to have a set of offline backups because mirroring does not protect against some of the most common causes of data loss (theft, virus, and power surge). It also provides no protection against human error, such as accidentally erasing or downsizing a file.
Note
RAID IS NOT BACKUP. (Yes, I know I’m shouting.) I have run into many photographers who act as though RAID is a backup system, since it can survive the loss of any one drive in the array. While this can protect against drive failure (if you are using mirrored or parity RAID), it does not protect you against a number of other common hazards, such as theft, voltage surge, human error, total device failure, or falling off the table. Do not be fooled into thinking that using a RAID means there is no need to implement the backup strategies presented in the next chapter. RAID is fault-tolerant primary storage, not a backup system.
RAID Level 5. Provides a combination of striping and mirroring, resulting in both increased redundancy and increased speed. A Level 5 system should be able to survive the loss of any single drive, since a parity file (a copy of the data) is written to each of the other drives. Level 5 is probably the most popular current choice. The parity file is a compressed copy of the data; it can store the information in a small space, but requires computation to create.
RAID Level 6. An increasingly popular choice for enterprise-level systems, since it builds upon the capability of Level 5, adding the capacity to survive the loss of any two drives in the system. This configuration is typically found in corporate environments.
RAID 0+1 (also known as RAID 10). A configuration where you have multiple sets of striped drives for speed and redundancy. In a four-drive RAID 0+1, a pair of drives is striped for increased speed. Those drives are then mirrored to the other pair for redundancy. This is faster than RAID 5 or 6 since there is no parity file to be computed or decoded, but it is not quite as efficient.
Note
If you’re thinking about setting up a RAID configuration, bear in mind that RAID disks all need to be the same size. Ideally, they should also be the same make and model. One corollary to this is that if you want to increase capacity, you will need to replace all the disks in your RAID array. With a JBOD setup, on the other hand, you can simply add another drive to the bunch or replace a drive with a larger one without having to upgrade all of your drives at the same time.
Okay, so despite all the above cautions, you want to set up a RAID. How do you go about it? Let’s take a look at some considerations:
Why do you want it? Good reasons are that you need the speed, a single large volume, or that you need the 24/7 uptime. “It’s just easier to deal with” is probably not the right reason. Know if you are shopping mainly for speed, size, redundancy, or some combination.
Hardware or software RAID? You can use system software (or other third-party software) to span the drives and make a RAID from multiple drives, but I suggest you don’t. I suggest getting a hardware-controlled RAID device that is designed specifically for that purpose. Remember that an error in writing the files can kill the entire RAID. In general, high-quality, dedicated devices do this better than software.
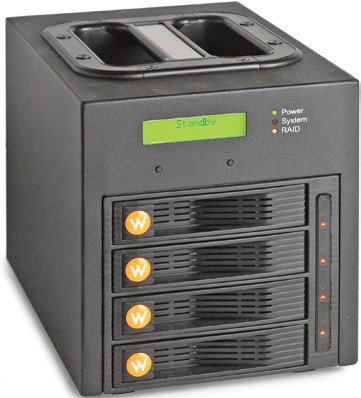
Which hardware RAID? There is a difference between hardware controllers. There are cheap ones from companies you never heard of, enterprise-level devices from well-known brands, and everything in between. Wiebetech is a company that makes, sells, and supports its own line of hardware RAID boxes (shown in Figure 5-22). Keep in mind that if the RAID card fails, it’s only remotely possible to access the data on the drives if you can get the identical RAID card as a replacement.
If you are the kind of person who knows how to make that purchasing decision, do your homework and forge ahead. If this sounds difficult to determine, you might want to think about working through a local reseller who can take responsibility for the purchase. Of all the purchases outlined in this book, this is the one that Joe Photographer is probably least able to do intelligently on his own.
The previous section might have made you nervous about getting a RAID setup. There is a consumer-level option that you may want to consider if you’re looking for a fault-tolerant storage device—Drobo (Figure 5-23). Drobo’s goal is to offer many of the advantages of RAID with some significant improvements, all in a device that is a simple storage appliance.
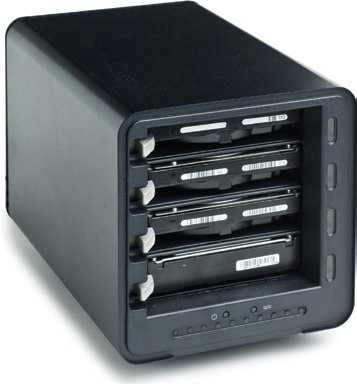
Figure 5-23. Drobo is a new kind of RAID that brings drive spanning to your desktop in appliance form.
Drobo acts like a RAID at first glance—it spans up to four drives to make one logical drive. It offers the same kind of parity protection you get with RAID 5, where the data can survive the loss of any single drive (or, if the drives are large enough, the loss of any two drives, like in RAID 6).
However, Drobo offers some things RAID does not. It can intelligently make use of drives of different sizes (unlike RAID, where all drives are chopped down to the size of the smallest drive). When you need to upgrade the capacity of your Drobo system, just take out the smallest drive and replace it with a larger one. The data will be swapped around, making the best use of the new drive space.
Drobo also has some very simple “gas gauge” lights that show you how full it is. As the disks get full, it will show you on the front of the box itself, as well as in the Drobo Dashboard software that comes with the unit (Figure 5-24). It connects to the computer by USB2 or FireWire 800 connection, and offers an add-on Ethernet connection for use as a NAS drive.

Figure 5-24. The Drobo software indicates how much space is left on the drives and how it’s allocated. It also has tools to see how adding larger drives will increase the overall storage capability.
Drobo also has some intelligent power consumption features. It goes into a very low-power-draw sleep when not connected or not used, and wakes up when it’s needed. And because it is a standardized item, the controller card is likely to be available in the future (in the event that the one in your unit dies and you need to get your data off).
There is one important disadvantage, however, compared to something like RAID 5. Drobo is not very fast for reads and writes. The newest FireWire unit adds additional speed over the original Drobo, but you should probably not consider it as primary storage for use in an environment where high throughput is important. I’ve been using one as a working files backup that is accessed in the middle of the night.
Like so much in the computing world, I expect this to be an area of rapid change, and I look forward to seeing fast units produced by the company in the near future.
NAS comes in two flavors: self-contained boxes about the size of a FireWire hard drive, and NAS servers that are effectively small, fully functional servers with connection ports for monitors, keyboards, and external drives. The self-contained drives make me nervous because there is not a transparent operating system—if the disk has a problem, you are dependent on the manufacturer to sort it out for you. The NAS servers provide an easy way to add a server for a low cost if you don’t already have a computer to turn into a server.
Although I generally don’t recommend using NAS as primary storage at the present time, it can be a good solution for someone who wants to keep backup storage online but far away from the primary storage. Since you can connect it by Ethernet cable, you have the flexibility to move it farther away than any other kind of wired storage.
While I suggest using hard drives as your primary storage media, best practices in data storage require the use of some other kind of media as well. Hard drives are subject to a number of hazards that don’t affect other media, particularly write-once media. These hazards include viruses, hacker destruction, voltage surges, and accidental damage or deletion. We’ll look at how to integrate this protection in the next chapter, but for now, let’s examine the various types of other storage media available.
CD, DVD, and Blu-ray disks provide a cost-effective and forward-compatible way to back up your images (Figure 5-25). Because so much content (music and movies) is distributed in this format, it’s likely that players for these disks will be available long into the future—hopefully long past the time when you have migrated your backup storage to some other medium.
While the capability to play optical disks will be available long into the future, the particular disks you burn today may not be so lucky. Data stored on an optical disk can degrade at an unknown rate, leaving you with disks that are partially or totally unreadable. There is a lot of conjecture and bad information floating around about the longevity of optical disks, but the truth is that we don’t know how long any particular one will last.
With proper handling, a quality optical disk that is burned well should be a valuable backup to a hard drive–based archive for 5 to 10 years. I’ve done data validation on the DVDs I’ve used to backup my collection, and have not found evidence of data degradation, even on 6-year-old disks. This is a collection of more than 700 DVDs from many manufacturers, burned with several different optical drives. I have run data validation checks on about 1/4 of the disks.
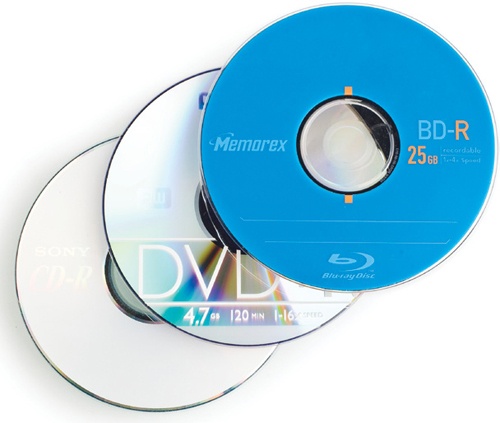
Figure 5-25. There are three kinds of optical disks: CD, DVD, and Blu-ray. They are all the same physical size, so each successive player also plays the older format(s). This will help keep them from becoming obsolete.
In order to maximize the lifespan of optical disks, I suggest the following precautions. Note that this is for disks that need to last as long as possible. For disks that are used for delivery only, or any other temporary use, feel free to break any of these rules.
Use quality disks. I outline disk choice in the section below covering the various kinds of optical media.
Burn at slow speeds. The slower you burn, the deeper the laser can mark the disk. I typically burn my disks at least one speed down from the disk’s maximum rated speed. If I’m only burning one disk, I’ll often take it down another speed or two.
Don’t use a solvent-based pen to mark the disk. The solvents can migrate through the plastic and damage the recording surface. I use only “CD safe” markers (available at computer or office supply stores) and mark only in the center area of the disk (Figure 5-26).
Do not put label stickers on your disks
Don’t print with inkjet printers. Inkjet inks also contain solvents.
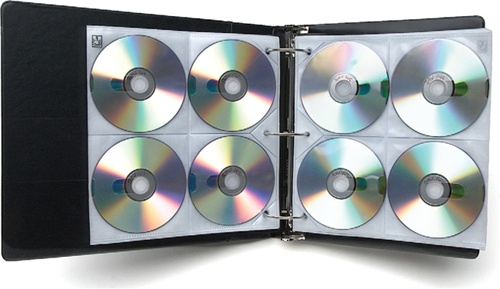
Immediately store your disks in a way that protects them from scratches. I use CD notebooks that are available at music stores (Figure 5-27). Archival storage pages are available from outlets like Light Impressions. The safest method is to use Jewel cases, but this will substantially increase the physical size of the disk archive.
Protect disks from sunlight. UV light is damaging to plastics and dyes.
Protect the disks from excessive heat and humidity, as well as frequent changes in temperature.
Be very careful handling the disks. If you need to take one out, put it immediately in a player, and put it back once you have finished with it.
Validate the data from time to time. This is discussed in the next chapter.

Here’s a rundown of the different types of optical disk in use today that could serve as your backup:
CD. Because of their small storage capacity (682 MB), CDs only make sense for photographers who shoot JPEGs rather than raw files. Manufacturing defects and poor storage conditions can result in data loss. Gold foil CDs are considered to be the best quality. Rewritable disks are inherently less stable than write-once disks.
DVD. DVD can be a very good option for backups at the present time, depending on how much data you create. DVDs are relatively stable, hold large amounts of data (4.3 GB), and should be readable for quite some time to come. The DVD+R format is more modern than DVD-R and includes some newer error-correction technology, and is therefore a better choice for archive disks. Manufacturing defects and poor storage conditions can result in data loss. Two brands of DVD that are considered particularly stable are Delkin Gold and Taiyo Yuden.
Blu-ray. In early 2008, the format war between Blu-ray and HD-DVD ended, with Blu-ray victorious. Blu-ray disks are the same physical size as CDs and DVDs, but hold either 23 or 46 gigabytes. Blu-ray players and recorders should always be able to play or record CD and DVD media. Recent changes in disk manufacturing technology should result in Blu-ray disks selling for roughly the same price as DVD blanks, once production gets up to speed. While there is not a long track record for Blu-ray disks, the underlying technology should provide stable long-term backup. Because the format is so new, there is no consensus on which brand of disks to use.
Note
An 8 GB dual layer DVD also exists, but it suffers from some drawbacks. Dual layer disks are significantly more expensive than single layer, slower to burn, and unavailable from the most reliable manufacturers. Dual layer readers are not as plentiful, so you might have trouble reading your dual layer disks in the future.
The fail-safe backup of choice for institutions is digital tape, in one of its many forms (Figure 5-28). One reason digital tape is preferred as a secondary medium is because it has a high capacity, and you can add more capacity cheaply once the system is in place. You can also reuse digital tape, which makes it well-suited for use as a rotating offsite backup. Digital tape is much less susceptible to viruses than hard drives are, if older versions of files are kept archived.
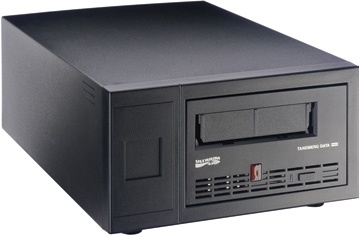
Figure 5-28. Digital tape is expensive to implement, but makes the most sense for a very high-volume photographic archive.
Digital tape has a few important drawbacks. The first is that a modern tape system is costly to implement for the single user or small workgroup. The tape deck itself is expensive, as is a tape autoloader, if one is needed. Often, these machines can only connect to computers using relatively expensive add-on cards, like Fibre Channel or SAS. Additionally, there is a confusing array of tape formats to choose from, some of which are proprietary and some of which are open.
Digital tape is most attractive to a studio or workgroup that shoots too much to consider Blu-ray as a secondary medium. If you need to back up hundreds of gigabytes a week, digital tape is probably the right technology. Tape is also the right choice for many workgroups that need to back up the work of multiple users. We’ll discuss more about backup scenarios in the next chapter.
As you consider a tape system, you’ll need to choose a particular flavor to commit to. You’ll be investing in a recorder and tape, and you’ll want to know that the data will be accessible even if the recorder you buy breaks in a few years. And the system you choose should allow for the kind growth that you expect in your media library without having to go to a new system.
Linear Tape Open (LTO) Ultrium is probably the best choice for the foreseeable future. It is an open format, meaning that no single company controls the production of recorders and tapes. Additionally, the LTO specification mandates that current recorders be backward compatible with two previous LTO versions. This makes it more likely to be readable in the future, should your recorder break.
LTO is also fast to read and write, uses high-capacity tapes, and can be set up for write-once capability so that old data is always protected. The LTO specification is currently in its fourth version, LTO-4. LTO-4 tapes can hold 800 GB of data and can transfer at the rate of 120 megabytes/second.
The cards you put in your camera are the first media that holds your image files (Figure 5-29). Let’s take a look at some of the issues you’ll want to consider when choosing media cards.
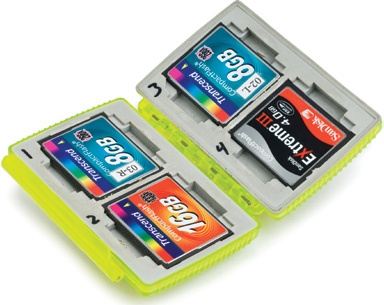
Figure 5-29. The media cards you use are also a storage medium. I like to keep mine in a case like this Gepe one that holds four cards (as well as SD memory cards). I turn the cards over once they have been shot and are ready for download.
One of the fist choices you need to make is the size of card to buy. As with hard drives, we have a choice between a larger number of smaller cards or a smaller number of larger cards. I come down firmly on the side of using larger cards. Some of the advantages are obvious. With large cards, you can carry lots of storage in a small package. You’re less likely to run out in the middle of a shoot. You’re also less likely to run out in the middle of a shooting sequence and miss pictures because you have to change cards.
In fact, changing cards rapidly is the most common cause of problems I’ve seen. If cards are pulled from the camera before writing is finished, images—and maybe the entire card—can be lost. The same thing applies to cards being disconnected from the computer before being dismounted: the entire file system can be corrupted.
Sometimes there are workflow considerations that make smaller cards more attractive. Those who want to burn each 4 GB card to backup DVD have sometimes become accustomed to the nice size correlation between these two.
Note
I’ve seen a particular kind of corruption happen more than once, and it took a long time to diagnose. If you pull a media card from a Mac before the filesystem lets it go, it triggers a warning about removed media. Sometimes the next card inserted can become corrupted, appearing to have no pictures on it. If you get the removal warning, do not mount another card until you have restarted the Mac.
In general, I have not found that the premium-priced brands are superior to other “no name” brands. In some cases, premium brands have had significant problems when put into widespread use.
Speed ratings, on the other hand, are important. The speed with which the card can write files and read them out to the computer can determine how fast you can shoot and how long it takes to download. The difference can be significant. Look for cards in a range that is higher than 200x.
Direct Memory Access (DMA) is the traditional transfer protocol used by media cards for the last decade. Ultra DMA (UDMA) started to come into general use in media cards in 2007. Once cameras supported it, the demand grew rapidly for UDMA cards and card readers. UDMA offers a much faster transfer protocol as long as each part of the system can take advantage of it. This means that both card and camera need to be UDMA-compliant in order to get faster write speeds, and both the card and the card reader need to be UDMA-compliant to get the faster read speeds.
There are many different kinds of readers you can use to transfer images from the card to the computer. Some computers have them built in, or you can use readers that connect to your computer via USB, FireWire, or PCMCIA/ExpressCard. They can be DMA or UDMA. Which one should you get?
Unfortunately, there’s no simple answer. After reliability, which is very hard to measure, transfer speed is probably the most important characteristic for users, but this is not easy to specify. Different computer models, system software, port drivers, and bridge chips in the card readers can all affect how fast the files transfer, as can the drive configurations.
Reference
The best place to find out about media cards and and card readers is at robgalbraith.com. They do comprehensive speed and compatibility tests.
Your choice here will depend on what kind of computer you use, what the available connections are, and which kind of backup media you use. In general, FireWire is faster on a Mac and USB is faster on PC. If you are only writing from the card to the internal drive, this makes the choice pretty easy. ExpressCard, found on newer laptops, is faster than either FireWire or USB, and may be a better choice.
If you are going to write to external backups as well, the choices are a little more complicated. If two devices are sharing a bus, the throughput goes down dramatically. So, while FireWire may be faster on the Mac, it won’t be faster if both a card reader and a drive have to share the same connection.
As you decide on which device attaches to which connection, keep in mind that the throughput of hard drives will likely be faster than the throughput coming off the media card, so the drives should occupy the fastest connections.
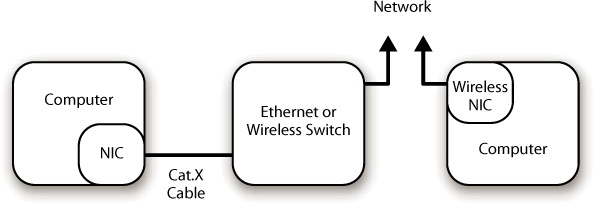
If you are using more than one computer, you’ll probably want to set up some kind of network (as a matter of fact, you probably already have one). There are several elements of the network to consider. For networks using wires, the elements are the Network Interface Card (NIC), the cables used to transmit the signal, and some combination of bridge, switch, or router to negotiate the connection between devices. For wireless networks, a wireless card replaces the NIC, and the system needs to have some kind of wireless access point (Figure 5-30).
The standard technology for wired networks, Ethernet, comes in three speeds—10BASE-T, 100BASE-T, and Gigabit. A fourth speed, 10 Gigabit, is on the way. Each successive version of Ethernet has increased speed by a factor of 10. Gigabit, or 1000BASE-T, became available on personal computers in 2000, and it is capable of transferring about 125 megabytes a second. If you’ve got a hard-wired network, it should be Gigabit Ethernet (at least until 10 Gigabit Ethernet becomes common).
There are also different specifications for wireless networks: 802.11a, 802.11b, 802.11g, and the coming 802.11n. The fastest current specification, 802.11g, cannot even transfer a megabyte a second, which puts it in the neighborhood of 10BASE-T in speed. While this will probably not affect you surfing the Web, it will make large transfers of image data painfully slow.
Both wired and wireless networks can fail to achieve their maximum throughput for any number of reasons. Poor signal and noise in the transfer can reduce throughput, as can collisions in the device negotiating the connection.
Ethernet networks use a hub or switch to control the flow of data between devices on the network. Like the NIC, the hub or switch will have a speed designation. Hubs are simple devices for directing the traffic, and will slow down if there are more than two computers on the network talking to each other. A switch, however, will create a more direct link between any two devices on the network, and can handle larger networks with less slowdown. If you’ve got more than a couple computers swapping a lot of data and you need maximum throughput, you’ll want to use a managed switch for optimal performance.
If you are sharing an internet connection, there needs to be a router on the network. It doles out IP addresses to each device on the network. While you can easily have multiple switches or hubs, you shlould only have one router (unless you know what you’re doing).
Ethernet cable also has its own specification, and the higher the number, the higher the theoretical throughput. The design of the cable—how thick the wire is, how the internal wires are braided, and what kind of shielding is on the wire—all affect how much noise is introduced in data transmission. This becomes particularly important in long cable runs, or when the wires run close to sources of electrical interference, like household electrical lines. Category 6 or 6a cable is current the highest officially specified standard.
If you are going to run some cable for your network, make sure to use the highest category cable you can. If you can, try to keep network cable from running alongside power lines for long stretches. And if you are installing a network in a building you intend to occupy for a long time, you might want to consider running the cable inside a conduit like the smurf tube, shown in Figure 5-31. This will give you the opportunity to upgrade the cable when new technology comes out that can carry even more data. Since you can easily run new cable through the tube, it’s much less expensive to upgrade.

Basically, a server is a computer that makes files available over a network. A server can be dedicated (i.e., it can exist only to make files available to other computers), or it can do other jobs as well. For example, your main Photoshop workstation could make files available to other machines, qualifying it as a file server, even as it performs other tasks. A client computer makes use of files or applications that reside on another computer.
Photographers may decide to switch to client/server networks (rather than directly connecting their drives) for several reasons, including the following:
They need to be able to access the files from multiple computers.
The size of the drive enclosures outgrows the physical space in the desk area, or the fans get too noisy.
They want to lock up the files in a more secure and/or temperature-controlled location.
One economical way to set up a modest server is to take a stable used computer and add some internal or external drives. This is a good use for a proven reliable computer that you’ve replaced with a newer, faster one. Because processor speed is less important for the server than for your editing workstation, an older computer can have a long “second life” as a server. The most desirable qualities for the server are, in order: proven stability, quality manufacturing, Gigabit Ethernet, and expansion options (multiple drive bays, FireWire/USB2/SATA ports, or open PCI slots).
You might also want to consider buying an inexpensive new computer for this task. On the Mac side, an iMac or Mac mini can make a fine server with a pretty small footprint and enough connectivity and processing power to work for an individual or small group. On the PC side, there are many more options, like the Dell Studio Hybrid, that squeeze a lot of computing power into a small and inexpensive package.
While a standard desktop computer running a basic OS can work as a server for a handful of clients, if you’ve got to serve files for more than a half-dozen computers, or if you have a high throughput demand, you should consider getting a machine that was built specifically as a server, running a server OS.
On the high end of the server spectrum are rack-mounted machines such as the Apple Xserve or Dell PowerEdge, with hardware RAID setup. These computers are the kinds of machines that large corporate networks run on. They’re well made and reliable, with modular, redundant parts for quick swap-out. At the moment, rack-mounted RAID servers are very expensive.
As your archive grows, an increasingly large percentage of it will be archive files rather than working files; most of the time, you won’t need time-critical access to most of it. A mission-critical, expensive server like this would be overkill for most photographers’ complete archives, especially as the archives grow in size over the years.
I expect that the falling price of hard drive storage, coupled with the demand for lots of media storage space, will spur the development of many new SOHO servers with lots of capacity. Look for these to become available soon, driven by the needs of people who want to store lots of video from their digital video cameras and television digital video recorder (DVR) devices.
Note that while processing power is not terribly important for file-serving functions, it’s useful for data validation functions, which tend to be more processor-intensive. As you consider what kind of server configuration to create, you might want to keep this in mind. In fact, data validation needs were the reason I upgraded my server from the older G4 computer shown in my last book to the iMac shown in the next section.
The monitor is one of the most critical components in your imaging system. Every monitor has different color characteristics that impact how images are displayed. Some monitors show a very limited range of color and brightness capabilities (referred to as the gamut of the monitor). Each monitor will also have a color bias or color signature.
To compensate for the different color signature of each monitor, computers use color management software to adjust the signal that is delivered to the screen (think of this as an electronic color compensation filter). In addition to this profile compensation, the best monitors (meaning expensive) have built-in hardware to actually calibrate the color that the monitor displays, for best optimization of the device.
Monitor technology is a fast-moving sector of computing hardware. In a few short years, flat-panel monitors went from expensive rarities to total market dominance. We’re now seeing the arrival of flat-panel monitors geared to photography, including some that can display all the colors contained in the AdobeRGB color space. You’ll probably need to do some online research to find out what the current best monitors are—it’s rare to find a store where you can look at them side by side. Check the hardware section of the DAM forum for current opinions.
No matter which monitor you buy, if you want to get the most out of it (and of your work on your images) you’ll also want to get a monitor profiler, such as the Eye-one Display 2 shown in Figure 5-32. By using this device and software to measure the color coming out of the monitor, you can create a profile that neutralizes the color cast as much as possible. While some utilities exist to do this calibration by eye, it’s a crude adjustment compared to what the colorimeter can do.
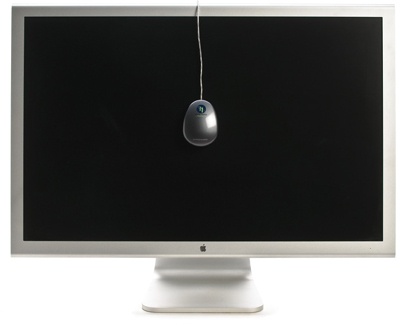
Figure 5-32. A monitor being profiled with a colorimeter. It reads the color signature of the monitor, and computes a color profile that compensates for the imperfections in the monitor’s color. The computer’s OS uses this profile to correct the color of the signal being delivered to the monitor.
As of this writing, the best monitors are ones with 12-bit color depth, AdobeRGB gamut, hardware calibration capability, and LED backlight.
As you build a system to hold your image archive, you should pay attention to the power that’s coming into the computer. A surge in power, such as one caused by a lightning strike, can kill the entire computer and all of the attached components. And a brownout or blackout can result in the loss of unsaved work or, worse, total corruption of the storage drive. Both of these problems can be addressed, to some degree, by using power conditioning equipment.
Surge suppressors (Figure 5-33) protect your equipment in the event of a voltage spike. They are relatively inexpensive and should be standard for all desktop computers. While they can stop the damage, they’re not a foolproof solution. A direct lightning strike to your building may destroy all electronics, regardless of surge protection.
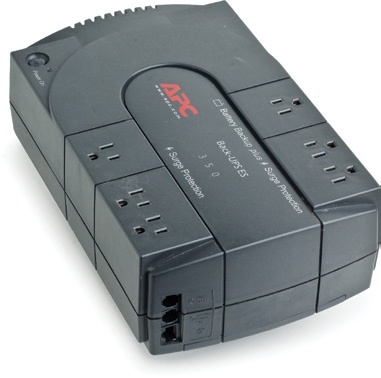
Figure 5-33. UPS units can provide electricity in the event of power failure, and can also condition the power to supress surges.
In addition to surge protection, uninterruptible power supplies (UPSs) have battery backups built in. The battery kicks in if power is lost, and gives you time to save files and shut down your computer properly. Some UPS units also have software that can intelligently shut down the attached computer before the battery power runs out. UPS devices are rated in terms of milliamperes per hour. The higher the number, the more power it can provide and the longer time it can provide. It’s considered a best practice for all desktop computers to have a UPS attached. Check the specifications on UPS devices to find one that can power your configuration for an appropriate amount of time. You must replace the batteries in your UPS device periodically.
Laptop computers have their own batteries already built in, so the battery backup is probably not necessary unless it is needed to power external drive(s). Surge suppression is still advisable, especially if you live in an area with lots of thunderstorms or voltage spikes.
Now that we’ve taken a look at the various hardware components you’ll need to consider for your image storage system, let’s put together a few sample configurations to see how everything can work together. We’ll start with some generic system configurations, and then look at some specific implementations.
The system shown in Figure 5-34 is the cheapest way to get started—simply add a drive to your existing system for the image archive and back up your image files onto an additional drive and to optical media. If you’re using a laptop or all-in-one computer, the dedicated image drive will probably have to be external. With a tower system, it could be an internal drive.
Further considerations:
Laptops can finally be used as primary image-editing computers, since processors have gotten faster. Currently, most laptops can only hold a single hard drive, and drive capacities are often insufficient to hold a photographer’s entire archive. Additional drives must be plugged in externally.
You don’t necessarily need a dedicated drive for your images if there is enough space on an existing drive, but I advise that this is the best arrangement.
Many all-in-one systems contain a 3.5-inch drive and can therefore hold significantly more data internally than laptops can.
Tower systems generally have space for several drives, and can accommodate large collections entirely on internal drives. If you’ve got a tower system and can use an internal bay for the dedicated image drive(s), you’ll save money and increase performance over most external solutions.
You will want to determine which connection best suits your computer when configuring an external drive. In general, eSATA is best, if the computer supports it. If not, use USB for PC and FireWire for Mac.
Most laptops (and many other inexpensive flat panel monitors) only display 6-bit color. If you want the best color fidelity, you should check out the specifications of the monitor. Most laptops can support an external monitor that is larger than the laptop’s screen.
The configuration shown in Figure 5-35 adds multiuser access, as well as the ability to lock your server in a remote location in your house or studio (make sure the server area is vented to avoid overheating).
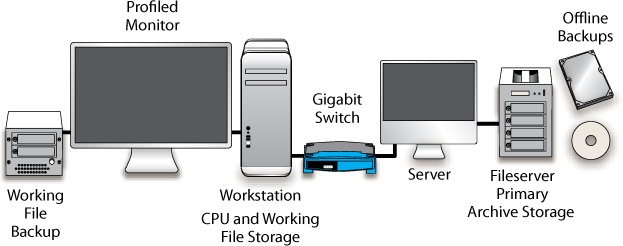
Figure 5-35. A basic client/server setup will provide an extra level of security and allow multiple machines to access your files.
Further considerations:
The server does not have to be any special machine. You can configure any known reliable machine as a file-sharing server.
The data storage device connected to the server should be configured for upgrade when it gets full. I suggest a JBOD configuration.
The offsite backup drives can be SATA drives that are put in removable drive bays.
The configuration shown in Figure 5-36 adds a laptop to the system, which has its own backup drive(s).
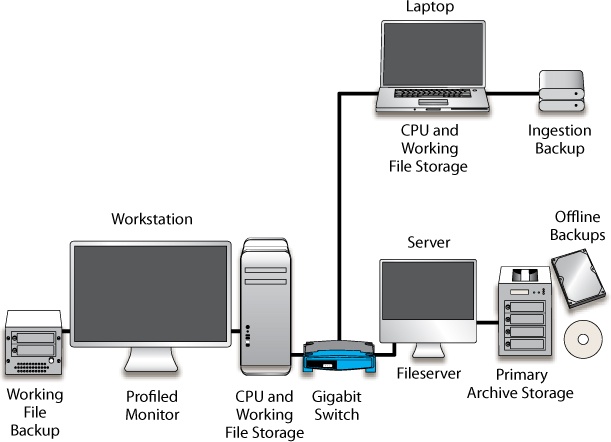
Figure 5-36. A professional photographer who works on location will generally need a laptop computer for downloading and field work. It can be added to the client/server system easily.
The laptop should ideally have its own portable backup drives in the location bag. These are primarily for backups of the ingestion, as well as a backup of the full data on the laptop’s drive.
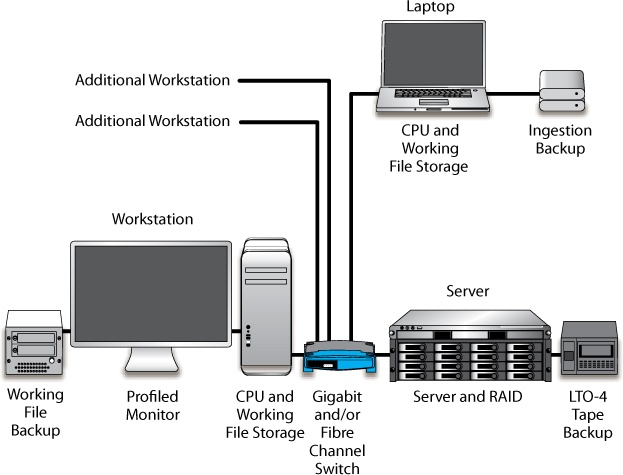
The configuration shown in Figure 5-37 provides the fastest access times and redundant storage for a no-downtime storage solution. It’s also really expensive.
Further considerations:
If you are looking at a system like this, you probably have enough money to hire someone to configure it properly for you.
In this section, we’ll look at a couple laptop configurations I have been using—a PC setup and a Mac rig. For me, these laptops are mostly for location work or for business, word processing, and web surfing back in the studio. The PC version is more powerful than most desktop tower computers you’ll find, while the Mac has got less horsepower.
Either of these laptop computers would be a fine workstation for many photographers. The processors that now come in laptops will outperform the best desktop systems of a couple years ago with no problem. If you wanted to use one of these as a main imaging workstation, I’d suggest a couple of improvements. Each of these computers can accept an ExpressCard eSATA attachment. This would provide fast drive access, which would translate into significant improvement in performance for heavy-duty image-editing work.
I’d also strongly consider adding a larger and better monitor for critical color work. Both of these machines have video cards that can drive large monitors, which I have found to provide a significant boost in productivity.
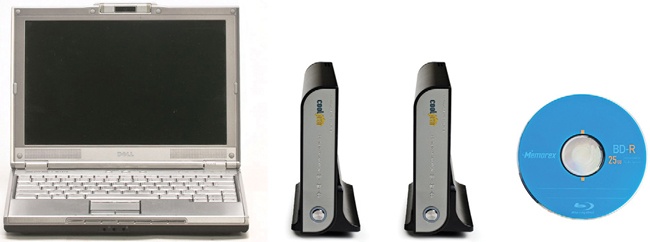
I have a Lenovo W700 (Figure 5-38) for use as both a location processor and a studio workstation. This machine was built for the professional photographer, and includes such features as an integrated color profiling system, Wacom pen tablet, dual internal hard drives, Blu-ray writer, integrated media card readers, two core duo processors, and a video card with 1 GB of video RAM. Currently, it’s configured with:
4 GB RAM in the machine. Having lots of RAM will provide the best performance. If I were running Vista 64-bit, I’d have it filled with the full 8 GB.
Dual 320 GB 7200 RPM drives installed as JBOD (primary storage and a backup).
External backup drive connected with USB. The portable drives I use are ones I put together myself. They hold SATA drives and have connections for FireWire 400, 800, and USB. They also have a power input. The bridge-board inside the drive is an Oxford 924.
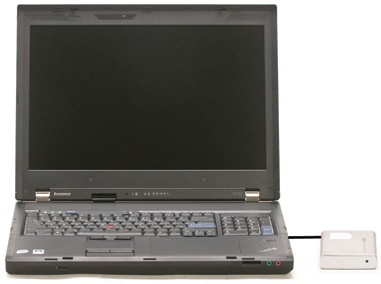
I also use a Mac, shown in Figure 5-39. This one is a Macbook Pro set up in the following way:
The RAM is maxed out at 4 gigabytes.
The drive on this computer is not easily user-replaceable, so I have not upgraded as often. It has a recently upgraded 320 GB 7200 RPM drive that is big enough to hold even a long location shoot.
I have found the fastest download configuration to be a USB card reader and two FireWire drives, each directly connected to a port on the computer. I can use the same drives that I show in the PC section above.
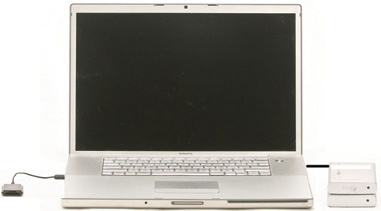
For many professional photographers, a dedicated imaging workstation will also be necessary (Figure 5-40). Full-size tower computers offer many advantages, including more processors, better video cards, more RAM slots, multiple drive bays, and PCI card expansion. In this section, I’ll outline one that I have in my studio.
I can boot my Mac Pro Quad-Core tower in either Mac OS or Vista. Because Photoshop cannot run in 64-bit on Mac OS, the fastest way to run Photoshop for very large files is to boot the computer in Vista 64. I’ve been working with image files that are up to 20 GB in size, and running in 32-bit mode on the Mac can be painfully slow.
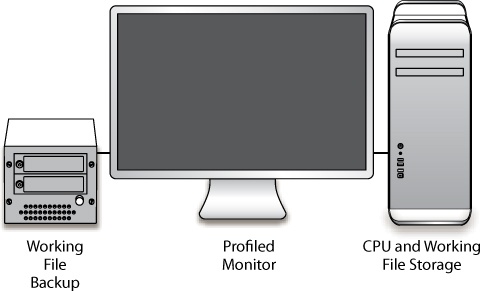
My Mac workstation is set up as follows:
8 Gigabytes of RAM (Yes, I’d like more.)
4 hard drives:
The Mac boot drive is 400 GB. This holds the system and programs.
The PC boot drive is 400 GB. Using Boot Camp, I can make this a Windows machine.
The working file drive is 1 TB. This drive holds all my works in progress. Sometimes I have more than 600 GB of working files.
The backup mirror drive is 1 TB. This drive holds backups of what’s on the working drive.
External two-bay drive box. I use this to hold offline swapper drives that store backups of my working files. I’ll outline how I use this in the next chapter.
Monitor 1 is an Apple 30-inch. This monitor provides a vast amount of screen real estate for image organizing, as well as for Photoshop work. While I am comfortable doing proofing work on this monitor, I don’t like it for critical color.
Monitor 2. Alas, my trusty Sony Artisan CRT monitor is at the end of its useful life. I will likely have replaced it with an Eizo by the time you read this.
Figure 5-41 shows the server that I am currently using in my studio. It’s an Intel iMac that is connected by gigabit Ethernet to my workstation (and about seven other computers). While it’s not the perfect setup, I’ve been very happy with its price and performance.
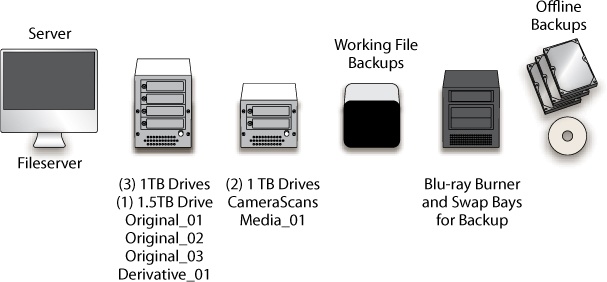
Figure 5-41. Here are the components to my storage system. The iMac works as a file server. I have a four-bay JBOD, a two-bay JBOD, Drobo, Blu-ray burner with empty drive bays, and my backup drives and optical disks.
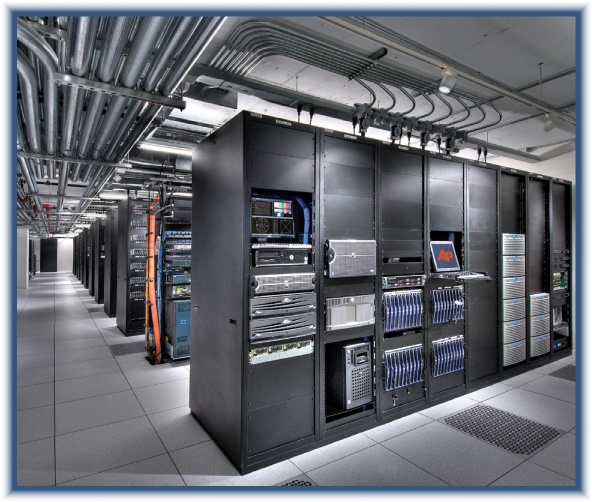
The biggest drawback to the iMac is that it does not have the capability to add eSATA as a direct connection (the drives are connected by FireWire). This means that I don’t have access to SMART data reporting, but I do get a smaller footprint, better processing power, less electrical power draw, lower cost, and less heat generation than I’d get with most tower computers.
Okay, so let’s look at how this machine is set up. It’s the heart of my digital archive (Figure 5-42).
The internal drive is a 250 GB that still has plenty of free space, since files are not stored here. It also has 2 GB of RAM.
The primary storage is one four-bay SATA enclosure with three 1 TB drives and one 1.5 TB drive. I also have a two-bay SATA unit with two 1 TB drives. They are configured as follows:
(3) 1 TB drives hold Originals buckets
1.5 TB drive holds Derivatives buckets
1 TB drive holds camera scans
1 TB drive holds media files (MP3 audio files and saved TV recordings)
I also have a Drobo unit attached to the server with 2.5 TB of usable space on it. Working files and folders on all computers are backed up to the Drobo overnight.
I also have a spare drive box attached to the server for temporary connections of PATA and SATA drives for offsite backups. I’ve put a Blu-ray burner in this device to make my write-once backups.
Note
If this stuff is too daunting for you to undertake on your own, and you have too many image files to keep on a single drive (and a single backup drive), you probably need a good computer consultant to set up your system for you.
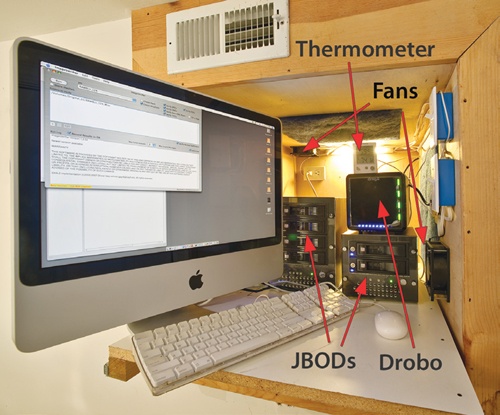
Figure 5-42. This photo shows my server “cubby” with the computer pulled out. The iMac is the server, and the JBOD devices and Drobo sit behind it. (The swapper is outside the cubby.) Make sure you have enough ventilation. I have one fan that pulls air from a cool crawlspace and another that exhausts. There are also cutouts for passive ventilation.