

In this chapter we will begin the workflow section, detailing how we can put the principles of the preceding chapters into practice. In the first part of the chapter, we’ll look at the best practices of image ingestion—the phase in the image lifecycle when images are downloaded and initially processed. In the second part, we will look at two pieces of software that you can use to automate the process—Lightroom and ImageIngesterPro.
Image Ingestion: Overview
Ingestion with Lightroom
Ingestion with ImageIngesterPro
The ingestion phase in the image lifecycle occurs when you download images and perform some basic processing tasks. In this phase, the vast majority of the work you do to the pictures can be automated. Let’s take a look at the tasks we need to accomplish during the ingestion phase.
Download: Move the images from the camera to the computer.
Rename: Give the images a unique name, preferably a permanent name.
Apply bulk metadata: Tag images with whatever information is common to the whole group.
Apply image settings: Tag the images with some rendering instructions as a starting point for the image adjustments.
Backup: Make at least one, and preferably two additional copies of the images.
Convert to DNG (optional): You can make a DNG in the ingestion process and take advantage of the data validation hash for added security.
Send to viewer: Load the images into some kind of viewing software for visual inspection.
Confirm integrity: Do a visual inspection of the images to ensure proper transfer prior to erasing from the media card.
Keep a record of what happened (optional): You may wish to keep some kind of written record your ingestions. This may be particularly important for multicard shoots where an assistant is downloading the images.
Tip
Make sure that the ingestion software you’re using supports the file types your camera shoots. Lightroom 2.2, for instance, does not handle movie files shot by your camera.
In order to accomplish all the steps outlined above, you’ll want to use a piece of software to help manage the process. This could be a download utility that is built into a program like Lightroom or Bridge. Or it could be a freestanding utility that is dedicated to the ingestion process, like ImageIngesterPro, the software that I recommend. We’ll take a look at both kinds of ingestion software later in this chapter.
Now let’s look at the workflow in more detail.
The download process itself is pretty simple: Transfer the images from the camera to the computer. For many pros, this is simply a matter of inserting the card into a reader and downloading the images. You can also transfer images by using a direct connection when shooting tethered, or, increasingly, by using a wireless connection of some sort.
Card readers are now available that can accept several media cards at the same time for more efficient downloads. In order to make the most use of these, you need to have ingestion software that supports multiple cards.

No matter what the download type, there is a possibility of transfer error producing corrupt files. Since download programs don’t do a bit-for-bit comparison with the data on the card, you will want to do a visual inspection of the images before erasing the media card. Even if the software did a bit-for-bit comparison with the files on the card, you’d still want to do a visual inspection before erasing the card—some read errors of the card data can be recovered using data recovery software.
When you bring the images in, you’ll need a place to put them. If you’re a single computer user with an all-in-one application like Lightroom, you may be able to send the images directly to their permanent homes right as you download, without holding them in a working files folder for initial processing. Ingesting the files into their permanent homes right away is the simplest approach. However, this approach can make for some difficulty if you want to burn write-once copies of the files that you can easily restore in the event of loss of the primary copy of the archive.
Note
If you are ingesting straight into the archive, you might want to review the directory structure options outlined in Chapter 4.
If you are a multicomputer user or if you want to keep your working files closer at hand than your permanent storage (which may be on external drives or networked storage), I suggest downloading the files to a working files folder on the internal drive of your computer and creating a set of folders in the working files folder to act as a workflow pipeline for your images on the way from card to archive. The first of these should be the landing zone for the download (Figure 7-1). The number of steps in the pipeline depends on the kind of work you generally need to do to your images, which software you use, and how you like to approach the work.
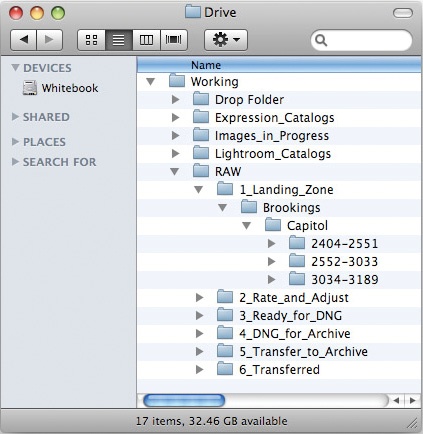
Figure 7-1. The contents of my Working folder, with the RAW pipeline showing. In side the 1_Landing_Zone folder, I created a client folder, and then a project folder inside that. The number range subfolders help me check that all cards from a shoot have been downloaded, even long after the fact.
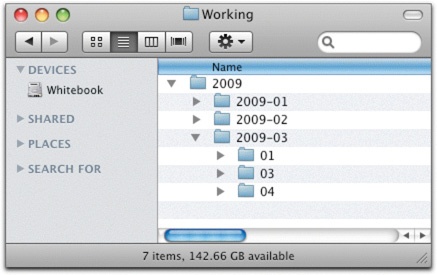
Inside the landing zone folder, you can set your subfolders up in many different ways. Some people like to use folders nested inside a date hierarchy, as shown in Figure 7-2. Some people like to create the folders according to the client or project, with a subfolder for each card downloaded. My personal preference is to download to a folder structure that is named for the client, project, and number range of the images in the folder (as shown in Figure 7-1). The number range folders let you do some data validation regarding the downloads themselves. Because the folders should line up with no gaps in numbering, it’s possible to get easy visual confirmation that all cards have been downloaded. Creating number range folders can be a bit of a pain to do manually, so I’ll show you later in this chapter how ImageIngesterPro can automate the process.
Back in Chapter 4, we discussed what goes into a file name. Any download utility you use should support your naming convention and create the name automatically. Most download utilities can do this, with varying degrees of flexibility. Ideally, you will rename files immediately after download so that you can link the primary version of any files with backup versions, should the need arise. This makes recovery from some kind of media failure a smoother process.
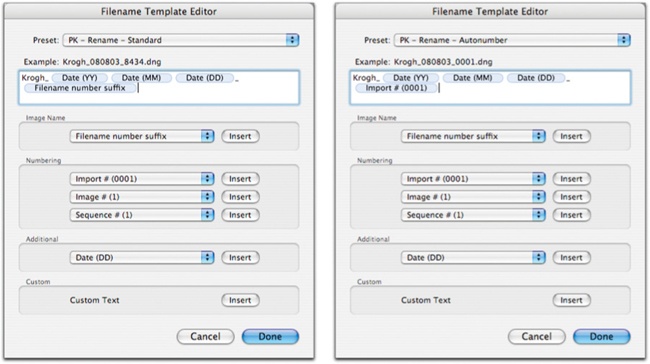
While I generally pick up the unique identifier number out of the original file name assigned by the camera as my permanent unique identifier (Figure 7-3), there is one case in which I don’t. If I am shooting with more than one camera and I want to make sure no two images have the same name, I will set my download utility to use a sequence number that it generates (Figure 7-4). This process will generate unique names, but it may not correctly sequence the images, since the order will be the order of download (camera-by-camera) and not the order in which they were shot.
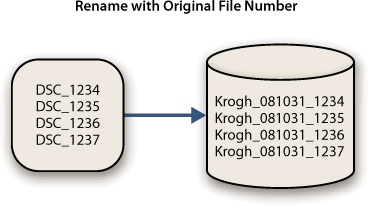
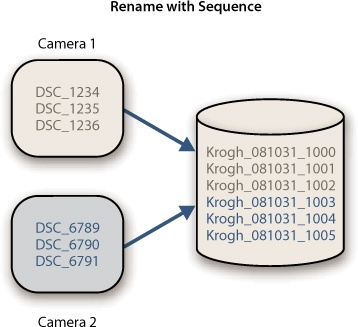
Figure 7-4. File renaming where the download utility assigns a sequence number as it downloads. This is helpful in a multicamera shoot where you want to avoid file name collisions.
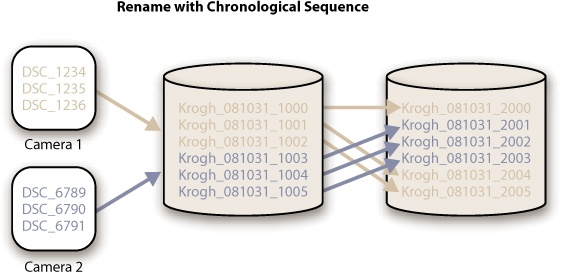
Some photographers (wedding and other event shooters in particular) are very fond of sequencing image file names in the order they were shot for multicamera shoots, as shown in Figure 7-5. This makes the images line up in order even if they are shown in a very simple viewer that can’t read the EXIF timestamp. To do this, you must first download all files, then line them up in order, and then rename them using a sequence number generated by the software. It’s also very helpful if you have synchronized all the cameras’ clocks so that the images line up properly (some ingestion software has the ability to compensate for improperly set clocks).
Part of a good ingestion workflow is applying bulk metadata (introduced in Chapter 3) to the images at the earliest possible moment. Most ingestion utilities will offer the capability to create and apply metadata to the images during the download process. Here’s how I suggest approaching this step.
At minimum, you should tag all images with information about the photographer and some basic boilerplate about the ownership and license of the images. Additionally, you should apply any information that pertains to the group of images as a whole. If you’ve got multiple shoots on one card, you might want to tag them with photographer information only, or you might want to split the images into two downloads and create a custom metadata template for each download. If you do split the download, make sure not to skip any images.
Listed below are the “building blocks” I use to create metadata templates (Figure 7-6). I start by making a basic template with the most universal information, and then add other information as I need it. If I think I’ll need to apply this information again, I will save it as a template. If that’s unlikely, I’ll just apply it to the current download and I won’t save the set.
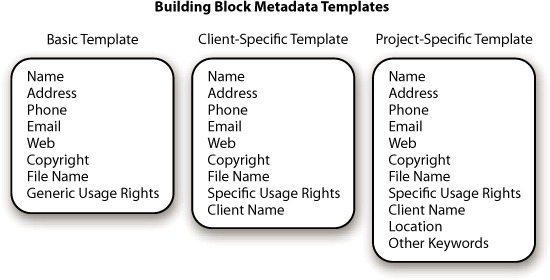
Figure 7-6. You can add to a building block template when you want to save larger groups of information for future use.
This is the building block template in your software, including name, address, phone, email, web, copyright, generic usage rights, and file name. In addition to the photographer and copyright information, I like to save the file name of the image into the IPTC Title field so that I have a record of the original file name that stays with the image even if the actual file name changes.
This template adds information including specific usage and client name. This is useful if you have repeat business with the same client and only want to type in the client’s name and agreement terms once.
This template adds information including location, keywords, and (maybe) headline and caption. It is useful when you have a particular subject matter that you will return to. I make this kind of template for work projects that may be shot over several days, as well as for recurring personal work, such as images shot in my house (Figure 7-7).
If you are shooting raw, you will probably find it advantageous to have Bridge, Lightroom, or other PIEware automatically apply some image settings as part of the ingestion process. For instance, when I ingest images in Adobe software, I like to add a bit of clarity, vibrance, sharpening, and autoshadows. By setting this up to happen on the way into the software, I save the program the extra effort (and processing time) of having to render the files twice. If you know you are going to use the images in black and white, setting the ingestion software to apply grayscale settings saves you a step.
Note
While it would be somewhat more secure to copy through both backups to get to the primary, I’m comfortable with doing it only once. The copy of the files on the first backup is my virgin download. It has been renamed, which is an extremely safe operation, and it has metadata attached in the form of a sidecar file that sits in the folder with the raw file. This “failsafe” backup of my download stays on the ingestion drive until I need to erase it to make room for more files. That is usually long after I have sent the DNG to the permanent archive. Many other people, including the technical editor of this book, like to keep copies of the virgin downloads as long-term backups.
Of course, backup is probably the most essential part of the ingestion process. As discussed in Chapter 6, you will want to make at least one backup, preferably two, and make a visual inspection of the images before erasing the images from the card.
You may think that the backup should happen before all the other work we’ve outlined so far, but I think it should happen afterward. Your backups need to have the same names as the primary version of the files, otherwise it may be nearly impossible to sort them out in the event of a drive failure. You should also preserve all the other work you have done in creating metadata and image settings.
In the previous chapter, we talked about backup options for the ingestion stage, and I recommended downloading files to the backup drive first, then copying them to the primary so that you can validate the integrity of both copies of the files with a single visual inspection. Most download utilities will offer the option to create at least one backup, although most of them copy to the primary location first and then to the backup. Alternatively, you could download to a mirrored device like a RAID 1. Or you could download to the primary location and use a file-synchronizing program to create the backup(s), preferably through a validated transfer.
On location, my preference is to download to the backup drive (Figure 7-8), then copy to the primary for inspection. I also make an immediate second backup to an additional drive.
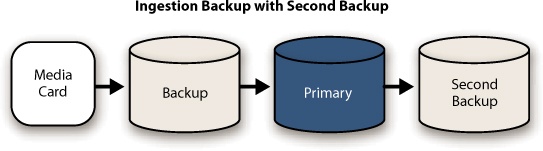
Figure 7-8. This is the process I use when in the field. On my Mac, each drive is in a separate enclosure. On the Lenovo, one of the backup drives is an internal drive.
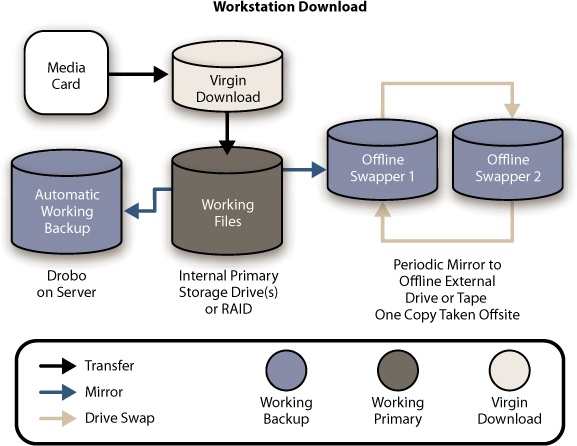
When I’m in the studio, it’s a slightly different story (Figure 7-9). I have access to larger drives there and I’m much less likely to need to erase cards right away.
I download a virgin copy of the images to a backup drive that lives in the workstation.
Images are copied to the working files folder on the primary drive.
Image files are copied to the offline swapper drive, and it is unplugged.
Images are visually inspected before being erased from the media card.
Are the end of the day, all working files are backed up to the Drobo on the network.
Files can be deleted from the Virgin Download folder as space is needed (or you could archive
You can convert to DNG when downloading the files (Figure 7-10), depending on which software you are using. On balance, this promises to be the most secure way to handle images because the data validation hash inside the DNG file will let you know if any corruption has befallen the file in subsequent handling. However, you will need to perform at least one visual inspection of the files. The hash will only tell you that the source image data has not changed since the DNG was first made; it does not tell you anything about the integrity of the first DNG you make.

Figure 7-10. Here’s a diagram of a great way to handle the download for DNG users. The first backup of the proprietary raw goes in the virgin download folder, and then a DNG conversion lands in the primary folder. A visual inspection confirms the integrity of both the virgin and primary copies. Since the second backup has the DNG hash code, it can be validated automatically by the Adobe DNG Converter or ImageVerifier.
If you are a Lightroom user with a DNG-based collection, it makes sense to create the DNG right away. Lightroom gives you control over when you update DNG previews, so it’s much easier to tell the program to update when, and only when, you want it to. If you are a Bridge/ACR user, this is less certain. When you adjust a DNG in Bridge, it can either update the embedded preview to reflect the new settings (which is time-consuming), or it can leave the preview alone (which means there will be a mismatch between the current settings and the embedded preview). The Bridge user may have a better workflow experience by waiting to convert to DNG until the end of the adjustment process, as the images are being prepared for archiving.
Now that you have renamed the images, tagged them with informational metadata and rendering instructions, and backed them up, it’s time to take a look at them. If you’re using a program like Lightroom or Bridge to do the download, this is a seamless process. If you use a standalone download utility, you’ll need to choose a program that you can use to look at the images. In order to get a visual confirmation of the images’ integrity, you will want to use a program that renders raw files, rather than one that shows the embedded preview like Photomechanic does.
I currently use Adobe software to adjust my images, so at this point in the workflow I send them to either Bridge or Lightroom with ImageIngesterPro, as we will see later in the chapter. If I’m in a hurry to get a visual confirmation of data integrity, I’ll have ImageIngesterPro send the images to Bridge, since it can launch Bridge, and build the cache directly from the ImageIngesterPro interface. If I am in less of a hurry and I’m going to be working with the images in Lightroom, I’ll send them there.
If you want to have full confidence in the integrity of the images, you will need to do a visual inspection, checking to make sure that every image looks right. It’s particularly important to do this inspection prior to erasing the card. More than once, I’ve seen a problem in transferring the images from the media card. If you catch this problem before you reformat and reuse the card, you can often fully recover the images using a different computer, reader, or some kind of recovery software.
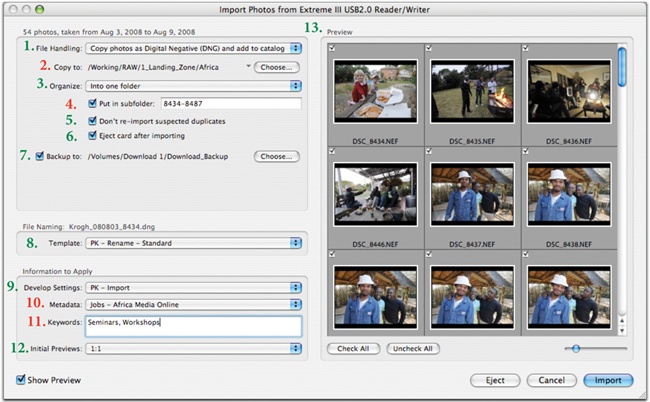
Let’s take a look at the ingestion options using Lightroom (these instructions are based on Lightroom 2). While Lightroom does not offer every feature outlined above, it does provide a solid platform for ingestion. Here are the options available in the Lightroom import dialog box (shown in Figure 7-11):
File handling (1). The file-handling options for a card import are limited to conversion to DNG or leaving the files as proprietary raw (or JPEG). If you’re a Lightroom user, unless you are pressed for time, you might as well convert to DNG during the import process. Note that the backup files will be kept in the original proprietary raw format.
Copy to (2). This setting tells Lightroom where to put the files. I suggest images go to the raw files pipeline I outlined earlier in this chapter.
Organize (3). This setting lets you choose a subfolder organization for your downloads. I suggest building a folder for each shoot. If you’d like to use date folders to organize your images instead, this is a good place to make them. While I don’t see it as necessary, since you have date information in metadata, there’s nothing wrong with the practice.
Subfolder (4). You can create a subfolder for this particular shoot. I create a number range subfolder here with the starting and ending image numbers on the media card. If there is only one download from the shoot, no number range folder is necessary.
Don’t re-import (5). If you have forgotten to reformat your card and kept shooting, this command will keep Lightroom from importing the older files again.
Eject card (6). This checkbox, which ejects the card after download, is a key feature, particularly for Mac users. Cards can become corrupted if you remove them from the computer before the file system has “put them away.” If you have the program eject the card once the download is finished, you’ll greatly reduce the risk of this.
Backup to (7). Lightroom can copy the files to a second location. These will be in the original raw format, even if the primary copy has been converted to DNG. They will be put in a folder showing the date of import, regardless of the folder structure you have chosen for the primary copy.
Rename (8). You have flexibility here for renaming options, although it might require some manual text entry, depending on what you want to do. Figure 7-12 shows the two naming schemes I recommend. One picks up file name numbers, and the other is autonumbered.
Develop preset (9). I like to add some punch to the images on download. I’ve created a preset in the Develop module that has extra vibrance, sharpening, and clarity. I have called it “PK - Import.” You can apply your presets here.
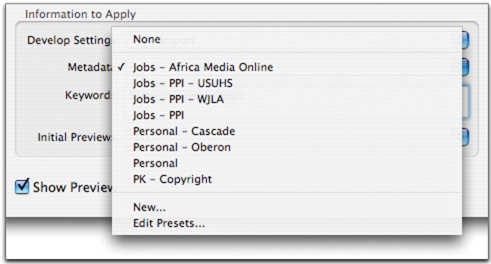
Metadata (10). The metadata template in Lightroom can hold all of the IPTC fields. You can see back in Figure 7-7 how I organize the metadata templates so that it’s easy to find the one I want at a particular time.
Additional keywords (11). While the metadata template can contain keywords, you may want to add a few additional ones to the images on download. You can enter them in this field.
Initial previews (12). This setting controls how the previews will be built as the images are imported. If you have time, creating one-to-one previews here makes rating your photos go much faster. If you’re in a real hurry, you can create minimal previews and get the images into the Lightroom library as fast as possible.
Show preview (13). The Preview window lets you choose which image to download and import into the catalog. While you can do a bit of editing here, I suggest that you bring the entire group of images in from the card and do your editing in the Lightroom environment.

While Lightroom 2 does a reasonable job of ingestion, there are some holes in the workflow that I would like to see filled. As it happens, ImageIngesterPro fills these gaps. Here are the rough spots:
The Lightroom download utility does not handle movie files from the camera, though it will alert you that these files have not been downloaded. This means that you will need to remount the card, find the movies, and manually transfer them. Ugh.
Lightroom only offers the capability to back the files up to one other location. Of course, you can use a file sync to create a second backup after download if you wish.
No metadata is attached to either the primary or backup files on download. I like to keep this bulk metadata attached to the files, embedded in a DNG or in a sidecar for proprietary raw. If you have to restore from the backup, you won’t have captured any of the metadata you applied on ingestion unless you have a copy of the catalog. To protect this data, you can export a catalog of the images to the backup drive without previews, as shown in Figure 7-13.
You can’t automate folder creation. I’ve gotten used to being able to automate the creation of my number range folders with ImageIngesterPro.
Folder structure is not the same in primary and backups unless you use the same date structure for folders that Lightroom does. This can make recovery from backups particularly painful.
Lightroom does not offer a way to permanently write the file name into a metadata field on download.
The images are downloaded to the primary and the backup locations simultaneously. This means that visual confirmation of the primary does not mean validation of the backup.
Backing up the metadata from a Lightroom ingestion is best done by dropping a copy of the catalog into the project backup folder with the images from the shoot. If you have not already made a second backup of the image files themselves, you can export both catalog and images from the File > Export Catalog menu. This will copy the images and all the metadata into one place. You will need to enable the “Export negative files” feature (Figure 7-13) if you want the original images to come along.
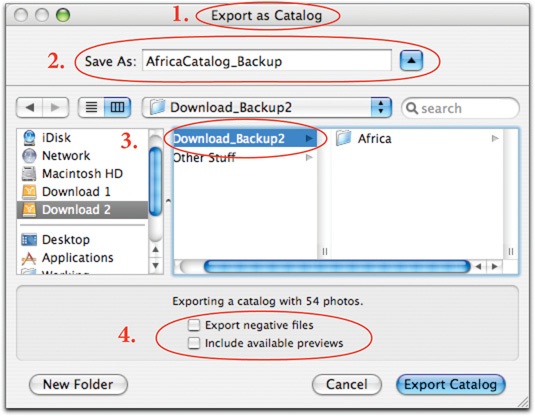
Figure 7-13. The steps for backing up a catalog. Choose Export Catalog from the File menu, which brings up this dialog box (1). Save the catalog as <Project-Name>_backup (2) in the folder that holds the backup version of the raw or DNG files (3). If the image files have already been copied to this backup disk, make sure not to include the negatives (4).
If you have already copied the image files to another drive and you only want to add the catalog information, you can export the catalog to the backup folder with the images and make sure not to include the negatives.
Once we get everything set up in the download interface, the rest is a pretty simple process. Here are the steps to follow when using Lightroom 2, based on my workflow recommendations:
Connect the card and backup drive.
Configure the Import dialog box for the current photos.
Prepare the folders.
Set Metadata and Develop Presets.
Import and build previews.
Inspect images for signs of corruption.
Mirror primary images to second backup (optional).
Export Catalog to backup drive (optional).
Disconnect backups.
You are free to erase the media card.
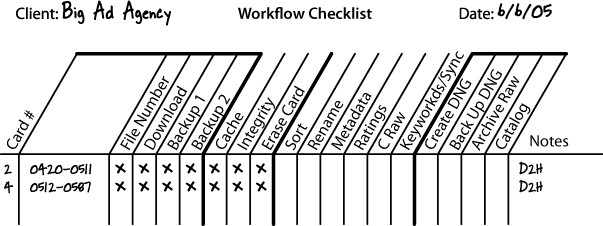
If you have a lot of cards to keep track of, it can be helpful to keep a written record of your downloads. Most photographers I know have had the experience of wondering if they have downloaded everything, and then frantically swapping cards around to double-check. This may be even more important if you are using an assistant to do the downloads for you. A download checklist can help you identify a card that has an intermittent problem, or any other error you want to diagnose.
Prior to using ImageIngesterPro, I made a habit of using a download checklist that kept information about all the ingestions that I performed as part of my professional work. Figure 7-14 shows a reproduction of that list.
Shortly after the release of the previous edition of this book, I heard from a programmer, Marc Rochkind, who was working on a program to automate the ingestion procedure I outlined in the book. ImageIngester was born, and it has been under continuous development for the last several years, using the principles outlined in the first book as a guide. In the intervening years, I have gotten to know Marc, and we have collaborated on many improvements in the software, as well as in the functions of ImageVerifier, another of his creations. If you Google Marc, you’ll see that he really knows his stuff.
While I have no economic interest in ImageIngester, I have found it to be a reliable and essential tool for my own downloads. Marc goes to great lengths to ensure that the program will save you time and will never contribute to the loss of your images. In fact, the program does everything I outline at the front of this chapter and more. We’ll take a look at ImageIngester as the current best-of-breed software for ingestion. I expect we’ll see a lot of these functions in other software as time goes by.
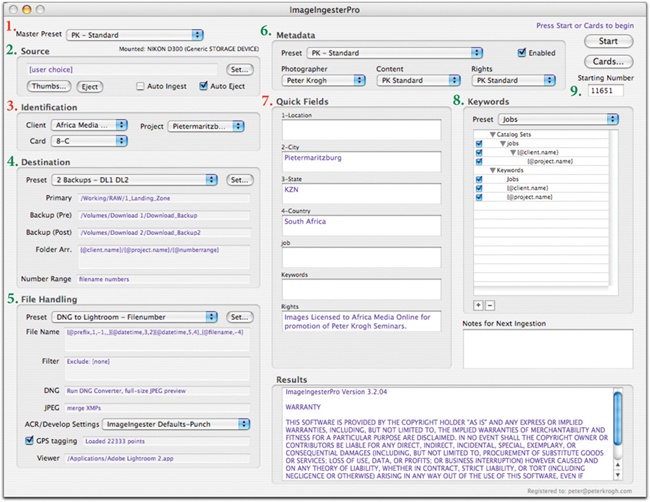
Figure 7-15 shows the ImageIngesterPro interface. The software’s options are split into groups, which are detailed in the following sections. Each of the categories has its own presets so that you can set up flexible workflows for differing circumstances. Destinations, file handling, and metadata instructions can be saved for mixing and matching.
Master preset (1). The Master Preset option allows you to select a saved collection of all the other category presets. You can create master presets if you have configurations you like to use repeatedly. For instance, if you have a repeat client, you may want to save your Identification and Metadata settings for that client, and then make a master preset that includes those category presets. A master preset includes all of the current category presets (basically, everything that is in a drop-down menu).
Source (2). The Source options control where the images are downloaded from. If you insert a card, ImageIngesterPro will assume that’s the source you want. You can use the Thumbs button to preview the files and choose which ones you want to download. Enable Auto Eject so that the card is dismounted after download. If you know you want to use exactly the same settings for a group of cards that you will download over time, you can enable Auto Ingest. I find that I generally want to make at least some kind of change between downloads, so I don’t use this option.
Identification (3). You can enter a client name and a project name here and have the program make download folders with those names. You can use these entries to generate keywords and catalog sets in the Keywords section (8). You can also note which cards you downloaded from, which can help in case you need to track down a card with an intermittent problem (you can find this information in the database, described later).
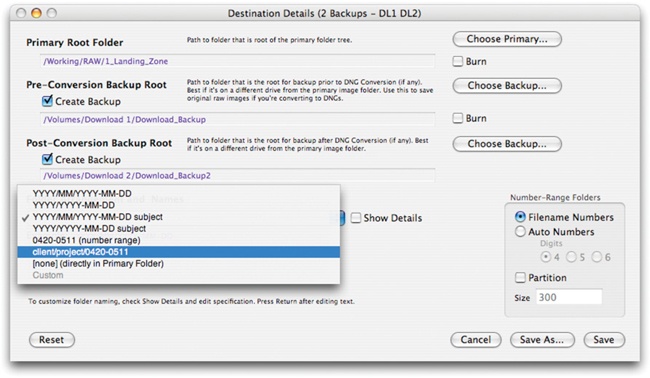
Destination (4). Here, you can tell the program which location to use for the primary and for up to two backups. The Pre backup is always downloaded as proprietary raw, while the Post backup will be a DNG if you choose to convert to DNG on import. Clicking the Set button brings up the dialog box shown in Figure 7-16, where you can target drives and folders for download.
There are a number of built-in folder configurations, shown in the drop-down menu in Figure 7-16. You also can use macros to create custom folder arrangements. I typically use a
client/project/number rangeformat. If you are creating number range folders, you can choose which number you want to use on the folder—the file name number or the autonumber. If you do things in different ways, say, on location and in the studio, you can create a preset for each.You can also have ImageIngesterPro burn CDs or DVDs of your downloads if you want extra security. To do this, enable the Burn option next to the appropriate download in Destination Details. The software will automatically split the images among multiple DVDs if the collection is larger than a single disk will hold.
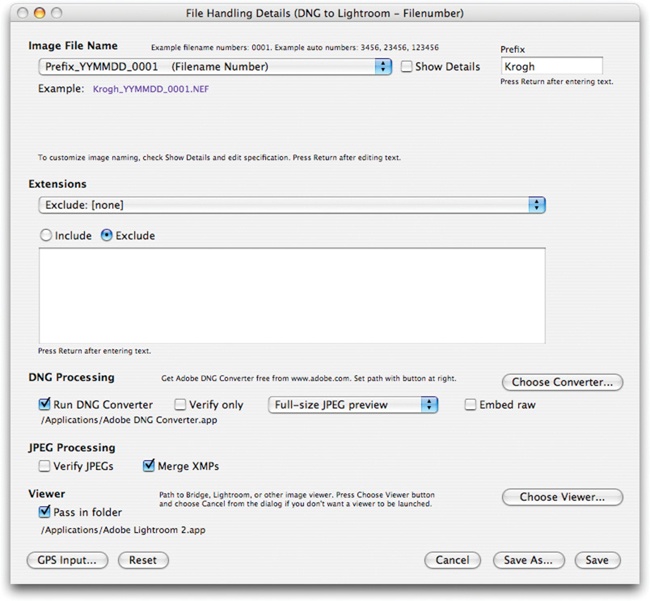
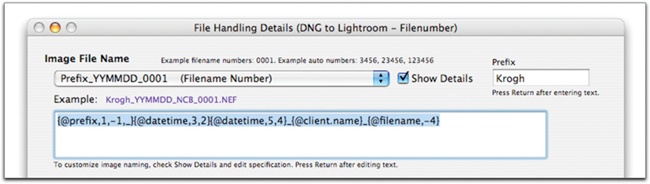
File handling (5). There is lots of power here, as shown in Figure 7-17. You can choose a file-naming protocol, file types to exclude from download, whether to convert to DNG or to use the DNG converter for validation only, how to handle JPEGs, how to set up GPS tagging, and which viewer to send the images to. As with the other groups, you can make different presets for different ways you might want to handle images.
Figure 7-17. In the File Handling Details dialog box, you can set a file-naming protocol, which file types to skip, DNG or JPEG handling, which viewer to use, and GPS merging.
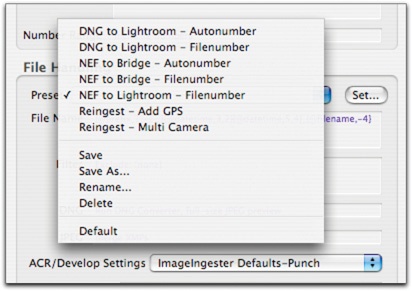
I have one preset, for example, that uses autonumbers for multicamera shoots, and another one for downloads where I keep the original file name numbers (Figure 7-18). I have presets to send NEF files to Bridge for fast turnaround, and ones that send DNG files to Lightroom for a more thorough workflow. Figure 7-19 shows my naming protocol for these presets.
Figure 7-18. You can rename using all kinds of parameters. In this example, the client name (NCB) is automatically placed in the file name by insertion of a macro in the file naming instructions.
You can set a develop preset (from either Bridge or Lightroom) in the main window (shown earlier in Figure 7-15). ImageIngesterPro will read the presets from the folder that Adobe puts them in for these applications.
Figure 7-19. My naming protocol for my presets helps me to keep them straight. NEF refers to the proprietary raw NEF files produced by Nikons.
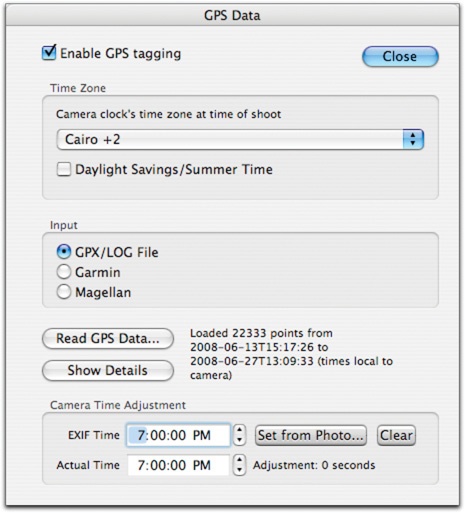
If you’ve carried a GPS unit with you and set it to save a tracklog, Image-IngesterPro can assign GPS coordinates to your photos on download. At the bottom of the File Handling dialog box is a GPS Input button that brings up the dialog box shown in Figure 7-20. In order to make the data line up correctly, you need to know which timezone the camera was set to when you shot the pictures, since GPS tracklogs are always saved in the UTC timezone (see Chapter 3). You then select the type of tracklog you will use, and the tracklog itself.
If your camera’s clock is different from your GPS by minutes or seconds, you can compensate for this with the Capture Time adjust feature. The easiest way to use this is to shoot a picture of the GPS unit screen with the clock showing. Further instructions are in the manual for ImageIngesterPro.
If you want to set up ImageIngesterPro to work with a GPS unit, I suggest that you run a few test downloads with only a few pictures until you get all the settings working properly.
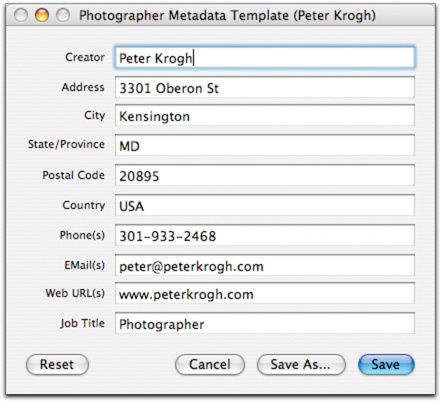
Metadata presets (6). In the Metadata panel, you can enter and save information for particular photographers, usage rights arrangements, and image content. These are the same IPTC fields we find in Bridge, Lightroom, Expression Media, etc. These metadata templates can be saved, in turn, as presets. Let’s look at the information you can enter here.
The Photographer template (Figure 7-21) is for the photographer-specific information. You can set this up for any photographer who might use this computer for downloading, and save it as a preset for just this part of the metadata.
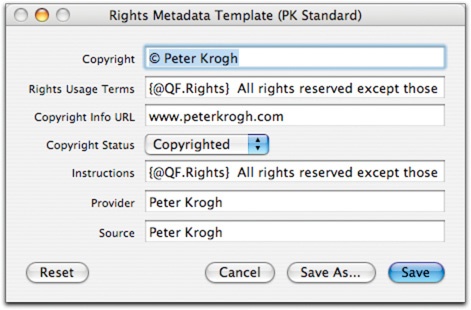
The Rights template lets you enter and save specific usage rights terms (Figure 7-22). You’ll notice some funny looking text in both the Rights Usage Terms and Instructions fields. The string {@QF.Rights} is an instruction to make a quick field in the main window and to insert whatever is typed there into the field during download.
Figure 7-22. The Rights template. Notice the instructions to make a quick field, which is noted by the syntax {@QF.}.
I’ve set mine up here so that all images are tagged with some generic usage rights metadata indicating that the images are protected by copyright (“All rights reserved except those specifically granted herein. Contact Peter Krogh at ... to inquire about any reproduction of this image”). When I do an assignment, I can type in the usage rights that I’ve negotiated for those particular images in the Rights quick field (Figure 7-15), and it will be inserted at the start of the Rights Usage Terms field. When there is no other rights information to enter at the time of download, the generic copy can stand by itself; when there is an agreement, it also works well. If you have a rights agreement with a particular client that you use on an ongoing basis, you can save it as a preset.
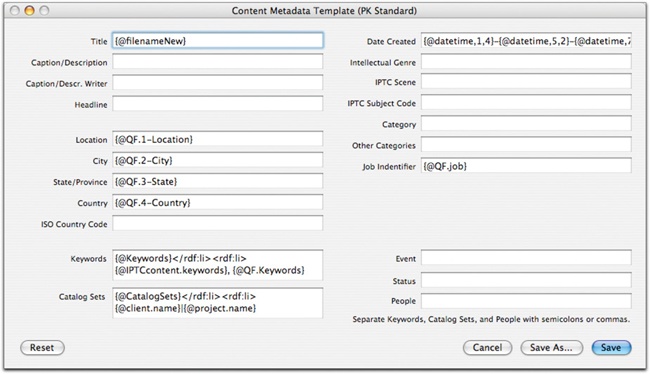
In the Content template (Figure 7-23), I make a lot of use of macros. I use some of them to create quick fields, and some to do automatic data entry. The macro {@filenameNew} puts the file name in the Title field so that if someone changes the file name, I can still find the original. I also drop the date the image was created into the IPTC Date Created field. The rest of the macros refer to the main window—the Quick Fields panel and the Keywords panel.
If you have a subject you return to repeatedly, you can also make a content preset specifically for that. For instance, I have prepared one just for images shot at my house. In that case, I don’t use the quick fields for location—I’ve typed the address in the location fields. I’ve also saved a few specific keywords for this subject matter.
Quick fields (7). Quick fields are intended for information that changes from download to download. For my standard settings, I show the location, job, keyword, and usage rights fields. This is the most common information for me to customize for individual shoots. By having the quick fields readily accessible, it’s easy to put the appropriate information in as I download.
Note that whatever you type in to the quick field will be persistent, but will not be saved as part of the master preset. This means that the text will stay there until it’s changed, but you’ll need to retype it if you have replaced the data at some point. If you have recurring information that you don’t want to keep retyping, save it as a custom preset.
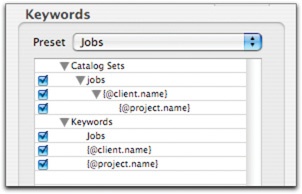
Keywords (8). The keywords panel also lets you save presets for both keywords and Expression Media catalog sets. As you can see in Figure 7-24, I use a mixture of words and macros here. In particular, I use the macros to put the client name and project name in keywords and catalog sets. The indentations in the catalog sets indicate that the sets will be nested hierarchically. At the moment, ImageIngesterPro does not support hierarchical keywords, but it’s possible that will change in a future version. Make keyword presets as you need to, and save ones that you will need to use again in the future.
Sequence number (9). The Starting Number shown in the Sequence Number window is the number that will be applied to the file name if you have chosen Auto Number in the naming preset. By default, it just keeps counting up. If you would like to set a particular starting number for your shoot, just type it in here before the ingestion.
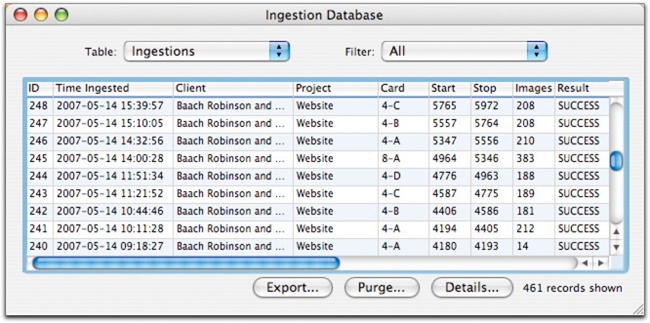
One of the most reassuring and useful features of ImageIngesterPro is the database of ingestions (Figure 7-25), which you can find in the Tools menu under Database. The program saves a record of each download in case you want to double-check the work you or your assistant has done. Not only does it keep a record of the time, client, project, card, starting and ending images and result, but the Details tab will show you where the images were downloaded and backed up, how they were named, which metadata template was used, and more. There have been a number of occasions when I have found it very useful to refer to this database as I moved images around between several computers.
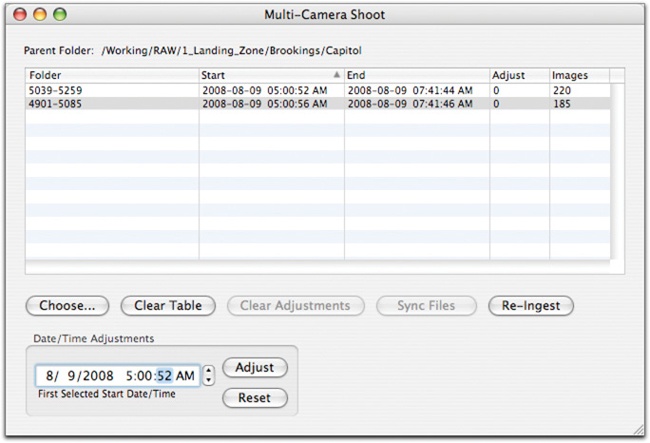
If you are shooting with several cameras and want to sequence the images chronologically at the end of the shoot, you can use the multicamera feature. You first need to download all images from the shoot, since they can’t be put in order until all of them are present. Once you have downloaded all files, open Multi-Camera from the Tools menu and select all the folders from the shoot (Figure 7-26). If you need to adjust a clock on a particular camera, you can do it here. Reingest all the images into the primary folder. Note that this will pick up whatever naming settings you currently have. Since you’ll want to generate new file name numbers, make sure to enable autonumbering in File Handling. You may also want to set the Partition option in the Destination Details dialog box to 300 or so if you want to keep too many images from going into one giant folder.
Of course, you can also do this renaming later in other programs. Some people like to throw out poor quality images before renaming in sequence.
As with most software, it can take a little time to get everything configured the way you want, but once it’s done, things can go very smoothly. I suggest that you download ImageIngesterPro and work through each of the preset groups to configure the software. Once you think you’ve got it right, shoot a handful of images to a media card and run a trial download.
Make sure your primary and backup copies of the images end up in the expected folders.
Check the metadata to make sure that it looks correct and that no macros have been mistyped.
Check in iView or Expression Media, if you use those programs, to see that catalog sets have been built as expected.
If anything is not set properly, work through the settings again until you’ve got it right.
Save the settings as your defaults.
Reference
We’ve taken a look at two methods for ingestion—one that is part of an all-in-one solution, and one that is done by a dedicated downloading program. Your choice of software will be determined by your needs, budget, and ability to figure out how to make it work. I suggest that professional users should strongly consider the use of dedicated software, at least as the options stand at the time of this writing. Other considerations for downloading software include other catalog programs, like Expression Media, Aperture, idImager, iMatch, etc. and dedicated utilities, including PhotoMechanic and Downloader Pro. If you’d like information about other options, check out www.theDAMbook.com.
Once you get everything configured properly, downloading becomes an automatic and painless part of the digital photography workflow. For a typical ingestion, use the following steps:
Make sure that the appropriate backup drives are connected to the computer.
Insert the media card and open ImageIngesterPro.
Select the proper master preset for the work you want to do.
Click the Thumbs button to load thumbnails. Inspect the images to make sure that they all belong to a single shoot or group. Select for download.
Set the client and project appropriately.
If GPS tagging, find the tracklog (I download these from my GPS unit to a GPS folder in my working files folder).
If you want to use a special develop preset, select it in the File Handling area.
Select a metadata preset, if needed. Set location, any needed usage rights, and any needed keywords in the quick fields.
Download.
Inspect.
Disconnect drives.
Format card.
Once we have brought the images in and carried out the above procedures, the files are now working files, ready for rating, adjusting, and some additional grouping. We’ll cover that workflow in the coming chapters.