
One of the challenges of digital archiving is the need to periodically migrate your work from one storage medium, file format, metadata field, or software application to another. This process will be absolutely essential to the long-term survival of your photographs.
In this chapter, I will present some workflow tips that can help you successfully navigate these transitions. We’ll start this chapter by looking at how you can perform different types of migrations. Then we’ll see how the parts can fit together, looking at a comprehensive migration from a disorganized collection into an organized, manageable one.
Data Migration Principles
Migrating from One Drive to Another
Migrating from One Metadata Field to Another
Migrating File Names
Converting Legacy Camera Originals to DNG
Deduping
Migrating Disorganized Digital Files to an Organized Archive Structure
Migrating from Film to Digital
Let’s spend a little time establishing some general workflow principles for file migration. As everyone’s situation will be a little different, you may have to customize your procedures; however, these general guidelines should still apply:
Get comfortable with your new system. It doesn’t make sense to start the process until you know exactly what you are migrating to.
Create a comprehensive plan. Think about what you are doing (the totality of the task ahead), and break it into manageable chunks. Make sure you have all your materials at hand.
Track your progress. Make catalog snapshots along the way. Saving a catalog of the material at different steps of the migration process can be very helpful. This will let you reconstruct what you have done if you make any mistakes or omissions.
Freshen up your backups before migration.
Start the process with enough storage space at hand.
Keep a legacy system for a while. Don’t immediately erase the old configuration until you are sure that everything has gone as planned.
Make sure to back up the new configuration.
Let’s take a closer look at each of these principles.
Warning
While you might delay comprehensive migration until you know the tools better, don’t delay the backup process, if you have images with insufficient backups.
Don’t worry too much about integrating your legacy images until you have settled on a comprehensive DAM system for your new work and gotten very comfortable with it. If you work all the kinks out of your new workflow before you try to migrate over all your older files, you’re more likely to only have to do this work once, and do it efficiently.
The hardest jobs in the DAM universe are ones involving migration. Sorting out a disorganized and duplicated collection can be a brain-busting process as you look over old work and wonder, “What was I thinking when I did this?” Don’t make the hardest thing you do with DAM software also be the first thing you try to do with it.
Depending on the kind of migration you’re trying to do, this may be best accomplished by putting new hardware into service and leaving the legacy system as-is until you’re ready to migrate it. Migrating computer and OS, for instance, is often best accomplished by running systems side by side for a period of weeks before trying to make the final switch.
Any time you’re going to do a wholesale change to a bunch of data, it’s important to map out the entire process from start to finish. Some changes will be easy enough to implement without a written plan—copying location names from the keywords field to the IPTC Location Fields, for instance, is a self-evident process. Consolidating two dozen small and semiduplicated drives onto new storage, however, may need some charting out. Don’t be afraid to put pencil to paper; sometimes that is the only way to do it reliably, even in the computer age.
Part of developing a comprehensive plan includes deciding which files you need to migrate, and when. Some of the migration tasks that you will be faced with will involve large numbers of files at once. These tasks include storage and OS migration—the type of tasks that affect the entire archive. Other migration tasks will best be done a little at a time. For example, it may only make sense for you to add film images to your digital archive when you actually have a use for those particular images, rather than trying to add all of them at once.
Still other tasks may require you to do part of the work comprehensively, and part of it incrementally. For instance, I suggest that you bring all of your legacy digital images into any new directory structure at one time. This will reduce the probability of duplication and will encourage thoroughness. However, you may prefer to do the work sorting these files for duplicates, or entering metadata into the files, on an as-needed basis.
One of the most useful tools that cataloging software offers for collection-wide work such as file migration is the ability to create “snapshots” of your collection as you proceed. If you save versioned catalogs at each critical step in the migration process, you will know exactly what you did during the process, and when.
Because the catalog shows where files are, how many images are included, and what metadata is associated with them, you can reconstruct your steps and make sure that everything worked as expected. For instance, you might suspect that you have lost a bunch of files. By looking through the saved catalogs, you can see if there was a problem, where it occurred, and thus have a better chance of correcting your mistakes. If you don’t save versions along the way, you will only know where you ended up.
At some point in the migration process, there is a change as the primary version of your files moves from one “place” to another. As you perform any migration, make sure it’s clear to you when the “primary” designation changes. If you are consolidating multiple drives onto new storage, for instance, you should consider the primary copy to be the new copy, as long as there was a validated transfer.
Once you’ve moved your material, make sure you don’t add to the older version. Doing this adds to uncertainty and increases the possibility of data loss.
Whenever you are doing a migration, there should be some level of validation, and it should be an integral part of the process. When copying files to new media, the validation should be managed by a transfer utility. If you are migrating metadata from one field to another, you’ll want to validate by doing a comparison of the two fields—for instance, confirming that, “I had 21,729 files with the keyword Boston, and now I have 21,729 files with the location Boston.” You’ll want to validate as soon as possible. Delay introduces uncertainty.
A migration is one of those tasks where there is often coincidental risk and a chance of cascading errors. You’ll want to make sure your backups are good and fresh. It’s also good to consider validating your backups prior to a migration.
I always make a fresh bootable clone before any major OS upgrade and prior to any other software upgrade that I may even suspect to be complicated. I frequently find that when I’m doing an OS migration, it’s also a convenient time to upgrade the hard drive, and I’ll pull the old hard drive and store it for a month or more while I give the new OS a workout.
One of the most common mistakes is starting a migration without enough storage. This leads to all kind of errors, including accidentally deleting files and deleting old files before the new ones have been fully validated. It’s way too easy to wipe entire drives with a few clicks. Storage is getting really cheap. Buy enough of it.
Whenever you make any major changes to your computer configuration, I suggest you try to keep the legacy system in place for a while. You can then do some real-world testing of the new configuration, while keeping the currently functioning system available in case anything goes wrong.
For instance, when I want to do a major upgrade of my system software or install a new version of a mission-critical application such as Photoshop, I like to keep a fully functioning version of the current configuration at hand as I get the new one set up. That way, if I have any serious problems, I can go back to the known system and get the day’s work done. If you have done the upgrade on your only copy of the system, you have no choice but to work out all the problems before moving forward.
Keeping the parallel structure is also useful if you are transferring images from an old drive to a new, larger one. I suggest that you keep the old drive(s) intact for a while, until you are comfortable that the new storage is functioning correctly.
The end of many migration processes will be the backup of the new system or data. If you are migrating operating systems, you should make a clone of the new OS once you see it works as expected. If you have renamed files, added metadata, or done some other work to your files, make sure you back it up once you validate it.
We talked about validated transfer in previous chapters, but mostly in the context of an open pipeline—a repeating task where a source (the working folder) feeds a destination (the archive) on a continuing basis (Figure 12-1). In addition to this kind of transfer, we will sometimes transfer files from a drive as a one-time operation, possibly just prior to pulling the drive from service. In this case, we have a different workflow.
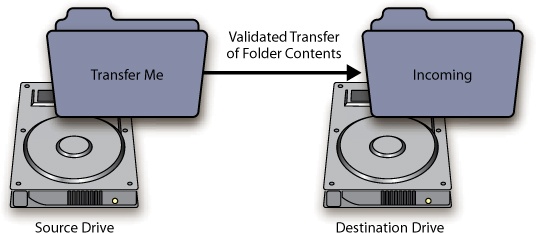
Figure 12-1. If you are setting up a system for repeating transfers, you’ll want to use staging folders on the source and the destination drives. In this case, all folders in the Transfer Me folder are copied to the Incoming folder on the destination.
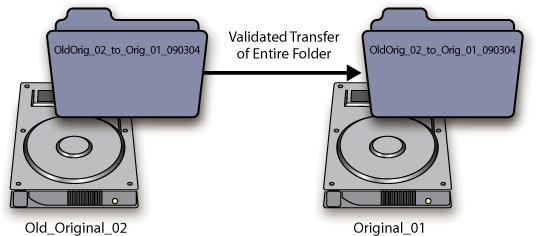
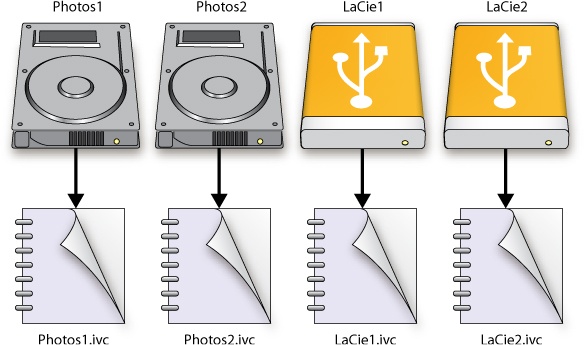
Sometimes you need to get data off the drive because you’re taking the drive out of service or repurposing it somehow. Let’s say that we’ll be moving files from the older Original_02 drive over to new, larger primary storage. I suggest that you gather all the files you want to transfer into a single transfer folder, and name it for the source, destination, and transfer date, such as OldOrig_02_to_Orig_01_090304. This simple technique tells you where the files came from, where they went, and when the transfer happened. There’s nothing worse than powering up a drive sitting on the shelf only to see a bunch of files that you’re not sure if you can delete. It can take hours to sort out what happened to them, and whether you can really erase the drive.
Here are the steps for migrating data from one drive to another:
If you have several drives to migrate, make a checklist naming each.
Gather all the files to be transferred into transfer folders named as in Figure 12-2.
Run a validated transfer. As with all critical transfers, you should use some kind of utility that does bit-for-bit validation. Do additional validation at the destination if there is any reason to suspect a problem with file integrity.
Back up the data in the new home.
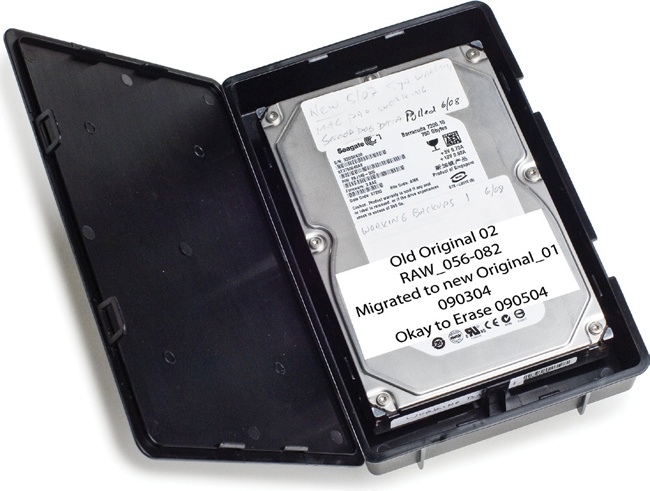
Write the migration history on the old drive itself (Figure 12-3), including the date when it can be erased. Of course, the old drive should not be formatted until the new data is backed up properly, and you’re sure the new storage is functioning properly.
As your archive grows, you’ll likely want to migrate your primary storage to larger drives to save space, electricity, and reduce heat generation. I’ve had to do this about every 18 months since I went fully digital—moving from 60GB drives through four migrations until I reached 1TB drives. One of the advantages of the bucket system is that you don’t need to migrate the backups just because you’ve migrated the primary, and therefore you only need to validate the transfer, not the files themselves (Figure 12-4).
Note
One of the benefits of the bucket system is that it allows you to have a backup media structure that is largely independent of the primary copy.
It allows you to migrate the primary storage to larger drives without having to do anything to the backup storage—a straight mirror system would generally require new backup drives any time you upgraded the primary. Not only would this upgrade be more expensive in terms of drive cost, it would also be more time-intensive to perform. You should always do a reasonable pass at data validation before you migrate both the primary and the main backups at the same time.
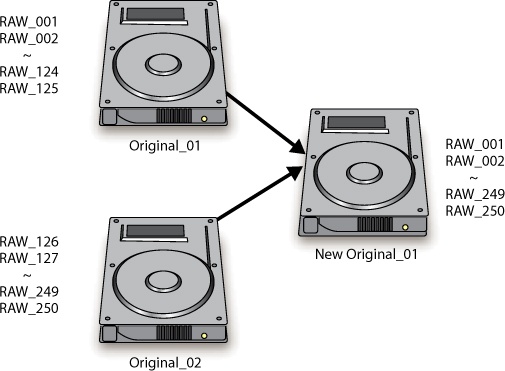
Figure 12-4. Buckets make for easy migration of the primary data to new drives. Buckets can simply be copied by means of validated transfer to the new drive.
Migrating to a bigger bucket size, say from DVD to Blu-ray, is also a straightforward process, as outlined in Chapter 4:
You can combine buckets on a drive by dragging the folders into the new larger bucket size. No validation is needed, since no files are being copied to new devices.
You do not have to reburn the current backup DVDs onto Blu-ray disks, since you can restore the archive from these older DVDs if necessary. If your CDs or DVDs are more than five years old, however, you may want to consider replacing them.
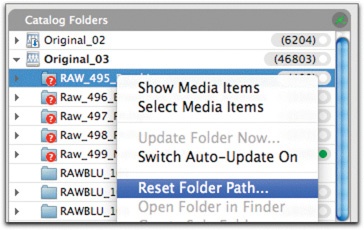
In either case, after transferring the files, you’ll need to tell the catalog where the new ones are (Figure 12-5).
While the bucket system does not require you to upgrade backup drives at the same time the primary is upgraded, you will want to do this eventually. Your collection of backup drives might be made of many drives of smaller capacity, and they will require more overhead to store and validate (Figure 12-6). When you update the backups, there are a few options to consider:
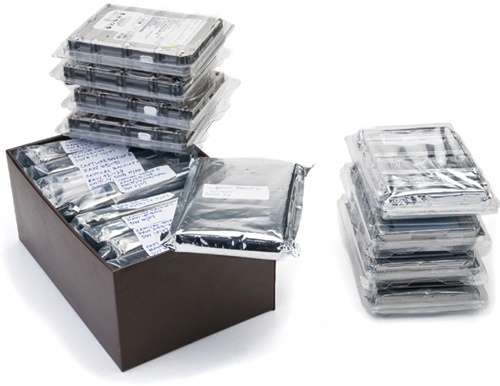
Figure 12-6. Eventually, you’ll want to consolidate backup drives. When I got around to it, I had a collection of 14 drives (left) that were able to fit on 4 1TB drives (right).
Note
The simplest way to validate raw or DNG files is to run them through the Adobe DNG Converter and check for errors. You can catalog and visually inspect TIFF, JPEG, PSD, and other rendered file types with Expression Media. You can use Image-Verifier on both file types, as described in Chapter 6.
The simplest way to migrate backup hard drive storage is to buy a new drive and do a validated transfer as described above. If everything transfers with no errors, take the new drives back offsite, and you’re done.
You may want to make your backup from the most recent version of the files—the ones on primary storage, rather than the oldest version—the ones on the backup drives. If you do this, you should do some kind of validation of the new backup files before you erase the old backups. By pulling the old backups out of service, you lose your protection against damage that may have been done to the primary files without your knowledge.
You may also want to migrate metadata from one field to another. This could be an end in itself: perhaps you’ve written all your location information to keywords, and now you want this data to be in the IPTC location fields (Figure 12-7). Or you might need to migrate metadata as part of a larger process—maybe you’ve used collections in Lightroom to organize your photos, and now you want to move to a different catalog program, and that information can’t travel with the files to the new program.
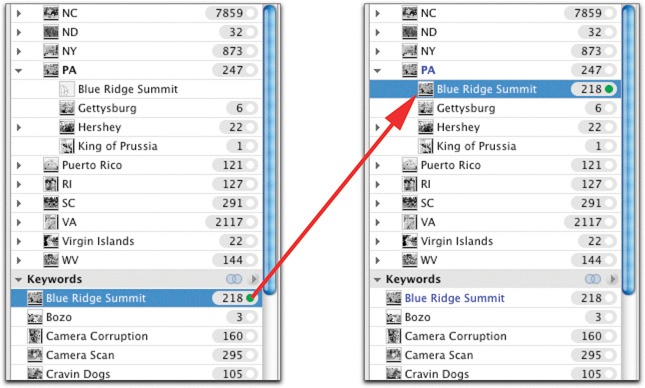
Figure 12-7. If you want to take information that is in one field and put it in another, you can select all images with a tag and add the second tag to them. This is a quick and easy drag-and-drop in Expression Media.
Reference
John Beardsworth has created some scripts that can translate catalog sets in Expression Media to Lightroom Hierarchical Keywords and back. For more information on scripts, and to ask specific scripting questions, visit the forum at www.theDAMbook.com.
You can select all images that share a tag—say all images in a Lightroom collection—and create a keyword named for the collection. Add the keyword to all images in that collection, and you’ve copied the data into the new field. This can be labor-intensive if you have a lot of tags to copy, but might not be as bad as you’d think.
One of the great capabilities of Expression Media and Bridge is the use of scripts to transfer metadata tags. For example, if you’ve used folder names to organize your photos and now want to move to keywords as a principal tool, you can use one of the scripts that come with Expression Media to do this automatically (Figure 12-8). Bridge has an even more robust scripting environment that can make use of all kinds of metadata, including XMP that is native to other programs.
If you have a collection of images that are named in a disorganized manner, you might want to go back and rename the files. This is particularly important if you have not used unique names for your files. Duplicate names in a collection lead to confusion, and likely data loss at some time in the future. Keep in mind that renaming files can also lead to confusion—you’ll want to make sure that renaming is worth it.
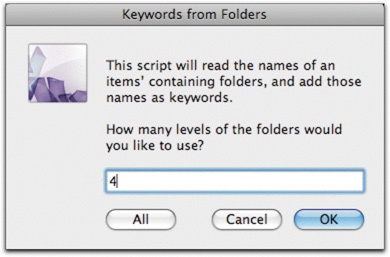
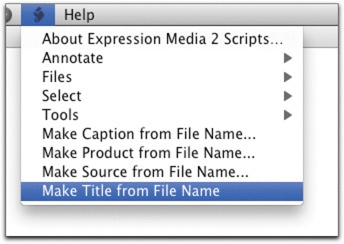
If you are going to rename older files, particularly ones that have been delivered previously, or in cases where other people will expect to find the files by their old names, you’ll want to make sure that you still have access to the old name. You can run a script to put the old name into a searchable metadata field. One comes with Expression Media (Figure 12-9), and there is a Bridge script available on www.theDAMbook.com to do this.
Many readers of this book will have archives that are made up primarily of proprietary raw files, along with rendered file types like TIFF, JPEG, and PSD. As the tools of parametric image editing evolve, an increasing number of users will want to move to DNG as the storage format of choice because of its capabilities in a parametric editing environment. If you’ve got an existing archive of proprietary raw files, you may wish to convert the whole group to DNG at some point.
You’ll want to do a little prep work before converting legacy proprietary raw to DNG. If you’ve done some organizational work with the files in catalog software, you’ll want to make sure to sync annotations to the files before conversion so that the data is written to the new DNG. If you’ve created the metadata in Expression Media, you’ll want to do a test conversion with a few files to make sure the metadata comes through.
Not all raw files support all metadata fields, so you may need to do some metadata translation before the conversion. For instance, if ratings are not written to the raw file, you might want to assign a keyword to the file to indicate the rating. You could assign the keyword 1Star to images with a one-star rating. After conversion, you can select all images with the keyword 1Star and assign the one-star rating to the DNG file.
If all your proprietary raw files are in a directory structure that does not have too many other file types commingled, the easiest way to do the conversion is probably with the free DNG Converter from Adobe. As we saw in the Chapter 10, you can submit an entire directory of images to the software, and it will make a new duplicate directory filled with DNG files. If you’ve been working on the raw files with catalog software, make sure to push all metadata back into the files before conversion.
The DNG converter can be problematic, however, if you have nonraw files in the directory structure (Figure 12-10). JPEGs, nonraw TIFFs, PSDs, movie files, and any nonphoto files will simply be left behind with no warning (except for the TIFF files). If all your nonraw files are confined to a few folders, that may not be difficult to address, but if you have thousands of files scattered in dozens of subfolders, it could be easy to leave some behind.
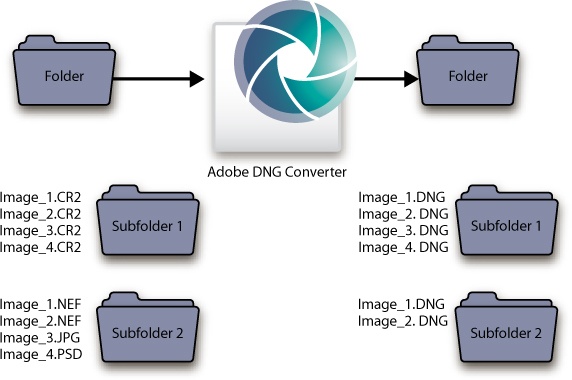
Figure 12-10. You can use the Adobe DNG Converter to create a new directory structure where all raws are converted to DNG files. It leaves nonraw files behind, however.
You Might Be Wondering
How Do I Find What’s Hiding in a Directory?
If you have a folder structure full of images, how do you know what’s in there? Do you have to open each folder looking for file types? Not if you have Expression Media. Here are the steps:
Make sure the folder is up to date in the Expression Media catalog (right-click the folder and choose Update Folder).
Click the folder’s dot to show all items.
Select all items in the thumbnail area.
See which file types light up in blue (Figure 12-11).
Now let’s see where those files are.
Command-click (Ctrl+click on PC) the file type TIFF. Now only the 80 TIFF files are showing.
Switch to List view and select Window > Show View Options. Hide everything except file name and path name.
Click the phrase “Path Name” at the top of the list, and the images will be sorted by their folders (Figure 12-12).
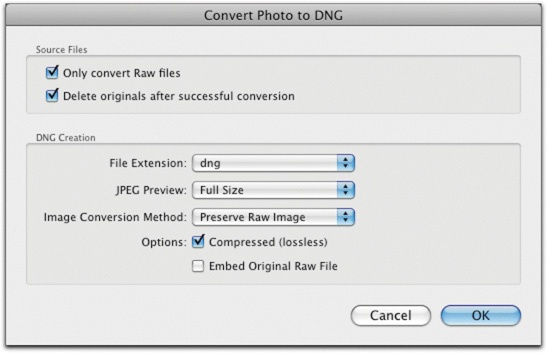
If you have your proprietary raw files mixed in with rendered file types, it may be best to migrate to DNG with Lightroom, since it has the ability to convert to DNG and then to erase the proprietary raw after a successful conversion. To do this, use the command Library > Convert to DNG and set it up as shown in Figure 12-13. This method has the added benefit of preserving any collections, virtual copies, history, or flags in this catalog, and keeping that information assigned to the new DNG file.
As you perform your migration, it’s a good time to be on the lookout for deduping opportunities. You may have multiple versions of some original files on your computer and want to get rid of duplicates to save space and reduce confusion. Expression Media has many tools that can be helpful as you work through a duplicated archive.
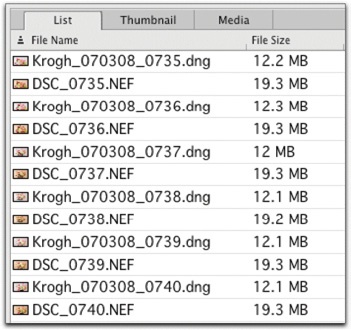
Figure 12-14. If you sort images by date, files will line up next to each other, even if the names or formats don’t match. You can use the List view to find duplication pretty easily.
Let’s take a look at some of ways you can search for duplication:
Sort by capture date. Sorting by capture date is a great way to spot duplicates in your collection, even if they have different names. This works best for digital camera originals, because Expression Media looks at EXIF data first to determine the file date. As long as the EXIF is there, these images will line up next to each other, even if you last worked on them at different times (Figure 12-14). It’s pretty easy to scroll through even a very large collection and see duplicates.
Show similar. In the Find menu of Expression Media, select Show Similar.
Expression Media will look at a number of the files’ characteristics and group images together that are likely duplicates. After you run this on the catalog, you can save the results as a catalog set, and look through the images to find duplication in the collection. You might even want to run it several times, with different options enabled.
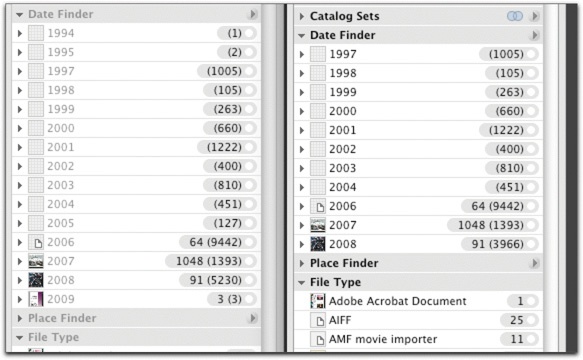
Dual catalogs. This is one of my favorites. If you have two sets of images that have a lot of duplication, you can make a catalog of each and compare them side-by-side (Figure 12-15). Look for matching patterns among dates, file types, or other metadata.
As you find dupe images you want to delete, I suggest moving them into a folder called Delete_Me rather than deleting them right away. This way you can double-check your work before deleting. You might even want to catalog just those items and compare the delete catalog to the master catalogs to see that everything is in the master archive.
Probably the most challenging digital migrations are those from a disorganized and duplicated collection to one that is organized around new collection architecture. Usually, several different kinds of migrations are needed as part of the process, such as storage media, file names, metadata, and maybe format. You must couple these with the need to straighten out duplication, and maybe assign metadata where very little exists. With a multistep process like this, it’s important to make a comprehensive plan and stick to it. Make sure you finish each stage and track your progress. Let’s look at a hypothetical migration that has some typical features.
Let’s assume you have an archive saved to a variety of drives, some of which are backed up to other drives, as well as some CDs and DVDs that contain additional files. The images are saved in a variety of formats and have been named in different ways over time. Some files have the original camera names and some files exist with several different names. Some metadata exists, but it’s not applied consistently. Most of the files have been organized into folders, with favorite images put into a separate subfolder called Select.
When I advise people on how to straighten out their archives from the very common state described above, I generally recommend that they follow the steps outlined below. Each of the major steps (1–5) should be considered its own project and should be carried out until complete:
Inventory, plan, and prep.
Gather media and transfer to new storage.
Prep files for permanent archive.
Make buckets.
Do further organizing.
In this stage, you need to get a good overview of what you’ve got and make a solid plan. This will likely include buying additional storage, but you may not know how much until you’ve cataloged the files.
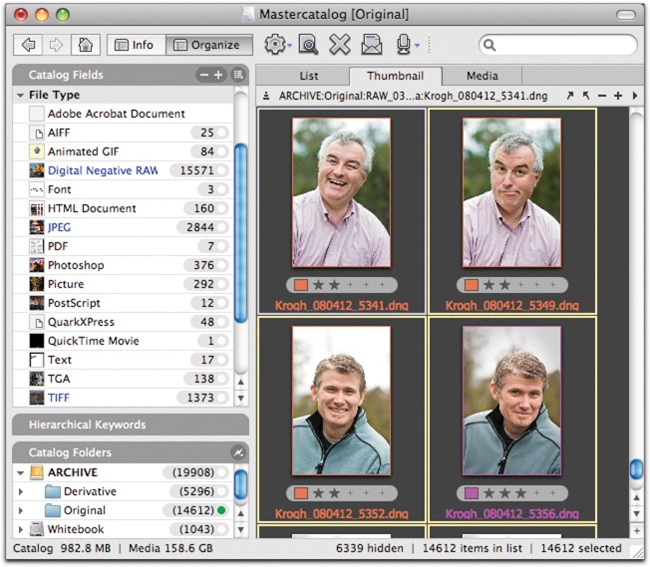
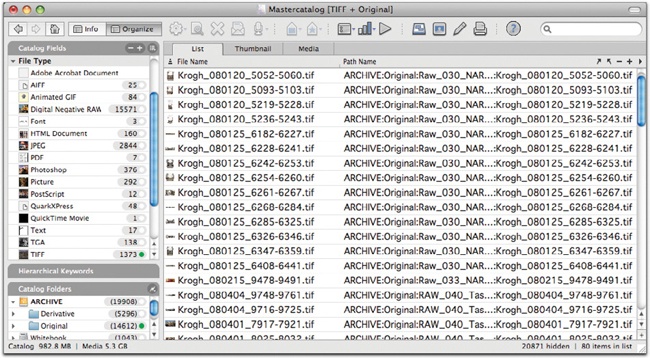
The first thing to do is get a comprehensive understanding of what data you have, how much space it takes up, and how much of the duplication you can easily straighten out. The best way to do this is to make a catalog of the existing drives so that you can see how much room the files take up and also see useful information like which file types are included, when the pictures were taken, what kind of naming conventions exist, and more (Figure 12-16). Expression Media catalogs top out at something like 60,000 images (previews built at low quality), so you might need to have several catalogs for your legacy material.
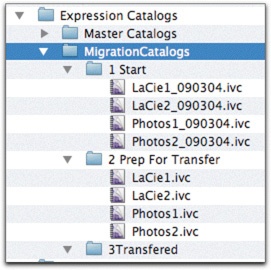
Save a copy of these catalogs exactly as they are now so you’ll have a good record of the starting point. Make a folder to keep the migration catalogs in, and keep it in the working folder (Figure 12-17). You can make a new folder of catalogs for each step of the way, naming the catalogs for the date they are closed.
Using the catalog of the image files, move the current files into a set of transfer folders, as outlined earlier in this chapter. Do this work from within the catalog environment, where you’ll have more information about what you’re doing. If you are taking some older drives out of service as part of this process, everything on the drive should end up in a transfer folder, as shown in Figure 12-18.
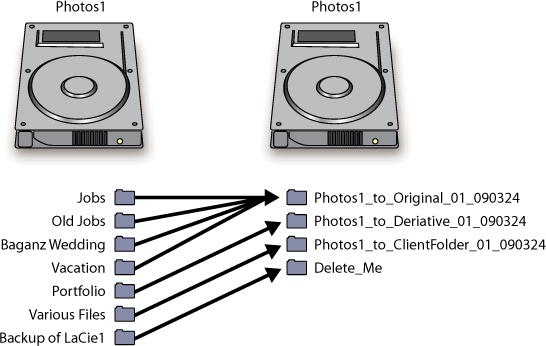
Figure 12-18. Organize everything on the drive to transfer or delete. Put the files in transfer folders.
For data on optical disks, you’ll need to estimate how much room it will require on the new storage. It probably won’t make sense to load those onto drives until you acquire the new storage.
Throughout the migration process, keep an eye out for any easy deduplication you can do. If you see that two hard drives have exactly the same contents as shown by Expression Media catalogs, don’t transfer the duplicated data (for example, one drive may be an up-to-date backup of another drive, or part of a drive). Don’t get too far down in the weeds at this point, however—some of this will be more easily accomplished once you have consolidated the files, and some of this may be best left alone.
Once you get your files grouped for transfer and have done the easy deduping, you’ll have a good idea how much new storage you’ll need. If you can easily duplicate all your data onto unused storage that you’ve already got, perhaps you don’t need any new storage. If your plan includes the words “transfer these files, then erase this drive and then moves the files from...” you probably need to consider buying new storage for the project. You’ll probably want enough to hold all your files, plus enough room for the next year’s worth of work, plus some additional disk space for defragmentation. If you are implementing RAID, you’ll probably want at least two years’ additional capacity.
Also consider that you will probably want to back up the new data during the migration process. You’ll have a lot of work tied up in the process, so make sure to allow for enough backup capacity.
Once you have cataloged the drives and put the files into transfer folders, do a validated transfer of the data (Figure 12-19). This can take a while, so be patient. Once a drive has been transferred, put it somewhere out of the way (if it can be moved). Mark the drive itself, as shown earlier in Figure 12-3. Duplicate your catalog, reset the folder paths to the new location of the files, and save the catalog. The old catalog should be dated and saved as shown in Figure 12-12. The version of the files on the new storage is now the primary version of the files.

Transfer your CDs, DVDs, or Blu-ray disks onto the new drives at this point. I suggest piling the disks up on one side of the computer and loading them all onto a new drive. I also suggest making a folder for each optical disk, naming it the same way you named the disk. If there is data written on the disk or the cover that is not already part of the metadata (such as a job number), you’ll probably want to enter that information in the catalog.
If you see obvious duplicates of your image files, take the opportunity to delete one copy of the files.
Once everything has been transferred to the new home, you’ll want to do some work to clean up the DAM system. This may include segregating originals from derivatives, consolidating folders, renaming files, and converting to DNG. This is a good opportunity to address some backlog tasks, as long as it does not keep you from completing the migration.
If you are thinking about moving files around into a new folder structure, you may want to use a script to preserve the folder-based organizational information.
We saw the Expression Media Keywords from Folders script earlier in this chapter.
There’s another one, available at
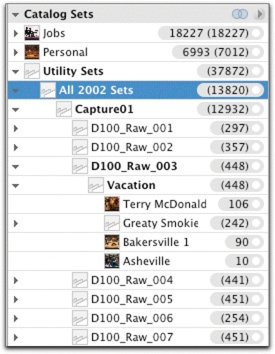
www.theDAMbook.com, called Folder to Catalog Sets, which can create a duplicate of your folder structure in catalog sets (Figure 12-20).If you’re going to rename files, I suggest you run the Filename to Title script so that the old name is preserved.
If you have the best images from a shoot in a subfolder called
Select, you might want to find them (Find Menu > Find > Path Contains Select) and label these images with two stars.
I’ve outlined why I like to keep my originals separate from derivatives. If you want to follow that workflow, this is a good time to segregate those files. You can use the tools I outlined in the Convert to DNG section earlier to help you find different file types (click a folder’s dot, select all thumbnails in the content area, and examine the File Types panel for formats listed in blue). Once you’ve found them, you can select just the TIFFs, for instance, and move them to a new folder.
This is a good time to convert to DNG using the techniques described earlier in the chapter.
If you have files with duplicate names, I strongly suggest that you rename them with some kind of unique naming convention. Likewise, any files with nonstandard characters in the name should probably be renamed. Files that just use older naming conventions, however, are not a clear-cut case for renaming. For instance, I have not renamed my older legacy derivatives, nor have I renamed my first digital files, which were created with a different naming convention (Figure 12-21).
Now that the files are ready for long-term archiving, it’s time to put them in a stable directory structure that you’re willing to live with. As you make buckets, don’t undo all the folder structure you may have created in the past—it’s still useful for some kinds of searching. Rather, I suggest that you place the existing folders into buckets for easy correlation of the primary to the backups. You can use Expression Media to create the buckets as outlined in Chapter 11.
Depending on your budget and size of collection, I suggest making Blu-ray rather than DVD buckets. A larger bucket size is a lot more convenient from a workflow standpoint (although it does mean that you may not get stuff into the archive quickly). For example, if it takes you months to shoot 23 GB of data, you might want to go with DVD.
This would be a good time to validate the images files you’re going to archive. Before reformatting your older drives, it’s good to make sure that everything ended up in the new archive with file integrity. Chapter 6 has tips on how to accomplish this.
When you make your catalogs and backups from this migrated data, you’ll now be making more permanent versions. Files should be backed up to write-once media and the hard drive backups should be taken offsite. The catalogs you have now will be your primary working catalogs. The catalogs that you made in the migration process should be archived if you want to be able to retrace your steps at some point in the future. You may only want to keep the first inventory catalogs, or you might want to keep each stage.
We’ve really reached the end of the true migration here, and now we move to a new phase. I suggest that you only continue to organize the files when there is some reason to (unless you are one of those people who likes to organize stuff just for fun). In my own work, I organize the legacy material whenever a project comes up that requires it.
I’ve found that the best way to approach this is to make large groupings and to subdivide as need presents and as time allows. You could, for instance, divide commissioned work from personal work. All the jobs can go in a big set, which you can divide into subgroups depending on what makes sense for your images:
If you have an important project as part of the collection, you might want to bring those together right away.
If you are a wedding photographer, perhaps you want to make a large group of all legacy weddings and do the subdivision whenever there is a need to access a particular wedding.
If you are documenting your family, maybe you should start with very broad groupings of events or family branches.
What’s most important here is that you start with large groupings and do the subdivision only with the images that need it. As these needs come up over time, eventually you will make more and more order from the chaos of your legacy files.
For many photographers, one of the most daunting prospects when moving to a digital workflow is the migration of their legacy film archives. We may have lots of valuable imagery on film—possibly tens or hundreds of thousands of images in various film formats. If you have ever tried to sit down and make a hundred scans on a conventional film scanner, you’ve probably given up hope that your film archives could ever be integrated into a digital archive.
For most photographers, it doesn’t make any sense to scan every image, but it makes a lot of sense to scan some images. Different images will require different treatments. In this section, we’ll take a look at some strategies for bringing your film images into your digital archive, with an eye to doing it in the most cost-effective way.
And not just to the French. ROI means return on investment. As you think about digitizing your film archive, you have to consider cost and benefit. What is the cost associated with digitizing the images? This can range from very high (more than $100 each) to very low (pennies each). You’ll also have to take into account the needs you have with respect to each image. Is it a portfolio image? A valuable stock image? An important personal photograph? A possible stock image?
Instead of trying to make one solution fit all your imaging needs, I suggest that you adopt at least a couple of levels of quality for your film scans. The most valuable of your images should get the best scan that you can afford to do: either a good desktop scan or a drum scan (I assume you know about these, so I won’t explain them here). Down a notch from that level will be images that need a pretty good scan. For these, especially for black-and-white negatives and for color transparencies, I suggest that you make camera scans.
Over the last few years, I’ve been making scans of my film with a digital camera. As digital cameras have improved, so have the camera scans, to the point where they are as good as most desktop film scanners, and can rival even drum scans.
Digital cameras can create very good scans of film images much more quickly than you could with any conventional film scanner I have ever seen. I have seen studio assistants make up to 1500 scans in a single day from black-and-white negatives (this figure assumes only a batch-conversion to positive, and it does not include time to custom correct or remove dust). Image quality is top-notch for black-and-white negatives and color transparencies, and reasonable for color negatives. I think this is the best way to bring lots of film images into a digital archive.
I have nearly completed scanning my entire black-and-white 35-mm personal archives, more than 45,000 images. I cannot emphasize how wonderful it is to have the photos available in digital form for prints, slideshows, email, and just to walk down memory lane. The cost per image was in the neighborhood of 10 cents each—not bad for high-res scans.
Because the images are stored as DNG files, the size of the archive is significantly reduced from conventional scans. A 12MB DNG file compares favorably to a 72MB TIFF in terms of image quality, but takes only one-sixth the storage space. Thus, my archive can fit easily on a 1TB drive instead of requiring multiple drives.
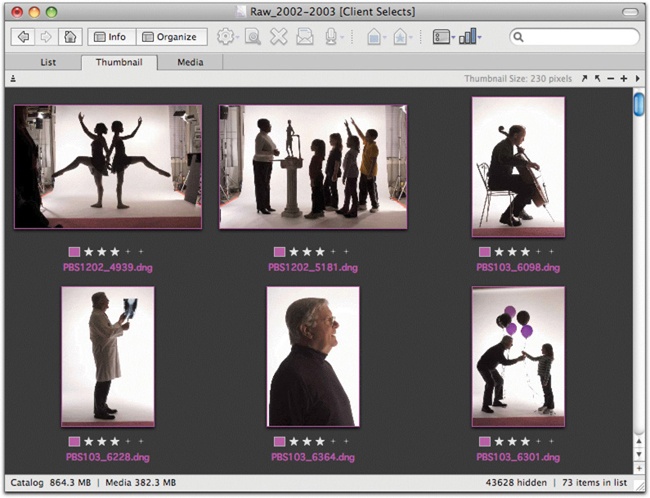
Furthermore, the workflow with camera scans shifts massive amounts of the work from the front end of the process to the back end. If scans cost $1 each, I would need to carefully look through my entire black-and-white negative archive deciding which images to scan. At $.10 each, I can afford to scan the whole thing. So instead of the process starting off with me hunched over a light-table doing arduous selections, my selection process starts when I open an Expression Media catalog and get to rate, group, and tag the images (Figure 12-22) scanned by my intern, Mike.
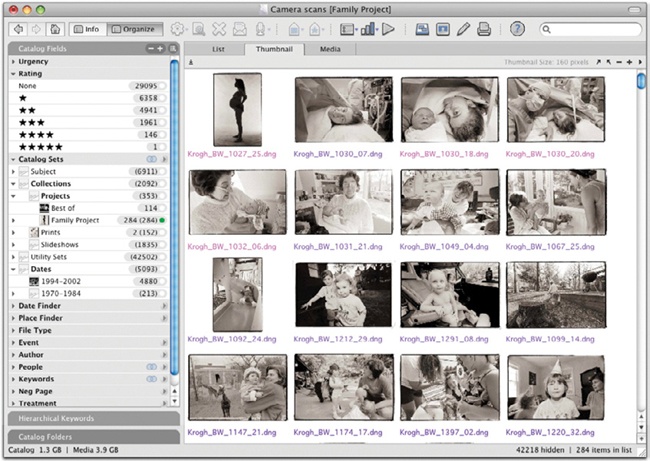
Figure 12-22. One of the greatest benefits of scanning entire collections is that you can do all your organizing work in the catalog.
With the development of the new imaging tools in ACR5 and Lightroom 2, it’s relatively easy to make a great finished image from a slide or black-and-white negative. The power of parametric image editing means that you can adjust images as the need arises, and don’t have to front-load the adjustment process like you need to do with conventional scans.
Reference
For a downloadable copy of some camera scan samples, go to the resources page of www.theDAMbook.com.
The essential components of this system are:
A “film stage” that holds the negative or transparency.
A diffusion screen that sits behind the film and provides even light distribution. Usually, this is a piece of translucent plastic.
Some kind of apparatus that holds the camera perpendicular to the film.
The lens. This could be a regular macro lens for your camera, or it might be a special enlarging lens for a device such as the Beseler Dual Mode Slide Duplicator, pictured in Figure 12-23.
A light source. If you’re not using a unit like the Beseler, which has its own light source, you’ll need to acquire some way to illuminate the film. A strobe with added diffusion, such as a softbox, can work well for this purpose. A GE SoLux light provides daylight balance for those without AC-powered strobes.
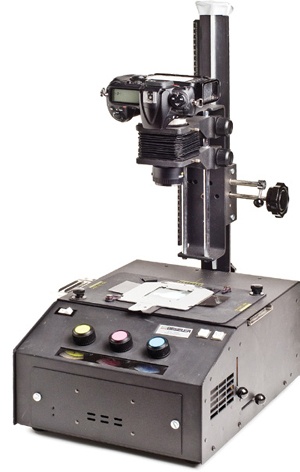
Figure 12-23. The Beseler Dual Mode Slide Duplicator is a great device to use for camera scans, if you can find one. They are no longer made, but show up regularly on eBay. This device can accommodate film of varying formats.
At the moment, no ideal hardware is generally available from camera retailers, with the exception of Nikon’s PB-6 bellows and PS-6 slide copy attachment. These will only work at the present time with the D700 camera (the D2 and D3 series cameras don’t fit on the device, and the DX sensors don’t work either). Other options include the following:
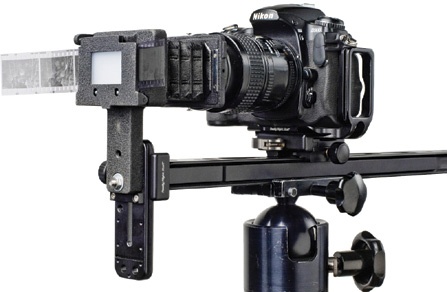
My favorite is a device I designed from Really Right Stuff rail components, along with a Nikon PS-5 film stage from an old slide copy rig (Figure 12-24). I have also adapted a Hasselblad copy attachment for medium format copying.
There are a number of devices that can attach to the front of a macrolens, such as the Xtend-a-Slide and the Nikon ES2. You can build your own from a copy stand, a lightbox, and a negative carrier from an enlarger.
Pro-quality film duplicators such as the Beseler Dual Mode Slide Duplicatior or Kenro Spectra 1000. These were the workhorses of 35-mm slide duplication, and you can now purchase them on eBay for $50 to $300. These devices are capable of copying 35-mm up to 6 × 7-cm—and in some cases 4 × 5-in—originals. Check
www.theDAMbook.comfor recommendations on devices and lenses.
Once you have acquired the copying hardware, you need to do a bit of setup before starting production. You’ll want to start by making sure your light source is the right color and that it’s even. To put the image data in the “sweet spot” of the camera’s sensitivity, set your camera to daylight and test. If you are using strobes, SoLux lights, or a daylight-balanced light table, you should be pretty close, and you can move on to the next step. If you find that the light source is far off, I suggest finding a different light source or filtering it to daylight.
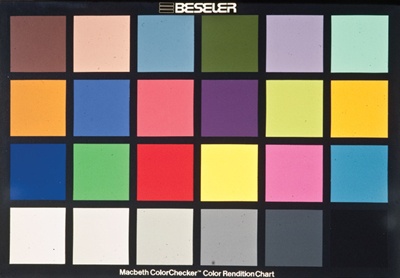
I suggest making a calibration slide from a Gretag Macbeth color checker (Figure 12-25). You can use this with the Adobe DNG Profile Editor to make a calibration “profile” that you can use in Lightroom or ACR (check www.labs.adobe.com/ for more information on the profile editor). Scan a few samples and make sure you can get results you’re happy with. Make sure your lens is producing a sharp image.
For your first test shot, pick an image with lots of color and good skin tones. If you are using the flash as your light source, set the camera white balance to Flash, and see what you get. If it’s pretty close to the original, bring the image into ACR and see how closely you can make it match the slide.
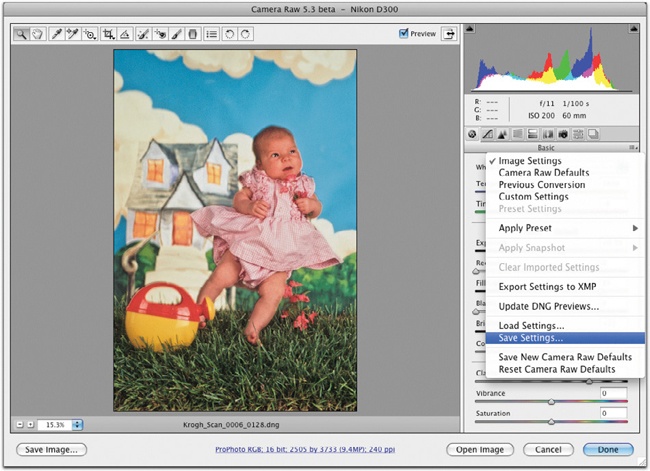
You might want to save these ACR adjustments as a custom setting named for the film type, so that you can use it as a starting point for color correction in the future (Figure 12-26). Every type of film has its own color-rendering biases (kind of like a color profile), so a calibration that you make for Kodachrome will be different from the one you want for Fujichrome.
You can use all the controls in ACR to get a good version of your image. I find that Fill Light is very helpful for opening up shadow areas, and that the HSL controls are very useful for fine-tuning color.
Black-and-white negatives are particularly well suited for camera scans for a couple of reasons. They are harder to sort, since they are probably cut into strips, and, in general, there’s probably less bracketing and duplication. Both of these characteristics make it more attractive to scan everything. Additionally, camera scanning can provide a true “black border effect” if the negative stage is the right size. I always loved this look in darkroom enlargements, and I’m very happy to get it back in my scanned images (Figure 12-27).
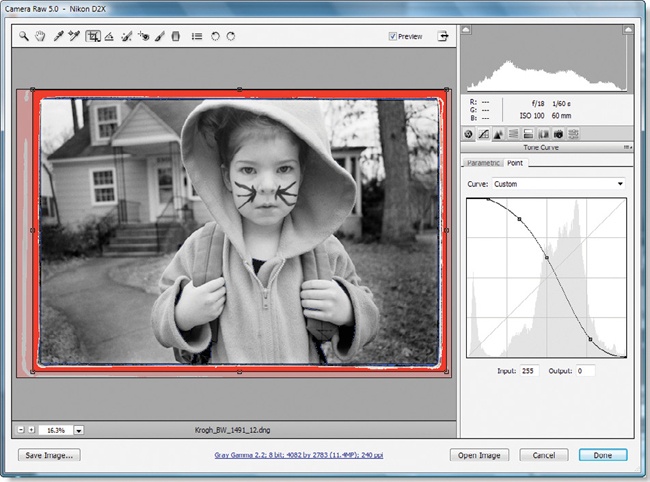
When you shoot a copy shot of a negative, you will need to invert the image to get it to display correctly. For black-and-white images, you can do most or all of this work in ACR. The trick is to use the Curve panel, shown in Figure 12-28. Flip the curve upside-down, and you will now have a positive. Save this flipped curve as a preset, and you can apply it to all new negative scans as you open them in ACR. If you save the file as a DNG, you’ll have access to the positive image from the DNG preview.
We’ve wired up a version of RaidFixer that pulls the ACR controls in reverse so that it works on negatives (Figure 12-29). I’ve found that this is a really fast way to correct lots of images quickly, without having to train myself to “think backward.” You can see a movie of it in action at www.DAMuseful.com.
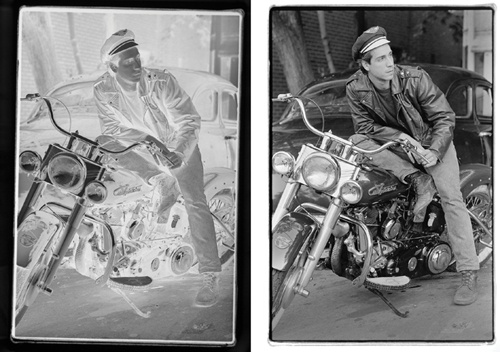
Camera scans of color negatives are not quite as good as the black-and-white ones, and definitely not as easy to make. Because the film base has an orange cast, and because color negative film compresses the color information in a pretty extreme way, it’s harder to get a good color-accurate camera scan quickly. However, you can make a very serviceable proofing image from a color negative (Figure 12-30).
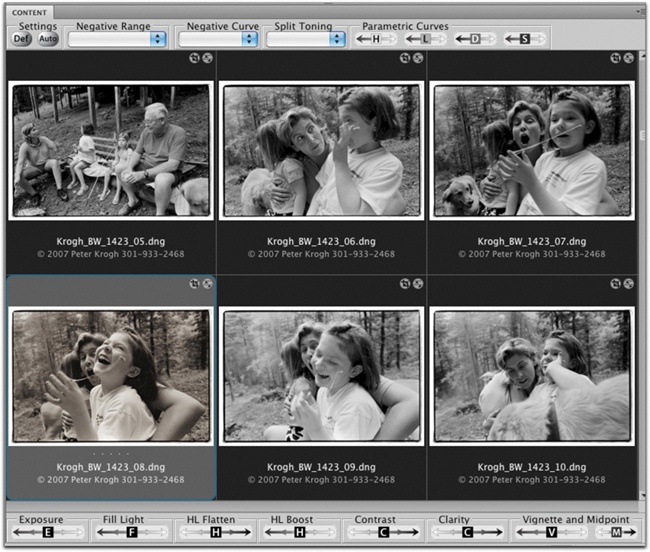
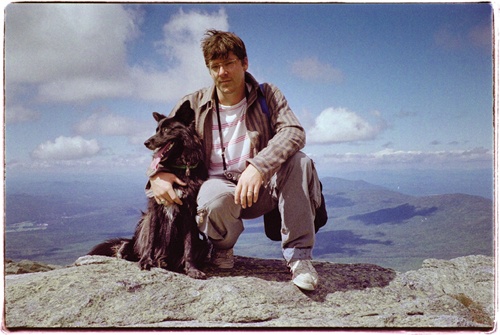
Figure 12-30. Lucy and me on top of Mount Washington. Scans from color negatives are not quite as good as those from slides, but they’re fine for proofing.
To get a good baseline color correction for a color negative, I suggest that you filter your light source so that the orange is taken out of the image. I have found a 40 cyan filter to be a good starting place for color balance. Ideally, you would filter the light so that when the image is shot on Daylight balance, neutral colors in the negative are neutral in the scan. When you flip the curve for the image, you’ll be at a decent starting point for color adjustments. We’re working with Adobe at the moment to generate some profiles for camera scans from color negatives. Check www.theDAMbook.com for the latest recommendations.
When naming scanned images, we’ll encounter the same problems that we faced earlier with digital originals. And we’ll add to that a further need: we must be able to find the film originals. If you have already instituted some kind of numbering system for your film images, I suggest that you simply extend that system to your scans.
In my case, I have an existing numbering system for my personal black-and-white images, but I do not have one for my color slides. The black-and-white negatives live in a set of notebooks in the sequence in which I shot them. This starts in 1979 with roll 0001 and goes up through roll 2069 in the summer of 2002, when I stopped shooting black-and-white film entirely. Since there is already an orderly structure, there is no need to reinvent it. The naming system I use for my black-and-white scans looks like this: Krogh_BW_0001_01.DNG. Here’s what the individual elements of the name are for:
Krogh is there to let people know where the image came from.
BW indicates that this is a black-and-white film original from my notebook.
0001 indicates the number of the negative page.
01 is the frame number.
I don’t feel the need to make the frame numbers line up exactly with the numbers on the film. Many of the rolls were shot on bulk-loaded film and the numbers don’t correspond to the order in which I shot them. Instances in which the camera scan is not sufficient for the usage at hand has been very rare. In those rare cases, finding the right frame has not been difficult.
For color slide images, I have adopted the following practice. I have created a separate filing drawer for images that have been scanned. These images are higher-value images, pretty much by definition. Images that I scanned previously have the names that I had originally given to the digital files. This relatively small group of photographs (just a few hundred) has been gathered together into one hanging file folder and labeled 0001.
Images that I have scanned since adopting DAM practices get a new naming scheme: Krogh_Scan_0002_0001.DNG. Here are the elements:
Krogh, as in all my other filenames, points to me.
Scan indicates that this is a color scan.
0002 indicates that this transparency lies in folder 0002 of my scanned images.
0001 is the unique identifier. If you have a lot of slides in a folder, or if you have a lot of images that are similar, or if someone other than yourself might need to retrieve the slide, you’ll probably want to write at least the unique identifier on the slide mount (it’s probably best to write the entire number sequence).
Numbering this way lets me to easily find the original film, should I ever need it. How do I decide when to make a new folder? Well, when it feels full or once a scanning session has ended. It doesn’t really matter all that much. The important points are that each file name has a unique frame number and it points to the physical location of the transparency.