
Now that we’ve generally outlined the workflow for works in progress, let’s take a look at a concrete example accomplishing those tasks. In this chapter we will see how to pull the levers in a sample workflow that uses Lightroom 2.2. Remember that this is just one example of how you might use Lightroom for your working files workflow—there are many variations, and some will be more appropriate than others for particular photographers.
We’ll start by going over some relevant Lightroom basics, and then see how we can use Lightroom’s tools to support the workflow discussed in the previous chapter.
Lightroom Basics
Setting Up Lightroom
Sample Lightroom Workflow
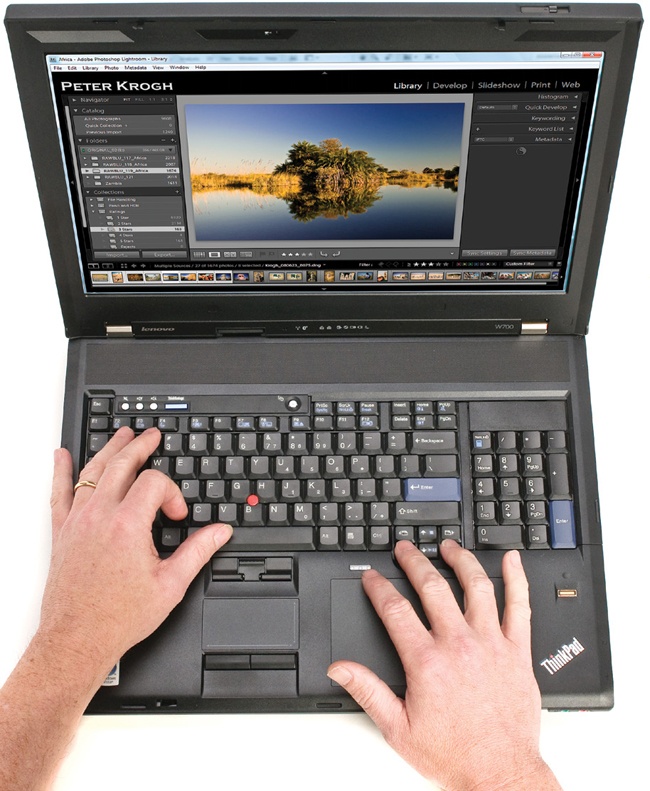
Lightroom is cataloging PIEware, an application that lets you nondestructively adjust your images and catalog them all in one environment. The rendering engine Lightroom is built on is Adobe Camera Raw (ACR), the same parametric image editor that comes with Photoshop. In Lightroom, the ACR engine is paired with a catalog and output controls for slideshows, prints, and web galleries. Keeping cataloging, image adjustment, and output controls in one program (Figure 9-1) can make things much simpler, even if Lightroom doesn’t perform each function as well as dedicated programs would.
Note
This chapter (and indeed this book) is not meant to be a comprehensive guide to the controls in Lightroom or any one program. Lightroom is being offered here as the best current example of a crossplatform all-in-one program to develop and manage your images. There are a number of fine books that can help you delve into the workings of all the program’s controls, including Martin Evening’s comprehensive The Adobe Photoshop Lightroom 2 Book (Adobe Press, 2008) and Mikkel Aaland’s Lightroom 2 Adventure (O’Reilly, 2008). Also keep in mind that Lightroom is a fast-changing program. If you are using a version later than 2.2, it’s likely that at least some of the controls and behavior will be different than what is described here. You can check www.theDAMbook.com for any updates to this material that will apply to newer versions.
When you first open Lightroom, it creates a catalog, where it saves all the work you do. A catalog has two components, one called CatalogName.lrcat and the other called CatalogName Previews.lrdata. The .lrcat file holds all the information about the images, and Previews.lrdata holds JPEG previews (Figure 9-1). (On a PC, Previews.lrdata is a folder, on a Mac, it’s a package file.) The catalog remembers all the work you do to the images, including collections, ratings, adjustments, output settings, and more.
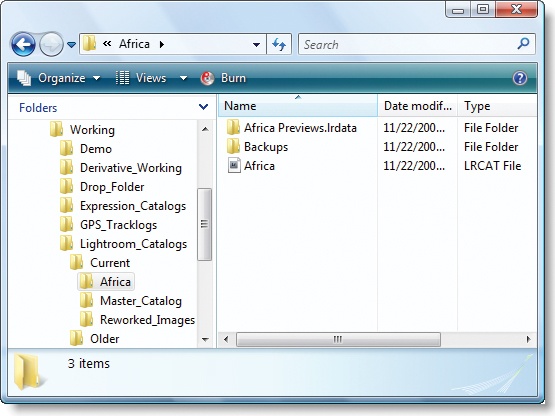
Figure 9-1. A Lightroom catalog with two components: the .lrcat file holds the information about your photos, and Previews.lrdata holds the previews of the images. The images themselves are not in the catalog, but rather are referenced by the catalog. The Backups folder contains previous versions of the LRCAT file that can be used if the catalog becomes corrupted.
Here are some important points to remember about Lightroom catalogs:
The images themselves don’t live in the Lightroom catalog; they are cataloged by reference, meaning that the catalog refers to files rather than containing them.
Lightroom catalogs are automatically saved when you do work on them.
You can back up catalogs and copy them to different drives.
You can take a Lightroom catalog with you and browse your photo collection even if you do not have the images themselves with you, since the catalog keeps thumbnails and previews in the
Previews.lrdatafile.You can make changes to the metadata while the files are offline, but you can’t make changes to the develop settings.
You can only have one Lightroom catalog open at a time.
Some people find that it’s easiest to make catalogs for each project and then merge the project catalogs into a master catalog once the images are archived. That gives you the ability to make smaller, more easily transferred catalogs when the images are working files. Once you merge the project catalog with the master, you get access to large chunks of your collection in the same place.
When Lightroom first imports (or, really, indexes) an image, it harvests all the data in the file and records it in the Lightroom catalog. It also creates some previews from the image. When you make changes to an image in Lightroom, such as adding a keyword or adjusting a develop setting, you are making a change to the catalog. Most of the work you do in Lightroom can be written back to the original file (or the sidecar file for proprietary raw files) if you would like to keep that information bundled with the image file itself.
There are a couple ways to save changes back to image files. You can tell Lighroom to always write the changes back to the file whenever you work on images, but I suggest you don’t do that (Figure 9-2). Not only does it slow down Lightroom’s performance, but I think it’s generally bad practice to “touch” your files every time you make changes. Instead, I suggest that you export the metadata back to the images files (or sidecar files) whenever it makes sense to do so.
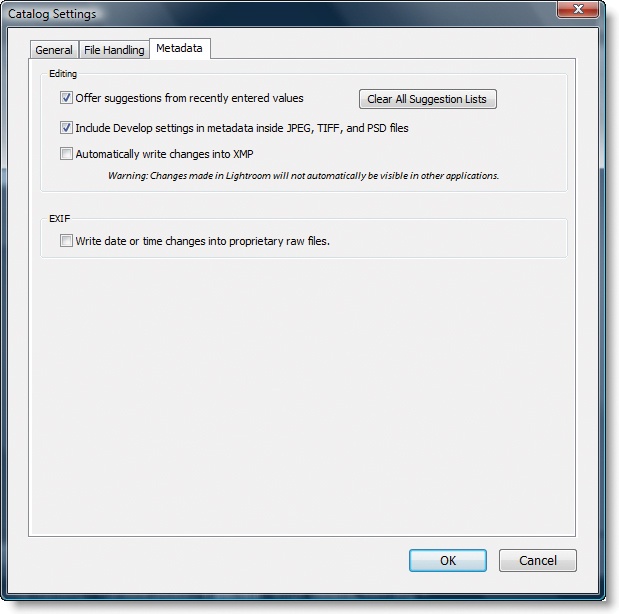
Figure 9-2. You can access the Catalog Settings window from the Edit menu on PC, and the Lighroom menu on Mac. I suggest you don’t enable Automatically Write Changes Into XMP.
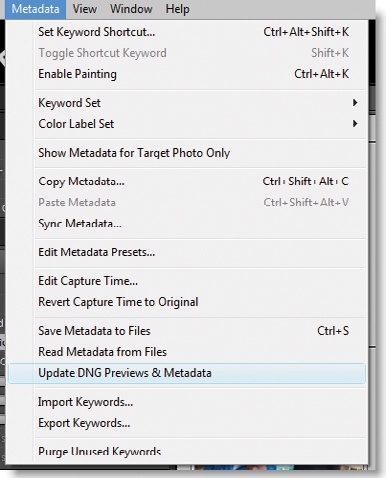
In the Library module, select Metadata > Save Metadata to File. You can also update the preview in DNG files simultaneously by selecting Update DNG Previews and Metadata (Figure 9-3). In the Develop module, these commands are in the Photo menu. I prefer to do this from the Library module, since it allows me to more easily determine that I have selected all the images in folder to update (when you’re in Develop, you can’t tell which images are being filtered out). Double-check that all images are selected by looking in the status bar just above the filmstrip.
Note
Once you’ve pushed the metadata back into the files, it can take some time for the DNG previews to update. Make sure to let this process finish before you close out the program.
There are some kinds of information that Lightroom stores that cannot be written back to the image files, and it’s good to know what they are. Collection information, develop history, stacks, virtual copy information, and flags are all contained in the catalog only. If you want to make this information visible to any other program, you will need to duplicate it in some other field, such as keywords or snapshots. It is possible to make another Lightroom catalog “see” this information, but only by a catalog export/import (described below). This export can transfer everything Lightroom knows about the files from one catalog to another.
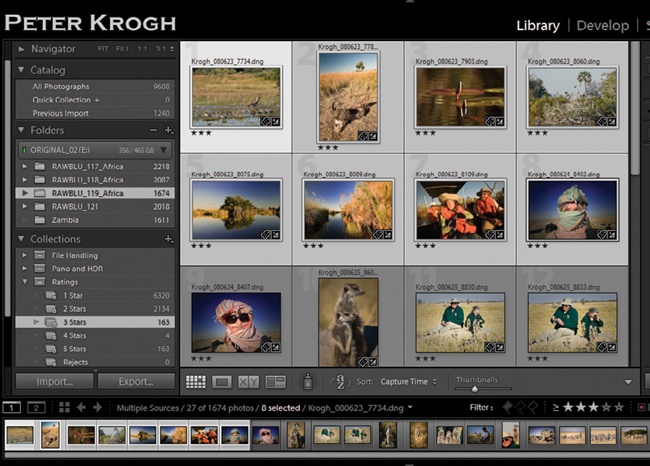
Lightroom is designed for you to work left to right and top to bottom through the modules at the top right of the screen. First you import and organize in the Library, then you adjust the image in Develop, and then you go to the output method of choice, Slideshow, Print, or Web (Figure 9-4). Each of these functions is separated into a module that has controls for the purpose at hand.
Within a particular module, the controls are laid out from top to bottom, roughly in the order you are expected to use them. In Develop, for instance, you will generally start with the Basic control and move down through the other controls. Let’s look at some other parts of the Lightroom interface. We will mainly deal with the Library module, since that’s where we’ll conduct our image management.
In the Library module, the panels listed on the left side of the window are “sources”—you select from the various sources to choose images to work with (Figure 9-5). You have to click on something here to get images to show. You can Ctrl+click (Command-click on Mac) on multiple sources, such as folders, and show the contents of all of them. There is some capability to use collections as a filter to narrow down what’s shown in either a folder or in the Catalog panel.
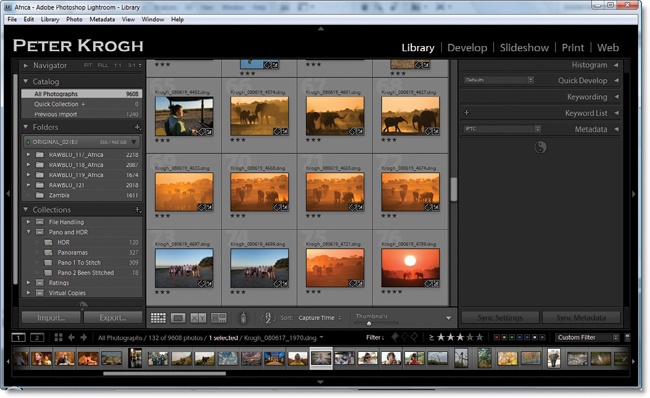
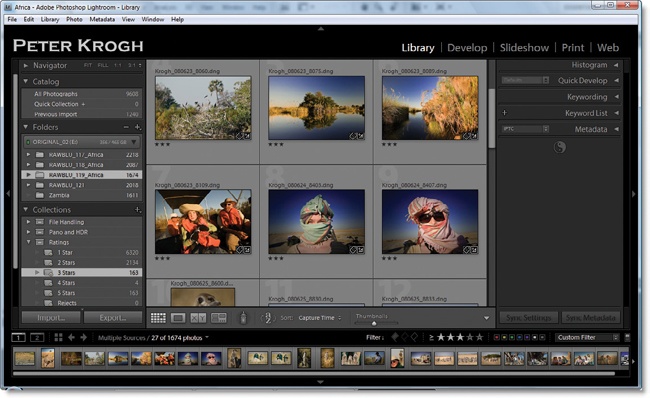
Figure 9-5. The “source” of what you are looking at in Lightroom is the item that is selected in the left-hand column. You can Ctrl+click (Command-click on Mac) to show images that are in both a particular folder and a particular collection.
In the Folders area, you can see where your image files are actually stored. By default, Lightroom will show you the name of the drive and folder that contains the images. Unlike a browser, only images that have been “imported” will show here—if you want images to appear in the catalog, you need to instruct Lightroom to index and remember images. When you move images in the folders area or change folder names, you are working on the actual file system. We’ll look at this a little more thoroughly later.
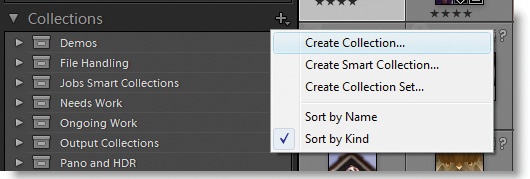
You can make three kinds of collections in Lightroom (Figure 9-6):
Collections are static groups (they stay the same unless you add or remove images manually). To add images, drag thumbnails to the collection, or selecting images, right-click the collection, and select Add Selected Photos to this Collection. To remove images, select the collection, then select images, and press the Delete key; or, select images, right-click, and choose “Remove from Collection.”
Smart collections are created by setting up filtering criteria so that images are added automatically to the group. You can only remove images by changing the annotations so that they don’t meet the criteria anymore.
Collection sets are groupings of collections—a tool to keep your collections organized.
Note
A collection holds not only images, but also output settings. So, the work you do to customize a slideshow for one group of images can stick to that group while you use a totally different group of settings for another. As a matter of fact, collections could be more accurately called “output collections,” since they are designed for that, rather than for organizing your images. You will notice that collections are visible in each of the output modules (Slideshow, Print, and Web). As you prepare images for some kind of output, you should group them with the collections tool rather than, say, keywords or folders.
The center of the Lightroom Library is the Content area (Figure 9-7). You can show one or more images by selecting Grid, Loupe, Compare, or Survey view at the bottom left of the content area:
Grid view is for looking through lots of images and for adding annotations or Quick Develop settings to multiple images at once.
Loupe view is for examining one particular image. It lets you zoom in and out quickly and easily with the space bar or by clicking with the mouse.
Compare view lets you examine images side-by-side to determine the best one of a group.
Survey view is useful for reviewing a selection of images to see if they work together as a group.
Below the content area is a filmstrip that you can use to browse through or select images.
In general, if you want to do something, such as adding a rating, to more than one image at once, you’ll want to work in the Grid view. You can also rate multiple images by selecting them in the filmstrip and right-clicking to add a rating.
Selecting a single image is easy: click on it. To select multiple images, click the first in a series, then hold the Shift key while you select another image; those images and all images in between will be selected. If you want to select multiple noncontiguous images, hold the Command key (on Mac) or the Ctrl key (on PC) while you click on the images you want to select.
There’s a twist in Lightroom, however, that you may not understand at first. The image that has the brightest frame around it (Figure 9-8) is the “most-selected” image, and sometimes Lightroom treats it differently than the other selected images, depending on what you are doing and which view you’re using. It can take a while to understand when you’re working on only one image or more than one image, but it becomes intuitive once you’ve worked with it for a while. The difference between selected and most-selected largely disappears when you work on images by right-clicking the filmstrip.
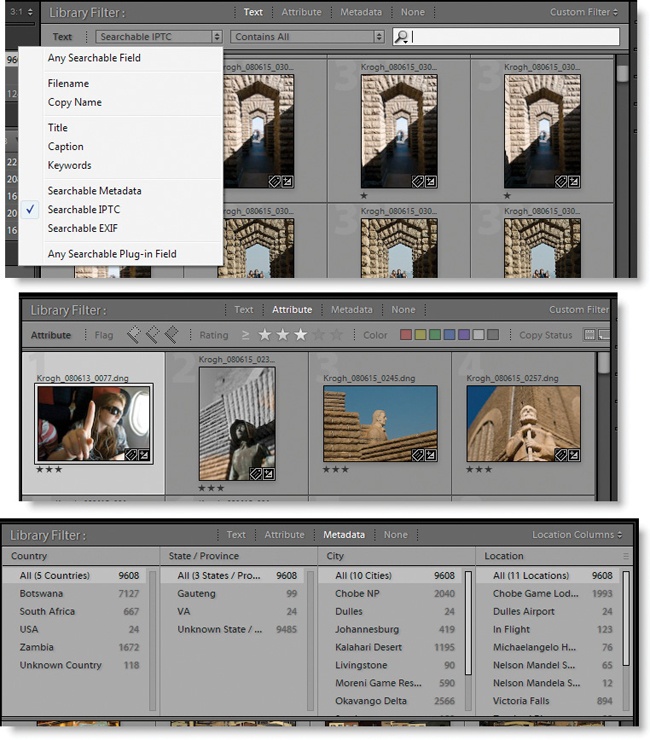
The filter tools in Lightroom 2 have been moved from the left-hand side to the top of the workspace. You can display the filter bar by selecting Show Filter Bar in the Metadata menu, or by pressing the key (Figure 9-9). You can only see the filter bar when you’re using Grid view. The filter bar has several filtering methods:
Text lets you search the metadata of the image for a text string. You can search among certain fields or all metadata.
Attribute lets you filter by flag, rating, color label, or Virtual Copy status. Attribute can be combined with Text or Metadata for cross-filtering.
Metadata lets you choose among many different metadata fields, such as keywords, locations, dates, cameras, and more. You can add columns, if you wish, and save particular configurations.
None removes all filters.
You can also save presets of filter combinations that you want to use in the future.
One important thing to keep in mind is that any filters you apply are “local” to the source. So, if you’ve selected a folder and filtered down to two-star images, when you click on another folder, the two-star filter will not be applied to the second folder. If you return to the first folder, you’ll see that the filter is still applied.
Pick and Reject flags (the P key and the X key) are also local to the source. If you flag an image while you have a collection selected, you will not see that flag when you view the same image by clicking on its folder. This “local” behavior can be confusing.
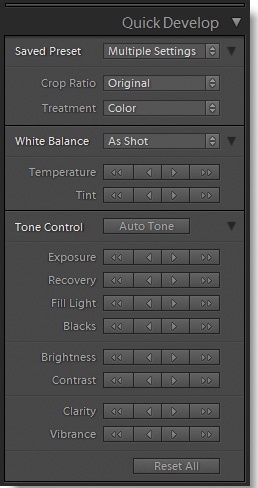
On the right-hand column in the Library is the Quick Develop panel, a fast way to make general corrections to your images as a group (Figure 9-10). You’ll want to use Grid view, or you will only be working on the most-selected image. These tools are most effective when you already understand how the develop controls affect your images. For instance, the Quick Develop interface gives you no clue that clicking the right-hand Temperature arrows makes your images more blue. Experienced users will know this already.
The keyword tools in Lightroom have been thoroughly developed. There are lots of ways to find and assign keywords to your images. Let’s take a quick look:
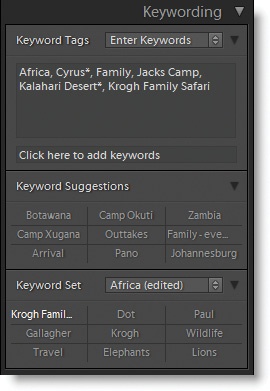
In the Keywording panel (Figure 9-11), you can see which keywords have been assigned to one or more selected images. Keywords that are separated by > are part of a hierarchy. The parent term is the second one: child > parent > grandparent.
An asterisk beside a keyword indicates that only some of the selected images has that particular keyword.
The Keyword Suggestions area shows keywords that the program thinks are likely to be appropriate for your images, based on the keywords of other images in the catalog.
Keyword sets are saved groups of keywords that you can use to speed up the process. You might want to make a set for your immediate family that includes everyone’s name, for example, and make a separate set for your in-laws.
The Keyword List panel (Figure 9-12) shows every keyword used in the catalog, and can be organized in a hierarchy for easy navigation.
You can create keywords by opening the Keyword List panel and clicking +. If a keyword already exists, you can add it to images by dragging them on top of the keyword in the panel, or by dragging the keyword onto images in the content area.
You can export and import keyword lists for use with multiple catalogs.
To show all images with a particular keyword, click the arrow on the right side of the Keyword List. The filter bar will use that keyword as a filter (Figure 9-12).
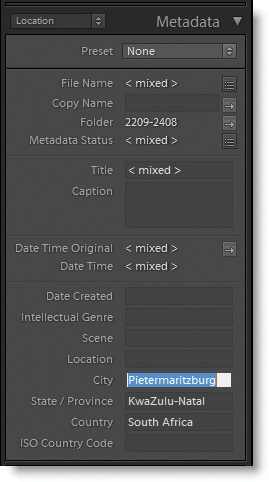
Below the Keywords panel is the Metadata panel (Figure 9-14), which shows metadata information for selected images(s). You can use the drop-down list at the upper-left corner of the panel to specify which fields to show. You can fill in metadata fields when you have the panel open, and you can also create metadata templates using the Preset drop-down list.

Digging Deeper
Show Metadata for Targeted photo Only
When entering tags in the Metadata panel, you need to double-check a menu setting before you begin. In the Metadata menu, there is an item labeled Show Metadata for Target Photo Only (Figure 9-13). If this is enabled, you will only see—and only change—the metadata for the “most-selected” image. Make sure to disable this feature if you want to enter metadata for multiple images at the same time.
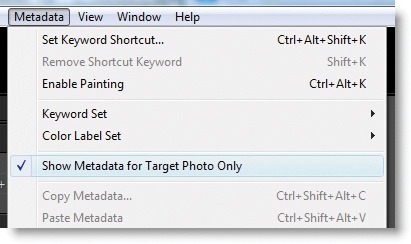
Figure 9-13. When Show metadata for Targeted Photo Only is enabled, you’ll only see and change metadata for the most-selected image, even in Grid view. When it’s disabled, you’ll be seeing and working on all the images in the Grid.
Keywords are applied to all selected images, no matter what the menu item says.
The Lightroom Develop module (Figure 9-15) is an excellent parametric image editor, and is fully interchangeable with Adobe Camera Raw, which comes with Photoshop. No changes that you make to images are ever permanent, so you can’t get yourself in trouble here by experimenting. You can always take the image back to the default setting.
We’ll look at the controls for saving and selecting changes on the left side of the window.

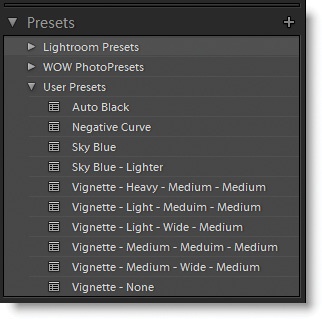
Presets are saved groups of adjustment settings that you can apply to images in several ways: on import, in the Library’s Quick Develop panel, or here in the Develop module (we also saw that ImageIngester Pro can access these). Presets can include every setting for an image or just some of the settings. You can see in Figure 9-16 that I have some presets to apply vignettes to images, as well as some that are HSL controls to make more dramatic skies. When you hover your mouse over the setting, the preview pane above will show you the effect on the image.
If you find yourself making the same adjustments regularly, you should consider making a preset for that group of settings. Click the + next to the word Presets, and Lightroom will ask which settings you want to include (Figure 9-17). Click the ones you want to save as part of the preset, and give it a name that makes sense to you. You can group presets into subsets to help navigate through them.
The Snapshots tool is one that has great promise for the future of parametric image editing, but it’s not fully developed in Lightroom 2.2. You can create a snapshot for any particular image adjustment, and save that particular rendering so that you can return to it any time in the future (Figure 9-18). You can even save these snapshots back to the file’s metadata with other metadata, so that you can access them in Bridge or in other Lightroom catalogs. This makes the setting a “permanent” variation of the image—one that can be recalled in the future. With snapshots, we are rapidly moving down the road to a world where one source
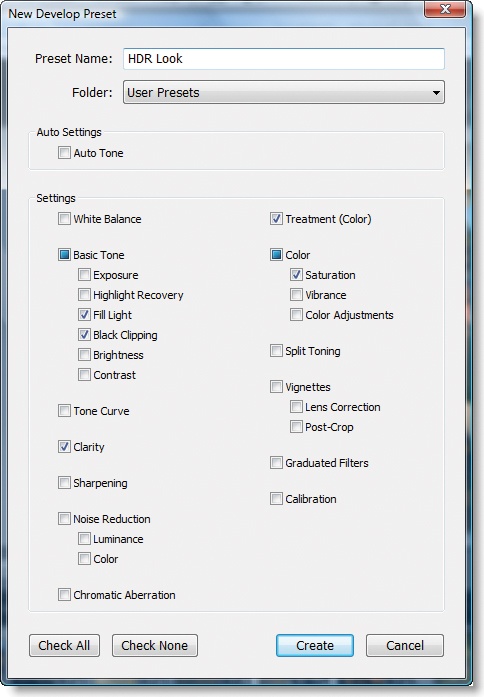
Figure 9-17. You can make presets that apply combinations of settings once you find looks that you like.
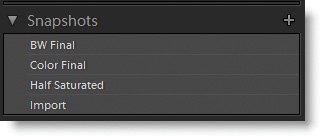
Figure 9-18. Snapshots provide a way to save a particular interpretation of a file. They are more permanent than a virtual copy, since they can be written back to the file’s metadata.
image can be used to store many different interpretations of the photo, without having to make additional copies of the image file.
If you want to use snapshots to save variations of a file, I suggest that you come up with a naming scheme that represents the kind of interpretations you do, and that you stick to that naming protocol. For instance, if you need to make finished versions of a file in both color and black-and-white, I suggest that you call them Color Final and BW Final. If you are making proofs only, you might call them Color Proof and BW Proof. If you want to compare different color interpretations of a file, you might want to call them Color Temp 1, Color Temp 2, etc. These variations will be much more useful over time if you name them systematically.
Unfortunately, Lightroom 2.2 does not provide an easy way to swap out snapshot settings for more than one image at a time. You can’t access them from the Library—you can only see, save, or swap them for a single image that is in the Develop module. In the next chapter, I’ll show you a tool we’ve created that addresses these issues with Bridge and can significantly improve the capabilities of snapshots.
There is another tool in Lightroom to store different variations of an image— virtual copies. With virtual copies, a single original file can appear twice (or more) in the Library, with custom settings for each version. You can, for instance, make a black-and-white version and a color version of the same image. You can then, for instance, output JPEG versions of the different copies without having to swap snapshots around in the Develop module.
You can easily create virtual copies by right-clicking one or more images and selecting Create Virtual Copy. The virtual copy appears right next to the “original” and has a turned-up page to indicate it’s a virtual copy (Figure 9-19). You can name virtual copies in the Metadata panel of the Library module, and you can find or hide them by selecting the options at the far right of the filter bar. You can also use smart collections to find all virtual copies or to find all virtual copies with a particular name.
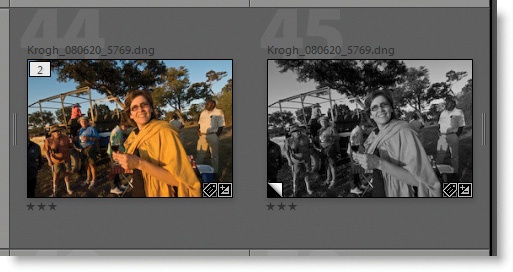
Figure 9-19. When you make a virtual copy, Lighroom lets you work with an alternate version of the image as a separate file—kind of.
Despite all this, I find the implementation to be not-quite-finished in Lightroom 2, and I generally avoid using virtual copies. I don’t like the fact that the virtual copy information is not written to the file and that it’s not easy to keep them straight. Nevertheless, I know a number of people who really like using them for alternate versions of the same file.
In Photoshop, the History tool lets you step back through changes you have made to your images. As soon as you close a file, however, the history disappears and you can no longer revert back to a previous state. Because all the work you do in Lightroom is recorded in the PIE settings, the program can keep track of that work and let you undo it long into the future. The History panel in Develop shows each change you’ve made to the file from a particular catalog (Figure 9-20). You can see what the image looked like at that particular History state by hovering your mouse over the line and looking at the Navigator window.
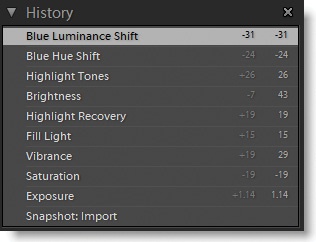
Figure 9-20. You can use the History panel to step back through the changes you’ve made to an image.
The history of changes is kept in the Lightroom database only, and is not recorded in the file itself. The list of History steps continues to grow until you click the X next to the word History, which clears the history for the selected image. If you want to keep particular history states available in the file, you should save them out as snapshots and save the metadata to the file.
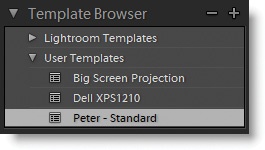
You can use the Slideshow module to proof images for a client or to create a traditional slideshow. On the right-hand side are lots of options for display, including colors and styles, metadata, autoadvance, and even music. Once you get a configuration you like, save it as a template so that you can go back to it later (Figure 9-21). The settings that you make for a collection are “sticky” to that collection, and will be there the next time you come back to that slideshow. You can output the slideshow as a PDF file if you wish, but it won’t have any soundtrack.
The Lightroom Print module can greatly simplify the print process (Figure 9-22). It provides you with control over layout, with the possibility of printing contact sheet–style prints. You can control the size and layout of the images, as well as the information that is printed on the page. One of Lightroom’s goals is to make printing easier. For many people, it works really well with minimal fiddling (I generally send my own prints through a RIP, a specialized piece of software that provides customized color handling that works very well for my older Epson 7600 printers rather than printing with Lightroom).

Lightroom’s Web module (Figure 9-23) offers an easy way to post images to the Web (you need to have your own web domain to upload the galleries—otherwise, you can save them to a CD or DVD and send them out on disk). Several attractive options are included with the software, including some impressive Flash-based galleries. It’s possible to customize these, but the programming work is not for inexperienced users.

Now we’ll take a look at some of the setup you’ll want to do to get Lightroom to behave as described in this chapter. Once again, this is not comprehensive, but it can help you get started using the program in ways that work for the methodology presented in this book.
Perhaps the most important part of Lightroom, from a DAM perspective, is proper handling of catalogs. This includes strategies for creation, backup, data export, and more. It’s essential to understand how this works if you want to preserve your work.
When Lightroom first opens, it creates a new catalog and places it in the Pictures folder of the users folder. We will want to instead create our catalog inside the working files folder, and name it Master Catalog (Figure 9-24). To set this up, launch Lightroom, then access File > New Catalog. Lightroom will prompt you to find a place to save the catalog and give it a name. Navigate to the folder WorkingLightroom Catalogs if you have one (if you don’t have these folders, make them now). Save the catalog as Master Catalog.
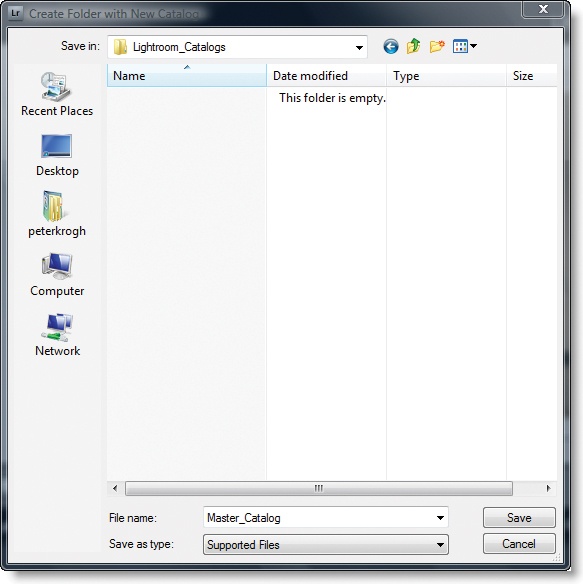
Figure 9-24. Save your main catalog with a name that helps you identify what it is. I suggest Master Catalog.
In the Preferences dialog box (get there from the Edit menu on PC or the Lightroom menu on Mac), select the General tab and set Master Catalog as your default catalog. Whenever you launch Lightroom, this catalog will open. While we’re in here, let’s make sure we have DNG import creation set to Full Size JPEG, Preserve Raw Image, and Compressed (Lossless) in the Import tab.
I suggest that you try to use only one catalog for your images. Eventually, the catalog may slow down so much that you want to start using project catalogs for new shoots, or you may want to make an additional catalog to keep the number of images from growing too large in the first master catalog.
In Lightroom’s Catalog Settings dialog (under the Edit menu on PC or Lightroom Menu on Mac), you can choose where and how often to back up the catalog (Figure 9-25). The backup will be triggered on the schedule you choose (when the catalog is opened), and can take a few seconds or a few minutes. I suggest that you set it up to back up the catalog either daily or weekly. If your working files folder is set on an automatic daily backup, you should probably set the catalog backup to go into the same folder that the catalog itself lives in. Your working files backup (Chapter 6) will make sure that the current catalog and the catalog backup are copied regularly to another drive.
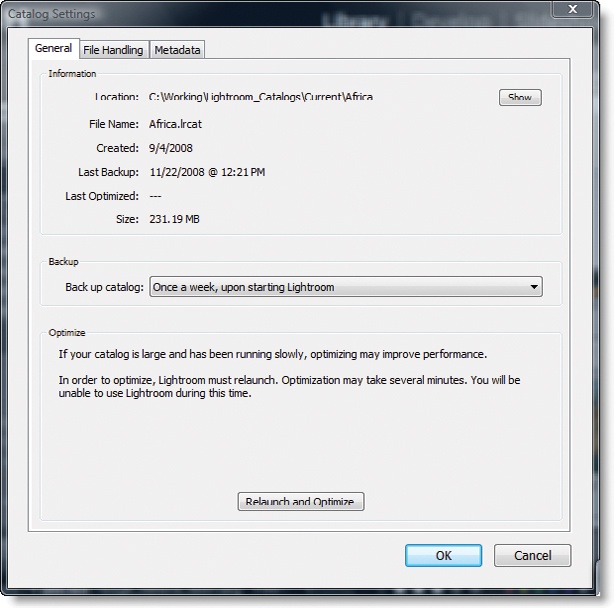
Figure 9-25. The Catalog Settings dialog in Lightroom. This is where you specify the backup location and schedule.
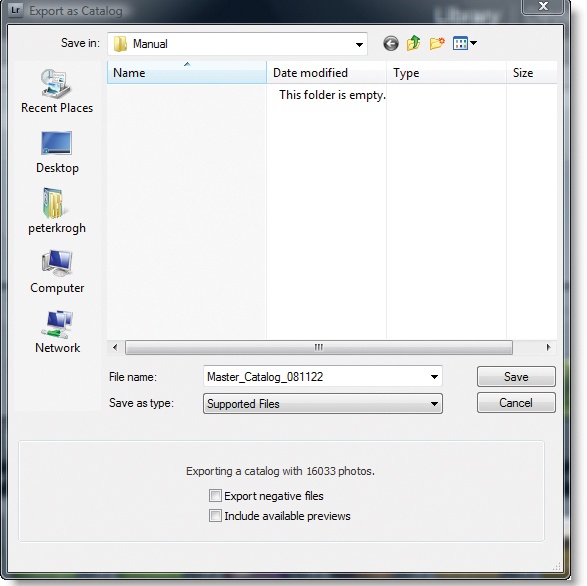
You can also back up the catalog at the end of a work session, if you want to make sure nothing happens to the work you did that day. You can choose Export Catalog from the File menu, and save out a copy of the entire catalog document—you can send this backup to a different drive if you like. Make sure that you disable the options for exporting previews and negatives, or else the backup will take up lots of space and will take a long time to make. Figure 9-26 shows how I send this backup to a folder called Manual (notice that I named the backup for the date it was made).
It’s also possible to write the metadata changes back to the DNGs, JPEGs, TIFFs, PSD files, or the sidecars for proprietary raw by using the Save Metadata command in the Library’s Metadata menu (shown later in this chapter). However, this does not back up flags, collections, output settings, virtual copies, or history.
There are quite a few customizations you might want to create for your catalogs. These include keyword groupings, collections, smart collections, and more. Once you’ve gotten things set up the way you like, it’s nice to have new catalogs inherit all the settings whenever you need to make one. There are a couple strategies you can use. If you want to copy settings from a catalog that’s not too big, the simplest way is to follow these steps:
Open Lightroom and create a new catalog.
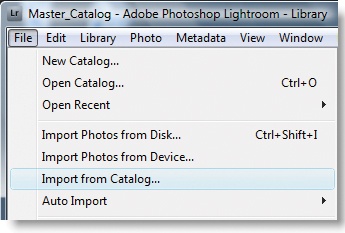
Access File > Import From Catalog.
Find your Master Catalog and select it.
In the Import dialog, under File Handling, select Don’t Import New Photos.
Keywords, collections, and other settings will be imported into the new catalog, even though the pictures won’t.
Note
Remember that this backup (Figure 9-26) is of the catalog settings only, not the previews, nor the images themselves. This is a way for you to save all your image adjustments and informational metadata only.
If you are importing settings from a catalog that is very large, this may take too much time. You can try the following process as an alternate method:
Find the LRCAT file of the catalog whose settings you want to import.
Duplicate the LRCAT file (not the preview folder) using the Mac Finder or Windows Explorer, and rename it appropriately with the new catalog name.
Open the catalog. All thumbnails should be gray rectangles. Select all images and press Delete. You should be left with an empty catalog that has the entire keyword list, as well as all collections and smart collections ready to use.
Import images and start using the catalog.
Working with multiple catalogs in Lightroom is a tricky business, mostly because you can’t open more than one at a time, but also because they can be large and unwieldy. Here are a few tips for multicatalog workflow:
Do it because there is a reason to. Don’t just make new catalogs for every shoot—you’ll have less comprehensive access to your collection as a whole, and can spend a lot of time opening and closing catalogs. You are also likely to do work to the same file in more than one place and you may have difficulty resolving between the two.
Know which is the primary copy of the catalog. Name catalogs in a way that makes sense. If you have a copy on a laptop and a desktop, make sure you know which has the most recent copy of the work.
Clean older catalogs out once you’re done with them.
Some people like to store their catalogs on external drives so that they can have a single primary master catalog that they don’t need to copy between a laptop and a desktop computer. The drive can be plugged into the desktop in the studio and into the laptop on the road. While this is an attractive idea, it’s kind of dangerous, particularly for the laptop. If the connection between the external drive and the laptop gets interrupted while the catalog is open, the catalog can become totally corrupted, losing all the annotations, develop settings, and more. As a photographer who travels a lot, I have frequently had drives come unplugged inadvertently.
If you are going to use this method, keep in mind that Mac users will want to avoid USB drives if at all possible, no matter how secure the cables are. The Lightroom development team has reported that this a risky way to run the program. Make sure you export your catalog frequently to the internal drive on the laptop so that you don’t lose your recent work. If you experience repeated corruption of a drive stored on a USB (or any external) drive, you should consider the drive configuration to be a likely cause of the problem.
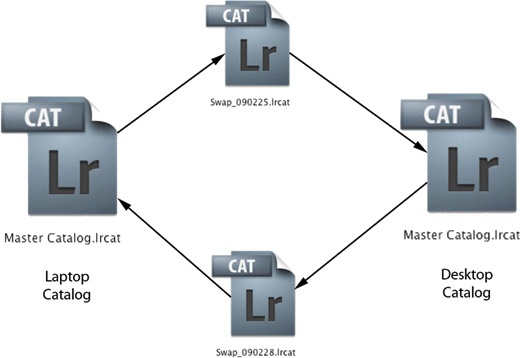
If you need to have a master catalog on both your laptop and your desktop, and it’s so large that copying it back and forth is unfeasible, here’s a method that can help you swap the new work between the two. It’s possible to export a catalog of files that have been changed recently from one computer and import the changes into the catalog on another computer (Figure 9-27). Here’s how:
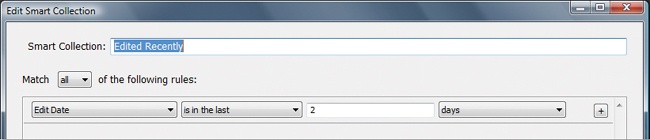
Set up a smart collection in the laptop catalog with the criteria Edit Date is in the last X days (where X is a high enough number to cover files edited in this catalog since last sync), as shown in Figure 9-28.
When you get back to your desktop computer, select all files in the smart collection and export as a catalog without negatives using File > Export as Catalog. Save the exported catalog as
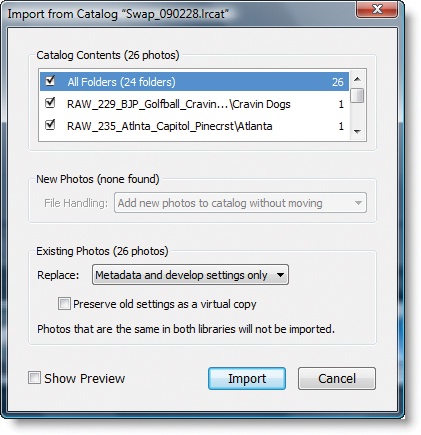
Swap_Todays Date.Transfer the catalog to the desktop, launch the master catalog, and choose File > Import from Catalog.
Lightroom will alert you that these files exist in the catalog already. In the Existing Photos dialog, select Replace Metadata and Develop Settings Only (Figure 9-29).
Note
You could also use this swapping technique if you want to make a catalog to travel with that includes only part of your collection.
Export a catalog containing a particular collection or shoot, including the previews (and negatives, if you want to do Develop work). When you get back to the studio, you can reimport all the new work back into the master catalog.
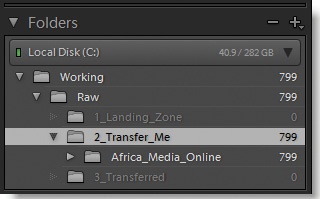
In Chapter 8, we saw how to set up the folders for our workflow pipeline, and now we need to make sure Lightroom can see them. Remember, Lightroom is not a browser, so by default, it’s only going to show us folders that contain images that have been cataloged. There are two different tricks we’ll need to do here to get Lightroom ready to work. The first is to have Lightroom show us the “parent” folders that hold our shoot. By default, Lightroom 2 shows you the drive name and the folder that contain your images. If you want to see the entire folder tree, right-click on the folder that contains the images and select Add Parent Folder (Figure 9-30). Do this all the way up from the image folder to the drive, and you’ll be able to see the whole folder tree.
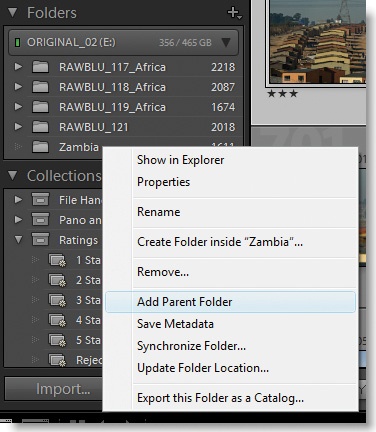
Figure 9-30. To see the folder tree that contains your images, right-click a folder and select Add Parent Folder, then move up the folder tree until all desired folders are showing.
To get Lightroom to see the additional folders that don’t contain cataloged images, click the + next to the word Folders (Figure 9-31). This will let you add the workflow pipeline folders to the Folders list, even if there are currently no images in those folders (if there are images in the folders, they will be added to the catalog).
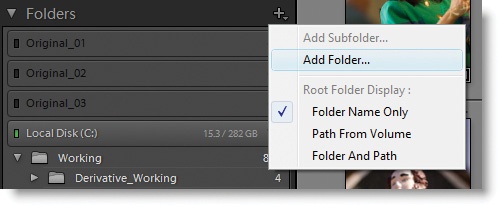
Figure 9-31. Lightroom won’t show you empty folders in the Folders panel. Add them by clicking the + and selecting Add Folder. You can add your pipeline folders to the panel, even if they are empty. Note that Lightroom will import any images that happen to be in these folders.
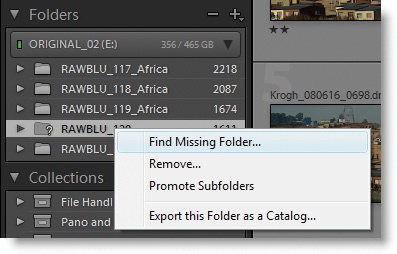
If you move or rename folders outside of Lightroom, the program will lose track of them, and you will need to reattach the catalog to the folders. The easiest way is to right-click the folder, choose Find Missing Folder (Figure 9-32), navigate to the new location of the folder, and select it.
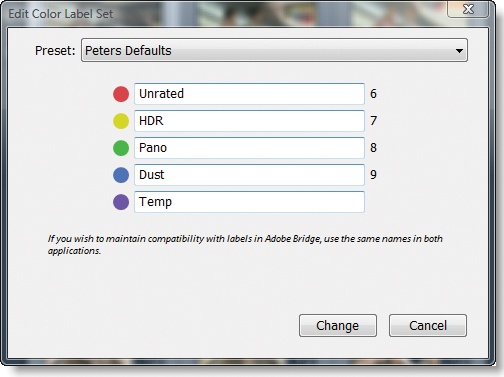
You can use the Labels in Lightroom to quickly tag and sort images. The labels have both a color and a name. While you cannot change the colors, you can name the labels however you want. Access Metadata > Color Label Set > Edit and set the labels up in a way that is useful for you. Because I shoot a lot of panoramas and HDR sequences, and because it’s important to me to get rid of sensor dust spots, I’ve made custom labels for these items (as shown in Figure 9-33). You can switch between label sets if you need to use the labels differently for each shoot.
You Might Be Wondering ...
What’s Up with those White Labels?
You may find that your labels appear white, even though there is no white label listed in the label set (Figure 9-34). What gives? The labels each have a name and a color, but only the name is written to the file’s metadata when you apply a label. Applying the red label Unrated does not assign the color red to the file, but rather the label name Unrated. If you apply a label to an image and there is no corresponding label with that name, the label shows up as white. This tells you that there is a label for the file, but that it does not match any of the current label names.
You can find out which labels are used in your collection by setting the filter bar to show labels. Any label applied to an image will show up here, regardless of how your color labels are currently set to display.

Since keywords are the most durable and flexible place to organize your images in Lightroom 2, you’ll want to do a little work to make it easier to navigate. As we saw in Chapter 3, a long list of alphabetized keywords is an unfriendly place to organize pictures, but one that is nested hierarchically is easy to work with. Do a little work to get the keywords organized into a hierarchy that works for your collection. I suggest making a few top-level hierarchies that are relevant for the kind of images in your collection, and building more detailed organization inside each one (Figure 9-35).
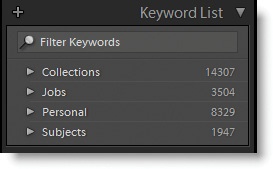
I’ve created four top-level sets to organize my images (I do this in Expression Media, but you could also do this in Lightroom):
Clients or Jobs. I make a subgroup for each client, and inside that group I make one for each project. I subdivide projects as necessary.
Personal. Any noncommissioned work I do is added to this group. It is subdivided into groups like Events, Family, Friends, Travel, and Projects.
Collections. This group brings together images with themes, such as Architecture, or images that are used in portfolios or slideshows.
Utility Sets. These images are grouped for some kind of temporary processing need, such as checking completeness of metadata, as a reminder to do some additional develop work.
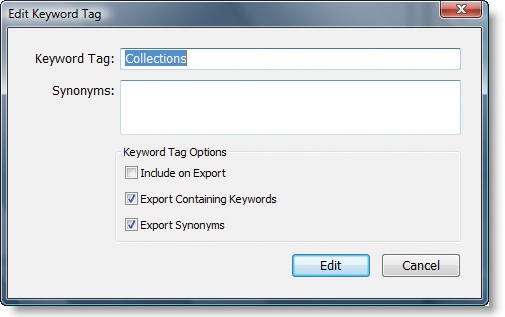
You might want to use a word to organize your hierarchy that you don’t want to export to the file. You can keep a keyword as private metadata by disabling Include on Export when you make the keyword. If you neglected to do that when you created the keyword, you can right-click the keyword and select Edit Keyword Tag. The dialog shown in Figure 9-36 will display.
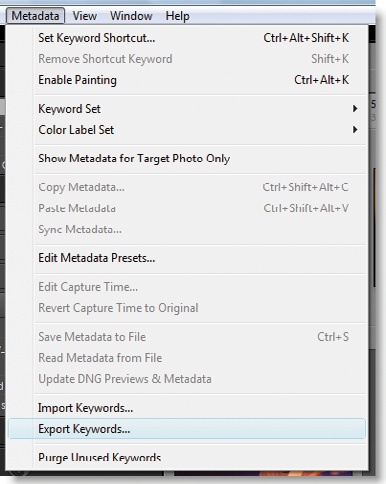
Once you’ve built a list of relevant keywords in one catalog, you might want to use it in another. You can easily export this list in the Library module by accessing the Metadata menu item and selecting Export Keywords (Figure 9-37). The keyword list will be saved as a text file that you can import into another catalog by selecting the Import Keywords item in the Metadata menu.
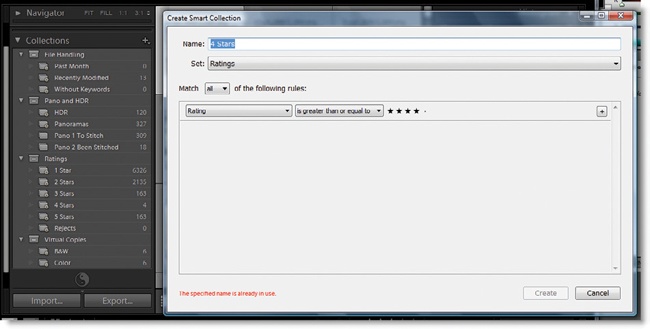
You will probably want to set up a few smart collections, depending on how you use the program (Figure 9-38). Your copy of Lightroom came with a few sample ones, including one labeled Five Stars. I like to create smart collections for each level of star ratings, but I name them with the numeral, rather than the word, so that they line up in order. I have also created a collection for images that are tagged with the Rejected flag so that I can see those images easily. You might also want to create some smart collections for virtual copies, named for the copy names you like to use. If, for instance, you often need to make a set of black-and-white and color versions of the same file, you can have them automatically drop in the smart collection as they are made.
Now we can get down to actually doing some work with Lightroom. We’ll cover the tasks outlined in the previous chapter as the basic roadmap for works in progress. This workflow outline is not meant to be definitive—there will be twists and turns for every photographer, depending on the needs of the shoot, time available, and more. This section will present an efficient linear workflow that you can adapt to your own personal situation.
Lightroom users who have collections that easily fit in one catalog don’t need to do this step. However, users who have very large catalogs, or who need to work on a laptop in the field and then bring images back to a studio workstation might want to start a new project catalog for each project. Use one of the techniques outlined in the Making template catalogs section to create your project catalog. You should save this catalog in the WorkingLightroom Catalogs folder.
If you did not pass all the images off to Lightroom in the ingestion process, it’s time to do it now. Figure 9-39 shows the preview area of the Import dialog. Building previews at 1:1 is the preferred way to prepare the shoot, since it will make examination of the photos a faster process. Minimal previews gets you started faster, but slows down whenever you want to closely look at a photo.
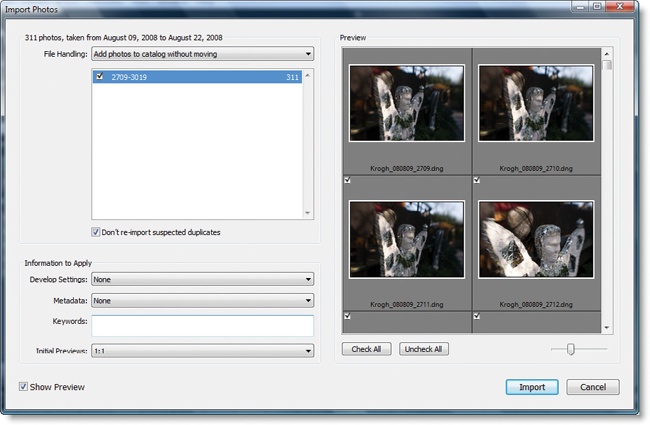
Figure 9-39. The preview generation in the Import Photos dialog. Set it to minimal if you want to get to work right away, or to 1:1 if you want to let the computer make the files really ready for you.
If you have not used a separate ingestion tool like the one outlined in Chapter 7, you’ll need to apply a metadata template and develop settings at this point. In this case, I’ve already renamed images and added bulk metadata and preliminary develop settings with ImageIngester Pro on download.
Note
A complete guide to ingesting with Lightroom is outlined in Chapter 7.
If you brought multiple shooting situations into Lightroom without applying bulk metadata for each shoot, you should do some basic tagging now. You can select all images from the shoot, or part of the shoot, and open the Metadata panel on the right-hand side of the Library. Fill in information for groups of images first, before working on individual images. In general, your workflow should start with many, then narrow down to a few.
This is where Lightroom can really shine. Because you can prebuild the previews for 1:1, you can move through images very quickly in the Library, making judgments about general quality. You can zoom in with a quick keystroke, add ratings, and move to the next picture. You can move back and forth among a group of similar images and find which is the best. The quick zoom lets you easily check for critical focus, even on a very large number of images.
As you rate your images, I strongly suggest that you resist the temptation to skip to the middle of the shoot and rate the best images. By doing that, you make the rating workflow more difficult and error-prone. As you come back later to do a comprehensive pass through the images, you run into the previously rated photos. This can lead you to overlook photos that are near this group but did not get a rating the first time through. Doing a comprehensive first pass will make it much more likely that you give all images the attention they deserve.
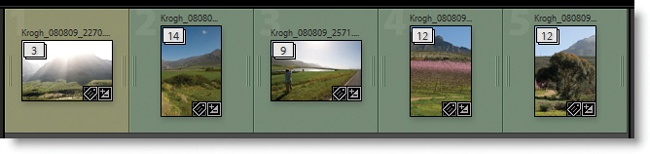
Sometimes you need to get images out before you have time to rate an entire shoot. Instead of using stars for this, I suggest using the Quick Collection tool (the B key) to tag images. This drops them into the Quick Collection area in the Catalog panel (Figure 9-40). Once you have made choices, you can click on the Quick Collection to see all the images. I suggest adding the Purple label to the images at this point so they stand out in the crowd more easily (Figure 9-41). Labels are also much more durable than the Quick Collection is.
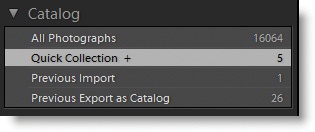

Figure 9-41. You can select all images in the Quick Collection and apply a label to them so you can remember which ones have been sent out.
You may also want to tag the remaining unrated images with the label Unrated so that you know you’ll need to return to them later.
Figure 9-42 shows how I run the keyboard when rating. Once you get used to this, it’s a very fluid and fast operation to look through your pictures. Here’s what my fingers are doing:
The middle and ring fingers on my left hand are working the number keys, adding ratings.
The index and middle finger on my right hand are running the arrow keys, moving along the filmstrip line.
I use the thumb on my left hand to zoom the image with the space bar. A click and hold does a springy zoom, a rapid click zooms in, and another rapid click zooms back out.
I mark outtakes with the X key using my left index finger.
If I want to mark an image as dusty, I can do it by hitting the 9 key (Blue) with my left index finger.
If I want to mark a panorama sequence or an HDR sequence with a label, I’ll need to either switch to Grid view, or tag the set of images by right-clicking in the filmstrip. The G key switches to Grid View, and the E key switches back to Loupe view. You can select all images by either Shift+clicking on the first and last in a sequence, or by holding the Shift key as you arrow through a sequence.
You can use the Filter command to show only the higher rated images, or any attribute such as label and flag. As I go through a shoot looking at the images, I like to filter down to my 1-star and better images to see what I’ll be showin from the shoot, or my 2-star and better images to see what I’ll be recommending from the shoot (Figure 9-43). You can get to the filter by using the filter bar at the top of the Grid view, or by clicking Filter at the bottom-right of the Light-room window.
This feature lets you refine your ratings until you are happy with the selects.
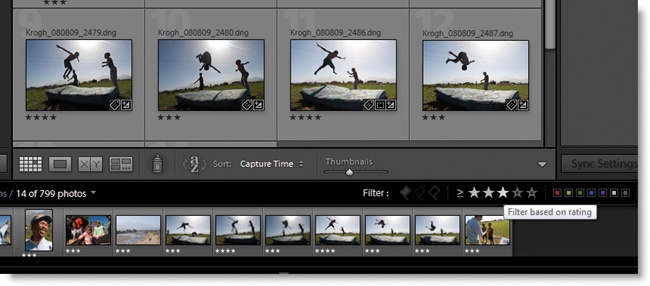
Figure 9-43. Use the Filter command to narrow the view down to just the best images to check how well you’ve rated a group of images.
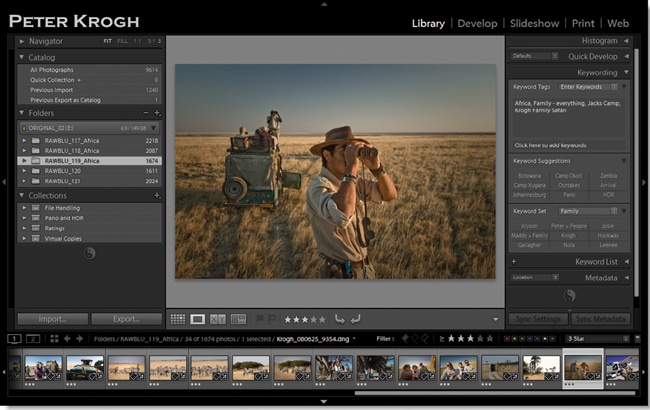
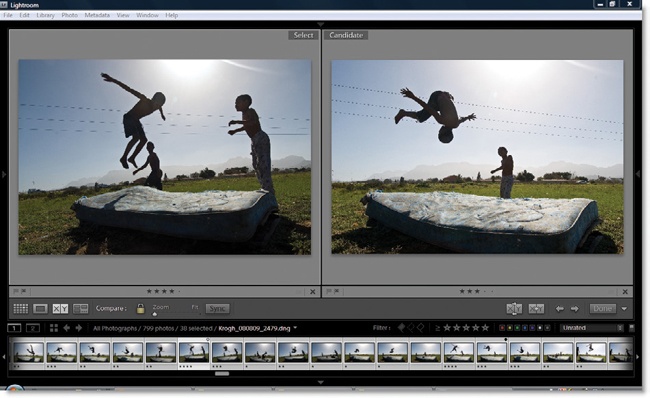
You can use the Compare function to choose between several images from a situation (Figure 9-44). Select the entire group by clicking on the first image and Shift+selecting the last image (this confines your examination only to these particular images). Press the C key to go into Compare view. The content area changes to a split screen. Press the Tab key to hide the side panels and get more screen real estate. The image on the left is the Select. As you work through the images and decide a later image is better, press the up arrow to replace the Select with the Candidate. If you apply a rating or label when in Compare, you will only be applying it to the Select.
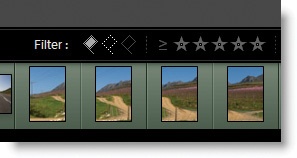
You can use the Reject flag and a filter to have outtakes disappear from the filmstrip as you work through a shoot. If you click the white flag filter and the middle (dotted outline) flag filter, images will disappear as you press the X key to assign the Reject flag (Figure 9-45). If you use this feature, I strongly suggest assigning the keyword “Outtakes” to rejected images at the end of the editing session if you really want to get rid of the images. Otherwise, the work might get lost (remember that flags are “local” to the folder or collection you’re using as a source).
If you’ve set up a smart collection to show rejected photos, you can see all the outtakes as a group, and decide if you want to delete them.
If you shoot panoramas or HDR sequences, I suggest you label them on this first pass through the shoot (Figure 9-46). I have found that I can spot HDR sequences quickly, since bracketed images are very obvious. Panorama sequences are a bit harder to spot, so I do a couple things that make them easier to see. I try to shoot a picture of my hand at the beginning and end of each series, which makes them easy to see. I also try to always shoot them left to right so that they line up in natural order in the window. If I shoot an HDR panorama, I’ll give them the Panorama label.
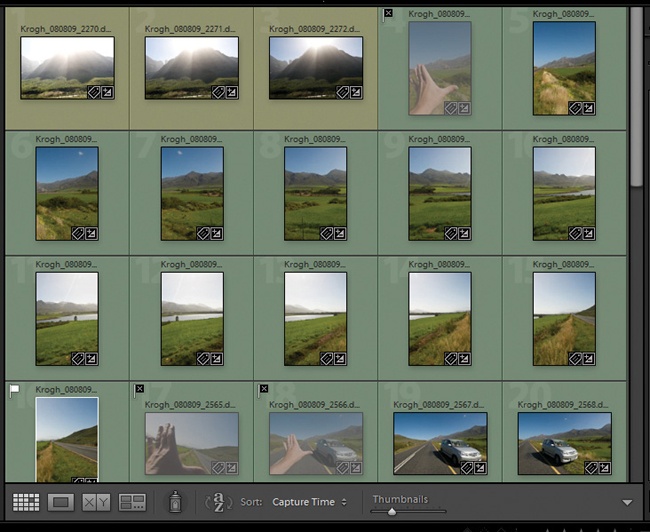
Figure 9-46. I tag my panorama and HDR sequences in my first pass through the images. You can see how shooting a picture of my hand at the beginning and end of each pano sequence makes it easier to see where they start and stop. Shooting left to right also makes it easier to see the sequence. If you carry a color checker or gray card, these would be even better to use.
Once you’ve tagged images for panorama or HDR, you might want to make use of the Stacks feature to keep the grid and filmstrip view cleaner (Figure 9-47). Ultimately, if you use Lightroom for file management, you might want to put the stitched panorama (even if only in proofed form) on top of the stack.
Note
Because you don’t really know what a panorama will look like until you stitch it, I consider proof-stitching an essential part of the image prep process. I like to make a proof-stitch of my panoramas—a small-sized version that shows me what the image will look like. I can use these to decide which panorama sequences to spend more time on. You’ll want to use some method to track which images have been proofed as part of the workflow. We’ll look at this in greater depth a little later.
Now that we’ve made a first pass at rating and grouping the images, it’s time to do some work to make them look the way we want. I’m not going to go into this in-depth, because there are many fine resources on using the develop tools in Light-room. I’ll give you a quick overview of my approach to the process.
To use Quick Develop most efficiently, you’ll want to switch to the Grid view, and you’ll likely want to hide both the filmstrip and the source panel so that you can see a lot of images at once. Remember that the work we’re doing at this stage is adjusting the images for proofing, whether it’s for our own use or someone else’s. We’re striking a balance between making them look right and using our time as efficiently as possible.
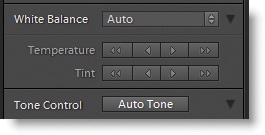
If you have images that need a lot of work correcting color balance and exposure, you might want to try applying the Auto settings for both White Balance and Tone Control (Figure 9-48). This may work well for you, depending on the subject matter of the pictures. If it makes things worse, you can’t undo the Auto Tone adjustment, but you can go back to the default value for the camera. This may have been the starting point, depending on what condition they were in when you hit the Auto button. If you reset the White Balance to As Shot, Lightroom will read the in-camera white balance and reset the image.
As you work through your images, you may want to filter down to the higher rated images and spend the most time there. In many cases, I find that I want to give all 1- and 2-star images some basic Quick Develop work, but that I will want to do more custom work to the 2-star and better images. At this point, it’s time to move into the Develop module.
It’s now time to turn our attention to the best of the images from the shoot and make them look as good as we can. We can really put our ratings to work here. We’ll want to work on the best images the most, and then do needed touch-ups to other photos. One strategy I use is to adjust the best images first, and then transfer those settings to other images shot under the same lighting conditions. As a matter of fact, if the whole shoot was shot under the same lighting conditions, you may be able to simply correct one image and paste the settings to the rest of the shoot and be done. This is one of the principle benefits of parametric image editing. So to start your develop work, filter to the best images first.
Reference
There are some great resources that can help you make the most out of your images in the Develop module. Martin Evening’s The Adobe Photoshop Lightroom 2 Book is probably the most comprehensive. Mikkel Aaland’s Lightroom 2 Adventure is also a good place to look for information.
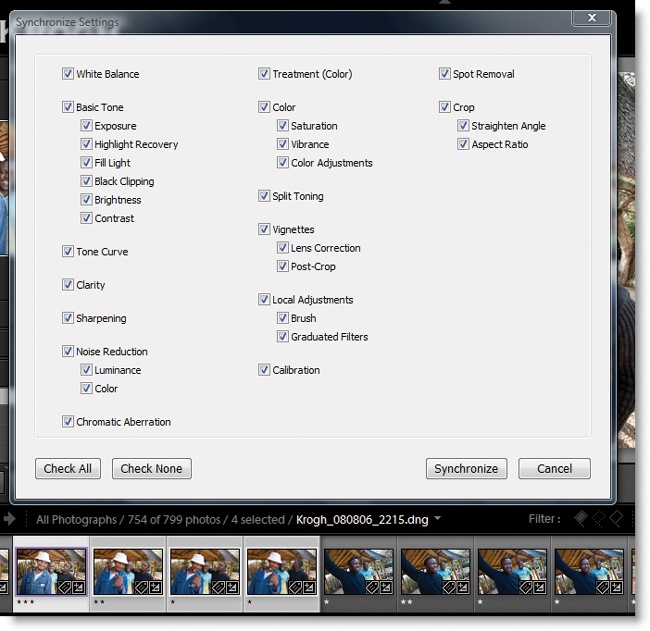
You can use the Sync command to transfer adjustments from one image to another. Select the image you want the settings to come from, then select the additional images (the source image will be the most-selected image, the one in the content area). When you click Sync, a dialog box appears asking which settings you’d like to transfer (Figure 9-49). Select the appropriate settings and click Synchronize. The Develop settings will be transferred from the source image to all other selected images.
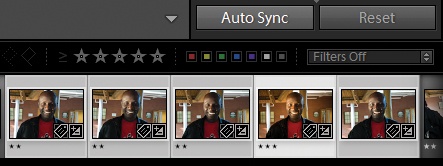
If you change Sync to Auto Sync, all adjustments applied to one image will be applied simultaneously to multiple selected images.
To enable Auto Sync mode, select multiple images and hold down the command key on Mac (Ctrl on PC) and click the Sync button (Figure 9-50). Be careful when working in Auto Sync: it’s not hard to change a lot of files inadvertently.
In this section, I’ll show you how to use collections (both smart and static) to help track workflow. We’ll use panorama proofing as the example, although you could use a similar technique for HDR creation. We’ve already labeled the images to indicate they are part of a panorama sequence. While Lightroom has the capability to go straight to photomerge in Photoshop CS3 or CS4, it sends a full-sized file, and the resulting panorama can become quite large (depending on your output settings, it may also send over a 16-bit version, which makes the file even bigger).
Note
This is only one way to accomplish panorama stitching— you could also use Bridge as outlined in the next chapter. I’m showing this example here because it demonstrates how to put several of Lightroom’s tools together to help with workflow.
One way to accomplish this is by creating a set of temporary proofing JPEGs to do the panorama proof-stitching (you can discard them once the pano has been stitched). Drop the JPEGs in to a temp folder and have Lightroom bring the images back into the catalog. Once you’ve exported the images for every panorama in the shoot, you can start making panoramas. Here’s the workflow:
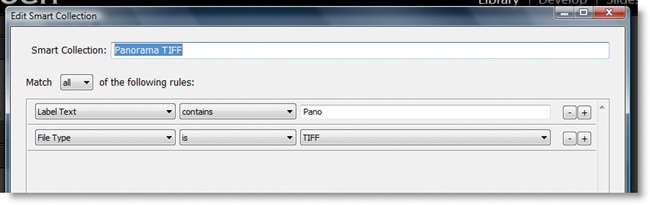
Make a smart collection called Panorama DNG (Figure 9-51 and Figure 9-52) that gathers all images with the Panorama label. Click on this collection to show all the panorama elements, and move to the Develop module to adjust them until you’re happy with the result. Apply the keyword Stitched to the DNG files once you’re done with the stitches, and they will be removed from this collection.
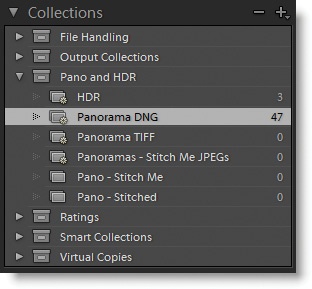
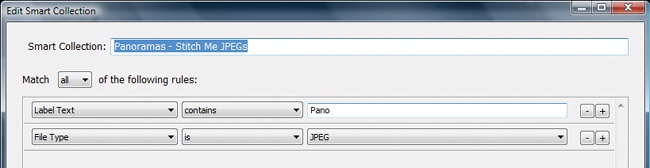
Figure 9-51. This smart collection gathers unstitched panorama elements, according to the criteria in Figure 9-52.

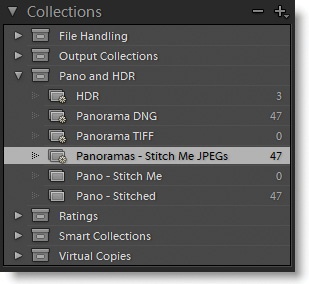
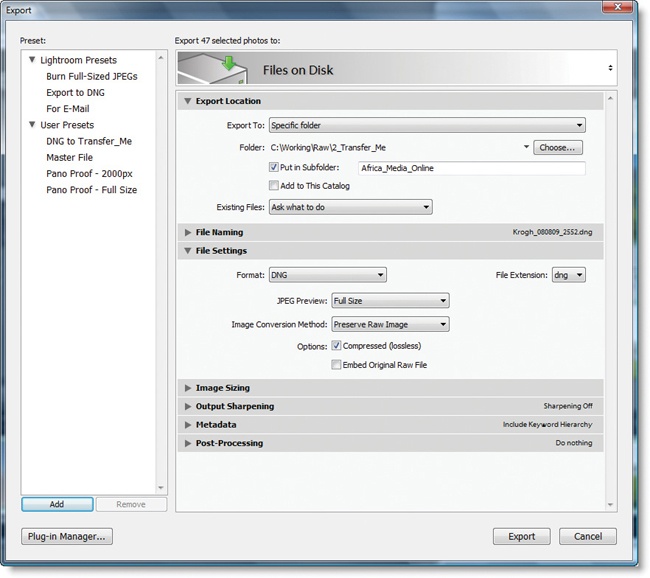
Create a preset in the Export dialog (File > Export) that will make the downsized 8-bit JPEG files, and save them to a temporary location in the folder WorkingTemppanoproof (Figure 9-53). You must also instruct Lightroom to import the images back into the catalog once they have been created. Once they’ve been imported, they will automatically appear in the smart collection Panoramas – Stitch Me JPEGs, as shown in Figure 9-54 and Figure 9-55.

Figure 9-53. Some Export presets for panorama stitching. This one resizes to 2000 pixels on the longest side, and converts to an Adobe RGB JPEG. It also tells Lightroom to add the JPEGs back to the catalog.
Click in the smart collection of panorama JPEGs and select each panorama sequence. Right-click the images and select Edit In > Merge to Panorama in Photoshop. Photoshop opens, and the panorama dialog pops up. Select Auto and click OK. Photoshop will build the panorama.
Once the stitching is complete, save the file. The naming I use for panoramas is Krogh_080809_2567-2573, where 080809 is the shoot date from the original filename, and 2567-2573 is the number of the first and last frame in the sequence. I suggest you leave the file as a layered TIFF so you can see exactly which frames were used to make the panorama (sometimes I omit a frame or use one from another sequence). If you need to do any skewing or warping of the file, create a merged layer, like the one in Figure 9-56. You can create this layer by choosing the keyboard shortcut Command-Option-Shift-E on Mac or Ctrl+Alt+Shift+E on PC.
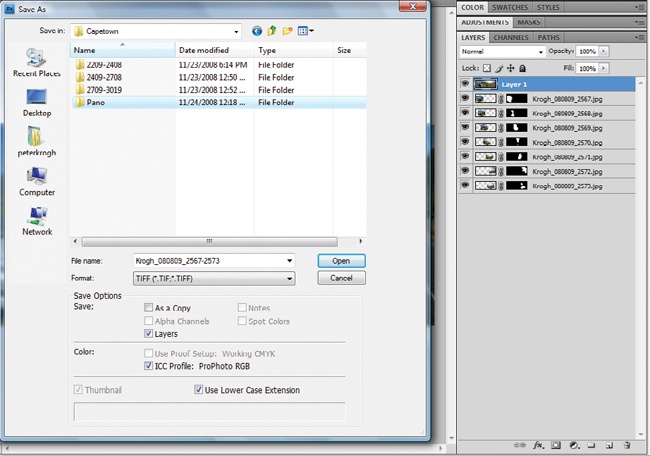
Figure 9-56. Once the panorama has been stitched, save it back with the rest of the files. Notice that the file is named for the starting and ending image numbers in the sequence.
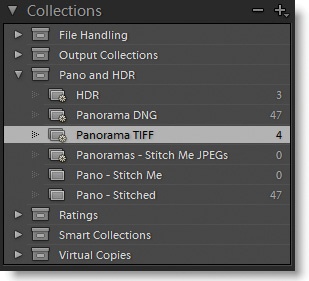
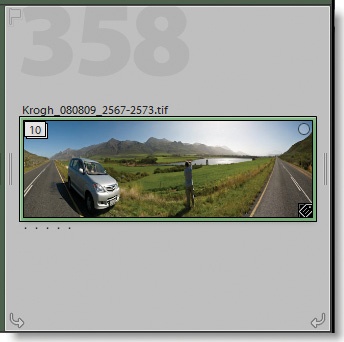
Save the file back into a folder called Pano in the shoot folder. Lightroom will automatically reimport the panorama back into the catalog, where it will show up in the smart collection Panorama TIFF (Figure 9-57 and Figure 9-58).
Once the panoramas have been stitched, select all the JPEGs and delete them by selecting Photo > Delete Photos in the menu. Select all the files in the Panorama DNG smart collection and add the keyword Stitched to remove them from the Panorama DNG smart collection. You can then drag them into the Panorama Stitched static collection (or you could create a smart collection for DNGs with the keyword Stitched that adds them automatically). As shown in Figure 9-59, you can stack the stitched image with the pano elements, making sure that the stitched image is the one on top of the stack (if you are going to stack, all files need to be in the same folder).
Lightroom offers several ways to create proofing output for image files. You can make a slideshow, web gallery, or prints. You can also send images straight to email, or create a set of files to zip up and send to your client. If you are going to make a slideshow or web gallery, I suggest making a static collection to wrangle the images with. This will preserve the sequencing you’ve created—just drag the images around, and that becomes your user order.
If you’ve used the star ratings to indicate which images you’ll proof with, it’s pretty easy to collect the correct images together. And if you’ve used the 2-star designation to indicate which ones you’ll recommend to your clients, you can move those to the front of the gallery or slideshow. To move these images:
Click to show the entire collection.
Click the 2-star filter on the bottom right of the content window.
Select all images.
Click the 2-star filter again. 2-star images will remain selected, and you can drag them to the front of the collection.
Once again, there are a large number of books, movies, and web-based resources that can show you how to get the most out of your Lightroom slideshows, web galleries, and prints.
Once you’ve finished your proofing adjustments, you can save the work back to the files, and transfer the files to the archive. After archiving the images, you can permanently back them up. This way, both the archive and the backups of the archive can contain a good basic adjustment of the file, as well as some basic metadata. Let’s look at how we can make sure the files contain all this important work.
If you have not already deleted outtake files, you may want to do it now. I generally keep nearly everything, but realize that not everyone wants to do this. This is the last chance to get rid of stuff before archiving. If you’ve tagged with the keyword Outtakes, or with the Reject flag, select the images and choose Photo > Delete Photos from the Library module.
Warning
Stacking makes your Library neater, but it has an unintended downside. When you select everything in a folder to update DNG previews and metadata, you only select the top item in a stack, so only the top image in the stack is updated. If you use stacks, before you update DNG previews and metadata, choose Photo > Stacking > Expand All Stacks. You can double-check that everything is selected by looking at the status bar above the filmstrip. Once you’ve synced the metadata, use the command to collapse the stacks back.
If you have already converted your images to DNG, you will want to push the metadata back into the DNG once you’ve done your rating and adjusting process. I strongly suggest that you also update the embedded preview inside the DNG with a current one. It should be a full-sized preview for maximum flexibility. If you are archiving raw images with sidecar files, this is the time to make sure the sidecars are up to date.
You can find the commands to Save Metadata to File for DNGs or sidecar metadata in the Photo menu of the Develop module, and the Metadata menu of the Library module.
Once you have updated the DNGs, you can move them to a folder for transfer to the archive drive (Figure 9-60). In the Folder window, drag the entire project folder to the Transfer_Me folder. You are now ready to use a transfer utility to put the images in their permanent home.
If you have been working with proprietary raw up until now, and want to create DNG files to archive, here’s where you do it. You’ll want to make sure that you have all the images from a folder selected for conversion. There are two ways to create DNG files within Lightroom, and each serves a different purpose.
In the Library menu, Convert to DNG will create a DNG file for each raw file and place it back in the same folder. These new DNG files will be the replacement files for the raw, and will inherit collections, history, flags, and virtual copy settings for each image. This would be the appropriate command for those who will continue using Lightroom as the principal file management tool, since it retains the collections, history, and virtual copy data. However, these users would probably be better off converting as they download, streamlining the whole process.
You can also convert to DNG with the File > Export command, and keep more control over where the DNG files land after conversion (Figure 9-61). You can set the newly created DNG to land in the Transfer_Me folder. This is a good workflow for readers who want to archive proprietary raws in addition to DNG files.
If you are a single-drive, Lightroom-only user, your images should already be in the archive. The images should have been copied to archive at ingestion or shortly thereafter. If you are using a working files pipeline, you will want to archive the images now. You should do this by means of a validated transfer, if you are moving the images to another drive or computer. Once you have placed the images into their permanent home, you can point Lightroom over to the new copies by right-clicking the folder in the Lightroom Library and choosing Update Folder Location (Figure 9-62).

Once you’ve put the rated and adjusted images away in their permanent home, it’s time to make the permanent backups. This is work you’ll need to do outside of Lightroom. In my workflow, the archive process involves burning to Blu-ray disk, and doing a validated transfer of the bucket to a backup drive. Once you have backed up the images, you can erase them from the Transferred folder on the working files drive.
When transitioning images from working files to the archive, you should also put the catalog of the images into a more permanent structure as well. You will likely continue to work on the images, at least to some degree, but I suggest that you transition from a project catalog to a master catalog (if you are using a project catalog). It’s a pretty easy process.
Close the project catalog and open your master catalog. In the File menu, select Import from Catalog (Figure 9-63). Navigate to the project catalog and select it. All the image data will be imported into the master catalog.
You should move the project catalog out of the current folder in the Lightroom Catalogs folder at this point so that you don’t accidentally open and work on the small catalog in the future. In fact, once you have made a backup of the new master catalog, it probably makes sense to erase the project catalog to save disk space and avoid confusion.
It’s certainly possible that you could do this process earlier in the workflow. A laptop user might want to do it right after returning from location, or after image adjustment. There is a speed advantage, however, to putting off the merging until you have done most of the proofing work to the project—smaller catalogs run faster than large ones, in general.
If you are using some other software as your top-level catalog, you can do the handoff once final DNG files have been made, either before or after transfer to the archive. I catalog my DNG files with Expression Media once they are ready for archiving. We’ll go over a multiapplication workflow in Chapter 11 that you could easily adapt to Lightroom.
If you’ve followed the workflow in this chapter, you will have images that are archived with some universal metadata, as well as proofing adjustments applied to the files. The large majority of images archived in this way probably won’t need to be readjusted. A relatively small number of images will get readjusted—either because they are high-value images and deserve further attention, or because you didn’t do a good enough job the first time through (it also might be because your taste changes, or new software offers better adjustment tools). You’ll need to pay attention when you rework images so that this valuable new work can be reliably preserved.
When you rework images, you’ll probably want to export the new settings back to the files at the end of the session. You’ll also want to back up the new settings work somewhere in case the primary archive becomes damaged and you need to restore from backup.
The best way to preserve new interpretations of your images is to do the work in a Lightroom catalog and keep a good backup of the catalog. Once again, this is reasonably simple for the single-catalog user, but starts to get tricky for a user with multiple catalogs. You need to know with certainty which catalog contains the most current version of the file settings in case you need to restore the archive after failure. If you have primary catalogs with neat dividing lines (all images from, say 2005–2007), make sure you do the reworking of the image with the primary copy of the catalog, and be sure to keep that catalog backed up.
You might also want to rework the images, sync the new metadata to the primary version of the files, and then update the backup version of the image files with the changes. This can make restoration of the archive easier, since the archive backup contains all the changes made to the primary copy of the files. However, it also makes your backup less secure. It’s all too possible that updating the backups will eliminate the protection that the backup offers. If the files in the primary archive are damaged by virus, disk, program, or transfer error, the act of updating the backups will also damage the backup.
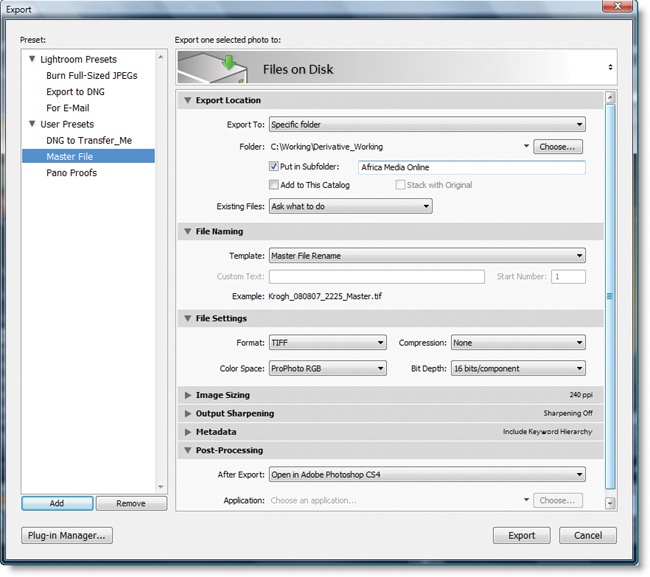
When you need to work on an image in Photoshop, you’ll need to export a derivative file from Lightroom. First select the image to work on, then choose File > Export to open the Export dialog (Figure 9-64). Here you’ll be able to set preferences for how the image is formatted and named, and where it lands. I use the following process when working with derivative files:
Export Location. I put derivative images in the
Derivative_Workingfolder, in a subfolder named for the client or project.File Naming. I have set up a template that appends the word
_Masterto the end of the file name.File Settings. I create a TIFF file, set to 16-bit PhoPhoto RGB or 8-bit Adobe RGB. I use the 16-bit settings for images that need a lot of color and tone work in Photoshop, or that are meant for high-value inkjet output. I use 8-bit for images that need little color or tonal correction and that will be reproduced in less exacting ways.
Post-Processing. Once I have created the files, I have Photoshop open them.
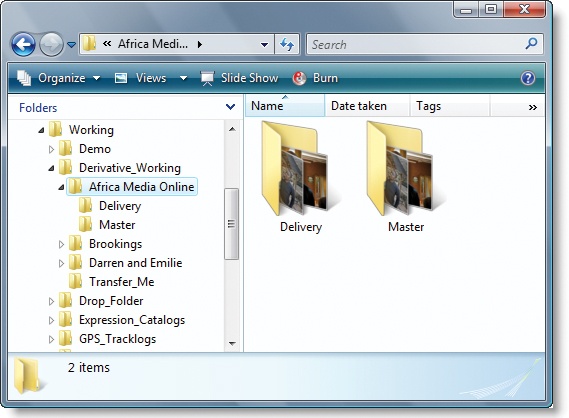
Once you have created the derivative master files, you can work on them in Photoshop until you’re satisfied. At the end of the process, you can make a delivery file, which is (for me) a flattened, 8-bit version of the master file. If you know the client is color-managed, you can deliver an AdobeRGB file. If the file is being sent to someone who may not understand color management, it may help to convert it to sRGB. And if you make a CMYK version of the file, you may want to put CMYK in the file name. Figure 9-65 shows what a finished set of derivative files looks like just before archiving. The folder called Master holds the layered master files, and the Delivery folder contains the files that will get sent to the client.
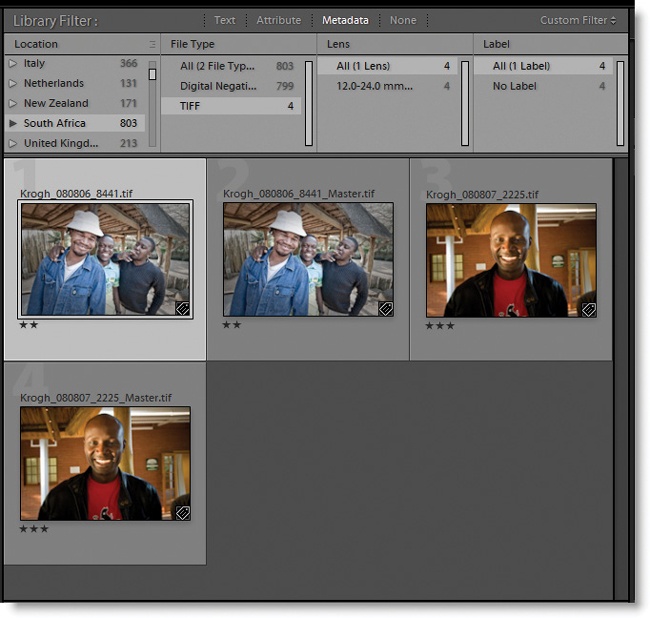
When the Photoshop work is finished, you can catalog the images. The images will inherit all the metadata that the originals had, so it should be easy to find them by keyword (collections don’t survive the round-trip back to Lightroom, unfortunately). You can use the filter to separate out the TIFF files from DNG files if you want to find the master or delivery files from a particular project (Figure 9-66).
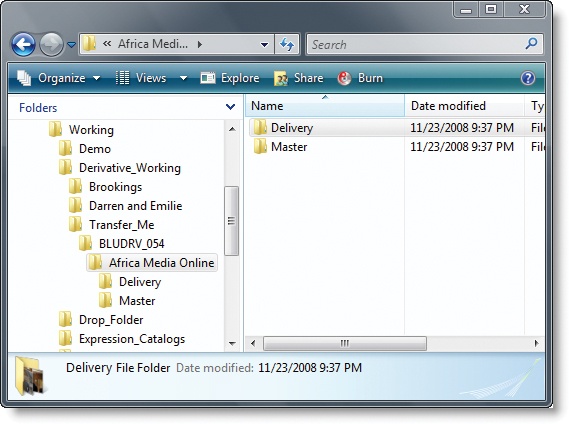
I have a Transfer_Me folder for my derivative files as well. As images are finished, I move the project folder into a holding folder named for the next bucket (Figure 9-67). Once the bucket fills up, I transfer it to the archive and make my backups (once again, you’ll need to look in the Windows Explorer or Mac Finder to monitor the size of the folder). After transferring your own files, you will also want to right-click the folder in the Lightroom Library and tell it to look for the images in the new permanent home.
You should archive your derivative files only when you’re sure you’re happy with them. Unlike the DNG files, readjusting derivatives means altering the file itself, not just the develop settings. And once the files have gotten their backups, saving the new work is best done by creating a whole new file, rather than by resaving the old one (and both backup copies).
Sometimes, however, it’s unavoidable—you need to rework a file. When this happens, copy the file back into the Derivative_Working folder, and do the process all over again. When it comes time to archive the new master file, you can either delete the older one from the primary storage or leave it as is and use the catalog to sort them out.