
C H A P T E R 33
Using Ajax—Part II
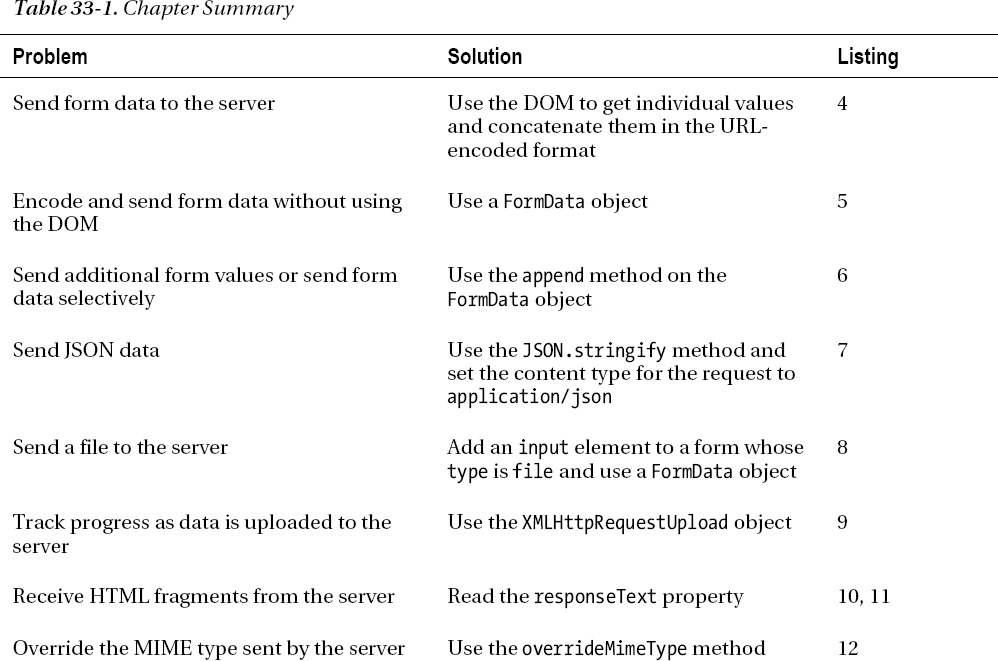
In this chapter, I will continue describing how Ajax works, showing you how to send data to the client. Sending forms and files are two common uses for Ajax, which allow web applications to create a richer experience for the user. I'll also show you how to monitor progress as you send data to the server and how to deal with different response formats sent back by the server in response to an Ajax request. Table 33-1 provides the summary for this chapter. The first three listings set up the server and HTML document used in the other examples.

Getting Ready to Send Data to the Server
One of the most common uses of Ajax is to send data to the server. Most typically, clients send form data—the values entered into input elements contained by a form element. Listing 33-1 shows a simple form, which will be the basis for this part of the chapter. I saved this HTML into a file named example.html.
Listing 33-1. A Basic Form
<!DOCTYPE HTML>

<html>

    <head>

        <title>Example</title>

        <style>

            .table {display:table;}

            .row {display:table-row;}

            .cell {display: table-cell; padding: 5px;}

            .label {text-align: right;}

        </style>

    </head>

    <body>

        <form id="fruitform" method="post" action="http://titan:8080/form">

            <div class="table">

                <div class="row">

                    <div class="cell label">Bananas:</div>

                    <div class="cell"><input name="bananas" value="2"/></div>

                </div>

                <div class="row">

                    <div class="cell label">Apples:</div>

                    <div class="cell"><input name="apples" value="5"/></div>

                </div>

                <div class="row">

                    <div class="cell label">Cherries:</div>

                    <div class="cell"><input name="cherries" value="20"/></div>

                </div>

                <div class="row">

                    <div class="cell label">Total:</div>

                    <div id="results" class="cell">0 items</div>

                </div>

            </div>

            <button id="submit" type="submit">Submit Form</button>

        </form>

    </body>

</html>
The form in this example contains three input elements and a submit button. The input elements allow the user to specify how many of three different kinds of fruit to order, and the button submits the form to the server. For more information about these elements, see Chapters 12, 13, and 14.
Defining the Server
For the examples, you need to create the server that will process requests. Once again, I used Node.js, largely because it is simple and it uses JavaScript. See Chapter 2 for details on obtaining Node.js. I won't go into how this script works, but since it is written in JavaScript, you should be able to get a fair idea of what's going on. That said, understanding the server script isn't essential to understanding Ajax, and you can readily treat the server as a black box if you like. Listing 33-2 shows the fruitcalc.js script.
Listing 33-2. The fruitcalc.js Script for Node.js
var http = require('http'),

var querystring = require('querystring'),

var multipart = require('multipart'),


function writeResponse(res, data) {

    var total = 0;

    for (fruit in data) {

        total += Number(data[fruit]);

    }

    res.writeHead(200, "OK", {

        "Content-Type": "text/html",

        "Access-Control-Allow-Origin": "http://titan"});

    res.write('<html><head><title>Fruit Total</title></head><body>'),

    res.write('<p>' + total + ' items ordered</p></body></html>'),

    res.end();

}


http.createServer(function (req, res) {

    console.log("[200] " + req.method + " to " + req.url);

    if (req.method == 'OPTIONS') {

        res.writeHead(200, "OK", {

            "Access-Control-Allow-Headers": "Content-Type",

            "Access-Control-Allow-Methods": "*",

            "Access-Control-Allow-Origin": "*"

            });

        res.end();

    } else if (req.url == '/form' && req.method == 'POST') {

        var dataObj = new Object();

        var contentType = req.headers["content-type"];

        var fullBody = '';


        if (contentType) {

            if (contentType.indexOf("application/x-www-form-urlencoded") > -1) {


                req.on('data', function(chunk) { fullBody += chunk.toString();});

                req.on('end', function() {
                    var dBody = querystring.parse(fullBody);

                    dataObj.bananas = dBody["bananas"];

                    dataObj.apples = dBody["apples"];

                    dataObj.cherries= dBody["cherries"];

                    writeResponse(res, dataObj);

                });


            } else if (contentType.indexOf("application/json") > -1) {

                req.on('data', function(chunk) { fullBody += chunk.toString();});

                req.on('end', function() {

                    dataObj = JSON.parse(fullBody);

                    writeResponse(res, dataObj);

                });


            } else if (contentType.indexOf("multipart/form-data") > -1) {

                var partName;

                var partType;

                var parser = new multipart.parser();

                parser.boundary = "--" + req.headers["content-type"].substring(30);


                parser.onpartbegin = function(part) {

                    partName = part.name; partType = part.contentType};

                parser.ondata = function(data) {

                    if (partName != "file") {

                        dataObj[partName] = data;

                    }

                };

                req.on('data', function(chunk) { parser.write(chunk);});

                req.on('end', function() { writeResponse(res, dataObj);});

            }

        }

    }

}).listen(8080);
I have highlighted the section of the script that requires attention: the writeResponse function. This function is called after the form values have been extracted from the request, and it is responsible for generating the response to the browser. At the moment, this function produces a simple HTML document such as the one shown in Listing 33-3, but we will change and enhance this function as we deal with different formats later in the chapter.
Listing 33-3. The Simple HTML Document Generated by the writeResponse Function
<html>

    <head>

        <title>Fruit Total</title>

    </head>

    <body>

        <p>27 items ordered</p>

    </body>

</html>
This is a simple response, but it's a good place to start. The effect is that the server totals the number of fruit that the user has ordered through the input elements in the form. The rest of the server-side script is responsible for decoding the various data formats that the client may be sending using Ajax. You can start the server like this:
bin
ode.exe fruitcalc.js
This script is intended for use only in this chapter. It isn't a general-purpose server, and I don't recommend you use any part of it for a production service. Many assumptions and shortcuts are tied to the examples that follow in this chapter, and the script is not suitable for any kind of serious use.
Understanding the Problem
The problem I want to use Ajax to solve is illustrated neatly in Figure 33-1.

Figure 33-1. Submitting a simple form
When you submit a form, the browser displays the result as a new page. This has two implications:
- The user must wait for the server to process the data and generate the response.
- Any document context is lost, as the results are displayed as a new document.
This is an ideal situation in which to apply Ajax. You can make the request asynchronously, so the user can continue to interact with the document while the form is processed.
Sending Form Data
The most basic way to send data to a server is to collect and format it yourself. Listing 33-4 shows the addition of a script to the example.html document that uses this approach.
Listing 33-4. Manually Collecting and Sending Data
<!DOCTYPE HTML>

<html>

    <head>

        <title>Example</title>

        <style>

            .table {display:table;}

            .row {display:table-row;}

            .cell {display: table-cell; padding: 5px;}

            .label {text-align: right;}

        </style>

    </head>

    <body>

        <form id="fruitform" method="post" action="http://titan:8080/form">

            <div class="table">

                <div class="row">

                    <div class="cell label">Bananas:</div>

                    <div class="cell"><input name="bananas" value="2"/></div>

                </div>

                <div class="row">

                    <div class="cell label">Apples:</div>

                    <div class="cell"><input name="apples" value="5"/></div>

                </div>

                <div class="row">

                    <div class="cell label">Cherries:</div>

                    <div class="cell"><input name="cherries" value="20"/></div>

                </div>

                <div class="row">

                    <div class="cell label">Total:</div>

                    <div id="results" class="cell">0 items</div>

                </div>

            </div>

            <button id="submit" type="submit">Submit Form</button>

        </form>

       <script>

            document.getElementById("submit").onclick = handleButtonPress;


            var httpRequest;


            function handleButtonPress(e) {

                e.preventDefault();


                var form = document.getElementById("fruitform");


                var formData = "";

                var inputElements = document.getElementsByTagName("input");

                for (var i = 0; i < inputElements.length; i++) {

                    formData += inputElements[i].name + "="

                        +  inputElements[i].value + "&";
                }


                httpRequest = new XMLHttpRequest();

                httpRequest.onreadystatechange = handleResponse;

                httpRequest.open("POST", form.action);

                httpRequest.setRequestHeader('Content-Type',

                                             'application/x-www-form-urlencoded'),

                httpRequest.send(formData);

            }


            function handleResponse() {

                if (httpRequest.readyState == 4 && httpRequest.status == 200) {

                    document.getElementById("results").innerHTML

                        = httpRequest.responseText;

                }

            }

        </script>

    </body>

</html>
This script looks more complicated than it is. To explain, I'll break down the individual steps. All of the action happens in the handleButtonPress function, which is called in response to the click event of the button element.
The first thing I do is call the preventDefault method on the Event object that the browser has dispatched to the function. I described this method in Chapter 30, when I explained that some events have default actions associated with them. For a button element in a form, the default action is to post the form using the regular, non-Ajax approach. I don't want this to happen—hence the call to the preventDefault method.
![]() Tip I like to place the call to the
Tip I like to place the call to the preventDefault method at the start of my event handler function because it makes debugging easier. If I called this method at the end of the function, any uncaught error in the script would cause execution to terminate and the default action to be performed. This happens so quickly that it can be impossible to read the details of the error from the browser script console.
The next step is to gather and format the values of the input elements, like this:
var formData = "";

var inputElements = document.getElementsByTagName("input");

for (var i = 0; i < inputElements.length; i++) {

    formData += inputElements[i].name + "=" +  inputElements[i].value + "&";

}
I use the DOM to obtain the set of input elements and create a string that contains the name and value attributes of each. The name and value are separated by an equal sign (=), and information about each input element is separated by an ampersand (&). The result looks like this:
bananas=2&apples=5&cherries=20&
If you look back to Chapter 12, you will see that this is the default way of encoding form data—the application/x-www-form-urlencoded encoding. Even though this is default encoding used by the form element, it isn't the default encoding used by Ajax, so I need to add a header to tell the server which data format to expect, like this:
httpRequest.setRequestHeader('Content-Type','application/x-www-form-urlencoded'),
The rest of the script is a regular Ajax request, just like the ones in the previous chapter, with a couple of exceptions.
First, I use the HTTP POST method when I call the open method on the XMLHttpRequest object. As a rule, data is always sent to the server using the POST method rather than the GET method. For the URL to make the request to, I read the action property of the HTMLFormElement:
httpRequest.open("POST", form.action);
The form action will cause a cross-origin request, which I deal with at the server using the CORS technique described in the previous chapter.
The second point of note is that I pass the string I want to send to the server as an argument to the send method, like this:
httpRequest.send(formData);
When I get the response back from the server, I use the DOM to set the contents of the div element with the id of results. You can see the effect in Figure 33-2.

Figure 33-2. Using Ajax to post a form
The HTML document that the server returns in response to the form post is displayed on the same page, and the request is performed asynchronously. This is a much nicer effect than we started with.
Sending Form Data Using a FormData Object
A neater way of gathering form data is to use a FormData object, which is defined as part of the XMLHttpRequest Level 2 specification.
![]() Note As I write this, Chrome, Safari, and Firefox support the
Note As I write this, Chrome, Safari, and Firefox support the FormData object, but Opera and Internet Explorer do not.
Creating a FormData Object
When you create a FormData object, you can pass an HTMLFormElement object (described in Chapter 31), and the value of all of the elements in the form will be gathered up automatically. Listing 33-5 gives an example. The listing shows only the script because the HTML remains the same.
Listing 33-5. Using a FormData Object
...

<script>

     document.getElementById("submit").onclick = handleButtonPress;


     var httpRequest;


     function handleButtonPress(e) {

         e.preventDefault();


         var form = document.getElementById("fruitform");


         var formData = new FormData(form);


         httpRequest = new XMLHttpRequest();

         httpRequest.onreadystatechange = handleResponse;

         httpRequest.open("POST", form.action);

         httpRequest.send(formData);

     }


     function handleResponse() {

         if (httpRequest.readyState == 4 && httpRequest.status == 200) {

             document.getElementById("results").innerHTML

                 = httpRequest.responseText;

         }

     }

</script>

...
Of course, the key change is the use of the FormData object:
var formData = new FormData(form);
The other change to be aware of is that I no longer set the value of the Content-Type header. When using the FormData object, the data is always encoded as multipart/form-data (as described in Chapter 12).
Modifying a FormData Object
The FormData object defines a method that lets you add name/value pairs to the data that will be sent to the server. The method is described in Table 33-2.

You can use the append method to supplement the data that is gathered from the form, but you can also create FormData objects without using an HTMLFormElement. This means that you can use the append method to be selective about which data values are sent to the client. Listing 33-6 provides a demonstration. Once again, I show only the script element, since the other HTML elements are unchanged.
Listing 33-6. Selectively Sending Data to the Server Using the FormData Object
...

<script>

     document.getElementById("submit").onclick = handleButtonPress;


     var httpRequest;


     function handleButtonPress(e) {

        e.preventDefault();


        var form = document.getElementById("fruitform");

        var formData = new FormData();

        var inputElements = document.getElementsByTagName("input");

        for (var i = 0; i < inputElements.length; i++) {

            if (inputElements[i].name != "cherries") {

                formData.append(inputElements[i].name, inputElements[i].value);

            }

        }


        httpRequest = new XMLHttpRequest();

        httpRequest.onreadystatechange = handleResponse;

        httpRequest.open("POST", form.action);

        httpRequest.send(formData);

     }


     function handleResponse() {
         if (httpRequest.readyState == 4 && httpRequest.status == 200) {

             document.getElementById("results").innerHTML

                 = httpRequest.responseText;

         }

     }

</script>

...
In this script, I create a FormData object without providing an HTMLFormElement object. I then use the DOM to find all of the input elements in the document and add name/value pairs for all of those whose name attribute doesn't have a value of cherries. You can see the effect in Figure 33-3, where the total value returned by the server excludes the value supplied by the user for cherries.
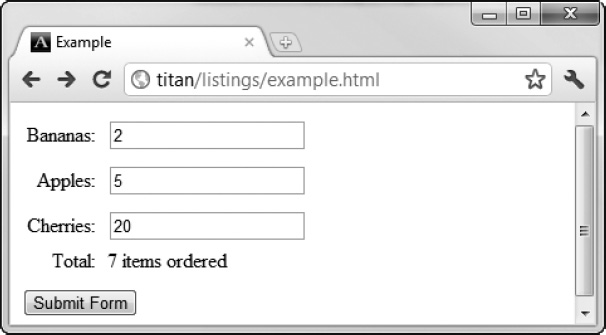
Figure 33-3. Selectively sending data using a FormData object
Sending JSON Data
You are not limited to sending just form data with Ajax. You can send pretty much anything, including JavaScript Object Notation (JSON) data, which has emerged as a popular data format. The roots of Ajax are in XML, but that is a verbose format. When you are running a web application that must transmit a high number of XML documents, verbosity translates into real costs in terms of bandwidth and system capacity.
JSON is often referred to as the fat-free alternative to XML. JSON is easy to read and write, is more compact than XML, and has gained incredibly wide support. JSON has grown beyond its roots in JavaScript, and a huge number of packages and systems understand and use the format.
Here is how a simple JavaScript object looks when represented using JSON:
{"bananas":"2","apples":"5","cherries":"20"}
This object has three properties: bananas, apples, and cherries. The values for these properties are 2, 5, and 20, respectively.
JSON doesn't have all of the functional richness of XML, but for many applications, those features aren't used. JSON is simple, lightweight, and expressive. Listing 33-7 demonstrates how easily you can send JSON data to the server.
Listing 33-7. Sending JSON Data to the Server
...

<script>

     document.getElementById("submit").onclick = handleButtonPress;


     var httpRequest;


     function handleButtonPress(e) {

        e.preventDefault();


        var form = document.getElementById("fruitform");


        var formData = new Object();

        var inputElements = document.getElementsByTagName("input");

        for (var i = 0; i < inputElements.length; i++) {

            formData[inputElements[i].name] =  inputElements[i].value;

        }


        httpRequest = new XMLHttpRequest();

        httpRequest.onreadystatechange = handleResponse;

        httpRequest.open("POST", form.action);

        httpRequest.setRequestHeader("Content-Type", "application/json");

        httpRequest.send(JSON.stringify(formData));

     }


     function handleResponse() {

         if (httpRequest.readyState == 4 && httpRequest.status == 200) {

             document.getElementById("results").innerHTML

                 = httpRequest.responseText;

         }

     }

</script>

...
In this script, I create a new Object and define properties that correspond to the name attribute values of the input elements in the form. I could use any data, but the input elements are convenient and consistent with the earlier examples.
In order to tell the server that I am sending JSON data, I set the Content-Type header on the request to application/json, like this:
httpRequest.setRequestHeader("Content-Type", "application/json");
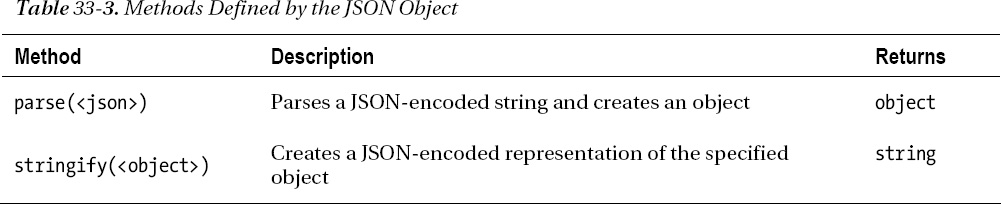
I use the JSON object to convert to and from the JSON format. (Most browsers support this object directly, but you can add the same functionality to older browsers with the script available at https://github.com/douglascrockford/JSON-js/blob/master/json2.js.) The JSON object provides two methods, as described in Table 33-3.
In Listing 33-7, I use the stringify method and pass the result to the send method of the XMLHttpRequest object. Only the data encoding in this example has changed. The effect of submitting the form in the document remains the same.
Sending Files
You can send a file to the server by using a FormData object and an input element whose type attribute is file. When the form is submitted, the FormData object will automatically ensure that the contents of the file that the user has selected are uploaded along with the rest of the form values. Listing 33-8 shows how to use the FormData object in this way.
![]() Note Using Ajax to upload files is tricky for browsers that don't yet support the
Note Using Ajax to upload files is tricky for browsers that don't yet support the FormData object. There are a lot of hacks and workarounds—some using Flash and others involving complicated sequences of posting forms to hidden iframe elements. They all have serious drawbacks and should be used with caution.
Listing 33-8. Sending a File to the Server Using the FormData Object
<!DOCTYPE HTML>

<html>

    <head>

        <title>Example</title>

        <style>

            .table {display:table;}

            .row {display:table-row;}

            .cell {display: table-cell; padding: 5px;}

            .label {text-align: right;}

        </style>

    </head>

    <body>

        <form id="fruitform" method="post" action="http://titan:8080/form">

            <div class="table">

                <div class="row">

                    <div class="cell label">Bananas:</div>

                    <div class="cell"><input name="bananas" value="2"/></div>
                </div>

                <div class="row">

                    <div class="cell label">Apples:</div>

                    <div class="cell"><input name="apples" value="5"/></div>

                </div>

                <div class="row">

                    <div class="cell label">Cherries:</div>

                    <div class="cell"><input name="cherries" value="20"/></div>

                </div>

                <div class="row">

                    <div class="cell label">File:</div>

                    <div class="cell"><input type="file" name="file"/></div>

                </div>

                <div class="row">

                    <div class="cell label">Total:</div>

                    <div id="results" class="cell">0 items</div>

                </div>


            </div>

            <button id="submit" type="submit">Submit Form</button>

        </form>

        <script>

             document.getElementById("submit").onclick = handleButtonPress;


             var httpRequest;


             function handleButtonPress(e) {

                 e.preventDefault();


                 var form = document.getElementById("fruitform");


                 var formData = new FormData(form);

                 httpRequest = new XMLHttpRequest();

                 httpRequest.onreadystatechange = handleResponse;

                 httpRequest.open("POST", form.action);

                 httpRequest.send(formData);

             }


             function handleResponse() {

                 if (httpRequest.readyState == 4 && httpRequest.status == 200) {

                     document.getElementById("results").innerHTML

                         = httpRequest.responseText;

                 }

             }

         </script>

    </body>

</html>
In this example, the significant change occurs in the form element. The addition of the input element leads to the FormData object uploading whatever file the user selects. You can see the effect of the addition in Figure 33-4.
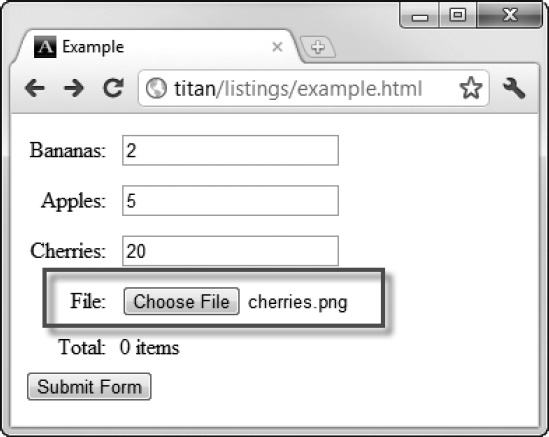
Figure 33-4. Adding an input element to upload files through the FormData object
![]() Tip In Chapter 37, I show you how to use the drag-and-drop API to allow users to drag files to be uploaded from the operating system, rather than using a file chooser.
Tip In Chapter 37, I show you how to use the drag-and-drop API to allow users to drag files to be uploaded from the operating system, rather than using a file chooser.
Tracking Upload Progress
You can track the progress of your data upload as it is sent to the server. You do this through the upload property of the XMLHttpRequest object, which is described in Table 33-4.

The XMLHttpRequestUpload object that the upload property returns defines only the attributes required to register handlers for the events described in the previous chapter: onprogress, onload, and so on. Listing 33-9 shows how to use these events to display upload progress to the user.
Listing 33-9. Monitoring and Displaying Upload Progress
<!DOCTYPE HTML>

<html>

    <head>
        <title>Example</title>

        <style>

            .table {display:table;}

            .row {display:table-row;}

            .cell {display: table-cell; padding: 5px;}

            .label {text-align: right;}

        </style>

    </head>

    <body>

        <form id="fruitform" method="post" action="http://titan:8080/form">

            <div class="table">

                <div class="row">

                    <div class="cell label">Bananas:</div>

                    <div class="cell"><input name="bananas" value="2"/></div>

                </div>

                <div class="row">

                    <div class="cell label">Apples:</div>

                    <div class="cell"><input name="apples" value="5"/></div>

                </div>

                <div class="row">

                    <div class="cell label">Cherries:</div>

                    <div class="cell"><input name="cherries" value="20"/></div>

                </div>

                <div class="row">

                    <div class="cell label">File:</div>

                    <div class="cell"><input type="file" name="file"/></div>

                </div>

                <div class="row">

                    <div class="cell label">Progress:</div>

                    <div class="cell"><progress id="prog" value="0"/></div>

                </div>

                <div class="row">

                    <div class="cell label">Total:</div>

                    <div id="results" class="cell">0 items</div>

                </div>


            </div>


            <button id="submit" type="submit">Submit Form</button>

        </form>

        <script>

             document.getElementById("submit").onclick = handleButtonPress;


             var httpRequest;


             function handleButtonPress(e) {

                 e.preventDefault();


                 var form = document.getElementById("fruitform");

                 var progress = document.getElementById("prog");


                 var formData = new FormData(form);
                 httpRequest = new XMLHttpRequest();


                 var upload = httpRequest.upload;

                 upload.onprogress = function(e) {

                    progress.max = e.total;

                    progress.value = e.loaded;


                 }

                 upload.onload = function(e) {

                    progress.value = 1;

                    progress.max = 1;

                 }


                 httpRequest.onreadystatechange = handleResponse;

                 httpRequest.open("POST", form.action);

                 httpRequest.send(formData);

             }


             function handleResponse() {

                 if (httpRequest.readyState == 4 && httpRequest.status == 200) {

                     document.getElementById("results").innerHTML

                         = httpRequest.responseText;

                 }

             }

         </script>

    </body>

</html>
In this example, I added a progress element (described in Chapter 15) and used it to provide data upload progress information to the user. I obtain an XMLHttpRequestUpload object by reading the XMLHttpRequest.upload property, and register functions to respond to the progress and load events.
The browser won't give progress information for small data transfers, so the best way to test this example is to select a large file. Figure 33-5 shows the progress of a movie file being sent to the server.

Figure 33-5. Displaying progress as data is uploaded to the server
Requesting and Processing Different Content Types
So far, all of the Ajax examples return a complete HTML document, including the head, title, and body elements. These elements are overhead and, given how little data is actually being transmitted from the server, the ratio of useful to useless information isn't ideal.
Fortunately, you don't need to return complete HTML documents. In fact, you don't need to return HTML at all. In the following sections, I'll show you how to deal with different kinds of data and, in doing so, reduce the amount of overhead that Ajax requests incur.
Receiving HTML Fragments
The simplest change to make is to have the server return an HTML fragment instead of the entire document. To do this, I first need to make a change to the writeResponse of the Node.js server script, as shown in Listing 33-10.
Listing 33-10. Modifying the Server to Send Back an HTML Fragment
...

function writeResponse(res, data) {

    var total = 0;

    for (fruit in data) {

        total += Number(data[fruit]);

    }

    res.writeHead(200, "OK", {

        "Content-Type": "text/html",

        "Access-Control-Allow-Origin": "http://titan"});

    res.write('You ordered <b>' + total + '</b> items'),

    res.end();

}

...
Instead of a fully formed document, the server now sends just a fragment of HTML. Listing 33-11 shows the client HTML document.
Listing 33-11. Working with HTML Fragments
<!DOCTYPE HTML>

<html>

    <head>

        <title>Example</title>

        <style>

            .table {display:table;}

            .row {display:table-row;}

            .cell {display: table-cell; padding: 5px;}

            .label {text-align: right;}

        </style>

    </head>

    <body>

        <form id="fruitform" method="post" action="http://titan:8080/form">

            <div class="table">
                <div class="row">

                    <div class="cell label">Bananas:</div>

                    <div class="cell"><input name="bananas" value="2"/></div>

                </div>

                <div class="row">

                    <div class="cell label">Apples:</div>

                    <div class="cell"><input name="apples" value="5"/></div>

                </div>

                <div class="row">

                    <div class="cell label">Cherries:</div>

                    <div class="cell"><input name="cherries" value="20"/></div>

                </div>

                <div class="row">

                    <div class="cell label">Total:</div>

                    <div id="results" class="cell">0 items</div>

                </div>

            </div>

            <button id="submit" type="submit">Submit Form</button>

        </form>

        <script>

             document.getElementById("submit").onclick = handleButtonPress;


             var httpRequest;


             function handleButtonPress(e) {

                e.preventDefault();


                var form = document.getElementById("fruitform");


                var formData = new Object();

                var inputElements = document.getElementsByTagName("input");

                for (var i = 0; i < inputElements.length; i++) {

                    formData[inputElements[i].name] =  inputElements[i].value;

                }


                httpRequest = new XMLHttpRequest();

                httpRequest.onreadystatechange = handleResponse;

                httpRequest.open("POST", form.action);

                httpRequest.setRequestHeader("Content-Type", "application/json");

                httpRequest.send(JSON.stringify(formData));

             }


             function handleResponse() {

                 if (httpRequest.readyState == 4 && httpRequest.status == 200) {

                     document.getElementById("results").innerHTML

                         = httpRequest.responseText;

                 }

             }

         </script>

    </body>

</html>
I have removed some of the recent additions for uploading files and monitoring progress. I send the data to the server as JSON and receive an HTML fragment in return (although there is no relationship between the data format that I used to send data to the server and the data format that I get back from the server).
Since I have control of the server, I made sure that the Content-Type header is set to text/html, which tells the browser that it is dealing with HTML, even though the data it gets doesn't start with a DOCTYPE or an html element. You can use the overrideMimeType method if you want to override the Content-Type header and specify the data type yourself, as shown in Listing 33-12.
Listing 33-12. Overriding the Data Type
<script>

     document.getElementById("submit").onclick = handleButtonPress;


     var httpRequest;


     function handleButtonPress(e) {

        e.preventDefault();


        var form = document.getElementById("fruitform");


        var formData = new Object();

        var inputElements = document.getElementsByTagName("input");

        for (var i = 0; i < inputElements.length; i++) {

            formData[inputElements[i].name] =  inputElements[i].value;

        }


        httpRequest = new XMLHttpRequest();

        httpRequest.onreadystatechange = handleResponse;

        httpRequest.open("POST", form.action);

        httpRequest.setRequestHeader("Content-Type", "application/json");

        httpRequest.send(JSON.stringify(formData));

     }


     function handleResponse() {

         if (httpRequest.readyState == 4 && httpRequest.status == 200) {

            httpRequest.overrideMimeType("text/html");

            document.getElementById("results").innerHTML

                = httpRequest.responseText;

         }

     }

</script>
Specifying the data type can be useful if the server doesn't classify the data the way you want it. This most often happens when you are delivering fragments of content from files and the server has preconfigured notions of how the Content-Type header should be set.
Receiving XML Data
XML is less popular in web applications than it used to be, having largely been replaced by JSON. That said, it can still be useful to deal with XML data, especially when working with legacy data sources. Listing 33-13 shows the changes to the server script required to send XML to the browser.
Listing 33-13. Sending XML Data from the Server
function writeResponse(res, data) {

    var total = 0;

    for (fruit in data) {

        total += Number(data[fruit]);

    }

    res.writeHead(200, "OK", {

        "Content-Type": "application/xml",

        "Access-Control-Allow-Origin": "http://titan"});


    res.write("<?xml version='1.0'?>");

    res.write("<fruitorder total='" + total + "'>");

    for (fruit in data) {

        res.write("<item name='" + fruit + "' quantity='" + data[fruit] + "'/>")

        total += Number(data[fruit]);

    }

    res.write("</fruitorder>");

    res.end();

}
This revised function generates a short XML document, like this one:
<?xml version='1.0'?>

<fruitorder total='27'>

    <item name='bananas' quantity='2'/>

    <item name='apples' quantity='5'/>

    <item name='cherries' quantity='20'/>

</fruitorder>
This is a superset of the information that I need to display in the client, but it is no longer in a format that I can just display using the DOM innerHTML property. Fortunately, the XMLHttpRequest object makes it easy to work with XML, which is not surprising since XML is the x in Ajax. Listing 33-14 shows how to work with XML in the browser.
Listing 33-14. Working with an XML Ajax Response
<script>

     document.getElementById("submit").onclick = handleButtonPress;


     var httpRequest;


     function handleButtonPress(e) {

        e.preventDefault();


        var form = document.getElementById("fruitform");
        var formData = new Object();

        var inputElements = document.getElementsByTagName("input");

        for (var i = 0; i < inputElements.length; i++) {

            formData[inputElements[i].name] =  inputElements[i].value;

        }


        httpRequest = new XMLHttpRequest();

        httpRequest.onreadystatechange = handleResponse;

        httpRequest.open("POST", form.action);

        httpRequest.setRequestHeader("Content-Type", "application/json");

        httpRequest.send(JSON.stringify(formData));

     }


     function handleResponse() {

         if (httpRequest.readyState == 4 && httpRequest.status == 200) {

            httpRequest.overrideMimeType("application/xml");

            var xmlDoc = httpRequest.responseXML;

            var val = xmlDoc.getElementsByTagName("fruitorder")[0].getAttribute("total");

            document.getElementById("results").innerHTML = "You ordered "

                + val + " items";

         }

     }

</script>
All of the changes to the script to work with the XML data occur in the handleResponse function. The first thing that I do when the request has completed successfully is override the MIME type of the response:
httpRequest.overrideMimeType("application/xml");
This isn't really needed in this example, because the server is sending a complete XML document. But when dealing with XML fragments, it is important to explicitly tell the browser that you are working with XML; otherwise, the XMLHttpRequest object won't properly support the responseXML property, which I use in the following statement:
var xmlDoc = httpRequest.responseXML;
The responseXML property is an alternative to responseText. It parses the XML that has been received and returns it as a Document object. You can then employ this technique to navigate through the XML using the DOM features for HTML (described in Chapter 26), like this:
var val = xmlDoc.getElementsByTagName("fruitorder")[0].getAttribute("total");
This statement obtains the value of the total attribute in the first fruitorder element, which I then use with the innerHTML property to display a result to the user:
document.getElementById("results").innerHTML = "You ordered "+ val + " items";
Receiving JSON Data
JSON data is generally easier to work with than XML because you end up with a JavaScript object that you can interrogate and manipulate using the core language features. Listing 33-15 shows the changes required to the server script to generate a JSON response.
Listing 33-15. Generating a JSON Response at the Server
function writeResponse(res, data) {

    var total = 0;

    for (fruit in data) {

        total += Number(data[fruit]);

    }

    data.total = total;

    var jsonData = JSON.stringify(data);


    res.writeHead(200, "OK", {

        "Content-Type": "application/json",

        "Access-Control-Allow-Origin": "http://titan"});

    res.write(jsonData);

    res.end();

}
All I need to do to generate a JSON response is define the total property on the object that is passed as the data parameter to the function and use JSON.stringify to represent the object as a string. The server sends a response to the browser, like this:
{"bananas":"2","apples":"5","cherries":"20","total":27}
Listing 33-16 shows the script changes required at the browser to deal with this response.
Listing 33-16. Receiving a JSON Response from the Server
<script>

     document.getElementById("submit").onclick = handleButtonPress;


     var httpRequest;


     function handleButtonPress(e) {

        e.preventDefault();


        var form = document.getElementById("fruitform");


        var formData = new Object();

        var inputElements = document.getElementsByTagName("input");

        for (var i = 0; i < inputElements.length; i++) {

            formData[inputElements[i].name] =  inputElements[i].value;

        }


        httpRequest = new XMLHttpRequest();

        httpRequest.onreadystatechange = handleResponse;

        httpRequest.open("POST", form.action);

        httpRequest.setRequestHeader("Content-Type", "application/json");

        httpRequest.send(JSON.stringify(formData));

     }


     function handleResponse() {

         if (httpRequest.readyState == 4 && httpRequest.status == 200) {

            var data = JSON.parse(httpRequest.responseText);

            document.getElementById("results").innerHTML = "You ordered "

                + data.total + " items";

         }

     }

</script>
JSON is exceptionally easy to work with, as these two listings demonstrate. This ease of use, plus the compactness of the representation, is why JSON has become so popular.
Summary
In this chapter, I finished explaining the intricacies of Ajax. I showed you how to send data to the server, both manually and using the FormData object. You learned how to send a file and how to monitor progress as the data is uploaded to the server. I also covered how to deal with different data formats sent by the server: HTML, fragments of HTML, XML, and JSON.