
C H A P T E R 37
Using Drag & Drop
HTML5 adds support for drag and drop. This is something that we had to rely on JavaScript libraries such as jQuery to handle previously. The advantage of having drag and drop built into the browser is that it is properly integrated into the operating system and, as you will see, works between browsers.
It is still early days for this feature and there is a significant gap between the specification and the implementations offered by the mainstream browsers. Not all parts of the specification are implemented by all browsers and some features are implemented in substantially different ways. In this chapter, I have showed you what currently works. This isn't the complete set of features defined by the HTML5 standard, but it is enough to get up and running. Table 37-1 provides the summary for this chapter.
Creating the Source Items
We tell the browser which elements in the document can be dragged through the draggable attribute. There are three permitted values for this attribute, which are described in Table 37-2.
The default is the auto value, which leaves the decision up to the browser, which typically means that all elements can be dragged by default and that we have to explicitly disable dragging by setting the draggable attribute to false. When using the drag and drop feature, I tend to explicitly set the draggable attribute to true, even though the mainstream browsers consider all elements to be draggable by default. Listing 37-1 shows a simple HTML document that has some elements that can be dragged.
Listing 37-1. Defining the draggable items
<!DOCTYPE HTML>

<html>

    <head>

        <title>Example</title>

        <style>

            #src > * {float:left;}

            #target, #src > img {border: thin solid black; padding: 2px; margin:4px;}

            #target {height: 81px; width: 81px; text-align: center; display: table;}

            #target > p {display: table-cell; vertical-align: middle;}

            #target > img {margin: 1px;}


        </style>

    </head>

    <body>

        <div id="src">

            <img draggable="true" id="banana" src="banana100.png" alt="banana"/>

            <img draggable="true" id="apple" src="apple100.png" alt="apple"/>

            <img draggable="true" id="cherries" src="cherries100.png" alt="cherry"/>

            <div id="target">

                <p>Drop Here</p>

            </div

        </div>
<script>
var src = document.getElementById("src");
var target = document.getElementById("target");
</script>
</body>
</html>
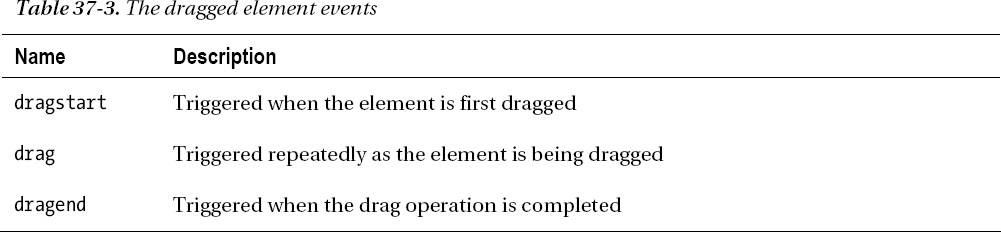
In this example, there are three img elements, each of which has the draggable attribute set to true. I have also created a div element with an id of target, which we will shortly set up to be the recipient of our dragged img elements. You can see how this document appears in the browser in Figure 37-1.
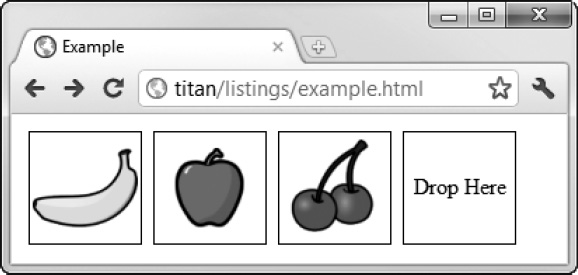
Figure 37-1. Three draggable images and a target
We can drag the fruit images without doing any further work, but the browser will indicate that we can't drop them anywhere. This is usually done by showing a no-entry sign as the cursor, as shown in Figure 37-2.
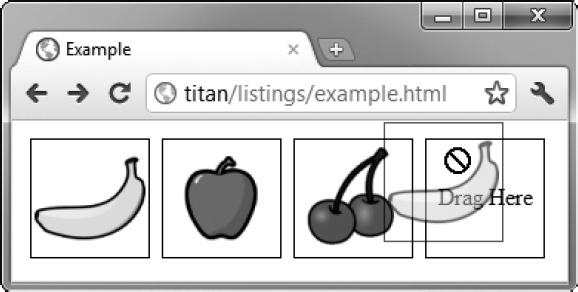
Figure 37-2. The browser showing that the dragged item cannot be dropped
Handling the Drag Events
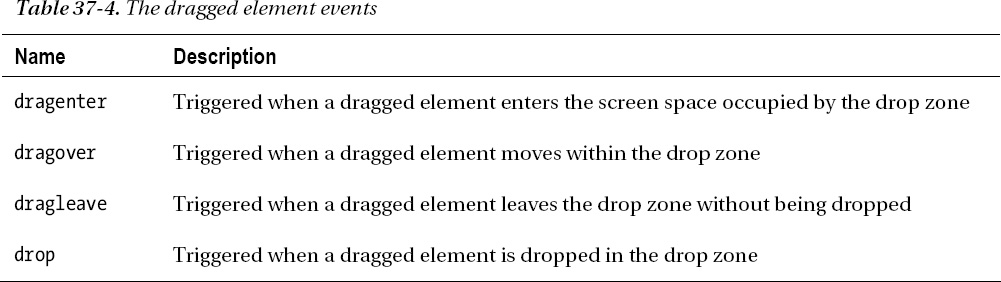
We take advantage of the drag and drop feature through a series of events. These are events that are targeted at the dragged element and events that are targeted at potential drop zones. Table 37-3 describes those events that are for the dragged element.
We can use these events to emphasize the drag operation visually, as demonstrated in Listing 37-2.
Listing 37-2. Using the events targeted at the dragged element
<!DOCTYPE HTML>

<html>

    <head>

        <title>Example</title>

        <style>

            #src > * {float:left;}

            #target, #src > img {border: thin solid black; padding: 2px; margin:4px;}

            #target {height: 81px; width: 81px; text-align: center; display: table;}

            #target > p {display: table-cell; vertical-align: middle;}

            #target > img {margin: 1px;}

            img.dragged {background-color: lightgrey;}


        </style>

    </head>

    <body>

        <div id="src">

            <img draggable="true" id="banana" src="banana100.png" alt="banana"/>

            <img draggable="true" id="apple" src="apple100.png" alt="apple"/>

            <img draggable="true" id="cherries" src="cherries100.png" alt="cherry"/>

            <div id="target">

                <p id="msg">Drop Here</p>

            </div

        </div>


        <script>

            var src = document.getElementById("src");

            var target = document.getElementById("target");

            var msg = document.getElementById("msg");


            src.ondragstart = function(e) {

                e.target.classList.add("dragged");

            }


            src.ondragend = function(e) {

                e.target.classList.remove("dragged");

                msg.innerHTML = "Drop Here";
}
src.ondrag = function(e) {
msg.innerHTML = e.target.id;
}
</script>
</body>
</html>
I have defined a new CSS style that is applied to elements in the dragged class. I add the element that has been dragged to this class in response to the dragstart event and remove it from the class in response to the dragend event. In response to the drag event, I set the text displayed in the drop zone to be the id value of the dragged element. The drag event is called every few milliseconds during the drag operation, so this is not the most efficient technique, but it does demonstrate the event. You can see the effect in Figure 3. Note that we still don't have a working drop zone, but we are getting closer.
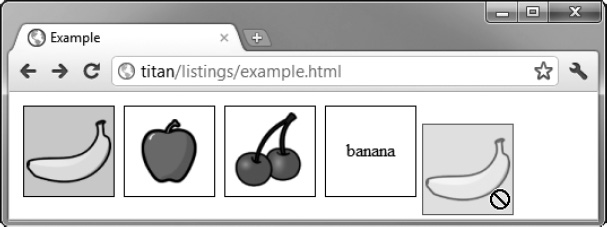
Figure 37-3. Using the dragstart, dragend, and drag events
Creating the Drop Zone
To make an element a drop zone, we need to handle the dragenter and dragover events. These are two of the events which are targeted at the drop zone. The complete set is described in Table 37-4.
The default action for the dragenter and dragover events is to refuse to accept any dragged items, so the most important thing we must do is prevent the default action from being performed. Listing 37-3 contains an example.
![]() Note The specification for drag and drop tells us that we must also apply the
Note The specification for drag and drop tells us that we must also apply the dropzone attribute to the element we want to make into a drop zone, and that the value of the attribute should contain details of the operations and data types that we are willing to accept. This is not how the browsers actually implement the feature. For this chapter, I have described the way things really work, rather than how they have been specified.
Listing 37-3. Creating a drop zone by handling the dragenter and dragover events
<!DOCTYPE HTML>
<html>
<head>
<title>Example</title>
<style>
#src > * {float:left;}
#target, #src > img {border: thin solid black; padding: 2px; margin:4px;}
#target {height: 81px; width: 81px; text-align: center; display: table;}
#target > p {display: table-cell; vertical-align: middle;}
#target > img {margin: 1px;}
img.dragged {background-color: lightgrey;}
</style>
</head>
<body>
<div id="src">
<img draggable="true" id="banana" src="banana100.png" alt="banana"/>
<img draggable="true" id="apple" src="apple100.png" alt="apple"/>
<img draggable="true" id="cherries" src="cherries100.png" alt="cherry"/>
<div id="target">
<p id="msg">Drop Here</p>
</div>
</div>
<script>
var src = document.getElementById("src");
var target = document.getElementById("target");
var msg = document.getElementById("msg");
target.ondragenter = handleDrag;
target.ondragover = handleDrag;
function handleDrag(e) {
e.preventDefault();
}
src.ondragstart = function(e) {
e.target.classList.add("dragged");
}
src.ondragend = function(e) {
e.target.classList.remove("dragged");
msg.innerHTML = "Drop Here";
            }


            src.ondrag = function(e) {

                msg.innerHTML = e.target.id;

            }

        </script>

    </body>

</html>With these additions, we have an active drop zone. When we drag an item over the drop zone element, the browser will indicate that it will be accepted if we drop it, as shown in Figure 37-4.
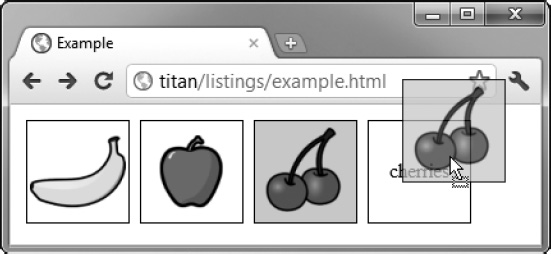
Figure 37-4. The browser indicating that an item can be dropped
Receiving the Drop
We receive the dropped element by handling the drop event, which is triggered when an item is dropped on the drop zone element. Listing 37-4 shows how we can respond to the drop event using a global variable as a conduit between the dragged element and the drop zone.
Listing 37-4. Handling the drop event
<!DOCTYPE HTML>

<html>

    <head>

        <title>Example</title>

        <style>

            #src > * {float:left;}

            #src > img {border: thin solid black; padding: 2px; margin:4px;}

            #target {border: thin solid black; margin:4px;}

            #target { height: 81px; width: 81px; text-align: center; display: table;}
#target > p {display: table-cell; vertical-align: middle;}
img.dragged {background-color: lightgrey;}
</style>
</head>
<body>
<div id="src">
<img draggable="true" id="banana" src="banana100.png" alt="banana"/>
<img draggable="true" id="apple" src="apple100.png" alt="apple"/>
<img draggable="true" id="cherries" src="cherries100.png" alt="cherry"/>
<div id="target">
<p id="msg">Drop Here</p>
</div>
</div>
<script>
var src = document.getElementById("src");
var target = document.getElementById("target");
var msg = document.getElementById("msg");
var draggedID;
target.ondragenter = handleDrag;
target.ondragover = handleDrag;
function handleDrag(e) {
e.preventDefault();
}
target.ondrop = function(e) {
var newElem = document.getElementById(draggedID).cloneNode(false);
target.innerHTML = "";
target.appendChild(newElem);
e.preventDefault();
}
src.ondragstart = function(e) {
draggedID = e.target.id;
e.target.classList.add("dragged");
}
src.ondragend = function(e) {
var elems = document.querySelectorAll(".dragged");
for (var i = 0; i < elems.length; i++) {
elems[i].classList.remove("dragged");
}
}
</script>
</body>
</html>
I set the value of the draggedID variable when the dragstart event is triggered. This allows me to keep a note of the id attribute value of the element that has been dragged. When the drop event is triggered, I use this value to clone the img element that was dragged and add it as a child of the drop zone element.
![]() Tip In the example, I prevented the default action for the
Tip In the example, I prevented the default action for the drop event. Without this, the browser can do some unexpected things. For example, in this scenario, Firefox navigates away from the page and displays the image referenced by the src attribute of the dragged img element.
You can see the effect in Figure 37-5.
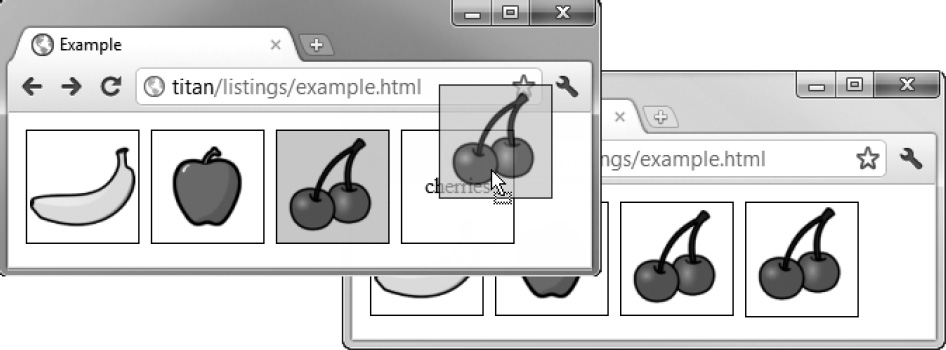
Figure 37-5. Responding to the drag event
Working with the DataTransfer Object
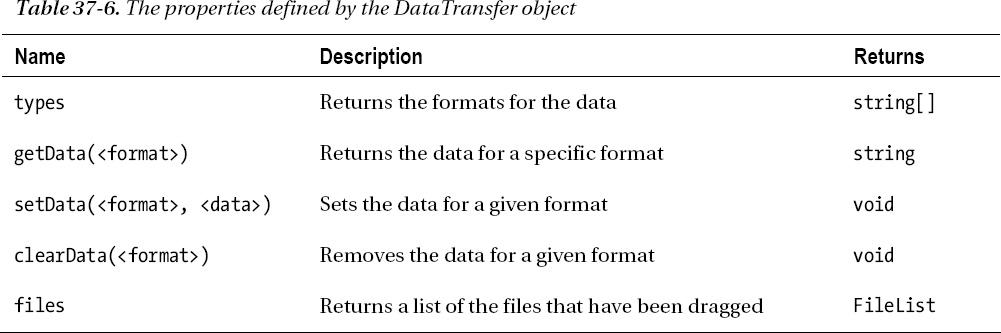
The object dispatched along with the events triggered for drag and drop is DragEvent, which is derived from MouseEvent. The DragEvent object defines all of the functionality of the Event and MouseEvent objects (which is described in Chapter 30), with the additional property shown in Table 37-5.

We use the DataTransfer object to transfer arbitrary data from the dragged element to the drop zone element. The properties and methods that the DataTransfer object defines are described in Table 37-6.
In the previous example, I cloned the element itself; however, the DataTransfer object allows us a more sophisticated approach. The first thing we can do is to use the DataTransfer object to transfer data from the dragged element to the drop zone, as demonstrated in Listing 37-5.
Listing 37-5. Using the DataTransfer object to transfer data
<!DOCTYPE HTML>

<html>

    <head>

        <title>Example</title>

        <style>

            #src > * {float:left;}

            #src > img {border: thin solid black; padding: 2px; margin:4px;}

            #target {border: thin solid black; margin:4px;}

            #target { height: 81px; width: 81px; text-align: center; display: table;}

            #target > p {display: table-cell; vertical-align: middle;}

            img.dragged {background-color: lightgrey;}

        </style>

    </head>

    <body>

        <div id="src">

            <img draggable="true" id="banana" src="banana100.png" alt="banana"/>

            <img draggable="true" id="apple" src="apple100.png" alt="apple"/>

            <img draggable="true" id="cherries" src="cherries100.png" alt="cherry"/>

            <div id="target">

                <p id="msg">Drop Here</p>

            </div>

        </div>


        <script>

            var src = document.getElementById("src");

            var target = document.getElementById("target");


            target.ondragenter = handleDrag;

            target.ondragover = handleDrag;
function handleDrag(e) {
e.preventDefault();
}
target.ondrop = function(e) {
var droppedID = e.dataTransfer.getData("Text");
var newElem = document.getElementById(droppedID).cloneNode(false);
target.innerHTML = "";
target.appendChild(newElem);
e.preventDefault();
}
src.ondragstart = function(e) {
e.dataTransfer.setData("Text", e.target.id);
e.target.classList.add("dragged");
}
src.ondragend = function(e) {
var elems = document.querySelectorAll(".dragged");
for (var i = 0; i < elems.length; i++) {
elems[i].classList.remove("dragged");
}
}
</script>
</body>
</html>
I use the setData method when responding to the dragstart event to set the data that I want to transfer. There are only two supported values for the first argument which specifies the type of data—Text or Url (and only Text is reliably supported by the browsers). The second argument is the data we want to transfer: in this case, the id attribute of the dragged element. To retrieve the value, I use the getData method, using the data type as the argument.
You might be wondering why this is a better approach than using a global variable. The answer is that it works across browsers, and by this, I don't mean across windows or tabs in the same browsers, but across different types of browser. This means that I can drag an element from a Chrome document and drop it in a Firefox document because the drag and drop support is integrated with the same feature in the operating system. If you open a text editor, type the word banana, select it and then drag it to the drop zone in the browser, you will see the banana image being displayed, just as it was when we dragged one of the img elements in the same document.
Filtering Dragged Items by Data
We can use the data stored in the DataTransfer object to be selective about the kinds of elements that we are willing to accept in the drop zone. Listing 37-6 shows how.
Listing 37-6. Using the DataTransfer object to filter dragged elements
…

<script>

    var src = document.getElementById("src");
var target = document.getElementById("target");
target.ondragenter = handleDrag;
target.ondragover = handleDrag;
function handleDrag(e) {
if (e.dataTransfer.getData("Text") == "banana") {
e.preventDefault();
}
}
target.ondrop = function(e) {
var droppedID = e.dataTransfer.getData("Text");
var newElem = document.getElementById(droppedID).cloneNode(false);
target.innerHTML = "";
target.appendChild(newElem);
e.preventDefault();
}
src.ondragstart = function(e) {
e.dataTransfer.setData("Text", e.target.id);
e.target.classList.add("dragged");
}
src.ondragend = function(e) {
var elems = document.querySelectorAll(".dragged");
for (var i = 0; i < elems.length; i++) {
elems[i].classList.remove("dragged");
}
}
</script>
…
In this example, I get the data value from the DataTransfer object and check to see what it is. I indicate that I am willing to accept the dragged element only if the data value is banana. This has the effect of filtering out the apple and cherry images. When the user drags these over the drop-zone, the browser will indicate that they cannot be dropped.
![]() Tip This kind of filtering doesn't work in Chrome, as the
Tip This kind of filtering doesn't work in Chrome, as the getData method doesn't work when called in handlers for the dragenter and dragover events.
Dragging and Dropping Files
Hidden deep in the browser is another new HTML5 feature, called the File API, which allows us to work with files on the local machine, albeit in a tightly controlled manner. Part of the control is that we don't usually interact with the File API directly. Instead, it is exposed through other features, including drag and drop. Listing 37-7 shows how we can use the File API to respond when the use drags files from the operating system and drops them in our drop zone.
Listing 37-7. Dealing with files
<!DOCTYPE HTML>

<html>

    <head>

        <title>Example</title>

        <style>

            body > * {float: left;}

            #target {border: medium double black; margin:4px; height: 75px;

                width: 200px; text-align: center; display: table;}

            #target > p {display: table-cell; vertical-align: middle;}

            table {margin: 4px; border-collapse: collapse;}

            th, td {padding: 4px};

        </style>

    </head>

    <body>

        <div id="target">

            <p id="msg">Drop Files Here</p>

        </div>

        <table id="data" border="1">

        </table>


        <script>

            var target = document.getElementById("target");


            target.ondragenter = handleDrag;

            target.ondragover = handleDrag;


            function handleDrag(e) {

                e.preventDefault();

            }


            target.ondrop = function(e) {

                var files = e.dataTransfer.files;

                var tableElem = document.getElementById("data");

                tableElem.innerHTML = "<tr><th>Name</th><th>Type</th><th>Size</th></tr>";

                for (var i = 0; i < files.length; i++) {

                    var row = "<tr><td>" + files[i].name + "</td><td>" +

                        files[i].type+ "</td><td>" +

                        files[i].size + "</td></tr>";

                    tableElem.innerHTML += row;

                }

                e.preventDefault();

            }

        </script>

    </body>

</html>
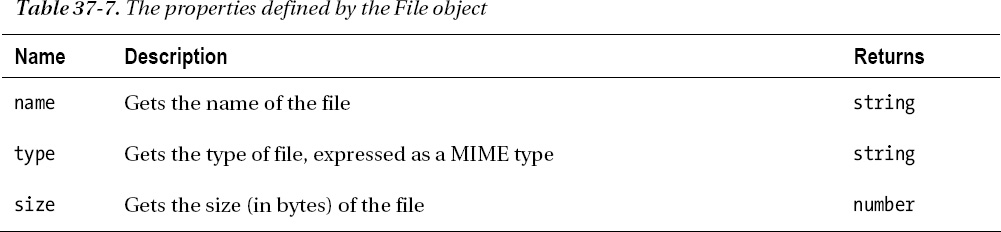
When the user drops files on our drop zone, the files property of the DataTransfer object returns a FileList object. We can treat this as an array of File objects, each of which represents a file that the user has dropped (the user can select multiple files and drop them in one go). Table 37-7 shows the properties of the File object.
In the example, the script enumerates the files that are dropped on the drop zone and displays the values of the File properties in a table. You can see the effect in Figure37-6, where I have dropped some of example files on the drop zone.

Figure 37-6. Displaying data about files
Uploading Dropped Files in a Form
We can combine the drag and drop feature, the File API and uploading data using an Ajax request to allow users to drag the files that want included in a form submission from the operating system. Listing 37-8 contains a demonstration.
Listing 37-8. Combining drag and drop, the File API and the FormData object
<!DOCTYPE HTML>

<html>

    <head>

        <title>Example</title>

        <style>

            .table {display:table;}

            .row {display:table-row;}

            .cell {display: table-cell; padding: 5px;}

            .label {text-align: right;}

            #target {border: medium double black; margin:4px; height: 50px;

                width: 200px; text-align: center; display: table;}

            #target > p {display: table-cell; vertical-align: middle;}

        </style>

    </head>

    <body>

        <form id="fruitform" method="post" action="http://titan:8080/form">

            <div class="table">

                <div class="row">

                    <div class="cell label">Bananas:</div>

                    <div class="cell"><input name="bananas" value="2"/></div>

                </div>

                <div class="row">

                    <div class="cell label">Apples:</div>

                    <div class="cell"><input name="apples" value="5"/></div>

                </div>

                <div class="row">

                    <div class="cell label">Cherries:</div>

                    <div class="cell"><input name="cherries" value="20"/></div>

                </div>

                <div class="row">

                    <div class="cell label">File:</div>

                    <div class="cell"><input type="file" name="file"/></div>

                </div>

                <div class="row">

                    <div class="cell label">Total:</div>

                    <div id="results" class="cell">0 items</div>

                </div>

            </div>

            <div id="target">

                <p id="msg">Drop Files Here</p>

            </div>

            <button id="submit" type="submit">Submit Form</button>

        </form>

        <script>

            var target = document.getElementById("target");

            var httpRequest;

            var fileList;


            document.getElementById("submit").onclick = handleButtonPress;
target.ondragenter = handleDrag;
target.ondragover = handleDrag;
function handleDrag(e) {
e.preventDefault();
}
target.ondrop = function(e) {
fileList = e.dataTransfer.files;
e.preventDefault();
}
function handleButtonPress(e) {
e.preventDefault();
var form = document.getElementById("fruitform");
var formData = new FormData(form);
if (fileList || true) {
for (var i = 0; i < fileList.length; i++) {
formData.append("file" + i, fileList[i]);
}
}
httpRequest = new XMLHttpRequest();
httpRequest.onreadystatechange = handleResponse;
httpRequest.open("POST", form.action);
httpRequest.send(formData);
}
function handleResponse() {
if (httpRequest.readyState == 4 && httpRequest.status == 200) {
var data = JSON.parse(httpRequest.responseText);
document.getElementById("results").innerHTML = "You ordered "
+ data.total + " items";
}
}
</script>
</body>
</html>
In this example, I have added a drop zone to an example taken from Chapter 33, where I demonstrated how to use the FormData object to upload form data to a server. We can include files dropped in the drop zone by using the FormData.append method, passing in a File object as the second argument to the method. When the form is submitted, the contents of the files will automatically be uploaded to the server as part of the form request.
Summary
In this chapter, I showed you the support for dragging and dropping elements. The implementation of this feature leaves a lot to be desired, but it holds promise and I expect that the mainstream browsers will start to address the inconsistencies before long. If you can't wait until then (or you don't care about dragging to and from other browsers and the operating system), then you should consider using a JavaScript library such as jQuery and jQuery UI.