C H A P T E R 17
Using the CSS Selectors—Part I
In Chapter 4, I explained that you use CSS selectors to identify which elements you want to apply a style to when using the style element or an external stylesheet. In this chapter and the next, I describe and demonstrate the core CSS3 selectors. You will see how easy it is to make selections and how you can tailor those selections to meet broad or very specific conditions.
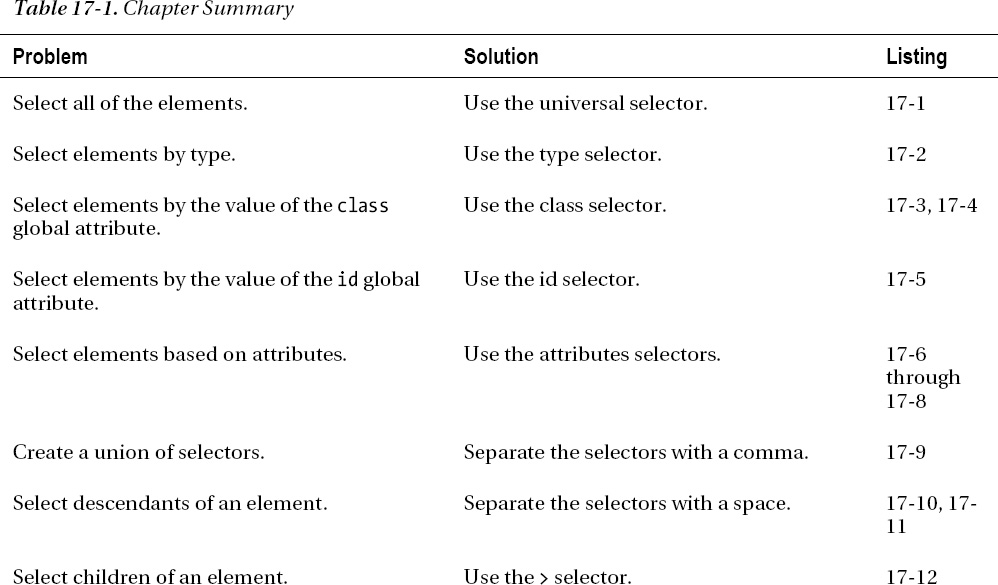
These selectors were introduced over time and in different versions of CSS. The mainstream browsers have fairly good support for all of the selectors, but you might find that coverage in less popular browsers is a little patchy. To help you work out what you can rely on, I have indicated in which version of CSS each selector was introduced. Table 17-1 provides the summary for this chapter.
Using the Basic CSS Selectors
There are a set of selectors that are very straightforward to use. Think of them as the basic selectors. You can use these selectors for making wide selections in a document, or as the foundation for more narrow matches when combined together (a technique I describe later in this chapter). In each of the following sections, I show you how to use one of the basic selectors.
Selecting All Elements
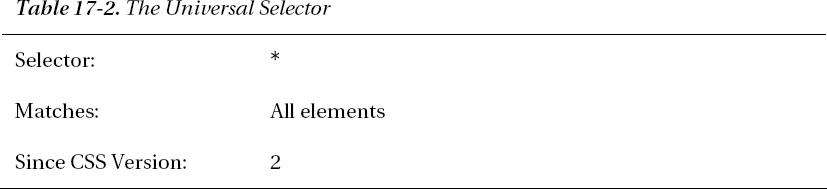
The universal selector matches every element in the document. This is the most fundamental of the CSS selectors, but is rarely used because it matches so widely. Table 17-2 summarizes the selector.
Listing 17-1 shows an example of a style that uses the universal selector.
Listing 17-1. Using the Universal Selector
<!DOCTYPE HTML>

<html>

    <head>

        <title>Example</title>

        <style type="text/css">

            * {

                border: thin black solid;

                padding: 4px;

            }

        </style>
    </head>

    <body>

        <a href="http://apress.com">Visit the Apress website</a>

        <p>I like <span>apples</span> and oranges.</p>

        <a href="http://w3c.org">Visit the W3C website</a>

    </body>

</html>
The style that I have defined in Listing 17-1 puts a thin black box around the selected elements. This is one of the styles I'll use to demonstrate the way that selectors match in this chapter. You can see the effect of this selector in Figure 17-1.
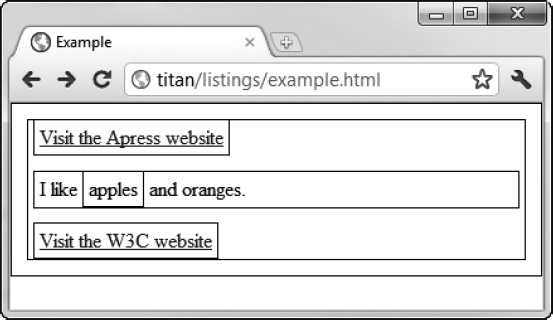
Figure 17-1. Using the universal CSS selector
If the figure looks a little odd it is because the universal selector really does match every element in the document, including the html and body elements. This selector is an effective, but somewhat brutal, tool and you should use it with caution.
Selecting Elements by Type
You can select all of the instances of an element in a document by specifying the element type as the selector (e.g., if you want to select all of the a elements then you use a as the selector). Table 17-3 provides a summary of the element type selector.
Listing 17-2 provides an example.
Listing 17-2. Using the Element Type Selector
<!DOCTYPE HTML>

<html>

    <head>

        <title>Example</title>

        <style type="text/css">

            a {

                border: thin black solid;

                padding: 4px;

            }

        </style>

    </head>

    <body>

        <a href="http://apress.com">Visit the Apress website</a>

        <p>I like <span>apples</span> and oranges.</p>

        <a href="http://w3c.org">Visit the W3C website</a>

    </body>

</html>
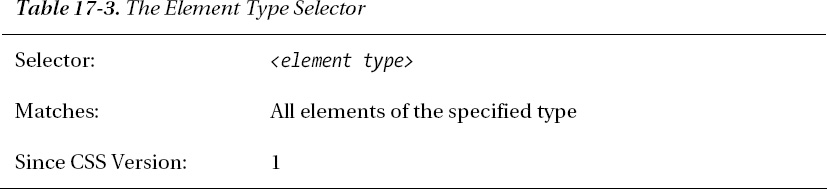
You can see the effect of this selector in Figure 17-2.
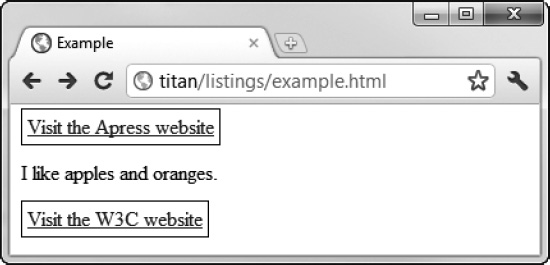
Figure 17-2. Selecting elements by type
![]() Tip You can apply a style to multiple element types by separating the types with a comma. See the section “Combining Selectors,” later in this chapter, for an example.
Tip You can apply a style to multiple element types by separating the types with a comma. See the section “Combining Selectors,” later in this chapter, for an example.
Selecting Elements by Class
The class selector allows us to select elements that have been assigned to a particular class using the class global attribute. Table 17-4 describes this selector. I describe the class attribute in Chapter 3.

Listing 17-3 provides a demonstration of this selector.
Listing 17-3. Selecting Elements by Class
<!DOCTYPE HTML>

<html>

    <head>

        <title>Example</title>

        <style type="text/css">

            .class2 {

                border: thin black solid;

                padding: 4px;

            }

        </style>

    </head>

    <body>

        <a class="class1 class2" href="http://apress.com">Visit the Apress website</a>

        <p>I like <span class="class2">apples</span> and oranges.</p>

        <a href="http://w3c.org">Visit the W3C website</a>

    </body>

</html>
In Listing 17-3, I have used the selector .class2. This has the effect of selecting all elements of any type that have been assigned to the class class2.
There are two ways of expressing this selector: with and without the universal selector. The selectors *.class2 and .class are equivalent. The first form is more descriptive, but the second form is the one that is most commonly used. This is a recurring pattern in CSS selectors. As you proceed through the available selectors, you will see that each of them is effectively a filter that narrows the scope of the selector so that it matches fewer elements. You can combine these selectors to create focused matches. I'll show you different techniques for combining selectors in the section “Combining Selectors,” later in this chapter.
In Listing 17-3, there are two elements assigned to the target class: an a element and a span element. You can see the effect of the style in Figure 17-3.
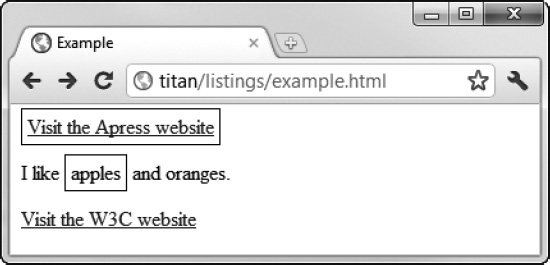
Figure 17-3. Using the class selector
You can be more specific and limit the selection to a single type of element that has been assigned to a class. You do this by replacing the universal selector with the element type, as shown in Listing 17-4.
Listing 17-4. Using the Class Selector for a Single Element Type
<!DOCTYPE HTML>

<html>

    <head>

        <title>Example</title>

        <style type="text/css">

            span.class2 {

                border: thin black solid;

                padding: 4px;

            }

        </style>

    </head>

    <body>

        <a class="class1 class2" href="http://apress.com">Visit the Apress website</a>

        <p>I like <span class="class2">apples</span> and oranges.</p>

        <a href="http://w3c.org">Visit the W3C website</a>

    </body>

</html>
In this case, I have narrowed the scope of the selector so that it will match only span elements that have been assigned to class2. You can see the effect of this narrowed scope in Figure 17-4.
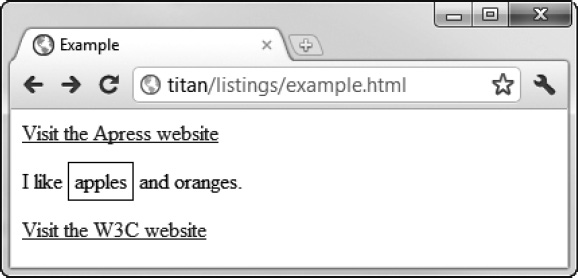
Figure 17-4. Narrowing the scope of the class selector
![]() Tip If you want to select elements that have membership in multiple classes, you can specify the class names separated with a period (e.g.,
Tip If you want to select elements that have membership in multiple classes, you can specify the class names separated with a period (e.g., span.class1.class2). This will select only elements that are assigned to both class1 and class2.
Selecting Elements by ID
The ID selector lets you select elements by the value of the global id attribute, which I described in Chapter 3. Table 17-5 summarizes this selector.
As I explained in Chapter 3, the value of an element's id attribute must be unique within the HTML document. This means that when you use the ID selector, you are looking for a single element. Listing 17-5 demonstrates the use of the id selector.
Listing17-5. Using the id Selector
<!DOCTYPE HTML>

<html>

    <head>

        <title>Example</title>
        <style type="text/css">

            #w3canchor {

                border: thin black solid;

                padding: 4px;

            }

        </style>

    </head>

    <body>

        <a id="apressanchor" class="class1 class2" href="http://apress.com">

            Visit the Apress website

        </a>

        <p>I like <span class="class2">apples</span> and oranges.</p>

        <a id="w3canchor" href="http://w3c.org">Visit the W3C website</a>

    </body>

</html>
In this example, I have selected the element with the id of w3canchor. You can see the effect of this in Figure 17-5.
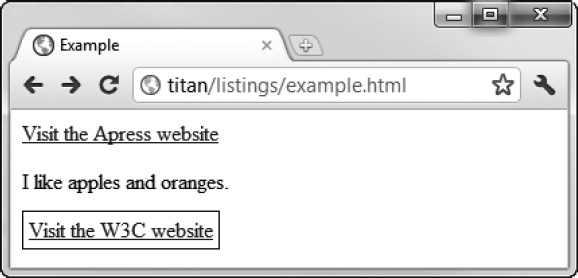
Figure 17-5. Selecting an element by ID
It might seem that if you are targeting an individual element for a style, you could achieve the same effect by using the element's style attribute. This is true, but the real value of this selector comes when you combine it with other selectors, a technique I demonstrate later in this chapter.
Selecting Elements by Attribute
The attribute selector allows you to match attributes based on different aspects of attributes, as described in Table 17-6.

You can choose to match all of the elements (or all elements of a given type) whose attributes meet the condition by using the universal selector (*) or, in the more common form, by omitting the universal selector and putting the condition inside of the square braces (the [ and ] characters). Listing 17-6 demonstrates the attribute selector in use.
Listing 17-6. Using the Element Attribute Selector
<!DOCTYPE HTML>

<html>

    <head>

        <title>Example</title>

        <style type="text/css">

            [href] {

                border: thin black solid;

                padding: 4px;

            }

        </style>

    </head>

    <body>

        <a id="apressanchor" class="class1 class2" href="http://apress.com">

            Visit the Apress website

        </a>

        <p>I like <span class="class2">apples</span> and oranges.</p>

        <a id="w3canchor" href="http://w3c.org">Visit the W3C website</a>

    </body>

</html>
In Listing 17-6, I have used the simplest form of the attribute selector, which matches any element that has an href attribute, irrespective of the value assigned to the attribute. In the example HTML document, this means that both the a elements will be selected, as shown in Figure 17-6.
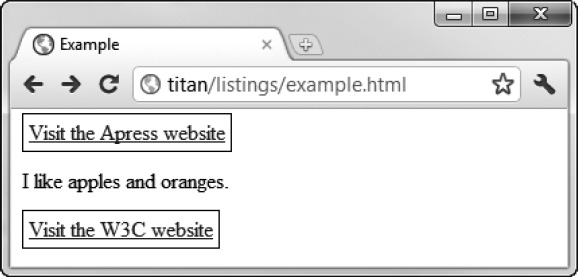
Figure 17-6. Selecting elements based on the presence of an attribute
You can create more sophisticated conditions to match attributes, as shown in Table 17-7. These conditions have been added to CSS in two waves, so I have indicated in which version of CSS each is supported.
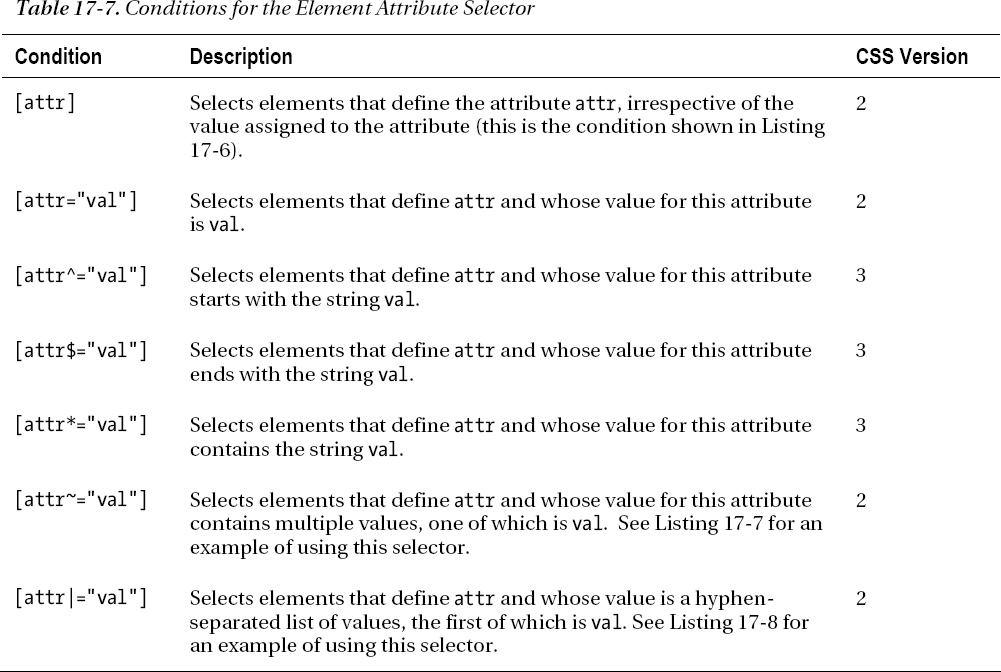
The last two conditions bear additional explanation. The ~= condition is useful for dealing with attributes that support multiple values that are separated by a space character, such as the class global attribute. Listing 17-7 gives a demonstration.
Listing 17-7. Selecting Based on One of Multiple Values
<!DOCTYPE HTML>

<html>

    <head>

        <title>Example</title>

        <style type="text/css">

            [class~="class2"] {

                border: thin black solid;

                padding: 4px;

            }

        </style>
    </head>

    <body>

        <a id="apressanchor" class="class1 class2" href="http://apress.com">

            Visit the Apress website

        </a>

        <p>I like <span class="class2">apples</span> and oranges.</p>

        <a id="w3canchor" href="http://w3c.org">Visit the W3C website</a>

    </body>

</html>
In Listing 17-7, I've used the class global attribute because it is the only attribute I have introduced so far that accepts multiple values. You don't need to use the attribute selector to match class values; the class selector handles multiple class memberships automatically.
The condition that I have used in the selector is to match elements who define the class attribute and whose value for this attribute includes class2. I have highlighted the class attributes of the content elements and you can see the effect of the selector in Figure 17-7.

Figure 17-7. Selecting based on a multivalue attribute
The |= condition is useful when several pieces of information are expressed in an attribute value and separated by hyphens. A good example of this is the lang global attribute, which can be used with language specifiers that contain regional subtags (for example, en-us is English as spoken in the United States, and en-gb is English as spoken in the United Kingdom). Listing 17-8 shows how you can select all of the English tags, without having to enumerate all of the regional variations (of which there are many).
Listing 17-8. Using the |= Attribute Condition
<!DOCTYPE HTML>

<html>

    <head>

        <title>Example</title>

        <style type="text/css">

            [lang|="en"] {

                border: thin black solid;

                padding: 4px;

            }

        </style>

    </head>

    <body>
        <a lang="en-us" id="apressanchor" class="class1 class2" href="http://apress.com">

            Visit the Apress website

        </a>

        <p>I like <span lang="en-gb" class="class2">apples</span> and oranges.</p>

        <a lang="en" id="w3canchor" href="http://w3c.org">Visit the W3C website</a>

    </body>

</html>
You can see the effect of this selector in Figure 17-8. Notice that the selector matches the second a element, which has no regional subtag (i.e., the value of the lang element is en and not en-us or en-gb), as well those that do have subtags.
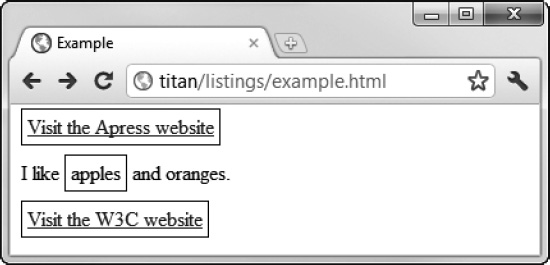
Figure 17-8. Selecting elements based on lang attributes
Combining Selectors
You can be much more specific in the elements that you select by creating combinations of selectors. These either broaden the range of elements that a style will be applied to or do the opposite: allow you to be incredibly specific in what you select. In the following sections, I'll show you the different ways you can combine selectors.
Creating Selector Unions
Creating a list of comma-separated selectors means that the style is applied to the union of all of the elements that each of the individual selectors matches. Table 17-8 summarizes unions of selectors.
Listing 17-9 provides an example of creating a union of selectors.
Listing 17-9. Creating Selector Unions
<!DOCTYPE HTML>

<html>

    <head>

        <title>Example</title>

        <style type="text/css">

            a, [lang|="en"] {

                border: thin black solid;

                padding: 4px;

            }

        </style>

    </head>

    <body>

        <a id="apressanchor" class="class1 class2" href="http://apress.com">

            Visit the Apress website

        </a>

        <p>I like <span lang="en-uk" class="class2">apples</span> and oranges.</p>

        <a id="w3canchor" href="http://w3c.org">Visit the W3C website</a>

    </body>

</html>
In Listing 17-9, I have specified a type selector (a) and an attribute selector ([lang|="en"]) separated by a comma (a, [lang|="en"]). The browser will evaluate each selector in turn and apply the style to the selected elements. You can mix and match different types of selectors freely and there doesn't need to be any commonality between the elements that are matched. You can see the effect of the selector from Listing 17-9 in Figure 17-9.
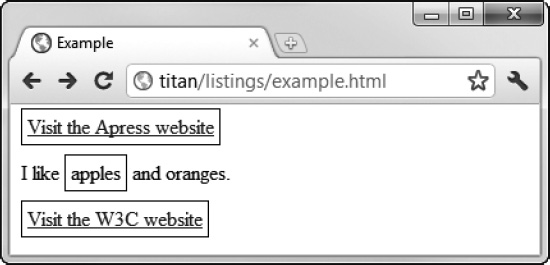
Figure 17-9. Creating selector unions
You can combine as many selectors as you require, each separated from the last by a comma.
Selecting Descendant Elements
You can use the descendant selector to select elements that are contained within another element. Table 17-9 provides a summary.
The first selector is applied and then the descendants of the matched elements are evaluated against the second selector. The descendant selector will match any element contained within the elements matched by the first selector, not just the immediate children. Listing 17-10 provides a demonstration.
Listing 17-10. Selecting Descendants
<!DOCTYPE HTML>

<html>

    <head>

        <title>Example</title>

        <style type="text/css">

            p span {

                border: thin black solid;

                padding: 4px;

            }

        </style>

    </head>

    <body>

        <a id="apressanchor" class="class1 class2" href="http://apress.com">

            Visit the Apress website

        </a>

        <p>I like <span lang="en-uk" class="class2">apples</span> and oranges.</p>

        <a id="w3canchor" href="http://w3c.org">Visit the W3C website</a>

    </body>

</html>
The selector in Listing 17-10 selects span elements that are descendants of p elements. Given the HTML in the example, I could just have selected the span element directly to get the same result, but this approach is more flexible, as the following example demonstrates.
Listing 17-11. A More Complex Descendant Selector Example
<!DOCTYPE HTML>

<html>

    <head>

        <title>Example</title>

        <style type="text/css">

            #mytable td {

                border: thin black solid;

                padding: 4px;

            }
        </style>

    </head>

    <body>

        <table id="mytable">

            <tr><th>Name</th><th>City</th></tr>

            <tr><td>Adam Freeman</td><td>London</td></tr>

            <tr><td>Joe Smith</td><td>New York</td></tr>

            <tr><td>Anne Jones</td><td>Paris</td></tr>

        </table>


        <p>I like <span lang="en-uk" class="class2">apples</span> and oranges.</p>


        <table id="othertable">

            <tr><th>Name</th><th>City</th></tr>

            <tr><td>Peter Pererson</td><td>Boston</td></tr>

            <tr><td>Chuck Fellows</td><td>Paris</td></tr>

            <tr><td>Jane Firth</td><td>Paris</td></tr>

        </table>

    </body>

</html>
In Listing 17-11, I have defined two simple tables, each of which defines the id attribute. Using the ID selector, I select the table with the id value of mytable and then select the td elements that it contains. You can see the effect in Figure 17-10.
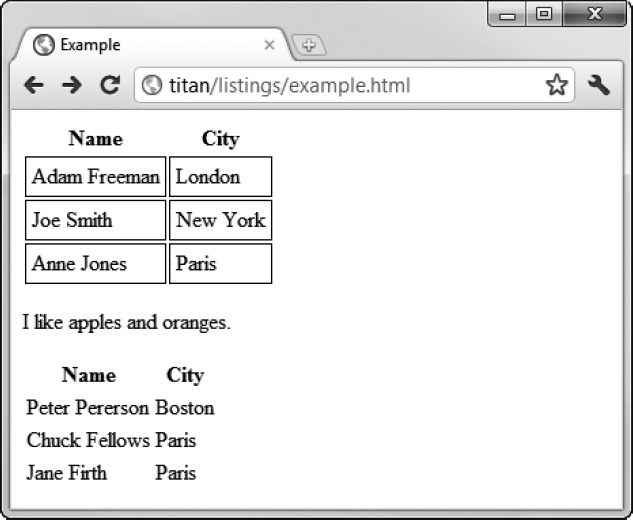
Figure 17-10. Selecting descendant elements
Notice that I am not selecting direct descendants in this example. I am skipping over the tr elements to select the td elements.
Selecting Child Elements
The counterpart to the descendant selector is the child selector, which will only match elements that are directly contained in matched elements. Table 17-10 summarizes the child selector.
Listing 17-12 provides a demonstration of how you can select child elements.
Listing 17-12. Selecting Child Elements
<!DOCTYPE HTML>

<html>

    <head>

        <title>Example</title>

        <style type="text/css">

            body > * > span, tr > th {

                border: thin black solid;

                padding: 4px;

            }

        </style>

    </head>

    <body>

        <table id="mytable">

            <tr><th>Name</th><th>City</th></tr>

            <tr><td>Adam Freeman</td><td>London</td></tr>

            <tr><td>Joe Smith</td><td>New York</td></tr>

            <tr><td>Anne Jones</td><td>Paris</td></tr>

        </table>


        <p>I like <span lang="en-uk" class="class2">apples</span> and oranges.</p>


        <table id="othertable">

            <tr><th>Name</th><th>City</th></tr>

            <tr><td>Peter Pererson</td><td>Boston</td></tr>

            <tr><td>Chuck Fellows</td><td>Paris</td></tr>

            <tr><td>Jane Firth</td><td>Paris</td></tr>

        </table>

    </body>

</html>
In this selector, I have created a union of child selectors. In the first, I am looking for span elements that are children of any element that is a child of the body element. In the second, I am looking for th elements that are children of tr elements. You can see which elements are matched in Figure 17-11.
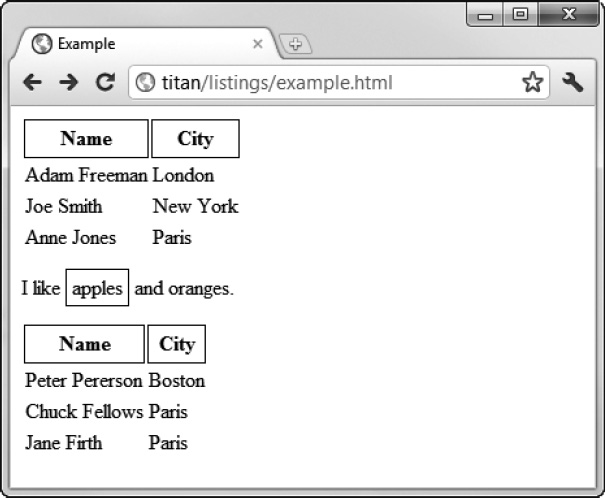
Figure 17-11. Selecting child elements
Selecting Sibling Elements
You can select elements that immediately follow other elements using the immediate sibling selector. Table 17-11 summarizes this selector.
Listing 17-13 shows how you can select immediate sibling elements.
Listing 17-13. Using the Immediate Sibling Selector
<!DOCTYPE HTML>

<html>

    <head>

        <title>Example</title>

        <style type="text/css">

            p + a {

                border: thin black solid;

                padding: 4px;

            }

        </style>

    </head>

    <body>

        <a href="http://apress.com">Visit the Apress website</a>

        <p>I like <span lang="en-uk" class="class2">apples</span> and oranges.</p>

        <a href="http://w3c.org">Visit the W3C website</a>

        <a href="http://google.com">Visit Google</a>

    </body>

</html>
In Listing 17-13, the selector will match a elements that immediately follow a p element. As you can see in Figure17-12, there is only one such element in the listing and it is the a element, which creates a hyperlink to the W3C website.
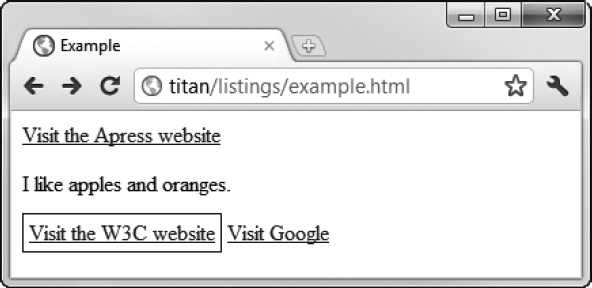
Figure 17-12. Selecting an immediate sibling
You can make the selection a little looser by using the general sibling selector, which selects elements that follow another specified element, but not necessarily immediately. Table 17-12 describes this element.


Listing 17-14 shows how you can use the general sibling selector.
Listing 17-14. Using the General Sibling Selector
<!DOCTYPE HTML>

<html>

    <head>

        <title>Example</title>

        <style type="text/css">

            p ~ a {

                border: thin black solid;

                padding: 4px;

            }

        </style>

    </head>

    <body>

        <a href="http://apress.com">Visit the Apress website</a>

        <p>I like <span lang="en-uk" class="class2">apples</span> and oranges.</p>

        <a href="http://w3c.org">Visit the W3C website</a>

        <a href="http://google.com">Visit Google</a>

    </body>

</html>
We are not limited to elements that immediately follow an element matched by the first selector, which means that the second selector will match against two a elements in this example. The excluded a element (the one that links to http://apress.com) is not selected because it precedes the p element; we can only select siblings that follow on). You can see the effect of this selector in Figure 17-13.
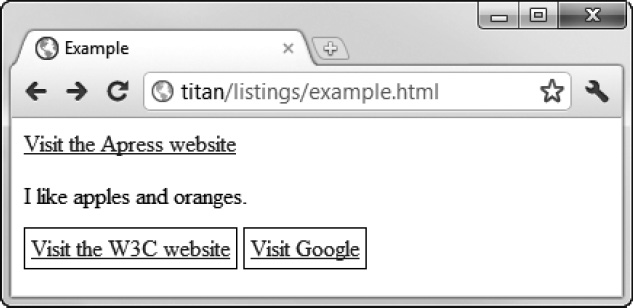
Figure 17-13. Using the general sibling selector
Using Pseudo-Element Selectors
So far, you have seen selections using the elements defined in the HTML document. CSS also includes pseudo-selectors, which provide more complex functionality but don't directly correspond to the elements defined in the document. There are two kinds of pseudo-selectors: pseudo-elements and pseudo-classes. In this section, I describe and demonstrate the pseudo-element selectors. As their name suggests, pseudo-elements don't really exist; they are a convenience provided by CSS to let you make helpful selections.
Using the ::first-line Selector
The ::first-line selector matches the first line of a block of text. Table 17-13 summarizes the ::first-line selector.
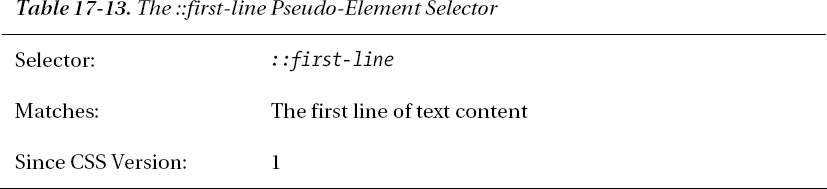
Listing 17-15 shows an example of using the ::first-line selector.
Listing 17-15. Using the ::first-line Pseudo-Element Selector
<!DOCTYPE HTML>

<html>

    <head>

        <title>Example</title>

        <style type="text/css">

            ::first-line {

                background-color:grey;

                color:white;

            }

        </style>

    </head>

    <body>

        <p>Fourscore and seven years ago our fathers brought forth

           on this continent a new nation, conceived in liberty, and

           dedicated to the proposition that all men are created equal.</p>


        <p>I like <span lang="en-uk" class="class2">apples</span> and oranges.</p>


        <a href="http://w3c.org">Visit the W3C website</a>

    </body>

</html>
I have used the selector on its own in this example, but it can also be applied as a modifier to other selectors. For example, if I wanted to select the first line of only p elements, I could specify p::first-line as the selector.
![]() Tip The pseudo-element selector is prefixed with two colon characters (
Tip The pseudo-element selector is prefixed with two colon characters (::), but browsers will recognize the selector with just one colon (i.e., :first-line instead of ::first-line). This makes the format consistent with the pseudo-class selectors I described earlier in this chapter for purposes of backward compatibility.
The browser will reassess what the first line is as the browser window is resized. This means that the style is always correctly applied to the first line of the text, as shown in Figure 17-14.
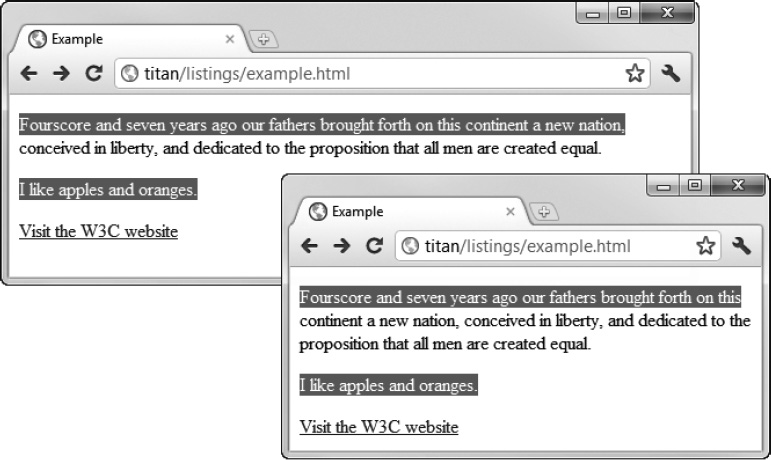
Figure 17-14. The browser ensures that the style is applied to the first line, even when the window is resized
Using the ::first-letter Selector
The ::first-letter selector does just what its name suggests: it selects the first letter in a block of text. Table 17-14 summarizes this pseudo-element selector.

Listing 17-16 shows the selector in use.
Listing 17-16. Using the ::first-letter Pseudo-Element Selector
<!DOCTYPE HTML>

<html>

    <head>

        <title>Example</title>

        <style type="text/css">

            ::first-letter {

                background-color:grey;

                color:white;

                border: thin black solid;

                padding: 4px;


            }

        </style>

    </head>

    <body>

        <p>Fourscore and seven years ago our fathers brought forth

            on this continent a new nation, conceived in liberty, and

             dedicated to the proposition that all men are created equal.</p>


        <p>I like <span lang="en-uk" class="class2">apples</span> and oranges.</p>

        <a href="http://w3c.org">Visit the W3C website</a>

    </body>

</html>
You can see the effect of this selector in Figure 17-15.
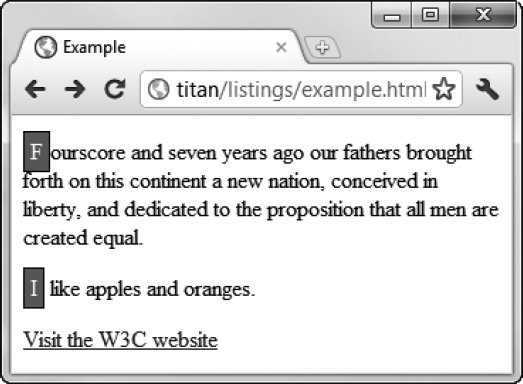
Figure 17-15. Using the ::first-letter selector
Using the :before and :after Selectors
The :before and :after selectors are unusual in that they generate content and add it to the document. I introduced the :before selector in Chapter 9, and showed you how to use it to create custom lists. The :after selector is the counterpart to :before and adds content following an element, as opposed to before an element. Table 17-15 describes these selectors.

Listing 17-17 demonstrates these attributes in use.
Listing 17-17. Using the :before and :after Selectors
<!DOCTYPE HTML>

<html>

    <head>

        <title>Example</title>

        <style type="text/css">

            a:before {

                content: "Click here to "

            }

            a:after {

                content: "!"

            }

        </style>

    </head>

    <body>

        <a href="http://apress.com">Visit the Apress website</a>

        <p>I like <span>apples</span> and oranges.</p>

        <a href="http://w3c.org">Visit the W3C website</a>

    </body>

</html>
In Listing 17-17, I have selected the a elements and applied the :before and :after pseudo-selectors. When using these selectors, you specify the content you want to insert by setting a value for the content property. This is a special property that you may use only with these selectors. In this example, the content Click here to will be inserted before the content of the a elements, and an exclamation mark (!) will be inserted after the content. You can see the effect of these additions in Figure 17-16.
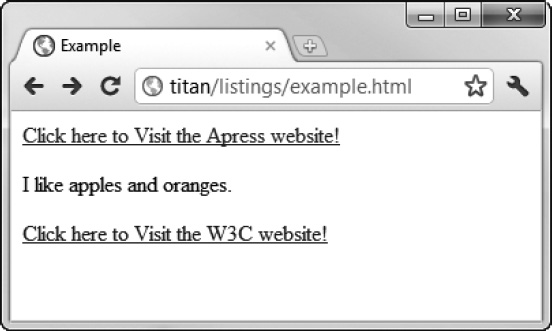
Figure 17-16. Using the :before and :after selectors
Using the CSS Counter Feature
The :before and :after selectors are often used with the CSS counter feature, which lets you generate numeric content. I gave an example of using these counters to create custom lists in Chapter 9. Listing 17-18 gives a demonstration.
Listing 17-18. Using the CSS Counter Feature
<!DOCTYPE HTML>

<html>

    <head>

        <title>Example</title>

        <style type="text/css">

            body {

                counter-reset: paracount;

            }

            p:before {

                content: counter(paracount) ". ";

                counter-increment: paracount;

            }

        </style>

    </head>

    <body>

        <a href="http://apress.com">Visit the Apress website</a>

        <p>I like <span>apples</span> and oranges.</p>

        <p>I also like <span>mangos</span> and cherries.</p>

        <a class="myclass1 myclass2" href="http://w3c.org">Visit the W3C website</a>

    </body>

</html>
To create a counter, you use the special counter-reset property and set the value to be the name you want to use for the counter, like this:
This has the effect of initializing a counter called paracount counter and setting the value to 1. You can specify a different initial value by adding a number after the counter name, like this:
counter-reset: paracount 10;
If you want to define multiple counters, you simply add the names (and optional initial values) to the same counter-reset declaration, like this:
counter-reset: paracount 10 othercounter;
This declaration creates a counter called paracount (with an initial value of 10) and a counter called othercounter (with an initial value of 1). After you have initialized a counter, you can use it in the content property of styles that use the :before and :after selectors, like this:
content: counter(paracount) ". ";
Because this declaration has been used in a selector that includes :after, this has the effect of including the current value of the counter in the HTML before every element that the selector matches and, in this case, appending a period and a space after each value. The value is expressed as a decimal integer by default (1, 2, 3, etc.), but you can specify other numeric formats as well, like this:
content: counter(paracount, lower-alpha) ". ";
The additional argument to the counter function is the style of number you want. You may use any of the supported values for the list-style-type property, which I describe in Chapter 24.
You increment the counter using the special counter-increment property. The value for this property is the name of the counter you want to increment, like this:
counter-increment: paracount;
Counters are incremented by one by default, but you can specify a different increment by adding the step size you want to the declaration, like this:
counter-increment: paracount 2;
You can see the effect of the counter from Listing 17-18 in Figure 17-17.
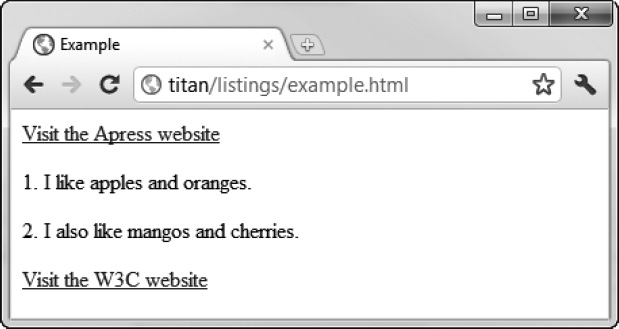
Figure 17-17. Using counters with generated content
Summary
In this chapter I have described the CSS selectors and pseudo-elements, which are the means by which you identify the elements that you want to apply a style to. The selectors allow you to match elements in broad sweeps or, by combining selectors, narrow your focus to elements in particular parts of your HTML documents. The pseudo-elements are a convenience that let you select content that doesn't really exist in the document. You'll see a similar principle in the next chapter when you examine pseudo-classes.
Learning the selectors is the key to getting the most out of CSS. In the chapters that follow, you will see lots of examples of selectors at work and I recommend that you take the time to experiment and become familiar with them yourself.