
Web services have been gaining popularity over the last several years, presenting themselves as interoperable services. In the NetBeans IDE, this trend is supported by a range of tools. When creating NetBeans Platform applications, it is useful to be aware of how web services can be used and integrated, which is the focus of this chapter.
Using Amazon E-Commerce Services (ECS) as an example, this chapter shows how to use the NetBeans IDE to create classes required for the use of web services, and includes an explanation of how to call them from a NetBeans Platform application. Taking this approach, your users will be able to search for products and product information, and execute other operations relating to ECS.
Before creating a NetBeans module, create an independent Java application. Do this, as in the case of NetBeans modules, via a wizard. Go to File
Next, right-click the application and choose New
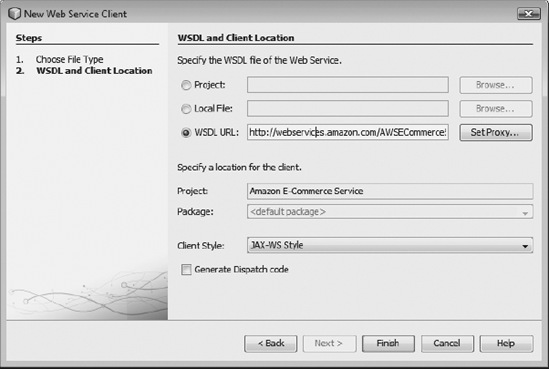
http://webservices.amazon.com/AWSECommerceService/AWSECommerceService.wsdl
Of course, this only works if you are online. Rather than taking the online approach, you can download the file and feed it to the wizard as a local file (see Figure 14-1).
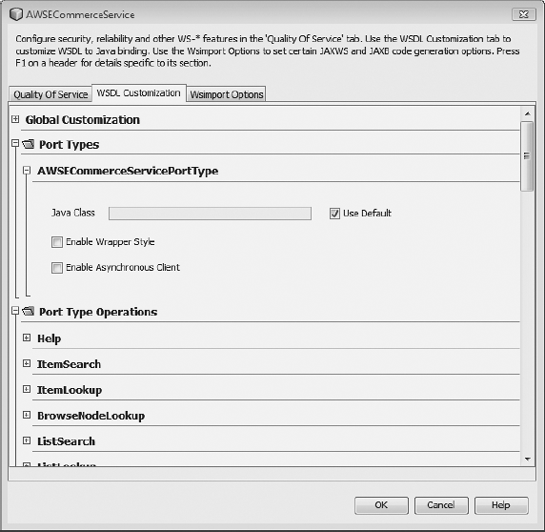
Click Finish. The files that are required for the use of the web service are thereby created, using the information provided by the WSDL file. For a result that is easier to understand, deactivate the Wrapper Style setting, which is switched on by default. To this end, open the Web Service References node in the Projects window. There, find an entry for AWSECommerceService, right-click it to open the context menu, and choose Edit Web Service Attributes. On the WSDL Customization tab, expand AWSECommerceServicePortType under the Port Types node, and then deactivate the Enable Wrapper Style option (see Figure 14-2). The setting is applied to all operations of this port type.
When you click OK, the web service client classes are updated. Now do a build, resulting in a web service client in the form of the JAR file dist/Amazon_E-Commerce_Service.jar in the main project directory. In the next section, we'll wrap this JAR file in a NetBeans module and use it as our Amazon ECS API.
The previous section showed how to create a JAR file containing the Java classes that allow using Amazon ECS. In exactly the same way, you also create client files for other web services. We will now examine how to use these files to let our NetBeans Platform application access the web service.
To that end, create a new NetBeans Platform application by choosing File
Start by creating a new library wrapper module, right-clicking the Modules node, and choosing Add New Library. In the Library field, browse to the JAR file created earlier. Click Next. Name the module Amazon E-Commerce Service and click Next. Enter com.amazon as the code name base, and then click Finish. Expand the new module project in the Projects window, right-click the Libraries node, and choose Add Module Dependency. Click Show Non-API Modules, and then select JAX-WS 2.1 API, JAXWS 2.1 Library, and JAXB 2.1 Library as dependencies. Finally, within the module project's Libraries node, right-click the JAXWS 2.1 Library and JAXB 2.1 Library nodes, choose Edit, and then choose Implementation Version.
With that, the web service client is ready to be used within the NetBeans Platform application. We'll now create a new module from which we'll call out to the web service client classes. In the Projects window, right-click the application's Modules node, and choose Add New. Create a new module and set a dependency on the Amazon E-Commerce Service module. To set up a small example, create a new TopComponent using the Window Component wizard.
In the example, use the Amazon Standard Identification Number (ASIN) to search for available pictures of a product. Looking ahead to the MP3 Manager that we'll create in Chapter 18, adapt the example as follows: save the ASIN into an MP3 file's ID3 tag, enabling you to show Amazon's CD cover of the MP3 file currently being played. Alternatively, use the example to search for albums of the currently playing MP3 file and display them to the user.
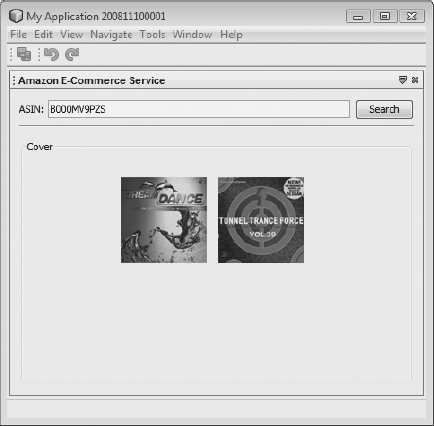
In the example application, as you can see in Figure 14-3, we use the ASIN to search for a product and show its cover, as is done on the Amazon.com site. To that end, let's look more closely at the queries that we use to interact with the Amazon web service. The requests need to be performed asynchronously, avoiding a situation where the whole application is blocked. At the same time, be aware that operations on the GUI components should only be performed over the EDT. In the end, we want to be informed when the query has succeeded, which is when we can display the image. The simplest approach to solving these related concerns is to use the SwingWorker class. To that end, we create our own class, deriving from SwingWorker<String, Object>.
The doInBackground() method, which we need to override, is automatically called asynchronously. This is where web service queries are coded (see Listing 14-1). When the queries succeed, the done() method in the SwingWorker is called. That is where we then use the get() method to access the value returned by the doInBackground() method. In the example, the value is the URL of the product image.
Example 14.1. Executing a web service request and showing the results with the help of the SwingWorker class
import com.amazon.webservices.awsecommerceservice.AWSECommerceService;
import com.amazon.webservices.awsecommerceservice.AWSECommerceServicePortType;
import com.amazon.webservices.awsecommerceservice.ImageSet;
import com.amazon.webservices.awsecommerceservice.Item;
import com.amazon.webservices.awsecommerceservice.ItemLookup;
import com.amazon.webservices.awsecommerceservice.ItemLookupRequest;
import com.amazon.webservices.awsecommerceservice.ItemLookupResponse;
final class ECSTopComponent extends TopComponent {
   private static final String AWS_KEY = "<your personal aws key>";
   ...
   private final class ImageLookupByASIN extends SwingWorker<String, Object> {
      private String asin = new String();
      public ImageLookupByASIN(String asin) {
         this.asin = asin;
      }
      @Override
      public String doInBackground() {
         String url = new String();
         try {
            AWSECommerceService service = new AWSECommerceService();
            AWSECommerceServicePortType port = service.getAWSECommerceServicePort();
            ItemLookupRequest request = new ItemLookupRequest();
            request.setIdType("ASIN");
            request.getItemId().add(asin);
            request.getResponseGroup().add("Images");
            ItemLookup il = new ItemLookup();
            il.setAWSAccessKeyId(AWS_KEY);
            il.getRequest().add(request);
            ItemLookupResponse response = port.itemLookup(il);
            Item i = response.getItems().get(0).getItem().get(0);
            ImageSet is = i.getImageSets().get(0).getImageSet().get(0);
            url = is.getThumbnailImage().getURL();
         } catch (Exception e) {
            e.printStackTrace();
         }
         return url;
      }
      @Override
      protected void done() {
         try {
            cover.add(new JLabel(new ImageIcon(new URL(get()))));
            cover.updateUI();
         } catch (Exception e) {
            e.printStackTrace();
         }
      }
}
private void searchActionPerformed(ActionEvent evt) {
new ImageLookupByASIN(asin.getText()).execute();
}
}In the asynchronously called doInBackground() method, we get the port for Amazon ECS. Then we invoke the ItemLookup operation. Configure the operation via the ItemLookup and ItemLookupResult objects. Using the Request object, specify the use of the ASIN to look for a product. Add the ASIN, which the ImageLookupByASIN object passes as a parameter, to the Item ID list. Using the Response group, process the information received from the web service. Since we are only interested in the URL of the product image, use the Images group type.
To use Amazon Web Services (AWS), you need an AWS access key, which you can get for free after subscribing at http://aws.amazon.com. Pass the key in to the ItemLookup object, via the method setAWSAccessKeyId(). Then pass in the ItemLookupRequest object. In doing so, you prepare the required parameters for the request and can perform the itemLookup() request on the web service port obtained earlier. The response is received in the ItemLookupResponse object containing a list of found products in the form of an Item object. Since there is only one product per ASIN, immediately take the first item from the list. An item includes an ImageSet, from which the URL of the product image is extracted. That is the value returned from the method.
And with that, the request ends and the SwingWorker class calls the done() method. In this method, we obtain the URL via the get() method and use it to access the ImageIcon object, which is then shown to the user (see Figure 14-3).
This chapter dealt with the topic of web services. We created a Web Service API (a web service client) for AWS from the corresponding WSDL file. To this end, we made use of the related NetBeans IDE tooling support. Next, you learned how to integrate the web service client into your own NetBeans Platform application. You also saw which additional libraries are necessary in this scenario. All in all, the example showed how easy it is to use a web service in your own application.