
An application's actions are among its most important and central components. In this chapter, you'll learn how to provide actions and how to integrate them into the application's menu bar, toolbar, and pop-up menus. You'll be introduced to specific NetBeans Platform classes that simplify the development and integration of action classes into your application. Moreover, the concepts are explained relevant to the creation of context-sensitive actions.
The NetBeans Platform bases its actions on the Swing Action Framework. Ultimately, every action rests upon Swing's Action interface. In the simplest case, an action class implements the Action interface or, even more straightforward, extends the AbstractAction class. Indeed, actions that derive from these standard base classes can be integrated into NetBeans Platform applications.
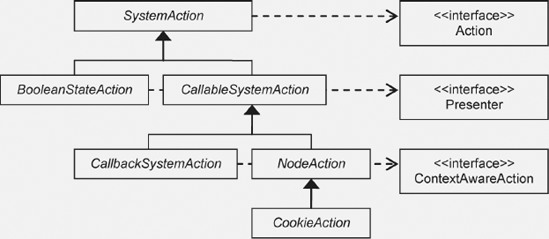
In addition to these standard Swing base classes, the NetBeans Platform has some of its own base classes from which you can derive your own actions. These base classes offer better integration with the NetBeans Platform for purposes of delivering standard action representatives for entries in menu bars, toolbars, and pop-up menus. Besides these, you can support these classes by the implementation of asynchronous tasks, as well as with the implementation of context-sensitive actions. Figure 4-1 illustrates the class hierarchy of these abstract base classes, while the following sections explain the purpose of each.
Actions are registered centrally in the layer file of your module, within the Actions folder. Other classes reference these registration entries, as you will learn in Chapter 5, which discusses the creation of menu bars and toolbars. The advantage is that actions can be used multiple times in different places, such as in the menu bar or toolbar, or even bound to a Swing component. However, though the action is displayed in multiple ways, only one instance is created.
Another reason for centralized declaration of an action is the possibility of toolbar customization. When removing an entry from the toolbar, the action itself is not removed, only the reference to the action.
The NetBeans IDE provides a wizard for creating new action classes. This is very practical, particularly for the insertion and organization of actions in the menu bar or toolbar, as well as for the insertion of separators between them. Additionally, it is handy that the registration of all entries in the layer file is taken care of for you, as the wizard handles this task by adding the necessary registration entries to the layer file.
Choose File
We will use an always enabled action in this section. In the next step, specify how to integrate your action class into the menu bar, toolbar, or both, and set a shortcut, if necessary (see Figure 4-2).
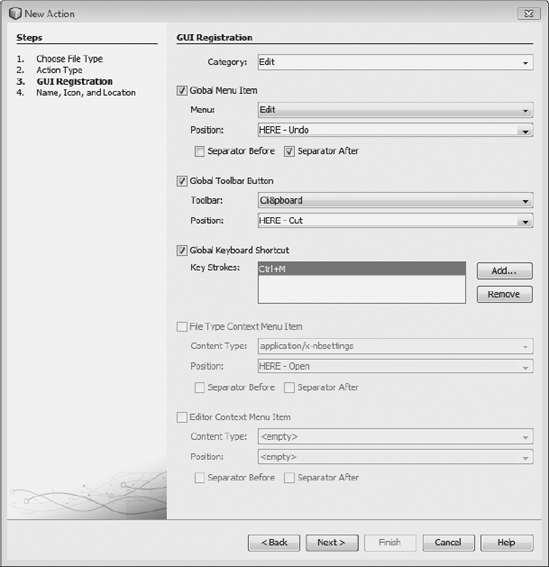
Next, select a category for the action. The categories represent semantic groupings of the actions. Either select a preexisting category or create a new one. In addition, assign your action to a menu bar, a toolbar, or both, and set the position where the action will be displayed. Drop-down menus show you possible locations for display. HERE identifies the location where display of your action will be inserted.
Although you can allow the action to be added to an existing menu bar or toolbar, it is also possible to tweak the layer file later, so the action will be displayed in a different position (see Chapter 5). The wizard also makes possible inserting a separator before or after the action (or both).
The dialog allows you to specify a keyboard shortcut that invokes the action. Once you approve of your settings, click Next to reach the final step of the wizard. There you set the name of the action class and the display name that will be shown in the menu bar. You must add an icon for the action. Typically, this should be 16×16 pixels in size. Since the user can show the toolbar in two different dimensions, you should provide the same icon in a different size, preferably 24×24 pixels. You need not specifically select this 24×24 pixel icon. It should merely be found in the same folder, with the same file name as the 16×16 pixel icon.
For example, if the 16×16 icon is named icon.gif, the accompanying 24×24 icon must be named icon24.gif. (Later, you can also add icons named icon_pressed.gif, icon_disabled.gif, and icon_rollover.gif for the related states, in the folder where icon.gif is found.) Afterward, click Finish to end the wizard and allow the action class to be created. Let's now look at the newly created action class (see Listing 4-1).
Example 4.1. Example of an always enabled action class
public final class MyFirstAction implements ActionListener {
    public void actionPerformed(ActionEvent e) {
        // TODO implement action body
    }
}
While earlier NetBeans versions used the NetBeans Platform CallableSystemAction (see Figure 4-1, shown previously), an always enabled action is created and handled as an ActionListener interface from NetBeans Platform 6.5 onward. Thus, we use a plain Java action class, making the integration of existing action classes into a NetBeans Platform application very easy. The integration into the NetBeans Platform is done in a declarative manner, via the layer file. The required entries are generated by the Action wizard. The entries that are generated are shown in Listing 4-2, within the Actions folder.
Example 4.2. Integration of an always enabled action into the NetBeans Platform
<file name="com-galileo-netbeans-module-MyFirstAction.instance">
   <attr name="SystemFileSystem.localizingBundle"
           stringvalue="com.galileo.netbeans.module.Bundle"/>
   <attr name="delegate" newvalue="com.galileo.netbeans.module.MyFirstAction"/>
   <attr name="displayName"
           bundlevalue="com.galileo.netbeans.module#CTL_MyFirstAction"/>
   <attr name="iconBase" stringvalue="com/galileo/netbeans/module/icon.gif"/>
   <attr name="instanceCreate" methodvalue="org.openide.awt.Actions.alwaysEnabled"/>
   <attr name="noIconInMenu" stringvalue="false"/>
</file>
These attributes have the following meaning:
SystemFileSystem.localizingBundle:Specifies the bundle where localized string literals are found.
delegate:Specifies the default constructor of the action class. It is also possible to specify a factory method.
displayName:Specifies the key of the action's name property in the properties bundle.
iconBase:Specifies the path and the base name of an icon for this action.
instanceCreate:Specifies the factory method responsible for the creation of the action class. For this purpose, the utility class
Actionsprovides the methodalwaysEnabled().
The previously described approach to creating and integrating an action into a NetBeans Platform application is the approach taken since the NetBeans Platform 6.5. It is the recommended approach to take. Previously, a NetBeans Platform CallableSystemAction class was created by the wizard for always enabled actions. It is the superclass of the action classes that are described later in this chapter.
Listing 4-3 shows an example. The class is derived from the CallableSystemAction class. Rather than defining attributes in the layer file, as is done from the NetBeans Platform 6.5 onward, several methods need to be overridden to set attributes.
Example 4.3. Always enabled action with CallableSystemAction as superclass
public final class MyFirstAction extends CallableSystemAction {
   public void performAction() {
      // TODO implement action body
   }
   public String getName() {
      return NbBundle.getMessage(MyFirstAction.Class, "CTL_MyFirstAction");
   }
   protected String iconResource() {
      return "com/galileo/netbeans/module/icon.gif";
   }
   public HelpCtx getHelpCtx() {
      return HelpCtx.DEFAULT_HELP;
   }
   protected boolean asynchronous() {
      return false;
   }
}
In the performAction() method, you add the logic of your action implementation. Using the getName() method, you are able to provide the name displayed in the menu item or as the toolbar button's tooltip. This name is loaded via the bundle key CTL_MyFirstAction (further information about this is found in Chapter 10). In the resource bundle, you can also set a mnemonic for your action (see the section "Shortcuts and Mnemonics").
The iconResource() method merely provides the base path of the icons you want to display. At the appropriate time, these are loaded in a relevant size and state as required. If you do not want an icon at all, simply do not override the iconResource() method.
The toolbar button displays the name of the action. If you want to ensure the icon assigned to the action is not shown in the menu, set the property noIconInMenu for the action. This is done by calling putValue("noIconInMenu", Boolean.TRUE) on the action. Setting this property substitutes the real icon of the action with a placeholder, which is an empty icon. Using this feature is only useful if none of the items in the menu show their icons, so that all the items have a similar appearance.
The getHelpCtx() method is provided by the interface HelpCtxProvider and defines the help ID of a specific help topic relating to the action. This topic is addressed in detail in Chapter 9.
Finally, you should override the asynchronous() method. That method allows the action to be created asynchronously, simply by returning true from this method. In turn, this causes performAction() to be run in a separate thread, instead of on the event dispatch thread (EDT). Therefore, by means of the asynchronous implementation, you ensure that access to GUI components is put into the EDT. Returning false here, the action logic is executed synchronously in the EDT. In this case, you should ensure that no long-running processes are handled in the duties of the performAction() method, because the GUI would otherwise be blocked.
The abstract action class CallbackSystemAction is a subclass of CallableSystemAction. It differs from its parent by the fact that it can delegate to another action, which is typically a context-sensitive action.
CallbackSystemAction contains no action logic, but delegates to an action performer. These action classes are used especially by global actions—that is, actions that provide different behavior depending on their context. For example, these are actions such as performing searches, copying, or pasting. Depending on the current context, such actions behave in different ways, depending on what needs to happen in the context of the current objects. Such global actions are offered out of the box by the NetBeans Actions API.
The action performer is made available by a Java ActionMap. It is registered in a map, together with the key of the CallbackSystemAction class that is delivered via the method getActionMapKey(). All classes that derive from JComponent can make use of an ActionMap. That means the NetBeans superclass TopComponent, which creates windows that integrate into NetBeans Platform applications (see Chapter 5 for details), also has an ActionMap.
These ActionMap s are made available via a Lookup. It is the task of the CallbackSystemAction class to look in the global Proxy Lookup to determine whether an ActionMap exists and, if so, whether an action performer has been registered for a given action. If this is the case, the action representatives (menu bar or toolbar entries) are automatically activated. If no action performer is available, the related entries are deactivated.
In the following code listing, a refresh action is shown. This action will behave differently, depending on which window is currently selected. Therefore, the performAction() method is not needed, since action handling will be provided by the selected window. The class should look like Listing 4-4.
Example 4.4. The global action class that inherits from CallbackSystemAction and delegates to an action performer
public final class RefreshAction extends CallbackSystemAction {
   public String getName() {
      return NbBundle.getMessage(RefreshAction.class, "CTL_RefreshAction");
   }
   protected String iconResource() {
      return "com/galileo/netbeans/module/icon.gif";
}
public HelpCtx getHelpCtx() {
return HelpCtx.DEFAULT_HELP;
}
protected boolean asynchronous() {
return false;
}
}Running the module, you see the action deactivated in the menu bar, as well as in the toolbar. That is because no action performer currently exists. A general outline for creating an action performer is described following, although the full discussion of TopComponent s comes later, in Chapter 5. Once we discuss how TopComponent s are created, you can return here and try out the action class described in Listing 4-5.
Example 4.5. Registration of an action performer for a CallbackSystemAction
final class MyTopComponent extends TopComponent {
private MyTopComponent() {
...
RefreshAction ra = RefreshAction.get(RefreshAction.class);
getActionMap().put(ra.getActionMapKey(), new AbstractAction() {
public void actionPerformed(ActionEvent event) {
// refresh content of TopComponent
}
});
}
}First obtain the singleton instance of the previously created RefreshAction class to determine the key needed for the ActionMap. Next, use the getActionMap() method, defined by the JComponent class, to get the ActionMap of the TopComponent and to add an instance of the action implementation as the key of the RefreshAction. Then the action created by the class AbstractAction becomes the action performer in the context of MyTopComponent.
You can insert into the ActionMap any action that implements the Action interface. Therefore, you can also use the CallableSystemAction class of your choice. Now, as soon as the MyTopComponent window is active, RefreshAction becomes active. And when the action is invoked, MyTopComponent 's actionPerformed() method is invoked.
For a comprehensive understanding, you should know how a CallbackSystemAction class obtains an action performer. Simply adding it to the ActionMap is not enough. After all, the RefreshAction class must somehow be connected to the ActionMap. The Lookup handles this connection. The TopComponent 's local Lookup is made available to CallbackSystemAction via the global Proxy Lookup.
Therefore, the TopComponent needs to ensure that the ActionMap is added to its own Lookup. Only then will the CallbackSystemAction be able to find the action performer. By default, the ActionMap is already in the TopComponent 's local Lookup, which means that you don't need to worry about it yourself. However, you do need to be aware of this when you create your own Lookup via associateLookup(), or if you override getLookup(). In these cases, pay attention to the fact that the ActionMap must be added to the TopComponent 's Lookup.
Let's leave this discussion at this point. You are referred to Chapter 6 in this book, in which many more details are found about the NetBeans Lookup, together with examples that illustrate its usage.
Note, however, that in the manner described in this chapter, you can add many action performers to a CallbackSystemAction. These are then handled according to their context. Possibly you've been wondering how to use the actions that are typically default members of NetBeans Platform applications, such as CopyAction, CutAction, and DeleteAction. Well, all these classes are simply CallbackSystemAction s, which you can use by providing a related action performer, as shown in this section, via the RefreshAction example.
The abstract superclass CookieAction is, just like CallbackSystemAction, a class you can use to create context-sensitive actions. First, let's talk about node actions. As indicated by its name, actions of the type NodeAction are dependent on nodes. A node is, as you will discover in detail in Chapter 7, the visual representation of a particular piece of data. For example, a node can be shown in a tree structure or opened in an editor. Each TopComponent (and therefore each window within the NetBeans Platform) can make use of one or many activated nodes.
It is precisely these activated nodes that form the context of a CookieAction. Context-sensitivity is constructed from interfaces, which are called cookies. And now you begin to understand how to create context-sensitive implementations of an action. The node on which the action is to operate implements an interface specifying the method that should be invoked by the action. The action can specify a set of cookies, the presence of which in the active node (if the active node implements one of these interfaces) determines whether the action is enabled.
To create an action of the type CookieAction, you again use the Action wizard. However in this case, select the type Conditionally Enabled. Moreover, you can immediately specify the cookies for which the action should be enabled. Later, you can change these in your code. In the wizard, you also specify whether several nodes can be active at the same time. In the next step of the wizard, define integration of the action into the menu bar or toolbar, as explained in the previous section. Upon completion of the wizard, your action should look something like Listing 4-6.
Example 4.6. Action class of type CookieAction that is enabled if the active node implements the EditCookie interface
public final class MyCookieAction extends CookieAction {
protected void performAction(Node[] activatedNodes) {
EditCookie ec = activatedNodes[0].getLookup().lookup(EditCookie.class);
ec.edit();
}
protected int mode() {
return CookieAction.MODE_EXACTLY_ONE;
}
protected Class[] cookieClasses() {
return new Class[] {
EditCookie.class
};
}protected boolean surviveFocusChange() {
return false;
}
public String getName() {
return NbBundle.getMessage(MyCookieAction.class, "CTL_MyCookieAction");
}
protected String iconResource() {
return "com/galileo/netbeans/module/icon.gif";
}
   public HelpCtx getHelpCtx() {
      return HelpCtx.DEFAULT_HELP;
   }
   protected boolean asynchronous() {
      return false;
   }
}As you can see, the method performAction() distinguishes itself by the fact that it passes in the activated nodes, which together form the context of the action. Via these nodes, you gain access to cookies, which invoke the action. The mode() method lets you specify the conditions for activation. On that note, the constants listed in Table 4-1 are available to you.
Table 4.1. Constants for setting conditions under which the action is enabled
Constant | Condition for Activating the Action |
|---|---|
| Action is enabled if one or several nodes are selected that implement all cookies |
| Action is enabled if one or several nodes are selected, while at least one of them implements cookies |
| Action is enabled if exactly one node is active that implements cookies |
| Action is enabled if one or several nodes are selected, of which exactly one implements cookies |
| Action is enabled if one or several nodes are selected, of which some, though not all, implement cookies |
Via the method cookieClasses(), specify the cookies—that is, the interfaces—that the active node must implement in order for the action to be enabled. Let's take EditCookie as an example. Though the surviveFocusChange() method is not added to the code by the wizard, you should normally override this and let it return false. Since the default implementation of the method provides true, the action will remain enabled even if the applicable TopComponent is no longer current. The remaining methods should be familiar to you from the sections that covered the CallableSystemAction and CallbackSystemAction classes.
We still need a node that permits an action to become enabled. The node must derive from the abstract superclass Node. However, in general you should instead feel free to implement the Node subclass AbstractNode. It offers a base implementation of a node and is usually exactly what you need.
Following, as an example, you see the MyNode class, without any other logic. In a real-life scenario, the node represents a file of a certain type. However, here the class exists for no reason other than to clarify the relationship between the CookieAction and Node classes. In our CookieAction class (created in Listing 4-4), we specified that the node should implement the EditCookie interface.
Let's do so at this point (see Listing 4-7). The interface specifies the edit() method, which consists of an empty implementation. The method will be called later by the action class and exists to make the context-sensitive action logic available.
Example 4.7. Node that provides the context of the action
public class MyNode extends AbstractNode implements EditCookie {
   public MyNode() {
     super(Children.LEAF);
   }
   public void edit() {
      // edit something depending on the data this node represents
   }
}
Now, in your TopComponent (which could be a file editor in which the file that the node represents is opened), use the setActivatedNodes() method to define the TopComponent 's activated node. Typically, you would do this at the time when the file is opened. Rather than using this method, you can also add the activated node to the local Lookup (see Listing 4-8). The exact connection between the node and its various representations is described in Chapter 7.
Example 4.8. Defining the active node, by means of which the action is enabled, to the extent the applicable cookies of the node have been implemented
final class MyTopComponent extends TopComponent {
   private MyTopComponent() {
      MyNode node = new MyNode();
      ...
      setActivatedNodes(new Node[]{node});
      // or more general with
      // associateLookup(Lookups.fixed(node, getActionMap()));
   }
}
Let's look again at the performAction() method of the action:
protected void performAction(Node[] activatedNodes) {
   EditCookie ec = activatedNodes[0].getLookup().lookup(EditCookie.class);
   ec.edit();
}
When the action is used, we receive the active node as parameters, which thereby provide the context of the action. Since we defined the action as only active (and thereby selectable) when the active node has implemented the EditCookie interface, we can assume that this cookie is now available to us. A node has access to a local Lookup, which we obtain via the getLookup() method. The Lookup gives us access to the EditCookie interface of the node, which in this case is an instance of the MyNode type. Now only the edit() method needs to be called, which delegates to the node. Therefore, we need not know the actual action logic of the class in order to create our context-sensitive action.
In the two previous sections you learned how to create a context-sensitive action based on the CallbackSystemAction class and the CookieAction class. Take particular note of the fact that the CallbackSystemAction is dependent on an ActionMap, while the CookieAction has a relationship with the Node class.
Next, yet another approach will be introduced. You will be given a starting point for providing generic context-sensitive action classes with the help of the Lookup class (see Chapter 6 for details about Lookup). You will see how to use Lookup to create a general context-sensitive action, by means of which you will (similar to how it is done with the CookieAction class) use a Class object to determine when an action should be enabled. You will not, however, be dependent upon a Node class, nor any other NetBeans superclass, since you will observe how any class or interface can be used to determine the applicable context of an action.
First, we provide a generic abstract superclass that inherits from AbstractAction, while implementing LookupListener and ContextAwareAction. As private data elements, we have Lookup, which sets up the context, and Lookup.Result, with which we can monitor our Lookup. The default constructor uses the global Proxy Lookup as the context. Through this Proxy Lookup we get access to the local Lookup of the currently active window (see Chapter 6). With an additional constructor, you are able to provide a special context. If the action (such as a pop-up menu) has a node added to it, the createContextAwareInstance() method is automatically called, which receives the context of the node.
From this context, we receive a Lookup.Result for the class type to which the action should be sensitive. We attach a listener to the Lookup.Result so that we are informed about the presence or absence of an instance of the class type and provide appropriate handling via the resultChanged() method, which enables or disables the action.
We implement the actionPerformed() method and call the abstract performAction() method, which must be implemented by the subclass. We pass the instance, which forms the context of the action, to this method (see Listing 4-9). In this way, usage and access to the context in the subclasses is simplified.
As you can see, this is how the context is passed via the Lookup to the concrete action classes. Moreover, a subclass (the actual action class) must implement the contextClass() method, which specifies the class type that determines whether the action should be enabled.
Example 4.9. Abstract superclass for a general contextual action
public abstract class ContextAction<T> extends AbstractAction
   implements LookupListener, ContextAwareAction {
   private Lookup context = null;
   private Lookup.Result<T> result = null;
   public ContextAction(Lookup context) {
      init(context);
}
private void init(Lookup context) {
this.context = context;
result = context.lookupResult(contextClass());
result.addLookupListener(this);
resultChanged(null);
}
public void resultChanged(LookupEvent ev) {
setEnabled(result.allItems().size() != 0);
}
public void actionPerformed(ActionEvent e) {
performAction(result.allInstances().iterator().next());
}
public abstract Class<T> contextClass();
public abstract void performAction(T context);
}Next, let's look at an example action that derives from the ContextAction defined previously (see Listing 4-10). First, we need to override the methods performAction() and contextClass(). In performAction(), we call the method doSomething() of the MyInterface interface, which is an example of a context-sensitive action. Using the contextClass() method, we provide a class object of the MyInterface interface to which the action should react. Besides these requirements, we must still implement createContextAwareInstance(), with which we create a new instance for the general context. As mentioned, this method can be used (for example) at the creation of a context-sensitive menu for a node.
Example 4.10. Example of a context-sensitive action class that becomes active if an instance of the interface MyInterface is in the global Proxy Lookup
public final class MySensitiveAction extends ContextAction<MyInterface> {
   public MySensitiveAction() {
      this(Utilities.actionsGlobalContext());
   }
   public MySensitiveAction(Lookup context) {
      super(context);
      putValue(NAME,
         NbBundle.getMessage(MySensitiveAction.class,"CTL_MySensitiveAction"));
      putValue(SMALL_ICON,new ImageIcon(
         ImageUtilities.loadImage("com/galileo/netbeans/module/icon.gif", true)));
   }
   public Class<MyInterface> contextClass() {
      return MyInterface.class;
   }
   public void performAction(MyInterface context) {
      context.doSomething();
   }
   public Action createContextAwareInstance(Lookup context) {
      return new MySensitiveAction(context);
   }
}
The example action MySensitiveAction should be active if the MyInterface interface is available in the global Proxy Lookup (Utilities.actionsGlobalContext()).
This interface provided in the example is, as in most other cases, a window that implements the TopComponent class. In the doSomething() method of the interface, we implement the action logic that will be invoked by the action. We must make sure that the instance of the MyInterface interface is in the local Lookup, which will be represented by the global Proxy Lookup.
This is achieved by using the Lookups factory to create a Lookup containing the MyTopComponent instance, while defining this Lookup as our local Lookup via a call to associateLookup() (see Listing 4-11). As soon as the window is activated, the instance of the MyInterface interface is in the global Proxy Lookup, causing the resultChanged() method in ContextAction to be called, activating the action. The action is deactivated when the window is no longer current.
Example 4.11. The class MyTopComponent is a window that shows the context for the action. If this window has the focus, the action should be active.
final class MyTopComponent extends TopComponent implements MyInterface {
   private MyTopComponent() {
      associateLookup(Lookups.fixed(getActionMap(), this));
   }
   public void doSomething() {
      // called by the context-sensitive action
   }
}
The advantage of this approach is that you can use the contextClass() method of the action class to provide a class type of your choice. In this case, for example, we provided the MyInterface interface. It would be as easy to provide the TopComponent class instead, so the action would be enabled for each and every window. Another solution would be to provide only the MyTopComponent class, resulting in the action being active only when the MyTopComponent window is current.
In Listing 4-2, you already saw how to integrate an action into your application. Except that with the new approach the action's attributes are also specified, the registration with an .instance file is the same for all mentioned action classes.
Actions are registered in the central folder Actions. There they can be divided into different groups, essentially different folders in the layer file (see Listing 4-12). From this central actions registry, the menu bar and toolbar are created (in Chapter 5, you'll learn how to build menu bars and toolbars from the actions).
Example 4.12. Registration of actions in the layer file
<folder name="Actions">
   <folder name="Edit">
      <file name="com-galileo-netbeans-module-MyCookieAction.instance"/>
      <file name="com-galileo-netbeans-module-MyFirstAction.instance"/>
<file name="com-galileo-netbeans-module-MySensitiveAction.instance"/>
</folder>
<folder name="Window">
<file name="com-galileo-netbeans-module-MyAction.instance"/>
</folder>
</folder>The System Filesystem now has the necessary information required for the creation of actions. Therefore, you need not instantiate them yourself. They are simply integrated in this way—that is, declaratively. The options available for the definition and instantiation of actions are explained in Chapter 3, which covers the general definitions of classes in the layer file and how they are instantiated.
Shortcuts are also centrally defined and administered via the layer file. This is done in the Shortcuts folder. The file element defines the shortcut, with a reference to an action class as a file attribute. You see from this that a shortcut is not created for a menu entry, but an action. A shortcut consists of one or more modifiers and an identifier, separated by a minus sign:
modifier-identifier
Be aware that the following keys are represented by characters in the layer file, where they are used as modifiers for shortcuts:
C: Ctrl
A: Alt
S: Shift
M: Cmd/Meta
In addition, there are two wildcards that guarantee the platform independence of the shortcuts. These should be used as shown here:
D: Ctrl or Cmd/Meta (on the Mac)
O: Alt or Ctrl (on the Mac)
As identifiers, all constants defined by the KeyEvent class are possible. For example, for KeyEvent.VK_M, you simply omit VK_. The identifier would simply be M, in this case.
For example, to create the shortcut Ctrl+M for the action MyCookieAction that we created in the "CookieAction" section, we need the code shown in Listing 4-13 in the layer file.
Example 4.13. Definition of shortcuts in the layer file
<folder name="Shortcuts">
  <file name="D-M.shadow">
    <attr name="originalFile" stringvalue=
            "Actions/Edit/com-galileo-netbeans-module-MyCookieAction.instance"/>
</file> </folder>
Tip
It can be helpful to look in the Javadoc for the functions Utilities.keyToString() and Utilities.stringToKey(). These are used for encoding shortcuts. In Table 4-2, you see example combinations for shortcuts. And if you do not know how to write the definition of a shortcut for a certain key, you can simply use the New Action wizard to help you (see Chapter 3 and Figure 4-2).
Table 4.2. Examples of shortcuts and their corresponding entries in the layer file
Shortcut | Entry in the Layer File |
|---|---|
|
|
|
|
|
|
|
|
|
|
|
|
Mnemonics are inserted directly into the name of an action, via the insertion of an ampersand (&). This can be coded directly into an action, or within its related properties file:
CTL_OpenMyWindow=Open MyWind&ow
Note that the mnemonics are only shown if the user holds down the Alt key.
In this chapter, we discussed actions. You learned how to quickly and efficiently create actions via a wizard in the NetBeans IDE. You also saw the various types of actions that are available and learned how to make effective use of them. For example, some actions are always available, while others are only available within specific contexts. Finally, we looked at how actions are registered, how they integrate into applications, and how to set shortcuts and mnemonics for actions.