
T he NetBeans IDE itself is a rich client application. It provides its functionality in the form of modules on top of the NetBeans Platform. That means you can extend the functionality the IDE provides the same way you would your own rich client application—by adding modules. For that purpose, in this chapter we discuss aspects that are important when dealing with the IDE.
In Chapter 9, we developed a palette. From this palette, we could drag and drop music albums onto a specially created TopComponent. The possibility of registering a palette to a specific file type was mentioned. Registering automatically opens a registered palette whenever a file of that type is opened in the NetBeans editor. We will be working out an example of how that is achieved.
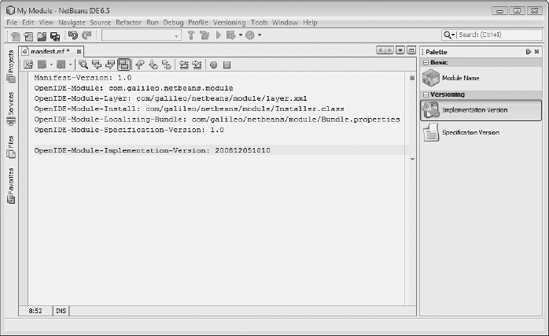
Assume that we would like to create a palette for manifest (.mf) files (see Figure 15-1). To achieve this, we do the following. For every entry the palette provides, we register an XML file in the layer file. Then we implement a class that creates a palette for the registered palette entries. Finally, we register that class to the manifest file type in the layer file.
Every palette entry is defined by an XML file of the editor-palette-item type (see DTD in the Appendix). In that file, we declare a class that is called when dragging and dropping to handle the inserts. We also declare two icons of differing sizes, as well as the text and tooltip for the entry. For the palette entry Module Name, the file looks like Listing 15-1.
Example 15.1. Definition of the Module Name palette entry by means of an XML file
<?xml version="1.0" encoding="UTF-8"?>
<!DOCTYPE editor_palette_item PUBLIC
   "-//NetBeans//Editor Palette Item 1.1//EN"
   "http://www.netbeans.org/dtds/editor-palette-item-1_1.dtd">
<editor_palette_item version="1.1">
  <class name="com.galileo.netbeans.module.items.ModuleName"/>
  <icon16 urlvalue="com/galileo/netbeans/module/resources/ModuleName16.png"/>
  <icon32 urlvalue="com/galileo/netbeans/module/resources/ModuleName32.png"/>
  <inline-description>
     <display-name>Module Name</display-name>
     <tooltip>Module Name</tooltip>
  </inline-description>
</editor_palette_item>In the class element, we declared the class ModuleName. That class is called whenever the user drags the entry from the palette into the editor of a manifest file. Therefore, the class has to implement the ActiveEditorDrop interface. The interface is a component of the Text API to which you must declare a dependency. Upon a drop event, the method handleTransfer() from the ActiveEditorDrop interface is called automatically. In that call, a JTextComponent is passed as a parameter. Via the JTextComponent, we get access to the current document—our manifest file—where we want to insert our entry. Since the process is very repetitive for each palette entry and differs only in the text to be inserted, we will be implementing the abstract class ManifestItem (see Listing 15-2). That class is responsible for inserting text into the manifest document. Text is supplied by the method getItem(), which subclasses must implement.
Example 15.2. Abstract class taking responsibility of inserting text into the manifest file
import org.openide.text.ActiveEditorDrop;
public abstract class ManifestItem implements ActiveEditorDrop {
   public abstract String getItem();
   public boolean handleTransfer(JTextComponent editor) {
      try {
         Document doc = editor.getDocument();
         int pos = editor.getCaretPosition();
         doc.insertString(pos, getItem() + "
", null);
      } catch (BadLocationException ex) {
         Logger.getLogger(ManifestItem.class.getName()).log(Level.SEVERE, null, ex);
      }
      return true;
   }
}
The classes for specific palette entries are trivial to implement:
public class ModuleName extends ManifestItem {
   public String getItem() {
      return "OpenIDE-Module-Name: My Module";
   }
}
public class ModuleSpecVersion extends ManifestItem {
public String getItem() {
return "OpenIDE-Module-Specification-Version: 1.0";
}
}You can extend these classes to allow the user to actively declare the values—in this case the name or the version of the module—for the entries in, e.g., a dialog.
To finish the first step of defining the entries, we need to register them in the layer file in a specially created folder. In this case, we use the folder ManifestPalette (see Listing 15-3). Every folder declared there will be a category in the palette by which entries can be grouped.
Example 15.3. Registration of palette entries in a separate folder
<folder name="ManifestPalette">
   <folder name="Basic">
      <file name="ModuleName.xml" url="items/ModuleName.xml"/>
   </folder>
   <folder name="Versioning">
      <file name="ModuleSpecVersion.xml" url="items/ModuleSpecVersion.xml"/>
      <file name="ModuleImplVersion.xml" url="items/ModuleImplVersion.xml"/>
   </folder>
</folder>We implemented the palette entries and registered them in the ManifestPalette folder in the layer file. We will now create a PaletteController instance for this folder that manages the entries. Therefore, we create a class named ManifestPalette. There, we add the method createPalette(), which will, with the help of the PaletteFactory class from the Palette API, create a PaletteController instance, as shown in Listing 15-4.
Example 15.4. The PaletteController is the manager of our entries.
import org.netbeans.spi.palette.PaletteActions;
import org.netbeans.spi.palette.PaletteController;
import org.netbeans.spi.palette.PaletteFactory;
public class ManifestPalette {
   private static PaletteController palette;
   public static PaletteController createPalette() {
      try {
         if (palette == null) {
            palette = PaletteFactory.createPalette(
                    "ManifestPalette",
                    new MyPaletteActions());
         }
         return(palette);
      } catch (Exception ex) {
         Logger.getLogger(
ManifestPalette.class.getName()).log(Level.SEVERE, null, ex);
}
return null;
}
private static final class MyPaletteActions extends PaletteActions {
...
}
}As the final part of this example, we must register the PaletteController to the manifest file type. To do that, we determine the MIME type of manifest files first. That we can do quite easily with the layer tree in the project view of our module. You will see the MIME type text/x-manifest under Important Files
<folder name="Editors">
   <folder name="text">
      <folder name="x-manifest">
         <file name="ManifestPalette.instance">
            <attr name="instanceOf"
               stringvalue="org.netbeans.spi.palette.PaletteController"/>
            <attr name="instanceCreate" methodvalue=
               "com.galileo.netbeans.module.ManifestPalette.createPalette"/>
         </file>
      </folder>
   </folder>
</folder>
From now on, every time a manifest file is opened in the editor, a controller for manifest palette entries is created by calling the method createPalette(). This controller is made available for the Palette module via the Lookup. It will display the corresponding entries as depicted in Figure 15-1.
Aside from creating a palette for a file type that previously had no palette, you can add entries to a preexisting palette. The name for the folder in the layer file must be known beforehand. The layer tree (Important Files
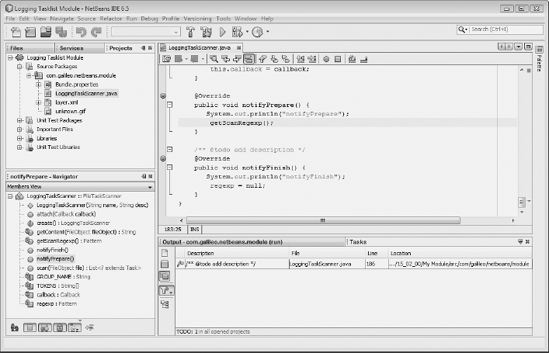
The Task List module of the NetBeans IDE allows the display of all-purpose information, like tasks, notifications, or error messages, as can be seen in Figure 15-2. Task list entries can be grouped so that the user is provided a better overview of information. The user can determine from what sections entries shall be shown. By default, three sections—called scopes—are defined in the Task List module. One scope corresponds to the currently opened file, another to the main project and its opened dependent projects, and the third to all opened projects. The entries are supplied by scanners working with the fixed scope.
The Task List API dynamically expands the scope of operation of the Task List module, primarily by providing additional scanners. These extensions integrate with the help of extension points in the layer file. We will show how that works in an example. We will need to implement a scanner displaying all code fragments with a direct output of information, like System.out.println(). Doing that enables us to ascertain that, prior to the release of a product, every unwanted direct output is replaced by logging output or removed.
Our LoggingTaskScanner extends from the abstract class FileTaskScanner. Each scanner has a name and description of its capability. There is an optional link to an options panel from which the scanner can be configured individually. An example is the ToDo scanner of the IDE. The tokens identified as ToDo tasks can be configured there. For reasons of simplicity, we define these tokens directly in our scanner. The constructor of our scanner calls the superconstructor with three parameters: the name, the description, and the path to the options panel (null if there is none). Since the scanner is registered declaratively in the layer file to be initialized by the Task List framework, we provide the factory method create() to create a LoggingTaskScanner instance.
The important part of the scanner—as you may have guessed—is the scan() method (see Listing 15-6). In a parameter, we access a file to be searched. With the help of a Pattern (to identify the tokens) and a Matcher, we search the file. For every occurrence of the tokens, we create a task instance that we add to a list that is returned once we are done searching the file. The TodoTaskScanner provides the template for the following implementation. A task instance is created via the static method Task.create(), with parameters for the searched file, the group the entry belongs to, a description (usually the line with the occurrence), and the line number.
Example 15.6. Scanner implementation
import org.netbeans.spi.tasklist.FileTaskScanner;
import org.netbeans.spi.tasklist.Task;
import org.openide.filesystems.FileObject;
public class LoggingTaskScanner extends FileTaskScanner {
   private static final String GROUP_NAME = "logging-tasklist";
   private static final String[] TOKENS = {
      "System.out.println",
      "System.err.println",
      "printStackTrace"};
   private Pattern  regexp   = null;
   private Callback callback = null;
   public LoggingTaskScanner(String name, String desc) {
      super(name, desc, null);
   }
   public static LoggingTaskScanner create() {
      String name = NbBundle.getBundle(LoggingTaskScanner.class).
                             getString("LBL_loggingtask");
      String desc = NbBundle.getBundle(LoggingTaskScanner.class).
                             getString("HINT_loggingtask");
      return new LoggingTaskScanner(name, desc);
   }
   public List<? extends Task> scan(FileObject file) {
      List<Task> tasks = new LinkedList<Task>();
      try {
         String text = getContent(file);
         int index  = 0;
         int lineno = 1;
         int len    = text.length();
         Matcher matcher = getScanRegexp().matcher(text);
         while (index < len && matcher.find(index)) {
            int begin = matcher.start();
            int end   = matcher.end();
            ...
            String description = text.subSequence(begin, nonwhite + 1).toString();
            Task task = Task.create(file, GROUP_NAME, description, lineno);
            tasks.add(task);
         }
      } catch(Exception e) {
         Logger.getLogger(getClass().getName()).info(e);
}
return tasks;
}
private String getContent(FileObject file) {
// extract the content from the file
}
private Pattern getScanRegexp() {
if (regexp == null) {
// create pattern for the tokens
}
return regexp;
}
public void attach(Callback callback) {
if(callback == null && this.callback != null) {
regexp = null;
}
this.callback = callback;
}
@Override
public void notifyPrepare() {
getScanRegexp();
}
@Override
public void notifyFinish() {
regexp = null;
}
}In the context menu of the Task List window, users can activate and deactivate the scanner. We are informed of changes in scanner states of activation with a call to the method attach(). If the value of the callback parameter is null, the scanner has been disabled. Via the callback instance, we access the Task List framework. The method notifyPrepare() is called, prior to the initiation of a scan, by the Task List framework. It allows us to prepare the upcoming call of scan(). The notifyFinish() method is called last.
The Task List framework defines the following three extension points that allow the registration of extensions:
TaskList/GroupsTaskList/ScannersTaskList/Scopes
Initially, we want to create a new group for logging tasks. We have already declared the group ID as logging-tasklist in the scanner. That allows us to assign tasks created in the scanner to a group. Creating a group is done by simply calling the createGroup() method of the Task class. We must specify attributes to configure the group. Among those attributes are an ID and keys from a resource bundle (see Listing 15-7). Registering the scanner, we must declare the base class and factory method.
Example 15.7. Creation of a Task group and registration of the scanner via the extension points of the Task List framework
<filesystem>
  <folder name="TaskList">
    <folder name="Groups">
      <file name="LoggingTaskGroup.instance">
        <attr name="instanceCreate"
           methodvalue="org.netbeans.spi.tasklist.Task.createGroup"/>
        <attr name="localizingBundle"
           stringvalue="com.galileo.netbeans.module.Bundle"/>
        <attr name="groupName" stringvalue="logging-tasklist"/>
        <attr name="diplayNameKey" stringvalue="LBL_loggroup"/>
        <attr name="descriptionKey" stringvalue="HINT_loggroup"/>
        <attr name="iconKey" stringvalue="ICON_logging"/>
        <attr name="position" intvalue="400"/>
      </file>
    </folder>
    <folder name="Scanners">
      <file name="LoggingTaskScanner.instance">
        <attr name="instanceOf"
           stringvalue="org.netbeans.spi.tasklist.FileTaskScanner"/>
        <attr name="instanceCreate" methodvalue=
           "com.galileo.netbeans.module.LoggingTaskScanner.create"/>
      </file>
    </folder>
  </folder>
</filesystem>In this chapter, the NetBeans IDE was presented as a NetBeans Platform application. Its features can be extended in the same way as is done with your own NetBeans Platform applications. In addition to the NetBeans Platform modules, you were exposed to several APIs provided by the NetBeans IDE. In particular, you learned about the Palette API and the Task List API and SPI.