
Most client applications, certainly most rich client applications, are able to persist business objects across restarts. In combination with other features of rich client applications on the NetBeans Platform, this chapter discusses client database solutions and the implementation of a bridge for the loosely coupled and transparent storage of business objects.
Java DB is 100% Java and, as a result, is platform independent. For a complete DBMS, Java DB is very small, and since no special installation procedure is necessary, can be delivered as part and parcel of your application. Java DB is therefore ideal for usage within rich client applications. With Java 6, Sun Microsystems delivers it as the official JDK database solution. Additionally, the NetBeans IDE provides support in the form of tools for working with Java DB.
You can find Java DB in the db subdirectory in your JDK 6 installation. You can also download the latest version from http://developers.sun.com/javadb/downloads. In the lib subdirectory, you will find derby.jar, which is the actual database system that makes the driver available (see Figure 13-1). In addition, there's derbyclient.jar, which you can use when Java DB is executed on a server and you do not want to deliver it together with your application.
In this chapter, we focus mainly on the client-related aspects of Java DB, as well as embedding it into your applications. Following the NetBeans Platform structure discussed earlier, it makes sense to deliver Java DB as an independent and separate module within your application.
To that end, create a library wrapper module. Go to File
If you've ever worked with the JDBC API, the call to Class.forName() should be familiar to you. That's how the database driver for the database system you're using is indirectly loaded. That's also how the driver manager makes a connection to your database. With the JDBC API 4.0, which is part of Java 6, the DriverManager class was extended, such that database drivers can be loaded if they're registered in the META-INF/services folder.
In this way, you register the driver as an implementation of the java.sql.Driver interface. This has the advantage that the call to Class.forName() can fail and the driver can be loaded at the exact point needed. That's also how Java DB registers its required drivers. For our purposes, this means we can make a direct connection via the DriverManager to the database, without concern over the driver.
After you make Java DB available to your application as a library wrapper module and set a dependency on the library wrapper module from the module that needs it, you can simply access the DBMS and create your first database.
Java DB creates a separate folder for each database, with the same name as the database itself. These folders are stored in a system folder, which you must define next. An ideal place for this folder would be the application user directory, since that is where the NetBeans Platform also stores its user-specific settings. The path to this location is obtained via the system properties, and hence we need not care about cross-platform paths. This system folder is registered under the name derby.system.home :
System.setProperty("derby.system.home",
        System.getProperty("netbeans.user",
        System.getProperty("user.home")) + "/databases");
We assign the property netbeans.user to the path to the application-specific file. If it has not been set, we use the user directory obtained via the user.home property. By means of these lines, the database is created in the databases folder. If you have not set the derby.system.home property, Java DB will use the current working directory of the application.
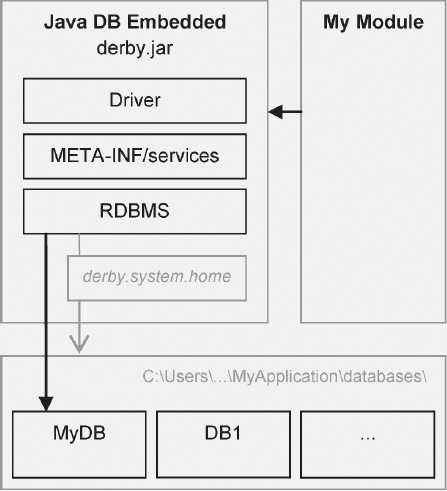
Figure 13.1. Java DB as a library wrapper module for the integration of Java DB into your application. The physical storage place for databases is defined by the derby.system.home property.
Very pragmatically, the database need not be started or kept running explicitly. Each database is started separately at the point it is first accessed. No extra administrative effort is required for control of the local databases, and you use them exactly as you would use databases on the server.
After you set up the system properties as described previously, make a connection to the database via the driver manager:
Connection connection =
   DriverManager.getConnection("jdbc:derby:MyDB;create=true", "user", "password");
But how to create a new database? That occurs through the declaration of the attribute create=true, passed via the connection URL, as shown in the preceding code. If the database MyDB is not available, it will be created. Then a connection to the database will be established. If the database is already available, only the connection is established. This attribute is particularly important in relation to the embedded, local use of Java DB, since it is used automatically when the application is initialized or first started.
Java DB defines a range of further attributes, none of which are particularly relevant here. Information about these attributes can be found in the Java DB Reference Manual, found with the other documents in the docs folder of your Java DB distribution.
Rather than putting the attribute directly in the URL, you may also save it in a Properties object and then pass it as a second parameter in the getConnection() method:
Properties props = new Properties();
props.put("user", "user");
props.put("password", "password");
props.put("create", "true");
Connection connection = DriverManager.getConnection("jdbc:derby:MyDB", props);Starting a database occurs automatically when connecting for the first time. Shutting down happens in much the same way. Since the database has no way of knowing when the application exited, and hence ends abruptly, you must shut down the database explicitly when the application shuts down to ensure that the database shuts down in a consistent state. When the system shuts down, all active databases implicitly shut down as well. Optionally, you can shut down a specific database instead of all of them together.
The best approach for this task is to use the ModuleInstall class (see Chapter 3) or a LifecycleManager implementation (see Chapter 17). In a ModuleInstall class, use the close() method, defined as follows:
public class Installer extends ModuleInstall {
   public void close() {
      try {
         DriverManager.getConnection("jdbc:derby:;shutdown=true");
      } catch (SQLException ex) {}
   }

}
If you shut down the DBMS when the application closes, as in the preceding code, the complete Java DB system will shut down when the application closes. To shut down an individual database, simply specify the corresponding database name after jdbc:derby:. For example, when you wish to end the MyDB database, the command to shut down should be as follows: DriverManager.getConnection("jdbc:derby:MyDB;shutdown=true");. Note the fact that at shutdown (and also when you use shutdown=true), an exception is thrown. The exception simply passes information about the shutting down of the database.
Simplifying the development of database-oriented applications, the NetBeans IDE provides tooling for Java DB integration. Using the IDE, you can start and stop a database. But you can also create a new database and make a connection to it. More than anything, the IDE simplifies development via its graphical support for the creation and configuration of tables. Hence, you can easily save your tables and their data types, and also change them without any problems.
To use the NetBeans IDE support described previously, first invoke Tools
Further, you must specify a path where the database is created and stored. After you deal with these settings, start the database server by selecting Tools
Since the Java DB database is not integrated into your application, but is being controlled as a server, you are advised to add a different driver to your application. This driver, which is necessary for establishing the connection to a Java DB server, is found in derbyclient.jar, as mentioned in the "Integrating Java DB" section. Add this to your application via a library wrapper module, and then set a dependency on that module from the module that requires a connection to the database.
At this point, your application has been set up and can access the Java DB server. Now go to Tools
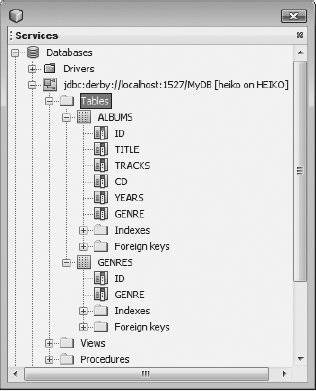
You can establish a connection via the context menu item Connect. If a connection is correctly established, the IDE shows the tables, indexes, and foreign keys of the database. New entries may be established via the context menu. For example, use the context menu of Tables to select Create Table and establish a new table. With View Data, you can see the content of a table, while with Execute Command, you send any SQL query to the database.
Now let's take a look at the application from which you'd like to use a database. The definition of the property derby.system.home, which was necessary for the integration of Java DB with your application, is no longer needed. Optimally, to make a connection from your application to a Java DB server, tweak your connection URL. Specify the name (or the IP address), as well as the port on which the database server accepts connections:
Connection connection = DriverManager.getConnection(
        "jdbc:derby://localhost:1527/MyDB;",
        "user",
        "password");
Since the database server, in our case, is found on the same computer where the application is running, we use the setting localhost or the IP address 127.0.0.1. We also specify port 1527. You can also take this URL from the connection information in the IDE's Services window.
Finally in this discussion, let's look at an extremely useful feature of the Database Explorer in the Services window. You can select the SQL source text with which a table is created and copy it into your application for initial establishment of database tables or, alternatively, into a SQL script file. For this purpose, call up the context menu for the desired table. There, you find the menu item Grab Structure. Click this menu item to store the structure of your data. After that, simply choose the context menu item Recreate Table, where you then select the data that you just created. A window shows the SQL source needed to create a table. You can of course use this functionality in the way intended and import tables from foreign databases into your own.
With a very simple example, we'll round off this section and in the process show you some characteristics of Java DB for creating table structures, also illustrating integration of Java DB into your application's lifecycle. In this example, we'll manage music albums, assigning them to various genres.
With a module installer (also see Chapter 3), we optimally configure the Java DB database system, access it centrally, and, at the appropriate time, shut down the system (see Listing 13-1). First, use the restored() method, which is called at the start of the application via the derby. system.home property, to specify the database storage path. That will be within the databases folder in an application-specific user directory.
Next, call the method initTables(), using a SELECT statement to test whether the required tables already exist. When the application is started for the first time, the tables do not yet exist and a SQLException is thrown. Catch the exception and then create both the albums and genres tables.
First create the genres table, since the albums table will depend on it. Each entry in the table has a unique ID, which is assigned incrementally by the database. We achieve this using the command GENERATED ALWAYS AS IDENTITY for the ID. As a result, even when a value is specified for the physical ID when an entry is added to the table, an automatically generated value is used instead.
Alternatively, replace ALWAYS with BY DEFAULT, which means the value will be generated only if the ID is not defined explicitly. Using PRIMARY KEY, define the physical ID as the primary key, where connection to the entries in the albums table will be established. We then create this immediately and define, in the same way, the physical key ID. Further columns are title, tracks, cds, years, and genre.
Finally, don't write a genre directly. Instead, write the ID of a genre entry from the genres table. The genre column in albums is thus a foreign key. We define this via the FOREIGN KEY (genre) command, and connect via REFERENCES genres (id) to the id column in the genres table (see Figure 13-2). To allow user genre selection when creating an album, we provide three example entries in the genres table.
Example 13.1. Setting up the database system and initializing the database
public class Installer extends ModuleInstall {
   private static Connection conn = null;
   public void restored() {
      System.setProperty("derby.system.home",
         System.getProperty("netbeans.user",
         System.getProperty("user.home")) + "/databases");
      initTables();
   }
   private void initTables() {
      try {
Statement stmt = getConnection().createStatement();
stmt.executeQuery("SELECT id FROM genres");
stmt.close();
} catch(SQLException e) {
try {
Statement stmt = getConnection().createStatement();
stmt.execute("CREATE TABLE genres (" +
"id INTEGER GENERATED ALWAYS AS IDENTITY, " +
"genre VARCHAR(100), " +
"PRIMARY KEY(id))");
stmt.execute("CREATE TABLE albums (" +
"id INTEGER GENERATED ALWAYS AS IDENTITY, " +
"title VARCHAR(100), " +
"tracks VARCHAR(10), " +
"cds VARCHAR(10), " +
"years VARCHAR(10), " +
"genre INTEGER, " +
"PRIMARY KEY(id), " +
"FOREIGN KEY(genre) REFERENCES genres (id))");
stmt.execute("INSERT INTO genres (genre) VALUES('Trance & Dance')");
stmt.execute("INSERT INTO genres (genre) VALUES('Rock & Pop')");
stmt.execute("INSERT INTO genres (genre) VALUES('Country & Classic')");
stmt.close();
}
catch(SQLException ex) {
ex.printStackTrace();
}
}
}
}Setting up the database system and initializing the database using the static method getConnection() provides central access to the database. Thus, the client need not worry about the connection URL. Also, the Connection object, with its connection to the database, is centralized and need not be stopped and started whenever a connection is made. getConnection() is, therefore, a factory method that creates a connection when none exists or one has been closed (see Listing 13-2). It then returns the Connection object. The close() method informs us when the application exits. We close the current connection in this method. We use jdbc:derby:; shutdown=true to close the whole Java DB system and also, automatically, our MyDB database.
Example 13.2. Centralized creation of the connection and shutting down of the database
public static Connection getConnection() throws SQLException {
   if(conn == null || conn.isClosed()) {
      conn = DriverManager.getConnection(
         "jdbc:derby:MyDB;create=true",
         "user", "password");
   }
   return conn;
}
public void close() {
try {
conn.close();
DriverManager.getConnection("jdbc:derby:;shutdown=true");
} catch (SQLException ex) {}
}As shown before with the creation of tables, we want to be able to choose two different classes of data. First, we have the albums, information for which can be chosen from the albums table; and second, we have the genres, found within the genres table. To assist us, we create a data model (see Listing 13-3 and Listing 13-4). The data model consists of the classes Album and Genre, which provide relevant setters and getters. Note that no persistence logic is found in these classes. We will put this logic in a separate class.
Example 13.3. Data model for an album
public class Album {
   private int id = 0;
   private String title;
   private String tracks;
   private String cds;
   private String year;
   private Genre genre;
   public Album(
      int id, String title, String tracks, String cds, String year, Genre genre) {
      this.id = id;
      this.title = title;
      this.tracks = tracks;
      this.cds = cds;
      this.year = year;
      this.genre = genre;
   }
   public int getId() {
      return id;
   }
   public String getTitle() {
      return title;
   }
   ...
}
The data model for an Album in the Genre class requires overwriting both the toString() and equals() methods. This is necessary for the correct representation and selection of a genre in the dialog for creating a new album.
Example 13.4. Data model for a genre
public class Genre {
   private int id = 0;
   private String genre;
public Genre(int id, String genre) {
this.id = id;
this.genre = genre;
}
public int getId() {
return id;
}
public String getGenre() {
return genre;
}
public String toString() {
return genre;
}
public boolean equals(Object obj) {
if(obj instanceof Genre) {
if(((Genre)obj).getId() == id) {
return true;
}
}
return false;
}
}To let the data model and business logic (which in this case is primarily the user interface for selecting data) be loosely coupled to the persistence layer, we encapsulate access to the database and SQL statements in a separate class named DataModel (see Listing 13-5). This class performs desired changes and requests to the database, while also providing the data via the Album and Genre data models.
The methods getAlbums() and getGenres(), implemented in the DataModel class, provide vectors containing the chosen data. We also have the methods insertAlbum(), updateAlbum(), and deleteAlbum(), with which we enter albums into the database and also use for changing and deleting them.
Example 13.5. The DataModel class encapsulates the access to Java DB and makes data available via the related Album and Genre data models.
public class DataModel {
   public static Vector<Album> getAlbums() {
      Vector<Album> albums = new Vector<Album>();
      try {
         Statement stmt = Installer.getConnection().createStatement();
         ResultSet rs = stmt.executeQuery("SELECT * FROM albums"+
            " INNER JOIN genres ON albums.genre = genres.id");
         while(rs.next()) {
            albums.add(new Album(rs.getInt(1), rs.getString(2),
               rs.getString(3), rs.getString(4), rs.getString(5),
new Genre(rs.getInt(7), rs.getString(8))));
}
rs.close();
stmt.close();
} catch(SQLException e) {
Exceptions.printStackTrace(e);
}
return albums;
}
public static Vector<Genre> getGenres() {
Vector<Genre> genres = new Vector<Genre>();
try {
Statement stmt = Installer.getConnection().createStatement();
ResultSet rs = stmt.executeQuery("SELECT * FROM genres");
while(rs.next()) {
genres.add(new Genre(rs.getInt(1), rs.getString(2)));
}
rs.close();
stmt.close();
} catch(Exception e) {
e.printStackTrace();
}
return genres;
}
public static void updateAlbum(Album a) throws SQLException {
PreparedStatement stmt = Installer.getConnection().prepareStatement(
"UPDATE albums SET title=?, tracks=?, cds=?, years=?, genre=? WHERE id=?");
stmt.setString(1, a.getTitle());
stmt.setString(2, a.getTracks());
stmt.setString(3, a.getCDs());
stmt.setString(4, a.getYear());
stmt.setInt(5, a.getGenre().getId());
stmt.setInt(6, a.getId());
stmt.execute();
}
public static void insertAlbum(Album a) throws SQLException {
PreparedStatement stmt =Installer.getConnection().prepareStatement(
"INSERT INTO albums (title, tracks, cds, years, genre) VALUES(?,?,?,?,?)");
stmt.setString(1, a.getTitle());
stmt.setString(2, a.getTracks());
stmt.setString(3, a.getCDs());
stmt.setString(4, a.getYear());
stmt.setInt(5, a.getGenre().getId());
stmt.execute();
}
public static void deleteAlbum(Album a) throws SQLException {
PreparedStatement stmt = Installer.getConnection().prepareStatement(
"DELETE FROM albums WHERE id = ?");stmt.setInt(1, a.getId());
stmt.execute();
}
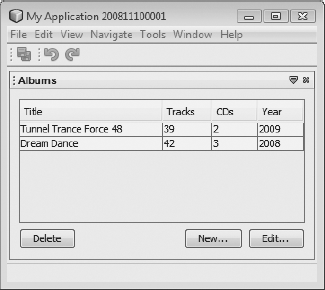
}We now come to components that will display the data, allowing the user to create and edit music albums. We'll list the albums in a table within a TopComponent (see Figure 13-3). We begin by creating the AlbumsTopComponent class, containing a JTable. To enable the table to display the DataModel of our album, we need a model for the table.
Since the DataModel is only available to this class, we implement it as a private inner class named AlbumTableModel (see Listing 13-6). The data is obtained from a vector of the type Album. Since we later need access to the model, we create it as a private data element. We connect the DataModel with the table via the setModel() method. Typically, table entries can be edited or viewed via a double-click of the mouse. To create this functionality, we register a MouseListener or a MouseAdapter with the JTable, which calls the editAlbumActionPerformed() method on double-click. This will be discussed next.
Example 13.6. TopComponent implementation with AlbumTableModel
final class AlbumsTopComponent extends TopComponent {
   private JTable albums;
   private AlbumTableModel model = new AlbumTableModel();
   private AlbumsTopComponent() {
      initComponents();
      albums.setModel(model);
      albums.addMouseListener(new MouseAdapter() {
         public void mouseClicked(MouseEvent event) {
            if(event.getClickCount() == 2) {
editAlbumActionPerformed(null);
}
}
});
}
private static final class AlbumTableModel
extends AbstractTableModel {
private String[] columns = {"Title", "Tracks", "CDs", "Year"};
private Vector<Album> data = new Vector<Album>();
public Album getRow(int row) {
return data.get(row);
}
public int getRowCount() {
return data.size();
}
public int getColumnCount() {
return columns.length;
}
public String getColumnName(int col) {
return columns[col];
}
public Object getValueAt(int row, int col) {
Album album = data.get(row);
switch(col) {
case 0: return album.getTitle();
case 1: return album.getTracks();
case 2: return album.getCDs();
case 3: return album.getYear();
}
return "";
}
public Vector<Album> getData() {
return data;
}
}As the TopComponent opens, we need to load and display the current entries from the database. For this reason, we override the method componentOpened(), where we use our data access model DataModel, which abstracts access to the database to obtain all entries in the database, via the getAlbums() method. We add these to the DataModel in the table and inform the view, which is the JTable, via the fireTableDataChanged() method, that the data has changed.
Finally, we implement three action methods that enable the user to add, edit, and delete entries. For the creation of new albums, we have the newAlbumActionPerformed() method. We use it to call a static method that opens a dialog where the user can enter the required data. We create this dialog in the final step. If the method returns an Album instance, the dialog is immediately closed and the data is added to the database. If that code can be run without an exception being thrown, we add the album to the table.
public void componentOpened() {
      model.getData().addAll(DataModel.getAlbums());
      model.fireTableDataChanged();
   }
   private void newAlbumActionPerformed(ActionEvent evt) {
      Album album = AlbumEditDialog.newAlbum();
      if(album != null) {
         try {
            DataModel.insertAlbum(album);
            model.getData().add(album);
            model.fireTableDataChanged();
         } catch(SQLException e) {
            Exceptions.printStackTrace(e);
         }
      }
   }
The method editAlbumActionPerformed() is invoked by means of the Edit button or by a double-click. Similar to the way new entries are created, we again call up a dialog. However, we need editAlbum() for that purpose, to which we pass an Album instance, allowing data to be edited in the dialog. The currently selected row in the table invokes the getSelectedRow() method, with the returned value allowing related data to be found in the JTable 's data model.
The user can now change the data. If the OK button is clicked, the editAlbum() method is called, which returns the changed Album instance (see Listing 13-7). The changes are saved in the database with the updateAlbum() method.
Finally, we need to address situations where the user deletes an entry from the database. That will be handled by the deleteAlbumActionPerformed() method. To prevent unintended deletion, the user is asked to confirm that the entry should be deleted. The dialog that is required for this functionality is created in a very simple way, via the NetBeans Dialogs API (see Chapter 8). We use the NotifyDescriptor.Confirmation instance. We show the dialog via the notify() method. Once the user has confirmed the deletion request, the entry is removed from the database via the deleteAlbum() method. Only when the operation can be completed successfully do we delete the album from the JTable and update with its current entries.
Example 13.7. TopComponent for displaying and working with the albums in the database
private void editAlbumActionPerformed(ActionEvent evt) {
      Album album = AlbumEditDialog.editAlbum(
              model.getRow(albums.getSelectedRow()));
      if(album != null) {
         try {
            DataModel.updateAlbum(album);
            model.fireTableDataChanged();
         } catch(SQLException e) {
            Exceptions.printStackTrace(e);
         }
      }
   }
private void deleteAlbumActionPerformed(ActionEvent evt) {
Album album = model.getRow(albums.getSelectedRow());
NotifyDescriptor d = new NotifyDescriptor.Confirmation(
"Are you sure you want delete the album " + album.getTitle(),
"Confirm Album Deletion");
if(DialogDisplayer.getDefault().notify(d) == NotifyDescriptor.YES_OPTION) {
try {
DataModel.deleteAlbum(album);
model.getData().remove(album);
model.fireTableDataChanged();
} catch(SQLException e) {
Exceptions.printStackTrace(e);
}
}
}
}Our last task is the creation of a dialog with which the data can be created and edited. Again, we need to use the classes of the Dialogs API; so we need not create a complete dialog of our own, but simply the panel with required fields (see Figure 13-4). We therefore create a simple JPanel class, via File
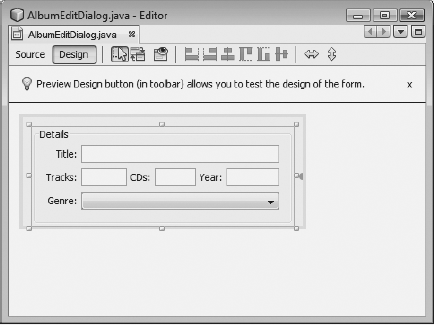
In the constructor of the panel, we load all the genres from the database and add them to the combo box. Additionally, we require the methods newAlbum() and editAlbum(), which you were introduced to in the previous section. To simplify things, implement these as static methods (see Listing 13-8). These methods are therefore factories that are concerned with the creation of the dialog. First, create an instance of the AlbumEditDialog class. Create a dialog with the help of a DialogDescriptor, pass the recently created panel, and that's everything needed for creating a dialog. As per usual, we show the dialog via the notify() method.
As soon as the user clicks the OK button, we use the data to create an Album object and pass it back to the user; otherwise, we simply return null and indicate an error. In the case of the editAlbum() method, we take the same approach with creating the dialog. Simply fill the fields with the values of the selected album. However, when the dialog is completed, don't create a new Album object; simply update the data via the relevant setters and pass the updated instance back to the user.
Example 13.8. Dialog for editing and creating new music albums
public class AlbumEditDialog extends Jpanel {
   private AlbumEditDialog() {
      initComponents();
      for(Genre g : DataModel.getGenres()) {
         genre.addItem(g);
      }
   }
   public static Album newAlbum() {
      AlbumEditDialog d = new AlbumEditDialog();
      DialogDescriptor desc = new DialogDescriptor(d, "New...");
      if(DialogDisplayer.getDefault().notify(desc) == DialogDescriptor.OK_OPTION) {
         Album album = new Album(0,
            d.title.getText(),
            d.tracks.getText(),
            d.cds.getText(),
            d.year.getText(),
            (Genre)d.genre.getModel().getSelectedItem());
         return album;
      } else {
         return null;
      }
   }
   public static Album editAlbum(Album album) {
      AlbumEditDialog d = new AlbumEditDialog();
      d.title.setText(album.getTitle());
      d.tracks.setText(album.getTracks());
      d.cds.setText(album.getCDs());
      d.year.setText(album.getYear());
      d.genre.getModel().setSelectedItem(album.getGenre());
      DialogDescriptor desc = new DialogDescriptor(d, "Edit...");
      if(DialogDisplayer.getDefault().notify(desc) == DialogDescriptor.OK_OPTION) {
         album.setTitle(d.title.getText());
         album.setTracks(d.tracks.getText());
         album.setCDs(d.cds.getText());
         album.setYear(d.year.getText());
         album.setGenre((Genre)d.genre.getModel().getSelectedItem());
         return album;
      } else {
         return null;
      }
} }
At this point, we have explained everything relating to data access and display of data found within Java DB databases. We also looked at an example application, showing how to set up and use Java DB within the NetBeans Platform.
In the last section, you became familiar with tasks pertaining to client database solutions in the context of a rich client application. We decomposed our Java objects to save them in our database. Likewise, we adopted a conventional approach in using SQL to extract data via JDBC interfaces from the database. And from the data we then constructed Java objects, which were named Album and Genre. Encapsulating that functionality in our DataModel class, you probably noticed that this might ultimately lead to a very complex and error-prone result, which we'd prefer to avoid.
These are some of the reasons why database developers created and standardized object-oriented databases. However, for a long time this approach was unable to make a dent in the success of the many existing relational systems. More than anything, that was because of the wide adoption of RDBMSs, which resulted in new applications being able to provide access to data stored in these kinds of systems.
For these reasons, object-relational bridges were developed. Their central focus is saving and loading objects to and from relational databases, thereby providing an abstraction layer over the database beneath. The most well-known and widely used implementation of such a bridge is provided by Hibernate. Hibernate handles objects and their relationships, which must be established and maintained as transparently as possible. Ideally, we needn't care where or how our business objects are stored.
This section focuses on a useful example of Hibernate integration within a rich client application based on the NetBeans Platform. We only discuss the most basic principles of Hibernate, since we're concerned specifically with its relation to the NetBeans Platform, not with the details of Hibernate's many features.
First, download the current version of the Hibernate Core distribution from http://hibernate.org. Along with the Hibernate library, the distribution provides examples, as well as a complete documentation set and required libraries provided by third-party vendors.
As in the previous section, begin by encapsulating the libraries as an independent NetBeans module. Go to File
hibernate3.jarlib/antlr-x.x.x.jarlib/asm.jarlib/asm-attrs.jarlib/cglib-x.x.x.jarlib/commons-collections-x.x.x.jarlib/commons-logging-x.x.x.jarlib/dom4j-x.x.x.jarlib/jta.jarlib/log4j-x.x.x.jar
The libraries listed here are the minimum required to start Hibernate. For various reasons, another set of libraries are also at your disposal. Further information about these can be found in the README.txt file.
Typically, any problems arising when using libraries on the NetBeans Platform relate to class loading. Unfortunately, this is also the case with Hibernate. The Bytecode enhancer of the CGLIB library looks for its objects on the standard classpath, which is the application classpath. The enhancer is necessary for the proxy creation of objects required for lazy-loading. The application classpath simply contains a number of standard Java libraries, but not our Hibernate library, nor the classes of our application module (further information about the NetBeans Platform classloader system can be found in Chapter 2).
There's nothing we can do other than ensure that the enhancer is used from the module classloader, rather than from the application classloader. That way, the enhancer is able to access the libraries in the Hibernate module, as well as the classes in the modules where dependencies are defined.
To that end, we need to tweak the Hibernate source code slightly. The source code is already available in your environment, within the src folder. Look in the appropriate location for the org.hibernate.proxy.pojo.cglib.CGLIBLazyInitializer.java class. Add the following statement in the method getProxyFactory(), after the creation of the enhancer:
e.setClassLoader(CGLIBLazyInitializer.class.getClassLoader());
The CGLIBLazyInitializer class is loaded by the module classloader of the Hibernate module. We obtain the classloader via the getClassLoader() method, which we pass to the enhancer object. This lets the enhancer access the required classes. After that, create the package org.hibernate.proxy.pojo.cglib in the Hibernate wrapper module and add the changed class there, so that it will be loaded instead of the original class.
You will learn to use Hibernate by an example based on the albums used in the "Example Application" section earlier in the chapter. Along the way, the advantages of object-relational bridges will immediately become obvious, and there will be two different approaches for comparison. In addition, we've already bundled the Java DB database system, which now needs to be used again.
Therefore, add the Hibernate module to the application created earlier. Each module that needs to use the Hibernate functionality can simply declare its own dependency. In our example, the module that declares this dependency is simply our only application module (My Module). Open the Properties window via the context menu and add the Hibernate module under Libraries as a new dependency. Because Hibernate can access the Java DB database driver, add the same dependency from the Hibernate module to the Java DB module.
A further dependency must be defined between the application module My Module and the Hibernate module. That enables us to access the functionality made available by Hibernate.
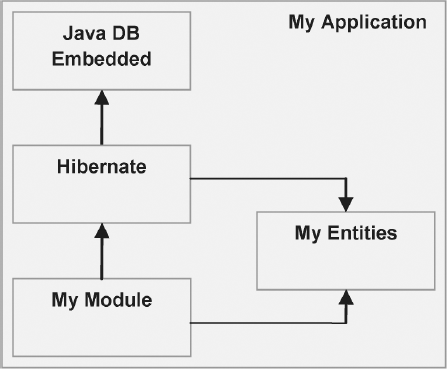
Till now, we've used the application module to work with the Genre and Album entities. Since Hibernate accesses the classes, we set a dependency to the Hibernate module from the application module, resulting in an undesirable cyclic dependency. The NetBeans Platform runtime container then quickly throws an error and the application is unable to start.
For this reason, let's take our entity classes and put them into a module of their own, which solves the problem of cyclic dependencies. The architecture with the additional module (My Entities) is shown in Figure 13-5.
Tip
When developing your application, it is highly recommended to not immediately use the embedded version of Java DB (in other words, our Java DB Embedded module). It's better to use the server variation, which is integrated into the NetBeans IDE. Include the Java DB driver in your application, as explained in the "Database Development with the Help of the NetBeans IDE" section earlier in the chapter. Then adapt your hibernate.cfg.xml file to make the URL connection and start the database server in the NetBeans IDE via Tools
Now that Hibernate is bundled with our application, we can set up a configuration dependency. Do this via an XML file, which is named hibernate.cfg.xml by default. There, we define the database driver, the connection URL, the authentication data, and the applicable SQL dialect. The configuration data will look as shown in Listing 13-9.
Example 13.9. Hibernate configuration data
<?xml version="1.0" encoding="utf-8"?>
<!DOCTYPE hibernate-configuration PUBLIC
"-//Hibernate/Hibernate Configuration DTD 3.0//EN"
"http://hibernate.sourceforge.net/hibernate-configuration-3.0.dtd">
<hibernate-configuration>
<session-factory>
<property name="connection.driver_class">
org.apache.derby.jdbc.EmbeddedDriver</property>
<property name="connection.url">jdbc:derby:hibernate-db;create=true</property>
<property name="connection.username">user</property>
<property name="connection.password">password</property>
<property name="dialect">org.hibernate.dialect.DerbyDialect</property>
</session-factory>
</hibernate-configuration>Next, define the database driver class, which in this case is for the Java DB database system, requiring the class org.apache.derby.jdbc.EmbeddedDriver. Since Hibernate creates a connection to the database, we also provide the connection URL.
The "Creating and Using a Database" section at the beginning of the chapter described putting together this information for Java DB (aside from the username and the password, which may be required for the database). We also must define the SQL dialect. For all the popular databases, Hibernate provides the package org.hibernate.dialect, containing classes that can be used to define the applicable dialect. The Hibernate reference documentation should help you with any additional configuration settings that might need to be set.
Where then to place these files? Since the data is located in a separate file, we are able to provide different Hibernate modules with different data. We can either put the file into the src folder of an application or directly within a Hibernate wrapper module. Importantly, you should place it in the appropriate classpath, since that is by default where the file is searched. You also have a choice at the time the Configuration object is created to provide an alternative URL or configuration file.
When the required libraries are added to the Hibernate wrapper module, you may notice that Hibernate uses Hibernate Log4J. To ensure support by useful log messages, add a configuration file for Log4J. Use the file log4j.properties for this purpose, from the etc folder in your Hibernate distribution. Then add the src folder to the Hibernate module.
Now that Hibernate is ready to go, we ask, "How exactly will Hibernate save our object into the database?" In addition, how is the object structure mapped to a relation? The answer is to create a map file for each object that we'd like to persist. That is where mapping information will be stored. For example, this file includes information about the name and type under which the attribute will be saved.
Even more importantly, the file defines relationships between different objects. Aside from the complexity of the object structure, there are many possible entries, some of which are mandatory to define. In this discussion, we obviously cannot delve into too much detail, and we must limit ourselves to mapping information relevant to this section's example application.
Have a look at a map file for our example class Genre (see Listing 13-10). Remember, we defined a number as the unique ID and a string as the genre's name.
Example 13.10. Object-relational mapping for the Genre class: Genre.hbm.xml
<!DOCTYPE hibernate-mapping PUBLIC
"//Hibernate/Hibernate Mapping DTD 3.0//EN"
"http://hibernate.sourceforge.net/hibernate-mapping-3.0.dtd">
<hibernate-mapping package="com.galileo.netbeans.myentities">
<class name="Genre" table="Genre" lazy="true">
<id name="id">
<generator class="increment"/>
</id>
<property name="genre" not-null="true" length="30" column="genre"/>
</class>
</hibernate-mapping>We use the class element to specify the class name and the name of the table where the data of the type Genre is stored. Using the id element for the object attribute of the same name, the primary key of the table is defined. The primary key will increment whenever needed.
Thus, we only need to define the second and last genre attribute via the property element. Now when looking at the map file for the Album class (see Listing 13-11), things become quite interesting, because a genre can be assigned to an album. However, multiple albums can use the same genre. That means a many-to-one relationship exists. Define that relationship via the element of the same name and set the lazy attribute to false.
By this, we ensure that the Genre object will load immediately, together with the Album, and not afterward or separately. Via the assignment fetch="join", Hibernate connects the Genre simultaneously with the query for the album data, via a JOIN query. This is, in fact, a request optimization, since this ensures that only one request is needed instead of two, when loading the class from the database.
Example 13.11. We define the genre with a many-to-one relationship.
<!DOCTYPE hibernate-mapping PUBLIC
"//Hibernate/Hibernate Mapping DTD 3.0//EN"
"http://hibernate.sourceforge.net/hibernate-mapping-3.0.dtd">
<hibernate-mapping package="com.galileo.netbeans.myentities">
<class name="Album" table="Album" lazy="true">
<id name="id">
<generator class="increment"/>
</id>
<many-to-one name="genre" lazy="false" fetch="join"/>
<property name="title"
not-null="true"
length="30"
column="title"/>Now, put the map files into the same package as the classes. Typically, the map files end in hbm.xml. Next, make them known to Hibernate. This occurs via an entry in the hibernate. cfg.xml configuration file, where we have already defined our database settings.
Using the element mapping, connect all the data. In addition, define the property hbm2ddl, using the value update (see Listing 13-12). That is how Hibernate obtains, when the application starts, the database schema automatically. It does so via the information that you set in the map files, so long as the database schema is not already available.
Example 13.12. Registering the map files in the configuration file
<hibernate-configuration>
<session-factory>
...
<property name="hbm2ddl.auto">update</property>
<mapping resource="com/galileo/netbeans/myentities/Genre.hbm.xml"/>
<mapping resource="com/galileo/netbeans/myentities/Album.hbm.xml"/>
</session-factory>
</hibernate-configuration>At this stage, we've completed the configuration tasks. Now we'll try to connect to Hibernate. With that in mind, first create an object of the Configuration class, administering the configuration defined earlier in the hibernate.cfg.xml file. By default, the information for this class extracts from the hibernate.properties file.
However, our information is organized in an XML file. For that reason, we prompt the Configuration instance, via its configure() method, to find the data in question. The method is also available in a parameterized form, allowing you to pass in either a File or a URL pointing to the configuration data. In this case, we'll use the parameterless version, which immediately expects the configuration to be available via the name hibernate.cfg.xml on the classpath.
A Configuration object is normally created only once. Based on this configuration, create a SessionFactory, via the method buildSessionFactory(). Similar to the Configuration object, a SessionFactory is kept alive over the duration of the application lifecycle.
That means that we must set up both the Configuration and the SessionFactory instances within the same location in the module. Use the ModuleInstall class for that purpose (see Chapter 3). In this way, a static instance of a SessionFactory is created (see Listing 13-13).
Example 13.13. The central administration and preparation of a SessionFactory
import org.hibernate.Session;
import org.hibernate.SessionFactory;
import org.hibernate.cfg.Configuration;
public class Installer extends ModuleInstall {
private static final SessionFactory sessionFactory;
static {
try {
sessionFactory = new Configuration().configure().buildSessionFactory();} catch (Throwable ex) {
throw new ExceptionInInitializerError(ex);
}
}
public static Session createSession() {
return sessionFactory.openSession();
}
public static Session currentSession() {
return sessionFactory.getCurrentSession();
}
@Override
public void close() {
sessionFactory.close();
}
}Access to the database takes place via sessions. A session is a short-lived object, responsible for the interaction between application and database. Hiding behind a session is a JDBC connection. Thus, a Session object is also responsible for the creation of Transaction s, containing a cache for that purpose.
Using the openSession() method, create a new Session instance. Via the getCurrentSession() method, we receive the current Session. If none is available, a new one is created and connected to the current thread. If a transaction that is created by the current session ends (via commit() or rollback()), the session is automatically closed. This usage of sessions is the simplest and most comfortable approach to adopt. It is also highly recommended for integration into your own application.
Using the Installer class, we obtain a simple helper for saving and loading objects. We would like to use these objects right away. You'll remember that we created the DataModel to take responsibility for interacting with the database. We also created it to be a mediator between SQL and our objects.
All that functionality is now handled by Hibernate. However, we'd like to use the class later on, without changing the rest of our application—and we have encapsulated Hibernate. Now we introduce the interesting part (see Listing 13-14), since this is where the simplification takes place.
Example 13.14. The DataModel class integrates with the database via Hibernate.
import org.hibernate.Session;
import org.hibernate.Transaction;
public class DataModel {
   public static List<Album> getAlbums() {
      Session s = Installer.currentSession();
      Transaction t = s.beginTransaction();
      List<Album> list = (List<Album>)s.createCriteria(Album.class).list();
      t.commit();
      return list;
   }
   public static List<Genre> getGenres() {
      Session s = Installer.currentSession();
      Transaction t = s.beginTransaction();
      List<Genre> list = (List<Genre>)s.createCriteria(Genre.class).list();
t.commit();
return list;
}
public static void updateAlbum(Album album) {
Session s = Installer.currentSession();
Transaction t = s.beginTransaction();
s.update(album);
t.commit();
}
public static void insertAlbum(Album album) {
Session s = Installer.currentSession();
Transaction t = s.beginTransaction();
s.save(album);
t.commit();
}
public static void deleteAlbum(Album album) {
Session s = Installer.currentSession();
Transaction t = s.beginTransaction();
s.delete(album);
t.commit();
}
}For each action, we provide an updated or a new Session. By this approach, we continually create another Transaction. Then we use the Session to execute a specific action (request, store, update, etc.), after which we close the Transaction via the commit() method. As pointed out, it isn't necessary to explicitly close the Session, since it automatically closes when the Transaction ends.
In this example, we've obviously dealt with an extremely simple scenario. As a result, we've dealt with actions over a session and a transaction that have durations of equal length. Read the Hibernate documentation for information about the correct level of granularity in using sessions and transactions.
And with that, we've migrated our example (which first used SQL over a JDBC interface to crudely transfer data from application to database) completely to Hibernate. The application now runs entirely on top of the underlying persistence layer, and the application developer can neatly and transparently store objects in and request objects from the database.
The aim of the Java Persistence API (JPA) is to specify a standardized, simple, and useful persistence model. The persistence model should be relevant to the JSE world, as well as to that of JEE. In that light, the best ideas have come from the Hibernate, TopLink, and JDO communities. As a result, applications that make use of the JPA interfaces are completely independent of any specific framework, such as Hibernate itself. Their use encompasses the same independence as you may have experienced with the JDBC interfaces.
JPA distinguishes itself, more than anything else, by the extent to which it is lightweight. Its main characteristics include the ability to specify object relations, via Java annotations, directly within the persistence object. This entails a separate map file, similar to the one shown in the previous section on Hibernate. Unsurprisingly, there are no explicit relations between object structures and their relations. Instead, annotations are used to influence the default mappings between objects. This enormously simplifies the definition of entities.
Furthermore, JPA specifies SQL-like queries in the form of Java Persistence Query Language (JPQL), for both static as well as dynamic queries. This makes your queries independent of proprietary queries, such as those provided by HQL. JPA's persistence encompasses three different aspects: the API itself, which is in the package javax.persistence; the query language JPQL; and the annotations used for the definition of relational information.
Over time, a range of projects and frameworks have provided their own JPA implementations. Among these are, of course, Hibernate and TopLink, as well as GlassFish and OpenJPA. Since you have already been introduced to the native Hibernate interfaces, we now turn to its JPA interfaces, which are not all that different from Hibernate's native interfaces. Here, you can see very clearly how closely Hibernate implements the JPA Specification.
To be able to use JPA from Hibernate, we first need two further packages from the http://hibernate.org web site. These are the packages Hibernate Annotations and Hibernate EntityManager. Their libraries need be added to our Hibernate library wrapper module. Unfortunately, it isn't possible to add them to a preexisting library wrapper module. We can only add them manually, and therefore it is simpler to create a new Hibernate module from scratch. The libraries that we need are as follows:
Hibernate Core:
hibernate3.jarlib/antlr-x.x.x.jarlib/asm.jar lib/asm-attrs.jarlib/cglib-x.x.x.jarlib/commons-collections-x.x.x.jarlib/commons-logging-x.x.x.jarlib/dom4j-x.x.x.jarlib/javassist.jar lib/jta.jarlib/log4j-x.x.x.jar
Hibernate Annotations:
hibernate-annotations.jarlib/hibernate-commons-annotations.jar
Hibernate EntityManager:
hibernate-entitymanager.jarlib/ejb3-persistence.jarlib/hibernate-validator.jarlib/jboss-archive-browsing.jar
Check to make sure that you have the required libraries by reading the file lib/README.txt. Depending on the version, this might have changed, so be very careful!
Configuring persistence follows the native Hibernate approach very closely. The configuration is done in the persistence.xml file (see Listing 13-15), which is in the META-INF folder. In addition, the files are bundled in persistence units.
Example 13.15. Persistence configuration in the META-INF/persistence.xml file
<persistence xmlns="http://java.sun.com/xml/ns/persistence"
        xmlns:xsi="http://www.w3.org/2001/XMLSchema-instance" version="1.0">
   <persistence-unit name="HibernateJPA" transaction-type="RESOURCE_LOCAL">
      <class>com.galileo.netbeans.myentities.Genre</class>
      <class>com.galileo.netbeans.myentities.Album</class>
      <properties>
         <property name="hibernate.connection.driver_class">
            org.apache.derby.jdbc.EmbeddedDriver</property>
         <property name="hibernate.connection.url">
jdbc:derby:hibernatejpa-db;create=true</property>
<property name="hibernate.connection.username">user</property>
<property name="hibernate.connection.password">password</property>
<property name="hibernate.dialect">
org.hibernate.dialect.DerbyDialect</property>
<property name="hibernate.hbm2ddl.auto">update</property>
</properties>
</persistence-unit>
</persistence>Create a persistence unit with the name HibernateJPA, which we will use later, when creating an EntityManagerFactory. Within that, add all the classes that will be administered by the factory via its EntityManager. In addition, you need to define the same properties as already done with hibernate.cfg.xml, while giving the properties the prefix hibernate. The persistence.xml file created in that way is added via the My Entities module to the src/META-INF folder.
The advantage of implementing JPA entities, thanks to the attribute accessor methods, is that no attribute needing to be persisted is required to have getters and setters. Nor does the attribute need to be explicitly exposed in any way.
JPA can also read and write private attributes. Additionally, no special interface needs to be implemented, nor does any need to be extended. Entities that are administered via JPA are therefore completely normal Java objects. Only a few annotations are necessary within the class.
In essence, the only annotations needed are those defining a class as an entity, via the @Entity annotation or the @Id attribute and the declaration of the attribute. The extent to which a class is constrained by specification is therefore extremely marginal. By default, a hierarchy of objects is administered within a relation. This mapping strategy can be adapted via annotations, for example, to customize a newly implemented object to a database schema.
From the perspective of the entity definition, once again use the classes Genre and Album. Simply add the @Entity annotation to the class definition, after which you add the id class attribute as the identity of the class via the @Id annotation (see Listing 13-16). At the same time, specify the persistence provider (in our case Hibernate) that will provide a value for the attribute. The genre attribute is a normal attribute and does not need to be identified in any particular way. It is automatically considered, so long as it has not been marked as transient.
Optionally, you can add the @Basic annotation to normal attributes. Take note of the fact that there is no requirement to add getters and setters for attributes. In this way, we omit the getId() and setId() methods from the Genre class because we don't need to do anything special with them ourselves.
Example 13.16. With only a few annotations, we define our class as an entity. It can then be saved in a relational database. The previous map file is completely superfluous in this case.
import javax.persistence.Entity;
import javax.persistence.GeneratedValue;
import javax.persistence.Id;
@Entity
public class Genre {
   @Id
   @GeneratedValue
   private Long id;
   private String genre = new String();
   public Genre() {
   }
   ...
}
Little more than that needs be done for the Album class. To be exact, define a column name for the year attribute. By default, the column is named after the attribute itself. However, in the case of year, that would lead to failure at the first point of access, since year is part of SQL. Therefore, use the @Column annotation to define a user-specific name (see Listing 13-17). Finally, define the association for the Genre class as @ManyToOne, and right away both entities will be ready.
Example 13.17. Definition of the album entity with the association of the Genre class
import javax.persistence.Column;
import javax.persistence.Entity;
import javax.persistence.GeneratedValue;
import javax.persistence.Id;
import javax.persistence.ManyToOne;
@Entity
public class Album {
@Id
@GeneratedValue
private Long id;
private String title = new String();
private String tracks = new String();
private String cds = new String();
@Column(name = "years")
private String year = new String();
@ManyToOne
private Genre genre;
public Album() {
}
...
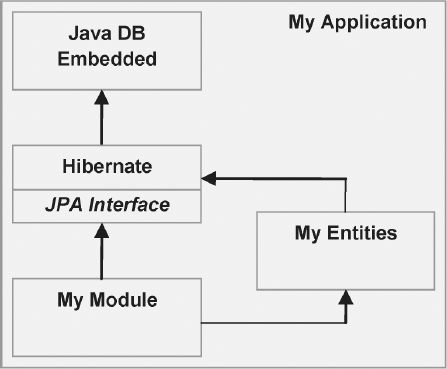
}To let entities use annotations, set a dependency on the My Entities module so it uses the Hibernate module. Fortunately, the Hibernate EntityManager makes use of the system classloader (see Chapter 2), so there is no need to set a dependency in the Hibernate module on our entities, which would have led to a cyclic dependency. Had that been the case, wrapping the entities in a separate module could have resulted in a rather complex architecture. In this way, we arrive at the division and dependencies shown in Figure 13-6.
Comparable to the SessionFactory in the native Hibernate interfaces, we have an EntityManagerFactory in the world of JPA. The factory creates a specific persistence unit for us. The persistence unit is the EntityManager, which is created by this factory. It is able to save objects that correspond to the persistence unit in their defined database and administer them there. An EntityManagerFactory, just like the SessionFactory, normally performs its creation task once during the application lifecycle.
We obtain an instance of this factory via the bootstrap class Persistence, using the following call:
EntityManagerFactory emf = Persistence.createEntityManagerFactory("HibernateJPA");The parameter HibernateJPA passes the name of the persistence unit, as defined in persistence.xml.
The counterpart to a session that creates a wrapper for a JDBC connection is handled by JPA in the EntityManager class. Via this manager, we gain access to the database, where we can save, delete, query, and find objects. As a rule, one EntityManager is used for one procedure.
However, it is bad practice to create a new EntityManager for each query or action performed. You must choose an appropriate lifecycle for an EntityManager in relation to the application context. For example, since we're dealing with only a few (and trivial) database actions in Listing 13-18, we simply use a single EntityManager for the entire lifecycle, which is not recommended.
As with the SessionFactory, you can manage an EntityManagerFactory in a module's ModuleInstall class. In that way, you can easily end the lifecycle of the factory when the application closes.
Example 13.18. The central administration and creation of the EntityManagerFactory
import javax.persistence.EntityManager;
import javax.persistence.EntityManagerFactory;
import javax.persistence.Persistence;
public class Installer extends ModuleInstall {
   public static final EntityManagerFactory EMF;
   public static final EntityManager EM;
   static {
      try {
         EMF = Persistence.createEntityManagerFactory("HibernateJPA");
         EM = EMF.createEntityManager();
      } catch (Throwable ex) {
         throw new ExceptionInInitializerError(ex);
      }
   }
   @Override
   public void close() {
      EM.close();
      EMF.close();
   }
}Finally, we must discuss how to use the EntityManager to access objects. Again, take the DataModel class, in which interaction with the native Hibernate interfaces was implemented (see Listing 13-19). This is something we need now to let JPA handle for us. Take, for example, the methods getAlbums() and getGenres(). As per usual, create a transaction that executes our queries or actions. An instance of the EntityTransaction is received from the EntityManager via the getTransaction() method. Start the transaction with the begin() statement, and then create a new Query instance for the JPQL query SELECT a FROM Album a. The query provides us all the objects from the albums table. We place this result in a List via the getResultList() method. Using the commit() method, we successfully close the transaction.
Example 13.19. Interaction with the database via the EntityManager
import javax.persistence.Query;
public class DataModel {
   public static List<Album> getAlbums() {
     Installer.EM.getTransaction().begin();
     Query q = Installer.EM.createQuery("SELECT a FROM Album a");
     List<Album> list = (List<Album>) q.getResultList();
     Installer.EM.getTransaction().commit();
     return list;
   }
public static List<Genre> getGenres() {
Installer.EM.getTransaction().begin();
Query q = Installer.EM.createQuery("SELECT g FROM Genre g");
List<Genre> list = (List<Genre>) q.getResultList();
Installer.EM.getTransaction().commit();
return list;
}
public static void updateAlbum(Album album) {
Installer.EM.getTransaction().begin();
Installer.EM.persist(album);
Installer.EM.getTransaction().commit();
}
public static void insertAlbum(Album album) {
updateAlbum(album);
}
public static void deleteAlbum(Album album) {
Installer.EM.getTransaction().begin();
Installer.EM.remove(album);
Installer.EM.getTransaction().commit();
}
}In this chapter, you learned how to add database support to your application. There are a number of different approaches. Firstly, we looked at the Java DB database system. With Java DB, you have the possibility of integrating the complete system into your application, so there is no need for a database server. In this case, you can store your data via SQL on the client. Secondly, Hibernate is a very popular object-relational mapping (ORM) framework for storing objects in relational databases. We also looked at this framework and how to integrate and use it within a NetBeans Platform application. Thirdly, to be independent of a special ORM framework, you can use the Java Persistence API (JPA). It provides an abstraction over specific interfaces, enabling you to interchange ORM frameworks easily. We ended by adapting our previously created example to demonstrate how JPA is used.