
Now, as we know almost everything about the most important aspects of the NetBeans Platform in detail, we will implement a full-featured example step by step. Most of what has been learned will be incorporated into it.
The purpose of this chapter is to demonstrate the design and implementation of an executable application, playing MP3 files on the NetBeans Platform. This application will be as flexible and modular as possible. We will reuse much of the previously implemented and handled advantages and features of the NetBeans Platform.
This chapter is useful for those who did not yet read all the previous chapters, as well as those trying to dive directly into the NetBeans Platform world. Some parts of the chapter requiring those instructions contain references to the applicable chapters. The following pages will cover only the most important parts of the implementation.
The complete example can be downloaded from the Apress web site (www.apress.com).
Essentially, the application should be able to play MP3 files, manage these files in playlists, and display the relevant ID3 information. In addition, it will provide support for simple editing functionality, and also let the user add ID3 information. The Favorites module of the NetBeans Platform is used as base for the MP3 library. Using the Palette module, we can manage whole MP3 albums. Also, the Output module can be useful, giving feedback to the user while processing ID3 jobs. One of the main advantages of the application is its easy extensibility, due to the module-based architecture of the NetBeans Platform. A well-designed architecture and structure for developed applications is required as well. We must think about how much functionality we provide and how many modules are required to do the job. To provide proper interfaces and extension points, we also have to think about where and how the application needs be most extensible.
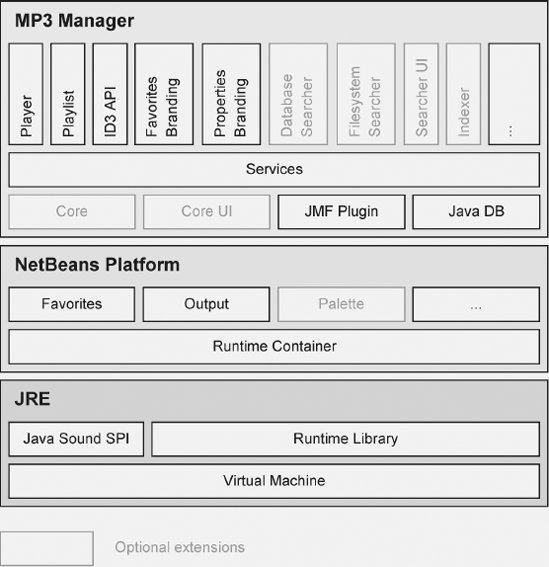
Figure 18-1 clarifies the design of the application, including the NetBeans Platform, as well as the underlying Java Runtime Environment (JRE). The application portion is marked with "MP3 Manager" in Figure 18-1, and can be roughly divided into three layers:
Modules, which can be seen as integral parts of the application, are collected in the lowest layer. GUIs (like the toolbar for navigation), implementations of the Java Sound SPI for MP3 files, and Java DB databases (used by the application for several purposes) belong to this layer.
The middleware layer encapsulates service interfaces, providing us a decoupling of application components, as these no longer depend on each other's implementation, but in most cases only on the provided interfaces.
The third layer, based on the second, implements the application's components, providing actual functionality, using the independent modules (where applicable).
All modules and their respective responsibilities are listed below. We will implement them, step by step, now.
Core:This module may be used to contain all components specifically required for proper use of the application.
Core UI:Additional user interface parts are encapsulated by this module.
JMF Plugin:The Java Media Framework (JMF) and the MP3 implementation of the Java Sound SPI (provided by Sun Microsystems as a JAR archive) are required to play back audio files encoded as MP3. This module encapsulates these functionalities.
Java DB:Using this module, we access the Java DB system.
Services:Services provided by the application should be dynamically extensible. To achieve this, we define and bundle service interfaces into a module.
Player:This module provides an MP3 player with a GUI.
Playlist:This module provides MP3 file management by manipulating file and player lists.
ID3 API:This module contains an API to read and write ID3 information for MP3 files.
Favorites Branding:This module customizes module entries of the
Favoritesmodule.Properties Branding:This module customizes module entries of the
Propertiesmodule.
Every NetBeans rich client application is based on a NetBeans Platform Application (or Module Suite), representing the whole application and containing several modules. Application branding (naming of the application, splash screens, and so on) is also provided out of the box. You can easily create a NetBeans Platform Application by calling File
The application contains only those modules related to the NetBeans Platform. If IDE modules are required by the application later on, they can be added by using the Libraries category in the Project Properties dialog. In the Project Properties dialog, select the Build tab to choose another icon. Define the splash screen under Build
Next, we will proceed with the application components: NetBeans modules.
To support playing MP3 files in the Player module, we use JMF and an MP3 plugin. Like JMF, the plugin is created by Sun Microsystems and represents an implementation of the Java Sound SPI (contained in the JSE) for MP3 files. The plugin is sufficient to play back MP3s, but using JMF simplifies further implementations, and we shouldn't pass up this chance to use it. Both components (JMF and the MP3 plugin) will be included in a library wrapper module that integrates them into the application.
Download JMF as a cross-platform edition, as well as the MP3 plugin from Sun Microsystems' official web site, at http://java.sun.com/products/java-media/jmf. The JAR archives lib/jmf.jar in the JMF distribution and lib/ext/mp3plugin.jar in the MP3 plugin distribution need to be copied to a directory now, so we can add them to a module. Therefore, click File
By design, the MP3 plugin is not immediately usable by JMF. We must register it as the JMF plugin manager. For our purposes, it would be good to ensure that the plugin is always registered at application startup, using a module installer (see Chapter 3), which is executed during loading of the JMF plugin. In order to create such a module installer, switch to the Source Packages folder of the MP3 plugin in the Projects window, and right-click to open the context menu. Then select New
Example 18.1. Registering the MP3 plugin at the JMF plugin manager during startup
package javax.media;
import javax.media.format.AudioFormat;
import org.openide.modules.ModuleInstall;
public class Installer extends ModuleInstall {
   public void restored() {
      Format input1 = new AudioFormat(AudioFormat.MPEGLAYER3);
      Format input2 = new AudioFormat(AudioFormat.MPEG);
      Format output = new AudioFormat(AudioFormat.LINEAR);
      PlugInManager.addPlugIn(
              "com.sun.media.codec.audio.mp3.JavaDecoder",
              new Format[]{input1, input2},
              new Format[]{output},
              PlugInManager.CODEC);
   }
}Another important issue for easy-to-use and professional management of MP3 files in our application is an MP3 file type infrastructure. The file type infrastructure of the NetBeans Platform is used to manage files of a particular type. This infrastructure consists of three main parts. First, we have the FileObject, which wraps a File object, representing the actual MP3 file. Based on this, there is a DataObject, which extends the FileObject by flexible properties and functionalities. Finally, a Node object is used, representing a DataObject in the user interface that includes the ability to accept actions. More information relating to this can be found in Chapter 7.
Normally, the MP3 file type belongs to the core functionality of the MP3 Manager, which means we could manage it in the Core module. But for flexible usage and to avoid cyclic dependencies, we will create a separate module for it. This can be done by invoking File
All components of a file type are created completely by the wizard provided by the IDE. It can be brought up from the context menu of the File Type module using New
An instance named Mp3DataLoader, registered to the MIME type of MP3 and used to load the Mp3DataObject, will be registered by the wizard (see Listing 18-2).
Example 18.2. Registration of the default DataObject factory to load Mp3DataObjects
<folder name="Loaders">
   <folder name="audio">
      <folder name="mpeg">
         <folder name="Factories">
            <file name="Mp3DataLoader.instance">
               <attr name="SystemFileSystem.icon"
                       urlvalue="nbresloc:/com/hboeck/mp3manager/filetype/mp3.png"/>
               <attr name="dataObjectClass"
                       stringvalue="com.hboeck.mp3manager.filetype.Mp3DataObject"/>
               <attr name="instanceCreate"
                       methodvalue="org.openide.loaders.DataLoaderPool.factory"/>
               <attr name="mimeType" stringvalue="audio/mpeg"/>
            </file>
         </folder>
      </folder>
   </folder>
</folder>
For any FileObject of type MP3, this factory creates an Mp3DataObject, which consists of the skeletal structure in Listing 18-3.
Example 18.3. The class Mp3DataObject implements the logic of an MP3 file.
import org.openide.filesystems.FileObject;
import org.openide.loaders.DataNode;
import org.openide.loaders.DataObjectExistsException;
import org.openide.loaders.MultiDataObject;
import org.openide.loaders.MultiFileLoader;
import org.openide.nodes.Node;
import org.openide.nodes.Children;
import org.openide.util.Lookup;
public class Mp3DataObject extends MultiDataObject {
   public Mp3DataObject(FileObject pf, MultiFileLoader loader)
      throws DataObjectExistsException, IOException {
      super(pf, loader);
   }
@Override
protected Node createNodeDelegate() {
return new DataNode(this, Children.LEAF, getLookup());
}
@Override
public Lookup getLookup() {
return getCookieSet().getLookup();
}
}This class puts logic into a generic FileObject and provides a Node object, useful for easily presenting the MP3 file to several views, like the Favorites module, or in a playlist (which we will implement next).
Automatically generated classes like those just shown are just the skeleton for what we will develop on the following pages. We will extend these classes with additional functionality if required.
Inside an MP3 file, information about the file exists in the ID3 tag. Currently, two different versions are in use. The ID3v1 tag uses a fixed number of fields (e.g., artist and title), where each has a fixed size. The most important information is stored in the file with that tag. With the ID3v2 tag, a more flexible concept is introduced: more standardized fields are defined, and further customized fields may be added (a field is referred to as frame). Nonetheless, these fields can be read by applications that do not know about the fields. A frame of an ID3v2 tag may vary in length. Also, a frame will only exist if it is required, which means there are no empty frames.
We will reuse information stored in this manner in our application by using an API supporting retrieval and storage of ID3 data, according the specification. The Internet provides many such APIs for free. Most of them are reasonably useful, but we created one of our own, aiming at easy handling and integration of personal requirements. For reuse in other applications, we intentionally avoided using NetBeans APIs. Although this library is still under development (only the editing of ID3v1 tags is possible at the moment), it is sufficient for this example, which merely demonstrates advantages and strengths of the NetBeans Platform. Of course, you are free to use another library. If you do, however, you then must adapt resulting source locations to the selected API.
As with the JMF libraries, we put the ID3 library into a library wrapper module. It is created by clicking File
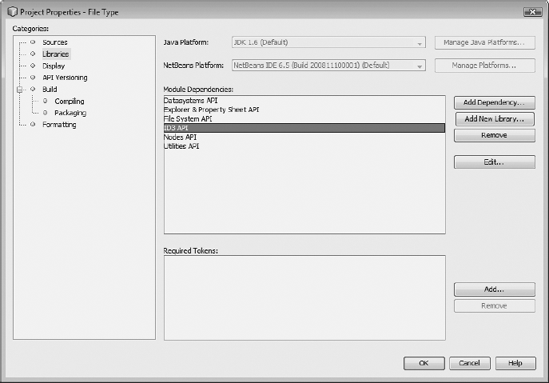
The ID3 API is available to the File Type module only if a dependency to it is defined. We do this using the Libraries category in the Properties dialog of the File Type module (see Figure 18-2). Click Add Dependency and select the ID3 API module.
As mentioned before, the class Mp3DataObject is responsible for the information and methods specific to MP3. Extending this class with two methods provides us access to the ID3v1 as well as the ID3v2 tags (see Listing 18-4). It is highly important to create the tags only when accessing the file itself. Imagine creating folders with a lot of MP3 files in the Favorites window. For each of these file, an individual Mp3DataObject would be created. If we read the ID3 tags of every file, we would eventually encounter a measurable delay—a behavior to be avoided.
Example 18.4. Extending the Mp3DataObject class with support for ID3
import com.hboeck.mp3manager.id3.v1.ID3v1Tag;
import com.hboeck.mp3manager.id3.v2.ID3v2Tag;
public class Mp3DataObject extends MultiDataObject {
   private ID3v1Tag id3v1 = null;
   private ID3v2Tag id3v2 = null;
   public Mp3DataObject(FileObject pf, MultiFileLoader loader)
           throws DataObjectExistsException, IOException {
      super(pf, loader);
   }
   ...
   public ID3v1Tag getID3v1Tag() {
      if(id3v1 == null) {
         id3v1 = new ID3v1Tag(FileUtil.toFile(getPrimaryFile()));
      }
      return id3v1;
   }
   public ID3v2Tag getID3v2Tag() {
      if(id3v2 == null) {
         id3v2 = new ID3v2Tag(FileUtil.toFile(getPrimaryFile()));
      }
      return id3v2;
   }
}
Using the DataObject method getPrimaryFile() returns the FileObject of the MP3 file, which is managed by the Mp3DataObject instance. We must pass a FileObject to the ID3 tag constructor. This file is obtained by using the method FileUtil.toFile(), which determines the file encapsulated by the FileObject.
Another way to obtain instances of the ID3v1Tag and ID3v2Tag classes is to provide them using the Lookup of the Mp3DataObject. This enables us to retrieve these instances from a simple Node or DataObject instance, without special type safety:
Node n = ...
ID3v1Tag id3v1 = n.getLookup().lookup(ID3v1Tag.class);
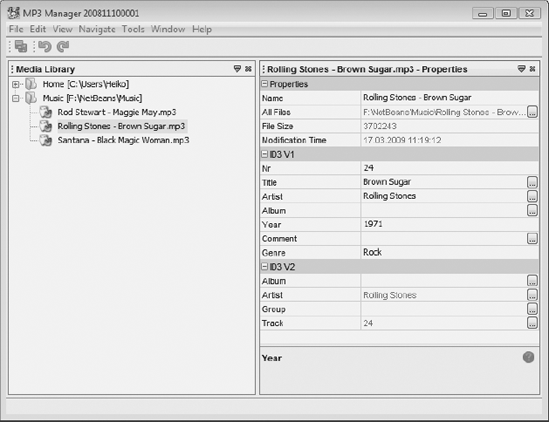
The next step is to display and edit the ID3 data, as shown in Figure 18-3. The NetBeans Platform ships with a Properties module that is useful in combination with the MP3 file type. Providing properties shown in the user interface is the responsibility of nodes. Rather than a generic DataNode instance (see Listing 18-3, shown earlier), we will create our own node class. This class is named Mp3DataNode and overrides the createSheet() method (see Listing 18-5). This method provides the properties of nodes using a Sheet object. Usually, properties are only readable, but some are also writable. We have such a case: ID3v1 data must be both readable and writable, but ID3v2 data must be readable only.
First, we invoke the createSheet() method of the DataNode superclass, which creates a default Sheet object containing base properties, such as file name and size, as well as the date of last modification. If you do not want this data displayed, you can create your own sheet using Sheet.createDefault(). Inside a Sheet object, properties are grouped using Set objects, which may be hidden or shown in the Properties window. A user selects whether these groups will be displayed or not. The static method createPropertiesSet() creates just such a grouping set. We create two of them, to manage the ID3v1 and ID3v2 data separately. Each set should be given a unique name, using the method setName(); otherwise, the sets will be overridden inside the sheets.
Example 18.5. Providing ID3 information in a properties sheet for display and edit purposes
import com.hboeck.mp3manager.id3.v1.ID3v1Tag;
import com.hboeck.mp3manager.id3.v2.ID3v2Tag;
import org.openide.loaders.DataNode;
import org.openide.nodes.Children;
import org.openide.nodes.PropertySupport;
import org.openide.nodes.Sheet;
import org.openide.util.Lookup;
public class Mp3DataNode extends DataNode {
   public Mp3DataNode(Mp3DataObject obj) {
      super(obj, Children.LEAF);
   }
   public Mp3DataNode(Mp3DataObject obj, Lookup lookup) {
      super(obj, Children.LEAF, lookup);
   }
   @Override
   protected Sheet createSheet() {
      Sheet sheet = super.createSheet();
      Sheet.Set set1 = Sheet.createPropertiesSet();
      Sheet.Set set2 = Sheet.createPropertiesSet();
      set1.setName("id3v1");
      set1.setDisplayName("ID3 V1");
      set2.setName("id3v2");
      set2.setDisplayName("ID3 V2");
      Mp3DataObject m = getLookup().lookup(Mp3DataObject.class);
      ID3v1Tag id3v1 = m.getID3v1Tag();
      ID3v2Tag id3v2 = m.getID3v2Tag();
      try {
         /* ID3v1 Properties */
         Property title1 =
            new PropertySupport.Reflection<String> (id3v1, String.class, "title");
         ...
         title1.setName("Title");
         set1.put(title1);
         /* ID3v2 Properties */
         Property album2 = new PropertySupport.Reflection<String>
            (id3v2, String.class, "getAlbum", null);
         ...
         album2.setName("Album");
         set2.put(album2);
      } catch (Exception e) { }
      sheet.put(set1);
      sheet.put(set2);
      return sheet;
   }
}
The Lookup of the Node provides us an instance of the Mp3DataObject represented by that node. Using the previously created methods getID3v1Tag() and getID3v2Tag() allows access to the ID3 information of the MP3 file. Next, we create an instance of the class PropertySupport. Reflection<T> for every property. With the help of a template, the type of property is specified (in this example, it is String). The name of the method for the read/write properties (the means to read and write properties) should not contain the prefixes get or set. Passing title to the constructor sets the title (e.g., to create the methods getTitle() and setTitle()). Properties that are read-only are passed to a special version of the constructor taking the names of the get and set methods separately. Passing null will prevent modification of the property. Each property created is named using the method setName(). This name is displayed in the Properties window. Finally, we add each instance to the Sheet object using the put() method, and return that sheet.
After creating the Mp3DataNode class, we need to adapt the Mp3DataObject class, which uses a DataNode instance (see Listing 18-3, shown previously). Instead of this, we now return an Mp3DataNode instance in the createNodeDelegate() method:
@Override
protected Node createNodeDelegate() {
   return new Mp3DataNode(this, getLookup());
}
Executing the application, opening the Favorites and Properties windows using the Window menu, and then adding an MP3 file to the Favorites window will give you the results shown in Figure 18-3.
The "User-Defined Properties Editor" section in Chapter 9 provides an overview for creating and providing special editors (e.g., a combo box providing different values) for properties. This is useful for properties like the genre, which can have several predefined values.
In the previous chapter, we made use of the Favorites module provided by the NetBeans Platform. We can use this module again for a media library, where the user can add or remove arbitrary files or directories easily. This feature is not restricted to MP3 files, but can be used for any file type. For example, if we use the Image module from the ide cluster, we can manage and display covers of records in JPG format. Since we can bind actions to a particular MIME type via the layer file, we are able to work with MP3 files directly in the Favorites window. That means we can play back files by merely double-clicking, or using the drag-and-drop feature to push files to a separate window (like a playlist).
The Favorites window can be used only if it is activated in the application. Therefore, we open the properties of the MP3 Manager via the context menu and ensure that the Favorites module is activated in the Libraries category under the platform9 cluster.
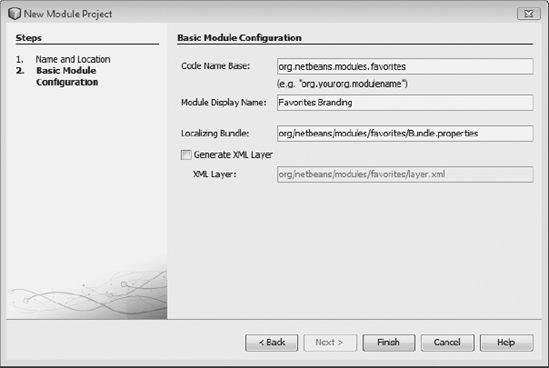
Now we can change the name and the menus of the Favorites module using a branding module, created via File
The file Bundle_mp3_manager.properties should contain all the entries we want to change from the Bundle.properties file of the Favorites module. In our case, it's the name of the window as well as several menu entries. So we must add the following entries to our properties file:
ACT_Add=&Add to Media Library
ACT_AddOnFavoritesNode=&Add to Media Library...
ACT_Remove=&Remove from Media Library
ACT_View=&Media Library
ACT_Select=Media Library
ACT_Select_Main_Menu=Select in Media Library
Favorites=Media Library
Finally, we ensure the module is located in the directory modules/locale (see the "Customization of Platform Modules" section in Chapter 11). The best way to do this is, of course, automatically. For that, we add the following properties to the project properties file (which can be found in the Important Files folder of the Favorites Branding module), which overrides default configurations of the properties in the build script:
module.jar.dir=modules/locale
module.jar.basename=org-netbeans-modules-favorites_mp3_manager.jar
Following on, we will implement the main functionality of the application. It is divided into two sections: the service interface and the service provider. In conjunction with the registry mechanism of the service provider and the Lookup, we can implement functionality that's absolutely decoupled and independent of the specific module. For this purpose, we create a new module to bundle service interfaces for a central provision (see Figure 18-1). From this point of view, the module can be seen as a link between different application modules. As usual, we use File
In the previous section, we created the base for our player design by dividing the Services module into two parts: a service interface and a service provider. Now we'll consider the interfaces the player should provide, as well as other components of our application. These interfaces are described in an abstract class—not an interface—as the player should be seen as a global service, which means that requesting modules are normally interested in a single player instance only. You will notice, in this and the following sections, that this behavior can be ensured much more easily using an abstract class than an interface.
Inside the Services module, we create a new package named player with an abstract class named Mp3Player. Of course, a player must be able to play back, pause, and stop MP3 files. Additionally, a user should be able to mute the playback, control the volume, and see the current playback position and total duration. Beside that, seek functionality would be great. All these desired functionalities of the player are specified in the abstract class in Listing 18-6.
Example 18.6. Defining the player's interfaces and providing an implementation using the getDefault() method
package com.hboeck.mp3manager.services.player;
import com.hboeck.mp3manager.filetype.Mp3DataObject;
import org.openide.util.Lookup;
public abstract class Mp3Player {
   public static Mp3Player getDefault() {
      Mp3Player p = Lookup.getDefault().lookup(Mp3Player.class);
      if (p == null) {
         p = new DefaultMp3Player();
      }
      return p;
   }
   public abstract void play(Mp3DataObject mp3);
   public abstract void play(ListIterator<Mp3DataObject> mp3s);
   public abstract void pause();
   public abstract void stop();
   public abstract void previous();
   public abstract void next();
   public abstract void setMute(boolean mute);
   public abstract void setVolume(int volume);
   public abstract int getDuration();
   public abstract int getMediaTime();
   public abstract void setMediaTime(int seconds);
}
The most important method for service requesters—the modules that want to use the player—is getDefault(), which searches for registered Mp3Player implementations using the Lookup. If an implementation is found, the Lookup returns an instance of it. If no implementation is found, we nonetheless ensure that a requester never obtains a null reference, but always an instance of the Mp3Player class. Therefore, we provide a default implementation inside the abstract Mp3Player class, which is named DefaultMp3Player and will do—in the simplest case—nothing but telling the user it will do nothing (see Listing 18-7). Another easy and smart solution would be to delegate the MP3 file to an external application.
Example 18.7. Providing a default implementation inside the abstract class
public abstract class Mp3Player {
   ...
   private static class DefaultMp3Player extends Mp3Player {
      public void play(Mp3DataObject mp3) {
         Logger.getLogger(Mp3Player.class.getName()).info("not supported");
      }
      public void stop() { }
      ...
   }
}
Considering a module using the player, we notice that a module needs to be notified about the events that may occur in the player. A user interface, for example, needs to notice the end of the playback of a file. For this purpose, we define a listener interface named Mp3PlayerEventListener, which might look like this in its simplest version:
package com.hboeck.mp3manager.services.player;
public interface Mp3PlayerEventListener extends EventListener{
   public void playing(Mp3DataObject mp3);
   public void stopped();
}
The functionality to add and remove Mp3PlayerEventListeners to the player is implemented directly in the abstract class (see Listing 18-8), so the concrete player implementation does not need to care about this. Additionally, we provide two fire methods for listener interfaces to notify listeners about events.
Example 18.8. Methods to manage listeners interested in events
public abstract class Mp3Player {
   ...
   private final Set<Mp3PlayerEventListener> listeners =
      new HashSet<Mp3PlayerEventListener>(1);
   public void addEventListener(Mp3PlayerEventListener l) {
      synchronized (listeners) {
         listeners.add(l);
      }
   }
   public void removeEventListener(Mp3PlayerEventListener l) {
      synchronized (listeners) {
         listeners.remove(l);
      }
   }
   protected final void firePlayEvent(Mp3DataObject mp3) {
      Iterator<Mp3PlayerEventListener> it;
synchronized (listeners) {
it = new HashSet<Mp3PlayerEventListener>(listeners).
iterator();
}
while (it.hasNext()) {
it.next().playing(mp3);
}
}
protected final void fireStopEvent() {
Iterator<Mp3PlayerEventListener> it;
synchronized (listeners) {
it = new HashSet<Mp3PlayerEventListener>(listeners).
iterator();
}
while (it.hasNext()) {
it.next().stopped();
}
}
}Our first service has been defined, so we can now start implementing the service providers. This means we use the JMF module and its functionality for the playback of MP3 files. This brings us back to the MP3 file type. As indicated previously in Figure 18-1, the MP3 player is implemented by a separate module. We create this module with the name Player and the code name base com.hboeck.mp3manager.player. Using Properties
First, we create an Mp3PlayerImpl class, which inherits the service interface Mp3Player, and implement its methods by means of JMF (see Listing 18-9). Let's start with the method play(), by which an MP3 file is given as Mp3DataObject. The central class of JMF is the Manager class. It is used to obtain system-dependent resources. This manager creates a Player instance for the MP3 file passed as a URL. But before starting that Player using the start() method, we register a ControllerListener so that we'll be informed of the different states of the Player.
Example 18.9. Implementation of the service provider using JMF
package com.hboeck.mp3manager.player;
import com.hboeck.mp3manager.filetype.Mp3DataObject;
import com.hboeck.mp3manager.services.player.Mp3Player;
import javax.media.ControllerEvent;
import javax.media.ControllerListener;
import javax.media.EndOfMediaEvent;
import javax.media.GainControl;
import javax.media.Manager;
import javax.media.Player;
import javax.media.RealizeCompleteEvent;
import javax.media.Time;
public class Mp3PlayerImpl extends Mp3Player implements ControllerListener {
   private static final Logger LOG =
Logger.getLogger(Mp3PlayerImpl.class.getName());
private Player player = null;
private GainControl volumeControl = null;
private int volume = 20;
private boolean mute = false;
private Mp3DataObject mp3 = null;
private Enumeration<Mp3DataObject> list = null;
public Mp3PlayerImpl() {
}
public void play(Mp3DataObject mp3) {
try {
this.mp3 = mp3;
if(player != null) {
player.stop();
player.close();
}
player = Manager.createPlayer(mp3.getPrimaryFile().getURL());
player.addControllerListener(this);
player.start();
} catch(Exception e) {
LOG.log(Level.SEVERE, e.getMessage(), e);
}
}
public void play(ListIterator<Mp3DataObject> mp3s) {
list = mp3s;
if(list.hasNext()) {
play(list.next());
      }
   }
public void pause() {
if(player != null) {
player.stop();
}
}
public void stop() {
if(player != null) {
fireStopEvent();
player.stop();
player.setMediaTime(new Time(0));
player.close();
}
}
public void previous() {
if (list != null && list.hasPrevious()) {
play(list.previous());
}
}
public void next() {
if (list != null && list.hasNext()) {play(list.next());
}
}The ControllerListener interface defines the controllerUpdate() method, which is used to get the current state of the player. We are particularly interested in two states. First, we're interested in the RealizeCompleteEvent state of the player, because only if the player is fully initialized can we access the volume control. Thereby we notify listeners about the playback start of the MP3 file, using firePlayEvent() (see Listing 18-10). The second state of interest is EndOfMediaEvent, which allows us to stop the player, and then reset the current playback position to the beginning. If the play() method was provided with a list of MP3 files, we start playback with the next file in the list.
Example 18.10. Handling events of the JMF player
public void controllerUpdate(ControllerEvent evt) {
      if (evt instanceof RealizeCompleteEvent) {
         LOG.info("Realized");
         firePlayEvent(mp3);
         volumeControl = player.getGainControl();
         setVolume(volume);
         setMute(mute);
      } else if (evt instanceof EndOfMediaEvent) {
         LOG.info("End of Media");
         stop();
         if(list != null && list.hasNext()) {
            play(list.next());
         } else {
            list = null;
         }
      }
   }
Finally, we implement the missing control and information methods in our service provider class, as shown in Listing 18-11.
Example 18.11. Methods to control volume and playback position
public void setVolume(int volume) {
      this.volume = volume;
      if(volumeControl != null) {
         volumeControl.setLevel((float)(volume/100.0));
      }
   }
   public void setMute(boolean mute) {
      this.mute = mute;
      if(volumeControl != null) {
         volumeControl.setMute(mute);
      }
   }
   public int getDuration() {
return (int)player.getDuration().getSeconds();
}
public int getMediaTime() {
return (int)player.getMediaTime().getSeconds();
}
public void setMediaTime(int seconds) {
player.setMediaTime(new Time((double)seconds));
}
}Accessing this implementation of the MP3 player should be done via the Mp3Player. getDefault() method. However, we must register the Mp3PlayerImpl class to enable this method to find the implementation using the Lookup. This is done by creating a META-INF/services folder in the Source Packages folder of the Player module. In this folder, we add a file with a name reflecting the full class name of the abstract class Mp3Player. Now we can insert the fully qualified class name of our implementation to this file:
META-INF/services/com.hboeck.mp3manager.services.player.Mp3Player
   com.hboeck.mp3manager.player.Mp3PlayerImpl
We are done with the implementation of the MP3 player's service provider and can proceed to registering an action for our MP3 file type. Using this action enables us to begin the playback via the context menu of an MP3 file in the Favorites window, or by merely double-clicking the file. Such an action can be easily created and registered using the NetBeans Action wizard (File
Example 18.12. Context-sensitive action to play MP3 files
public final class PlayAction extends CookieAction {
   protected void performAction(Node[] activatedNodes) {
      Mp3DataObject mp3 = activatedNodes[0].getLookup().lookup(Mp3DataObject.class);
      if(mp3 != null) {
         Mp3Player.getDefault().play(mp3);
      }
   }
}
With this action, we immediately test the MP3 player. Start the application and open the Favorites window. Add an MP3 file or a directory with MP3 files to it. Now you can start the playback by double-clicking or using the context menu.
Having only an action is not really useful, so we will create a complete user interface for an MP3 player in this section. This user interface uses the functionality provided by the MP3 player service. Therefore, we create a new package in the Player module named com.hboeck. mp3manager.player.gui. With the help of the Window Component wizard, invoked via File
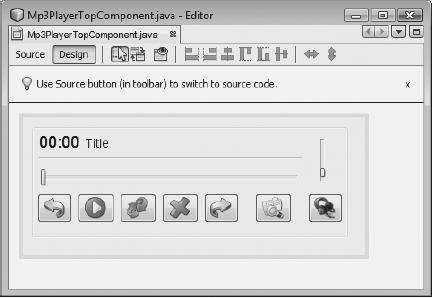
Of course, it's not very pretty, but it's functional and offers all the relevant MP3 player functionalities. Most of the work required for designing the TopComponent is done by the Matisse GUI Builder; we simply have to implement the actions (see Listing 18-13). But first, we provide access to an instance of the Mp3Player delivered by the getDefault() method in the constructor. For this instance, register an Mp3PlayerEventListener, for which we defined an interface in the "Service Interface" section to notify starting and stopping of an MP3 file (as you may remember). Now the player events are required to update information displayed on the user interface.
Example 18.13. Most of the methods are really simple and only delegate the relevant values to the MP3 player.
final class Mp3PlayerTopComponent extends TopComponent
        implements Mp3PlayerEventListener {
   private static final SimpleDateFormat SDF = new SimpleDateFormat("mm:ss");
   private JSlider duration;
   private JSlider volume;
   private JToggleButton mute;
   private JButton next;
   private JButton open;
   private JButton pause;
   private JButton play;
   private JButton previous;
   private JButton stop;
   private JLabel time;
   private JLabel title;
   private Timer t = null;
   private Mp3Player player = null;
   private Mp3PlayerTopComponent() {
      initComponents();
      ...
      player = Mp3Player.getDefault();
      player.addEventListener(this);
   }
   private void pauseActionPerformed(ActionEvent evt) {
      player.pause();
   }
   private void stopActionPerformed(ActionEvent evt) {
      player.stop();
   }
   private void nextActionPerformed(ActionEvent evt) {
      player.next();
   }
   private void previousActionPerformed(ActionEvent evt) {
      player.previous();
   }
   private void muteActionPerformed(ActionEvent evt) {
      player.setMute(mute.isSelected());
   }
   private void volumeStateChanged(ChangeEvent evt) {
      player.setVolume(volume.getValue());
   }
   private void durationMouseReleased(MouseEvent evt) {
      player.setMediaTime(duration.getValue());
   }
}
Clicking the Play button invokes the playActionPerformed() method, in which we can access TopComponent.Registry (see Listing 18-14). This will provide the currently activated nodes independently of the TopComponent they belong to. Resulting from this behavior, an MP3 file will be played if it is selected in any TopComponent (regardless of whether that's the Media Library window, the Favorites window, or somewhere else) when the Play button is clicked.
Example 18.14. Using TopComponent.Registry, the currently selected MP3 file can be played.
private void playActionPerformed(ActionEvent evt) {
      Node n[] = getRegistry().getActivatedNodes();
      if(n != null) {
         Mp3DataObject mp3 = n[0].getLookup().lookup(Mp3DataObject.class);
         if(mp3 != null) {
            player.play(mp3);
         }
      }
   }
   private void openActionPerformed(ActionEvent evt) {
      JFileChooser c = new JFileChooser();
      c.setFileFilter(new FileNameExtensionFilter("MP3 Files", "mp3"));
      if(c.showOpenDialog(this) == JFileChooser.APPROVE_OPTION) {
         try {
            player.play(Mp3DataObject.find(c.getSelectedFile()));
         } catch(Exception e) {
            e.printStackTrace();
         }
      }
   }
Within the playing() method, called by Mp3Player, we can display title and time information in the user interface. Thus, we are not restricted to the file name, and we can access the ID3 tag and its stored information (see Listing 18-15). The timer is used to update playback time. In the stopped() method (indicating that the playback of the MP3 file was stopped), we reset all displayed information and stop the timer.
Example 18.15. Updating the displayed information of the current MP3 file
public void playing(Mp3DataObject mp3) {
      resetInfos();
      title.setText(mp3.getName());
      duration.setMaximum(player.getDuration());
      ID3v1Tag id3v1 = mp3.getID3v1Tag();
      title.setText(id3v1.getArtist()+" - "+id3v1.getTitle());
      ActionListener updateInfo = new ActionListener() {
         public void actionPerformed(ActionEvent evt) {
            duration.setValue(player.getMediaTime());
            time.setText(SDF.format(new Date(player.getMediaTime() * 1000)));
}
};
if (t != null) {
t.stop();
}
t = new Timer(1000, updateInfo);
t.start();
}
public void stopped() {
resetInfos();
if(t != null) {
t.stop();
}
}
private void resetInfos() {
duration.setValue(0);
time.setText("00:00");
title.setText("Title");
}
}The object of this section is to create a playlist, with the additional goal of enabling the user to manage multiple playlists simultaneously. And of course we want the user to be able to add MP3 files from the media library to the playlist by merely using drag-and-drop. All this functionality is provided in a separate module. So, we create a new module via File
For the playlist, another TopComponent is used, containing a TreeTableView taken from the Explorer API. Using such a view eases the management of MP3 files with the help of the Mp3DataNode class.
Let's display our nodes. First, create a subclass of TreeTableView and name it PlaylistView. This class is used to hide the configuration and to have a handier class. The only thing we need to configure is the default action processor, because by default a double-click executes the default action of a node, which is the PlayAction we created in the "Playback of MP3 files" section. But this action plays only one single file, while the desired behavior of a playlist is to play the complete list automatically. Therefore, we implement the setDefaultActionProcessor() method (see Listing 18-16), which takes an instance of an ActionListener. The actionPerformed() method of this listener is executed (instead of the node's default action) when the node is double-clicked or the Enter key is pressed.
Example 18.16. This view is used to represent MP3 files in a list view.
package com.hboeck.mp3manager.playlist;
import org.openide.explorer.view.TreeTableView;
public class PlaylistView extends TreeTableView {
   public PlaylistView() {
      setRootVisible(false);
   }
   public void setDefaultActionProcessor(
      final ActionListener action) {
      setDefaultActionAllowed(false);
      tree.addMouseListener(new MouseAdapter() {
         @Override
         public void mouseClicked(MouseEvent me) {
            if (me.getClickCount() == 2) {
               action.actionPerformed(null);
            }
         }
      });
      treeTable.registerKeyboardAction(action,
             KeyStroke.getKeyStroke(KeyEvent.VK_ENTER, 0, false),
             JComponent.WHEN_FOCUSED);
   }
}All nodes represented in the PlaylistView are managed by a container. A container is based on the class Children, which can have several characteristics, depending on its purpose. We will use the class Index.ArrayChildren as superclass for our node container (see Listing 18-17). The nodes to be added to a playlist are stored in an object of type ArrayList, delivered by the method initCollection(). It will initially be empty, because the nodes are inserted via drag-and-drop from the media library. Using the getRemaining() method, we return a list of remaining MP3 files, which can be directly shown to the player to play back the playlist.
Example 18.17. Container class to manage MP3 files contained in a playlist
package com.hboeck.mp3manager.playlist;
import com.hboeck.mp3manager.filetype.Mp3DataObject;
import org.openide.nodes.Index;
import org.openide.nodes.Node;
public final class NodeContainer extends Index.ArrayChildren {
   private ArrayList<Node> list = new ArrayList<Node>();
   @Override
   protected List<Node> initCollection() {
      return list;
   }
public ListIterator<Mp3DataObject> getRemaining(Node n) {
Vector<Mp3DataObject> v = new Vector<Mp3DataObject>();
for (Node n : list.subList(indexOf(n), list.size())) {
v.add(n.getLookup().lookup(Mp3DataObject.class));
}
return v.listIterator();
}
public void add(Node n) {
add(new Node[]{n});
}
}Now we begin creating the playlist, again based on a TopComponent. This time, we will not create it using the Window Component wizard, as this wizard creates TopComponents as singletons. Rather, we will use the JPanel wizard, which is accessible via File
package com.hboeck.mp3manager.playlist;
import com.hboeck.mp3manager.filetype.Mp3DataObject;
import com.hboeck.mp3manager.services.player.Mp3Player;
import org.openide.explorer.ExplorerManager;
import org.openide.explorer.ExplorerUtils;
import org.openide.nodes.AbstractNode;
public class Playlist extends TopComponent implements ExplorerManager.Provider {
   public static final String ICON_PATH =
           "com/hboeck/mp3manager/playlist/playlist.png";
   private static final String PREFERRED_ID = "Playlist";
   private static final String PREF_CURRENTDIR = "currentdir";
   private Preferences PREF = NbPreferences.forModule(Playlist.class)
   private ExplorerManager manager = new ExplorerManager();
   private NodeContainer container = new NodeContainer();
   private PlaylistView playlist = new PlaylistView();
   public Playlist() {
      initComponents();
      setName(NbBundle.getMessage(Playlist.class, "CTL_Playlist"));
      setToolTipText(NbBundle.getMessage(Playlist.class, "CTL_Playlist"));
      setIcon(ImageUtilities.loadImage(ICON_PATH, true));
      manager.setRootContext(new AbstractNode(container));
      playlist.setDefaultActionProcessor(new ActionListener() {
         public void actionPerformed(ActionEvent e) {
            Mp3Player.getDefault().play(
               container.getRemaining(manager.getSelectedNodes()[0]));
         }
      });
      associateLookup(ExplorerUtils.createLookup(manager, getActionMap()));
   }
@Override
protected String preferredID() {
return PREFERRED_ID;
}
@Override
public int getPersistenceType() {
return TopComponent.PERSISTENCE_ALWAYS;
}
public ExplorerManager getExplorerManager() {
return manager;
}
...
}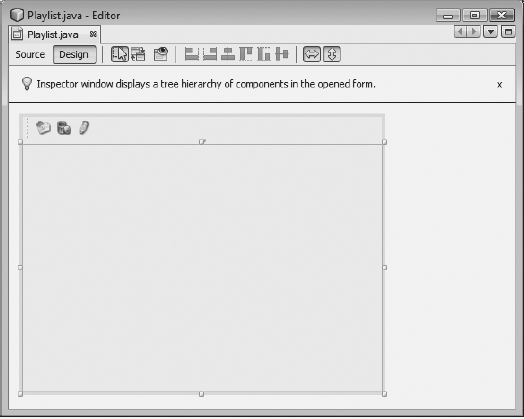
We enhance the TopComponent by adding a toolbar with three buttons, using the Matisse GUI Builder (see Figure 18-6). These buttons are used to add and remove files, and to name the playlist. Finally, we add a panel that uses the BorderLayout and occupies the whole area of the TopComponent (see Figure 18-6). This panel is used as the container for the node view.
Management of the nodes in our PlaylistView is done by an ExplorerManager. Therefore, we implement the interface ExplorerManager.Provider, create a private instance of the ExplorerManager, and return this manager in the getExplorerManager() method. Additionally, we have to create a NodeContainer instance. Every manager has a root context, which is a node that is used as root for all the other nodes. This context is set by the method setRootContext(). We will use an AbstractNode as the root context (as we do not want to display it anyway) and pass it to the container carrying the MP3 files of the playlist.
Finally, we create an instance of PlaylistView to which we pass the action to be performed when double-clicking an MP3 file in the playlist. To pass the action, we use the method setDefaultActionProcessor(). Our default behavior is to play back the complete list starting at the selected file. Therefore, the method getRemaining() delivers all files still remaining in the list, except those above the selected one. Now the view needs to be added to the panel we created in a previous step with the Matisse GUI Builder. To do so, select Customize Code from the context menu of the panel and insert the following lines after the layout initialization:
panel.add(playlist, BorderLayout.CENTER);
Lastly, we shouldn't forget the buttons in the toolbar, as they are used to add and remove MP3 files by invoking a file chooser dialog, as well as to rename the playlist itself. It should be possible to select multiple files and folders to add to the playlist. Therefore, we add the method addAllFiles() (see Listing 18-18), which recursively parses the selection and adds all files to the node container. Removing files (done by the removeActionPerformed() method) is much easier, as the ExplorerManager returns all selected entries, and the remove() method of the container removes an array of nodes in one step. Renaming the playlist (invoked by the method renameActionPerformed()) is easy as well, using the Dialogs API.
Example 18.18. Actions to edit the playlist
public class Playlist extends TopComponent implements ExplorerManager.Provider {
   ...
   private void addActionPerformed(ActionEvent evt) {
      JFileChooser fc = new JFileChooser(PREF.get(PREF_CURRENTDIR, ""));
      fc.setFileSelectionMode(JFileChooser.FILES_AND_DIRECTORIES);
      fc.setFileFilter(new FileNameExtensionFilter("MP3 Files", "mp3"));
      fc.setMultiSelectionEnabled(true);
      if(fc.showOpenDialog(this) == JFileChooser.APPROVE_OPTION) {
         addAllFiles(fc.getSelectedFiles());
         PREF.put(PREF_CURRENTDIR, fc.getCurrentDirectory().getAbsolutePath());
      }
   }
   private void addAllFiles(File[] files) {
      for(File f : files) {
         if(f.isFile()) {
            try {
               container.add(Mp3DataObject.find(f).getNodeDelegate());
            } catch(Exception e) {}
         } else if(f.isDirectory()) {
            addAllFiles(f.listFiles());
         }
      }
   }
   private void removeActionPerformed(ActionEvent evt) {
      container.remove(manager.getSelectedNodes());
   }
   private void renameActionPerformed(ActionEvent evt) {
      NotifyDescriptor.InputLine nf = new NotifyDescriptor.InputLine(
            "New Playlist Name", "Rename");
      nf.setInputText(getName());
if(DialogDisplayer.getDefault().notify(nf) == NotifyDescriptor.OK_OPTION) {
setName(nf.getInputText());
}
}
}Since we didn't create the TopComponent for the playlist using the Window Component wizard, a menu entry allowing us to open a new playlist is missing. The simplest way to access such an action is using the Action wizard, via File
Example 18.19. Action class to open a new playlist
public final class NewPlaylist implements ActionListener {
public void actionPerformed(ActionEvent evt) {
Playlist pl = new Playlist();
pl.open();
pl.requestActive();
}
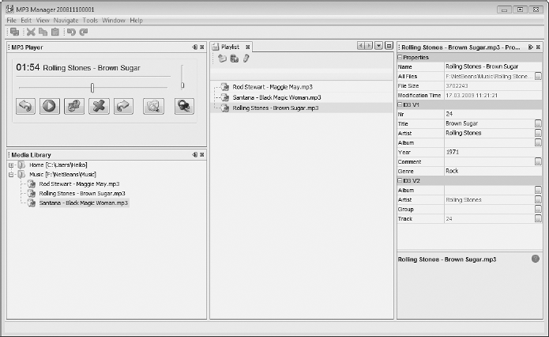
}We are ready to execute the application. Open one or more playlists and add MP3 files using the toolbar (see Figure 18-7).
It isn't possible to drag files from the Media Library window to the playlist, because the Mp3DataNode class (containing the objects we want to transfer between windows) and the PlaylistView class are not yet prepared for dragging actions. We will cover this in the next section, as drag-and-drop is very important for easy and intuitive use.
First, extend the Mp3DataNode class. Its superclass, AbstractNode, already implements the drag() method, which is invoked if a drag event occurs. For example, a drag event will be fired when we drag files from the media library to the playlist. This method delivers an instance of type Transferable. So we will implement the Transferable interface and its methods in the class Mp3DataNode (see Listing 18-20). The drag() method is overridden and just returns a reference to itself. To access the data, and for identification purposes during a drag-and-drop operation, we have to create a DataFlavor object that can be accessed from outside.
Example 18.20. Extension to the Mp3DataNode class to enable drag-and-drop
package com.hboeck.mp3manager.filetype;
import java.awt.datatransfer.DataFlavor;
import java.awt.datatransfer.Transferable;
import java.awt.datatransfer.UnsupportedFlavorException;
public class Mp3DataNode extends DataNode implements Transferable {
   public static final DataFlavor DATA_FLAVOR =
      new DataFlavor(Mp3DataNode.class, "Mp3DataNode");
   ...
   @Override
   public Transferable drag() {
      return this;
   }
   public DataFlavor[] getTransferDataFlavors() {
      return new DataFlavor[]{DATA_FLAVOR};
   }
   public boolean isDataFlavorSupported(DataFlavor flavor) {
      return flavor == DATA_FLAVOR;
   }
   public Object getTransferData(DataFlavor flavor)
      throws UnsupportedFlavorException {
      if(flavor == DATA_FLAVOR) {
         return this;
      } else {
         throw new UnsupportedFlavorException(flavor);
      }
   }
}
An Mp3DataNode can now be transferred, but our playlist is still not able to accept it. We can enable it to do so by adding a DropTarget to our PlaylistView. We create an object of type DropTarget and pass a DropTargetAdapter to it (see Listing 18-21). Now we are notified regarding drag as well as drop events. The only methods we need to implement are dragEnter() and drop(). The first one is called at the moment a file is dragged to our playlist. As we only want to allow drops of MP3 files, we check the type of data using the DataFlavor. In case it is not an Mp3DataNode, we call rejectDrag() to prevent a drop. The second method of implementation is invoked during the real drop event. Herein we extract the Mp3DataNode from the parameter and add the node to the ExplorerManager, or rather the container responsible for the view.
Example 18.21. To enable adding of MP3 files via drag-and-drop, a DropTarget is required for the PlaylistView.
package com.hboeck.mp3manager.playlist;
import java.awt.dnd.DropTarget;
import java.awt.dnd.DropTargetAdapter;
import java.awt.dnd.DropTargetDragEvent;
import java.awt.dnd.DropTargetDropEvent;
public class PlaylistView extends TreeTableView {
   public PlaylistView() {
      setRootVisible(false);
      setDropTarget();
   }
   private void setDropTarget() {
      DropTarget dt = new DropTarget(this, new DropTargetAdapter() {
         @Override
         public void dragEnter(DropTargetDragEvent dtde) {
            if(!dtde.isDataFlavorSupported(
               Mp3DataNode.DATA_FLAVOR)) {
               dtde.rejectDrag();
            }
         }
         public void drop(DropTargetDropEvent dtde) {
            try {
               Mp3DataNode n = (Mp3DataNode)dtde.getTransferable().
                   getTransferData(Mp3DataNode.DATA_FLAVOR);
               ExplorerManager.find(getParent()).
               getRootContext().getChildren().add(new Node[]{n});
            } catch(Exception e) {
               e.printStackTrace();
               dtde.rejectDrop();
            }
         }
      });
      setDropTarget(dt);
   }
}
Thus, we are able to drag MP3 files from the media library or other sources directly into a playlist.
You may have already noticed that the content of the playlist is lost when restarting the application. This is because the window system stores the playlist itself, but is unable to store the contained data. In other words, we have to extend the load and store functions for our application. A good approach is to store the lists into embedded databases (e.g., Java DB). This client-side database system was already used in the "Java DB" section in Chapter 13. To use it for our playlist, we need to bind it to our application, using a module again.
The module is a library wrapper module, and is created like any other module—via File
In the restored() method, called while starting the module, we set the system directory of Java DB and execute the initTables() method. This method will first check whether the table playlist exists, by performing a SELECT query (see Listing 18-22). If the table does not exist, a SQLException will be thrown, which we will catch in order to create the table. Using the getConnection() method, we obtain a connection to the database. The close() method allows the database system to be correctly shut down after the application is finished.
Example 18.22. The database class initializes the database and provides a central connection.
package org.apache.derby;
import java.sql.Connection;
import java.sql.DriverManager;
import java.sql.SQLException;
import java.sql.Statement;
import org.openide.modules.ModuleInstall;
public class Database extends ModuleInstall {
   private static Connection conn = null;
   public void restored() {
      System.setProperty("derby.system.home",
         System.getProperty("netbeans.user",
         System.getProperty("user.home")) + "/databases");
      initTables();
   }
   private void initTables() {
      try {
         Statement stmt = getConnection().createStatement();
         stmt.executeQuery("SELECT id FROM playlist");
         stmt.close();
      } catch(SQLException e) {
         try {
            Statement stmt = getConnection().createStatement();
            stmt.execute("CREATE TABLE playlist (" +
               "id VARCHAR(12)," +
               "filename VARCHAR(100))");
            stmt.close();
         } catch(SQLException ex) {
            ex.printStackTrace();
         }
}
}
public static Connection getConnection() throws SQLException {
if(conn == null || conn.isClosed()) {
conn = DriverManager.getConnection(
"jdbc:derby:Mp3Manager;create=true",
"user", "password");
}
return conn;
}
public void close() {
try {
conn.close();
DriverManager.getConnection("jdbc:derby:;shutdown=true");
} catch (SQLException ex) {}
}
}Do not forget to make the org.apache.derby package containing the Database class public. To enable the Playlist module to access the database, we specify a dependency to the Java DB module. As you already know, the nodes for a view have to be provided by the class NodeContainer. Knowing this, it would be best to just extend this class so it reads the content of the playlist from the database for itself and can store it when the application closes. To do so, we add the methods load() and update() to the NodeContainer class (see Listing 18-23). The load() method will perform a query to read all entries for a particular playlist. When the getNodeDelegate() method is used, each entry will result in an Mp3DataObject that delivers its corresponding node.
Example 18.23. The load() method reads all playlist entries from the database and adds them to the container.
package com.hboeck.mp3manager.playlist;
import java.sql.PreparedStatement;
import java.sql.ResultSet;
import java.sql.SQLException;
import org.apache.derby.Database;
public final class NodeContainer extends Index.ArrayChildren {
   ...
   public void load(String id) {
      try {
         String sql="SELECT filename FROM playlist WHERE id = ?";
         PreparedStatement stmt = Database.getConnection().prepareStatement(sql);
         stmt.setString(1, id);
         ResultSet rs = stmt.executeQuery();
         while (rs.next()) {
            try {
               add(Mp3DataObject.find(rs.getString(1)).getNodeDelegate());
} catch(Exception e) {}
}
rs.close();
stmt.close();
} catch(SQLException e) {
LOG.severe(e.toString());
}
}To store the playlist, we use the update() method (see Listing 18-24). First, remove all entries of this specific playlist to avoid lost entries. Then use the getNodes() method to obtain all nodes of this container and store the path of the related MP3 file for each node.
Example 18.24. The update() method stores the container's entries in the database.
public void update(String id) {
      try {
         String sql = "DELETE FROM playlist WHERE id = ?";
         PreparedStatement stmt = Database.getConnection().prepareStatement(sql);
         stmt.setString(1, id);
         stmt.execute();
         stmt.close();
         sql="INSERT INTO playlist (id, filename) VALUES (?, ?)";
         stmt = Database.getConnection().prepareStatement(sql);
         for(Node n : getNodes()) {
            stmt.setString(1, id);
            stmt.setString(2, n.getLookup().lookup(Mp3DataObject.class).
               getPrimaryFile().getPath());
            stmt.execute();
         }
         stmt.close();
      } catch(Exception e) {
         LOG.severe(e.toString());
      }
   }
}
You might be wondering how these methods are being called. The answer can be found if we open the Playlist class. Its base class, TopComponent, defines a method named componentOpened(), called while opening the window. Here, we determine the unique ID of the TopComponent, while in a subsequent step we call the container's load() method with this ID (see Listing 18-25). The writeExternal() method of the superclass is used to store data while the application is closing. We will override this method and invoke the update() method with the ID we stored as a private variable. Finally, we must invoke the writeExternal() method of the superclass; otherwise, the TopComponent will not be stored.
Example 18.25. The Playlist class is responsible for loading and storing the container's content.
public class Playlist extends TopComponent implements ExplorerManager.Provider {
   ...
   private String id;
   ...
   @Override
public void componentOpened() {
id = WindowManager.getDefault().findTopComponentID(this);
LOG.info("Load playlist with ID: " + id);
container.load(id);
}
@Override
public void writeExternal(ObjectOutput oo) throws IOException {
LOG.info("Save playlist with ID: " + id);
container.update(id);
super.writeExternal(oo);
}
}In this chapter, we created a bigger example to apply a lot of the concepts you learned about in the previous chapters. Firstly, we defined a modular application structure based on NetBeans modules. We created a module, enabling our example application to play MP3 files. The module contains the JMF classes, as well as the MP3 plugin.
To handle MP3 files within the NetBeans Platform, we created an MP3 file type, as explained in Chapter 7. Next, we included an ID3 library in our NetBeans Platform application, implementing an MP3 player service module. In this module, we also implemented a small GUI for the player.
Next, we created playlist functionality. To that end, we created our own node view and node container. To implement drag-and-drop functionality from the Media Library window, we extended our Node class.
Finally, this chapter demonstrated how easy it is to incrementally build a modular NetBeans Platform application. The extensibility of such an application has also been highlighted.