
Chapter Two. Building a Studio from Scratch
It’s Much Easier and Less Expensive Than You’d Think
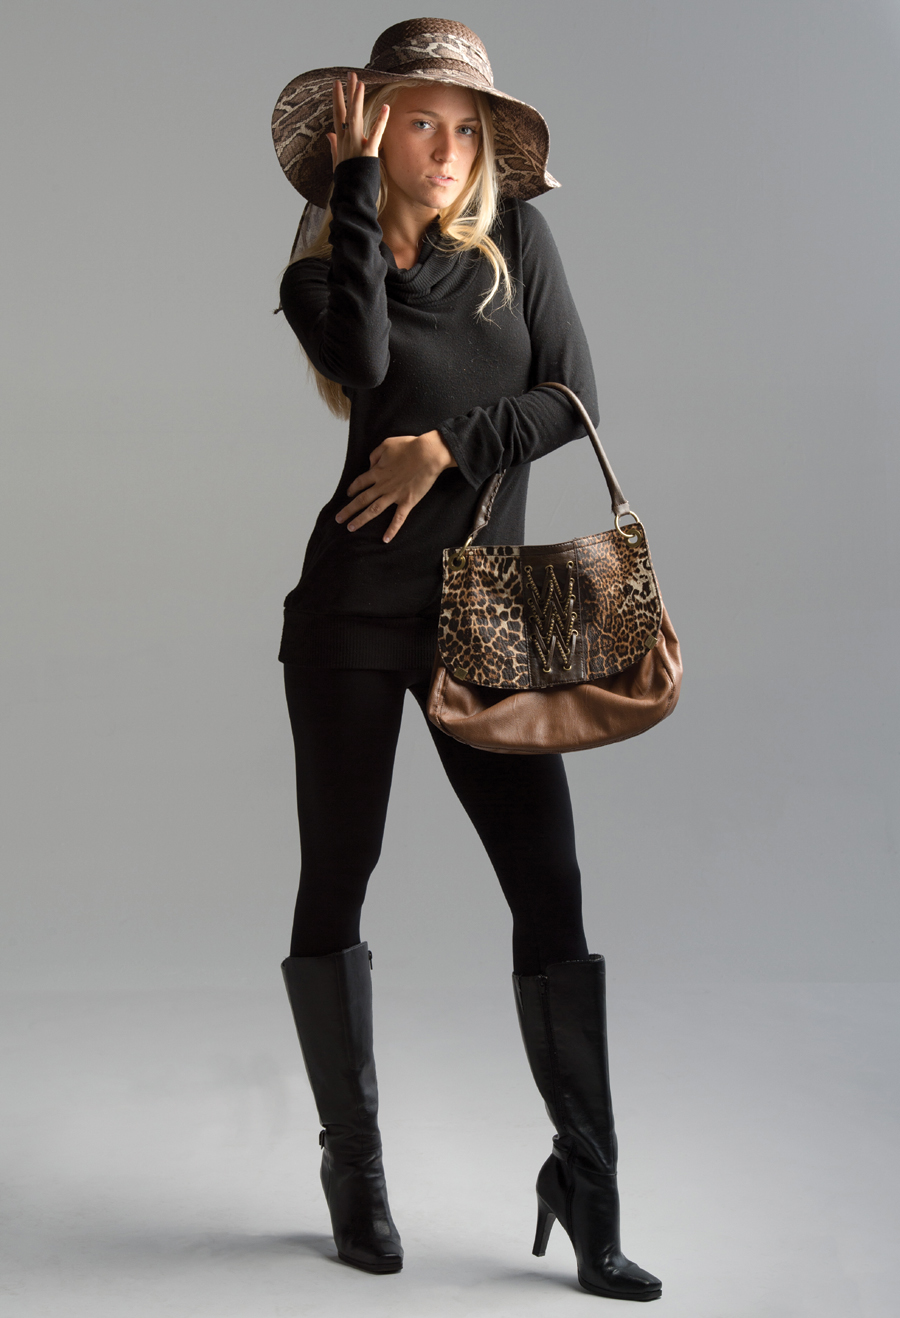
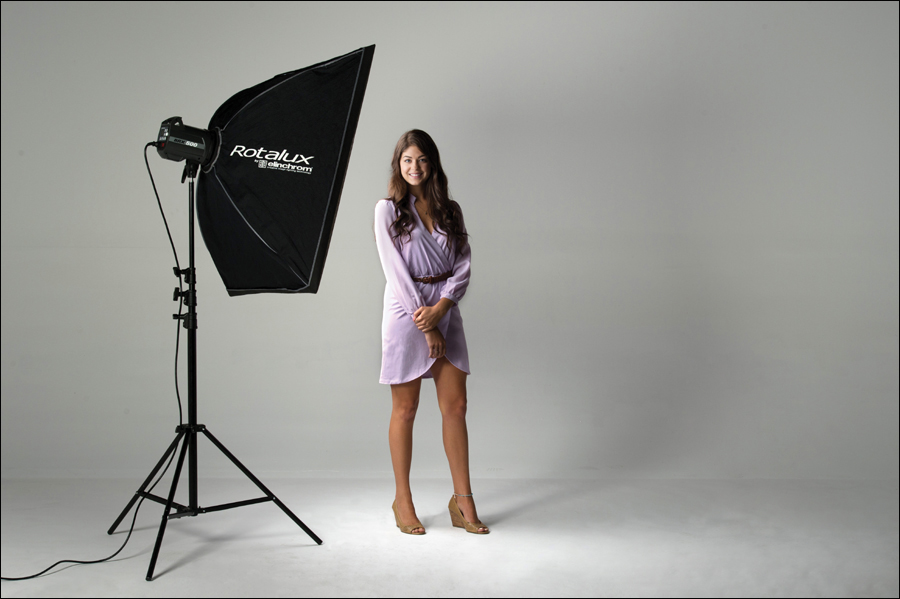
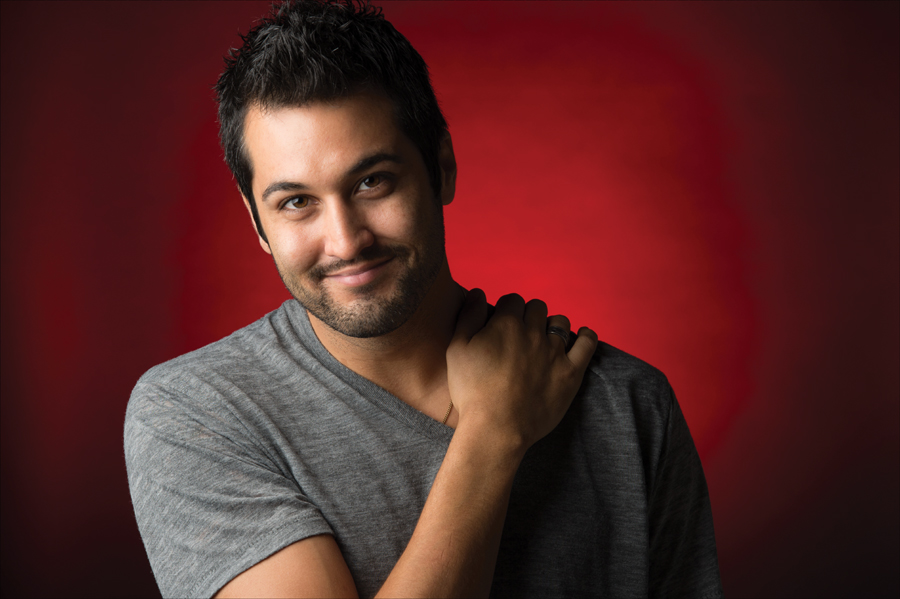
SHUTTER SPEED: 1/125 SEC F-STOP: F/11 ISO: 200 FOCAL LENGTH: 98MM PHOTOGRAPHER: SCOTT KELBY
 It used to be that only full-time working professionals could afford to put together a studio, but these days the prices of studio gear have come down so much, and the equipment is so much easier to use, that anyone (well, anyone with a platinum American Express card) can now build a studio of their own. Of course, I’m joking, you don’t have to have a platinum card (a gold card will do just fine). Actually, the main reason why building a studio from scratch is within most folks’ reach today is that you can do so much with just one light. In fact, nearly this entire chapter is to show you how to get professional results using just one light. Now, in the studio we don’t always refer to lights as simply “lights,” because then people would know what they do (we call them “strobes,” because it sounds much cooler). Studio photography is intentionally shrouded in mystery to make the process appear more complicated than it really is. In fact, there is a special committee, The Council for Creation of Complex-Sounding Studio Gear Names (the CCCSSGN, for short), whose charter is to create confusing insider lingo to throw beginners off track. For example, when we talk about the color of light, we don’t use the term “indoor lighting.” Nope, people would realize what that is, because they’ve been indoors before. Instead, we assign a color temperature measured in Kelvin, so to throw beginners off, we might say to one another, “It looks like that strobe is throwing 5500 Kelvin.” And the other person might say, “It looks a bit warmer to me. More like 5900,” then the other person might say, “Ya know, you might be right—it is more like 5900 Kelvin.” It’s amazing that either of these people ever get a date. Anyway, this chapter is designed to cut through the Kelvin and show you the light.
Studio Backgrounds
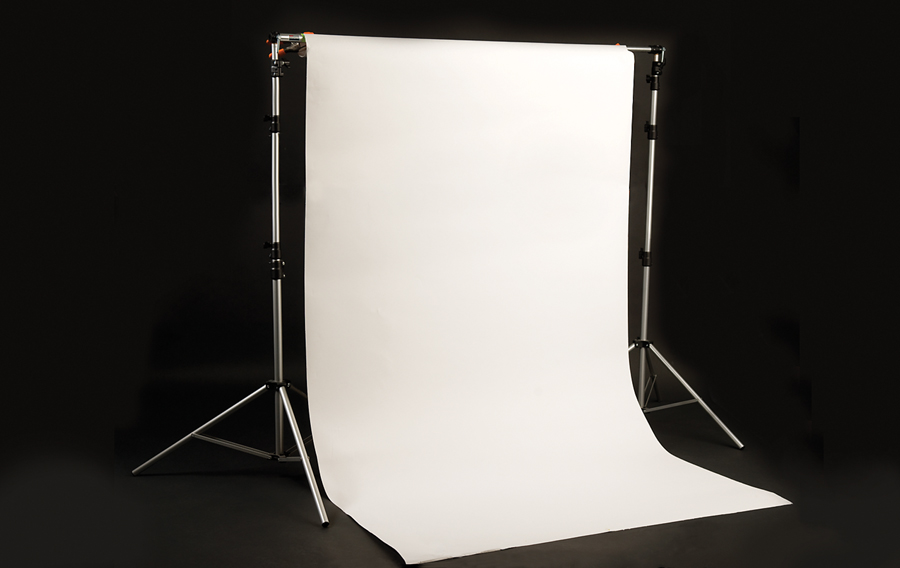
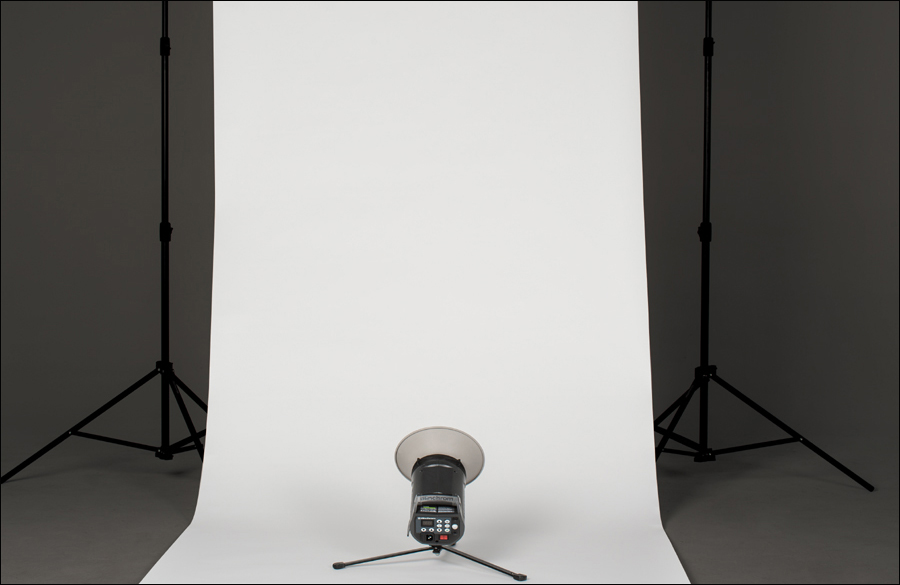
One of the least expensive, and most popular, studio backgrounds is seamless paper. This paper comes in long rolls, and the two most popular widths are just over 4 feet wide (53″) and nearly 9 feet wide (107″). The nice things about seamless paper are: (1) It’s cheap. A 53-inch-wide white roll that’s 12 yards long goes for around $25 (at B&H Photo), and if you want the 9-foot-wide roll, it’s only around $40. (2) It’s seamless. There’s no visible seam where the paper folds as it reaches the floor (or a tabletop), so the background looks continuous. (3) The stands to support seamless paper backgrounds are pretty cheap, too. For example, the Savage Economy Background Stand Support System, which supports both the 53″ and 107″ rolls, only costs around $75. That ain’t bad. And, (4) this paper comes in a wide variety of colors, from solid white to solid black, to blue, green, and everything in between (hey, that rhymes). If you’re building your first studio, this is a great way to start, because you can get your background and the supports to hold it up for around $100.
So Which Should I Get, the 53” or the 107” Seamless?
If you’re planning on shooting products on a table, or strictly just head-and-shoulder shots of people, you can get away with the 53″ width. If you need to see more of your subjects, go with the 107″.
Using Studio Flash (Called Strobes)
A lot of people are intimidated by studio lighting, thinking it’s complicated or too technical for them, but in reality, most studio lights are just bigger versions of the hot shoe flash you’re already used to using off-camera (in fact, they are flashes, but in the industry they’re usually called “studio strobes” or just “strobes”). The main differences between hot shoe flashes (like a Nikon Speedlight or a Canon Speedlite) and studio strobes are: (1) studio strobes usually plug into the wall rather than running on batteries; (2) studio strobes are much more powerful (they put out a lot more light) than the hot shoe flashes; (3) they have a modeling light (more on this on page 43); (4) they’re designed to have lighting accessories, like softboxes, attached right to the front of them; and, (5) since they’re designed to be mounted on top of a light stand, they have a light stand mount right on the bottom of the strobe itself (to mount a hot shoe flash on a light stand, you usually will need some sort of separate adapter or swivel head).
Scott’s Gear Finder
 AlienBees B400 (around $225)
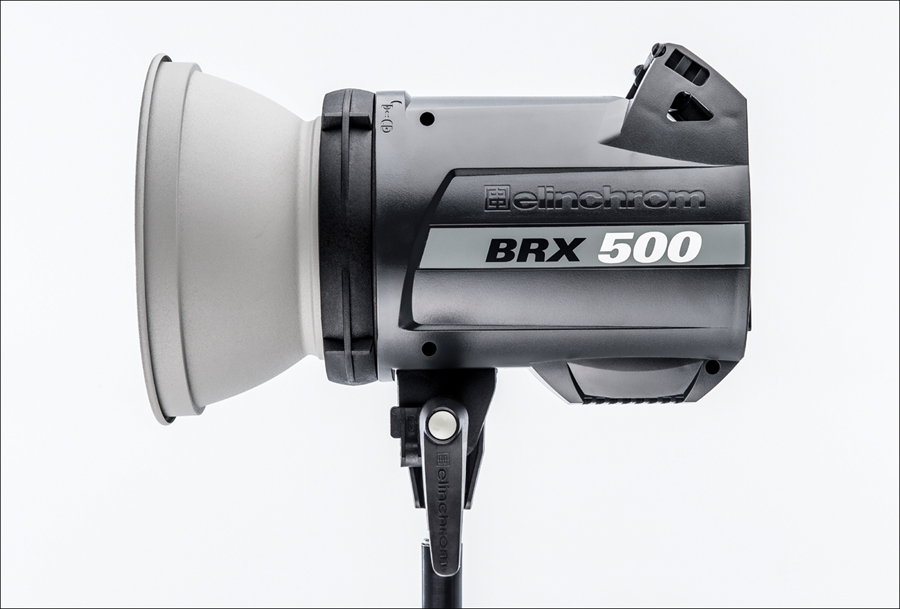
 Elinchrom Style BRX 500 Monolight ($675)
 Elinchrom Digital Style RX 1200 1200ws Monolight ($1400)
Softening Harsh Studio Strobes
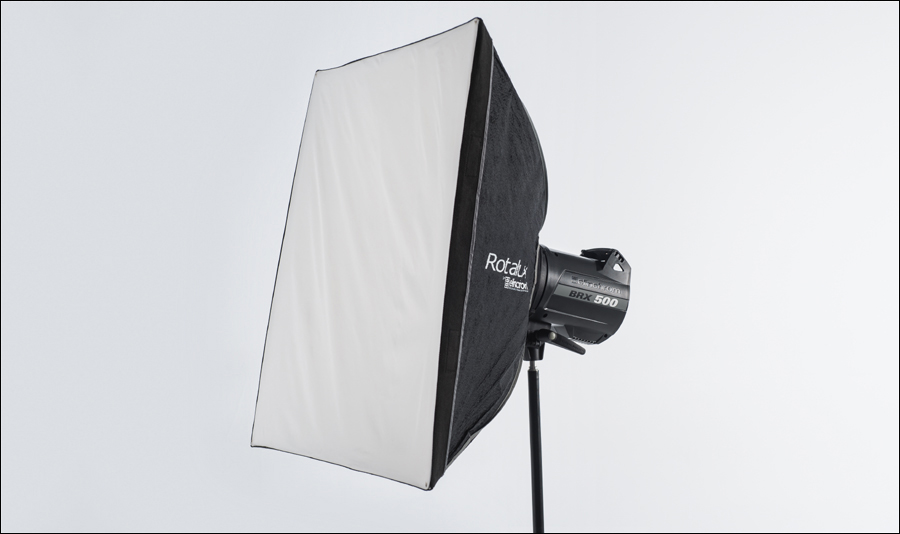
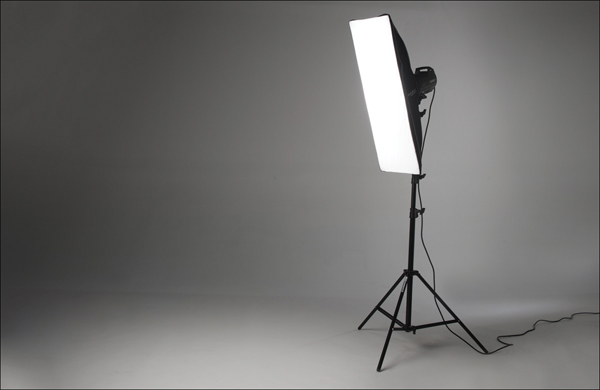
So, if the light from your regular off-camera flash is harsh, imagine how harsh the light will be from a brighter, more powerful flash (your studio strobe). Right, it’s harsh city. To diffuse that light and make it softer, you have to make the light that comes from your strobe larger, because the rule is: the larger the light source, the softer the light. So, we have to put something big between our studio strobe and our subject to spread and soften that light, and for that I recommend a softbox. They’re aptly named because they soften the light from your strobe big time, and they are very popular with professional studio photographers (in fact, it’s the softening device of choice for most top pros). They fit right over your studio strobe (they have a hole in one end) and your flash fires through the white diffusion material at the large end of the softbox. This spreads the light, so when it hits your subject, it’s a bigger source of light, and that means it’s a much more flattering, softer light. But this softer light isn’t just for lighting people—even if your subject is a product, you still want nice, soft shadows throughout your image, and a softbox is your key to getting just that.
Why I Prefer Softboxes to Umbrellas
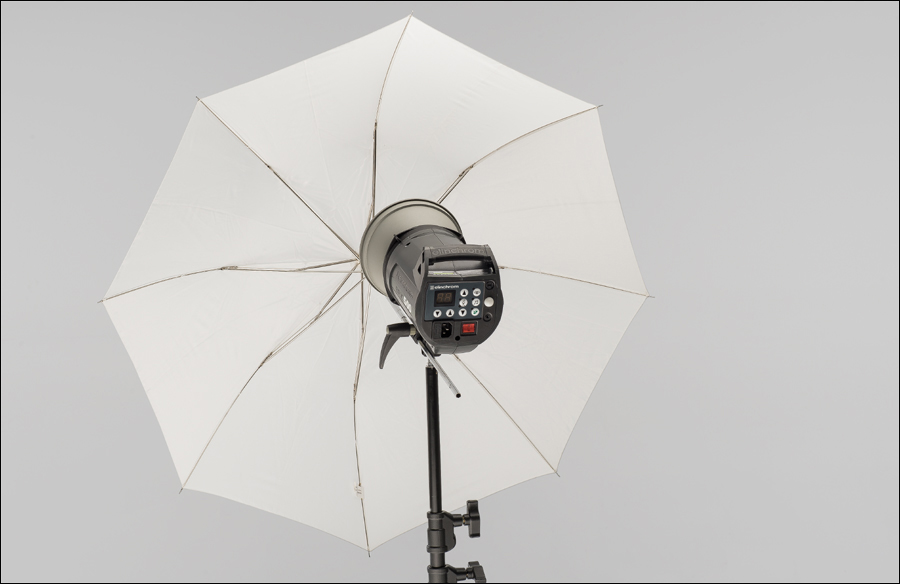
Besides softboxes, another way to spread and soften your light is to use a lighting umbrella. Surprisingly, you don’t generally put the umbrella between your strobe and the subject (although you could). Instead, you turn the strobe so it’s aiming 180° away from your subject—in the opposite direction. Then you put the umbrella in front of the flash (strobe) itself, so that your strobe fires into the underside of the umbrella. When the light hits the umbrella, it spreads out and travels back in the opposite direction, back toward your subject. Because the light spreads out when it hits that umbrella, the light from your strobe is much softer. So, why don’t I like, or recommend, using an umbrella? It’s because with a softbox your light is pretty much contained within a box—it doesn’t spill out, so your light is more directional. You aim it in a direction and it pretty much goes right there. But with an umbrella, you have less control over what happens once the light leaves your umbrella. I think of it more like a lighting grenade—you throw it in the general direction of what you’re trying to light, and it’ll probably light it. So, while an umbrella does take the harsh light from your strobe and create soft, pretty light from it, it kind of goes everywhere. Whereas, a softbox is more contained, more directional, and you can add other accessories to narrow the throw of your softbox light even more.
What a Speed Ring Does (& Why You Need It)
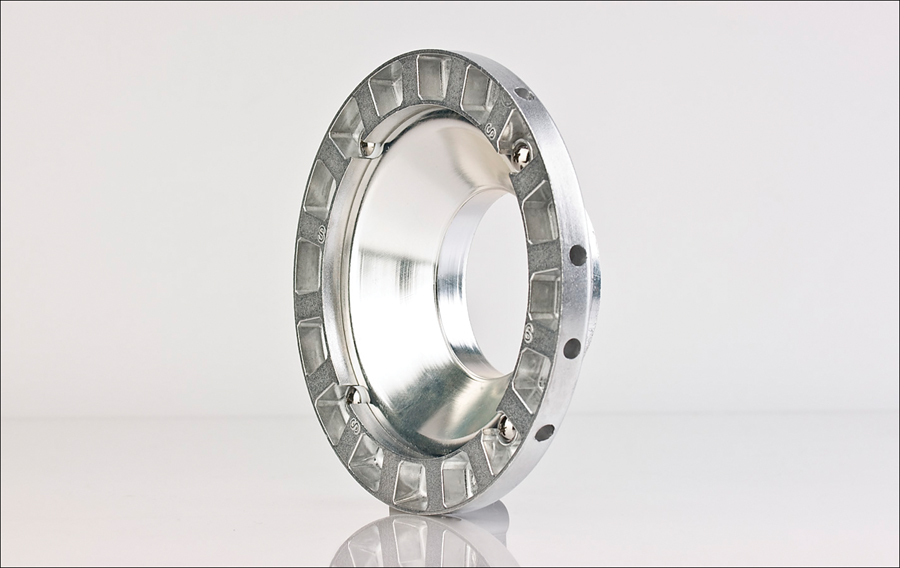
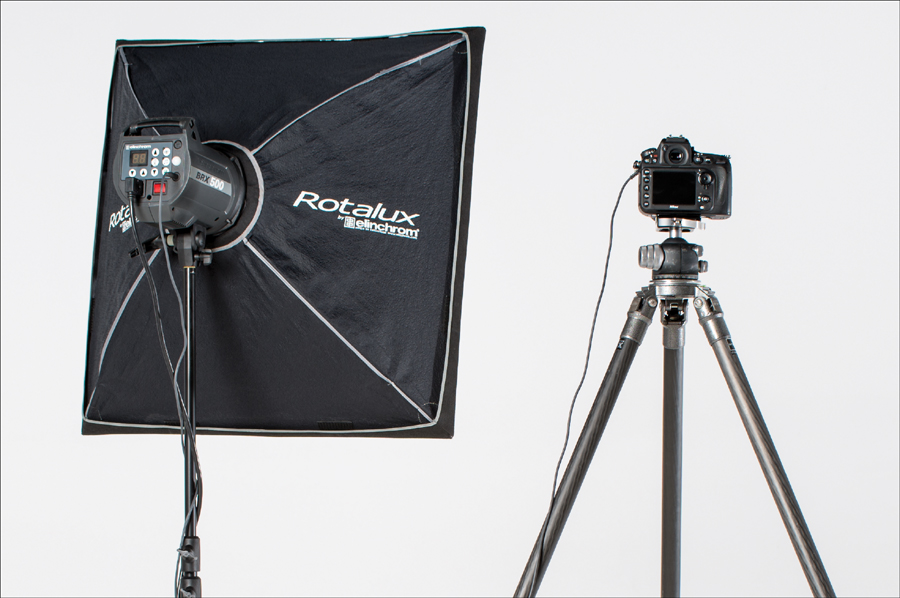
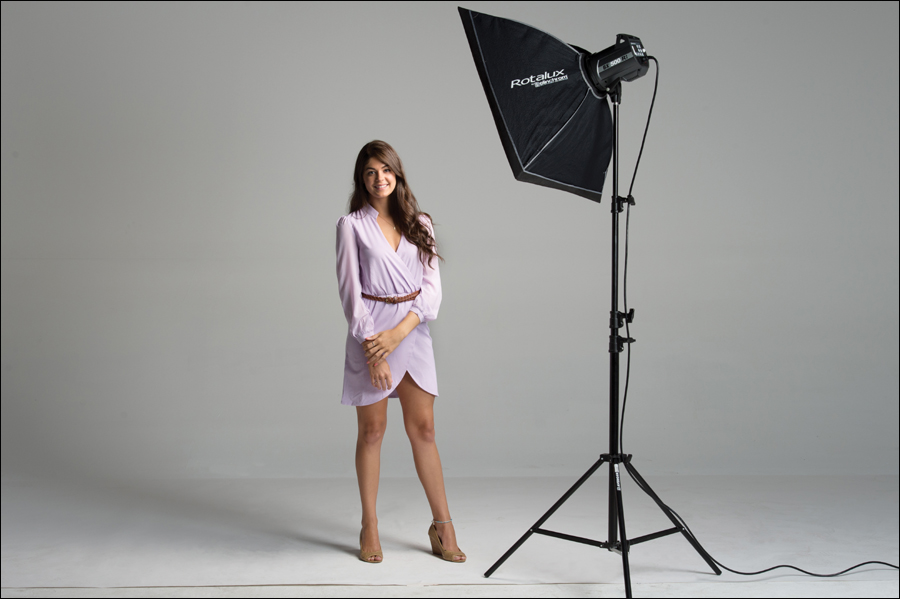
So, you need: (1) a strobe, (2) a light stand to hold it up, (3) a softbox to spread and soften the light, and (4) you’re also gonna need a speed ring. A speed ring is generally made of a light metal, and has four holes on the edge where you insert the ends of the four thin metal poles on each corner of your softbox. Once you insert those poles into the speed ring, it gives your softbox its form (it creates the shape of a box), and then you attach this whole rig (the speed ring with your softbox attached) to your strobe. I use an Elinchrom Rotalux softbox, which has an Elinchrom speed ring built right in, with an Elinchrom BRX 500. However, most softboxes don’t come with a speed ring built in, so if you have to order one, make sure you order one designed to fit your brand of strobe. By the way, most speed rings are rotating (meaning you can rotate the softbox from tall to wide while it’s mounted on the strobe), and if that’s important to you (and I would think it would be), then make sure the one you have or order does rotate.
Using a Modeling Light
Usually, when you’re shooting in a studio environment, the only lights you want to light your subject are the studio strobes themselves. Otherwise, the other lights in the room can affect your exposure, so studios are generally pretty dark once the shooting starts. This creates a problem, because the autofocus on the camera needs some light to lock its focus onto. That’s one reason why studio strobes usually come with a built-in modeling light, which is a fairly dim, continuous light that stays on between flashes to let your camera’s autofocus do its thing. Another advantage of using a modeling light is that it gives you an idea where your shadows are going to fall on your subject (it’s not exact, but it does give you an idea). I leave the modeling light on all the time during a shoot, but you’ll find an on/off switch on the back of your strobe unit itself (or on a separate power pack or battery pack, if you’re using one).
 When you’re talking about studio strobes, there are basically two kinds: (1) A monolight, which is what we’ve been talking about here in the book, is a self-contained unit (with the power pack, flash bulb, and power controls all in one) that plugs directly into a standard wall outlet, and (2) a flash head, which is just the flash itself, and all controls are in a separate power pack or battery pack, which you plug the flash head into.
Firing Your Studio Strobe
To get your strobe to fire when you press your camera’s shutter button, you’ll need to connect your strobe to your camera (either wirelessly or using a sync cord). If you go with a sync cord (it’s way cheaper, around $10 for a 15′ sync cord at B&H Photo), it’s pretty straightforward: one end plugs into your camera’s sync terminal, and the other end plugs into your strobe. That’s it. Now when you press your shutter button, your studio strobe fires. That being said, I can’t really recommend using a sync cord because, at some point, you or your subject will trip over it. Guaranteed. Somebody’s going to trip over it and, at the very least, pull your whole lighting rig over (you’ll know exactly when this happens because of the sound of shattering glass), or they’ll pull over your camera rig (listen for the sound of lenses shattering), or both. At that moment, however much you saved by using a cheap sync cord will pale in comparison to the repair bill and/or attorney’s fees (if your subject trips and falls) you’ll be faced with next. So, I highly recommend using wireless to fire your strobes (it’s easier than you’d think).
Firing Your Studio Strobe Wirelessly
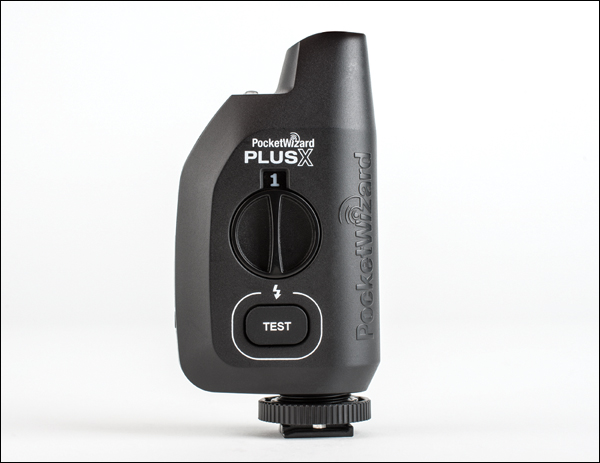
Besides avoiding the potential for broken glass (well, broken everything actually), there’s another thing using a wireless flash setup gives you—freedom. You’re no longer tied (well, actually tethered) to your strobe. You’re free to move around the studio, completely untethered, unencumbered, unfettered (insert your own “un” word here), without being on a leash (so to speak). Here’s how it works: to start, you need two of these wireless devices—one sits on the top of your camera (in your camera’s hot shoe) and transmits the wireless signal to the other wireless unit, which plugs into the sync input on your strobe. What I love about them is you just plug them in, turn them on, and they do their thing. There’s no real configuring or messing around for this simple setup. Now when you press your shutter button, it instantly fires your strobe, even if it’s across the room (even way across the room). The most popular wireless units are from a company called PocketWizard, and their new PocketWizard PlusX is a small, thin, lightweight model of simplicity that is incredibly reliable and very well made. They go for around $100 each (and you need two of them, so $200 for the set. They also make more expensive units with more features and stuff, but at this point, you don’t need ‘em). If you want a cheaper alternative, go with the Cactus Flash Transceiver V5 Duo. They’re a bargain at around $60 for a set of two (so, $30 each), and they actually work really well. Perhaps they’re not quite as rock-solid as the PocketWizard, and they may not have the 300+ foot range of a PocketWizard, but they’re pretty darn reliable and about $140 cheaper.
Using Continuous Light Instead
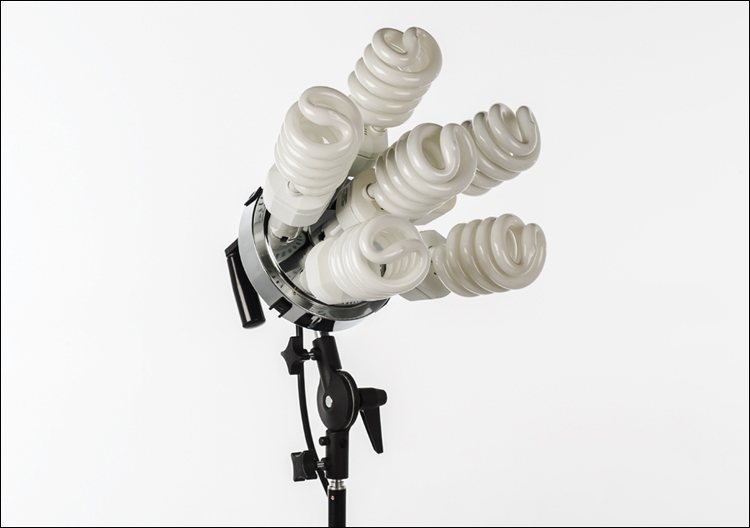
A fast-growing alternative to studio strobes is continuous lights, and with these lights there is no “flash of light”—instead, the lights just stay on continuously. This makes studio lighting incredibly easy, because what you see is what you get. I use these continuous lights in my studio (I have three of them) and I took them on the road with my Adobe Photoshop Lightroom Live Tour, where they nearly created a sensation, because no matter what I tell you about them here in this book, it doesn’t have the impact of seeing them used live. People just go nuts over them. The ones I use are Westcott Spiderlite TD6s (as shown above), which use daylight-balanced fluorescent light (since they’re fluorescent, they produce hardly any heat—they stay nice and cool the entire time you’re shooting with them, and your subjects stay cool, too). These lights are naturally softer than the studio strobes, but of course I still use them with a softbox attached, and the nice thing is the speed ring is built right into the light itself, so you don’t have to buy a speed ring. Best of all—they’re fairly inexpensive, and you can buy a kit, which includes a light stand, the Spiderlite TD6 fixture, a tilter bracket, and a 24×32″ softbox, for around $830 at B&H Photo. Hard to beat. So, what’s the downside with these lights? There’s one: since there’s no flash to freeze things, things need to be fairly still, because the fluorescent lights aren’t as bright as the light from a strobe. So as long as your subjects don’t move a whole bunch (for example, I wouldn’t buy these for shooting toddlers or puppies), they’re awesome.
Choosing the Size for Your Softbox
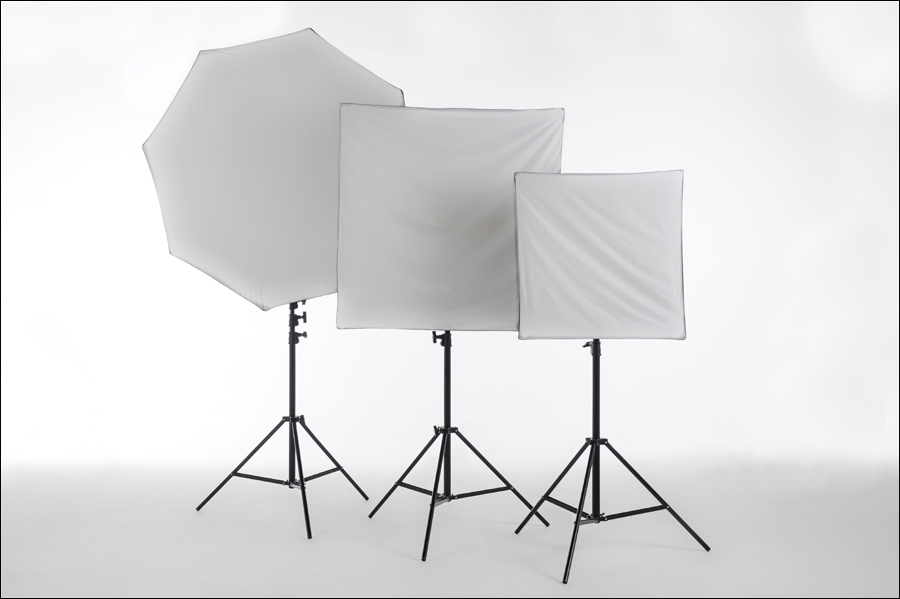
When you’re trying to decide which size to choose for your softbox, there are a couple of considerations: the first being, what are you planning to shoot, and the second being, how soft do you want your light? We’ll tackle the “What are you planning to shoot?” question first. If you’re shooting product shots on a table, you can get away with a smaller softbox, like one that’s 2×3′, yet it would still be big enough to also work for head-and-shoulders portraits. If you’re going to be shooting people, and doing more than just head-and-shoulder-type stuff, then you’ll need to go with a larger softbox. I mentioned before that the larger the light source, the softer the light, so if you buy a very large softbox (like one that’s 3×4′), you’re going to get very soft light, and you’re going to be able to light a larger area. I use three sizes in my studio: a 27×27″, a 39×39″ for people shots, and a 53″ Elinchrom Midi-Octa (it’s an octagonal-shaped softbox) when I want really, really, wonderfully soft wraparound light.
Scott’s Gear Finder
Photoflex 2×3′ (24×32″) Litedome Softbox (around $113)
Chimera Pro II 3×4′ Softbox (around $196)
Elinchrom 53″ Midi-Octa Light Bank (around $315)
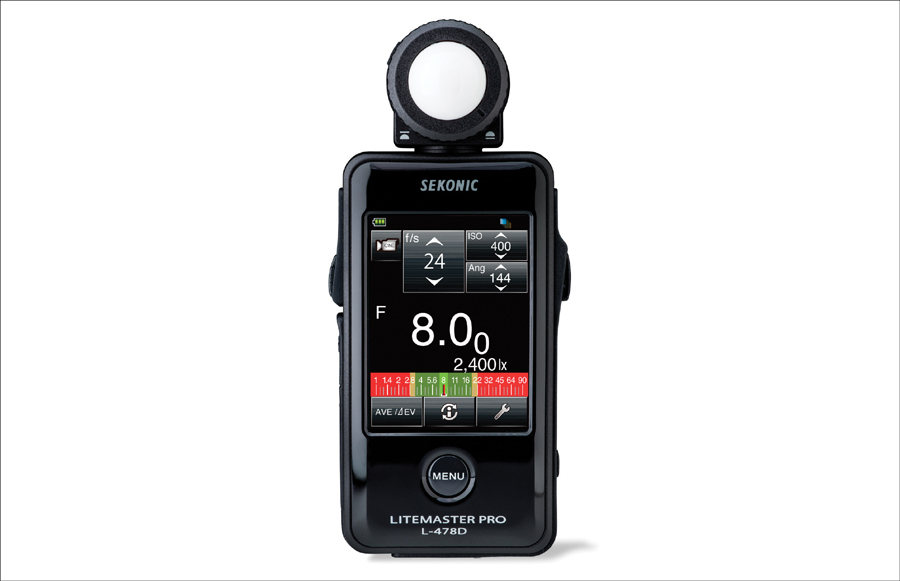
Once you’ve got your lighting all set up, how will you know what f-stop to set your camera at to get a proper exposure? Of course, once you’ve had years of experience you can get pretty close, or you can go the trial and error route. But, what if there were a device that would actually tell you to “set your f-stop at this number,” and then all you had to do was dial in that f-stop on your camera and your exposure would be right on the money? Well, that’s what a light meter does. In fact, that’s all a light meter does. You fire your strobe, the meter measures the light from the strobe, and it shows you on its screen what f-stop to use for a perfect exposure. Sounds like cheating, right? It kinda is.
Scott’s Gear Finder
Gossen Digiflash Light Meter 2 (around $200)
Sekonic Litemaster Pro L-478D Light Meter (around $390)
Gossen DIGISKY Light Meter (around $470)
How to Use a Light Meter
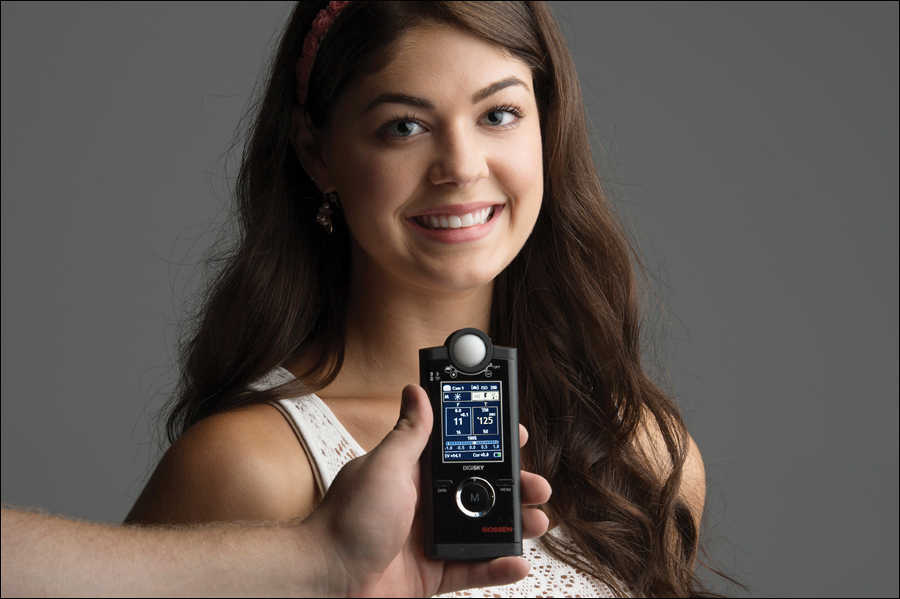
Before you get started, there are three simple things you’ll need to do before you measure the light from your flash: (1) Enter the ISO that your camera is set to into your light meter (so, if you’re shooting at 100 ISO, you enter 100 ISO). (2) Enter the shutter speed you’re going to be using (in a studio, I generally use 1/125 of a second—a good, safe shutter speed for working with studio flash. So, go ahead and enter 1/125 of a second). And, (3) make sure the round white plastic dome on the meter is extended (turn the wheel so it extends out). That’s it—you’re ready to put it to use. Most people aim the light meter at the light itself, but today’s meters are actually designed so they work with that white plastic dome aiming back directly at your camera’s lens. If you’re metering a person for a portrait, position the meter directly under their chin, with the dome aiming back directly at the camera. Now, push the measurement button on the meter, and then fire the flash (if you’re firing your flashes wirelessly, make sure you get a light meter that has a wireless trigger built right in, so when you push the measurement button, it fires the flash for you. Otherwise, you’ll have to have your subject hold the meter under their chin and push the measurement button, so you can walk back to your camera to take a test shot which fires the flash). When the flash fires, it instantly tells you the exact f-stop you need to dial in on your camera for a perfect exposure. Go over to your camera, make sure you’re in manual mode, set your f-stop to what it said (make sure your shutter speed is still set at 1/125 of a second) and you’ve got it—perfect exposure. As long as you don’t move the light or change the power of the flash, you can continue to use those settings. If anything does change, just take a new meter reading the same way and dial in your f-stop just like before.
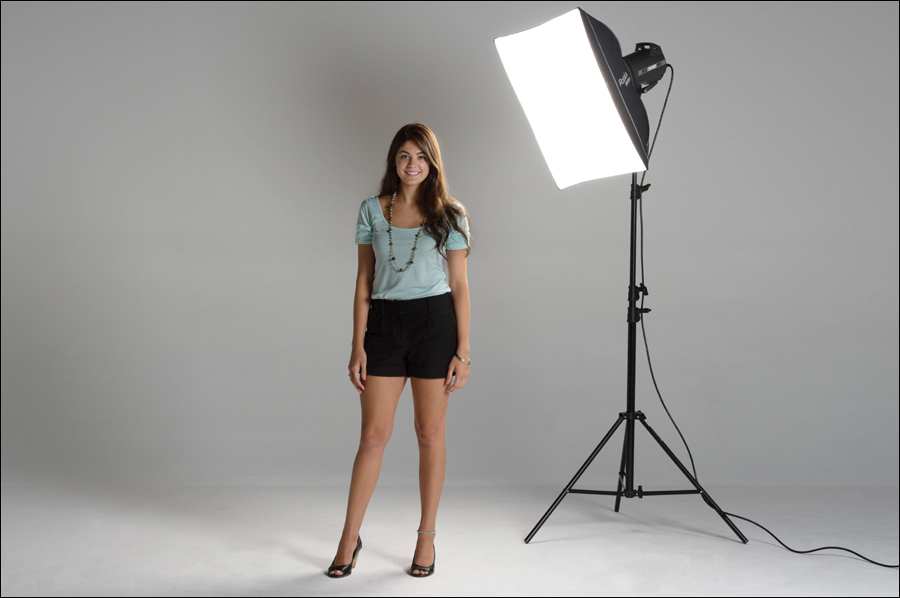
How Many Lights Should You Use?

One. I am not kidding. The secret to lighting success is to keep it simple, and if you stick with just one light at this stage, your chances for success go up by about 1000%. Here’s why: (1) You won’t get into trouble with just one light. You’ll set it up, you’ll position it, you’ll take a shot, it’ll look great, and you’ll be happy (think: less is more). In fact, it’ll probably look so good that you’ll want to add more lights. But, as soon as you start setting up more lights, the problems begin because, while one light is simple, two lights takes the complexity of getting overall good light up a big notch. Three lights is a total circus (at least until you really know what you’re doing). So, do yourself a favor and get really good at just one light. (2) One light costs about half of what two lights cost, it takes about half the time to set up, and it weighs half as much. (3) With one light, you’ll probably sidestep one of the biggest mistakes people new to studio lighting always tend to make, and that is to “overlight” everything. They use too many lights and make everything too bright. (4) You’ll have a chance to really understand light because the whole process will be really simple. You’ll get really, really good at using one light. You’ll become a master of one light, and then you’ll know exactly when you need to use a second light, and precisely why. This “stick with just one light” is some of the best advice in this chapter (heck, in this whole book), and if you do stick with it, it won’t be long before you’ll become known for your lighting. I know that sounds like a dream at this point, and it will stay a dream if you rush out and buy a three-light kit. Go with one.
The Least Expensive Extra Light
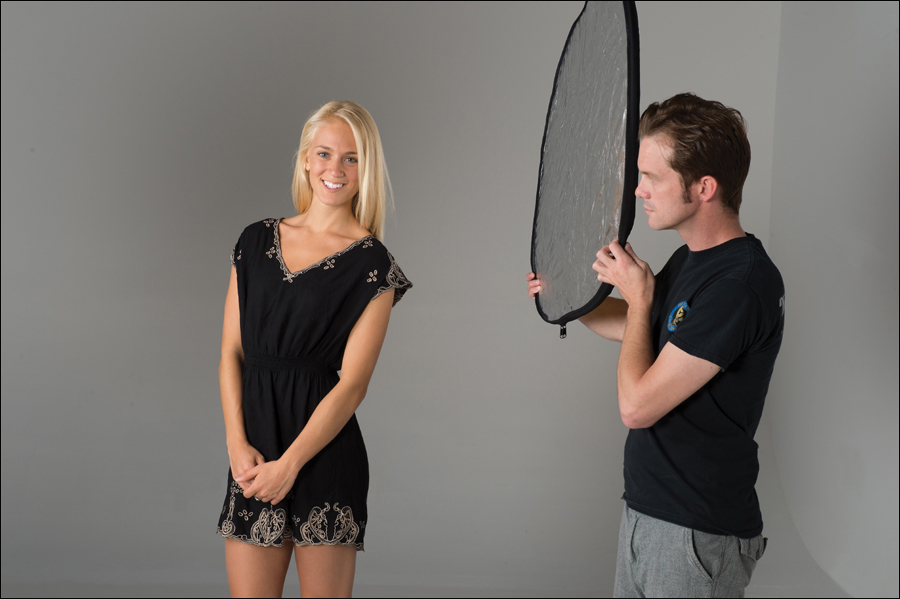
So, what do you do if you set up your one light and your subject’s eyes look too dark, or if one side of their face is too dark, but I just told you not to use more than one light? Still don’t buy that other light (not yet anyway). Instead, buy a reflector. They’re cheap (about $30 for the Westcott reflector I use) and it’s like having a second light but without the cost, complexity, size, weight, or electrical requirements. Here’s how they work: When light hits a reflector, it bounces off it the way a billiard ball bounces off the rail cushion in a game of pool—it hits the reflector and changes direction. Your job is to direct that bounced light back toward your subject (well, back toward the part that needs more light). So, the idea is this: if one side of your subject’s face is really dark, position the reflector so the light from your strobe hits it, and then bounces back onto that side of their face. Is it really that simple? Yup. You control how bright this bounced light is in two ways: (1) just like a real light, the closer the reflector is to your subject, the brighter it will be (so if it’s too bright, move it farther away), and (2) the color you use affects how much light it bounces back—silver reflectors reflect a lot of light; white reflectors reflect much less (you can buy reflectors with white on one side, and silver on the other). So, if you just need a little light to fill in those shadows, use the white side. If you need a lot of light, use silver. Also, there are probably just two places you’re really going to wind up placing this reflector in a studio: (1) right beside your subject, on the opposite side of the light to bounce light back toward the shadowy side of your subject, or (2) directly in front of your subject for headshots, to bounce light back into their eyes, usually around chest or waist level.
Adding a Hair Light
If you’re thinking of adding a second light to your studio, it should probably be a hair light. A hair light is just another strobe, but it’s generally aimed directly at your subject’s hair (did I even have to say that?), which helps to separate your subject from the background and give your portraits a more professional look all around. For lighting hair these days, we generally use a tall, thin rectangular softbox called a strip bank, which helps keep the light more directional (and lights just the hair and/or shoulders, instead of spilling over everywhere). The strip bank size I use is 12×36″. Also, I usually set the power on my strobe for the hair light so it’s around one stop brighter than my front light, so the light from my front light doesn’t overpower it.
Scott’s Gear Finder
Westcott Strip Softbox 12×36″ ($150)
Chimera 9×36″ Super Pro Plus Strip ($183)
Westcott Strip Softbox 12×50″ ($248)
Where to Position Your Hair Light
We used to position hair lights on a boom stand directly above our subjects, but honestly, that’s kind of an outdated “old school” approach to hair lighting. Today, it’s much more popular to use a strip bank behind and to the side of your subject instead. Generally, you position it on the opposite side of your front light (catty-corner to it), behind your subject, aiming back at their hair. As far as height goes, position it so about the top half of the softbox is above their head and then you angle it down slightly toward your subject. As far as how close/far to place this hair light from your subject, that’s easy: if you want the light to be harder, move it farther away (6 to 8 feet); if you want it softer, get it as close as you can to your subject (without it being visible in the shot. I didn’t really have to say that last part, did I?). One more advantage of not going “old school” with the boom stand right overhead: you don’t need a boom stand. You can do this strip bank hair light using just a regular ol’ light stand. Another victory for simplicity!
Testing Your Hair Light’s Position
A trick for checking the position of your hair light, to make sure none of the light from it is spilling onto your subject’s face, is to turn off your main strobe (your front light), so nothing but the hair light is turned on. Your subject should be in complete silhouette, with no light on their nose, cheeks, or face whatsoever. If you see any light now, you’ll need to reposition your hair light (maybe move it back a little bit, or to the side), until you only see light on their head and shoulders—none on the face. By the way, this “turn off the front light” trick isn’t just for hair lights—it’s for any time you’re using more than one light. By doing a test shot with just one light on at a time, you’ll see exactly what each one is doing. If you turn them all on from the beginning, the lighting won’t look good, but you won’t have any idea why. So, always start with just one light (I always do any back lights first), and then add another light, one at a time. If something doesn’t look right when you add another light, turn the other lights off, adjust the one that didn’t look right, then turn them on again, one at a time.
Keeping Your Hair Light from Spilling
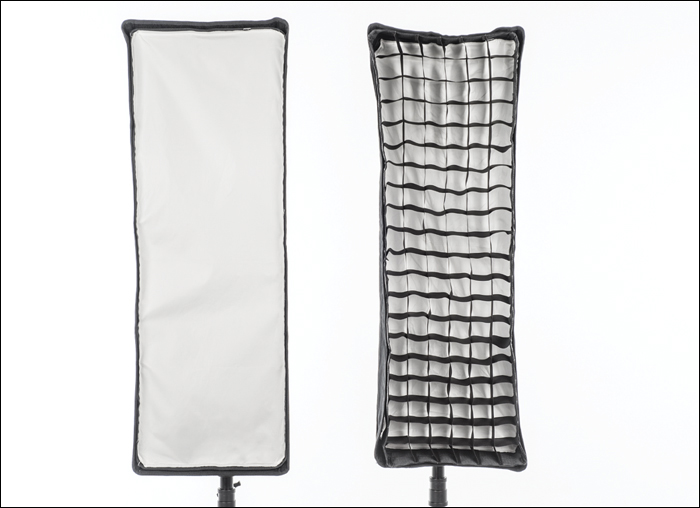
Probably the most popular accessory for hair lights is an egg crate grid. This is a fabric grid that Velcros (or slips, depending on the brand) over the front of your strip bank. It narrowly focuses the light from your hair light so it doesn’t spill out the sides, and it really does a wonderful job of focusing your light just where you want it. They come in different sizes, and there’s one to match the exact size and shape of your strip light. These used to be insanely expensive (literally, often more than the cost of the softbox itself, like the price was controlled by some sort of egg crate cartel), but a number of new sources now have them at really affordable prices (for example, instead of being $190 for a grid for 12×36″ strip banks, you can get one from Denny Manufacturing [www.dennymfg.com] for around $40. Whew! That’s better). Once you use one, you’ll always use one, because for hair lights they’re absolutely ideal.
Which Mode Should You Shoot In?

When it comes to shooting with studio strobes or flashes, this is the one time I would absolutely recommend that you shoot in manual mode. The reason is you need to set both the f-stop and shutter speed independently, and manual mode easily lets you do just that. Start by setting your shutter speed at 1/125 of a second (a good, safe speed that will sync your camera with your flash unit, no sweat). This shutter speed, in a studio, is a “set it and forget it” setting. Now all you have to worry about is setting your f-stop. So, set your shutter speed to 1/125 of a second, your f-stop to f/11 (great for studio portraits because everything will be in focus), and then take a shot and see how it looks on your camera’s LCD monitor. If it’s too dark/too bright, don’t change the settings. Instead, just raise/lower your flash power until the lighting looks right to you. Of course, you could just use a light meter to tell you exactly which f-stop to use for the power setting you currently have on your flash (if you’d rather not mess with changing the power of your flash).
A “Show Me How to Do It” Book
This is a “show me how to do it” book. I’m telling you these tips just like I’d tell a shooting buddy, and that means, oftentimes, it’s just which button to push, which setting to change, where to put the light, and not a whole lot of reasons why. I figure that once you start getting amazing results from your camera, you’ll go out and buy one of those “tell me all about it” digital camera or lighting books.
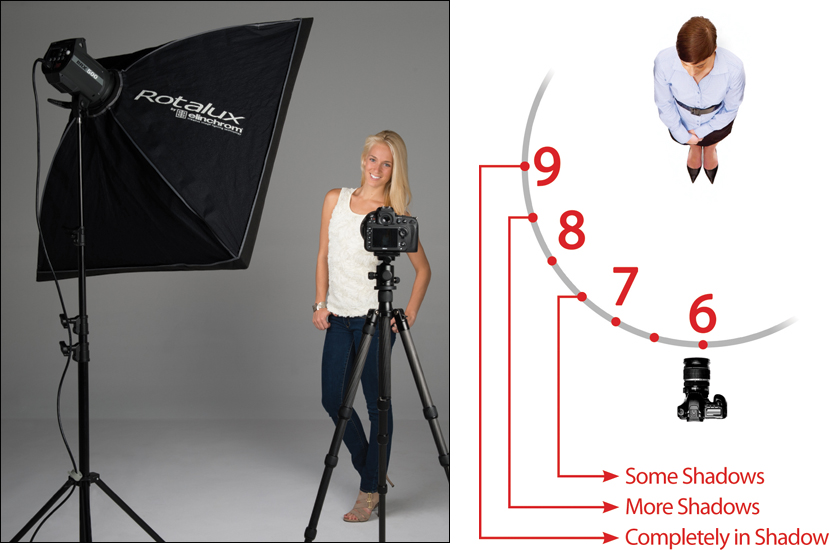
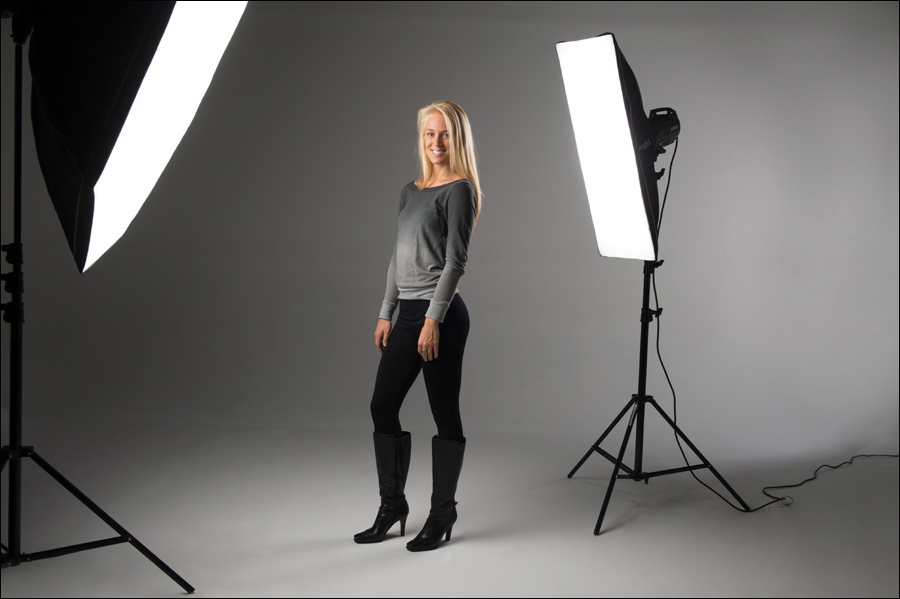
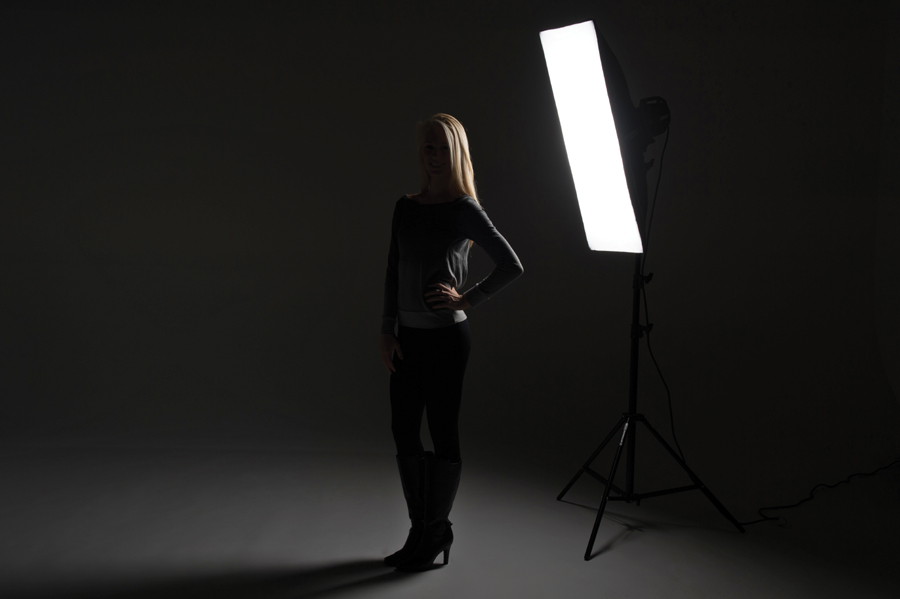
There is no absolute “right” place to position your lights, so it really comes down to your personal preference about how you want the shadows to look on your subject. Shadows are what create depth and dimension on a person’s face (and having soft shadows on your subject’s face is usually very flattering), so I usually position my main light so it’s at a 45° angle to the subject. So, for example, if your subject was standing at the center of a clock face, and the camera is straight in front of them at 6:00, then you’d place the light at around 7:30. This creates some nice soft shadows on the side of their face that’s farthest away from the light (the side opposite the light). If you want more shadows on that side of their face, you’d move the light to around 8:00. Want more shadows? Move it to 8:30. Want that whole side of their face totally in shadow (often seen in dramatic portraits of men)? Put the light right beside them at 9:00. Okay, what if you actually want less shadows on that opposite side of their face—maybe just a hint of shadows? Then, move the light closer to the camera position—to around 7:00. If you move the light right in front of the subject, their whole face will be lit evenly with no shadows on the opposite side of their face. This is “flat lighting” and it usually looks okay on someone with really good skin. Okay, so which one of these positions is the “right” position? The one you choose—it’s totally up to your personal preference (my preference has me positioning my light at between 7:30 and 8:00 most of the time).
How High to Position Your Main Light
If you were doing a shoot using natural light from the sun, where does the light come from? It comes from above us, right? When it’s straight above us, it’s really harsh midday sun, but later in the day, the sun is lower in the sky and it becomes softer and more flattering as it now comes down on us at an angle. We want to do the same thing with our studio lights—we want to mimic that soft, late afternoon position. That’s why we position our light up high above our subject, and aiming down at them at an angle, so it creates a more flattering look to our light. So, in short, we place it above them, angled down at them. If they’re standing, the center of the light is usually up a couple of feet higher than their eye level. If they’re sitting, it’s also usually a couple of feet up higher than their eye level. Easy enough.
Sometimes you have to Buy Gear
Just so you know, I don’t get a kickback, bonus, or promotional fee from any of the companies whose products I recommend. I’m just giving you the same advice I’d give a friend if we were out shooting (which is the theme behind this entire book). This is not a book to sell you stuff, but before you move forward, understand that to get pro results, sometimes you have to use (and that means buy) some of what the pros use.
How Close to Position Your Light
Once you know this rule, you’ll know exactly how close (or far away) to position the light. The rule is actually very simple: the closer the light is to your subject, the softer the light is. That’s it. Now that you know that rule, how far the light is positioned away from your subject is actually based on (wait for it...wait for it...) your subject. For example, if you’re shooting a mother and daughter portrait, and you want the light to be really soft and beautiful, you’ll position the light as close to them as possible (without actually seeing the softbox in the shot). If you’re shooting a boxer, and you want the light on him to be hard and edgy, move the light back maybe 8 or 10 feet, and the shadows become much harder and edgier. The farther the light is away from him, the harder it will be. So, really, how close (or far) you position the light from your subject is based on how soft or hard you want the light to be. By the way, there’s nothing to say you couldn’t have soft, beautiful light on a boxer—it’s actually a good look (I’ve done it myself). But, in the end, this is a call you make based on your subject and how soft or hard you want the light to be. Soft = close. Hard = far away. One thing to remember: when you move the light close to your subject, it gets brighter, so you might have to turn the power down. By the same token, if you move the light away from your subject for a harder look, the light gets darker (I know, duh!), so you’ll have to turn the power of your flash up to compensate.
Using a Fan for Windblown Effects
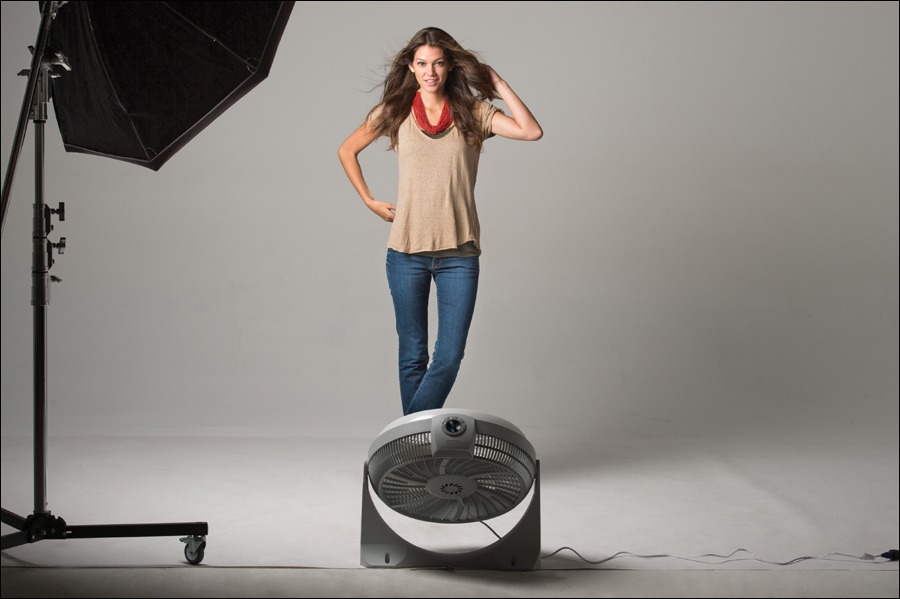
If you’re shooting portraits of women, this is going to sound silly at first, but you want to buy a fan. Not just a fan, a powerful, hurricane-force commercial fan that would put most of your lighting equipment in jeopardy if you were to ever turn it on to its highest possible setting (which I believe, on most fans, is marked “Category Five”). Anyway, a fan with a nice kick to it (like the Lasko 3520 20″ Cyclone Pivoting Floor Fan, for around $35) creates a windblown hair effect that can add energy and excitement to your portraits (besides making the subject’s hair look full and glamorous). The fan should be positioned on the ground, aiming upward at your subject, and once the fan is in place and turned on, there’s not much else to do but shoot. If you really want to “blow people away,” take a look at Buffalo Tools’ 42″ Industrial Fan (it sells for $366), which was designed for use in factories and sports arenas, and features high-performance, belt-driven motion with a two-speed capacitor and a thermal cut-off (whatever that means). In short, it’s guaranteed to relocate anything in your studio that’s not bolted to the foundation.
Want to Impress the Folks at Vogue? Buy This Fan!
If you get a huge, paying, fashion cover shot gig and you want to really impress your new clients, buy the only fan I’ve found that is made for shooting fashion—the Bowens Jet Stream 350 Wind Machine. With its 2500-rpm blast and a wireless remote, it’ll be knocking your clients off their feet (and it should—it sells for around $1,300). B&H Photo has ‘em in stock. What the heck—buy two!
Want Softer, More Even Light? Feather It!
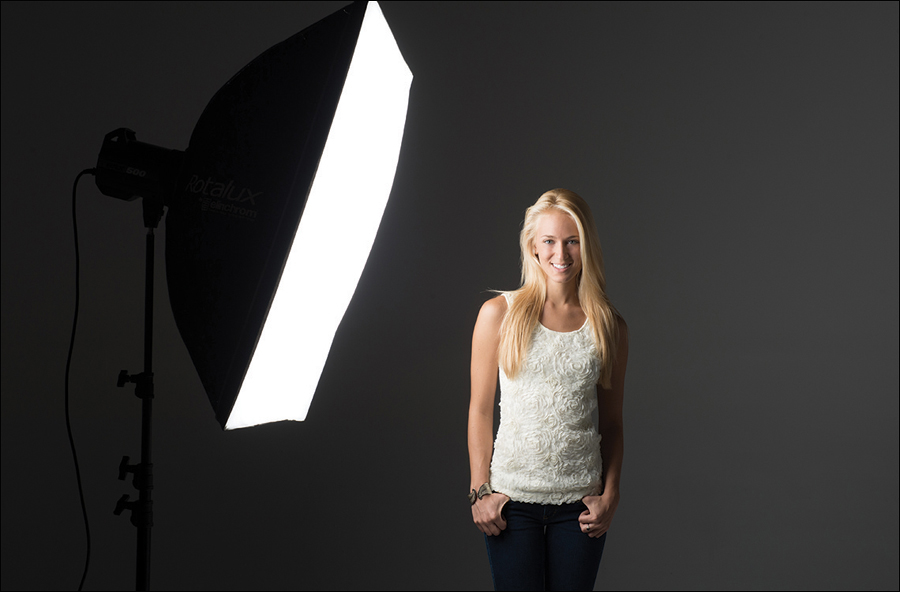
If you’re already using a large softbox (one that’s around 36×48″ or larger), and you want softer, more even light than it delivers, then you can use a technique called feathering, which puts your subject in the softest and most even light your softbox can deliver. Feathering just means that you turn the light away from your subject, so they are now lit by just the edges of the light. They won’t be getting the full intensity of the light when you feather it, so you might have to adjust your exposure so it’s not too dark (use a lower number f-stop on your lens—like f/4 or f/3.5, etc.—or better yet, use your light meter and it will tell you exactly which settings to use when feathering your light). This light out at the edges of your softbox is very even, very soft, and very flattering (since the light in the center of the softbox is usually brighter and less even), so when you really need that super-soft, even light—now you know where to get it. This technique looks great on portraits of young children, a mother/daughter shot, or when you want a very soft, glamorous look to your lighting.
What That Extra Panel in Your Softbox Does
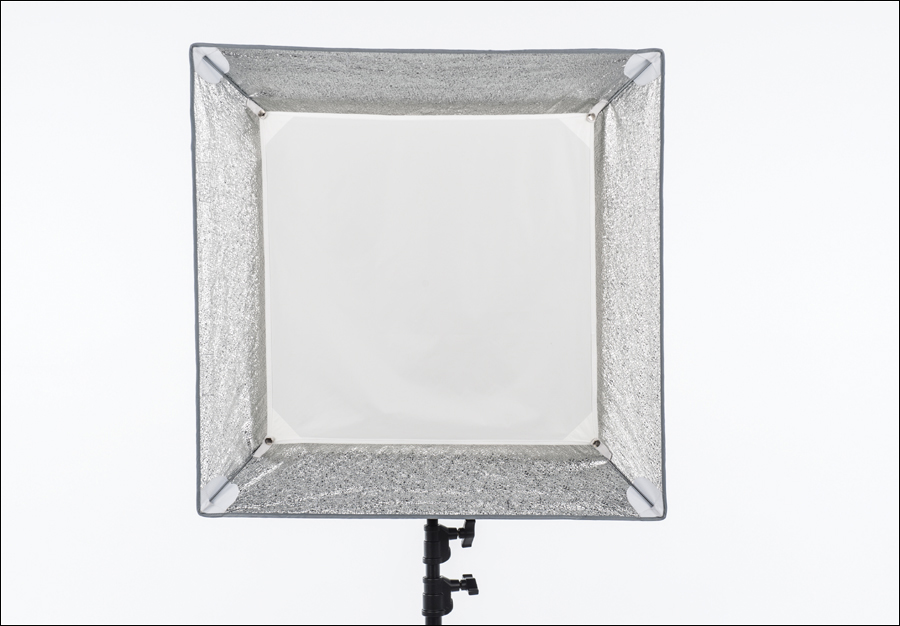
When you buy your first softbox, it may come with a second, smaller diffusion panel, which you place inside the softbox (and then you place the larger outer diffusion panel on the inside edge of the softbox, to cover the front). That internal diffusion panel really serves one purpose: to try to even out the light, so you don’t get a hot spot in the center of your light where the flash bulb is. This internal panel does make the light a tiny bit softer, but that’s not its main job—it’s to hide that hot spot. Of course, by adding this internal panel, your light has to pass through that diffusion material first, so you lose a little bit of light in the process. As a general rule, if I’m using continuous light (like the Westcott Spiderlites), I always take this extra internal diffusion panel out. That’s because those daylight fluorescent bulbs are already soft (by their very nature), and the panel doesn’t really soften them significantly, it just eats up light, so I especially want them out when using continuous lights, because I need all the brightness I can get. Otherwise, if I’m using strobes, I leave them in place.
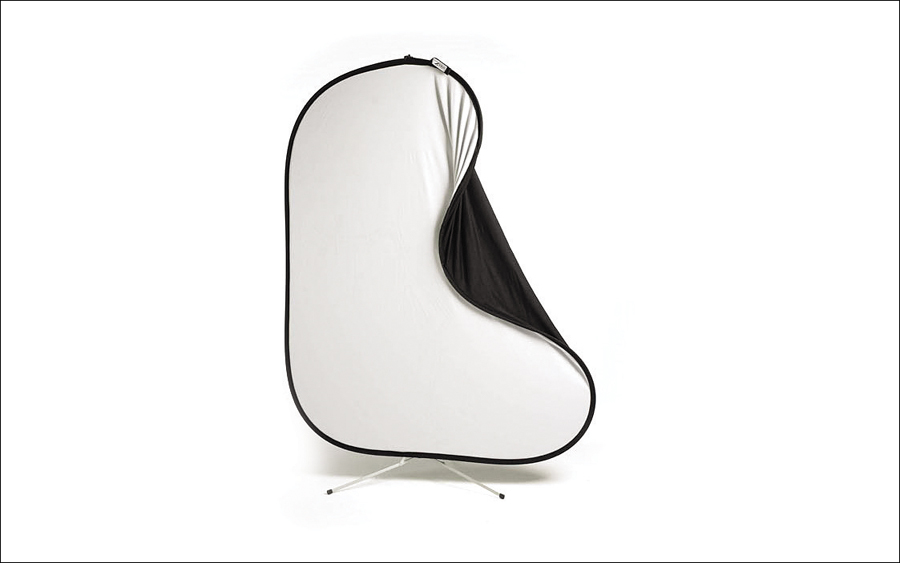
Another quick and flexible studio background is a pop-up collapsible background that instantly folds up into a small, flat circle, but expands to be a full studio background in a matter of seconds. The one I use is a 6×7′ Westcott Masterpiece 2-in-1 Collapsible Illuminator Background with white on one side and black on the other. It sells for around $220, and I also recommend buying the Illuminator stand to hold it up, which is another $90, but unless you can stand there and hold it up (or have somebody else hold it up), it’s worth its weight in gold. So, with this background, anytime you want to shoot, you just open the round plastic case it comes in, pull it out, and it pops up, ready to go. You put it on the Illuminator background stand, and you’re ready to go. Another advantage of this particular background (over the seamless paper route) is that it’s very portable, lightweight, and you can set it up in literally seconds—by yourself. The only downside is it doesn’t go all the way to the floor seamlessly, so it’s fine for 3/4-body shots, but not full-body shots. One more thing: although I use the black/white version, these collapsible backgrounds come in all sorts of patterns, looks, sizes, and colors.
Keep Light from Hitting the Background

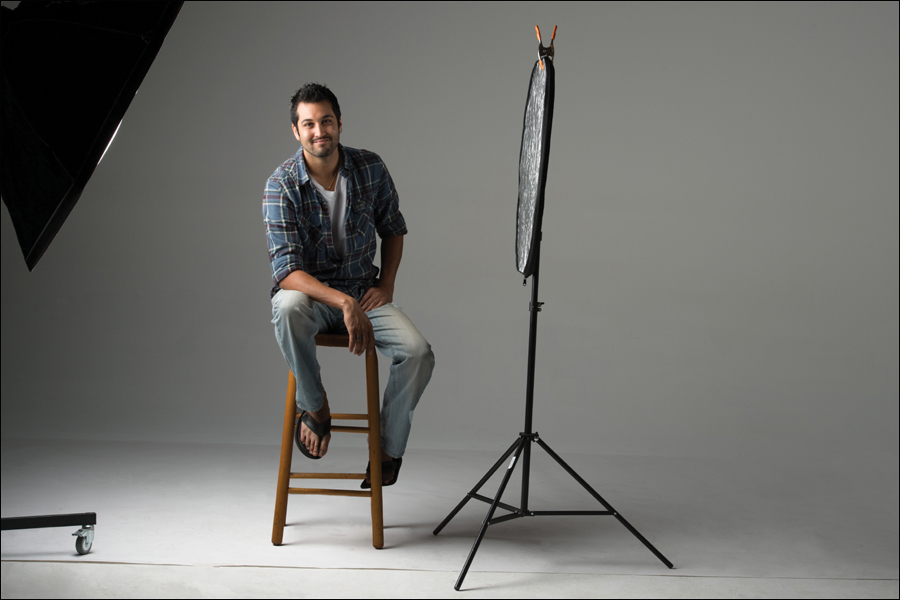
If you want to create a portrait with dramatic lighting, the key is to control where the light goes, so only a small portion of it actually hits your subject (and little or none winds up lighting the background). The problem is that even with a softbox (which is fairly directional compared to an umbrella), the light aiming back at your subject can spread too much, so we use black “flags” to block the light from hitting our background (or anything else we don’t want it to hit). These flags are really just tall, or wide, black rectangular reflectors that absorb and block light, so you put one between your strobe (softbox) and the background, and voilá—it stops the light from spilling (as shown above). So, if you have more than one, you can really keep your light pretty much directed just where you want it by putting these black flags up to block any extra light. I use two Mathews 24×36″ black flags (around $42 each). If you’re not ready to plunk down that kind of change, you could always get two large black pieces of poster board or foam core, and that will do the trick.
Three Backgrounds for the Price of One
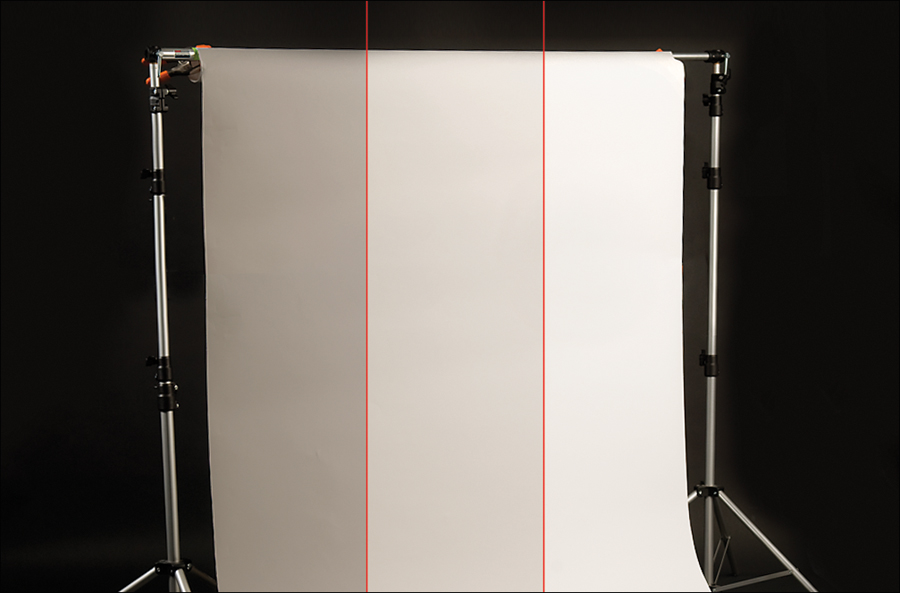
One of the advantages of shooting on a white background is that you can get three different looks from it, depending on how you light it. For example, if you put two bright strobes (or continuous lights, for that matter) aiming at the background behind your subject (or product), the background will look bright white. If you dim those lights, or remove one, then the background looks like a light gray. If you leave the background lights off altogether, your white background will now look medium gray. So, with white you get three separate looks: bright white, light gray, and medium gray—all based on whether, and how, you light the background.
Using Off-Camera Flash to Light Backgrounds
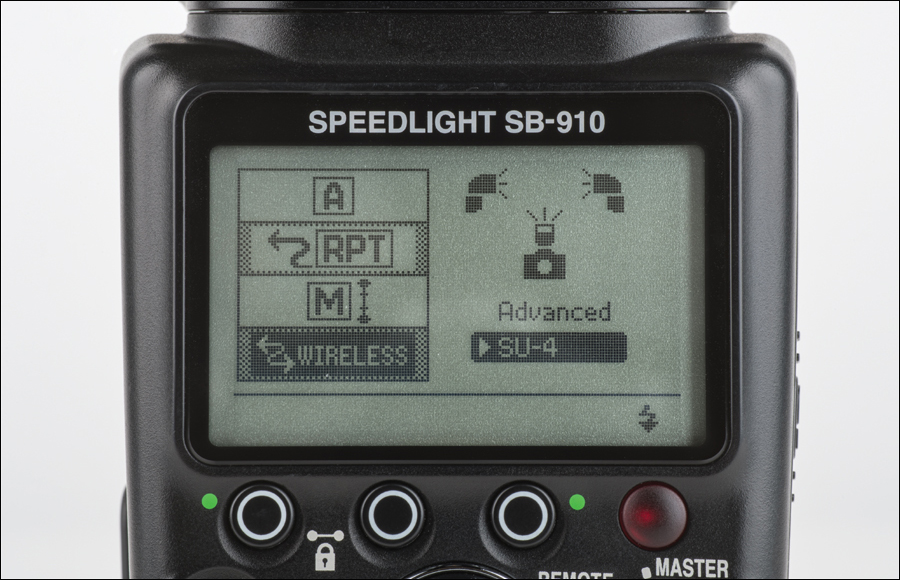
If you want to add a light to your background (aiming back at your seamless paper), but you don’t want to go through the extra expense of adding a second studio strobe, if you have a standard off-camera flash (like a Nikon SB-910 or a Canon 600EX-RT), you’re in luck. You can set either of these off-camera flashes to become wireless slave flashes, meaning that when your studio strobe fires to light your subject, it automatically triggers your off-camera flash to light your background. You only have to do two things to make this happen: (1) Put your flash on a light stand. (Note: If you have a Nikon SB-910 flash, it actually comes with wonderful little flash stand that lets you set your flash on the floor. Then you aim the head back up at your background, and this will work in a pinch.) So, the first thing (once again) is to put your flash on a light stand, and position it directly behind your subject so your subject’s body hides the flash from view. Then, (2) set your off-camera flash to Slave, so it fires when it senses the light from your studio strobe. For example, on a Nikon SB-910, turn the ON/OFF switch to Remote, press the Menu button, scroll down to Wireless, and then choose SU-4 (as shown above). Press the OK button, then press the Menu button, and you’re ready to go.
The Advantage of Shooting Tethered
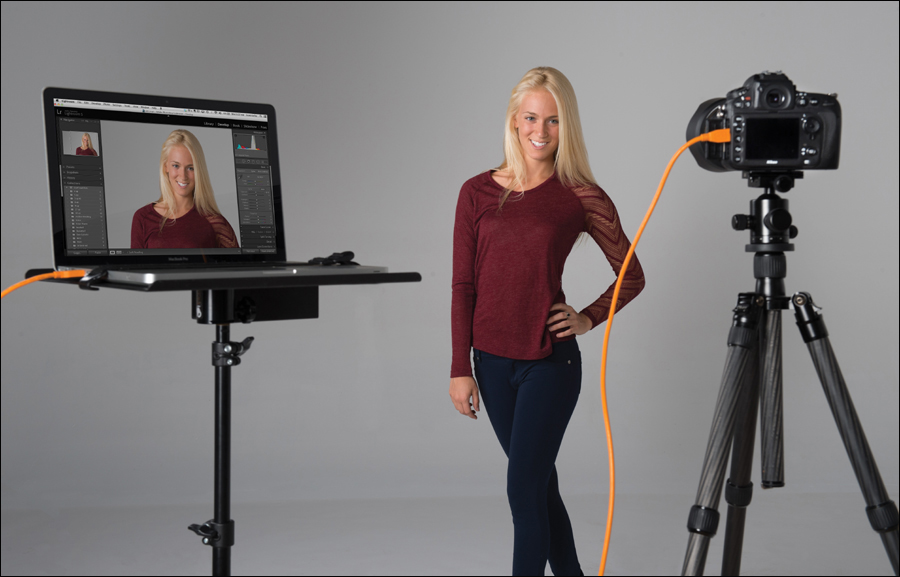
You know that tiny LCD screen on the back of your camera? Yeah, that one. That little screen is what we use to make critical decisions about our photography (like “is this photo really tack sharp” or “are my subject’s eyes both open”), but that screen (usually either 2½″ or 3″ in size) is actually smaller than the screen on our cell phones. I know—crazy, right? No wonder we misjudge sharpness and quality so often—that screen is absolutely tiny. That’s why, if I’m shooting in a studio, I shoot tethered directly into my computer, so that way I see each image really large (at least at 8×10″ size on my laptop, or larger on my desktop monitor) right as I take it. At this larger size, you can really see what’s going on in your photo (and how your lighting looks), and you can make adjustments based on a much larger-sized image, which makes it hard to look at that tiny 2½″ or 3″ LCD display anymore. Tethering itself is actually very simple, just two steps: (1) Connect a USB cable from your camera’s mini-USB port to your computer’s USB port. (2) Now, you just need some tethering software. Luckily, Adobe’s Photoshop Lightroom and Apple’s Aperture already have tethering built right in. If you don’t have Lightroom or Aperture and you’re a Canon shooter, you already have the software you’ll need—it’s that EOS Utility software you got when you bought your camera (if you can’t find it, you can download it for free from Canon’s website). If you’re a Nikon shooter on a Mac, go to www.sofortbildapp.com and download their excellent free tethering software. If you’re a Nikon shooter on Windows, go to ControlMyNikon.com. If you’re a Sony Alpha-series DLSR Shooter, you can use Sony’s free Sony Camera Remote Control software.
Getting Super-Saturated Background Color
If you want some really vivid, punchy colors as your background, here’s a recipe to get just that: Start on a background of black seamless paper (I know, it sounds weird that we start creating vivid colors with a black background, but believe it or not, this is the easiest way), and then position a light on the background. Now, for a background light you can use another one of the same strobes you already have (so, basically, you’re going to need a second strobe if you want to light the background, or there’s the trick you can pull to use your off-camera flash as a background light that we talked about a couple pages ago). Once you’ve got your black seamless paper in place and a second strobe (or off-camera flash) positioned behind your subject, aiming at the background, the trick is to put a vivid-colored gel (a translucent piece of plastic) over the front of your flash, and when your background flash fires, the color it produces is rich, vivid, and surprisingly colorful. You can get these gels (made by Lee or Rosco) from B&H Photo for around $6.50 for a 20×24″ sheet (choose really vivid colors—reds, yellows, greens, etc.).
Lighting a White Background
When you shoot on a white seamless-paper background, you’ll probably be surprised to find out that most of the time it doesn’t look white—it looks light gray. To get it to look solid white (that nice bright white you’re used to seeing in portraits and product shots), you have to light the background. It doesn’t take a bunch of lights—usually just one or two will do the trick, and they don’t have to be very high-powered strobes either (see the off-camera trick a few pages back), so it’s not a bad idea to buy a lower-powered, less expensive strobe just for lighting the background. But beyond just having a background light aimed at your white seamless background, there’s a little trick you’ll want to use to make sure that the light does make the background look that nice solid white, but without blowing out the background so much that the back light starts to wash out the edges of your subject (this happens more than you might think). The pros’ trick to getting around this is (you guessed it) to use their light meter. They hold the meter up against the background, aim the white dome back toward the camera position, and check the reading. You want the background to be around one stop brighter than the light on your subject. So if your meter showed f/11 for your subject, you want the background to read one stop brighter (like f/16). You get that background brighter by increasing the power (brightness) of the strobe itself. Try increasing a bit, then recheck the background with your meter again, and keep adjusting the power of the background light until it reads that one stop (or slightly more) than your subject. That’s the formula.
Which Color Reflector to Use
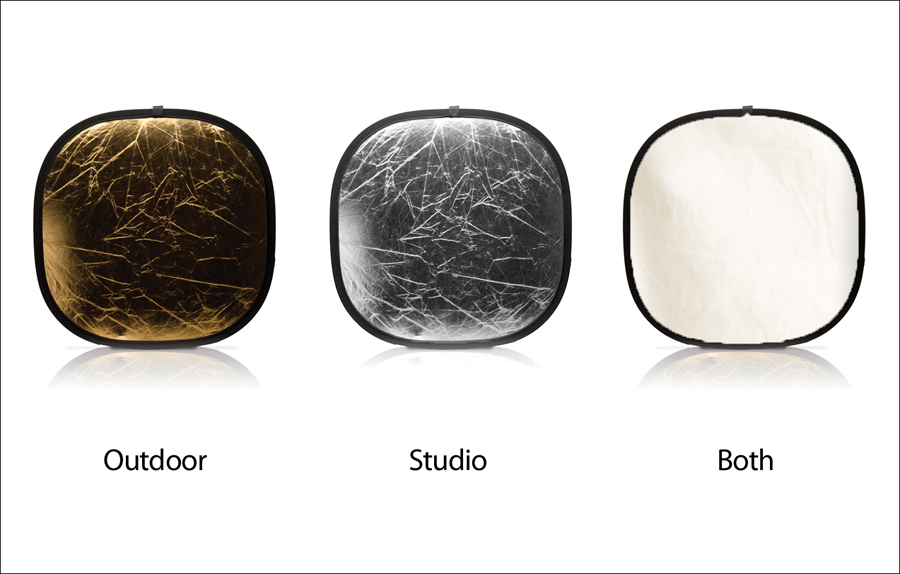
Reflectors come in a variety of colors (white, black, silver, gold, etc.), and if you’re wondering which color does what, well, here ya go:
• Silver reflects the most amount of light, and doesn’t change the color of the studio light that hits it, so you see a lot of portrait pros using silver.
• White reflectors don’t bounce nearly as much light, but they’re still used in portraits because the reflected light is very soft and works both indoors and outdoors. White reflectors are also a good choice if you’re doing product photography.
• Gold reflectors are for outdoor portraits to match the warm color of sunlight. They don’t work well in a studio, because when the white light from your strobe hits the gold reflector, it becomes very yellow (so one side of your subject’s face looks studio white, and the shadow side looks overly yellow).
• A Black reflector actually absorbs light, so it’s used to cut reflections when you’re shooting anything that’s reflective, like glass, or jewelry, or tableware, or anything that’s clear, etc.
For my studio portraits, I use a reflector that is silver on one side and white on the other, and I use the silver side around 80% of the time.
Where to Position a Reflector
Reflectors are a key part of a studio setup, because they keep you from having to set up a second light. Luckily, they’re pretty inexpensive (the Westcott 30″ Silver/White square reflector I use costs only around $40), but once you’ve got one, where do you put it? A reflector’s job is to bounce some of the light from your main light (your flash) back into the shadowy areas of your subject, so you’ll need to position it where it can do its job, right? One popular method is to place the reflector directly beside your subject (on the opposite side from your studio flash), then move it a bit forward so it extends a little in front of the subject, so it catches the light and fills in the shadows. Make sure that: (1) it is indeed in front of them a bit, and not right beside them, and (2) it’s not positioned up higher than they are—it should be at their height. Another popular place to position a reflector for head shots is directly in front of your subject, usually right below your subject’s head and shoulders, so the light bounces back to lighten the shadows on their face—in particular, the areas under their eyes and neck. You can have your subject hold the reflector flat in front of them, or you can position it on a reflector stand, or even lay it on the floor in front of them. Another popular position is to place it out in front, where you’d place a second light (on the opposite side from your studio strobe), so it bounces light back toward your subject. The key thing to remember with reflectors is: if the light isn’t hitting the reflector fairly directly, it has nothing to bounce, so make sure that wherever you position it, the light from your strobe is hitting it directly.
Reflectors Without an Assistant
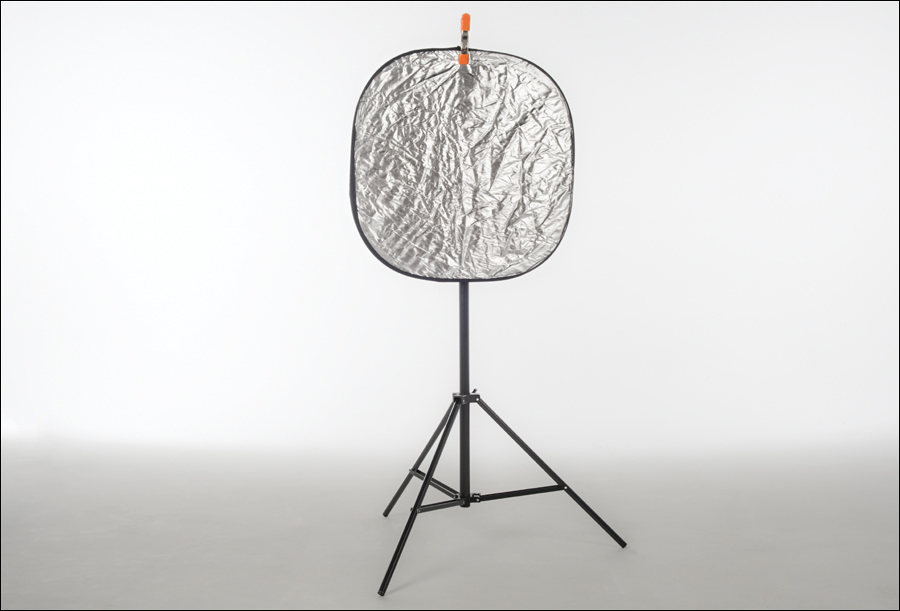
If you don’t have an assistant to hold your reflector in the studio, you just need an inexpensive light stand and a cheap clamp. The light stand I use for this is a 6′ model made by Impact (I got mine at B&H Photo for around $20), and it’s great for holding a pretty decent size reflector (like the Westcott 30″ 5-in-1 Reflector I mentioned in the Flash chapter). Then just attach the reflector to the light stand using a cheap 2″ Pony clamp, like the 2″ Adjustable Clamp Company Pony Spring “A” Clamp with Plastic Tips for around $3. This is incredibly handy to have around (and much less expensive than hiring an assistant to hold your reflector).
Visit B&H Photo’s New York Superstore
If you’re ever in New York City, make it a point to drop by the B&H Photo store. It is absolutely amazing. It’s like Disneyland for photographers. I could spend a day there (and I have). Anyway, they’re good people and are pretty much beloved throughout the photography community (and that’s saying something).
Seeing the Light from Your Reflector
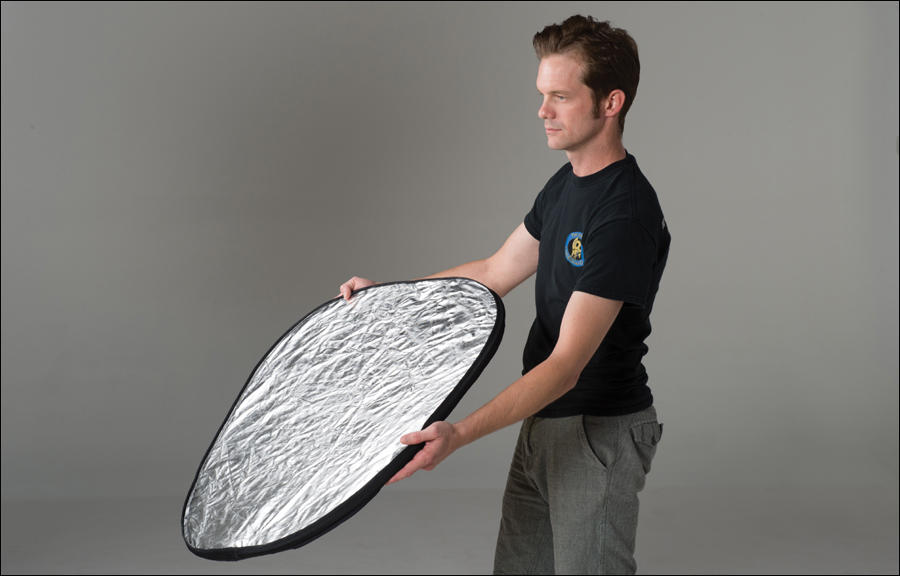
So, you’re standing there holding a reflector. How do you know if it’s really hitting your subject? Here’s a quick trick for helping you position the angle of your reflector so you know the light is hitting where you want it to. Hold the reflector by its side and tilt it up and down a few times as you’re facing your subject, and you’ll see the reflected light move across their face. By tilting the reflector up and down a few times, you’ll locate that “sweet spot”—where the light is hitting and fully bouncing from—and then you can tilt the reflector to right where you want it.
Where to go to Learn More about Studio Lighting
If this chapter gets you excited about what can be done with just one strobe (or one strobe and a hair light), and you want to learn more (and learn how and when to add more lights), then man did I write a book for you. It’s called Light It, Shoot It, Retouch It: Learn Step by Step How to Go from Empty Studio to Finished Image and I go through a number of lighting setups from scratch, but without using diagrams. Instead, I use real photos, taken overhead, and from the front, the sides, and in back, so you can actually see exactly where everything goes. You’ll totally dig it (but, of course, I would say that, right?). It’s published by Peachpit Press.