
Hypertext Markup Language (HTML) is the language for delivering content on the Web. HTML is not owned by anyone, but is the result of people working in many countries and many organizations to define the features of the language. An HTML document is a text document which you can produce using any text editor. HTML documents contain elements surrounded by tags—text that starts with a < symbol and ends with a > symbol. An example of a tag is <img src="home.gif"/>. This particular tag will display the image held in the file home.gif. These tags are the markup. It is through the use of tags that hyperlinks, images, and other media are included in web pages.
Basic HTML can include directives for formatting in a language called Cascading Style Sheets (CSS) and programs for interaction in a language called JavaScript. Browsers, such as Firefox and Chrome, interpret the HTML along with any CSS and JavaScript to produce what we experience when we visit a web site. HTML holds the content of the web site, with tags providing information on the nature and structure of the content as well as references to images and other media. CSS specifies the formatting. The same content can be formatted in different ways. JavaScript is a programming language that's used to make the web site dynamic and interactive. In all but the smallest working groups, different people may be responsible for the HTML, CSS, and JavaScript, but it's always a good idea to have a basic understanding of how these different tools work together. If you are already familiar with the basics of HTML and how CSS and JavaScript can be added together, you may want to skip ahead to the next chapter. Still, it may be worth casting your eye over the content in this chapter, to make sure you are up to speed on everything before we start on the first core examples.
The latest version of HTML (and its associated CSS and JavaScript) is HTML5. It is generating considerable excitement because of features such as the canvas for displaying pictures and animation; support for video and audio; and new tags for defining common document elements such as header, section, and footer. You can create a sophisticated, highly interactive web site with the new HTML5. As of this writing, not all browsers accept all the features, but you can get started learning HTML5, CSS, and JavaScript now. Learning JavaScript will introduce you to general programming concepts that will be beneficial if you try to learn any other programming language or if you work with programmers as part of a team.
The approach I'll use in this book is to explain HTML5, CSS, and JavaScript concepts in the context of specific examples, most of which will be familiar games. Along the way, I'll use small examples to demonstrate specific features. Hopefully, this will help you both understand what you want to do and appreciate how to do it. You will know where we are headed as I explain the concepts and details.
The task for this chapter is to build a web page of links to other web sites. In this way, you'll get a basic understanding of the structure of an HTML document, with a small amount of CSS code and JavaScript code. For this and other examples, please think of how to make the project meaningful to you. The page could be a list of your own projects, favorite sites, or sites on a particular topic. For each site, you'll see text and a hyperlink. The second example includes some extra formatting in the form of boxes around the text, pictures, and the day's date and time. Figure 1-1 and Figure 1-2 show the different examples I've created.

When you reload the Favorite Sites page, the date and time will change to the current date and time according to your computer.
The requirements for the list of links application are the very fundamental requirements for building a web page containing text, links, and images. For the example shown in Figure 1-1, each entry appears as a paragraph. In the example shown in Figure 1-2, in contrast, each entry has a box around it. The second example also includes images and a way to obtain the current day, date, and time. Later applications will require more discussion, but for this one we'll go straight to how to implement it using HTML, CSS, and JavaScript.
As I noted, HTML documents are text, so how do we specify links, pictures, formatting, and coding? The answer is in the markup, that is, the tags. Along with the HTML that defines the content, you'll typically find CSS styles, which can be specified either inside the HTML document or in an external document. You might also include JavaScript for interactivity, again specified in the HTML document or in an external document. We'll start with a look at how you can build simple HTML tags, and how you can add inline CSS and JavaScript all within the same document.
An HTML element begins with a starting tag, which is followed by the element content and an ending tag. The ending tag includes a / symbol followed by the element type, for example /head. Elements can be nested within elements. A standard HTML document looks like this:
<html>
<head>
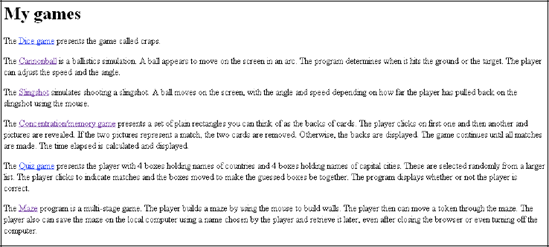
<title>Very simple example
</title>
</head>
<body>
This will appear as is.
</body>
</html>Note that I've indented the nested tags here to make them more obvious, but HTML itself ignores this indentation (or whitespace, as it's known), and you don't need to add it to your own files. In fact, for most of the examples throughout this book I won't be indenting my code.
This document consists of the html element, indicated by the starting tag <html> and ending with the closing tag: </html>.
HTML documents typically have a head and a body element, as this one has. This head element contains one element, title. The HTML title shows up different places in different browsers. Figure 1-3 shows the title, "Very Simple Example" at the top-left portion of the screen and also on a tab in Firefox.
In most cases, you will create something within the body of the web page that you'll think of as a title, but it won't be the HTML title! Figure 1-3 also shows the body of the web page: the short piece of text. Notice that the words html, head, title and body do not appear. The tags "told" the browser how to display the HTML document.
We can do much more with text, but let's go on to see how to get images to appear. This requires an img element. Unlike html, head, and body elements that use starting and ending tags, the img element just uses one tag. It is called a singleton tag. Its element type is img (not image) and you put all the information with the tag itself using what are termed attributes. What information? The most important item is the name of the file that holds the image. The tag
<img src="frog.jpg"/>
tells the browser to look for a file with the name frog and the file type jpg. In this case, the browser looks in the same directory or folder as the HTML file. You can also refer to image files in other places and I'll show this later. The src stands for source. It is termed an attribute of the element. The slash before the > indicates that this is a singleton tag. There are common attributes for different element types, but most element types have additional attributes. Another attribute for img elements is the width attribute.
<img src="frog.jpg" width="200"/>
This specifies that the image should be displayed with a width of 200 pixels. The height will be whatever is necessary to keep the image at its original aspect ratio. If you want specific widths and heights, even if that may distort the image, specify both width and height attributes.
Tip
You'll see examples (maybe even some of mine) in which the slash is omitted and which work just fine, but it is considered good practice to include it. Similarly, you'll see examples in which there are no quotation marks around the name of the file. HTML is more forgiving in terms of syntax (punctuation) than most other programming systems. Finally, you'll see HTML documents that start with a very fancy tag of type !DOCTYPE and have the HTML tag include other information. At this point, we don't need this so I will keep things as simple as I can (but no simpler, to quote Einstein).
Producing hyperlinks is similar to producing images. The type of element for a hyperlink is a and the important attribute is href.
<a href="http://faculty.purchase.edu/jeanine.meyer">Jeanine Meyer's Academic Activities </a>
As you can see, this element has a starting and ending tag. The content of the element, whatever is between the two tags—in this case, Jeanine Meyer's Academic Activities—is what shows up in blue and underlined. The starting tag begins with a. One way to remember this is to think of it as the most important element in HTML, so it uses the first letter of the alphabet. You can also think of an anchor, which is what the a actually stands for, but that isn't as meaningful for me. The href attribute (think hypertext reference) specifies the web site where the browser goes when the hyperlink is clicked. Notice that this is a full Web address (called a Universal Resource Locator, or URL, for short).
We can combine a hyperlink element with an img element to produce a picture on the screen that a user can click on. Remember that elements can be nested within other elements. Instead of putting text after the starting <a> tag, put an <img> tag:
<a href="http://faculty.purchase.edu/jeanine">
<img src="jhome.gif" width="100" />
</a>
Let's put these examples together now:
<html> <head> <title>Second example </title> </head> <body> This will appear as is. <img src="frog.jpg"/> <img src="frog.jpg" width="200"/> <a href=http://faculty.purchase.edu/jeanine.meyer>Jeanine Meyer's AcademicActivities </a> <a href=http://faculty.purchase.edu/jeanine.meyer><img src="jhome.gif"/></a> </body> </html>
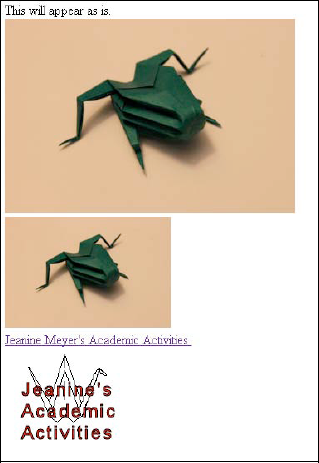
I created the HTML file, saved it as second.html, and then opened it up in the Chrome browser. Figure 1-4 shows what is displayed.
This produces the text; the image in its original width and height; the image with the width fixed at 200 pixels and height proportional; a hyperlink that will take you to my web page (I promise); and another link that uses an image that will also take you to my web page. However, this isn't quite what I had in mind. I wanted these elements spaced down the page.
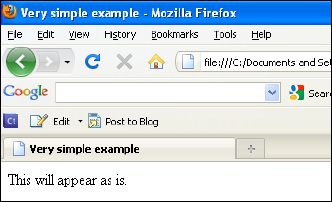
This demonstrates something you need to remember: HTML ignores line breaks and other white space. If you want a line break, you have to specify it. One way is to use the br singleton tag. I'll show other ways later. Take a look at the following modified code. Notice that the <br/> tags don't need to be on a line by themselves.
<head> <title>Second example </title> <body> This will appear as is. <br/> <img src="frog.jpg"/> <br/> <img src="frog.jpg" width="200"/> <br/> <a href=http://faculty.purchase.edu/jeanine.meyer>Jeanine Meyer's AcademicActivities </a> <br/> <a href=http://faculty.purchase.edu/jeanine.meyer><img src="jhome.gif"/></a> </body> </html>
Figure 1-5 shows what this code produces.
There are many HTML element types: the h1 through h6 heading elements produce text of different sizes; there are various elements for lists and tables, and others for forms. CSS, as we'll see in a moment, is also used for formatting. You can select different fonts, background colors, and colors for the text, and control the layout of the document. It's considered good practice to put formatting in CSS, interactivity in JavaScript, and keep the HTML for the content. HTML5 provides new structural elements, such as article, section, footer, and header, and this makes it even easier to put the formatting in CSS. Doing this lets you easily change the formatting and the interactions. Formatting, including document layout, is a large topic. In this book, I stick to the basics.
CSS is a special language just for formatting. A style is essentially a rule that specifies how a particular element will be formatted. This means you can put style information in a variety of places: a separate file, a style element located in the head element, or a style within the HTML document, perhaps within the one element you want to format in a particular way. The styling information cascades, trickles down, unless a different style is specified. To put it another way, the style closest to the element is the one that's used. For example, you might use your official company fonts as given in the style section in the head element to flow through most of the text, but include specification within the local element to style one particular piece of text. Because that style is closest to the element, it is the one that is used.
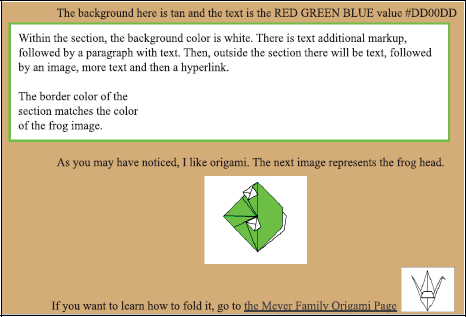
The basic format includes an indicator of what is to be formatted followed by one or more directives. In the application for this chapter (available at www.friendsofed.com/downloads.html), I'll specify the formatting for elements of type section, namely a border or box around each item, margins, padding, and alignment, and a background of white. The complete HTML document in Listing 1-1 is a mixture (some would say a mess!) of features. The elements body and p (paragraph) are part of the original version of HTML. The section element is one of the new element types added in HTML5. The section element does need formatting, unlike body and p, which have default formatting that the body and each p element will start on a new line. CSS can modify the formatting of old and new element types. Notice that the background color for the text in the section is different from the background color for the text outside the section.
In the code in Listing 1-1, I specify styles for the body element (there is just one) and the section element If I had more than one section element, the styling would apply to each of them. The style for the body specifies a background color and a color for the text. CSS accepts a set of 16 colors by name, including black, white, red, blue, green, cyan, and pink. You can also specify color using RGB (red green blue) hexadecimal codes, but you'll need to use a graphics program, such as Adobe Photoshop, Corel Paint Shop Pro, or Adobe Flash Professional to figure out the RGB values, or you can experiment. I used Paint Shop Pro to determine the RGB values for the green in the frog head picture and used that for the border as well.
The text-align directives are just what they sound like: they indicate whether to center the material or align it to the left. The font-size sets the size of text in pixels. Borders are tricky and don't appear to be consistent across browsers. Here I've specified a solid green border of 4 pixels. The width specification for section indicates that the browser should use 85 percent of the window, whatever that is. The specification for p sets the width of the paragraph at 250 pixels. Padding refers to the spacing between the text and the borders of the section. The margin is the spacing between the section and its surroundings.
Example 1.1. A Complete HTML Document with Styles
<html>
<head>
<title>CSS example </title>
<style>
body {
        background-color:tan;
color: #EE015;
text-align:center;
font-size:22px;
}
section {
width:85%;
border:4px #00FF63 solid;
text-align:left;
padding:5px;
margin:10px;
background-color: white;
}
p {
width: 250px;
}
</style>
</head>
<body>
The background here is tan and the text is the totally arbitrary RED GREEN BLUE value #EE015. <br/>
<section>Within the section, the background color is white. There is text with
additional HTML markup, followed by a paragraph with text. Then, outside the
section there will be text, followed by an image, more text and then a
hyperlink. <p>The border color of the section matches the color of the
frog image. </p></section>
<br/>
As you may have noticed, I like origami. The next image represents a frog head.<br/>
<img src="frogface.gif"/> <br/>If you want to learn how to fold it, go to
<a href=http://faculty.purchase.edu/jeanine.meyer/origami>the Meyer Family
Origami Page <img src="crane.png" width="100"/></a>
</body>
</html>
value #EE015. <br/>
<section>Within the section, the background color is white. There is text with
additional HTML markup, followed by a paragraph with text. Then, outside the
section there will be text, followed by an image, more text and then a
hyperlink. <p>The border color of the section matches the color of the
frog image. </p></section>
<br/>
As you may have noticed, I like origami. The next image represents a frog head.<br/>
<img src="frogface.gif"/> <br/>If you want to learn how to fold it, go to
<a href=http://faculty.purchase.edu/jeanine.meyer/origami>the Meyer Family
Origami Page <img src="crane.png" width="100"/></a>
</body>
</html>This produces the screen shown in Figure 1-6.
Tip
Don't be concerned if you don't understand everything immediately—you'll find lots of help on the Web. In particular, see the official source for HTML 5 at http://dev.w3.org/html5/spec/Overview.html.
There are many things you can do with CSS. You can use it to specify formatting for types of elements, as shown above; you can specify that elements are part of a class; and you can identify individual elements using the id attribute. In Chapter 6 where we create a quiz, I use CSS to position specific elements in the window and then JavaScript to move them around.
JavaScript is a programming language with built-in features for accessing parts of an HTML document, including styles in the CSS element. It is termed a scripting language to distinguish it from compiled languages, such as C++. Compiled languages are translated all at once, prior to use, while scripting languages are interpreted line by line by browsers. This text assumes no prior programming experience or knowledge of JavaScript, but it may help to consult other books, such as Getting Started with JavaScript, by Terry McNavage (friends of ED, 2010), or online sources such as http://en.wikipedia.org/wiki/JavaScript. Each browser owns its version of JavaScript.
An HTML document holds JavaScript in a script element, located in the head element. To display the time and date information as shown in Figure 1-2, I put the following within the head element of the HTML document:
<script>
document.write(Date());
</script>
JavaScript, like other programming languages, is made up of statements of various types. In later chapters, I'll show you assignment statements, compound statements such as if and switch and for statements, and statements that create what are called programmer-defined functions. A function is one or more statements that work together in a block and can be called anytime you need that functionality. Functions save writing out the same code over and over. JavaScript supplies many built-in functions. Certain functions are associated with objects (more on this later) and are called methods. The code
document.write("hello");is a JavaScript statement that invokes the write method of the document object with the argument "hello". An argument is additional information passed to a function or method. Statements are terminated by semicolons. This piece of code will write out the literal string of characters h, e, l, l, o as part of the HTML document.
The document.write method writes out anything within the parentheses. Since I wanted the information written out to change as the date and time change, I needed a way to access the current date and time, so I used the built-in JavaScript Date function. This function produces an object with the date and time. Later, you'll see how to use Date objects to compute how long it takes for a player to complete a game. For now, all I want to do is display the current date and time information, and that's just what the code
document.write(Date());
does. To use the formal language of programming: this code calls (invokes) the write method of the document object, a built-in piece of code. The period (.) indicates that the write to be invoked is a method associated with the document produced by the HTML file. So, something is written out as part of the HTML document. What is written out? Whatever is between the opening parenthesis and the closing parenthesis. And what is that? It is the result of the call to the built-in function Date. The Date function gets information maintained by the local computer and hands it off to the write method. Date also requires the use of parentheses, which is why you see so many. The write method displays the date and time information as part of the HTML document, as shown in Figure 1-2. The way these constructs are combined is typical of programming languages. The statement ends with a semi-colon. Why not a period? A period has other uses in JavaScript, such as indicating methods and also for decimal points for numbers.
Natural languages, such as English, and programming languages have much in common: different types of statements; punctuation using certain symbols; and a grammar for the correct positioning of elements. In programming, we use the term notation instead of punctuation, and syntax instead of grammar. Both programming languages and natural languages also let you build up quite complex statements out of separate parts. However, there is a fundamental difference: As I tell my students, chances are good that much of what I say in class is not grammatically correct, but they'll still understand me. But when you're "talking" to a computer via a programming language, your code must be perfect in terms of the grammatical rules of the language to get what you want. The good news is that unlike a human audience, computers do not exhibit impatience or any other human emotion so you can take the time you need to get things right. There's also some bad news that may take you a while to appreciate: If you make a mistake in grammar—termed a syntactic error—in HTML, CSS, or JavaScript, the browser still tries to display something. It's up to you figure out what and where the problem is when you don't get the results you wanted in your work.
You build an HTML document using a text editor and you view/test/play the document using a browser. Though you can use any text editor program to write the HTML, I suggest TextPad for PCs and TextWrangler for Macs. These are shareware, which makes them relatively inexpensive. Don't use a word processing program, which may insert non-text characters. Notepad also works, though TextPad has benefits such as color-coding that I'll demonstrate. To use the editor, you open it up and type in the code. Figure 1-7 shows what the TextPad screen looks like.

You will want to save your work frequently and, most important, save it as the file type .html. In TextPad, click on File
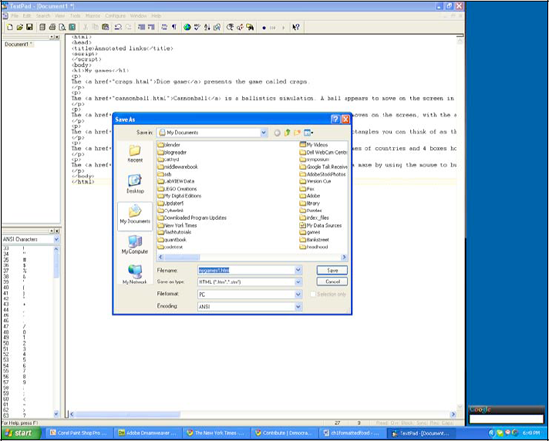
Notice that I gave the file a name and that I can also change the folder from My Documents to something else if I want. After saving the file, and clicking on Configure
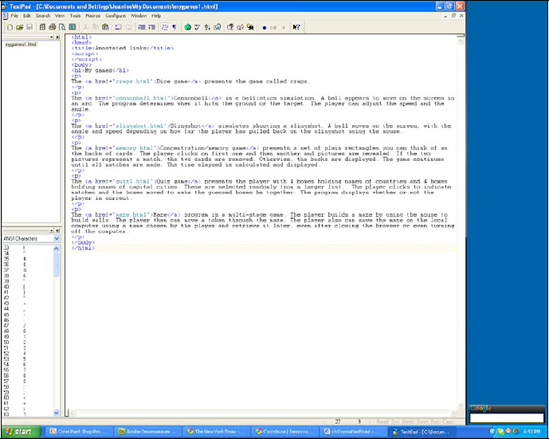
The color coding, which you'll see only after the file is saved as HTML, indicates tags and quoted strings. This can be valuable for catching many errors.
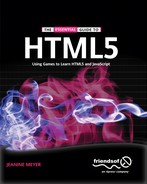
Now let's delve into the HTML coding, first for the list of annotated links and then for the favorite sites. The code uses the features described in the previous section. Table 1-1 shows the complete code for this application: paragraphs of text with links to different files, all located in the same folder.
Table 1.1. The "My games" Annotated Links Code
Code | Explanation |
|---|---|
<html> | Opening |
<head> | Opening |
<title>Annotated links</title> | Opening |
<body> | Opening |
<h1>My games</h1> | Opening |
<p> | Opening |
The <a href="craps.html">Dice game</a> presents the game called craps. | Text with an |
</p> | Closing |
<p> | Opening |
The <a href="cannonball.html">Cannonball</a> is a ballistics simulation. A ball appears to move on the screen in an arc. The program determines when the ball hits the ground or the target. The player can adjust the speed and the angle. | See the previous case. The |
</p> | Closing |
<p> | Opening |
The <a href="slingshot.html">Slingshot</a> simulates shooting a slingshot. A ball moves on the screen, with the angle and speed depending on how far the player has pulled back on the slingshot using the mouse. | See previous. This paragraph contains the hyperlink to slingshot.html. |
</p> | Closing |
<p> | Opening |
The <a href="memory.html">Concentration/memory game</a> presents a set of plain rectangles you can think of as the backs of cards. The player clicks on first one and then another and pictures are revealed. If the two pictures represent a match, the two cards are removed. Otherwise, the backs are displayed. The game continues until all matches are made. The time elapsed is calculated and displayed. | See previous. This paragraph contains the hyperlink to memory.html. |
</p> | Closing |
<p> | Opening |
The <a href="quiz1.html">Quiz game</a> presents the player with 4 boxes holding names of countries and 4 boxes holding names of capital cities. These are selected randomly from a larger list. The player clicks to indicate matches and the boxes are moved to put the guessed boxes together. The program displays whether or not the player is correct. | See previous. This paragraph contains the hyperlink to quiz1.html |
</p> | Closing |
<p> | Opening |
The <a href="maze.html">Maze</a> program is a multi-stage game. The player builds a maze by using the mouse to build walls. The player then can move a token through the maze. The player can also save the maze on the local computer using a name chosen by the player and retrieve it later, even after closing the browser or turning off the computer. | See previous. This paragraph contains the hyperlink to maze.html. |
</p> | Closing |
</body> | Closing |
</html> | Closing |
The Favorite Site code has the features of the annotated list with the addition of formatting: a green box around each item and a picture in each item. See Table 1-2.
Table 1.2. The Favorites Sites Code
It is pretty straightforward how to make this application your own: use your own favorite sites. In most browsers, you can download and save image files if you want to use a site logo for the hyperlink, or you can include other pictures. It is my understanding that making a list of sites with comments and including images such as logos is within the practice called "fair use," but I am not a lawyer. For the most part, people like links to their sites. It doesn't affect the legal question, but you can also choose to set the src in the img tag to the Web address of the site where the image lives if you'd rather not download a particular image file to your computer and then upload it to your web site.
Web addresses can be absolute or relative. An absolute address starts with http://. A relative address is relative to the location of the HTML file. In my example, the postcard.jpg and the friendsofed.gif are both located in the same folder as my HTML file. They are there because I put them there! For large projects, many people put all the images in a subfolder called images and write addresses as "images/postcard.gif".
You also can make this application your own by changing the formatting. Styles can be used to specify fonts, including specific font, font family, and size. This lets you pick a favorite font, and also specify what font to use if the preferred font is not available on the user's computer. You can specify the margin and padding or vary independently the margin-top, margin-left, padding-top, and so forth.
You need to have all the files, in this case the single HTML file plus all image files, in the same folder unless you are using full Web addresses. For the links to work, you need to have the correct addresses for all href attributes. My examples show how to do this for HTML files in the same folder or for HTML files somewhere else on the Web.
You can start testing your work even if it is not completely done. For example, you can put in a single img element or a single a element. Open up a browser, such as Firefox, Chrome, or Safari (I didn't mention Internet Explorer because it does not yet support some of the HTML5 features I'll be using in other tutorials, though support is coming in IE9). In Firefox, click on File and then Open file and browse to your HTML file. In Chrome, press Ctrl on the PC (CMD on the MAC) and o and then browse to the file and click OK to open it. You should see something like my examples. Click on the hyperlinks to get to the other sites. Reload the page using the reload icon for the browser and observe the different time. If you don't see what you expect—something like my examples—you need to examine your code. Common mistakes are
wrong name for image files or HTML files, or wrong file extension for the image files. You can use image files of type JPG, GIF, or PNG but the file extension named in the tag must match the actual file type of the image.
missing quotation marks. The color coding, as available in TextPad and some other editors, can help you identify this.
In this chapter, you learned how to compose HTML documents with text, images, and hyperlinks. This included
the basic tags, including
html, head, title, style, script, body.the
imgelement for displaying images.the
aelement for hyperlinks.simple formatting using a style element written following Cascading Style Sheet (CSS) rules.
a single line of JavaScript code to provide date and time information.
This chapter was just the beginning, though it's possible to produce beautiful and informative web pages using basic HTML, with or without Cascading Style Sheets. In the next chapter, you will learn how to include randomness and interactivity in an application, and how to use the canvas element, the critical feature of HTML5.