

Among the most important new features in HTML5 is the canvas. This element provides a way for developers to make line drawings, include images, and position text in a totally free-form fashion, a significant improvement over the older HTML. Although you could do some fancy formatting in the earlier versions, layouts tended to be boxy and pages less dynamic. How do you draw on the canvas? You use a scripting language, usually JavaScript. I will show you how to draw on canvas and I'll explain the important features of JavaScript that we'll need to build an implementation of the dice game called craps: how to define a function, how to invoke what is termed pseudo-random behavior, how to implement the logic of this particular game, and how to display information to a player. Before we go any further, though, you need to understand the basics of the game.
The game of craps has the following rules:
The player throws a pair of dice. The sum of the two top faces is what matters so a 1 and a 3 is the same as 2 and 2. The sum of two 6-sided dice can be any number from 2 to 12. If the player throws a 7 or 11 on the first throw, the player wins. If the player throws a 2, 3, or 12, the player loses. For any other result (4, 5, 6, 8, 9, 10), this result is recorded as what is called the player's point and a follow-up throw is required. On follow-up throws, a throw of 7 loses and a throw of the player's point wins. For anything else, the game continues with the follow-up throw rules.
Let's see what our game play might look like. Figure 2-1 shows the result of a throw of two ones at the start of the game.
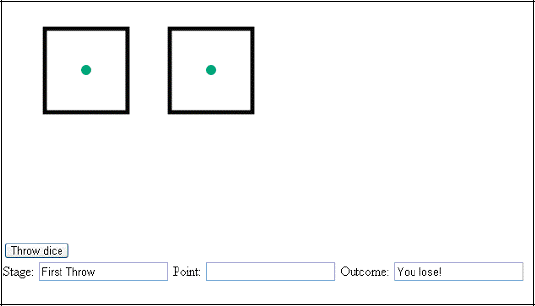
It is not apparent here, but our dice game application draws the die faces each time using the canvas tag. This means it's not necessary to download images of individual die faces.
A throw of two 1s means a loss for the player since the rules define 2, 3, or 12 on a first throw as a loss. The next example shows a win for the player, a 7 on a first throw, as shown in Figure 2-2.
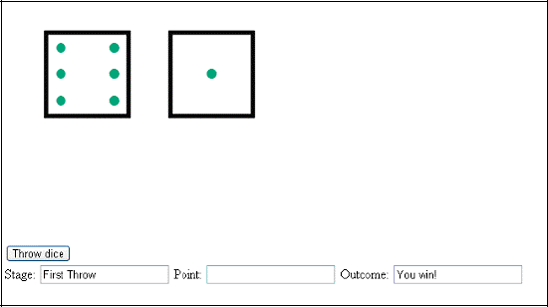
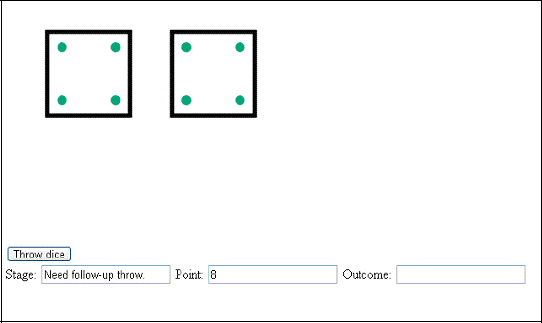
Figure 2-3 shows the next throw—an 8. This is neither a win nor a loss, but means there must be a follow-up throw.
Let's assume that the player eventually throws an 8 again, as indicated in Figure 2-4.
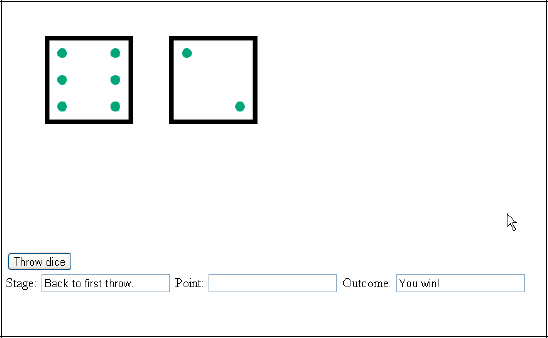
As the previous sequence shows, the only thing that counts is the sum of the values on the faces of the dice. The point value was set with two 4s, but the game was won with a 2 and a 6.
The rules indicate that a game will not always take the same number of throws of the dice. The player can win or lose on the first throw, or there may be any number of follow-up throws. It is the game builder's job is to build a game that works—and working means following the rules, even if that means play goes on and on. My students sometimes act as if their games only work if they win. In a correct implementation of the game, players will win and lose.
The requirements for building the dice game begin with simulating the random throwing of dice. At first, this seems impossible since programming means specifying exactly what the computer will do. Luckily, JavaScript, like most other programming languages, has a built-in facility that produces results that appear to be random. Sometimes languages make use of the middle bits (1s and 0s) of a very long string of bits representing the time in milliseconds. The exact method isn't important to us. We will assume that the JavaScript furnished by the browser does an okay job with this, which is called pseudo-random processing.
Assuming now that we can randomly get any number from 1 to 6 and do it twice for the two die faces, we need to implement the rules of the game. This means we need a way to keep track of whether we are at a first throw or a follow-up throw. The formal name for this is the application state, which means the way things are right now, and is important in both games and other types of applications. Then we need to use constructs that make decisions based on conditions. Conditional constructs such as if and switch are a standard part of programming languages, and you'll soon understand why computer science teachers like me—who have never been in a casino or a back alley—really like the game of craps.
We need to give the player a way to throw the dice, so we'll implement a button on the screen to click for that. Then we need to provide information back to the player on what happened. For this application, I produced graphical feedback by drawing dice faces on the screen and also displayed information as text to indicate the stage of the game, the point value, and the result. The older term for interactions with users was input-output (I/O), back when that interaction mainly involved text. The term graphical user interface (GUI) is now commonly used to indicate the vast variety of ways that users interact with computer systems. These include using the mouse to click on a specific point on the screen or combining clicks with dragging to simulate the effect of moving an object (see the slingshot game in Chapter 4). Drawing on the screen requires the use of a coordinate system to specify points. Coordinate systems for the computer screen are implemented in similar ways in most programming languages, as I'll explain shortly.
Let's now take a look at the specific features of HTML5, CSS, and JavaScript that provide what we need to implement the craps game.
Pseudo-random processing in JavaScript is performed using a built-in method called Math.random. Formally, random is a method of the Math class. The Math.random method generates a number from 0 up to, but not including 1, resulting in a decimal number, for example, 0.253012. This may not seem immediately useful for us, but it's actually a very simple process to convert that number into one we can use. We multiply that number, whatever it is, by 6, which produces a number from 0 up to but not including 6. For example, if we multiply the .253012 by 6 we get 1.518072. That's almost what we need, but not quite. The next step is to strip away the fraction and keep the whole number. To do that, we make use of another Math method, Math.floor. This method produces a whole number after removing any fractional part. As the name suggests, the floor method rounds down. In our particular case, we started with .253012, then arrived at 1.518072, so the result is the whole number 1. In general, when we multiply our random number by 6 and floor it, we'll get a number from 0 to 5. The final step is to add a 1, because our goal is to get a number from 1 to 6, over and over again, with no particular pattern.
You can use a similar approach to get whole numbers in any range. For example, if you want the numbers 1 to 13, you'd multiply the random number by 13 and then add 1. This could be useful for a card game. You'll see similar examples throughout this book.
We can combine all of these steps together into what is called an expression. Expressions are combinations of constants, methods, and function calls, and some things we'll explore later. We put these items together using operators, such as + for addition and * for multiplication.
Remember from Chapter 1 how tags can be combined—nesting a tag within another tag—and the one line of JavaScript code we used in the Favorite Sites application:
document.write(Date());
We can use a similar process here. Instead of having to write the random call and then the floor method as separate statements, we can pass the random call as an argument of the floor method. Take a look at this code fragment:
1+Math.floor(Math.random()*6)
This expression will produce a number from 1 to 6. I call it a code fragment because it isn't quite a statement. The operators + and * refer to the arithmetic operations and are the same as you'd use in normal math. The order of operations starts from the inside and works out.
Invoke
Math.random()to get a decimal number from 0 up to, but not quite 1.Multiply the result by 6.
Take that and strip away the fraction, leaving the whole number, using
Math.floor.Add 1.
You'll see a statement with this expression in our final code, but we need to cover a few other things first.
Like other programming languages, JavaScript has a construct called a variable, which is essentially a place to put a value, such as a number. It is a way of associating a name with a value. You can use the value later by referencing the name. One analogy is to office holders. In the USA, we speak of "the president." Now, in 2010, the president is Barack Obama. Before January 21, 2009, it was George W. Bush. The value held by the term "the president" changes. In programming, the value of the variable can vary as well, hence the name.
The term var is used to declare a variable.
The names of variables and functions, described in the next section, are up to the programmer. There are rules: no internal blanks and the name must start with an alphabetic character. Don't make the names too long as you don't want to type too much, but don't make them so short you forget what they are. You do need to be consistent, but you don't need to obey the rules of English spelling. For example, if you want to set up a variable to hold the sum of values and you believe that sum is spelled som, that's fine. Just make sure you use som all the time. But if you want to refer to something that's a part of JavaScript, such as function or document or random, you need to use the spelling that JavaScript expects.
You should avoid using the names of built-in constructs in JavaScript (such as random or floor) for your variables. Try to make the names unique, but still easily understandable. One common method of writing variable names is to use what's called camel case. This involves starting your variable name in lower case, then using a capital letter to denote when a new word starts, for example, numberOfTurns or userFirstThrow. You can see why it's called camel case—the capitals form "humps" in the word. You don't have to use this naming method, but it's a convention many programmers follow.
The line of code that will hold the pseudo-random expression explained in the previous section is a particular type of statement called an assignment statement. For example,
var ch = 1+Math.floor(Math.random()*);
sets the variable named ch to the value that is the result of the expression on the right-hand side of the equal sign. When used in a var statement, it also would be termed an initialization statement. The = symbol is used for setting initial values for variables as in this situation and in the assignment statements to be described next. I chose to use the name ch as shorthand for choice. This is meaningful for me. In general, though, if you need to choose between a short name and a longer one that you will remember, pick the longer one! Notice that the statement ends with a semi-colon. You may ask, why not a period? The answer is that a period is used in two other situations: as a decimal point and for accessing methods and properties of objects, as in document.write.
Assignment statements are the most common type of statements in programming. Here's an example of an assignment statement for a variable already defined:
bookname = "The Essential Guide to HTML5";
The use of the equal sign may be confusing. Think of it as making it true that the left-hand side equals what's produced by the right-hand side. You'll encounter many other variables and other uses of operators and assignment statements in this book.
Warning
The var statement defining a variable is called a declaration statement. JavaScript, unlike many other languages, allows programmers to omit declaration statements and just start to use a variable. I try to avoid doing that, but you will see it in many online examples.
For the game of craps, we need variables that define the state of the game, namely whether it is a first throw or a follow-up throw, and what the player's point is (remember that the point is the value of the previous throw). In our implementation, these values will be held by so-called global variables, variables defined with var statements outside of any function definition so as to retain their value (the values of variables declared inside of functions disappear when the function stops executing).
You don't always need to use variables. For example, the first application we create here sets up variables to hold the horizontal and vertical position of the dice. I could have put literal numbers in the code because I don't change these numbers, but since I refer to these values in several different places, storing the values in variables mean that if I want to change one or both, I only need to make the change in one place.
JavaScript has many built-in functions and methods, but it doesn't have everything you might need. For example, as far as I know, it does not have functions specifically for simulating the throwing of dice. So JavaScript lets us define and use our own functions. These functions can take arguments, like the Math.floor method, or not, like Math.random. Arguments are values that may be passed to the function. Think of them as extra information. The format for a function definition is the term function followed by the name you want to give the function, followed by parentheses holding the names of any arguments, followed by an open bracket, some code, and then a closed bracket. As I note in the previous sections, the programmer chooses the name. Here's an example of a function definition that returns the product of the two arguments. As the name indicates, you could use it to compute the area of a rectangle.
function areaOfRectangle(wd,ln) {
    return wd * ln;
}
Notice the return keyword. This tells JavaScript to send the result of the function back to us. In our example, this lets us write something like rect1 = areaOfRectangle(5,10), which would assign a value of 50 (5 × 10) to our rect1 variable. The function definition would be written as code within the script element. It might or might not make sense to define this function in real life because it is pretty easy to write multiplication in the code, but it does serve as a useful example of a programmer-defined function. Once this definition is executed, which probably would be when the HTML file is loaded, other code can use the function just by calling its name, as in areaOfRectangle(100,200) or areaOfRectangle(x2-x1,y2-y1).
The second expression assumes that x1, x2, y1, y2 refer to coordinate values that are defined elsewhere.
Functions also can be called by setting certain tag attributes. For example, the body tag can include a setting for the onLoad attribute:
<body onLoad="init();">
My JavaScript code contains the definition of a function I call init. Putting this into the body element means that JavaScript will invoke my init function when the browser first loads the HTML document or whenever the player clicks on the reload/refresh button. Similarly, making use of one of the new features of HTML5, I could include the button element:
<button onClick="throwdice();">Throw dice </button>
This creates a button holding the text Throw dice. When the player clicks it, JavaScript invokes the throwdice function I defined in the script element.
The form element, to be described later, could invoke a function in a similar way.
The craps game has a set of rules. One way to summarize the rules is to say, if it is a first-throw situation, we check for certain values of the dice throw. If it's not the first throw, we check for other values of the dice throw. JavaScript provides the if and switch statements for such purposes.
The if statement is based on conditions, which can be a comparison or a check for equality—for example, is a variable named temp greater than 85 or does the variable named course hold the value "Programming Games". Comparisons produce two possible logical values—true or false. So far you've seen values that are numbers and values that are strings of characters. Logical values are yet another data type. They are also called Boolean values, after the mathematician, George Boole. The condition and check that I mentioned would be written in code as
temp>85
and
course == "Programming Games"
Read the first expression as: Is the current value of the variable temp greater than 85?
and the second one as: Is the current value of the variable course the same as the string "Programming Games"?
The comparison example is easy to understand; we use > to check if one value is greater than another, and < to check the opposite. The value of the expression will be one of the two logical values true or false.
The second expression is probably a little more confusing. You may be wondering about the two equal signs and maybe also the quotation marks. The comparison operator in JavaScript (and several other programming languages) that checks for equality is this combination of two equal signs. We need two equal signs because the single equal sign is used in assignment statements and it can't do double duty. If we had written course = "Programming Games", we would have been assigning the value "Programming Games" to our course variable rather than comparing the two items. The quotation marks define a string of characters, starting with P, including the space, and ending with s.
With that under our belts, we can now take a look at how to write code that does something only if a condition is true.
if (condition) {code}
If we want our code to do one thing if a condition is true and another thing if it is NOT true, the format is:
if (condition) {if true code}else {if not true code}
Note that I used italics here because this is what is called pseudo-code, not real JavaScript that we would include in our HTML document.
Here are some real code examples. They make use of alert, a built-in function that causes a small window with the message indicated by the argument given between the parentheses to pop up in the browser. The user must click OK to continue.
if (temp>85) {
   alert("It is hot!");
}
if (age > 21) {
   alert("You are old enough to buy a drink.");
}
else {
   alert("You are too young to be served in a bar.");
}
We could write the craps application using just if statements. However, JavaScript supplies another construct that makes things easier—the switch statement. The general format is:
switch(x) {case a:
codea;case b:codeb;default: codec;}
JavaScript evaluates the value of x in the first line of the switch statement and compares it to the values indicated in the cases. Once there is a hit, that is, x is determined to be equal to a or b, the code following the case label is executed. If there is no match, the code after default is executed. It's not necessary to have a default possibility. Left to its own devices, the computer would continue running through the switch statement even if it found a matching case statement. If you want it to stop when you find a match, you need to include a break statement to break out of the switch.
You can probably see already how if and switch will do what we need for the dice game. You'll read how in the next section. First, let's look at an example that determines the number of days in the month indicated by the variable mon holding three-letter abbreviations ("Jan", "Feb", etc.).
switch(mon) {
case "Sep":
case "Apr":
case "Jun":
case "Nov":
        alert("This month has 30 days.");
        break;
case "Feb":
        alert("This month has 28 or 29 days.");
        break;
default:
        alert("This month has 31 days.");
}
If the value of the variable mon is equal to "Sep", "Apr", "Jun", or "Nov", control flows to the first alert statement and then exits the switch statement because of the break. If the value of the variable mon is equal to "Feb", the alert statement mentioning 28 or 29 days executes and then the control flow exits the switch. If the value of mon is anything else, including, by the way, an invalid three-letter abbreviation, the alert mentioning 31 days is executed.
Just as HTML ignores line breaks and other white space, JavaScript does not require a specific layout for these statements. You could put everything on one line if you wished. However, make things easy on yourself and use multiple lines.
Now we get to one of the most powerful new features in HTML5, the canvas element. I will explain the pieces of coding that go into an application involving canvas, then show some simple examples, and finally get back to our goal of drawing dice faces on the canvas. Recall that the outline for an HTML document is
<html>
        <head>
                <title>... </title>
<script> .... </script>
</head>
<body>
... Here is where the initial static content will go...
</body>
</html>To work with the canvas, we include the tags for canvas in the body element of the HTML document and JavaScript in the script element. I'll start by describing a standard way to write a canvas element.
<canvas id="canvas" width="400" height="300">
Your browser doesn't support the HTML5 element canvas.
</canvas>
If an HTML file with this coding is opened by a browser that does not recognize canvas, the message Your browser doesn't support the HTML5 element canvas. appears on the screen. If you were preparing web pages for all common browsers, you could choose to direct visitors to your site to something else or try another strategy. In this book, I just focus on HTML5.
The HTML canvas tag defines this element to have an id of "canvas". This could have been anything, but there's no harm in using canvas. You can have more than one canvas, however, and in that case, you would need to use distinct values for each id. That's not what we do for this application, though, so we don't have to worry about it. The attributes of width and height are set to specify the dimensions of this canvas element.
Now that we've seen the canvas in the body, let's look at the JavaScript. The first step in drawing on the canvas is to define the appropriate object in the JavaScript code. To do this, I need a variable so I set up one named ctx with the line
var ctx;
outside of any function definition. This makes it a global variable that can be accessed or set from any function. The ctx variable is something that's needed for all drawing. I chose to name my variable ctx, short for context, copying many of the examples I've seen online. I could have chosen any name.
Later in the code (you'll see all the code in the examples that follow, and you can download it from www.friendsofed.com/downloads.html), I write the code to set the value of ctx.
ctx = document.getElementById('canvas').getContext('2d'),What this does is first get the element in the document with the id 'canvas' and then extract what is called the '2d' context. We can all anticipate that the future may bring other contexts! For now, we use the 2d one.
In the JavaScript coding, you can draw rectangles, paths including line segments and arcs, and position image files on the canvas. You can also fill in the rectangles and the paths. Before we do this, however, we need to tackle coordinate systems and radian measures.
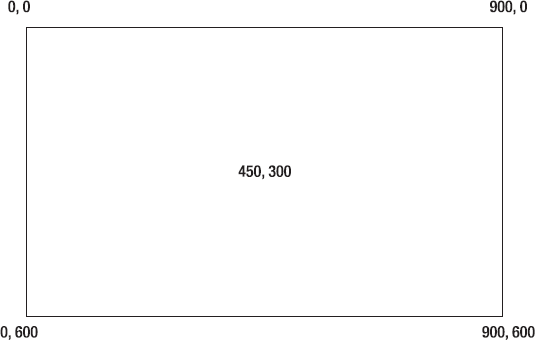
Just as a global positioning system uses latitude and longitude to define your location on the map, we need a way to specify points on the screen. These points are called pixels, and we used them in the previous chapter to specify the width of images and the thickness of borders. The pixel is a pretty small unit of measurement, as you can see if you do any experiments. However, it's not enough for everyone to agree on the linear unit. We also need to agree on the point from which we are measuring, just as GPS systems use the Greenwich Meridian and the equator. For the two-dimensional rectangle that is the canvas, this goes by the name origin or registration point. The origin is the upper left corner of the canvas element. Note that in Chapter 6, when we describe the quiz show by creating and positioning elements in the HTML document and not in a canvas element, the coordinate system is similar. The origin is still the upper left corner of the window.
This is different from what you may recall from analytical geometry or from making graphs. The horizontal numbers increase in value moving from left to right. The vertical numbers increase in value moving down the screen. The standard way to write coordinates is to put the horizontal value first, followed by the vertical value. In some situations, the horizontal value is referred to as the x value and the vertical, the y value. In other situations, the horizontal value is the left (think of it as from the left) and the vertical value is the top (think of it as from the top).
Figure 2-5 shows the layout of a browser window 900 pixels wide by 600 high. The numbers indicate the coordinate values of the corners and the middle.
Now we'll look at several statements for drawing, and then put them together to draw simple shapes (see Figures 2-6 through 2-10). After that we'll see how to draw the dots and rectangles to represent die faces.
Here's the HTML5 JavaScript code for drawing a rectangle:
ctx.strokeRect(100,50,200,300);
This draws a hollow rectangle, with its top left corner 100 pixels from the left side and 50 pixels down from the top. The rectangle has width 200, and height 300. This statement would use whatever the current settings are for line width and for color.
The next piece of code demonstrates setting the line width to 5 and the color of the stroke, that is, the outline to the indicated RGB value, namely red. The rectangle is drawn using the values in the variables x, y, w, and h.
ctx.lineWidth = 5;
ctx.strokeStyle = "rgb(255,0,0)";
ctx.strokeRect(x,y,w,h);
ctx.fillStyle = "rgb(0,0,255)";
ctx.fillRect(x,y,w,h);
draws a solid blue rectangle at the indicated position and dimensions. If you want to draw a blue rectangle with a red outline, you use two lines of code:
ctx.fillRect(x,y,w,h);
ctx.strokeRect(x,y,w,h);
HTML5 lets you draw so-called paths consisting of arcs and line segments. Line segments are drawn using a combination of ctx.moveTo and ctx.lineTo. I'll cover them in a number of chapters: for the slingshot game in Chapter 4, the memory game using polygons in Chapter 5, and Hangman in Chapter 9. In the cannon ball game in Chapter 4, I'll also show you how to tilt a rectangle, and the Hangman game in Chapter 9 demonstrates how to draw ovals. In this chapter, I'll focus on the arcs.
You start a path using
ctx.beginPath();
and end it, with the path being drawn, with either
ctx.closePath();
ctx.stroke();
or
ctx.closePath();
ctx.fill();
An arc can be a whole circle or part of a circle. In the dice applications, we draw only whole circles to represent the pips on the face of each die, but I'll explain how arcs work in general to make the code less mysterious. The method for drawing arcs has the following format:
ctx.arc(cx, cy, radius, start_angle, end_angle, direction);
where cx, cy, and radius are the center horizontal and vertical coordinates and the radius of the circle. To explain the next two parameters requires discussing ways to measure angles. You're familiar with the degree unit for angles: we speak of making a 180-degree turn, meaning a u-turn, and a 90-degree angle is produced by two perpendicular lines. But most computer programming languages use another system, called radians. Here's one way to visualize radians—think of taking the radius of a circle and laying it on the circle itself. You can dig into your memory and realize that it won't be a neat fit, because there are 2* PI radians around the circle, somewhat more than 6. So if we want to draw an arc that is a whole circle, we specify a starting angle of 0 and an end angle of 2*PI. Luckily, the Math class furnishes a constant Math.PI that is the value of PI (to as much accuracy, as many decimal places, as necessary), so in the code, we write 2*Math.PI. If we want to specify an arc that is half a circle, we use Math.PI, while a right-angle (90 degrees) will be .5*Math.PI.
The arc method requires one more argument, direction. How are we drawing these arcs? Think of the movement of the hands on a clock face. In HTML 5, clockwise is the false direction and counterclockwise is the true direction. (Don't ask why. That's just the way it's specified in HTML5.) I use the built-in JavaScript values true and false. This will be important when we need to draw arcs that are not whole circles. The nature of the particular problem dictates how you define the angles if you need to draw arcs that are not full circles.
Here are some examples, with the complete code, for you to create (using TextPad or TextWrangler) and then vary to test your understanding. The first one draws an arc, representing a smile.
<html>
<head>
<title>Smile</title>
<script>
function init() {
        var ctx =document.getElementById("canvas").getContext('2d'),
        ctx.beginPath();
        ctx.strokeStyle = "rgb(200,0,0)";
        ctx.arc(200, 200,50,0,Math.PI, false);
        ctx.stroke();
}
</script>
</head>
<body>
<body onLoad="init();">
<canvas id="canvas" width="400" height="300">
Your browser doesn't support the HTML5 element canvas.
</canvas>
</body>
</html>
Figure 2-6 shows a portion of the screen with the arc produced by this code.
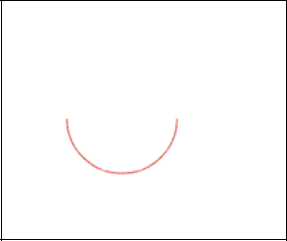
You can look ahead to Figures 2-11, 2-12 and 2-13 in which I captured more of the screen to see the positioning of the drawing. Please vary the numbers in your own example so you can gain an understanding of how the coordinate system works and how big a pixel actually is.
Before going on to see a frown, try making the arc wider or taller or changing the color. Then try moving the whole arc up, down, left, and right. Hint: you need to change the line
ctx.arc(200, 200,50,0,Math.PI, false);
Change the 200,200 to reset the center of the circle and the 50 to change the radius.
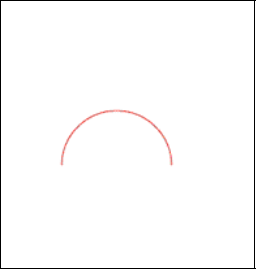
Now, let's go on with other variations. Do take each one and experiment with it. Changing the last parameter of the arc method to true:
ctx.arc(200,200,50,0,Math.PI,true);
makes the arc go in a counterclockwise direction. The complete code is:
<html>
        <head>
                <title>Frown</title>
<script type="text/javascript">
function init() {
        var ctx =document.getElementById("canvas").getContext('2d'),
        ctx.beginPath();
        ctx.strokeStyle = "rgb(200,0,0)";
        ctx.arc(200, 200,50,0,Math.PI, true);
        ctx.stroke();
}
</script>
</head>

<body>
<body onLoad="init();">
<canvas id="canvas" width="400" height="300">
Your browser doesn't support the HTML5 element canvas.
</canvas>

</body>
</html>
Notice that I also changed the title. This code produces the screen shown in Figure 2-7.
Putting in the statement to close the path before the stroke:
ctx.closePath();
ctx.stroke();
in the frown example, will "finish off" the arc. The complete code is
<html>
        <head>
                <title>Frown</title>
<script type="text/javascript">
function init() {
        var ctx =document.getElementById("canvas").getContext('2d'),
        ctx.beginPath();
        ctx.strokeStyle = "rgb(200,0,0)";
        ctx.arc(200, 200,50,0,Math.PI, true);
        ctx.closePath();
        ctx.stroke();
}
</script>
</head>

<body>
<body onLoad="init();">
<canvas id="canvas" width="400" height="300">
Your browser doesn't support the HTML5 element canvas.
</canvas>

</body>
</html>
This produces the screen show in Figure 2-8.

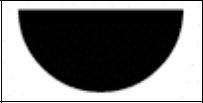
The closePath command is not always necessary, but it's good practice to include it. Experiment here and also look ahead to the drawing of the slingshot in Chapter 5 and the drawing of the hangman figure in Chapter 9. If you want the path filled in, you use ctx.fill() in place of ctx.stroke(), which produces a black, filled-in shape as shown in Figure 2-9. The complete code is
<html>
        <head>
<title>Smile</title>
<script type="text/javascript">
function init() {
var ctx =document.getElementById("canvas").getContext('2d'),
ctx.beginPath();
ctx.strokeStyle = "rgb(200,0,0)";
ctx.arc(200, 200,50,0,Math.PI, false);
ctx.closePath();
ctx.fill();
}
</script>
</head>
<body>
<body onLoad="init();">
<canvas id="canvas" width="400" height="300">
Your browser doesn't support the HTML5 element canvas.
</canvas>
</body>
</html>Black is the default color.
If you want a shape to be filled and have a distinct outline, you use both the fill and the stroke commands and specify different colors using the fillStyle and strokeStyle properties. The color scheme is based on the same red/green/blue codes introduced in Chapter 1. You can experiment or use a tool such as Photoshop or Paint Shop Pro to get the colors you want. Here is the complete code:
<html>
        <head>
                <title>Smile</title>
<script type="text/javascript">
function init() {
        var ctx =document.getElementById("canvas").getContext('2d'),
        ctx.beginPath();
        ctx.strokeStyle = "rgb(200,0,0)";
        ctx.arc(200, 200,50,0,Math.PI, false);
        ctx.fillStyle = "rgb(200,0,200)";
        ctx.closePath();
        ctx.fill();
        ctx.strokeStyle="rgb(255,0,0)";
ctx.lineWidth=5;
ctx.stroke();
}
</script>
</head>
<body>
<body onLoad="init();">
<canvas id="canvas" width="400" height="300">
Your browser doesn't support the HTML5 element canvas.
</canvas>
</body>
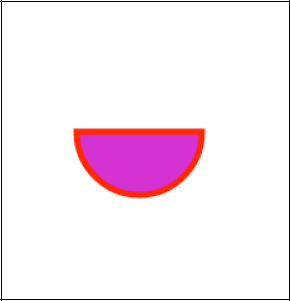
</html>This code produces a half circle filled in with purple (a combination of red and blue), with a stroke, that is, an outline of pure red as shown in Figure 2-10. The coding specifies a path, then draws the path as a fill, and then draws the path as a stroke.
A full circle is produced by many different commands, including:
ctx.arc(200,200,50,0, 2*Math.PI, true);
ctx.arc(200,200,50, 0, 2*Math.PI, false);
ctx.arc(200,200,50, .5*Math.PI, 2.5*Math.PI, false);
You may as well stick with the first one—it's as good as any other. Note that I still use the closePath command. A circle may be a closed figure in geometric terms, but that doesn't matter in terms of JavaScript.
If you think of the canvas element as a canvas on which you put some ink or paint, you realize you'll need to erase the canvas or the appropriate part of it to draw something new. To do this, HTML5 supplies the command
ctx.clearRect(x,y,width,height);
Later examples show how to draw a slingshot (Chapter 4), polygons for the memory/concentration game (Chapter 5), walls for a maze (Chapter 7), and the stick figure in Hangman (Chapter 9). Now let's get back to what we need for the dice game.
It is possible to write text on the canvas (see Chapter 5), but for the craps application, I chose to use a form, an element in both the older and current versions of HTML. I don't use the form for input from the player. I do use it for outputting information on the results of the throw of the dice. The HTML5 specification indicates new ways to set up forms, including checking or validating the type and range of input. The application in the next chapter demonstrates validation.
I used the following HTML to produce the form for the dice game:
<form name="f">
Stage: <input name="stage" value="First Throw"/>
Point: <input name="pv" value="   "/>
Outcome: <input name="outcome" value="     "/>
</form>
The form starts with a name attribute. The text Stage:, Point:, and Outcome: appear next to the input fields. The input tags—notice these are singleton tags—have both name and value fields. These names will be used by the JavaScript code. You can put any HTML within a form and a form within any HTML.
Because the dice game uses the new button element, I just added the form element with the fields used for displaying information to the player, without including an input element of type submit. Alternatively, I could have used a standard form with a submit input field (eliminating the need for the new button element) with the following code:
<form name="f" onSubmit="throwdice();">
Stage: <input type="text" name="stage" value="First Throw"/>
Point: <input type="text" name="pv" value="   "/>
Outcome: <input type="text" name="outcome" value="     "/>
<input type="submit" value="THROW DICE"/>
</form>
The input element of type submit produces a button on the screen. These are all the concepts we need to build the craps application. We can now go ahead and code it.
You may have already tried using the HTML5, CSS, and JavaScript constructs described in this chapter in small examples. Hint: please do. The only way to learn is to make your own examples. As a way to build up to the craps application, we will now look at three applications:
throwing a single die and reloading to throw again
throwing two dice by using a button
the complete game of craps
Figure 2-11 shows a possible opening screen for the first application. I say possible because it won't always be a 4. I deliberately captured this screenshot to show practically all of the window so you can see where the drawing is located on the screen.
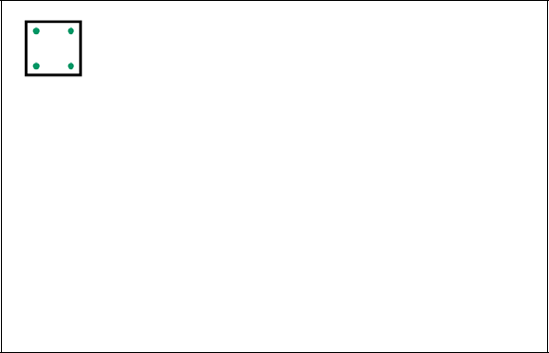
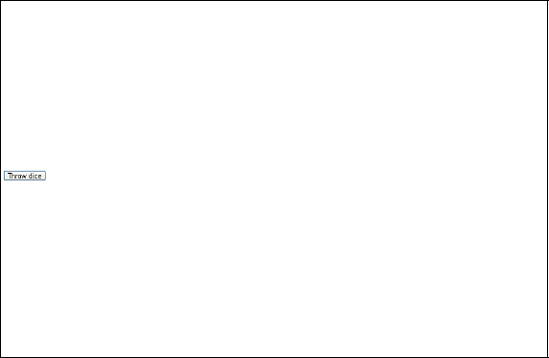
Figure 2-12 shows the opening screen of the application for throwing a pair of dice. All that appears is the button.
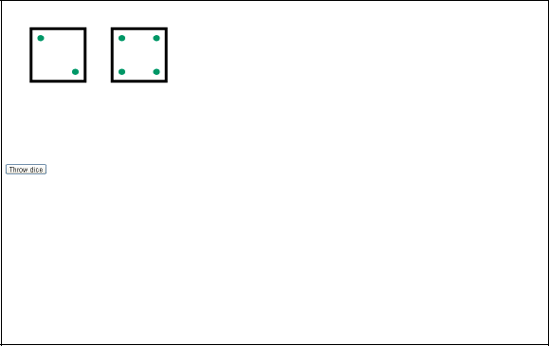
Lastly, Figure 2-13 shows the screen after the player clicks on the button.
It is good technique to build your application in incremental steps. These applications are built using a text editor, such as TextPad or TextWrangler. Remember to save the file as type .html— and do this early and often. You don't have to finish before saving. When you complete the first application and have saved and tested it, you can save it once more using a new name and then make the modifications to this new copy to be the second application. Do the same for the third application.
The purpose of this first application is to display a random die face on the canvas, with circles laid out in the standard way.
For any application, there are generally many approaches that would work. I realized that I could get double duty out of some of the coding, because the pattern for the 3 die face could be made by combining the 2 and 1 patterns. Similarly, the pattern for 5 is a combination of 4 and 1. The pattern for 6 is a combination of the one for 4 and something unique. I could have put all the coding into the init function or used a single drawface function. In any case, this made sense to me and I programmed and debugged it fairly fast. Table 2-1 lists all the functions and indicates what calls what. Table 2-2 shows the complete code, explaining what each line does.
Table 2.1. Functions in the Singe Die Throw Application
Function | Invoked By / Called By | Calls |
|---|---|---|
| invoked by action of the |
|
| called by |
|
| called by | |
called by | ||
| called by | |
| called by |
Table 2.2. The Complete Code for the Throwing a Single Die Application
Code | Explanation |
|---|---|
<html> | Opening |
<head> | Opening |
<title>Throwing 1 die</title> | Full |
<script> | Opening |
var cwidth = 400; | Variable holding the width of the canvas; also used to erase the canvas to prepare for redrawing |
var cheight = 300; | Variable holding the height of the canvas; also used to erase the canvas to prepare for redrawing |
var dicex = 50; | Variable holding the horizontal position of the single die |
var dicey = 50; | Variable holding the vertical position of the single die |
var dicewidth = 100; | Variable holding the width of a die face |
var diceheight = 100; | Variable holding the height of a die face |
var dotrad = 6; | Variable holding the radius of a dot |
var ctx; | Variable holding the canvas context, used in all the draw commands |
function init() {
| Start of the function definition for the |
var ch = 1+Math.floor(Math. | Declare and set the value of the |
drawface(ch); | Invoke the |
} | End function definition |
function drawface(n) {
| Start of the function definition for the |
ctx = document.getElementById('canvas').
| Obtain the object that is used to draw on the canvas |
ctx.lineWidth = 5; | Set the line width to 5 |
ctx.clearRect(dicex,dicey,dicewidth, | Clear the space where the die face may have been drawn. This has no effect the very first time. |
ctx.strokeRect(dicex,dicey,dicewidth, | Draw the outline of the die face |
ctx.fillStyle = "#009966"; | Set the color for the circles. I used a graphics program to determine this value. You can do this, or experiment. |
switch(n) {
| Start |
case 1: | If it is 1 |
Draw1(); | Call the |
break; | Break out of the switch |
case 2: | If it is 2 |
Draw2(); | Call the |
break; | Break out of the switch |
case 3: | If it is 3 |
draw2(); | First call |
draw1(); | Call |
break; | Break out of the switch |
case 4: | If it is 4 |
draw4(); | Call the |
break; | Break out of the switch |
case 5: | If it is 5 |
draw4(); | Call the |
draw1(); | Call the |
break; | Break out of the switch |
case 6: | If it is 6 |
draw4(); | Call the |
draw2mid(); | Call the |
break; | Break out of the switch (not strictly necessary) |
} | Close the |
} | Close the |
function draw1() {
| Start of the definition of |
var dotx; | Variable to be used for the horizontal position for drawing the single dot |
var doty; | Variable to be used for the vertical position for drawing the single dot |
ctx.beginPath(); | Start a path |
dotx = dicex + .5*dicewidth; | Set the center of this dot to be at the center of the die face horizontally and |
doty = dicey + .5*diceheight; | ... vertically |
ctx.arc(dotx,doty,dotrad,0,Math.PI*2,true); | Construct a circle (which is drawn with the fill command) |
ctx.closePath(); | Close the path |
ctx.fill(); | Draw the path, that is, fill the circle |
} | Close |
function draw2() {
| Start of |
var dotx; | Variable to be used for the horizontal position for drawing the two dots |
var doty; | Variable to be used for the vertical position for drawing the two dots |
ctx.beginPath(); | Start a path |
dotx = dicex + 3*dotrad; | Set the center of this dot to be 3 radius lengths over from the upper corner of the die face, horizontally and |
doty = dicey + 3*dotrad; | ... vertically |
ctx.arc(dotx,doty,dotrad,0,Math.PI*2,true); | Construct the first dot |
dotx = dicex+dicewidth-3*dotrad; | Set the center of this dot to be 3 radius lengths in from the lower corner of the die face, horizontally and |
doty = dicey+diceheight-3*dotrad; | ... vertically |
ctx.arc(dotx,doty,dotrad,0,Math.PI*2,true); | Construct the second dot |
ctx.closePath(); | Close the path |
ctx.fill(); | Draw both dots |
} | Close |
function draw4() {
| Start of |
var dotx; | Variable to be used for the horizontal position for drawing the dots. |
var doty; | Variable to be used for the vertical position for drawing the dots |
ctx.beginPath(); | Begin path |
dotx = dicex + 3*dotrad; | Position the first dot inside the upper left corner, horizontally and |
doty = dicey + 3*dotrad; | ...vertically |
ctx.arc(dotx,doty,dotrad,0,Math.PI*2,true); | Construct the circle |
dotx = dicex+dicewidth-3*dotrad; | Position the second dot to be inside the lower right corner, horizontally and |
doty = dicey+diceheight-3*dotrad; | ... vertically |
ctx.arc(dotx,doty,dotrad,0,Math. | Construct dots |
ctx.closePath(); | Close path |
ctx.fill(); | Draw 2 dots |
ctx.beginPath(); | Begin path |
dotx = dicex + 3*dotrad; | Position this dot inside the lower left corner, horizontally and |
doty = dicey + diceheight-3*dotrad; | ... vertically. (note that this is the same y value just used) |
ctx.arc(dotx,doty,dotrad,0,Math. | Construct circle |
dotx = dicex+dicewidth-3*dotrad; | Position this dot just inside the upper left corner, horizontally and |
doty = dicey+ 3*dotrad; | ... vertically |
ctx.arc(dotx,doty,dotrad,0,Math. | Construct circle |
ctx.closePath(); | Close path |
ctx.fill(); | Draw 2 dots |
} | Close |
function draw2mid() {
| Start |
var dotx; | Variable to be used for the horizontal position for drawing the two dots |
var doty; | Variable to be used for the vertical position for drawing the two dots |
ctx.beginPath(); | Begin path |
dotx = dicex + 3*dotrad; | Position the dots to be just inside horizontally |
doty = dicey + .5*diceheight; | And midway vertically |
ctx.arc(dotx,doty,dotrad,0,Math. | Construct circle |
dotx = dicex+dicewidth-3*dotrad; | Position this dot to be just inside the right border |
doty = dicey + .5*diceheight; //no change | Position y midway |
ctx.arc(dotx,doty,dotrad,0,Math. | Construct circle |
ctx.closePath(); | Close path |
ctx.fill(); | Draw dots |
} | Close |
</script> | Close |
</head> | Close |
<body onLoad="init();"> | Starting |
<canvas id="canvas" width="400" height="300"> Your browser doesn't support the HTML5 | Set up canvas and provide notice if browser doesn't accept |
</body> </html> | Close |
If you like, you can put comments in your code. Comments are pieces of text that are ignored by the browser but are there to remind you and, perhaps, others who will look at this program later, what is going on. One form of comment starts with two slashes on a line. Everything to the right of the slashes is ignored. For larger comments, you use a slash and an asterisk to start the comment and an asterisk and a slash to end it.
/*
This is a comment.
*/
This is a case of do as I say, not as I do. Since I'm using tables to put comments on every line and you can consider the whole chapter a comment, I haven't included comments in the code. You should, however.
HINT: when I was developing this code (and any code involving a random effect, I did not want to have to do the initial testing with the random coding. So, right after the line
        var ch =
1+Math.floor(Math.random()*6);
I put the line
ch = 1;
and tested it, then I changed it to
ch = 2;
and so on. I removed this line (or commented it out using // ) when I was done with this phase of testing. This falls under general advice, to avoid having to play a game, in all its complexity, while developing it.
The next application makes use of a button to give the player something to do, rather than just reloading the webpage, and it also simulates the throwing of a pair of dice. Before looking at the code, think about what you can carry over from the first application. The answer is: most of it. This second application will need to do something about the positioning of the two die faces, using two more variables for this, dx and dy. It also needs to repeat the code using Math.random and calling drawface twice to produce both die faces. And there needs to be a change in what invokes a throw. Table 2-3, which describes the functions calling and being called is essentially the same as Table 2-1, except now there's a function called throwdice, which is invoked by an action set up by the onClick attribute of the button tag. Table 2-4 contains the full HTML document for the application of throwing two dice.
Table 2.3. Functions in the Two-Dice Application
Function | Invoked By / Called By | Calls |
|---|---|---|
| invoked by action of the |
|
| called by |
|
| called by | |
called by | ||
| called by | |
| called by |
Table 2.4. The Complete Two-Dice Application
The third application is the complete game of craps. Again, much can be carried over from the previous application. However, now we need to add in the rules of the game. Among other things, this will mean using the conditional statements if and switch, as well as global variables, that is variables defined outside of any function definition, to keep track of whether or not it is a first turn (firstturn) and what is the player's point (point). The function table is identical to the one given for the second application (Table 2-3), so I won't repeat it. Table 2-5 holds the code for this application. The new action is all in the throwdice function. I will comment the new lines.
Table 2.5. The Complete Craps Application
Code | Explanation |
|---|---|
<html> | |
<head> | |
<title>Craps game</title> | |
<script> | |
var cwidth = 400; | |
var cheight = 300; | |
var dicex = 50; | |
var dicey = 50; | |
var dicewidth = 100; | |
var diceheight = 100; | |
var dotrad = 6; | |
var ctx; | |
var dx; | |
var dy; | |
var firstturn = true; | Global variable, initialized to the value |
var point; | Global variable, does not need to be initialized because it will be set before use |
function throwdice() {
| Start of |
var sum; | Variable to hold the sum of the values for the 2 dice |
var ch = 1+Math.floor(Math.random()*6); | Set |
sum = ch; | Assign this to |
dx = dicex; | Set |
dy = dicey; | set dy |
drawface(ch); | Draw the first die face |
dx = dicex + 150; | Adjust the horizontal position |
ch=1 + Math.floor(Math.random()*6); | Set |
sum += ch; | Add |
drawface(ch); | Draw the second die |
if (firstturn) {
| Now start the implementation of the rules. Is it a first turn? |
switch(sum) {
| If it is, start a |
case 7: | For 7 |
case 11: | .. or 11 |
document.f.outcome.value="You win!"; | Display You win! |
break; | Exit the switch |
case 2: | For 2, |
case 3: | .. or 3 |
case 12: | .. or 12 |
document.f.outcome.value="You lose!"; | Display You lose! |
break; | Exit the switch |
default: | For anything else |
point = sum; | Save the sum in the variable point |
document.f.pv.value=point; | Display the point value |
firstturn = false; | Set |
document.f.stage.value="Need follow-up throw."; | Display Need follow-up throw |
document.f.outcome.value=" "; | Erase (clear) the outcome field |
} | End the switch |
} | End the if-true clause |
else {
| Else (not a first turn) |
switch(sum) {
| Start the switch, again using |
case point: | if |
document.f.outcome.value="You win!"; | Display You win! |
document.f.stage.value="Back to first throw."; | Display Back to first throw |
document.f.pv.value=" "; | Clear the point value |
firstturn = true; | Reset |
break; | Exit the switch |
case 7: | If the sum is equal to 7 |
document.f.outcome.value="You lose!"; | Display You lose! |
document.f.stage.value="Back to first throw."; | Display Back to first throw |
document.f.pv.value=" "; | Clear the point value |
firstturn = true; | Reset |
} | Close the switch |
} | Close the else clause |
} | Close the |
function drawface(n) {
| |
ctx =
document.getElementById('canvas').getContext('2d'),
| |
ctx.lineWidth = 5; | |
ctx.clearRect(dx,dy,dicewidth,diceheight); | |
ctx.strokeRect(dx,dy,dicewidth,diceheight) | |
var dotx; | |
var doty; | |
ctx.fillStyle = "#009966"; | |
switch(n) {
| |
case 1: | |
draw1(); | |
break; | |
case 2: | |
draw2(); | |
break; | |
case 3: | |
draw2(); | |
draw1(); | |
break; | |
case 4: | |
draw4(); | |
break; | |
case 5: | |
draw4(); | |
draw1(); | |
break; | |
case 6: | |
draw4(); | |
draw2mid(); | |
break; | |
} | |
} | |
function draw1() {
| |
var dotx; | |
var doty; | |
ctx.beginPath(); | |
dotx = dx + .5*dicewidth; | |
doty = dy + .5*diceheight; | |
ctx.arc(dotx,doty,dotrad,0,Math.PI*2,true); | |
ctx.closePath(); | |
ctx.fill(); | |
} | |
function draw2() {
| |
var dotx; | |
var doty; | |
ctx.beginPath(); | |
dotx = dx + 3*dotrad; | |
doty = dy + 3*dotrad; | |
ctx.arc(dotx,doty,dotrad,0,Math.PI*2,true); | |
dotx = dx+dicewidth-3*dotrad; | |
doty = dy+diceheight-3*dotrad; | |
ctx.arc(dotx,doty,dotrad,0,Math.PI*2,true); | |
ctx.closePath(); | |
ctx.fill(); | |
} | |
function draw4() {
| |
var dotx; | |
var doty; | |
ctx.beginPath(); | |
dotx = dx + 3*dotrad; | |
doty = dy + 3*dotrad; | |
ctx.arc(dotx,doty,dotrad,0,Math.PI*2,true); | |
dotx = dx+dicewidth-3*dotrad; | |
doty = dy+diceheight-3*dotrad; | |
ctx.arc(dotx,doty,dotrad,0,Math.PI*2,true); | |
ctx.closePath(); | |
ctx.fill(); | |
ctx.beginPath(); | |
dotx = dx + 3*dotrad; | |
doty = dy + diceheight-3*dotrad; //no change | |
ctx.arc(dotx,doty,dotrad,0,Math.PI*2,true); | |
dotx = dx+dicewidth-3*dotrad; | |
doty = dy+ 3*dotrad; | |
ctx.arc(dotx,doty,dotrad,0,Math.PI*2,true); | |
ctx.closePath(); | |
ctx.fill(); | |
} | |
function draw2mid() {
| |
var dotx; | |
var doty; | |
ctx.beginPath(); | |
dotx = dx + 3*dotrad; | |
doty = dy + .5*diceheight; | |
ctx.arc(dotx,doty,dotrad,0,Math.PI*2,true); | |
dotx = dx+dicewidth-3*dotrad; | |
doty = dy + .5*diceheight; //no change | |
ctx.arc(dotx,doty,dotrad,0,Math.PI*2,true); | |
ctx.closePath(); | |
ctx.fill(); | |
} | |
</script> | |
</head> | |
<body> | |
<canvas id="canvas" width="400" height="300"> | |
Your browser doesn't support the HTML5 element canvas. | |
</canvas> | |
<br/> | |
<button onClick="throwdice();">Throw dice </button> | |
<form name="f"> | |
Stage: <input name="stage" value="First Throw"/> | With the text |
Point: <input name="pv" value=" "/> | With the text Point: right before it, set up an input field named |
Outcome: <input name="outcome" value=" "/> | With the text |
</form> | Close the |
</body> | Close |
</html> | Close |
Making this application your own is not as straightforward as with the favorite sites application, because the rules of craps are the rules of craps. However, there are many things you can do. Change the size and color of the dice faces, using fillRect and setting fillStyle to different colors. Change the color and size of the whole canvas. Change the text for the outcomes to something more colorful. You also can implement other games using standard or specially made dice.
You can look ahead to the next chapter and learn about drawing images on the canvas instead of drawing each die face using arcs and rectangles. HTML5 provides a way to bring in external image files. The drawback to this approach is that you do have to keep track of these separate files.
You can develop coding for keeping score. For a gambling game, you can start the player with a fixed amount of money, say 100 of whatever the currency unit is, and deduct some amount, say 10, for playing a game, and add some amount, say 20, if and only if the player wins. You can add this bankroll information as part of the form element in the body:
<form name="f" id="f">
Stage: <input name="stage" value="First Throw"/>
Point: <input name="pv" value="   "/>
Outcome: <input name="outcome" value="     "/>
Bank roll: <input name="bank" value="100"/>
</form>
JavaScript (and other programming languages) distinguish between numbers and strings of characters representing numbers. That is, the value "100" is a string of characters, "1","0", and "0". The value 100 is a number. In either case, however, the value of a variable is stored as a sequence of 1s and 0s. For numbers, this will be the number represented as a binary number. For strings of characters, each character will be represented using a standard coding system, such as ASCII or UNICODE. In some situations, JavaScript will make the conversion from one data type to the other, but don't depend on it. The coding I suggest uses the built-in functions String and Number to do these conversions.
In the throwdice function, before the if(firstturn) statement, add the code in Table 2-6 (or something like it).
Table 2.6. Adding a Bank for the Player
Code | Explanation |
|---|---|
var bank = Number(document.f.bank.value); | Sets a new variable |
if (bank<10) {
| Compare |
alert("You ran out of money! Add some more and try again.");
| If |
Return; | Exit the function without doing anything. |
} | Close the if true clause. |
bank = bank – 10; | Decrease |
document.f.bank.value = String(bank); | Put the string representation of that value in the bank field. |
Then in each place where the player wins (in the switch statement for a first turn after the 7 and 11 cases, or in the switch statement for a follow-up turn, after the point case, add the code in Table 2-7.
Table 2.7. Increasing the Value of the Bank
Code | Explanation |
|---|---|
| Set |
Use the | |
| Put the string representation of the bank amount in the bank field |
When the player loses, or when it is a follow-up turn, you don't add any code. The bank value goes down before each new game.
These applications are complete in the HTML file. No other files, such as image files, are used. Instead, the dice faces are drawn on the canvas. (For your information, my versions of dice games written in the older HTML used one or two img elements. To make these fixed img elements display different images, I wrote code that changed the src attribute to be a different external image file. When I uploaded the application, I had to upload all the image files.)
Open up the HTML file in the browser. The first application needs to be reloaded to get a new (single) die. The second and third applications (the third one being the craps game) use a button to roll the dice.
I repeat what I wrote earlier. To test this program, you do need to check the many cases. You are not done when you, acting as the player, win. Typical problems include
missing or mismatched opening and closing tags
mismatched opening and closing brackets, the { and the } surrounding functions,
switchstatements, andifclausesmissing quotation marks. The color coding, as available when using TextPad and some other editors, can help here, as it will highlight keywords it recognizes.
inconsistency in naming and use of variables and functions. These names can be anything you choose, but you need to be consistent. The function
draw2midwill not be invoked bydrawmid2().
These are all, except arguably the last, mistakes in syntax, analogous to mistakes in grammar and punctuation. A mistake of semantics, that is, meaning, can be more difficult to detect. If you write the second switch statement to win on a 7 and lose on the point value, you may have written correct JavaScript code, but it won't be the game of craps.
It shouldn't happen here because you can copy my code, but a common mistake is to get confused about the coordinate system and think that vertical values increase going up the screen instead of down.
In this chapter, you learned how to
declare variables and use global variables to represent application state
write code to perform arithmetic operations
define and use programmer-defined functions
use several built-in features of JavaScript, including the
Math.randomandMath.floormethodsuse
ifandswitchstatementscreate a canvas using an HTML element
draw rectangles and circles
This chapter introduced a key feature of HTML5, the canvas, as well as the notions of randomness and interactivity. It also presented many programming features you'll use in the examples in the rest of the book. In particular, the technique of building an application in stages is useful. The next chapter will feature the animation of a ball bouncing in a box—preparation for the real games in Chapter 4: the ballistics simulations called cannon ball and sling shot.