

drawing polygons
placing text on the canvas
programming techniques for representing information
programming a pause
calculating elapsed time
one method of shuffling a set of card objects
This chapter demonstrates two versions of a card game known variously as memory or concentration. Cards appear face down, and the player turns over two at a time (by clicking on them) in an attempt to find matched pairs. The program removes matches from the board but [virtually] flips back cards that do not match. When players make all the matches, the game shows the elapsed time.
The first version of the game I describe uses polygons for the face cards; the second uses family photos. You'll notice other differences, which were made to illustrate several HTML5 features, but I also urge you to think about what the versions have in common.
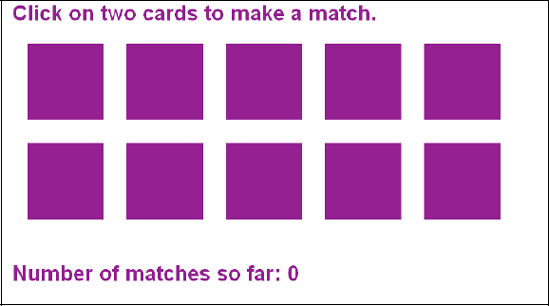
Figure 5-1 shows the opening screen of version one. When a player completes the game, the form that keeps track of matches also shows the elapsed time.
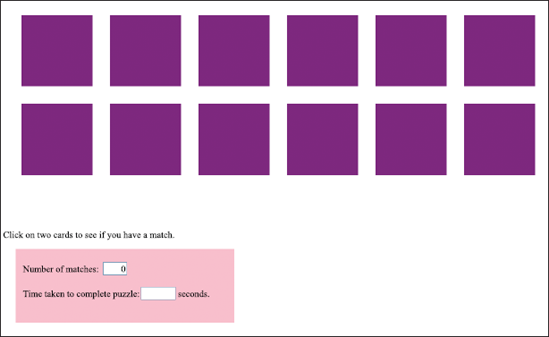
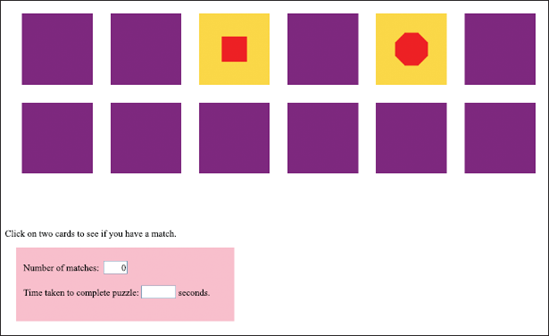
Figure 5-2 displays the result after a player has clicked on two cards (the purple squares). The depicted polygons don't match, so after a pause the program replaces them with images of the card backs, making the cards appear to have flipped over.
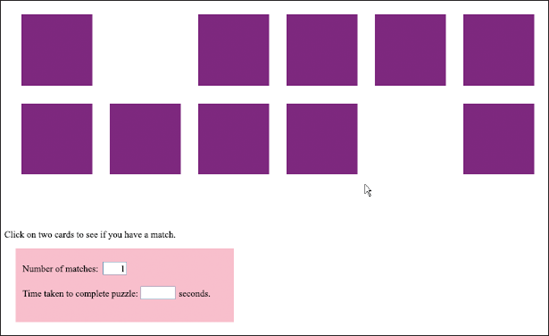
When two cards match, the application removes them and notes the match in the form (Figure 5-3).
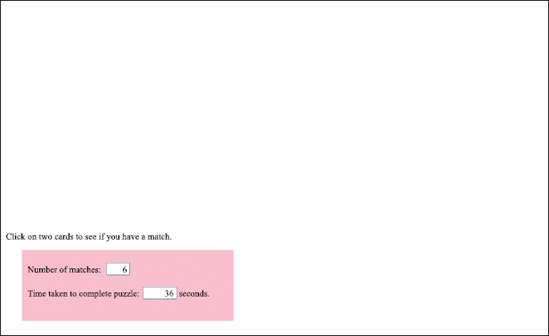
As illustrated in Figure 5-4, the game displays the result—in this case, 6 matches in 36 seconds—when the player finishes.
In version two of the game, the card fronts display photographs of people rather than polygons. And note that although many memory games consider images to be the same only if they're completely identical, this one is similar to a 2 of Hearts matching a 2 of Diamonds in a deck of playing cards. To illustrate a programming point, we'll define a match as the same person, even in differing pictures. This requires a method of encoding the information we use to determine matching states. Version two of the game also demonstrates writing text on the canvas, as you can see in Figure 5-5, which depicts the opening screen.
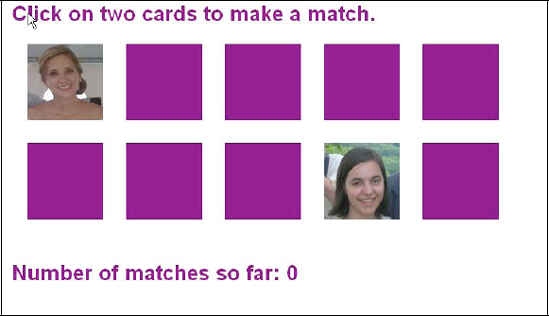
To see one possible result of clicking on two cards in our new game, look at Figure 5-6.
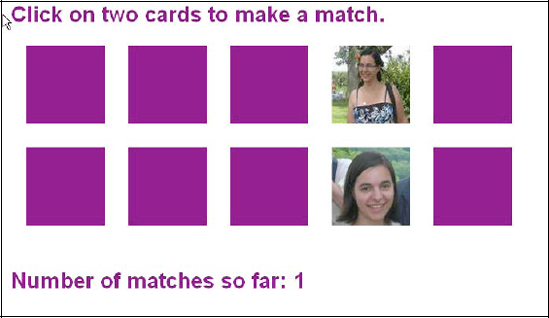
Because the result shows two different people—after pausing to let the player view both pictures—the application flips the cards over and lets the player try again. Figure 5-7 shows a successful selection—two images of the same person (albeit in different pictures).
The application removes matched images from the board. When all cards are removed, the time taken to complete the game appears along with instructions on how to play again, as shown in Figure 5-8.
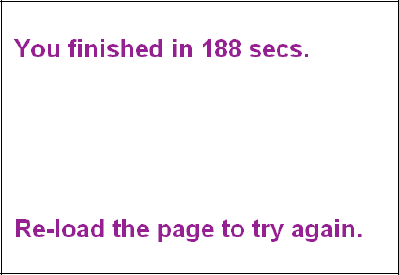
Figure 5.8. The final screen of the game (photo version). All images have been matched, so no cards appear.
You can play the game using photos available for download from the book's page on the Friends of ED web site (www.friendsofed.com/), but it's more fun to use your own. You can start with a small number—say two or three pairs of images—then work up to images of the whole family, class, or club. And for version one of the game, you can replace the polygons with your own designs.
The digital versions of the games require ways to represent the card backs (which are all the same) and the fronts with their distinct polygons or photos. The applications must also be able to tell which cards match and where cards are on the board. Additionally, players require feedback. In the real-world game, participants flip over two cards and look for a match (which takes a few moments). If there's none, they flip the cards face down again.
The computer program must show the faces of the selected cards and pause after revealing the second card so players have time to see the two faces. This pause is an example of something required for a computer implementation that occurs more-or-less naturally when people play the game. The application should also display the current number of pairs found and, when the game is complete, the length of time participants took to find them all. The polygon and photo versions of the program use different approaches to accomplish these tasks.
Here's a summary of what the two game versions must do:
Draw the card backs.
Shuffle the cards before a player makes an initial selection so the same array of choices doesn't appear every time.
Detect when a player clicks on a card, and distinguish between a first and a second click.
On detecting a click, show the appropriate card face by: drawing polygons in the case of game version one or displaying the correct photograph for version two.
Remove pairs that match.
Operate appropriately even if those pesky players do the unexpected, such as clicking on the same card twice or on an empty space formerly occupied by a card.
Let's go over the specific HTML5 and JavaScript features that provide what we need to implement the games. We'll build on material covered previously: the general structure of HTML documents; how to draw rectangles, images, and paths made up of line segments on a canvas element; programmer-defined and built-in functions; programmer objects; the form element; and arrays.
New HTML5 and JavaScript features include the time out event, the use of Date objects for the calculation of elapsed time, writing and drawing text on the canvas, and several useful programming techniques that you'll find valuable in future applications.
As in the previous chapters, this section describes the HTML5 features and programming techniques in general terms. You can see all the code in context in the "Building the Application" section. If you like, you can skip to that section to see the code, then return here for explanations of how the features work.
When we hold a physical card in our hands, we can see what it is. There's a card face and back, and the backs are all the same. We can clearly determine the cards' positions on the game board and whether their faces or backs show. To implement a computer game, we must represent—encode—all that information. Encoding is an essential part of creating many computer applications, not just games.
In this chapter (and throughout the book), I describe one way to accomplish the task. Keep in mind, though, that there's rarely just one way to implement a feature of an application. That said, different strategies for building an application will likely have some techniques in common.
Our approach to handling cards will employ a programmer-defined object. Creating a programmer-defined object in JavaScript involves writing the constructor function; in this case we'll call it Card. The advantage of using programmer-defined objects is that JavaScript provides the dot notation needed to access information and code for objects of a common type. We did this for the cannonball and slingshot games in Chapter 4.
We'll give the Card object properties that will hold the card's location (sx and sy) and dimensions (swidth and sheight), a pointer to a function to draw a back for the card, and for each case, the information that specifies the appropriate front (info).
In the case of a polygon, the value of info will indicate the number of sides to be drawn. (In a later section we'll discuss the code for drawing it.) For a photo card face, the value will be a reference, img, to an Image object we've created. The object will hold a specific image file along with a number (info) that ties together pictures that match. To draw the image for the file, we'll use the built-in drawImage method.
Needless to say, the cards don't exist as physical entities, with two sides. The application draws the card's face or back on the canvas where the player expects to see it. The function flipback draws the card's back. To give the appearance of a removed card, flipback effectively erases a card by drawing a rectangle that's the color of the board.
Both applications use a function named makedeck to prepare the deck, a process that includes creation of the Card objects. For the polygon version of the game, we store the number of sides (from three to eight) in the Card objects. The application draws no polygons during setup, though. The photos version sets up an array called pairs, listing the image file names for the photos. You can follow this example to create your own family or group memory game.
Tip
If you use the online code to play the game, as noted earlier, you can download the image files. To make the game your own, you need to upload the pictures and then change the code to reference your files. The code indicates what you need to change.
The makedeck function creates the Image objects and uses the pairs array to set the src property to the image object. When the code creates Card objects, it puts in the index value that controls the pairs array so that matched photos have the same value. As in the polygon version, the application draws no image on the canvas during the creation of the deck. On the screen, the cards all appear the same; the information is different, though. These cards are in fixed positions—shuffling comes later.
The code interprets position information, the sx and sy properties, differently for Card and Polygon. In the first case, the information refers to the upper-left corner. In the second case, the value identifies the center of the polygon. You can compute one from the other, though.
We need a way to determine how long the player took to make all the matches. JavaScript provides a way to measure elapsed time. You can view the code in context in the "Building the Application section." Here I provide an explanation of how to determine the number of seconds between two distinct events in a running program.
A call to Date() generates an object with date and time information. The two lines
starttime = new Date();
 starttime = Number(starttime.getTime());
store the number of milliseconds (thousands of a second) since the start of 1970 in the variable starttime. (The reason JavaScript uses 1970 doesn't matter.)
When either of our two memory programs determines the game is over, it invokes Date() again as follows:
var now = new Date();
var nt = Number(now.getTime());
var seconds = Math.floor(.5+(nt-starttime)/1000);
This code
creates a
new Dateobject and stores it in the variablenow.extracts the time using
getTime, converts it toNumber, and assigns it to the variablent. This meansntholds the number of milliseconds from the start of 1970 until the point at which the code calledDate. The program then subtracts the saved starting time,starttime, from the current time,nt.divides by 1,000 to get to seconds.
adds
.5and invokesMath.floorto round the result up or down to whole seconds.
If you need more precision than seconds provides, omit or modify the last step.
You can use this code whenever you need to calculate time elapsed between two events in a program.
When we play memory using real cards, we don't consciously pause before flipping nonmatching cards face down. But as noted earlier, our computer implementation must provide a pause so players have time to see the two differing cards. You may recall from chapters 3 and 4 that the animation applications—bouncing ball, cannonball, and slingshot—used the JavaScript function setInterval to set up events at fixed time intervals. We can employ a related function, setTimeout, in our memory games. (To see the complete code in context, go to the "Building the Application" section.) Let's see how to set up the event and what happens when the pause time runs out.
The setTimeout function sets up a single event, which we can use to impose a pause. The choose function, called when a player clicks on the canvas, first checks the firstpick variable to determine if the person has made a first or second selection. In either case, the program draws the card front on the canvas in the same spot as the card back. If the click was a second choice and the two cards match, the code sets the variable matched to true or false, depending on whether the cards did or didn't match. If the application determines that the game isn't over, the code invokes
setTimeout(flipback,1000);
This leads to a call to the flipback function in 1,000 milliseconds (1 second). The function flipback then uses the matched variable to determine whether to redraw card backs or erase the cards by drawing rectangles with the table background color at the appropriate card locations.
You can use setTimeout to set up any individual timed events. You need to specify the time interval and the function you want invoked when the interval expires. Remember that the time unit is milliseconds.
HTML5 includes a mechanism for placing text on the canvas. This provides a much more dynamic, flexible way to present text than previous versions. You can create some good effects by combining text placement with the drawing of rectangles, lines, arcs, and images we've already demonstrated. In this section, we'll outline the steps for placing text in a canvas element, and we'll include a short example that you can try. If you want, skip ahead to the "Building the Application" section to view the complete description of the code that produces what you see in Figures 5-5 through 5-8 for the photos version of the memory game.
To put text on the canvas, we write code that sets the font, and then we use fillText to draw a string of characters starting at a specified x-y location. The following example creates words using an eclectic set of fonts (see the caution note later in the section).
<html>
<head>
    <title>Fonts</title>
<script type="text/javascript">
var ctx;
function init(){
   ctx = document.getElementById('canvas').getContext('2d'),
   ctx.font="15px Lucida Handwriting";
   ctx.fillText("this is Lucida Handwriting", 10, 20);
   ctx.font="italic 30px HarlemNights";
   ctx.fillText("italic HarlemNights",40,80);
   ctx.font="bold 40px HarlemNights"
   ctx.fillText("HarlemNights",100,200);
   ctx.font="30px Accent";
   ctx.fillText("Accent", 200,300);
}
</script>
</head>
<body onLoad="init();">
<canvas id="canvas" width="900" height="400">
Your browser doesn't support the HTML5 element canvas.
</canvas>
</body>
</html>
This HTML document produces the screenshot shown in Figure 5-9.
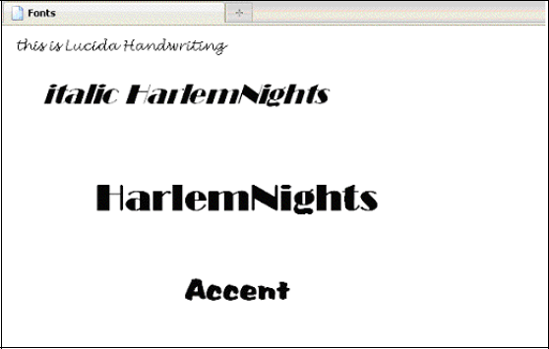
Figure 5.9. Text in different fonts drawn on the canvas, produced using the font and fillText functions
Warning
Make sure you pick fonts that will be present on the computers of all your players. In Chapter 10 you'll learn how to use a CSS feature, called font-family, that provides a systematic way to specify a primary font and backups.
Note that although what you see appears to be text, you're actually looking at ink on the canvas—that is, bitmap images of text, not a text field that you can modify in place. This means that to change the text, we need to write code that will completely erase the current image. We do so by setting the fillStyle to the value we placed in the variable tablecolor earlier, and use fillRect at the appropriate location and with the necessary dimensions.
After creating the text image, the next step is to set fillStyle to a color other than tablecolor. We'll use the color we chose for the card backs. For the opening screen display of the photograph memory game, here's the code to set the font used for all text:
ctx.font="bold 20pt sans-serif";
Using the sans-serif font makes sense, since it's a standard font present on any computer.
Putting together what we've done to this point, here's the code to display the number of matches at a particular point in the game:
ctx.fillStyle= tablecolor;
ctx.fillRect(10,340,900,100);
ctx.fillStyle=backcolor;
ctx.fillText
     ("Number of matches so far: "+String(count),10,360);
The first two statements erase the current tally and the next two put in the updated result. The expression "Number of matches so far: "+String(count) deserves more explanation. It accomplishes two tasks:
It takes the variable
count, which is a number, and turns it into a string of characters.It concatenates the constant string
"Number of matches so far: "with the result ofString(count).
The concatenation demonstrates that the plus sign has two meanings in JavaScript: If the operands are numbers, the sign indicates addition. If the operands are character strings, it indicates the two strings should be concatenated—put together. A fancy phrase for a single symbol having several meanings is operator overloading.
What will JavaScript do if one operand is a string and the other a number? The answer depends on which of the two operands is what data type. You'll see examples of code in which the programmer doesn't put in the commands to convert text to a number or vice versa, but the statement works because of the specific order of operations.
I suggest not taking chances, though. Instead, try to remember the rules that govern interpretation of the plus sign. If you notice that your program increases a number from, say, 1 to 11 to 111 when you're expecting 1, 2, 3, your code is concatenating strings instead of incrementing numbers, and you need to convert strings to numbers.
Creating polygons provides a good demonstration of HTML5's drawing facilities. To understand the code-development process used here for drawing polygons, think of the geometric figure as a wheel-like shape with spokes emanating from its center to each of its vertices. The spokes will not appear in the drawings, but are to help you, like they helped me, figure out how to draw a polygon. Figure 5-10 illustrates this with a triangle.
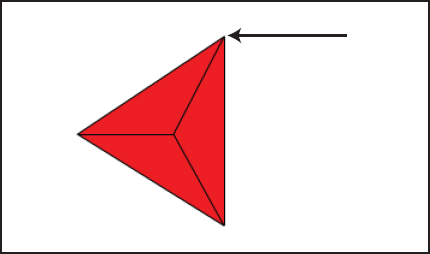
Figure 5.10. Representing a triangle as a spoked geometric shape can help clarify code development for drawing polygons. The arrow indicates the first point in the drawing path.
To determine the measure of the angle between spokes, we divide the quantity 2*Math.PI (representing a complete circle) by the number of sides the polygon has. We use the angle value and the moveTo method to draw the points of the path.
The program draws the polygon as a filled-in path that starts at the point (indicated by the arrow in Figure 5-10) specified by one-half the value of angle. To get to the point, we use the moveTo method along with the radius, Math.sin and Math.cos. We then use the lineTo method for n-1 more points, proceeding in clockwise fashion. For the triangle, n-1 is two more points. For the octagon it would be seven more. After running through a for loop with the lineTo points, we invoke the fill method to produce a filled-in shape. To see the complete annotated code, go to the "Building the Application" section."
Note
Note: Drawing and redrawing polygons takes time, but that doesn't cause problems with this application. If a program has a large number of intricate designs, preparing them ahead of time as pictures may make sense. That approach, however, requires users to download the files, which can take quite a while. You need to experiment to see which approach works better overall.
As noted previously, the memory game requires the program to shuffle the cards before each round, since we don't want the cards to appear in the same position time after time. The best way to shuffle sets of values is the subject of extensive research. In Chapter 10, which describes the card game called blackjack or 21, you'll find a reference to an article that describes a technique claimed to be the most efficient way to produce a shuffled deck.
For memory/concentration, let's implement the way I played the game as a child. I and the others would lay out all the cards, then pick up and swap pairs. When we thought we had done it a sufficient number of times, we would begin to play. In this section, we'll explore a few more concepts behind this approach. (To examine the shuffle function, you can skip ahead to the "Building the Application" section.)
To write the JavaScript for the swap method of shuffling, we first need to define "sufficient number of times." Let's make that three times the number of cards in the deck, which we've represented in the array variable deck. But since there are no cards, just data representing cards, what are we swapping? The answer is the information uniquely defining each card. For the polygon memory game, this is the property info. For the picture game, it's info and img.
To get a random card, we use the expression Math.floor(Math.random()*dl), where dl, standing for deck length, holds the number of cards in the deck. We do this twice to obtain the pair of cards to be (virtually) swapped. This could produce the same number, meaning a card is swapped with itself, but that's not really a concern. If it happens, this step in this process has no effect. The code mandates a large number of swaps, so one swap not doing anything is okay.
Carrying out the swap is the next challenge, and it requires some temporary storage. We'll use one variable, holder, for the polygon version of the game and two variables, holderimg and holderinfo, for the picture case.
The next step is to explain how we implement the player moves, namely the player clicking on a card. In HTML5, we can handle the click event employing much the same approach that we took with the mousedown event (described in Chapter 4). We'll use the addEventListener method:
canvas1 = document.getElementById('canvas'),
canvas1.addEventListener('click',choose,false);
This appears in the init function. The choose function must contain code to determine which card we choose to shuffle. The program must also return the coordinates of the mouse when the player clicks on the canvas. The methodology for obtaining mouse coordinates is also the same as that covered in Chapter 4.
Unfortunately, different browsers implement handling of mouse events in different ways. I discussed this in Chapter 4, and I repeat the explanation here. The following works in Chrome, Firefox, and Safari.
if ( ev.layerX || ev.layerX==0) {
   mx= ev.layerX;
   my = ev.layerY;
}
else if (ev.offsetX || ev.offsetX==0 ) {
   mx = ev.offsetX;
   my = ev.offsetY;}
This works because if ev.layerX doesn't exist, it will be assigned a value of false. If it does exist but has value 0, the value will also be interpreted as false, but ev.layerX==0 will be true. So if there's a good ev.layerX value, the program uses it. Otherwise, the code looks at ev.offsetX. If neither works, mx and my won't get set.
Because the cards are rectangles, going through the deck and doing compare operations is relatively easy using the mouse cursor coordinates (mx, my), the location of the upper-left corner, and the width and height of each card. Here's how we construct the if condition:
if ((mx>card.sx)&&(mx<card.sx+card.swidth)&&(my>card.sy)&&(my<card.sy+card.sheight)) {Note
Note: The next chapter, which describes the way you create HTML markup at runtime, shows how to set up event handling for specific elements positioned on the screen as opposed to using the whole canvas element.
We clear the variable firstpick and initialize it as true, which indicates that this is the first of two picks by a player. The program changes the value to false after the first pick and back to true after the second. Variables like this, which flip back and forth between two values, are called flags or toggles.
Note that the specifics of this section apply just to these memory games, but the general lesson holds for building any interactive application. There are at least two ways a player can thwart the game. Clicking twice on the same card is one; clicking on a region where a card has been removed (that is, the board has been painted over) is another.
To deal with the first case, after the if-true clause that determines whether the mouse is over a certain card, insert the if statement
if ((firstpick) || (i!=firstcard)) break;
This line of code triggers an exit from the for statement if the index value (i) is fine, which happens when either: 1) this is a first pick or 2) this isn't a first pick and i doesn't correspond to the first card chosen.
Preventing the second problem—clicking on a "ghost" card—requires more work. When the application removes cards from the board, in addition to painting over that area of the canvas, we can assign a value (-1, say) to the sx property. This will mark the card as having been removed. This is part of the flipback function. The choose function contains the code that examines the sx property and does the checking (only if sx is >= 0). The function incorporates both cheating tests in the following for loop:
for (i=0;i<deck.length;i++){
   var card = deck[i];
   if (card.sx >=0)
      if
 ((mx>card.sx)&&(mx<card.sx+card.swidth)&&(my>card.sy)&&(my<card.sy+card.sheight)) {
        if ((firstpick)|| (i!=firstcard)) break;
        }
   }
In the three if statements, the second is the whole clause of the first. The third has the single statement break, which causes control to leave the for loop. Generally, I recommend using brackets (for example: { and }) for if true and else clauses, but here I used the stripped-down format for single statements to show you that format and also because it seemed clear enough.
This section presents the complete code for both versions of the game. Because the applications contain multiple functions, the section provides a table for each game that tells what each function calls and is called by.
Table 5-1 is the function listing for the polygon version of the memory game. Notice that some of the invocation of functions is done based on events.
Table 5.1. Functions in the Polygon Version of the Memory Game
Function | Invoked By/Called By | Calls |
|---|---|---|
| Invoked in response to the |
|
| Invoked in response to the |
|
| Invoked in response to the | |
Invoked as the draw method for a card in | ||
| Called in | |
| Called in | |
| Called in | |
| Called by | |
| Called as the |
Table 5-2 shows the commented code for the complete polygon version of the application. When reviewing it, think about the similarities to applications described in other chapters. And remember that this illustrates just one way to name the application's components and program it. Other ways may work equally well.
Whatever programming choices you make, put comments in your code (using two slashes per line: //) and include blank lines. You don't need to comment every line, but doing a decent job of commenting will serve you well when you have to go back to your code to make improvements.
Table 5.2. Complete Code for the Polygon Version of the Memory Game
<html> | Starting |
<head> | Starting |
<title>Memory game using polygons</title> | Complete |
<style> | Starting |
form {
| Specify styling for the form |
width:330px; | Set the |
margin:20px; | Set the external |
background-color:pink; | Set the |
Padding:20px; | Set the internal |
} | Close the style |
input {
| Set the styling for input fields |
text-align:right; | Set right alignment—suitable for numbers |
} | Close the style |
</style> | Close the style element |
<script type="text/javascript"> | Start the |
var ctx; | Variable that holds the canvas context |
var firstpick = true; | Declare and initialize |
var firstcard; | Declare a variable to hold the info defining the first pick |
var secondcard; | Declare a variable to hold the info defining the second pick |
var frontbgcolor = "rgb(251,215,73)"; | Set the background color value for the card fronts |
var polycolor = "rgb(254,11,0)"; | Set the color value for the polygons |
var backcolor = "rgb(128,0,128)"; | Set the color value for card backs |
var tablecolor = "rgb(255,255,255)"; | Set the color value for the board (table) |
var cardrad = 30; | Set the radius for the polygons |
var deck = []; | Declare the deck, initially an empty array |
var firstsx = 30; | Set the position in x of the first card |
var firstsy = 50; | Set the position in y of the first card |
var margin = 30; | Set the spacing between cards |
var cardwidth = 4*cardrad; | Set the card width to four times the radius of the polygons |
var cardheight = 4*cardrad; | Set the card height to four times the radius of the polygons |
var matched; | This variable is set in |
var starttime; | This variable is set in |
function Card(sx,sy,swidth,sheight,info) {
| Header for the |
this.sx = sx; | Set the horizontal coordinate |
this.sy = sy; | ... vertical coordinate |
this.swidth = swidth; | ... width |
this.sheight = sheight; | .... height |
this.info = info; | ... |
this.draw = drawback; | Specify how to draw |
} | Close the function |
function makedeck() {
| Function header for setting up the deck |
var i; | Used in the |
var acard; | Variable to hold the first of a pair of cards |
var bcard; | Variable to hold the second of a pair of cards |
var cx = firstsx; | Variable to hold the x coordinate. Start out at the first x position. |
var cy = firstsy; | Will hold the y coordinate. Start out at the first y position. |
for(i=3;i<9;i++) {
| Loop to generate cards for triangles through octagons |
acard = new Card(cx,cy,cardwidth,cardheight,i); | Create a card and position |
deck.push(acard); | Add to deck |
bcard = new Card(cx,cy+cardheight+margin,cardwidth,cardheight,i); | Create a card with the same info, but below the previous card on screen |
deck.push(bcard); | Add to deck |
cx = cx+cardwidth+ margin; | Increment to allow for card width plus margin |
acard.draw(); | Draw the card on the canvas |
bcard.draw(); | Draw the card on the canvas |
} | Close the |
Shuffle(); | Shuffle the cards |
} | Close the function |
function shuffle() {
| Header for |
var i; | Variable to hold a reference to a card |
var k; | Variable to hold a reference to a card |
var holder; | Variable needed to do the swap |
var dl = deck.length | Variable to hold the number of cards in the deck |
var nt; | Index for the number of swaps |
for (nt=0;nt<3*dl;nt++) {
|
|
i = Math.floor(Math.random()*dl); | Get a random card |
k = Mathfloor(Math.random()*dl); | Get a random card |
holder = deck[i].info; | Store the info for |
deck[i].info = deck[k].info; | Put in |
deck[k].info = holder; | Put into |
} | Close |
} | Close function |
function Polycard(sx,sy,rad,n) {
| Function header for |
this.sx = sx; | Set up the x coordinate |
this.sy = sy; | ... the y |
this.rad = rad; | ...the polygon radius |
this.draw = drawpoly; | ...how to draw |
this.n = n; | ...number of sides |
this.angle = (2*Math.PI)/n | Compute and store the angle |
} | Close the function |
function drawpoly() {
| Function header |
ctx.fillStyle= frontbgcolor; | Set the front background |
ctx.fillRect(this.sx-2*this.rad,this.sy- 2*this.rad,4*this.rad,4*this.rad); | The corner of the rectangle is up and to the left of the center of the polygon |
ctx.beginPath(); | Start the path |
ctx.fillStyle=polycolor; | Change to color for polygon |
var i; | Index variable |
var rad = this.rad; | Extract the radius |
ctx.moveTo(this.sx+rad*Math.cos(- .5*this.angle),this.sy+rad*Math.sin(-.5*this.angle)); | Move up to the first point |
for (i=1;i<this.n;i++) {
|
|
ctx.lineTo(this.sx+rad*Math.cos((i- .5)*this.angle),this.sy+rad*Math.sin((i-.5)*this.angle)); | Set up drawing of line segments |
} | Close |
ctx.fill(); | Fill in the path |
} | Close function |
function drawback() {
| Function header |
ctx.fillStyle = backcolor; | Set card back color |
ctx.fillRect(this.sx,this.sy,this.swidth,this.sheight); | Draw rectangle |
Close function | |
function choose(ev) {
| Function header for |
var mx; | Variable to hold mouse |
var my; | Variable to hold mouse |
var pick1; | Variable to hold reference to created |
var pick2; | Variable to hold reference to created |
if ( ev.layerX || ev.layerX == 0) {
| Can we use |
mx= ev.layerX; | Set |
my = ev.layerY; | Set |
} | Close if true |
else if (ev.offsetX || ev.offsetX == 0) {
| Can we use |
mx = ev.offsetX; | Set |
my = ev.offsetY; | Set |
} | Close |
var i; | Declare variable for indexing in the |
for (i=0;i<deck.length;i++){
| Loop through the whole deck |
var card = deck[i]; | Extract a card reference to simplify the code |
if (card.sx >=0) | Check that card isn't marked as having been removed |
            if
((mx>card.sx)&&(mx<card.sx+card.swidth)&&(my>card.sy)&&(my<card
.sy+card.sheight))   {
| And then check if the mouse is over this card |
if ((firstpick)|| (i!=firstcard)) break; | If so, check that the player isn't clicking on the first card again, and if this is true, leave the |
} | Close |
Close | |
if (i<deck.length) {
| Was the |
if (firstpick) {
| If this is a first pick... |
firstcard = i; | ...Set |
firstpick = false; | Set |
pick1 = new Polycard(card.sx+cardwidth*.5,card.sy+cardheight*.5,cardrad,car d.info); | Create polygon with its coordinates at the center |
pick1.draw(); | Draw polygon |
} | Close if first pick |
else {
| Else... |
secondcard = i; | ...Set |
pick2 = new Polycard(card.sx+cardwidth*.5,card.sy+cardheight*.5,cardrad,car d.info); | Create polygon with its coordinates at the center |
pick2.draw(); | Draw polygon |
if (deck[i].info==deck[firstcard].info) {
| Check for a match |
matched = true; | Set |
var nm = 1+Number(document.f.count.value); | Increment the number of matches |
document.f.count.value = String(nm); | Display the new count |
if (nm>= .5*deck.length) {
| Check if the game is over |
var now = new Date(); | Get new |
var nt = Number(now.getTime()); | Extract and convert the time |
var seconds = Math.floor(.5+(nt-starttime)/1000); | Compute the seconds elapsed |
document.f.elapsed.value = String(seconds); | Output the time |
} | Close if this is the end of the game |
} | Close if there's a match |
else {
| Else... |
matched = false; | Set |
} | Close the |
firstpick = true; | Reset |
setTimeout(flipback,1000); | Set up the pause |
} | Close not first pick |
} | Close good pick (click on a card— |
} | Close the function |
function flipback() {
| Function header— |
if (!matched) {
| If no match... |
deck[firstcard].draw(); | ...Draw the card back |
deck[secondcard].draw(); | ...Draw the card back |
} | ...Close the clause |
else {
| Else need to remove cards |
ctx.fillStyle = tablecolor; | Set to the table/board color |
ctx.fillRect(deck[secondcard].sx,deck[secon dcard].sy,deck[secondcard].swidth,deck[secondcard].sheight); | Draw over the card |
ctx.fillRect(deck[firstcard].sx,deck[firstcard].sy,deck[firstca rd].swidth,deck[firstcard].sheight); | Draw over the card |
deck[secondcard].sx = −1; | Set this so the card won't be checked |
deck[firstcard].sx = −1; | Set this so tso card won't be checked |
} | Close if there's no match |
Close the function | |
function init(){
| Function header init |
ctx = document.getElementById('canvas').getContext('2d'),
| Set |
canvas1 = document.getElementById('canvas'),
| Set canvas1 for event handling |
canvas1.addEventListener('click',choose,false);
| Set up event handling |
makedeck(); | Create the deck |
document.f.count.value = "0"; | Initialize visible count |
document.f.elapsed.value = ""; | Clear any old value |
starttime = new Date(); | First step to setting starting time |
starttime = Number(starttime.getTime()); | Reuse the variable to set the milliseconds from benchmark |
shuffle(); | Shuffle the card info values |
} | |
</script> | Close the |
</head> | Close |
<body onLoad="init();"> |
|
<canvas id="canvas" width="900" height="400"> |
|
Your browser doesn't support the HTML5 element canvas. | Warning message |
</canvas> | Close |
<br/> | Line break before instructions |
Click on two cards to see if you have a match. | Instructions |
<form name="f"> |
|
Number of matches: <input type="text" name="count" value="0" size="1"/> | Label and input element used for output |
<p> | Paragraph break |
Time taken to complete puzzle: <input type="text" name="elapsed" value=" " size="4"/> seconds. | Label and input element used for output |
</form> | Close |
</body> | Close |
</html> | Close |
You can change this game by changing the font, font size, color, and background color for the form. More ways to make the application your own are suggested later in this section.
The version of the memory game that uses pictures has much the same structure as the polygon version. It doesn't require a separate function to draw the picture. Table 5-3 is the function listing for this version of the game.
Table 5.3. Functions in the Photo Version of the Memory Game
Invoked By/Called By | Calls | |
|---|---|---|
| Invoked in response to the |
|
| Invoked in response to the | |
| Invoked in response to the | |
| Invoked as the draw method for a card in | |
| Called in | |
| Called in | |
| Called by |
The code for the photos version of the memory game is similar to that for the polygon version. Most of the logic is the same. But because this example demonstrates the writing of text on the canvas, the HTML document doesn't have a form element. The code follows in Table 5-4, with comments on the lines that are different. I also indicate where you would put in the names of the image files for your photographs. Before looking at this second version of the memory game, think about which parts are likely to be the same and which may be different.
Table 5.4. Complete Code for the Photo Version of the Memory Game
<html> | |
<head> | |
<title>Memory game using pictures</title> | Complete title element |
<script type="text/javascript"> | |
var ctx; | |
var firstpick = true; | |
var firstcard = −1; | |
var secondcard; | |
var backcolor = "rgb(128,0,128)"; | |
var tablecolor = "rgb(255,255,255)"; | |
var deck = []; | |
var firstsx = 30; | |
var firstsy = 50; | |
var margin = 30; | |
var cardwidth = 100; | You may need to change this if you want your pictures to be a different width... |
var cardheight = 100; | ...and/or height |
var matched; | |
var starttime; | |
var count = 0; | Needed to keep count internally |
var pairs = [ | The array of pairs of image files for the five people |
["allison1.jpg","allison2.jpg"], | This is where you put in the names of your picture files |
[ "grant1.jpg","grant2.jpg"], | ... |
["liam1.jpg","liam2.jpg"], | ... |
["aviva1.jpg","aviva2.jpg"], | ... |
["daniel1.jpg","daniel2.jpg"] | You can use any number of paired pictures, but notice how the array holding the last pair does not have a comma after the bracket. |
] | |
function Card(sx,sy,swidth,sheight, img, info) {
| |
this.sx = sx; | |
this.sy = sy; | |
this.swidth = swidth; | |
this.sheight = sheight; | |
this.info = info; | Indicates matches |
this.img = img; |
|
this.draw = drawback; | |
} | |
function makedeck() {
| |
var i; | |
var acard; | |
var bcard; | |
var pica; | |
var picb; | |
var cx = firstsx; | |
var cy = firstsy; | |
for(i=0;i<pairs.length;i++) {
| |
pica = new Image(); | Create the |
pica.src = pairs[i][0]; | Set to the first file |
acard = new Card(cx,cy,cardwidth,cardheight,pica,i); | Create |
deck.push(acard); | |
picb = new Image(); | Create the |
picb.src = pairs[i][1]; | Set to second file |
bcard = new Card(cx,cy+cardheight+margin,cardwidth,cardheight,picb,i); | Create |
deck.push(bcard); | |
cx = cx+cardwidth+ margin; | |
acard.draw(); | |
bcard.draw(); | |
} | |
} | |
function shuffle() {
| |
var i; | |
var k; | |
var holderinfo; | Temporary place for the swap |
var holderimg; | Temporary place for the swap |
var dl = deck.length | |
var nt; | |
      for (nt=0;nt<3*dl;nt++) {  //do the swap 3 times
deck.length times
| |
i = Math.floor(Math.random()*dl); | |
k = Math.floor(Math.random()*dl); | |
holderinfo = deck[i].info; | Save the |
holderimg = deck[i].img; | Save the |
deck[i].info = deck[k].info; | Put |
deck[i].img = deck[k].img; | Put |
deck[k].info = holderinfo; | Set to the original |
deck[k].img = holderimg; | Set to the original |
} | |
} | |
function drawback() {
| |
ctx.fillStyle = backcolor; | |
ctx.fillRect(this.sx,this.sy,this.swidth,this.sheight); | |
} | |
function choose(ev) {
| |
var out; | |
var mx; | |
var my; | |
var pick1; | |
var pick2; | |
if ( ev.layerX || ev.layerX == 0) {
| Reminder: This is the code for handling differences among the three browsers |
mx= ev.layerX; | |
my = ev.layerY; | |
} else if (ev.offsetX || ev.offsetX == 0) {
| |
mx = ev.offsetX; | |
my = ev.offsetY; | |
} | |
var i; | |
for (i=0;i<deck.length;i++){
| |
var card = deck[i]; | |
if (card.sx >=0) //this is the way to avoid checking for clicking on this space | |
            if
((mx>card.sx)&&(mx<card.sx+card.swidth)&&(my>card.sy)&&(my<card.
sy+card.sheight)) {
| |
if ((firstpick)|| (i!=firstcard)) {
| |
break;} | |
} | |
if (i<deck.length) {
| |
if (firstpick) {
| |
firstcard = i; | |
firstpick = false; | |
ctx.drawImage(card.img,card.sx,card.sy,card.swidth,card.sheight) ; | Draw the photo |
} | |
else {
| |
secondcard = i; | |
ctx.drawImage(card.img,card.sx,card.sy,card.swidth,card.sheight) ; | Draw the photo |
if (card.info==deck[firstcard].info) {
| Check if there's a match |
matched = true; | |
count++; | Increment |
ctx.fillStyle= tablecolor; | |
ctx.fillRect(10,340,900,100); | Erase area where text will be |
ctx.fillStyle=backcolor; | Reset to the color for text |
ctx.fillText("Number of matches so far:
 "+String(count),10,360);
| Write out |
if (count>= .5*deck.length) {
| |
var now = new Date(); | |
var nt = Number(now.getTime()); | |
var seconds = Math.floor(.5+(nt-starttime)/1000); | |
ctx.fillStyle= tablecolor; | |
ctx.fillRect(0,0,900,400); | Erase the whole canvas |
ctx.fillStyle=backcolor; | Set for drawing |
out="You finished in "+String(seconds)+ " secs."; | Prepare the text |
ctx.fillText(out,10,100); | Write the text |
ctx.fillText("Reload the page to try again.",10,300);
| Write the text |
} | |
} | |
else {
| |
matched = false; | |
} | |
firstpick = true; | |
setTimeout(flipback,1000); | |
} | |
} | |
} | |
function flipback() {
| |
var card; | |
if (!matched) {
| |
deck[firstcard].draw(); | |
deck[secondcard].draw(); | |
} | |
else {
| |
ctx.fillStyle = tablecolor; | |
ctx.fillRect(deck[secondcard].sx,deck[secondcard].sy,deck[second card].swidth,deck[secondcard].sheight); | |
ctx.fillRect(deck[firstcard].sx,deck[firstcard].sy,deck[firstcar d].swidth,deck[firstcard].sheight); | |
deck[secondcard].sx = −1; | |
deck[firstcard].sx = −1; | |
} | |
} | |
function init(){
| |
ctx = document.getElementById('canvas').getContext('2d'),
| |
canvas1 = document.getElementById('canvas'),
| |
canvas1.addEventListener('click',choose,false);
| |
makedeck(); | |
shuffle(); | |
ctx.font="bold 20pt sans-serif"; | Set |
ctx.fillText("Click on two cards to make a match.",10,20);
| Display instructions as text on canvas |
ctx.fillText("Number of matches so far: 0",10,360);
| Display the count |
starttime = new Date(); | |
starttime = Number(starttime.getTime()); | |
} | |
</script> | |
</head> | |
<body onLoad="init();"> | |
<canvas id="canvas" width="900" height="400"> | |
Your browser doesn't support the HTML5 element canvas. | |
</canvas> | |
</body> | |
</html> |
Though these two programs are real games, they can be improved. For example, the player can't lose. After reviewing this material, try to figure out a way to force a loss, perhaps by limiting the number of moves or imposing a time limit.
These applications start the clock when they're loaded. Some games wait to begin timing until the player performs the first action. If you want to take this friendlier approach, you'd need to set up a logical variable initialized to false and create a mechanism in the choose function for checking whether this variable has been set to true. Since it may not have been, you'd have to include code for setting the starttime variable.
This is a single-player game. You can devise a way to make it a game for two. You probably need to assume that the people are taking turns properly, but the program can keep separate scores for each participant.
Some people like to set up games with levels of difficulty. To do so, you could increase the number of cards, decrease the pause time, or take other measures.
You can make this application yours by using your own pictures. You can, of course, use images of friends and family members, but you could also create an educational game with pictures that represent items or concepts such as musical-note names and symbols, countries and capitals, maps of counties and names, and more. You can change the number of pairs as well. The code refers to the length of the various arrays, so you don't need to go through the code changing the number of cards in the deck. You may need to adjust the values of the cardwidth and cardheight variables, though, to arrange the cards on the screen.
Another possibility, of course, is using a standard deck of 52 cards (or 54 with jokers). For an example using playing cards, skip ahead to Chapter 10, which takes you through creation of a blackjack game. For any matching game, you'll need to develop a way to represent the information defining which cards match.
When we, the developers, check our programs, we tend to do the same thing on each pass. Users, players, and customers, however, often do strange things. That's why getting others to test our applications is a good idea. So ask friends to test out your game. You should always have people who had no hand in building the application test it. You may discover problems you didn't identify.
The HTML document for the polygon version of the memory game contains the complete game, since the program draws and redraws the polygons on the fly. The photo version of the game requires you to upload all the images. You can vary this game by using image files from the Web (outside of your own Web page). Note that the pairs array needs to have the complete addresses.
In this example, you learned how to implement two versions of the game known as memory or concentration) using programming techniques and HTML5 features. These included
examples of programmer-defined functions and programmer-defined objects
how to draw polygons on the canvas using
moveToandlineToalong withMathtrig methodsguidance on how to use a form to show information to players
a method for drawing text with a specified font on the canvas
instructions about how to draw images on the canvas
using
setTimeoutto force a pauseemploying
Dateobjects to compute elapsed time
The applications demonstrated ways to represent information to implement two versions of a familiar game. The next chapter will temporarily depart from the use of canvas to demonstrate dynamic creation and positioning of HTML elements. It also will feature the use of HTML5's video element.