

creating programmer-defined objects
using setInterval for animation
drawing images
form input and validating form input
for loops
drawing with gradients
Animation, whether at the movies, using a flipbook, or generated by computer, involves displaying a sequence of still images fast enough so that we interpret what we see as movement, as life. In this chapter, I'll show you how to produce animated scenes by simulating a ball bouncing in a 2-dimensional box, with horizontal and vertical speeds that can by changed by a player. The first iteration of our program calculates new positions for the ball at fixed intervals of time and displays the result, and it also determines when there would be a virtual collision of ball and wall and how the ball would bounce off the wall. After that, we'll see how you can replace the ball with an image, and how to draw rectangles using gradients. Lastly, we'll examine the HTML5 feature for validating form input. The three examples are
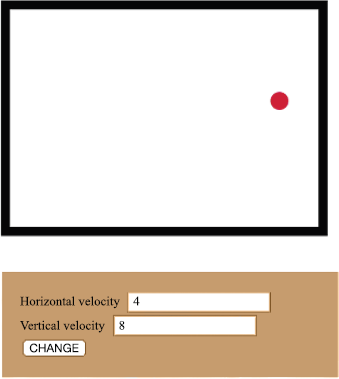
a ball bouncing in a 2-D box (Figure 3-1)
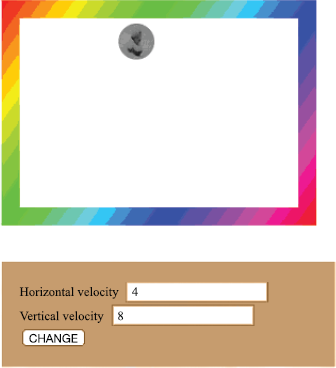
replace the ball with an image and use a gradient for the box walls (Figure 3-2)
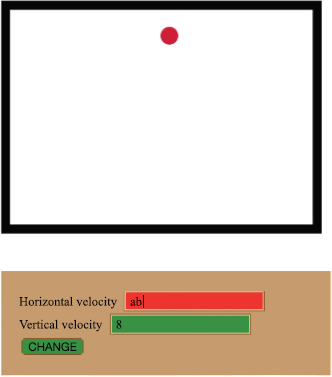
validate the input (Figure 3-3)
Note
The kind of animation we're going to produce is called computed animation, in which the position of an object is recalculated by a computer program and the object is then redisplayed. This is in contrast to cel (or frame-by-frame) animation, which uses predrawn individual static pictures. Animated gifs are examples of cel animation and can be produced in many graphics programs. The Flash authoring tool is excellent for producing and integrating computed animation and cel animation. Flash also has facilities, such as tweening, to help produce the individual static pictures.
You'll have to imagine the animation represented by these static pictures. In Figure 3-1, notice the form with fields for setting the horizontal and vertical velocity.
In Figure 3-2, the ball has been replaced by an image and the walls are filled in using a gradient.
HTML5 lets you specify what the input should be. In this example, I've specified the input should be a number and indicated minimum and maximum values. I used CSS to specify that if a user makes an invalid entry, the color of the field turns red. This is shown in Figure 3-3.
This set of applications demonstrates substantial programming but it's not really a game, though people enjoy seeing heads or other images bouncing in a box. Think about how to make it a game. You can also use ideas learned here to draw something besides a ball bouncing around in a box. The box can have different dimensions and the walls can be much fancier. The next chapter builds on this one and describes how to build simulations of a cannonball and a slingshot.
It is important for this application and, indeed, for all programming, to define the requirements before you begin writing any code. The application requires things I demonstrated in previous chapters: drawing shapes on a canvas element and using a form. For this example, we will actually use the form fields for input. In the dice game described in Chapter 2, they were used strictly for output.
In Chapter 1, the HTML document made use of external image files. In Chapter 2, we drew the faces of the dice entirely with coding. In this chapter, I'll demonstrate both: a bouncing circle drawn with code and a bouncing image from an image file.
To accomplish this, we need some code that will be able to do something—right now, it doesn't matter what—at fixed intervals of time. The intervals need to be short enough that the result looks like motion.
In this case, the something-to-be-done is to reposition the ball. In addition, the code needs to determine if the ball would hit any wall. Now, there isn't a ball and there aren't any walls. It is all virtual, so it is all coding. We'll write code to perform a calculation on the virtual position of the ball versus the virtual position of each of the walls. If there is a virtual hit, the code adjusts the horizontal or vertical displacement values so the ball bounces off the wall.
To calculate the repositioning, we use either the initial values or any new values typed into the input fields of the form. However, the goal is to produce a robust system that will not act on bad input from the player. Bad input would be an entry that wasn't a number or a number outside of the specified range. We could just not act on the bad input. However, we want to give feedback to the player that the input was bad, so we'll make the input boxes change color, as Figure 3-3 shows.
Let's take a look at the specific features of HTML5, CSS, and JavaScript we need to implement the bouncing ball applications. We'll build on material covered in previous chapters, specifically the general structure of an HTML document, using a canvas element, programmer-defined and built-in functions, and a form element.
As described in Chapter 2, drawing anything on the canvas, such as a circle to represent the ball, requires including the canvas element in the body section of the HTML document. Next we need to define a variable, ctx, and add code that sets up the value of this variable so we can use JavaScript. Here's the statement to implement this:
ctx = document.getElementById('canvas').getContext('2d'),As we saw in Chapter 2, a circle is created by drawing an arc as part of a path. The following lines of code start the path, set the color for the fill, specify the arc, and then use the fill method to draw a closed, filled-in path. Notice that the arc method uses variables to specify the coordinates of the center of the circle and the radius. The parameters 0 and Math.PI*2 represent angles, in this case 0 to Math.PI*2, making a complete circle. The true parameter indicates counterclockwise, though in this particular case, false would produce the same effect.
ctx.beginPath();
ctx.fillStyle ="rgb(200,0,50)";
ctx.arc(ballx, bally, ballrad,0,Math.PI*2,true);
ctx.fill();
For the first version of the bouncing ball, the box is drawn as a rectangle outline. The width of the outline, termed the stroke, is set using
ctx.lineWidth = ballrad;
You can experiment with the line width. Keep in mind that if you make the width small and set the ball to travel fast, the ball can bounce past the wall in one step.
The statement that draws the rectangle is
ctx.strokeRect(boxx,boxy,boxwidth,boxheight);
I put the code for the ball before the code for the rectangle so the rectangle would be on top. I thought this looked better for the bouncing.
The second version of the program displays an image for the ball. This requires code to set up an img object using the new operator with a call to Image(), assigning that to a variable, and giving the src property a value. In the application, we do all this in a single statement, but let's take a look at the individual parts.
You read about var statements in Chapter 2. Such statements define, or declare, a variable. It is okay to use the name img for our var here; there's no conflict with the HTML img element. The new operator is well-named: it creates a new object, in this case of the built-in type Image. The Image function does not take any arguments, so there are just opening and closing parentheses.
Image objects have attributes, just like HTML elements such as img do. The particular image used is indicated by the value of the src attribute. Here, "pearl.jpg" is the name of an image file located in the same folder as the HTML document. The following two statements set up the img variable and set its src (source) to the address, the URL, of the image file.
var img = new Image();
img.src="pearl.jpg";
For your application, use the name of an image file you've chosen. It can be of type JPG, PNG, or GIF, and be sure to either put it in the same folder as your HTML document or include the entire path. Be careful about matching the case both in the name and the extension.
To draw this image on the canvas, we need a single line of code specifying the image object, the location for the upper left corner of the image, and the width and length to be used in the display of the image. As was the case with the rectangles, this code is a call of a method of a context object, so I use the variable ctx defined in the init function. I need to adjust the ballx and bally values I used for the center of the circle to indicate this upper corner. I use 2 times the ball radius for both the width and the length. The statement is
ctx.drawImage(img,ballx-ballrad,bally-ballrad,2*ballrad,2*ballrad);
Let's take a break now. It's your turn, dear reader, to do some work. Consider the following HTML document:
<html>
<head>
<title>The Origami Frog</title>
<script>
var img = new Image();
img.src = "frogface.gif";
var ctx;
function init() {
        ctx =document.getElementById("canvas").getContext('2d'),
        ctx.drawImage(img,10,20,100,100);

}
</script>
</head>
<body>
<body onLoad="init();">
<canvas id="canvas" width="400" height="300">
Your browser doesn't support the HTML5 element canvas.
</canvas>
</body>
</html>
Find your own image file and use its name in place of frogface.gif. Change the title to something appropriate. Experiment with the line
ctx.drawImage(img,10,20,100,100);
That is, change the 10, 20 to reposition the image, and change the 100,100 to change the width and the height. Make the changes and see if the program responds as you intended. Remember that as you specify the width and height, you could be changing the shape—the aspect ratio—of the picture.
Now try another exercise: drawing two images on the canvas. You'll need to have two different variables in place of img. For this task, give the variables distinctive names. If you are emulating Dr. Seuss, you can use thing1 and thing2; otherwise, choose something meaningful to you!
Now, on to more drawing!
Let's see how to use gradients for this version of the program. You can use gradients to set the fillStyle property. I didn't want to have the ball on top of a filled in rectangle, so I needed to figure out how to draw the four walls separately.
A gradient is a type of object in HTML5. There are linear gradients and radial gradients. In this application we use a linear gradient. The code defines a variable to be a gradient object, using a method of a canvas context that we defined earlier with the variable ctx. The code for the gradient looks like this:
var grad;
grad=ctx.createLinearGradient(boxx,boxy,boxx+boxwidth,boxy+boxheight);
The gradient stretches out over a rectangle shape.
Gradients involve sets of colors. A typical practice is to write code to set what are called the color stops, such as to make the gradient be a rainbow. For this, I set up an array of arrays in a variable named hue.
You can think of an array as a holder for a collection of values. Whereas a variable can hold only one value, an array can hold many. In the next chapter, you'll read about an array named everything that will hold all the objects to be drawn on the screen. In Chapter 9, which describes the Hangman game, the word list is an array of words. You'll read about many applications of arrays in this book. Here's a concrete example. The following var statement sets up a variable to be a specific array:
var family = ["Daniel","Aviva", "Allison", "Grant", "Liam"];
The variable family is an array. Its data type is array. It consists of a list of people in my family (for pictures, see the memory game described in Chapter 5). To access or to set the first element of this array, you'd use family[0]. The values to specify specific members of an array are called index values or indices. Array indexing starts with zero. The expression family[0] would produce Daniel. The expression family[4] would produce Liam. If the value of a variable relative was 2, then family[relative] would produce Allison. To determine the number of elements in the array, you'd use family.length. In this case, the length is 5.
The individual items in an array can be of any type, including arrays. For example, I could modify the family array to provide more information:
var family  = [["Daniel","college teacher"],
  ["Aviva", "congressional staff"],
  ["Allison","graduate student"],
  ["Grant","kid"],
  ["Liam","kid"]
 ];
The formatting, with the line breaks and indents, is not required, but it's good practice.
The expression family[2][1] produces "graduate student". Remember: array indexing starts at 0 so the index value 2 for the array, sometimes termed the outer array in this type of example, produces ["Allison","graduate student"] and the array 1, the index for the inner array, produces "graduate student".
These inner arrays do not have to be the same length. Consider the example:
var family  = [["Daniel","college teacher"],
  ["Aviva", "congressional staff"],
  ["Allison","graduate student"],
  ["Grant"],
  ["Liam"]
 ];
The code would check the length of the array and if it was 2 instead of 1, the second item would be the profession of the individual. If the length of the inner array was 1, it would be assumed that the individual does not have a profession.
Arrays of arrays can be very useful for product names and costs. The following statement specifies the very limited inventory of a store:
var inventory = [
                             ["toaster",25.99],
                             ["blender",74.99],
["dish",10.50],
["rug",599.99]
];This store has 4 items, with the cheapest being the dish, represented in the position at index 2, and the most expensive the rug at index 3.
Now, let's see how we can use these concepts for defining a gradient. We'll use an array whose individual elements are also arrays.
Each inner array holds the RGB values for a color, namely red, yellow, green, cyan, blue, magenta.
var hue = [
    [255,   0,   0 ],
    [255, 255,   0 ],
    [  0, 255,   0 ],
    [  0, 255, 255 ],
    [  0,   0, 255 ],
    [255,   0, 255 ]
] ;
These values represent colors ranging from red (RGB 255,0,0) to magenta (RGB 255,0,255), with four colors specified in between. The gradient feature in JavaScript fills in the colors to produce the rainbow pattern shown in Figure 3-3. Gradients are defined by specifying points along an interval from 0 to 1. You can specify a gradient other than a rainbow. For example, you can use a graphics program to select a set of RGB values to be the so-called stop-points, and JavaScript will fill in values to blend from one to the next.
The array numeric values are not quite what we need, so we will have to manipulate them to produce what JavaScript demands.
Manipulation of arrays often requires doing something to each member of the array. One construct for doing this, present in many programming languages, is the for loop, which uses a variable called an indexing variable. The structure of the for loop is
for (initial value for indexing variable; condition for continuing; change forindexing variable) {code to be done every time. The code usually references the indexing variable}
This says: start with this initial value; keep doing the loop as long as this condition holds; and change the index value in this specified way. A typical expression for the change will use operators such as ++. The ++ operator increments the indicated variable by 1. A typical for header statement is
for (n=0;n<10;n++)
This for loop uses a variable named n, with n initialized to 0. If the value of n is less than 10, the statements inside the loop are executed. After each iteration, the value of n is increased by 1. In this case, the loop code will be executed 10 times, with n holding values 0, 1, 2, all the way up to 9.
Here's one more example, a common one to demonstrate arrays. Let the grades variable be set up to hold a set of grades for a student:
var grades = [4.0, 3.7, 3, 2.3, 3];
Depending on the institution, this could indicate grades of A, A-, B, C+, and B. The following snippet computes the grade-point average and stores it in the variable named gpa. Notice that we need to initialize the variable named sum to start with a value of 0. The += operator adds to the value held in sum the value in the grades array at index value g.
var sum = 0;
for (g=0;g<grades.length;g++) {
 sum += grades[g];
}
var gpa;
gpa = sum/grades.length;
To produce what we need to build the gradient, the code extracts values from the hue array and uses them to produce character strings indicating RGB values. We use the hue array along with a variable called color to set the color stops to define the gradient. The color stops are set at any point between 0 and 1, using a for loop that sets color to be a character string of the required format, namely starting with "rgb(", and including the three values.
for (h=0;h<hue.length;h++) {
 color = 'rgb('+hue[h][0]+','+hue[h][1]+','+hue[h][2]+')';
 grad.addColorStop(h*1/hue.length,color);
}
The assignment statement setting color may seem strange to you: there's a lot going on—and what are those plus signs doing? Remember, our task is to generate the character strings indicating certain RGB values. The plus signs do not indicate addition of numbers here but concatenation of strings of characters. This means that the values are stuck together rather than mathematically added, so while 5+5 yields 10, '5'+'5' would give 55. Because the 5s in the second example are enclosed by quote marks, they are strings rather than numbers. The square brackets are pulling out members of the array. JavaScript converts the numbers to the character string equivalent and then combines them. Remember that it's looking at arrays within arrays, so the first number within square brackets (in this case, provided by our variable h) gives us the first array, and the second number within square brackets gives us our number within that array. Let's look at a quick example. The first time our loop runs, the value of h will be 0, which gives us the first entry within the hue array. We then look up the separate parts of that entry in order to build our final color.
After all that, our code has set up the variable grad to be used to indicate a fill pattern. Instead of setting fillStyle to be a color, the code sets it to be the variable grad.
ctx.fillStyle = grad;
Drawing the rectangles is the same as before, but now with the indicated fill. These are four narrow walls at the left, right, top, and bottom of the original rectangle. I make the walls as thick as the radius of the ball. This thickness is the width in the case of the vertical walls and the height in the case of the horizontal walls.
ctx.fillRect(boxx,boxy,ballrad,boxheight);
ctx.fillRect(boxx+boxwidth-ballrad,boxy,ballrad,boxheight);
ctx.fillRect(boxx,boxy,boxwidth,ballrad);
ctx.fillRect(boxx,boxy+boxheight-ballrad,boxwidth,ballrad);
An important point to note here is that since the code is drawing or painting the canvas, to produce the effect of a moving ball, we also need code to erase everything and then redraw everything with the ball in a new spot. The statement to erase everything is:
ctx.clearRect(box,boxy,boxwidth,boxheight);
It might be possible to erase (clear) just parts of the canvas, but I chose to erase and then redraw everything. In each situation, you need to decide what makes sense.
Setting up timing events in HTML5 is actually similar to the way it's done in the older versions of HTML. There are two built-in functions: setInterval and setTimeout. We'll look at setInterval here and at setTimeout in the memory game in Chapter 5. Each of these functions takes two arguments. Remember that arguments are extra pieces of information included in function or method calls. Back in Chapter 1, we saw that document.write took as its single argument what was to be written out on the screen.
I'll describe the second argument first. The second argument specifies an amount of time, in milliseconds. There are 1000 milliseconds to a second. This may seem like a very short unit to work with, but it turns out to be just what we want for games. A second (1000 milliseconds) is quite long for a computer game.
The first argument specifies what is to be done at the intervals specified by the second argument. The first argument can be the name of a function. For this application, the init function definition contains the following line:
setInterval(moveball,100);
This tells the JavaScript engine to invoke the function moveball every 100 milliseconds (10 times per second). moveball is the name of a function that will be defined in this HTML document; it is the event handler for the timing interval event. Don't be concerned if you write this line of code before writing the code to define the function. What counts is what exists when the application is run.
JavaScript also provides a way other than a function name for the event handler. You could write
setInterval("moveball();",100);for the same effect. Putting it another way, for simple cases, when the action is the call of a function without parameters, the name of the function will do. For more complex cases (as described in the Aside note), you can write a string to specify code. The string can be a full function call, or something like this:
setInterval("positionx = positionx+speed;",100);That is, the complete response to the event can be written in the first argument. Using a function is the way to go in most situations.
Note
Here is a more complex example. Suppose I had a function named slide that itself took one argument, and I wanted this function to be called with a value 10 times the value of the variable d, and I wanted this to happen every one and one-half seconds, I would code
setInterval("slide(10*d);",1500);It is often the case that you want to indicate the passage of time on the screen. The following example will display 0, 1, .... etc. with the number changing every second.
<html>
<head>
<title>elapsed</title>
<script>
function init() {
        setInterval(increase,1000);
}
function increase() {
        document.f.secs.value = String(1+Number(document.f.secs.value));
}
</script>
</head>
<body onLoad="init();">
<form name="f">
<input type="text" name="secs" value="0"/>
</form>
</body>
</html>
This is a good example for you to take the time to write and run, both because it showcases timing events and also because it will make you appreciate how long a second lasts. The code takes the value out of the secs input field in the form named f, converts that value to a number, adds 1 to that number, and then converts it back to a string to assign as the value of the secs element. Try replacing the single statement inside the increase function with the statement
document.f.secs.value = 1+document.f.secs.value;
and see what happens. This is a lesson in the difference between numbers and character strings. Please play around with this little example. If you want to make the numbers go up in smaller increments, change the 1000 to 250 and the 1 to .25. This makes the script show quarter-second changes.
If you want to allow your code to stop a particular event, you can set up a global variable (one that's outside of any function). I use a variable named tev, my shorthand for timing event.
var tev;
You would then modify the setInterval call to be:
tev = setInterval(moveball,100);
When you wanted to stop this event, you'd include this code:
clearInterval(tev);
To reiterate, the setInterval function sets up a timing event that keeps occurring until it is cleared. If you know you want an event to happen just once, the setTimeout method sets up exactly one event. You can use either method to produce the same results, but JavaScript furnishes both to make things easier.
For the bouncing ball application, the moveball function calculates a new position for the ball, does the calculations to check for collisions and when they occur, redirects the ball and draws a new display. This is done over and over—the calls to moveball keep happening because we used setInterval.
Now that we know how to draw, and how to clear and redraw, and we know how to do something at fixed intervals, the challenge is how to calculate the new positions and how to do collision detection. We'll do this by declaring variables ballx and bally to hold the x and y coordinates of the ball's center; ballvx and ballvy to hold the amount by which the ball position is to be changed, and ballboundx, inboxboundx, ballboundy and inboxboundy to indicate a box slightly smaller than the actual box for the collision calculation. The amounts by which the ball position is to be changed are initialized to 4 and 8 (totally arbitrarily) and are changed if and when a player makes a valid change (see next section) and clicks on the change button. These amounts are termed displacements or deltas and, less formally, velocities or speeds.
The change in direction is pretty simple in this situation. If the ball "hits" a vertical wall, the horizontal displacement must change sign; i.e., if the ball was moving 4 units to the right and we hit a wall, we add −4 to its position, which starts it moving to the left. The vertical displacement stays the same. The hit is determined by comparing the next horizontal value with the boundary. Similarly, if the ball "hits" a horizontal wall as determined by comparing the vertical position with the appropriate boundary, the vertical displacement changes sign while the horizontal displacement remains the same. The change is for the next iteration. The check for collisions is done four times, that is, for each of the 4 walls. The calculation consists of comparing the proposed new x or y value, as appropriate, with the boundary condition for the particular wall. The tentative new position is adjusted if the ball center goes past one of the four walls to be exactly at the boundary. This has the effect of making the ball go slightly behind each wall or appear to be squeezed by each wall. The boundary values are set up to be just inside the box with the upper corner at boxx, boxy, a width of boxwidth, and a height of boxheight. I could use a more complex calculation to compare any point on the circle with any point on the walls. However, there is a more fundamental principle involved here. There are no walls and no ball. This is a simulation based on calculations. The calculations are done at intervals. If the ball is moving fast enough and the walls are thin enough, thinner than the ballrad specified here, the ball can escape the box. This is why I do the calculation in terms of the next move and a slightly smaller box.
var boxboundx = boxwidth+boxx-ballrad;
var boxboundy = boxheight+boxy-ballrad;
var inboxboundx = boxx+ballrad;
var inboxboundy = boxy+ballrad;
Here is the code for the moveandcheck function, the function that checks for collisions and reposition the ball:
function moveandcheck() {
   var nballx = ballx + ballvx;
   var nbally = bally +ballvy;
   if (nballx > boxboundx) {
      ballvx =-ballvx;
      nballx = boxboundx;
   }
   if (nballx < inboxboundx) {
      nballx = inboxboundx
      ballvx = -ballvx;
   }
   if (nbally > boxboundy) {
      nbally = boxboundy;
ballvy =-ballvy;
}
if (nbally < inboxboundy) {
nbally = inboxboundy;
ballvy = -ballvy;
}
ballx = nballx;
bally = nbally;
}You might say that not much actually happens here and you'd be correct. The variables ballx and bally are modified to be used later when things get drawn to the canvas.
It is not obvious from this code, but do keep in mind that vertical values (y values) increase going down the screen and horizontal values (x values) increase going from left to right.
Warning
As of this writing, some validation works in Chrome, and perhaps other browsers, but not in Firefox.
HTML5 provides new facilities for validating form input. The creator of a form can specify that an input field is of type number as opposed to text, and HTML5 will immediately check that the user/player entered a number. Similarly, we can specify max and min values. The code for the form is
<form name="f" id="f" onSubmit="return change();">
  Horizontal velocity <input name="hv" id="hv" value="4" type="number" min="-10" max="10" />
<br>
  Vertical velocity <input name="vv" id="vv" value="8" type="number" min="-10" max="10"/>
<input type="submit" value="CHANGE"/>
</form>
The input is still text, that is, a string of characters, but the values are to be text that can be interpreted as a number in the indicated range.
Other types of input include "email" and "URL" and it is very handy to have HTML5 check these. Of course, you can check any character string to see if it's a number using isNumber and more complicated coding, including regular expressions (patterns of characters that can be matched against), to check for valid e-mail addresses and URLs. One common tactic for checking an e-mail address is to make the user type it in twice so you can compare the two and make sure the user hasn't made any mistakes.
We want to take advantage of the work HTML5 will do for us, but we also want to let the user/player know if something is wrong. You can use HTML5 and CSS to do this, by specifying a style for valid and invalid input.
input:valid {background:green;}
input:invalid {background:red;}
HTML5 validation is not fully operational in all browsers, so I won't spend a lot of time on it. If you're using a compliant browser, such as Chrome, you can test out the example given in the next section. Notice that the ball keeps bouncing even if an invalid value, say "abc" is entered where a number was specified, because the program continues to use the current settings.
Tip
Validating input and generating appropriate feedback to users is important in any application. Among the new features HTML5 provides is a pattern attribute in the input element in which a special language called regular expressions can be used to specify valid input. Put HTML5 regular expressions into a search field to find up-to-date information.
Before continuing, I want to mention some issues that may cause unexpected problems. Browsers come with reload/refresh buttons. The document is reloaded when the button is clicked. We made use of this in the simple die throw application in Chapter 2. However, at times you may want to prevent a reload and, in such cases, you can put a return (false); in functions that don't have anything to return to keep the page from reloading.
When a document has a form, reloading does not always reinitialize the form input. You may need to leave the page and then reload it using the full URL.
Lastly, browsers try to use files previously downloaded to the client (user) computer rather than requesting files from a server based on inspection of the date and time. The files on the client computer are stored in what is called the cache. If you think you made a change but the browser isn't displaying the latest version, you may need to take steps such as clearing the cache.
I will now explain the code for the basic bouncing ball application; the application that uses an image for the ball and gradients for the walls; and the one that validates the input. Table 3-1 shows all the function calls and what is being called. This is the same for all three applications.
Table 3.1. Functions in the Bouncing Ball Applications
Function | Invoked By/Called By | Calls |
|---|---|---|
| Action of |
|
| Invoked directly by |
|
| Invoked by | |
| Invoked by action of |
The moveandcheck code could be part of the moveball function. I chose to separate it because it is a good practice to define functions that perform specific actions. Generally, more, smaller functions are better than fewer, larger ones when you're developing applications. By the way, when doing your own programming, don't forget to put comments in the code as described in Chapter 2. And add blank lines to make the code more readable. Table 3-2 shows the code for the basic bouncing ball application and explains what each line does.
Table 3.2. The Bouncing Ball Application
The application that uses an image as the ball and the gradient-filled walls is very similar. Table 3-3 shows all the code—but I just comment the code that is different. I'm not being lazy; the idea is to let you see how each application is built on the previous one.
Table 3.3. The Second Application, with an Image as the Ball and Gradient-Filled Walls
Code | Explanation |
|---|---|
<html> | |
<head> | |
<title>Bouncing Ball with inputs</title> | |
<style> | |
form {
| |
width:330px; | |
margin:20px; | |
background-color:#b10515; | |
padding:20px; | |
} | |
</style> | |
<script type="text/javascript"> | |
var boxx = 20; | |
var boxy = 30; | |
var boxwidth = 350; | |
var boxheight = 250; | |
var ballrad = 20; | This isn't a substantial change, but the picture required a bigger radius. |
var boxboundx = boxwidth+boxx-ballrad; | |
var boxboundy = boxheight+boxy-ballrad; | |
var inboxboundx = boxx+ballrad; | |
var inboxboundy = boxy+ballrad; | |
var ballx = 50; | |
var bally = 60; | |
var ballvx = 4; | |
var ballvy = 8; | |
var img = new Image(); | Defining the |
img.src="pearl.jpg"; | Set the |
var ctx; | |
var grad; | Set |
var color; | Used in setting up the gradient |
var hue = [ | Used in setting up the gradient |
[255, 0, 0 ], | Red |
[255, 255, 0 ], | Yellow |
[ 0, 255, 0 ], | Green |
[ 0, 255, 255 ], | Cyan |
[ 0, 0, 255 ], | Blue |
[255, 0, 255 ] | Purple (magenta) |
]; | Close array |
function init(){
| Used to set up the gradient |
var h; | |
ctx = document.getElementById('canvas').
| |
grad = ctx.createLinearGradient(boxx,boxy, | Create and assign a gradient value. |
for (h=0;h<hue.length;h++) {
| Start of for loop |
color = 'rgb('+hue[h][0]+','
| Set up |
grad.addColorStop(h*1/6,color); | Set up the color stop to define the gradient. |
} | Close for loop |
ctx.fillStyle = grad; | Set the fill to be |
ctx.lineWidth = ballrad; | |
moveball(); | |
setInterval(moveball,100); | |
} | |
function moveball(){
| |
ctx.clearRect(boxx,boxy,boxwidth,boxheight); | |
moveandcheck(); | |
ctx.drawImage(img,ballx-ballrad, | Draw an image |
ctx.fillRect(boxx,boxy,ballrad,boxheight); | Draw the left wall |
ctx.fillRect(boxx+boxwidth- ballrad,boxy,ballrad,boxheight); | Draw the right wall |
ctx.fillRect(boxx,boxy,boxwidth,ballrad); | Draw the top wall |
ctx.fillRect(boxx,boxy+boxheight- ballrad,boxwidth,ballrad); | Draw the bottom wall |
} | |
function moveandcheck() {
| |
var nballx = ballx + ballvx; | |
var nbally = bally +ballvy; | |
if (nballx > boxboundx) {
| |
ballvx =-ballvx; | |
nballx = boxboundx; | |
} | |
if (nballx < inboxboundx) {
| |
nballx = inboxboundx | |
ballvx = -ballvx; | |
} | |
if (nbally > boxboundy) {
| |
nbally = boxboundy; | |
ballvy =-ballvy; | |
} | |
if (nbally < inboxboundy) {
| |
nbally = inboxboundy; | |
ballvy = -ballvy; | |
} | |
ballx = nballx; | |
bally = nbally; | |
} | |
function change() {
| |
ballvx = Number(f.hv.value); | |
ballvy = Number(f.vv.value); | |
return false; | |
} | |
</script> | |
</head> | |
<body onLoad="init();"> | |
<canvas id="canvas" width= | |
This browser doesn't support | |
</canvas> | |
<br/> | |
<form name="f" id="f" onSubmit= | |
Horizontal velocity <input name= | |
<br> | |
Vertical velocity <input name= | |
<input type="submit" value="CHANGE"/> | |
</form> | |
</body> | |
</html> |
I chose to put the modest change of the style information in the first application. Table 3-4 shows the third bouncing ball application, with form validation. Again, I have only commented the new code, but I include all the code for completeness sake.
Table 3.4. The Third Bouncing Ball Application, with Form Validation
Code | Explanation |
|---|---|
<html> | |
<head> | |
<title>Bouncing Ball with inputs</title> | |
<style> | |
form {
| |
width:330px; | |
margin:20px; | |
background-color:brown; | |
padding:20px; | |
} | |
input:valid {background:green;}
| Set up feedback for valid input |
input:invalid {background:red;}
| Set up feedback for invalid input |
</style> | |
<script type="text/javascript"> | |
var cwidth = 400; | |
var cheight = 300; | |
var ballrad = 10; | |
var boxx = 20; | |
var boxy = 30; | |
var boxwidth = 350; | |
var boxheight = 250; | |
var boxboundx = boxwidth+boxx-ballrad; | |
var boxboundy = boxheight+boxy-ballrad; | |
var inboxboundx = boxx+ballrad; | |
var inboxboundy = boxy+ballrad; | |
var ballx = 50; | |
var bally = 60; | |
var ctx; | |
var ballvx = 4; | |
var ballvy = 8; | |
function init(){
| |
ctx = document.getElementById('canvas').
| |
ctx.lineWidth = ballrad; | |
moveball(); | |
setInterval(moveball,100); | |
} | |
function moveball(){
| |
ctx.clearRect(boxx,boxy,boxwidth,boxheight); | |
moveandcheck(); | |
ctx.beginPath(); | |
ctx.fillStyle ="rgb(200,0,50)"; | |
ctx.arc(ballx, bally, ballrad,0,Math.PI*2,true); | |
ctx.fill(); | |
ctx.strokeRect(boxx,boxy,boxwidth,boxheight); | |
} | |
function moveandcheck() {
| |
var nballx = ballx + ballvx; | |
var nbally = bally +ballvy; | |
if (nballx > boxboundx) {
| |
ballvx =-ballvx; | |
nballx = boxboundx; | |
} | |
if (nballx < inboxboundx) {
| |
nballx = inboxboundx | |
ballvx = -ballvx; | |
} | |
if (nbally > boxboundy) {
| |
nbally = boxboundy; | |
ballvy =-ballvy; | |
} | |
if (nbally < inboxboundy) {
| |
nbally = inboxboundy; | |
ballvy = -ballvy; | |
} | |
ballx = nballx; | |
bally = nbally; | |
} | |
function change() {
| |
ballvx = Number(f.hv.value); | |
ballvy = Number(f.vv.value); | |
return false; | |
} | |
</script> | |
</head> | |
<body onLoad="init();"> | |
<canvas id="canvas" width="400" height="300"> | |
Your browser doesn't support the HTML5 element canvas. | |
</canvas> | |
<br/> | |
<form name="f" id="f" onSubmit="return change();"> | |
Horizontal velocity <input name="hv" id= | |
<br> | |
Vertical velocity <input name="vv" id= | |
<input type="submit" value="CHANGE"/> | |
</form> | |
</body> | |
</html> |
There are many ways you can make this application your own. You can select your own image for the ball and experiment with the colors for the walls, with or without the gradients. You can change the position and the dimensions of each wall. You can add text and HTML markup to the page. You can change the look of the form.
You can include more than one ball, keeping track of the positions of each. If you decide to use two balls, you need two sets of variables and two lines of code for each one line you had before. One systematic way to do this is to use the search function in the editor to find all instances of ball and, for each line, substitute two lines, so in place of ballx, you have ball1x and ball2x, and in place of the var ballx = 50; use
var ball1x = 50;
var ball2x = 250;
This puts the second ball 200 pixels over on the canvas.
You would also need a second set of all the comparisons for the walls.
If you want to use more than two balls, you may want to consider using arrays. Subsequent chapters will show you how to handle sets of objects.
You also can try writing code that slows the ball each time it hits a wall. This is a nice effect and does simulate a real physical result. In each of the places in the code where the direction is changed by changing the sign of the appropriate variable, add in a factor to decrease the absolute value. For example, if I chose to decrease the value by 10%, I would write
if (nballx > boxboundx) {
        ballvx =-ballvx *.9;
        nballx = boxboundx;
  }
This means that the incremental change in the vertical direction would go down to 90% of what it was.
The first and third applications are complete in the HTML documents. The second application requires the image file to be present in the same folder. You can access files anywhere on the Web, but you need to make sure you include the correct address. For example, if you upload the HTML document to a folder called mygames and upload pearl.jpg to a subfolder of mygames named images, the line indicating this must be
img.src = "images/pearl.jpg";
You must also use accurate file extensions, such as JPG, that indicate the correct file type. Some browsers are forgiving but many are not. You can try to submit bad data and see the response using different browsers.
In this chapter, you learned how to create an application with animation that changes based on input from the user. We covered a number of programming and HTML5 features, including
setIntervalto set up a timing event for the animationvalidation of form input
programmer-defined functions to reposition a circle or an image horizontally and vertically to simulate a bouncing ball
tests to check for virtual collisions
drawing rectangles, images and circles, including gradients for the coloring
The next chapter describes the cannonball and slingshot games in which the player attempts to hit targets. These applications use the same programming and HTML5 features we used to produce the animation, but take them a step further. You will also see an example of animation in the rock-paper-scissors implementation in Chapter 8.