
maintaining a list of objects to draw on the screen
rotating objects drawn on the screen
mouse drag and drop operations
calculations to simulate ballistic motion (effects of gravity) and collisions
This chapter demonstrates another example of animation, in this case simulation of ballistics, also called projectile motion. A ball or ball-like object maintains a constant horizontal (x) displacement, with the vertical displacement changing as it would due to gravity. The resulting motion is an arc. The ball stops when it (virtually) hits the ground or the target. The code you'll see produces the animation using the same technique demonstrated for the ball bouncing in a box. The code repositions the ball and redraws the scene at fixed intervals. We will look at three examples.
A very simple ballistics simulation: a ball taking off and traveling in an arc before hitting a target or the ground. The parameters of flight are horizontal and initial vertical speeds, which are set by the player using form input fields. The ball simply stops when it hits the target or the ground.
An improved cannonball, with a rectangle representing the cannon tilted at an angle. The parameters of flight are the speed out of the cannon and the angle of the cannon. Again, these are set by the player using form input fields. The program calculates the initial horizontal and vertical displacement values.
A slingshot. The parameters of flight are determined by the player dragging, then releasing a ball shape tethered to a stick drawing representing a slingshot. The speed is determined by the distance from the ball to a place on the slingshot. The angle is the angle from the horizontal of this part of the slingshot.
Figure 4-1 shows the simple (no cannon) application.
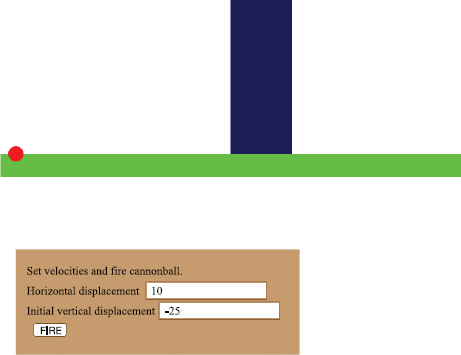
Figure 4-2 shows the opening screen for the second application. The target is an Image and the rectangle representing the cannon can be rotated. Notice the controls refer to an angle and an initial velocity
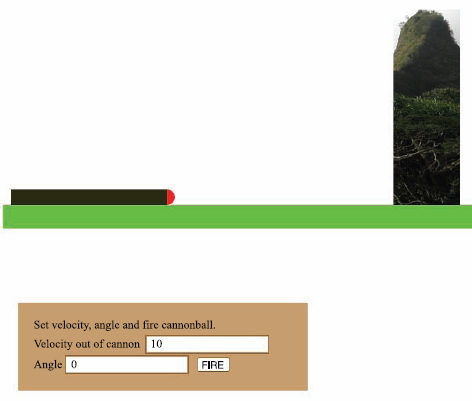
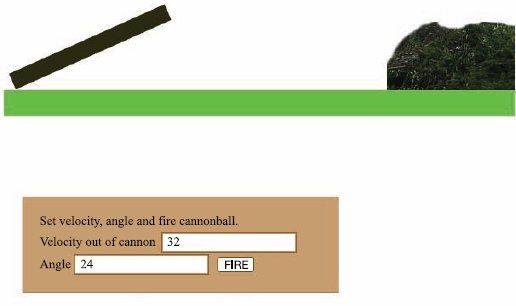
Figure 4-3 shows the scene after a successful hit. Notice that the cannon is rotated and the original image for the target has been replaced with a new image.
The opening screen of the slingshot application is shown in Figure 4-4. This application is similar to the cannon, but the parameters of flight are set by the player using a mouse to drag on the ball and the target is now a chicken.
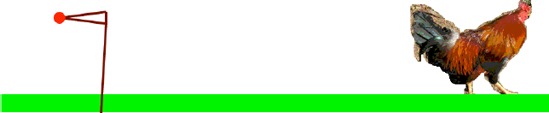
For the slingshot, I decided I wanted the ball to keep going until it hit the ground. However, if the chicken was hit, I wanted it to be replaced by feathers, as shown in Figure 4-5. Notice that the strings of the slingshot remain where they were when the mouse button was released and the ball took flight. I found I needed more time looking at the strings in order to plan my next shot. If you want, you can change the game so that the strings snap back to their original position or create a new-game button. In my example, the game is replayed by reloading the HTML file.

The programming for these applications uses many of the same techniques demonstrated in the bouncing ball applications. The repositioning of the ball in flight is only as different as it needs to be to simulate the effects of the vertical displacement changing because of gravity. The slingshot application provides a new way for the player to interact with the application, using drag and drop actions with the mouse.
The cannonball with cannon and the slingshot use drawing features for the cannon and slingshot and external image files for the original targets and hit targets. If you want to change the targets, you'll need to find image files and upload them with the application. The complete applications are available at www.friendsofed.com/downloads.html.
Our first requirement is to produce animation by setting up an event to occur at fixed intervals of time, and then setting up a function to handle the event by repositioning the ball and checking for collisions. We covered this in the previous chapter on the bouncing ball application. What's new here is the calculation for simulating gravity. The calculation indicated by a simple physics model works out a new vertical displacement based on changing the vertical displacement by a constant amount and then computing the average of the old and new displacements to compute the new position.
The horizontal displacement (held by variable
dx) is the horizontal velocity (horvelocity) and does not change. In code:dx = horvelocity;The vertical velocity at the start of the interval is
verticalvel1The vertical velocity at end of the interval is
verticalvel1plus the acceleration amount (gravity). In code:verticalvel2 = verticalvel1 + gravity;The vertical displacement for the interval (
dy) is the average ofverticalvel1andverticalvel2. In code:dy = (verticalvel1 + verticalvel2)*.5;
This is a standard way of simulating gravity or any other constant acceleration.
Note
Note: I made up my value for gravity to produce a pleasing arc. You can use a standard value, but you'll need to do research to assign realistic values for the starting velocity out of the mouth of the cannon and for a slingshot. You also need to determine the mapping between pixels and distances. The factor would be different for the cannonball and the slingshot.
The second version of the program must rotate the cannon based on either the initial values or the player's input for the velocity out of the mouth of the cannon and the cannon angle and calculate the horizontal and vertical values based on these values.
The third version of the program, the slingshot, must allow the player to press and hold the mouse button and drag the ball along with the strings of the slingshot, then let the mouse button up to release the ball. The motion parameters are calculated based on the angle and the distance of the ball from the top of the slingshot.
Both the second and third versions of the program require a way to replace the target image with another image.
Now let's look at the specific features of HTML5 and JavaScript that provide what we need to implement the ballistics simulation applications. Luckily, we can build on material covered in previous chapters, specifically the general structure of an HTML document, using a canvas element, programmer-defined and built-in functions, a form element, and variables. Let's start with programmer-defined objects and using arrays.
HTML5 lets you draw on a canvas, but once something is drawn, it's as if paint or ink were laid down; the thing drawn doesn't retain its individual identity. HTML5 is not like Flash in which objects are positioned on a Stage and can be individually moved and rotated. However, we can still produce the same effects, including rotation of individual objects.
Because these applications have a somewhat more complicated display, I decided to develop a more systematic approach to drawing and redrawing different things on the canvas. To that end, I created an array called everything that holds the list of objects to be drawn on the canvas. Think of an array as a set, or more accurately, a sequence of items. In previous chapters, we discussed variables set up to hold values such as numbers or character strings. An array is another type of value. My everything array will serve as a to-do list of what needs to be drawn on the canvas.
I am using the term objects in both the English and the programming sense. In programming terms, an object consists of properties and methods, that is, data and coding or behavior. In the annotated links example described in the first chapter, I demonstrated the write method of the document object. I used the variable ctx, which is of type 2D context of a canvas object, methods such as fillRect, and properties such as fillStyle. These were built-in; that is, they were already defined objects in HTML5's version of JavaScript. For the ballistics applications, I defined my own objects, specifically Ball, Picture, Myrectangle, and Sling. Each of these different objects includes the definition of a draw method as well as properties indicating position and dimensions. I did this so I can draw each of a list of things. The appropriate draw method accesses the properties to determine what and where to draw. I also included a way to rotate individual objects.
Defining an object is straightforward: I simply define a function called the constructor function for Ball, Picture, and Myrectangle, and use these functions with the operator new to assign the values to variables. I can then write code using the familiar dot notation to access or assign the properties and to invoke methods I've set up in the constructor function. Here is the constructor function for a Ball object:
function Ball(sx,sy,rad,stylestring) {
  this.sx = sx;
  this.sy = sy;
  this.rad = rad;
  this.draw = drawball;
  this.moveit = moveball;
  this.fillstyle = stylestring;
}
The term this refers to the object that's created when this function is used with the keyword new. The fact that this.draw and this.moveit are assigned the names of functions is not obvious from looking at the code, but that's what happens. The definitions of those two functions follow. Notice that they each use the term this to get at the properties necessary to draw and move the object.
function drawball() {
        ctx.fillStyle=this.fillstyle;
        ctx.beginPath();

        ctx.arc(this.sx,this.sy,this.rad,0,Math.PI*2,true);
        ctx.fill();
}
The drawball function draws a filled-in circle, a complete arc, on the canvas. The color of the circle is the color set when this Ball object was created.
The function moveball doesn't move anything immediately. Looking at the issue abstractly, moveball changes where the application positions the object. The function changes the values of the sx and sy properties of the object and when it is displayed next, these new values are used to make the drawing.
function moveball(dx,dy) {
        this.sx +=dx;
        this.sy +=dy;
}
The next statement, declaring the variable cball, builds a new object of type Ball by using the operator new and the function Ball. The parameters to the function are based on set values for the cannon because I want the ball to appear at the mouth of the cannon to start out.
var cball = new Ball(cannonx+cannonlength,cannony+cannonht*.5,ballrad,"rgb(250,0,0)");
The Picture, Myrectangle, and Slingshot functions are similar and will be explained below. They each specify a draw method. For this application, I only use moveit for cball, but I defined moveit for the other objects just in case I later want to build on this application. The variables cannon and ground will be set to hold a new Myrectangle, and the variables target and htarget will be set to hold a new Picture.
Tip
Names made up by programmers are arbitrary, but it's a good idea to be consistent in both spelling and case. HTML5 appears to disregard case, in contrast to a version of HTML called XHTML. Many languages treat upper- and lowercase as different letters. I generally use lowercase, but I capitalized the first letter of Ball, Picture, Slingshot, and Myrectangle because the convention is that functions intended to be constructors of objects should start with capital letters.
Each of the variables will be added to the everything array using the array method push, which adds a new element to the end of the array.
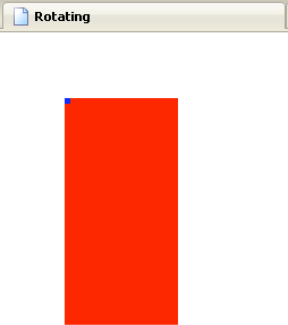
HTML5 lets us translate and rotate drawings. Take a look at the following code. I urge you to create this example and then experiment with it to improve your understanding. The code draws a large red rectangle on the canvas with the upper corner at (50,50) and a tiny blue, square on top of it.
<html>
<head>
    <title>Rectangle</title>
    <script type="text/javascript">
        var ctx;
function init(){
   ctx = document.getElementById('canvas').getContext('2d'),
        ctx.fillStyle = "rgb(250,0,0)";
        ctx.fillRect(50,50,100,200);
ctx.fillStyle = "rgb(0,0,250)";
        ctx.fillRect(50,50,5,5);
}
</script>
</head>
<body onLoad="init();">
<canvas id="canvas" width="400" height="300">
Your browser doesn't support the HTML5 element canvas.
</canvas>
</body>
</html>
The result is shown in Figure 4-6.
In this exercise, the goal is to rotate the large rectangle, pivoting on the upper-left corner where the small blue square is. I want the rotation to be counterclockwise.
One slight complication, common to most programming languages, is that the angle input for rotations as well as the trigonometry functions must be in radians, not degrees. Radians were explained in Chapter 2, but here's a reminder. Instead of 360 degrees in a full circle, the measurement is based on two times the mathematical constant pi radians in a circle. Fortunately, we can use the built-in feature of JavaScript, Math.PI. One pi radians is equivalent to 180 degrees and pi divided by 2 is equivalent to a right angle, 90 degrees. To specify a rotation of 30 degrees, we use pi divided by 6 or, in coding, Math.PI/6. To change the init function given previously to do a rotation, I put in a rotation of negative pi divided by 6 (equivalent to 30 degrees going counterclockwise), draw the red rectangle, and then rotate back, undo the rotation, to draw the blue square:
function init(){
   ctx = document.getElementById('canvas').getContext('2d'),
   ctx.fillStyle = "rgb(250,0,0)";
   ctx.rotate(-Math.PI/6);
   ctx.fillRect(50,50,100,200);
   ctx.rotate(Math.PI/6);
   ctx.fillStyle = "rgb(0,0,250)";
   ctx.fillRect(50,50,5,5);
}
Unfortunately, the drawing in Figure 4-7 is not what I wanted.
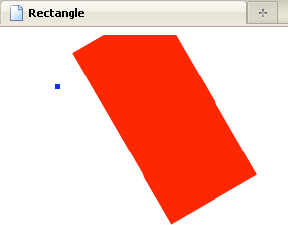
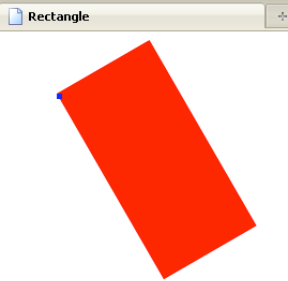
The problem is the rotation point is at the origin, (0,0) and not at the corner of the red rectangle. So, I need to write code to perform a translation, then the rotation, then a translation back in order to draw at the correct place. I can do this using features of HTML5. All drawing on the canvas is done in terms of a coordinate system, and I can use the save and restore operations to save the current coordinate system—the position and orientation of the axes—and then restore it to make follow-on drawings. Here's the code.
function init(){
   ctx = document.getElementById('canvas').getContext('2d'),
   ctx.fillStyle = "rgb(250,0,0)";
   ctx.save();
   ctx.translate(50,50);
   ctx.rotate(-Math.PI/6);
   ctx.translate(-50,-50);
   ctx.fillRect(50,50,100,200);
   ctx.restore();
   ctx.fillStyle = "rgb(0,0,250)";
   ctx.fillRect(50,50,5,5);
}
The rotate method expects an angle in radian units and clockwise is the positive direction. So my code is rotating 30 degrees counterclockwise, producing what I had in mind, as shown in Figure 4-8.
By the way, we can't expect our players to put in angles using radians. They, and we, are too accustomed to degrees (90 degrees is a right angle, 180 degrees is your arc when you make a u-turn, etc.). The program must do the work. The conversion from degrees to radians is to multiply by pi/180.
Note
Note: Most programming languages use radians for angles in trig functions. Flash uses degrees in certain situations and radians in others, so in some ways JavaScript is less confusing by only using radians.
With this background, I add to the information in the everything array indications as to whether there is to be a rotation and, if so, the required translation point. This is my idea. It has nothing to do with HTML5 or JavaScript, and it could have been done differently. The underlying task is to create and maintain information on objects in the simulated scene. The canvas feature of HTML5 provides a way to draw pictures and display images, but it does not retain information on objects!
The items in the everything array for the second and third applications are themselves arrays. The first (0th index) value points to the object. The second (1st index) is true or false. A value of true means that a rotation angle value and x and y values for translation follow. In practice, this means that the inner arrays have either two values, with the last one being false, or five values.
Note
Note: At this point, you may be thinking: she set up a general system just to rotate the cannon. Why not put in something just for the cannon? The answer is we could, but the general system does work and something just for the cannon might have had just as much coding.
The first application uses horizontal and vertical displacement values picked up from the form. The player must think of the two separate values. For the second application, the player inputs two values again, but they are different. One is the speed out of the mouth of the cannon and the other is the angle of the cannon. The program does the rest. The initial and unchanging horizontal displacement and the initial vertical displacement are calculated from the player's input: the velocity out of the cannon and an angle. The calculation is based on standard trigonometry. Luckily, JavaScript provides the trig functions as part of the Math class of built-in methods.
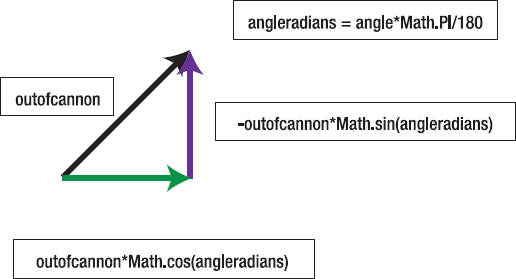
Figure 4-9 shows the calculation of the displacement values from the out of cannon and angle values specified by the player. The minus sign for the vertical is due to the way JavaScript screen coordinates have y values increasing going down the screen.
At this point, you may want to skip ahead to read about the implementation of the cannonball applications. You can then come back to read about what is required for the slingshot.
For the slingshot application, I have added a new object type by defining two functions, Sling and drawsling. My idealized slingshot is represented by 4 positions, as shown in Figure 4-10. Please understand that we could have done this in a number of different ways.

Drawing the slingshot consists of drawing four line segments based on the four points. The bx,by point will change as I'll describe in the next section. HTML5 lets us draw line segments as part of a path. We've already used paths for drawing circles. You can draw a path as a stroke or as a fill. For the circles, we used the fill method, but for the slingshot, I just want lines. Drawing a line may involve two steps: move to one end of the line and then draw it. HTML5 provides the moveTo and lineTo methods. The path is not drawn until the stroke or fill method is invoked. The drawsling function is a good illustration of line drawing.
function drawsling() {
   ctx.strokeStyle = this.strokeStyle;
   ctx.lineWidth = 4;
   ctx.beginPath();
ctx.moveTo(this.bx,this.by); ctx.lineTo(this.s1x,this.s1y); ctx.moveTo(this.bx,this.by); ctx.lineTo(this.s2x,this.s2y); ctx.moveTo(this.s1x,this.s1y); ctx.lineTo(this.s2x,this.s2y); ctx.lineTo(this.s3x,this.s3y); ctx.stroke(); }
adds to path a line from
bx,bytos1x,s1yadds to path a line from
bx,bytos2x,s2yadds to path a line from
s1x,s1ytos2x,s2yadds to path a line from
s2x,s2ytos3x,s3y
As always, the way to learn this is to experiment with your own designs. If there's no invocation of moveTo, the next lineTo draws from the destination of the last lineTo. Think of holding a pen in your hand and either moving it on the paper or lifting it up and moving without drawing anything. You also can connect arcs. Chapter 5 demonstrates drawing polygons.
The slingshot application replaces form input with mouse drag and drop operations. This is appealing because it's closer to the physical act of pulling back on a slingshot.
When the player presses down on the mouse button, it is the first of a sequence of events to be managed by the program. Here is pseudo-code for what needs to be done.
When the player presses the mouse button, check if the mouse is on top of the ball. If not, do nothing. If so, set a variable named inmotion.
If the mouse is moving, check inmotion. If it is set, move the ball and the strings of the slingshot. Keep doing this until the mouse button is released.
When the player releases the mouse button, reset inmotion to false. Calculate the angle and initial velocity of the ball and from these calculate the horizontal velocity and the initial vertical velocity. Start the ball moving.
You can use HTML5 and JavaScript to set up event handling for pressing the standard (left) mouse button, moving the mouse, and releasing the mouse button. The code uses a method based on the canvas element directly, not the so-called context. Here is the code, which is in the init function:
canvas1 = document.getElementById('canvas'),
canvas1.addEventListener('mousedown',findball,false);
canvas1.addEventListener('mousemove',moveit,false);
canvas1.addEventListener('mouseup',finish,false);
Now because this event is in terms of the whole canvas, the findball function must determine if the mouse is over the ball. The first task is to get the mouse x and y coordinates. Unfortunately, different browsers implement mouse events in different ways. The following works for Firefox, Chrome, and Safari. When other browsers, such as Internet Explorer, support HTML5, this code will need to be checked and, possibly, modified.
if ( ev.layerX ||  ev.layerX==0) {
   mx= ev.layerX;
   my = ev.layerY;
}
else if (ev.offsetX || ev.offsetX==0 ) {
   mx = ev.offsetX;
   my = ev.offsetY;
}
This works because if ev.layerX does not exist, its value will be interpreted as false. If ev.layerX does exist but has value 0, its value will also be interpreted as false, but ev.layerX==0 will be true.
Think of this code as saying: is there a good ev.layerX value? If so, let's use it. Otherwise, let's try ev.offsetX. If neither of these work, mx and my will not get set and I should add another else clause to tell the player that the code doesn't work in his browser.
Now, the next step is to determine if the (mx,my) point is on the ball. I am repeating myself, but it is important to understand that the ball is now the equivalent of ink or paint on canvas and we can't go any further without determining whether the (mx,my) point is on top of the ball. How do we do this? We can calculate how far (mx,my) is from the center of the ball and see if that's less than the radius of the ball. There is a standard formula for distance in the plane. My code is a slight variation on this idea. It makes the determination by calculating the square of the distance and comparing it to the square of the ball's radius. I do this to avoid computing the square root.
If the mouse click was on the ball, that is, within a radius distance of the center of the ball, this function sets the global variable inmotion to true. The findball function ends with a call to drawall().
Whenever the mouse moves, there's a call to the moveit function where we check whether inmotion is true. If it isn't, nothing happens. If it is, the same code as before is used to get the mouse coordinates and the ball's center, and the bx,by values for the slingshot are set to the mouse coordinates. This has the effect of dragging the ball and stretching the slingshot strings.
When the mouse button is released, we call the finish function, which doesn't do anything if inmotion is not true. When would this happen? If the player is moving the mouse around not on the ball and pressing and releasing the button.
If inmotion is true, the function immediately sets it to false and does the calculations to determine the flight of the ball, generating the information that in the earlier cannonball application was entered by the player using a form. The information is the angle with the horizontal and the distance of the ball to the straight part of the slingshot. This is the angle formed by (bx,by) to (s1x, s1y), and the horizontal and the distance from (bx,by) to (s1x, s1y), more precisely, the square of the distance.
I use Math.atan2 to do these calculations: calculating an angle from change in x and change in y. This is a variant of the arctangent function.
I use the distsq function to determine the square of the distance from (bx,by) to (s1x, s1y). I want to make the velocity dependent on this value. Pulling the strings back farther would mean a faster flight. I did some experiments and decided that using the square and dividing by 700 produced a nice arc.
The last step is to put in a call first to drawall() and then to setInterval to set up the timing event. Again, finish does an analogous job to fire in the first and second applications. In the first application, our player entered the horizontal and initial vertical values. In the second application, the player entered an angle (in degrees) and a velocity out of the mouth of the cannon, and the program did the rest. In slingshot, we did away with a form and numbers and provided a way for the player to pull back, or virtually pull back, on a slingshot. The program had more to do, both in terms of responding to mouse events and calculations.
The last task to explain is the replacement of the target image with another picture. Since I wanted two different effects, I used different approaches. For the second application, I wanted the ball to disappear along with the original target and display what I set up in the variable htarget. What I do is keep track of where the original target was placed on the everything array and remove it and substitute htarget. Similarly, I remove the ball from the everything array. For the slingshot operation, I don't remove the target but change its img property to be feathers. Please note that in the code, chicken and feathers are Image objects. Each has a src property that points to a file.
var chicken = new Image();
        chicken.src = "chicken.jpg";
        var feathers = new Image();
        feathers.src = "feathers.gif";
For both of these operations, I use the array method splice. It has two forms: you can just remove any number of elements or you can remove and then insert elements. The general form of splice is
arrayname.splice(index where splice is to occur, number of iterms to be removed, new item(s) to be added)
If more than one item is to be added, there are more arguments. In my code, I add a single item, which is itself an array. My representation of objects in the everything array uses an array for each object. The second argument of the array indicates if there is any rotation.
The following two lines of code do what I need: remove the target, stick in htarget with no rotation, and then remove the ball.
everything.splice(targetindex,1,[htarget,false]);
everything.splice(ballindex,1);
By the way, if I simply wanted to remove the last item in an array, I could use the method pop. In this situation, however, the target may be somewhere in the middle of the everything array, so I need to write code to keep track of its index value.
There are two places in the slingshot program in which I use the distance between points or, more accurately, the square of the distance. I need to find out if the mouse cursor is on top of the ball and I want to make the initial velocity—the equivalent of the velocity out of the cannon— depending on the stretch, so to speak, of the slingshot, the distance (bx,by) to (s1x, s1y). The formula for the distance between two points x1,y1 and x2,y2 is the square root of the sum of the squares of (x1-x2) and (y1-y2). I decided to avoid the computation of taking a square root by just computing the sum of the squares. This provides the same test for the mouse cursor being on top of the ball. For the other task, I decided it was okay to use the square of the distance for the initial velocity. I experimented with some numbers and, as I mentioned earlier, 700 seemed to work.
Let's now take a look at the code for the basic firing of a cannonball, without a cannon, based on horizontal and initial vertical speeds; the firing of a cannonball from a cannon, based on angle and initial speed out of the cannon; and the slingshot, based on angle and initial speed determined from the position of the mouse. As in previous chapters, I'll present the functions and what they call or are called by for each application. In this case, the tables are similar, though not identical, for all three applications. The calling is more varied than previous examples in that there are situations in which functions are invoked because they are named as methods of a programmer-defined object or as part of a declaration (var) statement. This is a characteristic of object-oriented, event-driven programming. I'll also present the complete code for each application in its own table, along with an explanation of what each line does. Table 4-1 shows the functions for the basic cannonball application.
Table 4.1. Functions in the Simplest Cannonball Application
Function | Invoked By / Called By | Calls |
|---|---|---|
| Action of the |
|
| Invoked directly by | Calls the |
| Invoked by action of the |
|
| Invoked by action of the |
|
| Invoked directly by code in a | |
| Invoked directly by code in a | |
| Invoked by call of the | |
| Invoked by call of the | |
| Invoked by call of the |
Table 4-2 shows the complete code for the simplest application, with the ball moving in an arc and no actual cannon.
Table 4.2. The First Cannonball Application
Code | Explanation |
|---|---|
<html> | Opening |
<head> | Opening |
<title>Cannonball</title> | Complete |
<style> | Opening |
form {
| Style for the form |
width:330px; |
|
margin:20px; | External |
background-color:brown; |
|
padding:20px; | Internal |
} | Close this style |
</style> | Close |
<script> | Opening |
var cwidth = 600; | Set value for width of canvas, used for clearing |
var cheight = 400; | Set value for |
var ctx; | Variable to hold canvas context |
var everything = []; | Array to hold all objects to be drawn. Initialized as an empty array |
var tid; | Variable to hold identifier for the timing event |
var horvelocity; | Variable to hold the horizontal velocity (aka displacement) |
var verticalvel1; | Variable to hold vertical displacement at start of interval |
var verticalvel2; | Variable to hold vertical displacement at end of interval, after change by gravity |
var gravity = 2; | Amount of change in vertical displacement. Arbitrary. Makes for a nice arc. |
var iballx = 20; | Initial horizontal coordinate for the ball |
var ibally = 300; | Initial vertical coordinate for the ball |
function Ball(sx,sy,rad,stylestring) {
| Start of function to define a |
this.sx = sx; | Set the |
this.sy = sy; | ... |
this.rad = rad; | ... |
this.draw = drawball; | ... |
this.moveit = moveball; | ... |
this.fillstyle = stylestring; | ... |
} | Close the |
function drawball() {
| Header for the |
ctx.fillStyle=this.fillstyle; | Set up the |
ctx.beginPath(); | Start a path |
ctx.arc(this.sx,this.sy | Set up to draw a circle |
ctx.fill(); | Draw the path as a filled path |
} | Close the function |
function moveball(dx,dy) {
| Header for the |
this.sx +=dx; | Increment the |
this.sy +=dy; | Increment the |
} | Close function |
var cball = new Ball(iballx,ibally, | Create a new |
function Myrectangle(sx,sy,swidth, | Header for function to construct a |
this.sx = sx; | Sets the |
this.sy = sy; | ... |
this.swidth = swidth; | ... |
this.sheight = sheight; | ... |
this.fillstyle = stylestring; | ... |
this.draw = drawrects; | ... |
this.moveit = moveball; | .... |
} | Close |
function drawrects() {
| Header for |
ctx.fillStyle = this.fillstyle; | Set the |
ctx.fillRect(this.sx,this.sy, | Draw the rectangle using the object properties |
} | Close function |
var target = new Myrectangle(300,100, | Build a |
var ground = new Myrectangle(0,300, | Build a |
everything.push(target); | Add target to |
everything.push(ground); | Add |
everything.push(cball); | Add |
function init(){
| Header for |
ctx = document.getElementById | Set up |
drawall(); | Draw everything |
} | Close |
function fire() {
| Head for |
cball.sx = iballx; | Reposition |
cball.sy = ibally; | Reposition |
horvelocity = Number(document. | Set horizontal velocity from form. Make a number |
verticalvel1 = Number(document. | Set initial vertical velocity from form |
drawall(); | Draw everything |
tid = setInterval | Start timing event |
return false; | Return |
} | Close function |
function drawall() {
| Function header for |
ctx.clearRect | Erase canvas |
var i; | Declare |
for (i=0;i<everything.length;i++) | For each item in |
everything[i].draw();} | ...invoke the object's |
} | Close function |
function change() {
| Header for |
var dx = horvelocity; | Set |
verticalvel2 = | Compute new vertical velocity (add gravity) |
var dy = (verticalvel1 + | Compute average velocity for the time interval |
verticalvel1 = verticalvel2; | Now set old to be new |
cball.moveit(dx,dy); | Move |
var bx = cball.sx; | Set |
var by = cball.sy; | ... and |
if ((bx>=target.sx)&&(bx<= | Is the ball within the target horizontally... |
(by>=target.sy)&&(by<= | and vertically? |
clearInterval(tid); | If so, stop motion |
} | Close if true clause |
if (by>=ground.sy) {
| Is the ball beyond ground? |
clearInterval(tid); | If so, stop motion |
} | Close if true clause |
drawall(); | Draw everything |
} | Close |
</script> | Close |
</head> | Close |
<body onLoad="init();"> | Open |
<canvas id="canvas" width= | Define |
Your browser doesn't support | Warning to users of non-compliant browsers |
</canvas> | Close |
<br/> | Line break |
<form name="f" id="f" | Starting form tag, with name and id. This sets up call to |
Set velocities and fire | Label and line break |
Horizontal displacement <input name= | Label and specification of input field |
<br> | Line break |
Initial vertical displacement <input | Label and specification of input field |
<input type="submit" value="FIRE"/> | Submit |
</form> | Close |
</body> | |
</html> | Close |
You certainly can make improvements to this application, but it probably makes more sense to first make sure you understand it as is and then move on to the next.
Our next application adds a rectangle to represent the cannon, a picture for the original target instead of the simple rectangle used in the first application, and a second picture for the hit target. The cannon rotates as specified by input in the form. I made the everything array an array of arrays because I needed a way to add the rotation and translation information. I also decided to make the result more dramatic when the cannonball hits the target. This means the code in the change function for checking for a collision is the same, but the code in the if-true clause removes the old target, puts in the hit target, and removes the ball. Now, having said all this, most of the coding is the same. Table 4-3, which shows the functions, has two additional lines for Picture and drawAnImage.
Table 4.3. Functions in the Second Cannonball Application
Function | Invoked By / Called By | Calls |
|---|---|---|
| Action of the |
|
| Invoked directly by | Calls the |
| Invoked by action of the |
|
| Invoked by action of the |
|
| Invoked directly by code in a | |
| Invoked directly by code in a | |
| Invoked by call of the | |
| Invoked by call of the | |
Invoked by call of the | ||
| Invoked directly by code in | |
| Invoked by call of the |
Table 4-4 shows the complete code for the second application, but only the changed lines have comments.
Table 4.4. The Second Cannonball Application
This application provides many possibilities for you to make it your own. You can change the cannon, the ball, the ground, and the target. If you don't want to use images, you can use drawings for the target and the hit target. You can draw other things on the canvas. You just need to make sure that the cannonball (or whatever you set your projectile to be) is on top or wherever you want it to be. You could, for example, make the ground cover up the ball. You can use an animated gif for any Image object, including the htarget. You could also use images for the cannon and the ball. One possibility is to use an animated gif file to represent a spinning cannonball. Remember that all image files referenced in the code must be in the same folder as the uploaded HTML file. If they are in a different place on the Web, make sure the reference is correct.
The support for audio and video in HTML5 varies across the browsers. You can look ahead to the presentation of video as a reward for completing the quiz in Chapter 6, and to the audio presented as part of the rock-paper-scissors game in Chapter 8. If you want to tackle this subject, it would be great to have a sound when the cannonball hits the target and a video clip showing the target exploding.
Moving away from the look of the game, you can invent a scoring system, perhaps keeping track of attempts versus hits.
The slingshot application is built on the cannonball application. There are differences, but much is the same. Reviewing and understanding how more complicated applications are built on simpler ones will help you to create your own work.
Creating the slingshot application involves designing the slingshot, and implementing the mouse events to move the ball and parts of the slingshot, and then fire the ball. The form is absent because the player's moves are just the mouse actions. In addition, I used a somewhat different approach for what to do when the target was hit. I check for the ball to intersect with an area within the target by 40 pixels. That is, I require the ball to hit the middle of the chicken! When there's a hit, I change the target.src value to be another Image element, going from a picture of a chicken to a picture of feathers. Moreover, I don't stop the animation, so the ball only stops when it hits the ground. As I indicated earlier, I don't have the slingshot slings return to their original position, as I wanted to see the position to plan my next attempt.
Table 4-5 shows the functions calling and being called in the slingshot application. This table is quite similar to the one for the cannonball applications.
Table 4.5. Functions in the Slingshot Application
Function | Invoked By / Called By | Calls |
|---|---|---|
| Action of the |
|
| Invoked directly by | Calls the |
| Invoked by action of |
|
| Called by | |
| Invoked by action of |
|
| Invoked by action of the |
|
Invoked by action of the |
| |
| Invoked directly by code in a | |
| Invoked directly by code in a | |
| Invoked by call of the | |
| Invoked by call of the | |
| Invoked by call of the | |
| Invoked directly by code in | |
| Invoked by call of the | |
| Invoked directly by code in | |
| Invoked by call of the |
Table 4-6 shows the code for the slingshot application, with the new or changed lines commented. Notice that the form is absent from the body element. Before looking at the code, try to identify what parts will be the same as in the cannonball application and what would be different.
Table 4.6. The Slingshot Application
Code | Explanation |
|---|---|
<html> | |
<head> | |
<title>Slingshot pulling back</title> | |
<script type="text/javascript"> | |
var cwidth = 1200; | |
var cheight = 600; | |
var ctx; | |
var canvas1; | |
var everything = []; | |
var tid; | |
var startrockx = 100; | Starting position x |
var startrocky = 240; | Starting position y |
var ballx = startrockx; | Set ballx |
var bally = startrocky; | Set bally |
var ballrad = 10; | |
var ballradsq = ballrad*ballrad; | Save this value |
var inmotion = false; | |
var horvelocity; | |
var verticalvel1; | |
var verticalvel2; | |
var gravity = 2; | |
var chicken = new Image(); | Name of original target |
chicken.src = "chicken.jpg"; | Set image file |
var feathers = new Image(); | Name of hit target |
feathers.src = "feathers.gif"; | Set image file |
function Sling(bx,by,s1x,s1y,s2x,s2y, | Function defining a slingshot based on the four points plus a color |
this.bx = bx; | Set property bx |
this.by = by; | ... |
this.s1x = s1x; | ... |
this.s1y = s1y; | ... |
this.s2x = s2x; | ... |
this.s2y = s2y; | ... |
this.s3x = s3x; | ... |
this.s3y = s3y; | ... |
this.strokeStyle = stylestring; | ... |
this.draw = drawsling; | Set the |
this.moveit = movesling; | Set the |
} | Close function |
function drawsling() {
| Function header for drawsling |
ctx.strokeStyle = this.strokeStyle; | Set this style |
ctx.lineWidth = 4; | Set line width |
ctx.beginPath(); | Start the path |
ctx.moveTo(this.bx,this.by); | Move to |
ctx.lineTo(this.s1x,this.s1y); | Set up to draw to s1x,s1y |
ctx.moveTo(this.bx,this.by); | Move to |
ctx.lineTo(this.s2x,this.s2y); | Set up to draw to s2x,s2y |
ctx.moveTo(this.s1x,this.s1y); | Move to |
ctx.lineTo(this.s2x,this.s2y); | Set up to draw to s2x,s2y |
ctx.lineTo(this.s3x,this.s3y); | Draw to |
ctx.stroke(); | Now draw the path |
} | Close function |
function movesling(dx,dy) {
| Header for movesling |
this.bx +=dx; | Add |
this.by +=dy; | Add |
this.s1x +=dx; | Add |
this.s1y +=dy; | Add |
this.s2x +=dx; | Add |
this.s2y +=dy; | Add |
this.s3x +=dx; | Add |
this.s3y +=dy; | Add |
} | Close function |
var mysling= new Sling(startrockx,startrocky, | Build new Sling and assign it to the |
function
Ball(sx,sy,rad,stylestring) {
| |
this.sx = sx; | |
this.sy = sy; | |
this.rad = rad; | |
this.draw = drawball; | |
this.moveit = moveball; | |
this.fillstyle = stylestring; | |
} | |
function drawball() {
| |
ctx.fillStyle=this.fillstyle; | |
ctx.beginPath(); | |
ctx.arc(this.sx,this.sy,this.rad, | |
ctx.fill(); | |
} | |
function moveball(dx,dy) {
| |
this.sx +=dx; | |
this.sy +=dy; | |
} | |
var cball = new Ball(startrockx,startrocky, | |
function myrectangle(sx,sy,swidth, | |
this.sx = sx; | |
this.sy = sy; | |
this.swidth = swidth; | |
this.sheight = sheight; | |
this.fillstyle = stylestring; | |
this.draw = drawrects; | |
this.moveit = moveball; | |
} | |
function drawrects() {
| |
ctx.fillStyle = this.fillstyle; | |
ctx.fillRect(this.sx,this.sy, | |
} | |
function Picture (sx,sy,swidth, | |
this.sx = sx; | |
this.sy = sy; | |
this.img = imga; | |
this.swidth = swidth; | |
this.sheight = sheight; | |
this.draw = drawAnImage; | |
this.moveit = moveball; | |
} | |
function drawAnImage() {
| |
ctx.drawImage(this.img,this.sx,this. | |
} | |
var target = new Picture(700,210,209, | Build new Picture object and assign it to target |
var ground = new myrectangle(0,370, | |
everything.push(target); | |
everything.push(ground); | Put the |
everything.push(mysling); | |
everything.push(cball); | |
function init(){
| |
ctx = document.getElementById | |
canvas1 = document.getElementById | |
canvas1.addEventListener('mousedown',
| Set up event handling for the mousedown event |
canvas1.addEventListener('mousemove',
| Set up event handling for the mousemove event |
canvas1.addEventListener('mouseup',
| Set up event handling for the mouseup event |
drawall(); | |
} | |
function findball(ev) {
| Function header for mousedown event |
var mx; | Variable to hold mouse x |
var my; | Variable to hold mouse y |
if ( ev.layerX || ev.layerX |
|
mx= ev.layerX; | Use it for |
my = ev.layerY; } | Use |
else if (ev.offsetX || ev.offsetX | Else try offset |
mx = ev.offsetX; | Set |
my = ev.offsetY; } | Set |
if (distsq(mx,my, cball.sx, | Is mouse over ball? |
inmotion = true; | Set |
drawall(); | Draw everything |
} | Close if over ball |
} | Close function |
function distsq(x1,y1,x2,y2) {
| Header for |
return (x1-x2)*(x1-x2)+(y1-y2)* | Return distance squared |
} | Close function |
function moveit(ev) {
| Function header for |
var mx; | For mouse x |
var my; | For mouse y |
if (inmotion) {
| in motion? |
if ( ev.layerX || ev.layerX == 0) {
| Does |
mx= ev.layerX; | Use it for |
my = ev.layerY; |
|
} else
if (ev.offsetX || ev.offsetX == 0) {
| Does |
mx = ev.offsetX; | Use it for |
my = ev.offsetY; | Use |
} | Close if true |
cball.sx = mx; | Position ball |
cball.sy = my; | ...and |
mysling.bx = mx; | Position |
mysling.by = my; | ... and |
drawall(); | Draw everything |
} | Close if in motion |
} | Close function |
function finish(ev) {
| Function for |
if
(inmotion) {
| In motion? |
inmotion = false; | Reset |
var outofcannon = distsq(mysling.bx,mysling.by, | Base |
var angleradians = -Math.atan2 | Compute angle |
horvelocity = outofcannon*Math.cos | |
verticalvel1 = - outofcannon*Math.sin | |
drawall(); | |
tid = setInterval(change,100); | |
} | |
} | |
function drawall() {
| |
ctx.clearRect(0,0,cwidth,cheight); | |
var i; | |
for (i=0;i<everything.length;i++)
{
| |
everything[i].draw(); | |
} | |
} | |
function change() {
| |
var dx = horvelocity; | |
verticalvel2 = verticalvel1 + gravity; | |
var dy = (verticalvel1 + | |
verticalvel1 = verticalvel2; | |
cball.moveit(dx,dy); | |
var bx = cball.sx; | |
var by = cball.sy; | |
if ((bx>=target.sx+40)&&(bx<= | Check for inside of target (40 pixels) |
target.img = feathers; | Change target |
} | |
if (by>=ground.sy) {
| |
clearInterval(tid); | |
} | |
drawall(); | |
} | |
</script> | |
</head> | |
<body onLoad="init();"> | |
<canvas id="canvas" width="1200" | |
Your browser doesn't support the | |
</canvas> | |
<br/> | |
Hold mouse down and drag ball. Releasing | Instructions for using mouse |
</body> | |
</html> |
These applications can be created without external image files, but using images for the target and the hit target is fun, so you remember to include those files when you upload your project. You can choose your own targets. Perhaps you feel kindly towards chickens!
You'll need to test that the program performs correctly in three situations: when the ball plops down to the left of the target, when the ball hits the target, and when the ball sails over the target. Note that I massaged the values so that the chicken needs to be hit in the middle, so it is possible for the ball to touch the head or tail and not cause the feathers to appear.
You can vary the position of the cannon and its target and hit target, and the slingshot and the chicken and the feathers, by changing the variables such as startrockx, and you can modify the gravity variable. If you put the slingshot closer to the target, you can have more ways to hit the chicken: pulling more to the left for a direct shot versus pulling down for more of a lob. Enjoy!
As I mentioned, you could use an animated gif for the hit target in either the cannonball or slingshot applications. This would produce a nice effect.
In this chapter, you learned how to create two ballistics applications. It is important to understand how they are the same and how they are different. The programming techniques and HTML5 features include
programmer-defined objects
setIntervalto set up a timing event for the animation, as done for the bouncing ballbuilding an array using the
pushmethod and using the array as a list of what to displaymodifying arrays using the
splicemethodthe use of trig functions with calculations to rotate the cannon and to resolve the horizontal and vertical velocities so as to simulate gravity
using a
formfor player inputhandling mouse events (
mousedown, mousemove, mouseup), withaddEventListenerto obtain player inputmove drawing arcs, rectangles, lines and images on a canvas
The technique of programmer-defined objects and the use of an array of objects to display will come up again in later chapters. The next chapter focuses on a familiar game known as either memory or concentration. It will use a different timing event as well as the Date function, introduced in Chapter 1.