
The last windows that we will discuss are those that IDA does not open by default. Each of these windows is available via View ▸ Open Subviews, but they tend to provide information to which you may not require immediate access and are thus initially kept out of the way.
The Strings window is the built-in IDA equivalent of the strings utility and then some. In IDA versions 5.1 and earlier, the Strings window was open as part of the default desktop; however, with version 5.2, the Strings window is no longer open by default, though it remains available via View ▸ Open Subviews ▸ Strings.
The purpose of the Strings window is to display a list of strings extracted from a binary along with the address at which each string resides. Like double-clicking names in the Names window, double-clicking any string listed in the Strings window causes the disassembly window to jump to the address of the selected string. When used with cross-references (Chapter 9), the Strings window provides the means to rapidly spot an interesting string and to track back to any location in the program that references that string. For example, you might see the string SOFTWAREMicrosoftWindowsCurrent VersionRun listed and wonder why an application is referencing this particular key within the Windows registry. As you will see in the following chapter, navigating to the program location that references this string takes only four clicks. Understanding the operation of the Strings window is essential to using it effectively. IDA does not permanently store the strings it extracts from a binary. Therefore, every time the Strings window is opened, the entire database must be scanned or rescanned for string content. String scanning is performed in accordance with the settings of the Strings window, and you can access these settings by right-clicking within the Strings window and selecting Setup. As shown in Figure 5-7, the Setup Strings window is used to specify the types of strings that IDA should scan for. The default string type that IDA scans for is a C-style, null-terminated, 7-bit, ASCII string of at least five characters in length.
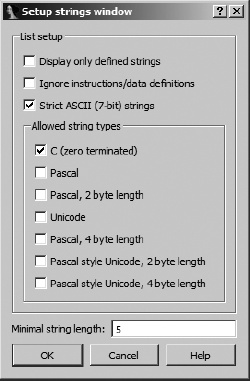
If you expect to encounter anything other than C-style strings, you should reconfigure the Setup Strings window to choose the appropriate string type to search for. For example, Windows programs often make use of Unicode strings, while Borland Delphi binaries use Pascal-style strings with a 2-byte length. Every time you close the Setup Strings window by clicking OK, IDA will rescan the database for strings in accordance with the new settings. Two setup options deserve special mention:
- Display only defined strings
This option restricts the Strings window to displaying only named string data items that have been automatically created by IDA or manually created by the user. With this option selected, all other options are disabled, and IDA will not automatically scan for additional string content.
- Ignore instructions/data definitions
This option causes IDA to scan for strings across instruction and existing data definitions. Using this option allows IDA to (1) see strings that may be embedded in the code portion of a binary and have been mistakenly converted into instructions or (2) to see strings within data that may be formatted as something other than a string (such as an array of bytes or integers). This option will also lead to the generation of many junk strings, which are sequences that happen to consist of five or more ASCII characters whether or not they are legible. The effect of using this option is similar to using the
stringscommand with the-aswitch.
Figure 5-8 demonstrates that IDA does not necessarily show all strings within a binary if the strings setup is not configured properly. In this case, Ignore instructions/data definitions has not been selected.
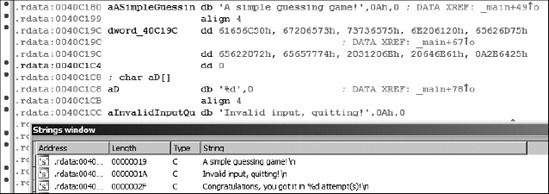
The result is that the string at location .rdata:0040C19C (“Please guess a number between 1 and %d.”) remains undetected. The moral here is to make sure that you are looking for all of the types of strings you expect to encounter in all of the places you might find them.
The Names window, shown in Figure 5-9, provides a summary listing of all of the global names within a binary. A name is nothing more than a symbolic description given to a program virtual address. IDA initially derives the list of names from symbol-table and signature analysis during the initial loading of a file. Names can be sorted alphabetically or in virtual address order (either ascending or descending). The Names window is useful for rapidly navigating to known locations within a program listing. Double-clicking any Names window entry will immediately jump the disassembly view to display the selected name.
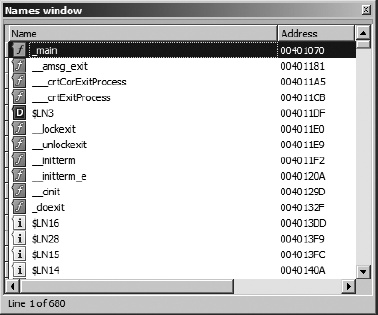
Displayed names are both color and letter coded. The coding scheme is summarized below:
F | A regular function. These are functions that IDA does not recognize as library functions. |
L | A library function. IDA recognizes library functions through the use of signature-matching algorithms. If a signature does not exist for a given library function, the function will be labeled as a regular function instead. |
I | An imported name, most commonly a function name imported from a shared library. The difference between this and a library function is that no code is present for an imported name, while the body of a library function will be present in the disassembly. |
C | Named code. These are named program instruction locations that IDA does not consider to be part of any function. This is possible when IDA finds a name in a program’s symbol table but never sees a |
D | Data. Named data locations typically represent global variables. |
A | String data. This is a referenced data location containing a sequence of characters that conform to one of IDA’s known string data types, such as a null-terminated ASCII C string. |
As you browse through disassemblies, you will notice that there are many named locations for which no name is listed in the Names window. In the process of disassembling a program, IDA generates names for all locations that are referenced directly either as code (a branch or call target) or as data (read, written, or address taken). If a location is named in the program’s symbol table, IDA adopts the name from the symbol table. If no symbol table entry is available for a given program location, IDA generates a default name for use in the disassembly. When IDA chooses to name a location, the virtual address of the location is combined with a prefix that indicates what type of location is being named. Incorporating the virtual address into a generated name ensures that all generated names will be unique, as no two locations can share the same virtual address. Autogenerated names of this type are not displayed in the Names window. Some of the more common prefixes used for autogenerated names include these:
| A subroutine at address |
| An instruction location at address |
| 8-bit data at location |
| 16-bit data at location |
| 32-bit data at location |
| Data of unknown size at location |
Throughout the course of the book we will show additional algorithms that IDA applies in choosing names for program data locations.
The Segments window displays a summary listing of the segments present in the binary file. Note that what IDA terms segments are most often called sections when discussing the structure of binary files. Do not confuse the use of the term segments in this manner with the memory segments associated with CPUs that implement a segmented memory architecture. Information presented in the window includes the segment name, start and end addresses, and permission flags. The start and end addresses represent the virtual address range to which the program sections will be mapped at runtime. The following listing is an example of Segments window content from a Windows binary:
Name   Start    End      R W X D L Align  Base
 Type   Class  AD es   ss   ds   fs       gs
UPX0   00401000 00407000 R W X . L para   0001 public CODE   32
 0000 0000 0001 FFFFFFFF FFFFFFFF
UPX1   00407000 00408000 R W X . L para   0002 public CODE   32
 0000 0000 0001 FFFFFFFF FFFFFFFF
UPX2   00408000 0040803C R W . . L para   0003 public DATA   32
 0000 0000 0001 FFFFFFFF FFFFFFFF
.idata 0040803C 00408050 R W . . L para   0003 public XTRN   32
 0000 0000 0001 FFFFFFFF FFFFFFFF
UPX2   00408050 00409000 R W . . L para   0003 public DATA   32
 0000 0000 0001 FFFFFFFF FFFFFFFF
In this case, we might quickly suspect that something is funny with this particular binary since it uses nonstandard segment names and has two executable segments that are writable, thus indicating the possibility of self-modifying code (more on this in Chapter 21). The fact that IDA knows the size of a segment does not indicate that IDA knows the contents of the segment. For a variety of reasons, segments often occupy less space on disk than they do in memory. In such cases, IDA displays values for the portions of the segment that IDA has determined it could fill from the disk file. For the remainder of the segment, IDA displays question marks.
Double-clicking any entry in the window jumps the disassembly view to the start of the selected segment. Right-clicking an entry provides a context menu from which you can add new segments, delete existing segments, or edit the properties of existing segments. These features are particularly useful when reverse engineering files with nonstandard formats, as the binary’s segment structure may not have been detected by the IDA loader.
Command-line counterparts to the Segments window include objdump (-h), readelf (-S), and dumpbin (/HEADERS).
IDA makes use of an extensive library of signatures for identifying known blocks of code. Signatures are used to identify common compiler-generated startup sequences in an attempt to determine the compiler that may have been used to build a given binary. Signatures are also used to categorize functions as known library functions inserted by a compiler or as functions added to the binary as a result of static linking. When IDA identifies library functions for you, you can focus more of your effort on the code that IDA did not recognize (which is probably far more interesting to you than reverse engineering the inner workings of printf).
The Signatures window is used to list the signatures that IDA has already matched against the open binary file. An example from a Windows PE file is shown here:
File      State     #func  Library name
vc32rtf   Applied   501    Microsoft VisualC 2-8/net runtime
This example indicates that IDA has applied the vc32rtf signatures (from <IDADIR>/sigs) against the binary and, in doing so, has been able to recognize 501 functions as library functions. That’s 501 functions that you will not need to reverse engineer!
In at least two cases, you will want to know how to apply additional signatures against your binaries. In the first case, IDA may fail to recognize the compiler that was used to build a binary, with a resulting inability to select appropriate signatures to apply. In this case, you may wish to force IDA to apply one or more signatures that your preliminary analysis has led you to believe IDA should try. The second situation involves creating your own signatures for libraries that may not have existing signatures included with IDA. An example might be the creation of signatures for the static version of the OpenSSL libraries that ship with FreeBSD 8.0. DataRescue makes a toolkit available for generating custom signatures that can be used by IDA’s signature-matching engine. We’ll cover the generation of custom signatures in Chapter 12. Regardless of why you want to apply new signatures, either pressing the insert key or right-clicking the Signatures window will offer you the Apply new signature option, at which time you can choose from a list of all signatures known to your installation of IDA.
Similar in concept to the Signatures window is the Type Libraries window. Type libraries represent IDA’s accumulated knowledge of predefined datatypes and function prototypes gleaned from header files included with most popular compilers. By processing header files, IDA understands the datatypes that are expected by common library functions and can annotate your disassemblies accordingly. Similarly, from these header files IDA understands both the size and layout of complex data structures. All of this type information is collected into TIL files (<IDADIR>/til) and applied any time a binary is analyzed. As with signatures, IDA must first be able to deduce the libraries that a program uses before it can select an appropriate set of TIL files to load. You can request that IDA load additional type libraries by pressing the insert key or by right-clicking within the Type Libraries window and choosing Load type library. Type libraries are covered in more detail in Chapter 13.
In any program, a function can both call and be called by other functions. In fact, it is a fairly simple task to construct a graph that displays the relationships between callers and callees. Such a graph is called a function call graph or function call tree (we will demonstrate how to have IDA generate such graphs in Chapter 9). On occasion, we may not be interested in seeing the entire call graph of a program; instead, we may be interested only in knowing the immediate neighbors of a given function. For our purposes, we will call Y a neighbor of X if Y directly calls X or X directly calls Y.
The Function Calls window provides the answer to this neighbor question. When you open the Function Calls window, IDA determines the neighbors of the function in which the cursor is positioned and generates a display such as that shown in Figure 5-10.
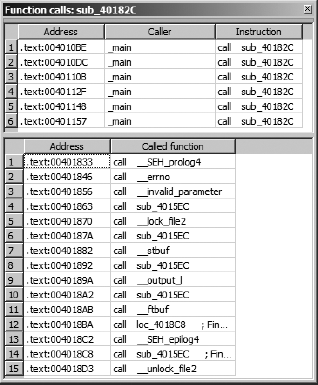
In this example, we see that the function named sub_40182C is called from six different locations in _main and _main in turn makes 15 other function calls. Double-clicking any line within the Function Calls window immediately jumps the disassembly window to the selected calling or called function (or caller and callee). IDA cross-references (xrefs) are the mechanisms that underlie the generation of the Function Calls windows. Xrefs will be covered in more detail in Chapter 9.
The Problems window is IDA’s way of informing you of any difficulties that it has encountered in disassembling a binary and how it has chosen to deal with those difficulties. In some instances, you may be able to manipulate the disassembly to help IDA overcome a problem, and in other instances you may not. You can expect to encounter problems in even the simplest of binaries. In many cases, simply choosing to ignore the problems is not a bad strategy. In order to correct many of the problems, you need to have a better understanding of the binary than IDA has, which for most of us is probably not going to happen. A sample set of problems follows:
Address          Type       Instruction
.text:0040104C   BOUNDS     call    eax
.text:004010B0   BOUNDS     call    eax
.text:00401108   BOUNDS     call    eax
.text:00401350   BOUNDS     call    dword ptr [eax]
.text:004012A0   DECISION   push    ebp
.text:004012D0   DECISION   push    ebp
.text:00401560   DECISION   jmp     ds:__set_app_type
.text:004015F8   DECISION   dd 0FFFFFFFFh
.text:004015FC   DECISION   dd 0
Each problem is characterized by (1) the address at which the problem occurs, (2) the type of problem encountered, and (3) the instruction present at the problem location. In this example, we see a BOUNDS problem and a DECISION problem. A BOUNDS problem occurs when the destination of a call or jump either can’t be determined (as in this example, since the value of eax is unknown to IDA) or appears to lie outside the range of virtual addresses in a program. A DECISION problem is most often not a problem at all. A DECISION usually represents an address at which IDA has chosen to disassemble bytes as instructions rather than data even though the address has never been referenced during the recursive descent instruction traversal (see Chapter 1). A complete list of problem types and suggestions for how to deal with them is available in the built-in IDA help file (see topic Problems List).