
In the last chapter we saw how IDA’s array-aggregation capabilities allow disassembly listings to be simplified by collapsing long lists of data declarations into a single disassembly line. In the next few sections we take a look at IDA’s facilities for improving the readability of code that manipulates structures. Our goal is to move away from structure references such as [edx + 10h] and toward something more readable like [edx + ch8_struct.field5].
Whenever you discover that a program is manipulating a data structure, you need to decide whether you want to incorporate structure field names into your disassembly or whether you can make sense of all the numeric offsets sprinkled throughout the listing. In some cases, IDA may recognize the use of a structure defined as part of the C standard library or the Windows API. In such cases, IDA may have knowledge of the exact layout of the structure and be able to convert numeric offsets into more symbolic field names. This is the ideal case, as it leaves you with a lot less work to do. We will return to this scenario once we understand a little more about how IDA deals with structure definitions in general.
When a program appears to be using a structure for which IDA has no layout knowledge, IDA offers facilities for specifying the composition of the structure and having the newly defined structure incorporated into the disassembly. Structure creation in IDA takes place within the Structures window (see Figure 8-2). No structure can be incorporated into a disassembly until it is first listed in the Structures window. Any structure that is known to IDA and that is recognized to be used by a program will automatically be listed in the Structures window.
There are two reasons why the use of a structure may go unrecognized during the analysis phase. First, even though IDA may have knowledge of a particular structure’s layout, there may be insufficient information for IDA to conclude that the program utilizes the structure. Second, the structure may be a nonstandard structure that IDA knows nothing about. In both cases the problem can be overcome, and in both cases the solution begins with the Structures window.
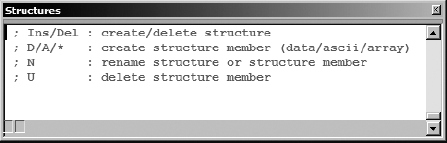
The first four lines of text in the Structures window serve as a constant reminder of the operations that are possible within the window. The principal operations we are concerned with involve adding, removing, and editing structures. Adding a structure is initiated using the insert key, which opens the Create Structure/Union dialog shown in Figure 8-3.
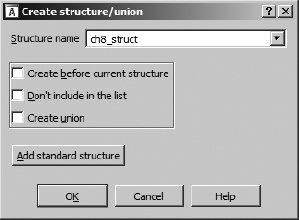
In order to create a new structure, you must first specify the name in the Structure name field. The first two checkboxes determine where or whether the new structure will be displayed within the Structures window. The third checkbox, Create union, specifies whether you are defining a structure or a C-style union.[46] For structures, the size is computed as the sum of the sizes of each component field, while for unions, the size is computed as the size of the largest component field. The Add standard structure button is used to access the list of all structure datatypes that IDA is currently aware of. The behavior of this button is discussed in Using Standard Structures in Using Standard Structures. Once you specify a structure name and click OK, an empty structure definition will be created in the Structures window, as shown in Figure 8-4.
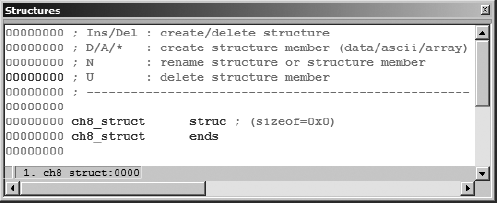
This structure definition must be edited to complete the definition of the structure layout.
In order to add fields to your new structure, you must make use of the field-creation commands D, A, and the asterisk key (*) on the numeric keypad. Initially, only the D command is useful, and unfortunately, its behavior is highly dependent on the location of the cursor. For that reason, the following steps are recommended for adding fields to a structure.
To add a new field to a structure, position the cursor on the last line of the structure definition (the one containing
ends) and press D. This causes a new field to be added to the end of the structure. The size of the new field will be set according to the first size selected on the data carousel (Chapter 7). The name of the field will initially befield_N, whereNis the numeric offset from the start of the structure to the start of the new field (field_0, for example).Should you need to modify the size of the field, you may do so by first ensuring that the cursor is positioned on the new field name and then selecting the correct data size for the field by repeatedly pressing D in order to cycle through the datatypes on the data carousel. Alternatively, you may use Options ▸ Setup Data Types to specify a size that is not available on the data carousel. If the field is an array, right-click the name and select Array to open the array specification dialog (Chapter 7).
To change the name of a structure field, click the field name and use the N hotkey, or right-click the name and select Rename; then provide a new name for the field.
The following helpful hints may be of use as you define your own structures.
The byte offset to a field is displayed as an eight-digit hex value on the left side of the Structures window.
Every time you add or delete a structure field or change the size of an existing field, the new
sizeofthe structure will be reflected on the first line of the structure definition.You can add comments to a structure field just as you can add comments to any disassembly line. Right-click (or use a hotkey) on the field you wish to add a comment to and select one of the available comment options.
Contrary to the instructions at the top of the Structures window, the U key will delete a structure field only if it is the last field in the structure. For all other fields, pressing U merely undefines the field, which removes the name but does not remove the bytes allocated to the field.
You are responsible for proper alignment of all fields within a structure definition. IDA makes no distinction between packed or unpacked structures. If you require padding bytes to properly align fields, then you are responsible for adding them. Padding bytes are best added as dummy fields of the proper size, which you may or may not choose to undefine once you have added additional fields.
Bytes allocated in the middle of a structure can be removed only by first undefining the associated field and then selecting Edit ▸ Shrink Struct Type to remove the undefined bytes.
Bytes may be inserted into the middle of a structure by selecting the field that will follow the new bytes and then using Edit ▸ Expand Struct Type to insert a specified number of bytes before the selected field.
If you know the size of a structure but not the layout, you need to create two fields. The first field should be an array of
size-1bytes. The second field should be a 1-byte field. After you have created the second field, undefine the first (array) field. The size of the structure will be preserved, and you can easily come back later to define fields and their sizes as you learn more about the layout of the structure.
Through repeated application of these steps (add field, set field size, add padding, and so on), you can create an IDA representation of the ch8_struct (unpacked version), as shown in Figure 8-5.

In this example, padding bytes have been included to achieve proper field alignment, and fields have been renamed according to the names used in the preceding examples. Note that the offsets to each field and the overall size (24 bytes) of the structure match the values seen in the earlier examples.
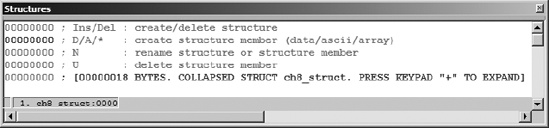
If you ever feel that a structure definition is taking up too much space in your Structures window, you can collapse the definition into a one-line summary by choosing any field within the structure and pressing the minus key (–) on the numeric keypad. This is useful once a structure has been completely defined and requires little further editing. The collapsed version of ch8_struct is shown in Figure 8-6.
The majority of structures that IDA is already aware of will be displayed in this one-line fashion since it is not expected that they will need to be edited. The collapsed display provides a reminder that you can use the plus key (+) on the numeric keypad to expand the definition. Alternatively, double-clicking the name of the structure will also expand the definition.
You may notice that structure definitions look somewhat similar to the detailed stack frame views associated with functions. This is no accident, as internally IDA treats both identically. Both represent contiguous blocks of bytes that can be subdivided into named component fields, each associated with a numeric offset into the structure. The minor difference is that stack frames utilize both positive and negative field offsets centered on a frame pointer or return address, while structures use positive offsets from the beginning of the structure.
[46] A union is similar to a struct in that it may consist of many named fields, each of differing type. The difference between the two lies in the fact that fields within a union directly overlap one another so that the size of a union is equal to the size of the largest field.