4 Building a documentation site
- Understanding the needs of a typical documentation site
- Choosing a headless CMS for managing documentation
- Choosing a static site generator for a documentation site
- Installing and configuring Hugo
- Setting up Netlify CMS open editing and modeling
- Configuring Netlify and GitHub for user authentication
- Editing content in Netlify CMS
The Jamstack has always excelled at content-focused sites, even from the early days of static site generators. Static HTML and CSS is perfect for displaying content quickly and efficiently; thus, content sites lend themselves to pre-rendering using Jamstack tools. This is why documentation sites have been one of the most obvious use cases for the Jamstack.
Documentation sites have always generally had additional advantages to using the Jamstack:
-
The ability to version file-based content easily via source control
-
A means of accepting contributions and corrections via processes like a GitHub pull request
-
The fact that, in many cases, the authors were technically adept with these sorts of development tools
The biggest disadvantage of choosing the Jamstack for a documentation site had typically been that the tools for editing content were not advanced enough to meet the needs of content authors and editors. However, the tools, services, and libraries available for documentation sites (or content-focused sites in general) using the Jamstack have improved tremendously in recent years. The benefits still apply, but modern Jamstack tools make site content easier to edit and contributions easier to accept—even from folks who may be unfamiliar with code. In this chapter, we’ll explore the options available to you for developing documentation sites using the Jamstack and walk through how to build a documentation site.
4.1 Requirements of a documentation site
There’s obviously no single kind of documentation site. For example, there is technical documentation, like software documentation or API documentation, and end-user documentation, like user manuals. The requirements for each of these may differ, but they also share some commonalities:
-
Documentation sites tend to have multiple, and often numerous, contributors. In the case of project or policy documentation, contributors might exclusively be company employees. However, in a software world increasingly dominated by open source, many documentation sites often have a large number of external contributors.
-
Contributors may have varying degrees of technical expertise when it comes to editing the site’s content.
-
Documentation sites are designed to be optimized for fast and easy access to information, favoring simple and straightforward features and design.
-
The layout and design are geared toward readability over style.
-
Outside of things like comments or runnable examples, many documentation sites do not include complex, dynamic functionality.
-
Many documentation sites have a lot of content, but that content can change relatively infrequently. A typical site may receive periodic major updates with occasional minor ones in between.
4.1.1 The example site requirements
We’re going to build technical documentation for an esoteric programming language called LOLCODE (http://www.lolcode.org/) (see figure 4.1). LOLCODE is intended to be a humorous take on a programming language that is based on lolspeak, a form of grammatically incorrect language associated with internet memes of cats. The docs are based on the LOLCODE specification (http://mng.bz/RE7D), written by Justin Meza.

Figure 4.1 The lolcode.org site showing the LOLCODE language, installation details, and links to the specifications that we’ll use for our example documentation site
As the adoption of LOLCODE inevitably expands, I expect this site to get rather large, so optimizing for build speed will be a priority. Since this is an open source language, I’d also like to enable easy contributions from third-party authors. Though I anticipate that most contributors will have a high degree of technical expertise, they may not be experts in building Jamstack sites. Nonetheless, I want to encourage contributions by enabling them to contribute without requiring that they go through the Git workflow of manually forking, installing locally, updating, and then creating a pull request.
Now that we understand the needs of our docs site, let’s look at the tools we have available to meet these requirements.
4.2 Choosing the right tools
Our requirements aren’t particularly complex. We need the ability to generate potentially many content pages for an extensive documentation, and we need the ability for third-party content contributors to edit content without requiring a deep technical knowledge of how the site is built. To accomplish this, we’re going to need the right static site generator and a headless content management system (CMS). The CMS will provide the editing interface that will allow content contributors to more easily write and edit content on the site.
4.2.1 What is a headless CMS?
We’ve talked a lot about static site generators but not about headless CMSs. Headless CMSs are a relatively new concept. The name derives from the idea that they decouple the backend (i.e., the actual content editing and management tools that the CMS provides) from the “head” (i.e., the frontend of the application, in this case, a website).
Traditional CMSs were created almost exclusively to manage web page content. Because of this, the management of the content was tied to its display. For example, in a typical WordPress site, the backend content management is provided by WordPress, but the frontend website is also built in (i.e., tightly coupled with) WordPress.
This tight coupling means that content is not reusable. A headline on the home page might also appear on a landing page, but updating one instance will not update the other. Since the content is intended for the web, it cannot easily be reused in things like a mobile app.
A traditional CMS also isn’t designed for the Jamstack. Pages on the frontend of a traditional CMS are server-rendered and unable to take advantage of the improved speed and security the Jamstack architecture offers.
Headless CMSs solve these problems by providing the backend content editing and management tools, untethered from a frontend site. There is a fast-growing list of headless CMS options available, but they fall under two different categories that determine how the frontend site accesses the content:
-
API-based headless CMS—Your content is stored by the CMS provider and is accessible by your website, mobile app, or other application via an API. Since content in an API-based headless CMS is not tied to physical files, they are able to easily handle reuse of content objects and more easily manage complex relationships between content objects or even embedding content objects within content blocks.
-
Git-based headless CMS—These CMSs do not store your content. Instead, content is maintained in a Git repository, often as Markdown for long-form content and YAML or JSON for data. The CMS is essentially a layer of tooling for managing the content via a web interface that is easy to understand for content editors who may be uncomfortable manually editing the file-based content.
NOTE For a more in-depth look at the pros and cons of Git-based versus API-based headless CMSs, see this detailed post by Bejamas: http://mng.bz/2j19.
One of the benefits of a Git-based CMS for our example use case is that it still allows a Git-based editing workflow and version histories that track changes, which can be publicly accessible via GitHub or other Git project hosting providers. This can be ideal for a technical documentation project, particularly for an open source project, as in our case. Therefore, our example project will use a Git-based solution.
4.2.2 Headless CMS options
Now that we’ve determined a Git-based solution is our choice, let’s look at some the options available.
Forestry (forestry.io) is a commercial Git-based CMS solution. It comes with built-in support for all of the most popular static site generators and integrates with most of the major static hosting providers (figure 4.2). At the time of this writing, it offers a free account that supports up to five editors, though free sites are automatically archived after three months of inactivity.
Figure 4.2 Editing a content page using Forestry’s what-you-see-is-what-you-get (WYSIWYG) page editor
Publii (https://getpublii.com/), shown in figure 4.3, is different from the other options in that it is an installable, open source desktop application rather than a web-based interface. It offers several options for editing content, including a WYSIWYG editor, a block editor similar to the new “Gutenberg” interface on WordPress, and a straight Markdown editor. Publii doesn’t just provide the editing tools like other Git-based CMSs, but also serves as the static site generator, which supports a wide variety of hosting options.

Figure 4.3 Publii’s desktop application interface offers several options for editing content: a WYSIWYG editor, a block editor similar to the new “Gutenberg” interface on WordPress, and straight Markdown source editing.
Prose (http://prose.io/), shown in figure 4.4, is also a unique option. It is a completely free tool that hooks into your GitHub account, giving you access to a web-based editor for any file in any repository connected to your account. While code and data files can be edited using the Prose editor, its focus is on offering a better editing experience for Markdown content with metadata (typically called front matter). It does provide a simple Markdown preview but not a true WYSIWYG experience.
Figure 4.4 Prose provides a Markdown editor with simple preview capabilities and front matter metadata editing for any Markdown file in any repository within your GitHub account.
Netlify CMS (https://www.netlifycms.org/), shown in figure 4.5, is an open source content management tool. One of its differentiators is the ability to configure it to work with just about any static site generator. It was built by and is largely maintained by Netlify, so some features work out-of-the-box with Netlify’s hosting, but it can be configured to work with other providers as well.
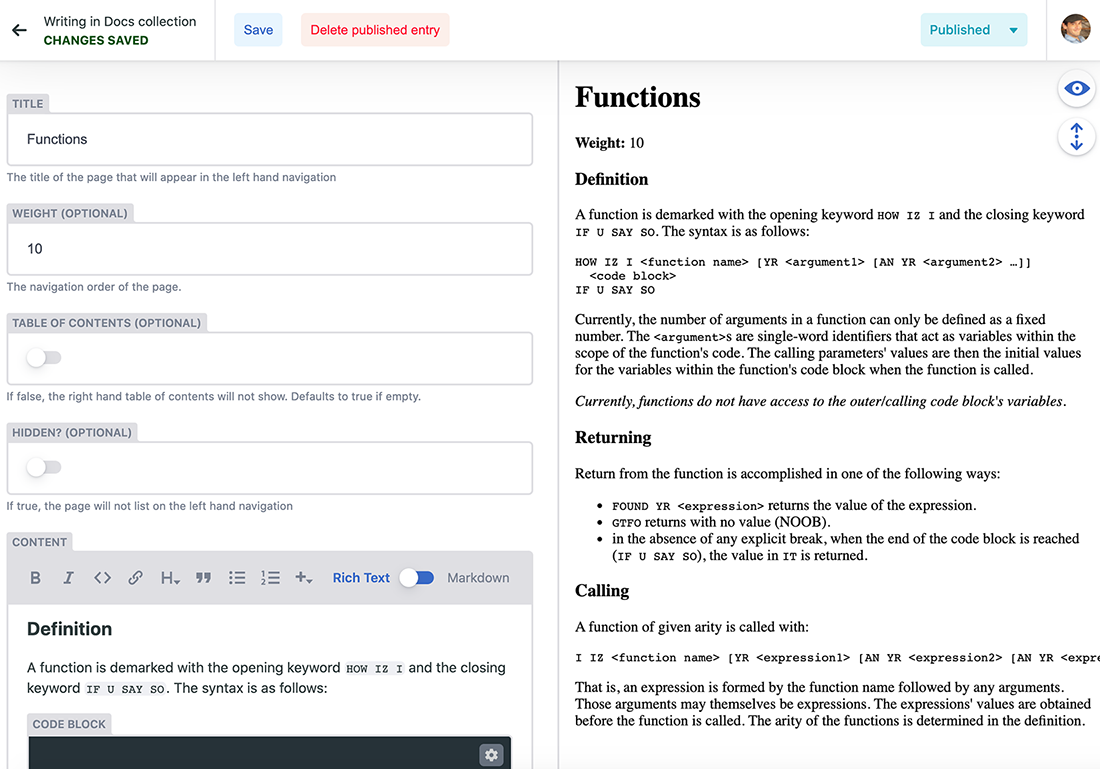
Figure 4.5 Netlify CMS has a variety of advanced widgets for editing both the long-form Markdown content of a post as well as the front matter metadata.
4.2.3 Why Netlify CMS?
Our project is going to be a technical documentation for the esoteric programming language LOLCODE. For this project, we’re going to use Netlify CMS. There are a number of reasons this is a good choice:
-
Netlify CMS is a liberally licensed open source project (it uses an MIT license). This means we can make our entire documentation project open source without worrying about license restrictions.
-
Netlify CMS has an open authoring feature that allows us to give anyone with a GitHub account access to make contributions to the documentation. The users will have full access to the content management system, but their contributions will be automatically submitted as pull requests on their behalf, meaning the changes will not affect the site until we have accepted them.
-
There is no limit to the number of users who are allowed to make a contribution and no costs associated with the number of users.
4.2.4 Static site generator (SSG) options
Any SSG can work for a documentation site. That being said, there are actually a number of SSGs that are specifically geared toward documentation:
-
Docsify (https://docsify.js.org)—A Javascript-based SSG that serves documentation as a single-page application (SPA). Docsify differs from other solutions in that it does not generate static HTML files but instead parses the Markdown content at runtime in the browser, meaning the application does not need to rebuild to reflect changes or new content.
-
Slate (https://github.com/slatedocs/slate)—A Ruby-based solution built on the Middleman SSG under the covers that is designed specifically for creating API docs. It also runs as a SPA that supports code examples in multiple languages, allowing the user to switch to the language tab that is relevant to them.
-
MkDocs (https://www.mkdocs.org/)—A Python-based solution that emphasizes its speed when generating a large number of pages. It offers many themes, including a lot of community-built themes.
-
Docusaurus (https://docusaurus.io/)—A JavaScript-based static site generator that uses React, Docusaurus comes with a lot of documentation-focused features and layouts out of the box, including things like documentation versioning and internationalization (i18n).
-
Hugo (https://gohugo.io/)—A popular Go-based SSG that is also focused on an extremely fast build process, including built-in asset management. While it isn’t documentation specific, Hugo has a large community of users with a lot of community-built themes, many of them specifically designed for documentation.
4.2.5 Why Hugo?
We’re going to use Hugo for our LOLCODE technical documentation project. It will handle our growing volume of content easily while keeping build times down. Hugo is installed via a binary, meaning there’s no complicated environment required for contributors who wish to run the project locally. It also has extensive and detailed documentation as well as a large number of community posts, making it easy to find solutions to any potential problems we may encounter.
Even though it isn’t a documentation-specific solution, Hugo has a significant number of community themes that offer designs and features targeted to documentation sites. Some examples include the following:
-
Dot is aimed at documentation in the form of a support center or knowledge base.
-
Hugo Book is a minimalist book-style theme with features like built-in search.
-
Kraiklyn is designed for creating single-page documentation.
For our example, we’ll choose the Hugo Book theme. I chose this not for any technical reason but because I think the simple, clean layout it provides works well for the sort of language documentation we are creating.
4.3 Building the example site
Let’s get started building our documentation site. We’ll begin by installing Hugo and getting our theme set up and then configure the site to work with Netlify CMS.
4.3.1 Installing Hugo
There are a number of ways to install Hugo, including simply downloading the binary. While that is a method that works across all supported platforms (MacOS, Windows, and Linux), it has some complications in that you’ll want to place it on your path so that it can easily be called from any location with just the hugo command-line command (rather than the full path to the binary). It’s important to note that if you choose the binary install or already have Hugo installed, you need the extended version of Hugo version 0.68 or higher.
It is preferable to use a package manager to install Hugo.
You can use Homebrew to install Hugo on MacOS or Linux:
brew install hugo
You can use Chocolatey to install Hugo on Windows:
choco install hugo-extended -confirm
Confirm that your Hugo installation worked properly:
hugo version
This should return something like the following (note that the version will have changed since this writing):
Hugo Static Site Generator v0.74.3/extended darwin/amd64 BuildDate: unknown
4.3.2 Creating a new Hugo site
We’re going to build a technical documentation site for the LOLCODE esoteric language using Hugo as our static site generator, Netlify CMS as our Git-based headless CMS, and Hugo Book as our site’s theme. The first step will be to generate a new site skeleton for our site using Hugo.
To create a new site using Hugo, use the new site command followed by a name for the directory you want the site to be created in:
hugo new site lolcode-docs
cd lolcode-docs
This will create a skeleton for a Hugo site with the following contents:
├── archtetypes
│   └── default.md
├── content
├── data
├── layouts
├── static
├── themes
├── config.toml
As you can see, the skeleton has no default content or theme. For the most part, Hugo generates only the directory structure and a basic configuration file. Here’s what each of these files and folders are used for:
-
In Hugo, archetypes represent the different content types in your application. These are templates for the front matter (i.e., metadata) of the different types of content your site will contain. For example, you may have a post archetype for blog posts that define the front matter a blog post will contain. While it isn’t necessary that you create an archetype for all your content, doing so allows you to use the hugo new command with that type to generate a new page with the correct settings for that content type. So, if we had a post type, we could enter the command hugo new post/my-new-post.md to create a blog post with the name “my-new-post.”
-
All content for a Hugo site exists within the content folder. This can be in any directory structure within that folder. When the site is generated, a page will be created for every content item within the content folder. For example, a Markdown file at /content/posts/my-new-post.md will generate a page at /posts/ my-new-post/ within the site.
-
The data folder contains all data files (YAML, TOML, or JSON). Hugo makes these available to the site within the .Site.Data object. For instance, a data file of authors.yaml would be available as .Site.Data.Authors.
-
The layouts folder contains all the layout templates that Hugo will use to generate the pages. Typically, this folder is used on a site that does not have a theme installed. If both exist, Hugo will use the more specific file in layouts first (we’ll use this to our advantage later). Hugo layouts are written using the Go template language to generate markup.
-
The static folder contains any files that should be moved to the site without processing. These are often assets like images, JavaScript, or stylesheets that you do not want Hugo to modify. Everything from the static folder will be placed in the site root. For example, if you have a /static/images folder filled with the site’s images, those will end up in just /images on the site. To show you what I mean, download the LOLCODE logo and save it in /static/images (the resulting file should be /static/images/logo.png).
-
The themes folder is where you would place third-party themes that you download. You can find a ton of these at themes.gohugo.io. You can also create your own theme in this directory. To set the site’s theme, you’ll need to define a theme variable in Hugo’s config.toml (we’ll look at this in a moment).
-
The config.toml is Hugo’s configuration file, written in TOML. The base configuration Hugo provides includes just a baseUrl, languageCode, and title.
-
Let’s go ahead and drop in some default content for our docs site. I have provided a zip file containing the Markdown content for the sample site in the book’s GitHub repository at http://mng.bz/1jRy. Download that zip and extract it to the /content folder of your new site. You should now have /content/ _index.md, which is the home page, and /content/docs, which will contain a number of Markdown files with the site documentation.
4.3.3 Setting up the Hugo Book theme
We’re going to install the Hugo Book theme as a submodule. Before we can do that, we’ll need to ensure our new project is initialized as a Git repository. Using the terminal/ command line at the root of your project directory, initialize a new repository:
git init .
Next, let’s add hugo-book as a submodule. Installing the theme this way will allow us to keep our project up to date if any changes are made to the theme in the GitHub repository:
git submodule add https://github.com/alex-shpak/hugo-book themes/book
Finally, let’s configure Hugo to use the newly installed theme. We’re going to open the config.toml in the root folder of the project and make the following changes:
-
Add additional Hugo Book configuration. The theme provides an extensive amount of configuration options, but we’ll just add the ability to search using the BookSearch parameter.
Here’s what the finished configuration file looks like:
baseURL = “http://example.org/”
languageCode = “en-us”
title = “LOLCODE Documentation”
theme = “book”
[params]
    BookSearch = true
For now, we’re leaving the baseURL value alone. This value represents the hostname and path to the root of the site and can be used in Hugo layout code. Once we’ve deployed our site to Netlify, we can update this, but for now it won’t impact our project.
Now we’re ready to test our site. Just as a reminder, be sure you downloaded the LOLCODE logo and saved it in /static/images. From the terminal/command line, run hugo serve from within the project’s root folder to launch Hugo’s local web server. This will build your site and make the page viewable at http://localhost:1313. If you open the site in your browser, it should look like figure 4.6.

Figure 4.6 The LOLCODE documentation site running on our local Hugo web server
Feel free to browse around or even search. You’ll see that we now have a fully functional documentation site. We could choose to leave it as-is and simply maintain content in GitHub, but, as we noted earlier, we want to include a CMS and allow third-party contributors access. Let’s do that.
4.3.4 Installing Netlify CMS
Now that we have content and a functioning site, we can enable it to be edited with Netlify CMS. Before we do that, we need to ensure we’ve published our project on GitHub. Please do this if you have not already.
There is no installer for Netlify CMS. Instead, you create the admin and add the necessary files into it. Here are the steps:
-
Create a folder named admin. Since this is Hugo, we need to place it within the static directory (i.e., /static/admin) because we do not want the files to be processed by Hugo.
-
Add an index.html within /static/admin that will load the script that runs the CMS admin. We’ll use the code supplied by the Netlify CMS docs:
<!doctype html>
<html>
<head>
  <meta charset=”utf-8” />
  <meta name=”viewport” content=”width=device-width,
  ➥ initial-scale=1.0” />
  <title>Content Manager</title>
</head>
<body>
  <!--Include the script that builds the page and powers Netlify CMS ->
  <script s”c="https://unpkg.com/netlify-cms@^2.0.0/dist/netlify-
  ➥ cms”js"></script>
</body>
</html>
-
Create a config.yml within /static/admin that will contain the Netlify CMS configuration. This will eventually contain our full content model definition, but for now we’ll add only the base configuration information that we need (note that you will need to replace remotesynth/lolcode-docs with your GitHub repository information):
publish_mode: editorial_workflow
media_folder: static/images
public_folder: /images
backend:
  name: github
  branch: master
  repo: remotesynth/lolcode-docs
  open_authoring: true
Let’s review what’s in this configuration file:
-
Setting publish_mode to editorial_workflow creates a draft, review, and approve workflow for content. Without setting this, content would be automatically published on save. The editorial workflow is a requirement of enabling open authoring.
-
The media_folder defines the folder within the site source where images and other media files can be uploaded. The public_folder then defines the path to the media_folder within the published site.
-
The backend section defines the repository details that Netlify CMS uses as the site’s backend. The default is Git Gateway, which is an open source API that proxies requests between users on your site and the Git repository. This works with Netlify Identity, Netlify’s authentication solution, out of the box. However, for open authoring in Netlify CMS we must use GitHub, which uses GitHub’s OAuth authentication to allow users access. We then define the branch and the repository for the site (the sample code points to my repository, so make sure the repository reflects your GitHub repository). Finally, we set open_authoring to true to allow external contributors without needing to invite them.
-
We’ve configured the basic settings for Netlify CMS, but it’s not going to work just yet for two reasons: we have not modeled any content for Netlify CMS, so it does not know anything about what it is editing, and we have not set up either Netlify or GitHub to allow users to authenticate.
4.3.5 Modeling content in Netlify CMS
Before it can begin editing your content, Netlify CMS needs to understand its structure. It does this by defining collections and fields within the config.yml. Depending on the complexity of your site, modeling content for Netlify CMS can become a pretty involved task. Luckily, our documentation site’s content is pretty straightforward.
A collection is a content type in Netlify CMS. This can represent a single page, a group of pages with common attributes, or a data file (i.e., YAML, TOML, or JSON). There are two collection types in Netlify CMS:
-
A folder collection represents a group of content files that all reside within a single folder. It is important to note that, as of this writing, Netlify CMS does not support subfolders, meaning that if you had /content/docs/topic-one and /content/ docs/topic-two, they could not all be defined using the /docs folder and would require three separate collection definitions.
-
A files collection represents one or more single files: a page (or pages) in Markdown or HTML or a data file (or files) in YAML, TOML, or JSON. When referencing a page in Markdown or HTML, you’d typically use the file type for a specialized page that does not share attributes with any other of the site’s pages, for example, the site’s home page.
Our documentation site has two content types, one representing the home page, which is a file type, and one representing the docs, which is a folder type. Place this beneath the backend configuration block right after the line containing open_authoring: true:
collections:
  - name: pages
    label: Pages
    files:
      - nam“: "h”me"
        labe“: "Home P”ge"
        fil“: "content/_index”md"
  - name: docs
    label: Docs
    folder: /content/docs
    create: true
    extension: md
    slug: '{{slug}}'
Let’s explore what we’ve configured so far:
-
Every collection must be given a name that is a unique identifier of the collection within Netlify CMS. You can use any name you choose, but you should avoid spaces or special characters other than dashes or underscores. Meanwhile, the label defines how the collection will be displayed to the user within the CMS. You can label it however you like.
-
A folder collection represents a single folder with multiple files. Users will have the ability to create new pages (create is set to true), and these new pages will be Markdown with a file extension of md. The slug field defines how Netlify CMS will generate new file names. In our case, we are saying to generate a URL-safe version of the content’s title (this means our field definition must contain a title field).
-
A files collection must define the different specific files it contains. There can be multiple, and each can define their own fields (we’ll discuss this shortly). This means that each file in a files collection does not need to share properties, but the collection is a way of grouping them together from an editing perspective. Our documentation site has only one file representing the home page.
Our configuration touches on only a small fraction of the options available to you. Check the documentation for a full list of collection configuration options (http://mng.bz/7W9m).
Fields represent the different data properties (metadata) on a content object. For example, a blog post might have a title and a date property, among others, that need to be defined as fields within Netlify CMS.
Each field is represented by a widget. A widget in Netlify CMS determines how this particular field will be edited. For example, a text widget would be an HTML textarea field, a boolean widget would be a toggle switch, and an image widget would be a file picker. Netlify CMS comes with 16 default widgets that cover most use cases, but you can define your own custom widgets as well.
Each field we define in our content model has the following common properties:
-
A widget property that defines which widget will be used for this field in the CMS user interface.
-
A name that is the field name within Netlify CMS and should be unique within this group of fields. You can name it anything, but avoid spaces or special characters other than dashes or underscores.
-
A required attribute to specify if the field is required. If this isn’t included, the default is true.
-
A hint field that defines text that will appear in a tool tip when the widget is displayed in the CMS user interface. This is optional and can be used to offer additional help or context to the user for entering values.
-
A pattern field that can define a regular expression (regex) pattern for validating the input and an error message to display when the validation fails. This is optional.
In addition, each type of widget can have widget-specific configuration properties. Check the documentation for the full list of options (https://www.netlifycms.org/docs/widgets/).
Our field definitions are all fairly straightforward, as the content model for our documentation isn’t particularly complex. Here’s the full complete configuration file with collections and fields (be sure to update the repo with your own GitHub repository).
Listing 4.1 The completed Netlify CMS configuration file (/static/admin/config.yml)
publish_mode: editorial_workflow
media_folder: static/images
public_folder: /images
backend:
  name: github
  branch: master
  repo: remotesynth/lolcode-docs
  open_authoring: true
collections:
  - name: pages
    label: Pages
    files:
      - name: "home"
        label: "Home Page"
        file: "content/_index.md"
        fields:
            - widget: string
              name: title
              label: Title
              required: true
              hint: >-
                The title of the page
            - widget: markdown
              name: body
              label: Content
              required: true
              hint: Page content
  - name: docs
    label: Docs
    folder: /content/docs
    create: true
    extension: md
    slug: '{{slug}}'
    fields:
        - widget: string
          name: title
          label: Title
          required: true
          hint: >-
            The title of the page that will appear in the left hand
            ➥ navigation
        - widget: number
          name: weight
          label: Weight
          required: false
          hint: >-
            The navigation order of the page.
        - widget: boolean
          name: bookToc
          label: Table of Contents
          required: false
          hint: >-
            If false, the right hand table of contents will not show.
            ➥ Defaults to true if empty.
        - widget: boolean
          name: bookHidden
          label: Hidden?
          required: false
          hint: >-
            If true, the page will not list on the left hand navigation
        - widget: markdown
          name: body
          label: Content
          required: true
          hint: Page content
With the configuration in place, we should be able to run hugo serve from the command line and then navigate to http://localhost:1313/admin and see a login for the admin interface.
Clicking Login with GitHub will not yet work (figure 4.7), as we have not configured Netlify or GitHub for authentication. Let’s do that next.
Figure 4.7 The Netlify CMS login at /admin using GitHub for user authentication
4.3.6 Deploying to Netlify
It is possible to use Netlify CMS without deploying to Netlify, but since Netlify created the project, it has the most straightforward path when it comes to enabling the authentication that will allow users access to editing the content via the CMS. We’ll look at deployment in depth in a later chapter, but for now we’ll cover the basics needed to allow users in our Netlify CMS admin.
First, make sure you’ve published your project to GitHub. Again, Netlify CMS allows for other Git hosting providers, but we’ll be using GitHub for authentication, so publishing there is a requirement in this scenario. Since the repository will be editable by third parties, be sure to make the repo public.
You’ll need to create an account on Netlify if you don’t already have one. Netlify offers a generous free plan that will enable you to complete this tutorial. Once you’ve created your Netlify account, click the New Site from Git, choose GitHub, and then locate your published repository. If this is your first time using Netlify, you will need to walk through some authorization steps to allow Netlify access to your GitHub repositories, as shown in figure 4.8.
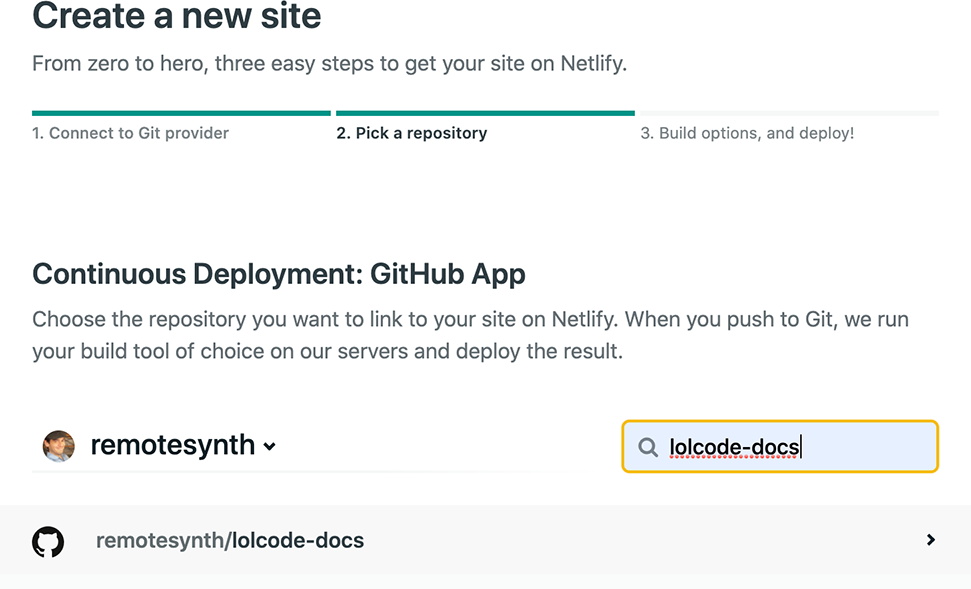
Figure 4.8 Creating a new site from a GitHub repository in Netlify
Netlify does a good job of picking up on which static site generator we’re using and the default settings for it. However, I have frequently run into issues when using a recent build of Hugo, so I find it best to set an environment variable that matches the Hugo version you are running locally. From the command line, type hugo version to see what version you are running. For example, mine returns the following:
Hugo Static Site Generator v0.74.3/extended darwin/amd64 BuildDate: unknown
Click on the Show advanced button in the deploy settings step of the setup, as seen in figure 4.9.

Figure 4.9 The default deploy settings when creating a Hugo site in Netlify
Click the New Variable button and then add a variable named HUGO_VERSION with a value of the version number that is returned by running hugo version. For example, in my case, the version is 0.74.3, which I’ve entered in figure 4.10.

Figure 4.10 Setting the Hugo version variable in Netlify’s deploy settings setup
Finally, click on Deploy Site. After a few minutes, your site should be deployed. Grab the URL that Netlify generated for your site (this can be found in the Site overview page in the Netlify dashboard). Let’s fix the baseURL value in the config.toml file in the root of the project by setting its value to the URL on Netlify. For example, mine is https://clever-thompson-493f7c.netlify.app/. This will fix any missing stylesheets you may see on the site when it is initially deployed. We’ll also need the URL for configuring authentication in GitHub.
4.3.7 Configuring GitHub for authentication
Before we can set up authentication in Netlify, we’ll need to set up an OAuth application in GitHub. To do this, go to Settings > Developer Settings > OAuth Apps and click the button that reads either Register a new application or New OAuth App or visit https://github.com/settings/applications/new.
We need to give our new OAuth App a name; it can be anything you want. In the Homepage URL field, place the URL of your Netlify site (which we received in the prior section). The description can also be anything you want. Finally, the authorization callback URL needs to be https://api.netlify.com/auth/done. You can see these settings in figure 4.11.
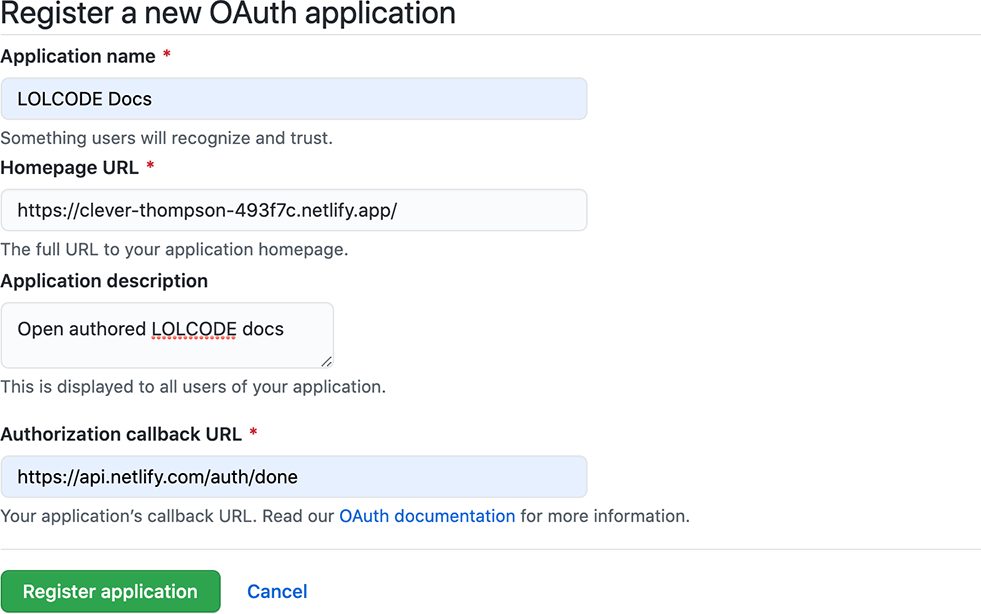
Figure 4.11 Setting up a new OAuth app in GitHub that can be used with Netlify’s authentication
After you click Register application, we’re given a client ID and client secret for our OAuth application. We will need these to set up Netlify.
4.3.8 Configuring Netlify for authentication
In our Netlify dashboard for our new site, we need to go to Site Settings > Access Control > OAuth. Click the Install Provider button.
As seen in figure 4.12, the provider should be GitHub and, in the client ID and secret fields, place the client ID and client secret we received from our GitHub OAuth application. Lastly, click Install.
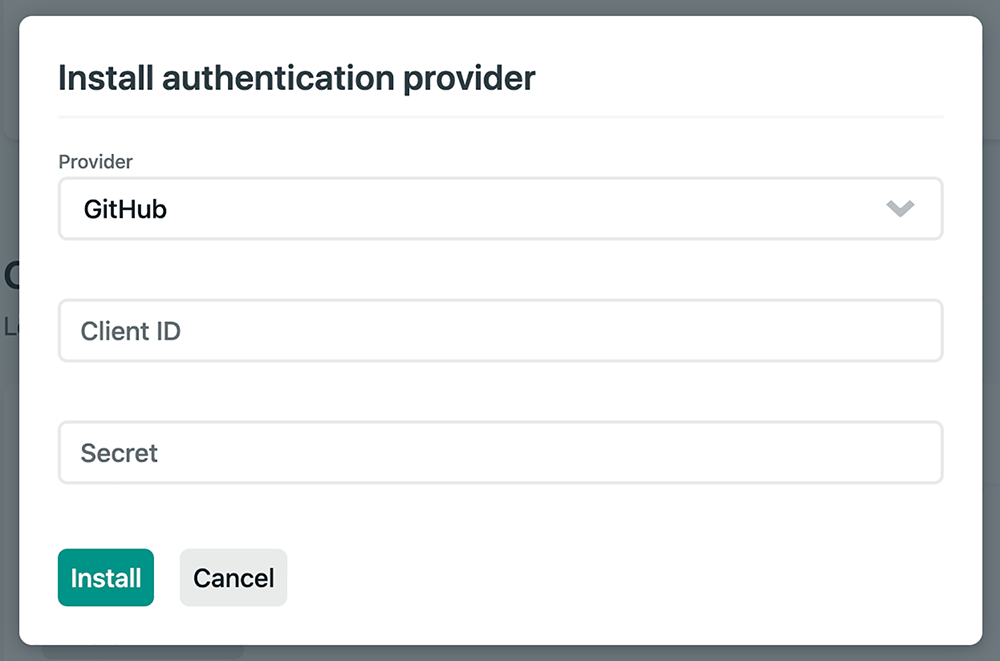
Figure 4.12 Adding an OAuth provider in Netlify. The client ID and secret come from the OAuth application we created in GitHub.
4.3.9 Editing content as an admin
We’re now ready to access the content admin on our documentation site (be sure you’ve pushed any changes we’ve made to GitHub first). The admin is available at /admin. For instance, the URL of my Netlify site is https://clever-thompson-493f7c.netlify.app/, so the URL for my Netlify CMS admin will be https://clever-thompson-493f7c.netlify.app/admin. Before moving on, be sure that you have your GitHub repository set for the value of repo in the Netlify CMS configuration (/admin/config.yml).
Click the Login with GitHub button, and we receive the authorization window for GitHub based on the GitHub OAuth app we created, as seen in figure 4.13.

Figure 4.13 The GitHub authorization window is displayed the first time you click Login with GitHub and displays the information we entered when creating our GitHub OAuth app.
Once we click Authorize, we’re logged in and taken to the Netlify CMS editing dashboard, which you can see in figure 4.14.
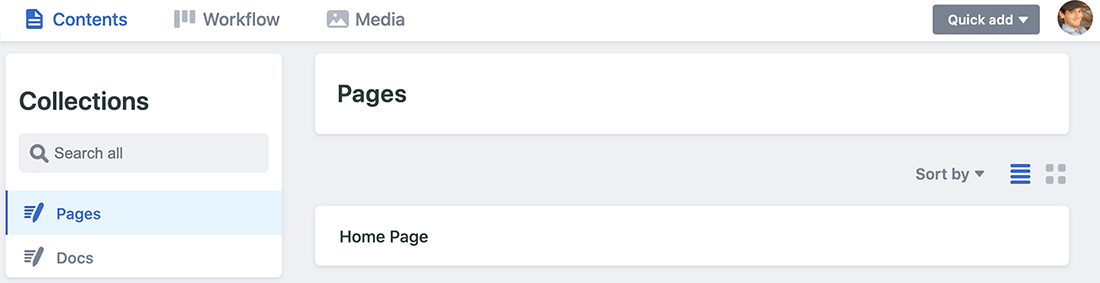
Figure 4.14 The Netlify CMS dashboard after logging in. The collections are the ones we defined in the Netlify CMS configuration.
By default, we’re in the Contents tab that shows the content collections we defined earlier in the config.yml configuration file: Pages and Docs. The Pages collection is selected by default. You may recall that this collection had only one content item defined, which is the home page content. You cannot add new pages into the Pages collection.
When we click the Docs collection, we see a full list of documentation pages as well as a button to create a new docs page. Feel free to click one to edit it. The editing page is shown in figure 4.15.
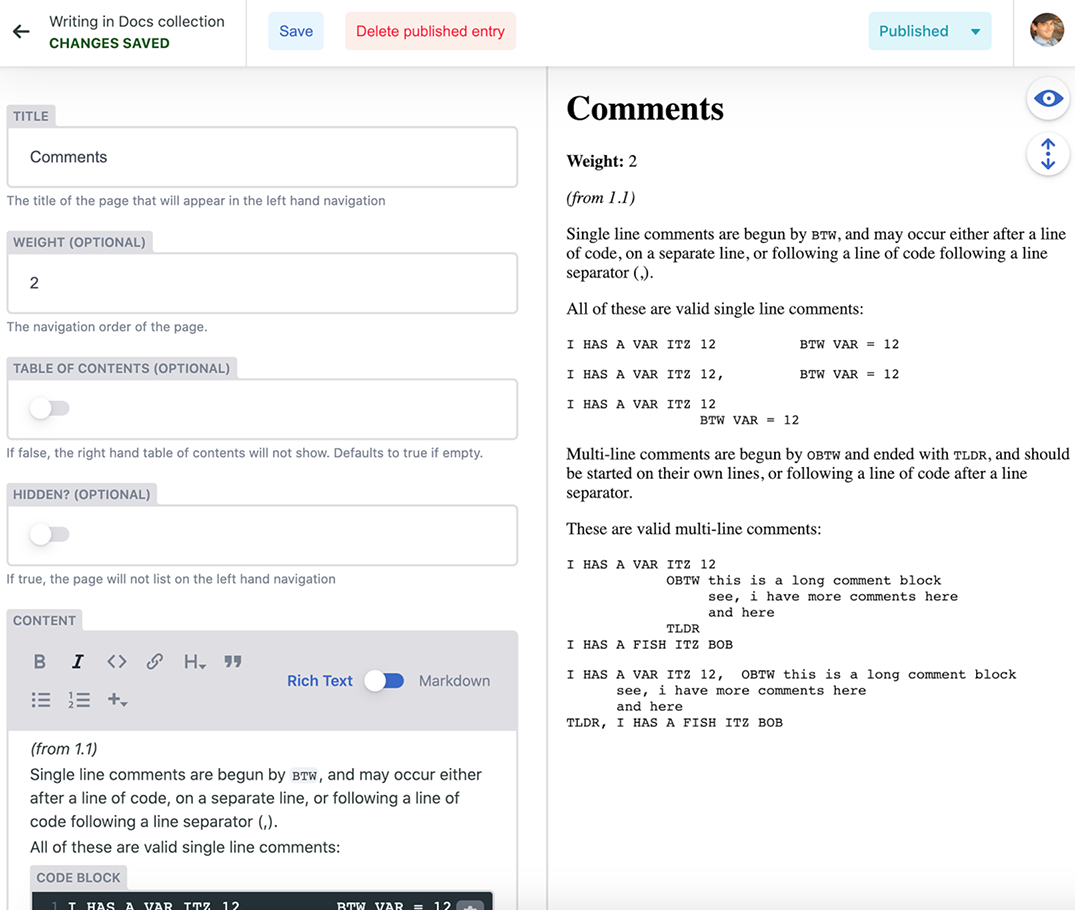
Figure 4.15 Editing one of the Docs pages in Netlify CMS. We can see the widgets for all the content properties we defined in the fields in the config.yaml.
Each of the widgets on the left-hand side of the page represents the properties we defined earlier for the docs content type in the config.yml configuration file. The content field offers a WYSIWYG-style editing interface for Markdown content. The right side of the page offers a preview of the content being edited.
Go ahead and make some changes to the content. Once you’ve made changes, click the Save button. Since we are using an editorial workflow, the document will be saved as a draft in the workflow. We can change the status to In Review or Ready. We’ll need to set the status to Ready before we can publish our changes to the page.
In addition, by using Netlify’s deploy previews feature, we can preview our changes on the site before we publish. In the top bar of the page, we’ll see a “Check for preview” link. Clicking that link will take us to the link for the deploy preview of our changes from Netlify, which may take a few seconds. Clicking View Preview will open the deploy preview of the site and will include our changes so that we can review them before publishing.
When you are ready, change the status to Ready, click Publish, and choose Publish Now. This will commit the changes to our GitHub repository, which will then trigger a build of our Netlify site and publish the changes to our live site.
4.3.10 The open authoring workflow
The flow for our external users will be slightly different. Let’s explore what this looks like. You don’t need to follow along with this part, as it would require a secondary GitHub account.
Once they log in with GitHub and authorize our GitHub OAuth app, they will be asked to fork the repository as seen in figure 4.16. Clicking Don’t fork the repo at this point will exit the process, and the user will be unable to make any edits.

Figure 4.16 External users will be asked to fork the repo in order to get access to the Netlify CMS admin and submit edits to the site.
Clicking Fork the repo will automatically create a fork of our repository on the user’s account. This is where all of the changes the user makes will be kept.
Once the user forks the repo, the Netlify CMS admin will be identical to the one we used to edit our site earlier. However, when they make changes to the site, they do not have the option to set the status to Ready or any of the Publish options. Instead, they will only have the option to set the status to In Review. Doing so will automatically submit a pull request to our main repo that contains the changes the user made, as you can see in figure 4.17.

Figure 4.17 When a third-party contributor sets a change as In R eview, a pull request is automatically submitted on the primary GitHub repository. To accept the change, we can merge the pull request.
To accept the user’s change into our site, we need to merge the pull request. This updates our GitHub repository, triggers an update on our Netlify site, and publishes the changes to our live site.
4.3.11 Simplifying the open authoring workflow
Before we finish, let’s make one last edit to our site. Right now, any external author wishing to contribute to the docs needs to know to go to /admin and log in. Contributions would be much more likely if we were to give users quick links for adding or editing content from within the documentation itself. To do this, we’ll make a small change to the template.
We are relying on the Hugo-Book theme for our layout and have installed this as a Git submodule. Thus, we cannot change the Hugo-Book code directly. Nonetheless, Hugo has a lookup order for theme templates that takes the most specific match first. This means that we can place files in the /layouts folder that can override the template files in the /themes folder. This will make more sense when we see how this works in practice.
The Hugo-Book theme has layout files that are specifically intended to inject content at certain points in the template output, such as before or after the content. You can see these files in /themes/book/layouts/partials/docs/inject. Let’s add the links at the end of each content page via the content-after.html template.
To override this template, create a file in your /layouts folder with the same directory structure and name: /layouts/partials/docs/inject/content-after.html. Since Hugo considers a file in /layouts more specific than the one in /themes, by creating a file of the exact same path, Hugo will use it in place of the theme file.
Place the following template code inside the file:
{{ if ne .RelPermalink "/"}}
{{ $edit_url := print "/admin/#/edit" .RelPermalink }}
<p><a href="{{$edit_url}}" class="book-btn">Edit this Page</a>
<a href="/admin/#/collections/docs/new" class="book-btn">Add a New
➥ Page</a></p>
{{ end }}Let’s look at what this template code is doing. First, it checks to see if we are on the home page by checking a variable Hugo provides called .RelPermalink that contains the relative path of the current page. The function ne in Hugo means “not equal,” so we are checking that the relative path is not equal to “/.” We do this so as not to offer edit links on the home page. Second, we assemble a URL to the admin based on the current page. Finally, we use that URL to add an Edit this Page link, which will take them directly into editing the content for the page they are currently viewing. We also include an Add a New Page link that directly links to creating a new docs page.
After committing and pushing this page to our repository or running it locally, we should see these new links added to any Docs page on our site, such as the one shown in figure 4.18.
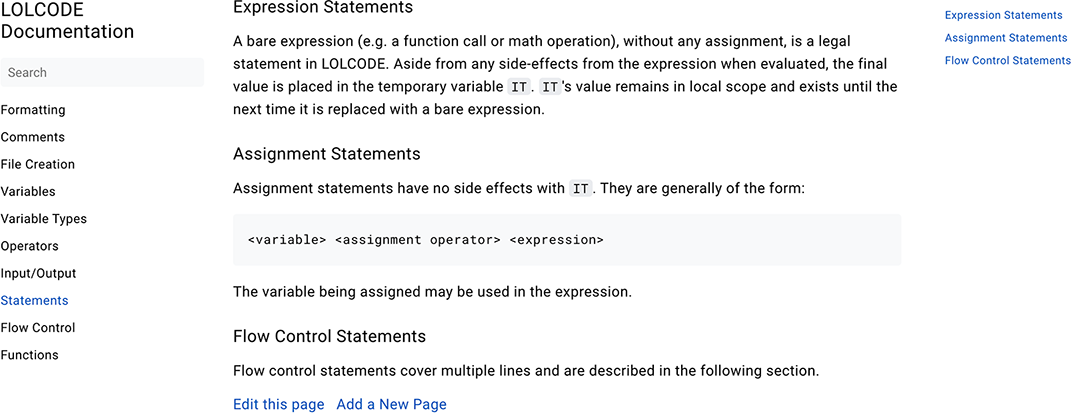
Figure 4.18 Once we’ve added our template code, Docs pages will have Edit this Page and Add a New Page links.
4.4 What’s next?
As we’ve seen, the Jamstack can be a powerful solution for documentation sites. An open source solution like Netlify CMS offers the ability to use a Git-based workflow while still allowing content editors an easy-to-use WYSIWYG editing experience, and even allowing third-party contributions—something that isn’t easy with a non-Jamstack solution.
While the editor experience of Netlify CMS is full-featured, some may feel that it lacks the polish of some non-Jamstack tools like WordPress. It’s worth keeping in mind that there are many alternatives that offer a different editing user experience. If you’re looking for a more WordPress-like experience, be sure to explore the API-based headless CMS options like Contentful, Sanity, or AgilityCMS, or even services like Stackbit.
As we have shown, the Jamstack is an excellent solution for content-focused sites like documentation, but you may be wondering if it can handle a site with more complex and dynamic user interaction. In the next chapter, we’ll look at just such an example as we build an e-commerce site using Jamstack tools.
Summary
-
Documentation sites have been and continue to be a perfect use case for the Jamstack, as they are heavily focused on content and can benefit from things like versioning that are a core part of a Jamstack workflow.
-
A headless CMS is a content management system that offers content editing tools that are independent of the site’s frontend display. An API-based headless CMS makes the content available to the frontend via an API, while a Git-based headless CMS edits content directly in the site’s Git repository.
-
Netlify CMS is an open source, Git-based headless CMS created and maintained by Netlify, which offers the option of an open-authoring workflow. This can allow external contributors the option to edit and submit changes to the site’s content.
-
There are a lot of documentation-specific static site generators. While Hugo, a Go-based static site generator, is not documentation-specific, it is often a favored tool for these types of projects due to its build speed and a large number of available templates for documentation.
-
Netlify CMS is configured via YAML and must have a model of the content on the site that the CMS will be able to edit. We configured Netlify CMS for the basic documentation content model used by our LOLCODE technical documentation site.
-
Open authoring on Netlify CMS allows third-party contributors to have access to the CMS to make content contributions. We configured Netlify and GitHub for authentication to allow third parties to sign in to our CMS using open authoring.
-
Netlify’s admin interface uses widgets to enable easy editing of the page’s metadata (front matter) and content. Markdown editing uses a WYSIWYG-style editing interface. The CMS user experience of both the site owner and third-party authors is nearly identical, other than the ability to mark updates as Ready and publish them, which is reserved for the site owner.