
8 Working with serverless computing
- Defining serverless
- Explaining what serverless means for the Jamstack
- Describing serverless options
- Building serverless functions with Netlify
- Building serverless functions with Vercel
In the last chapter, we discussed a few different ways you can add dynamic elements back into your Jamstack sites. These were done via external services set up specifically to serve a need, for example, Google Forms letting you design and accept feedback for a form.
While the availability of these services continues to grow in both number and variety, there are certain things that simply do not make sense as external services, including very particular business logic for your Jamstack site that only you know how to develop. This is where serverless computing, and specifically functions as a service, come into play.
8.1 What is serverless computing?
Let’s get this out of the way. There are still servers in serverless computing. Just like how we don’t actually build infrastructure in real clouds, serverless technology doesn’t magically remove the need for physical hardware. Serverless computing is about removing the need to worry about the servers. It’s about getting all the benefit of what the server provides without the boring work of actually maintaining a server.
There are a wide variety of services that can fall under the serverless definition. Here are just a few:
-
The ability to provision and use a MongoDB database entirely from its website (mongodb.com) without having to install anything themselves.
-
The ability to build complex workflows driven by events at Pipedream (pipedream.com). Pipedream lets developers build workflows by piecing together various steps that can include custom code.
-
And of course, the ability to build nearly anything with the first real enterprise-level provider of serverless, Amazon Lambda (https://aws.amazon.com/lambda/).
While serverless computing has many interpretations and implementations, this chapter will focus on probably the most widely known and used example: function as a service (FaaS). FaaS lets you focus on the business logic of a particular feature and not worry about the hosting or routing. Let’s consider a simple example.
Imagine you want to build a service that returns the current time. First, don’t do this. Browsers know what time it is. But this gives us a simple requirement to build. If I were building this with Node.js, the setup would go something like this:
-
Write a Node script that will listen for requests on a port and particular path.
-
When that happens, perform the business logic (get the current time).
Creating the same result with FaaS would typically be
And that’s it. Obviously this is a somewhat contrived example, but the idea is that the developer no longer needs to worry about the server, the operating system, the network routing, and such, and only needs to worry about the actual logic of what they’re building. It’s not always that easy, but you get the idea.
So how does this impact the Jamstack? While there are multiple services out there that provide APIs for various services, sometimes you need very specific logic that only you can create. By using serverless computing and functions as a service, a developer can write precisely what they need, expose it as an API, and then call it with JavaScript from their Jamstack site. Let’s look at one form of using this: Netlify functions.
8.2 Building serverless functions with Netlify
We discussed Netlify in an earlier chapter, and one of the features we hinted at was the ability to write serverless functions. This feature, called Netlify functions (https://functions.netlify.com/), lets you include functions written in JavaScript or Go. Netlify handles taking your code and making it available via HTTP, with no additional work required on your part. Netlify supports these functions on their free tier (with caps) and has higher tiers for higher cost (https://www.netlify.com/pricing/#add-ons-functions). Netlify functions are built on Amazon Lambda, but you don’t have to know anything about that service in order to use them.
Netlify functions support URL and form parameters, which means your client-side code can pass arguments in multiple ways when executing calls. Your code can also access full details of the request and return data in various forms, although typically you’ll return JSON.
For our first test, we’re going to make use of the Netlify CLI. While not required, it’s going to be useful in this chapter to help us more quickly get started and more easily test our code. To install the Netlify CLI, use npm:
npm install -g netlify-cli
After installing the utility, you will then be able to run the netlify function from your terminal (figure 8.1).

Figure 8.1 The default output of the Netlify CLI gives basic help for its commands.
After confirming you’ve installed the CLI correctly, run netlify login. This will prompt you for your authentication, so if you didn’t create an account with them in the deployment chapter, do so now. Once logged in you won’t need to reauthenticate in the future.
As you can see in figure 8.1, the CLI does quite a bit, but we’re going to touch on just a few aspects of it in this chapter. In particular, the CLI can scaffold functions for us, including numerous sample apps to help get started.
Your Netlify functions can be stored in any folder you want, but recently Netlify started supporting a default location of netlify/functions. Unfortunately, at the time this book was written, the CLI doesn’t yet support knowing about this default, which means we need to specify it. While this can be done via Netlify’s web-based dashboard, we can use yet another new feature of Netlify, file-based configuration.
Netlify lets you specify a netlify.toml file in the root of your project. Pretty much every setting possible can be set here (see the documentation at http://mng .bz/XWM6 for full details), but in our case we’re going to specify only the root folder for our Netlify functions. To get started with our first test, create a new empty directory and add a blank netlify.toml file (or use the chapter8/test1 folder from the GitHub repository). We will assume the folder you created is named test1.
Listing 8.1 Configuring netlify.toml (chapter8/test1/netlify.toml)
[build]
    functions = "netlify/functions"
The configuration file specifies the functions setting in the build group and sets where Netlify should look when preparing to load functions. Again, this value is now the default in Netlify but isn’t recognized in the CLI.
At this point, you can create the functions folder if you wish, but the CLI can create it if it needs to. If you decide to create it yourself, you should end up with a structure like the one shown in figure 8.2.

Figure 8.2 Folder structure of our functions test project. Note that netlify.toml is at the root of test1; it’s a bit unclear in the screenshot.
Now we can finally test the scaffolding feature of the CLI. To begin, run netlify functions:create from the test1 folder. This will open a prompt asking you to select an example (figure 8.3).

Figure 8.3 Browsing the selection of function examples
The first and default option, hello-world, is the simplest and the best to start with, so select that first. Next, you’ll be prompted to name your function; since we’re testing, take the default of hello-world. Click Enter, and the CLI will report on the newly scaffolded function (figure 8.4).

Figure 8.4 The CLI has finished scaffolding the function.
We’ll talk more about the general form of Netlify functions later, but for now know that this function looks for a name value in the query string, and if it doesn’t exist, uses a default value of 'World'. It then returns a JSON object with one value message that simply says hello to the name value (again, that is either provided in the query string or defaulted).
Listing 8.2 The hello-world function
const handler = async (event) => {
  try {
    const subject = event.queryStringParameters.name || 'World'
    return {
      statusCode: 200,
      body: JSON.stringify({ message: `Hello ${subject}` }),
      // // more keys you can return:
      // headers: { "headerName": "headerValue", ... },
      // isBase64Encoded: true,
    }
  } catch (error) {
    return { statusCode: 500, body: error.toString() }
  }
}

module.exports = { handler }
So how do we test this? Another useful feature of the CLI is the dev command. This starts a local web server and lets you test your Jamstack site locally. In your terminal, ensure you can run netlify dev, and you should see output, as seen in figure 8.5. Note that you should still be in the same directory as before.
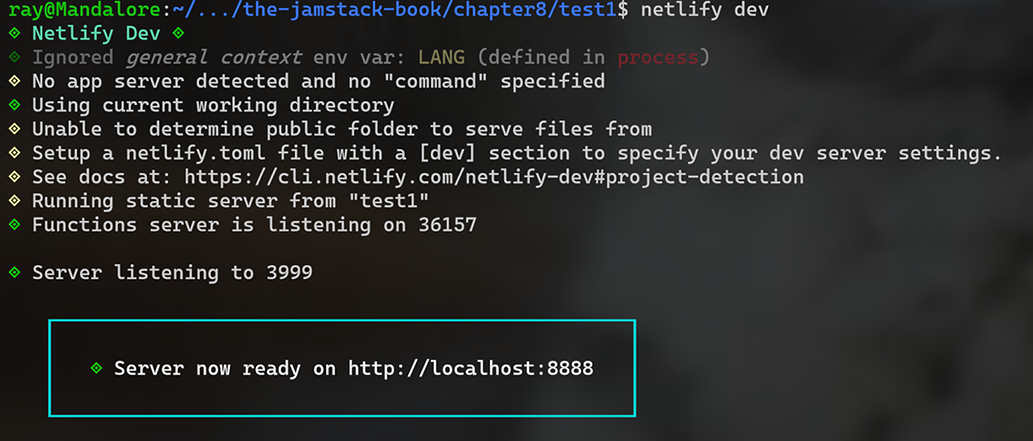
Figure 8.5 Running the local development server with the Netlify CLI
Along with running a local web server, the CLI may also open a tab in your browser. The site currently doesn’t have any HTML files, so you may get a “Not Found” message, but we can ignore that for now. To execute Netlify functions, you address them at /.netlify/functions/nameOfFunction. Given that figure 8.5 says our site is running on localhost at port 8888, the full URL to our test function will be: http://localhost:8888/.netlify/functions/hello-world. Notice there is no “.js” at the end. The URL uses the name of the function but not the extension. If you run this, you should get the following output:
{"message":"Hello World"}If you remember, we said the function takes a name argument via the URL. You can test this by adding ?name=Ray (or your own name) to the URL http://localhost :8888/.netlify/functions/hello-world?name=Ray. The output should then update:
{"message":"Hello Ray"}Let’s build something that makes use of this function. Our site now only contains the function (and configuration file), so let’s add an index.html file with a simple JavaScript example.
Best practices dictate that we should (normally) separate our HTML and JavaScript; for this simple demo, one file is sufficient. Our HTML consists of an input field, a button, and an empty div element. The input field will be where users enter their name. The button will fire off a request to our function. And finally, the empty div will display the result.
The JavaScript sets a listener for when the document is loaded, and when it’s ready, listens for click events on the button. This runs the function with the somewhat poor name testApi, which uses the fetch API to hit our Netlify function. If you remember, the result is a JSON object with the key message. We can take the result of that call and write it into our DOM.
Listing 8.3 Using our function from HTML and JavaScript code
<!DOCTYPE html>
<html>
<head>
</head>

<body>

<input type="text" id="name" placeholder="Enter your name...">      ❶
<button id="testBtn">Test Function</button>

<div id="result"></div>

<script>
document.addEventListener('DOMContentLoaded', init, false);
let textField, resultDiv;

function init() {
    textField = document.querySelector('#name');
    resultDiv = document.querySelector('#result');
    document.querySelector('#testBtn').addEventListener('click',
        testApi, false);                                            ❷
}

function testApi() {                                                ❸
    let name = textField.value.trim();
    if(!name) return;
    fetch(`/.netlify/functions/hello-world?name=${name}`)
    .then(res => res.json())
    .then(res => {
        resultDiv.innerHTML = `Function returned: ${res.message}`;
    });
}
</script>
</body>
</html>
❶ The field where a person can enter their name
❷ Where we listen for clicks on the button
❸ The code executed when the button is clicked. Figure 8.6 demonstrates a simple example of this.

Figure 8.6 A test of our Netlify function from simple JavaScript
You now have a simple static site that makes use of a serverless function! Let’s look at that serverless function again. At the top, we define the function using arrow-style functions (you can learn more about this style at http://mng.bz/Bx7r). If this style of defining functions is unfamiliar to you, you can rewrite it like so:
const handler = async function (event) {Netlify doesn’t require arrow functions, but the CLI defaults to using that format. The event object is one of two arguments sent to every Netlify function. The Netlify docs define this as similar to the Amazon AWS API Gateway event, but if you’ve never used that before, know that it will contain the following values:
-
httpMethod—The HTTP method used to call the function, useful for times when you care if the function was called with a form post
-
queryStringParameters—As shown, any values passed along the query string
-
isBase64Encoded—A true/false flag specifying if the body is base64 encoded
The second argument passed to Netlify function is a context object. This object contains information about the function context itself, for example, things pertaining to the AWS Lambda function behind the scenes (Netlify hides all of this for you!). The context object isn’t something you need to use (hence it not even being shown in the function), so you will rarely make actual use of it in your function. The one place it does come into use is with Netlify’s user management system called Identity. We aren’t covering that here, but you can find out more about that in the docs (https://docs.netlify.com/visitor-access/identity/).
The final part of your function is where you return data. As seen in listing 8.4, an object is returned containing the following parts:
-
statusCode—This should be a valid HTTP status code representing the result status of the function. 200 is used to mean a good status, whereas 500 (and others) can represent errors and other states. Generally, you will return 200.
-
Body—A JSON-string representing your data result. The caller will parse this JSON into valid data. You do not need to return a JSON string, but that’s fairly typical for serverless functions acting as an API.
-
headers and multiValueHeaders—These let you return headers to be sent along with your data. The headers value is used for simple key/value headers (header so-and-so has value so-and-so), whereas multiValueHeaders are used in cases where a header has multiple values. Some APIs will use headers to specify the content type or additional data related to things like licensing and other statuses.
-
isBase64Encoded—Another true/false flag, this time for the result, that specifies if the result is base64 encoded.
Most developers will only need to worry about statusCode and body, which is what the CLI uses in its default scaffolded function.
Listing 8.4 The hello-world function
const handler = async (event) => {                                 ❶
  try {
    const subject = event.queryStringParameters.name || 'World'    ❷
    return {                                                       ❸
      statusCode: 200,
      body: JSON.stringify({ message: `Hello ${subject}` }),
      // // more keys you can return:
      // headers: { "headerName": "headerValue", ... },
      // isBase64Encoded: true,
    }
  } catch (error) {
    return { statusCode: 500, body: error.toString() }
  }
}

module.exports = { handler }
❶ This is the function declaration that defines the event object.
❷ One of the values available in event is queryStringParameters.
❸ Serverless functions should return a status and body.
If you want, you can modify your serverless function to log out the entire event object to the console: console.log(event);. If you switch to the terminal where you’re running the netlify command, you can see the output, but note it may be rather large, especially in the request header section, as seen in figure 8.7.

Figure 8.7 Debug output from the serverless function
8.2.1 Adding serverless computing to Camden Grounds
In chapter 2, you learned about Eleventy and built a simple coffee store called Camden Grounds. Let’s look at how we can use Netlify functions to enhance our Jamstack site. We’re going to modify the site such that each product page will now display a dynamic message if the product is available. We’ll use hardcoded logic (everything but tea is available) and client-side JavaScript to display the result. An example is shown in figure 8.8.
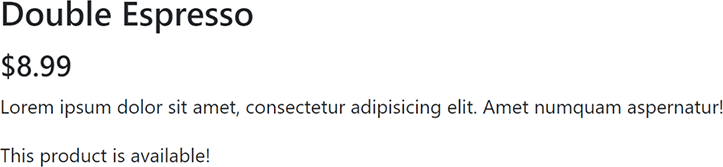
Figure 8.8 The double espresso product is available.
Create a new copy of the site into your chapter 8 folder (or ensure you’ve downloaded the final code from the GitHub repository). Add the netlify.toml file that specifys the function’s directory. Since the CLI can create this folder, you do not need to manually create it.
Once again we can use the Netlify CLI to scaffold an application, but this time we’ll save a step by specifying the name of function as an argument: netlify functions:create product-availability. This should be run in the new folder you created that is the copy of Camden Grounds. You will still be prompted for the type of function to create and accept the default (hello-world) again. The result will be a folder named product-availability and a file under it named product-availability.js, as shown in the following listing.
Listing 8.5 The product-availability function
const handler = async (event) => {
  try {
    const product = event.queryStringParameters.product;     ❶
    let available = true;
    if(product.toLowerCase() == 'tea') available = false;    ❷

    return {
      statusCode: 200,
      body: JSON.stringify({ available }),                   ❸
      // // more keys you can return:
      // headers: { "headerName": "headerValue", ... },
      // isBase64Encoded: true,
    }
  } catch (error) {
    return { statusCode: 500, body: error.toString() }
  }
}

module.exports = { handler }
❶ Checking for a product value in the query string
❷ Hardcoded logic that says tea won’t be available
❸ Returning the available value
As before, we check the query string for a value, this time product. If the product being checked is tea, we return false. Note the result body uses a shorthand notation that replaces code that would use the same key and value, so, for example, instead of writing { name: name }, we can now write { name } to specify the same thing. Basically, a name key and the value is represented by the name variable. Netlify doesn’t require this syntax, but it’s there if you want to use it.
To use this, we’re going to modify the products.liquid template file, which is used for every product for our site (listing 8.6). Our first change is to add an empty paragraph tag to the product template. This is then edited later by the JavaScript code. This template is executed once for every product, and you can actually see a bit of Liquid in the code itself. While JavaScript code is dynamic in the source, when deployed in product, it’s a hardcoded product name.
The JavaScript makes a request to the serverless function, gets the result, and then handles updating the DOM with the availability.
Listing 8.6 The new product template (/chapter8/camdengrounds/products.liquid)
---
layout: main
pagination:
    data: products
    size: 1
    alias: product
permalink:      "products/{{ product.name | slug }}/index.html"
---

<div class="row my-4">
        <div class="col">

     <div class="card mt-4">
          <img class="card-img-top img-fluid"
          src="http://placehold.it/900x400" alt="">
          <div class="card-body">
            <h3 class="card-title">{{ product.name }}</h3>
            <h4>${{product.price}}</h4>
            <p class="card-text">
            {{ product.description }}
            </p>
            <p id="availability"></p>                   ❶
          </div>
        </div>

        </div>
</div>

<script>
document.addEventListener('DOMContentLoaded', init, false);
let availabilityP;

async function init() {
  availabilityP = document.querySelector('#availability');
  let api = '/.netlify/functions/product-availability?';
  //add specific product
  api += 'product={{product.name}}';                    ❷
  let resp = await fetch(api);
  let data = await resp.json();
  let result = 'This product is available!';
  if(!data.available)
    result = 'Sorry, this product is <strong>not</strong> available.';
  availabilityP.innerHTML = result;                     ❸
}

</script>
❶ A new empty paragraph that will be updated via JavaScript
❷ JavaScript code that will be static once the site is deployed
❸ Where the actual update happens
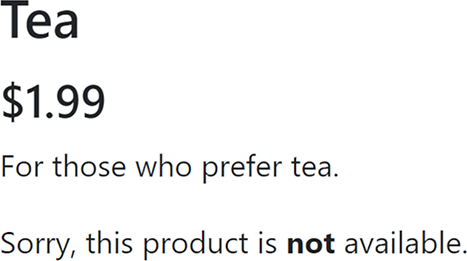
You’ve already seen an example of a product being available, but if you go to the Tea page (don’t forget to start your site with netlify dev if you haven’t), you’ll now see it isn’t available (figure 8.9).
This brings up an interesting situation. Our Camden Grounds site now has both static and dynamic product data. The static portion is in the _data folder and is hardcoded JSON. The dynamic portion is the availability of the product. In production, the list of products will be static, but their availability will be checked on every visit. This makes sense for Camden Grounds, as they rarely change the products they sell but do sometimes run out of a particular product. This would not be appropriate for every Jamstack site out there but shows the flexibility of Jamstack in general.
8.2.2 More on Netlify functions
Netlify functions are both simple to use and powerful in their implementation. You can peruse examples (https://functions.netlify.com/examples/) for more inspiration and play with some live ones at their playground (https://functions.netlify.com/playground/).
Recently, Netlify announced support for “Background Functions” (https://docs.netlify.com/functions/background-functions/). This feature is currently in beta and lets you run functions that need a much longer execution time to process. When called, they return a 202 status immediately and then begin their processing. They would not be used for functions that need to return a result to client-side JavaScript but could be useful for things that need to happen, as you can probably guess, in the background. Again, this feature is currently in beta, so use with caution.
8.3 Building serverless functions with Vercel
Like Netlify, Vercel supports easily deploying and using serverless functions along with your Jamstack site. You can write functions using Node.js, Go, Python, and Ruby. For those who want to use Node.js, you can use either JavaScript or TypeScript, if you prefer. (TypeScript is possible with Netlify functions as well, just not officially supported.) As with Netlify, Vercel has a free tier for their functions; details can be found on their pricing page (https://vercel.com/pricing).
Vercel’s serverless support is documented (https://vercel.com/docs/serverless-functions/introduction), but at the time of writing this chapter, there were some parts of that documentation that were a bit misleading. Let’s start with a basic introduction to serverless functions with Vercel.
To create a Vercel serverless function, you begin by adding an api folder to your project. (For developers working with Next.js, you would use pages/api instead.) In that folder, you can then create your serverless function. The docs (again, at the time of publication) imply that the name of the function (outside of the extension) does not matter. This is not the case. The name of your file will impact the URL that you use to call the API. Vercel deploys your serverless function at the path /api/filenameMinusExtension. For example, if you create a file named func1.js, and your host is raymondcamden.com, your serverless function would be available at https://raymondcamden.com/ api/func1. The documentation demonstrates a path that does not include the filename minus the extension, but that will only work if you name your file index.js. In my opinion, it doesn’t make sense to use this filename unless you are sure you are going to have only one serverless function on your site. Even if you are only planning one now, in the future you may need more.
This confusion aside, what does a Vercel serverless function look like? Here is the example from its own docs:
module.exports = (req, res) => {
  res.json({
    body: req.body,
    query: req.query,
    cookies: req.cookies,
  })
}
Once again, an arrow function is being used but is not required. You could rewrite this as such:
module.exports = function(req, res) {
  res.json({
    body: req.body,
    query: req.query,
    cookies: req.cookies,
  })
}
Use whatever form you are most comfortable with. The function is passed two arguments, req and res, which map to Node.js Request and Response objects with additional “helpers” provided by Vercel. For example, req.query maps to the query string of the request. These helpers are documented (http://mng.bz/doOv) and currently exist only for developers using Node.js for their serverless functions. Let’s see this in action.
8.3.1 Your first Vercel serverless function
In chapter 6, you tested the Vercel service by installing its CLI tool. If you have not done that yet, please see the instructions in the previous chapter and set that up. You will want to both install the CLI and ensure you run the login command, so you can properly go forward.
Vercel’s Zero Config feature means it’s rather simple to use most of its features, and that includes its serverless support. In a new folder (or use the /chapter8/test2 folder from the GitHub repository), create an API subdirectory and a new file, func1.js.
Listing 8.7 A Vercel serverless function (/chapter8/test2/api/func1.js)
module.exports = (req, res) => {
  res.json({
    body: req.body,
    query: req.query,
    cookies: req.cookies,
  })
}
This function is the same code as the Vercel documentation. When requested, it will echo back the request body, query string, and any cookies that were sent. To test this, run vercel dev in your terminal, ensuring you are in the folder you created, not the api folder, but rather the directory above it. The vercel dev command is much like the Netlify version: it lets you run your site locally and test your site. The first time you run the command, you’ll be prompted to answer questions about the site, and you can take all the defaults (figure 8.10).

Figure 8.10 Running vercel dev for the first time
Subsequent runs of vercel dev will skip all these questions. To test your function, open your browser to http://localhost:3000/api/func1. The “func1” at the end of the URL is our filename minus the extension. The result will be the contents of the query string (none in our first test), any cookies your browser sent, and nobody, as none was sent in the request. Your cookies may vary, but the output of the query value should look like an empty object:
"query":{}If you change the URL in your browser to include a query string, for example, http://localhost:3000/api/func1?msg=hello&name=world, you will see the query value change:
"query":{"msg":"hello","name":"world,"}The JSON response you are seeing comes from the serverless function using res.json. The argument passed to this is converted to JSON and returned in the result object. You do not need to return JSON, but most serverless functions do.
Let’s now test Vercel’s serverless functions by replicating what we did in the previous section. Earlier in the chapter, you used the scaffolded Netlify function in a simple frontend application that passed in a name value. Listing 8.4 demonstrated a Netlify function that looks for name in the query string with a default value of World. It then returned a JSON object with the key message and a value of "Hello Name", where Name is either the value in the query string or the default. The new function checks the req.query object for a name value and defaults it to "World". Then a string is returned with the message key containing the name. As you can see, at least in this example, it’s quite a bit slimmer than the Netlify version.
Listing 8.8 Hello function with Vercel (/chapter8/test2/api/hello.js)
module.exports = (req, res) => {
    let name = req.query.name || "World";    ❶

    res.json({
        message:`Hello ${name}`
    })
}
❶ Check for a name value in the query string and default it if not present.
If you named this file hello.js, you can then access it at http://localhost:3000/api/ hello?name=Ray. If you stopped the Vercel development server, remember to run it again with the vercel dev command. After clicking the URL, your output should be:
{
  "message": "Hello Ray"
}
Now we need to build the simple frontend. This version will be the same as listing 8.3 with one tiny difference: the URL. You can find this new version in the GitHub repo in the file, /chapter8/test2/index.html.
Listing 8.9 Calling our Vercel serverless function (/chapter8/test2/index.html)
function testApi() {
    let name = textField.value.trim();
    if(!name) return;
    fetch(`/api/hello?name=${name}`)       ❶
    .then(res => res.json())
    .then(res => {
        resultDiv.innerHTML = `Function returned: ${res.message}`;
    });
}The only thing we changed here is the URL used in the fetch command. Both the Netlify and Vercel function returned the same “shape” of their result, which made this update easier. Now let’s look at another interesting feature of Vercel’s serverless support.
8.3.2 Vercel functions with dynamic path support
In the previous examples, you saw a simple Vercel serverless function using the query string for input. While this works, you can use a different URL syntax that allows for dynamic paths, for example, /api/somefunction/somevalue and /api/somefunction/ anothervalue. In these examples, we want to run a function, somefunction, and the last values (somevalue and anothervalue) are inputs given to the function. This makes for slightly simpler URL syntax and could be more desirable than the query string.
To support this, you must do two things. First, create a subdirectory to store your function. This will end up as part of the URL path. Given the example, our directory is /api/somefunction. Next, you create a file for your serverless function. The name of the file must be surrounded in brackets, and the name of the file will determine how you access it in code. For example, if I used [value].js, then my serverless code would access the path value as req.query.value. Let’s test this by creating a new version of our previous serverless function that lets us use a path and not the query string. Under the api folder, create a new folder, greeter. The name must include the brackets and will then be used by our code to get the value. Create a file named [name].js. The contents of this file are the same as listing 8.8 and can be found in the GitHub repository at /chapter8/test2/api/greeter/[name].js. Once saved, you can access your function at http://localhost:3000/api/greeter/Ray. The output will be the same as the previous example:
{
  "message": "Hello Ray"
}
If you change Ray to Lindy (http://localhost:3000/api/greeter/Lindy), you can probably guess what you’ll get:
{
  "message": "Hello Lindy"
}
If you want to test this version, the GitHub repository has index2.html, which simply repeats the change to index.html in switching where the fetch call makes its request.
8.3.3 Adding serverless functions to Camden Grounds (again)
Let’s create another real-world example of serverless functions in the Jamstack by making use of Camden Grounds. This time we’re going to add an API to our site. This API will return either all the products available in JSON format or a filtered list based on a query string value.
To begin, copy the Camden Grounds site from your chapter 2 folder, or use the chapter8/camdengrounds2 folder from GitHub. If you don’t use the chapter 8 version from GitHub, we have to make a few quick changes to our earlier version. First, remove the existing package.json file. This came from the template source we used and will get in the way with our new version. The easiest way to create a new package .json file from scratch is with the command npm init -f. Next, we need to add Eleventy as a dependency. One of the features of Vercel is that it can determine a lot about your project based on your files. The package.json can help tip Vercel off as to how your project works. We’ve got an Eleventy site, so let’s set up Eleventy as a dependency by running npm install @11ty/eleventy --save.
At this point, your package.json file should look like so:
{
  "name": "camdengrounds2",
  "version": "1.0.0",
  "description": "",
  "main": ".eleventy.js",
  "scripts": {
    "test": "echo "Error: no test specified" && exit 1"
  },
  "keywords": [],
  "author": "",
  "license": "ISC",
  "dependencies": {
    "@11ty/eleventy": "^0.12.1"
  }
}
Now you can run vercel dev to start the local server. As before, you’ll be prompted a few times, and you should take the defaults. Once the CLI is done, it will run Eleventy, and this time you’ll notice something a bit off in the output (figure 8.11).
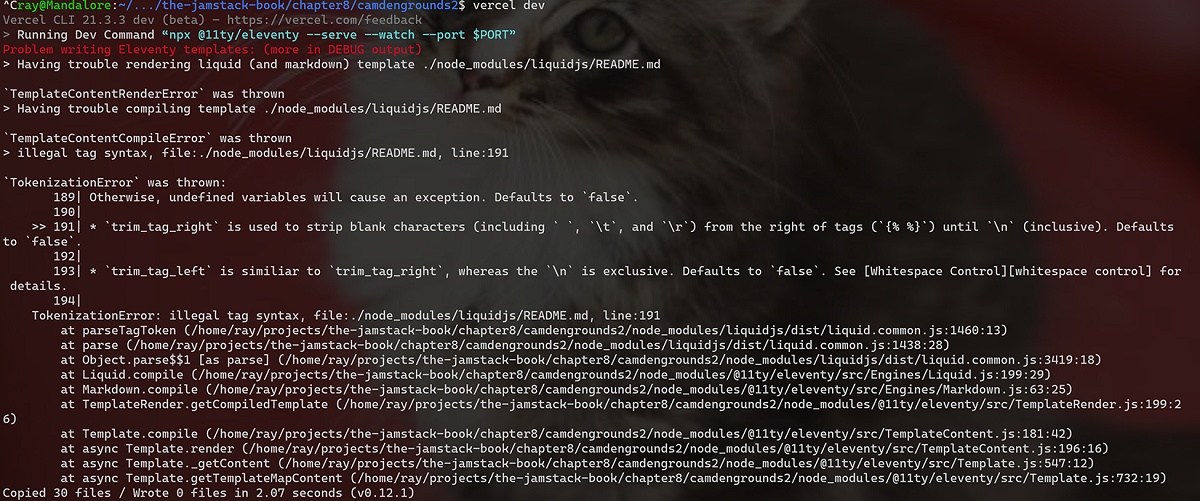
Figure 8.11 Error output from the Eleventy CLI
What you are seeing is an interesting side effect of using Vercel and Eleventy. When you ran vercel dev and it completed its initial setup, it created a new folder called .vercel with some configuration information. You don’t have to worry about that. But it also added a .gitignore file that specified .vercel. The .gitignore file is a special file Git repositories use as a way of flagging files and folders that should not be committed to your source repository. This action then triggered something in Eleventy. By default, Eleventy will ignore the node_modules folder used by npm unless you have a .gitignore file. The error message comes from Eleventy not ignoring the node_modules folder and getting tripped up by a random file inside. Luckily the fix is simple: add the node_modules file to your .gitignore file.
Listing 8.10 The fixed .gitignore file (/chapter8/camdengrounds2/.gitignore)
.vercel
node_modules
At this point you can press Ctrl or CMD-C in your terminal to stop vercel dev and simply run it again; the error should go away.
Now Camden Grounds should be up and running. Let’s add our serverless function. Create an api folder and then a file named products.js. The file begins with a copy of our product data from the Eleventy _data folder (with some of the text trimmed in the code listing to make it a bit shorter). After the list of products, the meat of the function begins. First, it looks for a query string value named filter. If it exists, this is used to filter the array. Finally, the products are returned as JSON.
Listing 8.11 The products API (/chapter8/camdengrounds2/api/products.js)
let products = [
    {
        "name" : "Coffee",
        "price" : 2.99,
        "description" : "Lorem ipsum dolor sit amet, consectetur adipisicing
         ➥ elit. Amet numquam aspernatur!",
        "thumbnail" : "http://placehold.it/700x400",
        "image" : "http://placehold.it/900x350"
    },
    {
        "name" : "Espresso",
        "price" : 3.99,
        "description" : "Lorem ipsum dolor sit amet, consectetur adipisicing
         ➥ elit. Amet numquam aspernatur!",
        "thumbnail" : "http://placehold.it/700x400",
        "image" : "http://placehold.it/900x350"
    },
    {
        "name" : "Americano",
        "price" : 5.99,
        "description" : "Lorem ipsum dolor sit amet, consectetur adipisicing
         ➥ elit. Amet numquam aspernatur!",
        "thumbnail" : "http://placehold.it/700x400",
        "image" : "http://placehold.it/900x350"
    },
    {
        "name" : "Double Espresso",
        "price" : 8.99,
        "description" : "Lorem ipsum dolor sit amet, consectetur adipisicing
         ➥ elit. Amet numquam aspernatur!",
        "thumbnail" : "http://placehold.it/700x400",
        "image" : "http://placehold.it/900x350"
    },
    {
        "name" : "Tea",
        "price" : 1.99,
        "description" : "For those who prefer tea.",
        "thumbnail" : "http://placehold.it/700x400",
        "image" : "http://placehold.it/900x350"
    }
]

module.exports = (req, res) => {
    let filter = req.query.filter;
    if(filter) {
        products = products.filter(
            p => p.name.toLowerCase().indexOf(filter.toLowerCase()) >= 0
        );
    }

    res.json({
        products
    })
}
Note that while testing, I noticed that the first time I added my serverless function, the CLI did not recognize that it had been added. I stopped the Vercel CLI and reran, and it picked it up fine. If you encounter this as well, try the same.
With the function saved, access it in your browser at http://localhost:3000/api/products. You’ll see all the products. Next, try filtering http://localhost:3000/ api/products?filter=espresso. This returns a shorter list:
{
  "products": [
    {
      "name": "Espresso",
      "price": 3.99,
      "description": "Lorem ipsum dolor sit amet, consectetur adipisicing...",
      "thumbnail": "http://placehold.it/700x400",
      "image": "http://placehold.it/900x350"
    },
    {
      "name": "Double Espresso",
      "price": 8.99,
      "description": "Lorem ipsum dolor sit amet, consectetur adipisicing...",
      "thumbnail": "http://placehold.it/700x400",
      "image": "http://placehold.it/900x350"
    }
  ]
}
Now your "static" Jamstack site has its own API that can be used by other sites!
In the next chapter, you’ll get an introduction to powerful, user-friendly CMS (content management system) offerings that make Jamstack even easier to use, especially for people without a technical background.
Summary
-
Serverless computing gives you all the power of a server without the boring chore of having to set one up. It also relieves you of the worry of maintaining that server.
-
FaaS is a generic term that describes using serverless computing as a way of writing functions that perform some action and then exposing that function via a URL. These functions could be site-specific utilities that don’t exist as external services. For example, a store that has unusual hours (let’s say weather-dependent) could use a serverless function to handle that logic. It could use another serverless function to handle checking product availability.
-
Netlify provides support for serverless functions and has a CLI that can be used to scaffold and test locally. Netlify lets you build multiple functions in your Jamstack site and provides a standard URL for accessing them.
-
Vercel has support for serverless functions and can be tested locally via the CLI. Like Netlify, it follows a standard of where to place your code and how to access it.