
2 Building a basic Jamstack site
- Using the Jamstack to build a simple site
- How to install and make use of Eleventy
- Creating a coffee shop website using Eleventy
The first site we’re going to build in the Jamstack will be what has previously been referred to as a brochureware website. In the past, this was used to describe websites that were nothing more than digital versions of a marketing brochure. While the web is an incredibly powerful platform and enables powerful collaboration, sometimes simple is all you need. There are multiple examples of where a one- or two-page site is more than satisfactory:
-
A restaurant website that just displays opening hours, the address, and a menu (but not in a PDF please!)
-
A temporary website for a service that is coming soon, perhaps with a simple form for people to sign up to be notified on release
-
A landing page for a mobile app, with only links to the respective app stores
Each of these examples could easily be handled by a website with one to two pages. In fact, a static site generator may even seem like overkill for such a small project. But as many developers know, projects tend to grow over time. By starting off with a static site generator, you’ll be much better prepared to adapt the website and add additional pages and features over time. For our first static site generator, we will use the incredibly flexible Eleventy.
2.1 Working with Eleventy
Eleventy (figure 2.1) is a simple but powerful static site generator that is incredibly flexible. Eleventy can be used to build just about anything you can imagine and isn’t necessarily tailored to one kind of site versus another. This flexibility makes it an excellent first choice for developers learning the Jamstack. It doesn’t have any preconceived notions about what kind of sites you will build and pretty much allows you to develop anything you need. Its wealth of templating languages also means you can use one that best matches your style of writing. It also relies on npm for installation, which is a very common tool among web developers, making the setup easier as well. This is why I’ve chosen Eleventy for the first static site generator covered in the book and also as the engine behind my personal blog, a site I’ve run for almost 20 years with over 6,000 blog posts. You can find Eleventy’s home page at https://www.11ty.dev/.
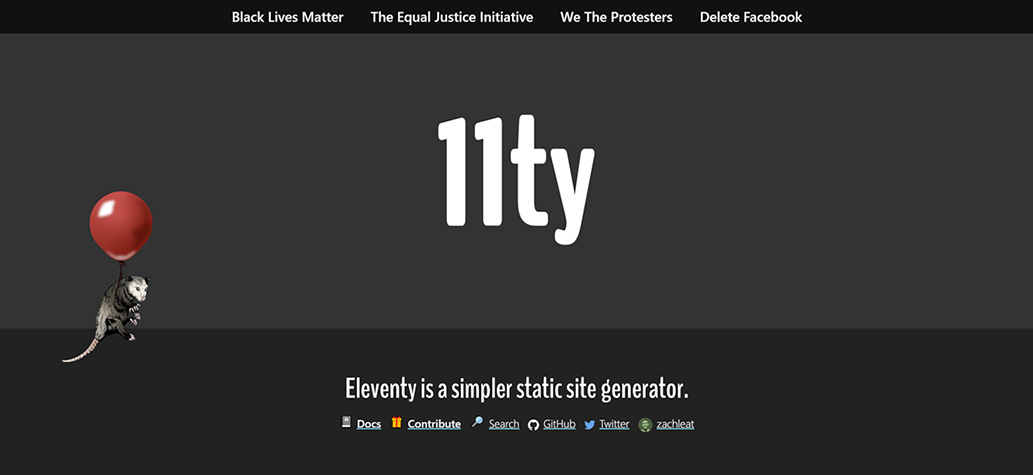
Figure 2.1 The Eleventy website
To begin working with Eleventy, you need to install the CLI tool via npm. npm stands for “Node package manager” and is a common tool to install utilities. You don’t have to be a Node developer to use npm but installing Node (via nodejs.org) is the simplest way to get the npm installed. Assuming you have npm available in your terminal, you can install Eleventy’s CLI like so:
npm install -g @11ty/eleventy
You can then confirm it worked by typing eleventy --help in your terminal, as shown in figure 2.2.

Figure 2.2 Help output from the Eleventy CLI
The Eleventy CLI boils down to two basic features. It can either take a directory and build the source code into a static site or set up a web server that does that same thing but also allows for hot reloading (i.e., reload the browser after a file change is detected). Typically you would use the web server feature while building your site and perform builds when you just want the static file output of your site.
Eleventy lets you write content in many different template processors. These template languages let you add basic logic and variables to HTML. Out of the box, Eleventy supports Markdown, Liquid, Nunjucks, Handlebars, Mustache, EJS, HAML, and Pug. You can also use basic HTML or even JavaScript. The language you pick is up to you, and you can even mix and match different ones in an Eleventy project. The Eleventy docs (https://www.11ty.dev/docs/) won’t help you learn these languages, so you’ll need to visit the respective web page of the processor you want to use if you aren’t familiar with it. For this chapter we’ll be using Markdown and Liquid. The choice of Liquid is purely a personal decision; if you don’t care for it, remember you’ve got options!
2.1.1 Creating your first Eleventy site
Let’s start by creating a simple site to test Eleventy. Create an empty folder (or clone the book repository) and add a new file, index.md. The “md” extension stands for Markdown, a very common template language used in many different platforms. You can find a good primer on Markdown at https://www.markdownguide.org/.
Listing 2.1 Initial Markdown file, index.md
## Hello World

This is my first page in lovely markdown.

Here's a list for fun:

* Cats
* Dogs
* More Cats
Now create another file in the same directory, cats.md.
Listing 2.2 The second Markdown file, cats.md
## Cats

Cats are the best, aren't they?
In case it isn’t obvious, you should feel free to change this text to whatever you want. After saving both files, execute a build by typing eleventy in your terminal. Ensure you are in the same directory as the two files. Eleventy will report on what it’s done as well as tell you how long it took. You can see an example of this in figure 2.3.

Figure 2.3 Output from running the Eleventy command
There are a few important things to note here. First, Eleventy outputs its result in a directory named _site. You can customize this with a flag passed to the Eleventy command line program. Second, notice how Eleventy converted the file names. The first file, index.md, is written out as index.html in the root of the output directory. The second file, cat.md, is written out into a cats subdirectory. The net result is that the home page is available at the root of your site and the cats page is available at /cats. Eleventy gives you full control over how pages are written out, so you can tweak these options to match your needs. However, it’s important to know the defaults so that you can link from one page to another. For example, the index page could link to the cats page like so:
Read about our [cats](/cats)
You can fire up a web server (my preference is httpster, installed via npm) to look at the output, but let’s use the other main feature of the Eleventy CLI instead and start the development server. In your terminal, run eleventy --serve. You should see output similar to that in figure 2.4.

Figure 2.4 Running the Eleventy server starts up a web server for your site’s files and lets you verify output in your browser.
If you copy the local URL output by the CLI you can open it in your browser and see your site. You will need to press CTRL+C to stop the server. Also note that Eleventy is writing to _site, which means when you’re done developing, you don’t need to run eleventy again to generate the final result. If you created your Markdown file exactly as specified, you’ll see what figure 2.5 depicts in your browser.
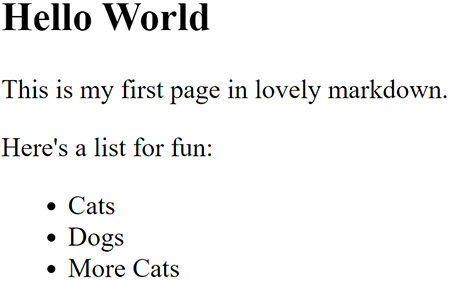
Figure 2.5 The HTML output generated from the Markdown file processed by Eleventy
If you edit the file and reload your browser, you’ll see the change reflected. Eleventy supports hot reloading, which means you won’t have to manually reload your browser, but that feature requires a “full” HTML page that includes body tags. When we get to layouts you’ll see how to add that.
2.1.2 Working with template languages
So far all you’ve seen is Markdown conversion, which by itself isn’t that exciting. What if we add in a template language? Template languages give us more flexibility in building out HTML (and other) files. They let you use variables, conditionals, and looping. Let’s build out an example of this so you can see it in action. You’ll see how to add logic and programming statements in an HTML file so that Eleventy can process them and make them static. Create a new directory (or use the chapter2/demo2 folder from the GitHub repository) and add the following as index.liquid.
Listing 2.3 An example of the Liquid template language
<h2>Liquid Demo</h2>

{% assign name = "ray" %}

<p>
Hello, {{ name }}!
</p>

{% assign cool = true %}

{% if cool %}
<p>
Yes, you are cool.
</p>
{% endif %}

{% assign cats = "Fluffy,Muffy,Duffy" | split: ',' %}
<ul>
{% for cat in cats %}
    <li>{{ cat }}</li>
{% endfor %}
</ul>
Liquid (https://shopify.github.io/liquid/) is an open source template language used in many projects, including another static site generator that we’ll cover later in the book, Jekyll. In listing 2.3 you can see a bit of the syntax Liquid uses. The first line (ignoring the HTML) assigns a value ("ray") to a variable (name). Immediately after the assignment, the variable is output. Liquid uses {% ... %} tokens to wrap commands and uses {{ ... }} to wrap variables. Basically, if you are applying any kind of logic, use {%; otherwise use {{.
The next set of code assigns a Boolean value (true) to a variable (cool), and then the next block checks to see if it’s true. Finally, an array is created from a list of names that’s then iterated over and displayed in a list. If that syntax looks a bit wonky, keep in mind that these template languages are not supposed to replace a “proper” full development language. Rather, they provide some basic functionality to let you create dynamic HTML.
If you were still running the Eleventy command line, use CTRL+C to stop it, then run eleventy --serve from the new directory, and you should see output similar to figure 2.6. Again, you should feel free to modify the values a bit to see them change.

Figure 2.6 Output from the Liquid template
Eleventy used the Liquid processor to take your input and output it as pure HTML. We only looked at a small part of what you can do in Liquid, but remember that if you don’t care for this style of writing, Eleventy gives you multiple other options. Before I used Liquid, I was a fan of Handlebars, but I found it limiting at times. Handlebars doesn’t want you using a lot of logic in your templates and pushes you to do that elsewhere. I get the logic behind that thinking, but at the same time I prefer the flexibility of Liquid. Liquid can’t do everything, so when I need something really customized, I’ll use EJS (https://ejs.co/). I really don’t like how EJS looks. It’s a purely personal opinion, but I find EJS code ugly. However, it’s easily the most flexible option, so I appreciate that I can use it when I need it.
2.1.3 Adding layouts and includes
Thus far you’ve seen how Eleventy can transform a Markdown or other language file into HTML. Now it’s time to improve this a bit by working with layouts and includes. Layouts are “wrapper” files that can be used to add a site layout to your files. Each layout will have a marker where your page content is included. This means you can have one file for your layout and then have the rest of your site use it. Hopefully the power of that is apparent. You can quickly change the entire look and feel of your site just by modifying that one file. You can also correct things like typos in your site more quickly when they’re in the header or footer. Includes are simply other files that you include in your templates. If you’ve got a few forms on your site that need to include the same legal text (that readers ignore), includes are a good way to simplify that process.
To begin working with layout files, we first need to tell our templates to use them. Eleventy uses a feature that many static site generators support: front matter. Front matter is metadata about your file included at the top. In almost all cases, front matter uses a particular marker to start and end the block and then a simple “key: value” format to specify values. Here’s an example of how front matter may look for a particular file.
Listing 2.4 An example of front matter
---
something: a value!
anotherSomething: another value
---

This is the rest of the file.
In this incredibly simple example, there are two values specified in front matter, something and anotherSomething. Eleventy, or any other static site generator, will typically look at these values and do different things based on what you’ve set. For values they don’t understand, the values will be ignored but available to your code. (You’ll see this later in the section on data.) When the file is generated to HTML, the front matter is completely removed. Let’s look at an example of this.
Create a new directory (or work with your copy of the repository) named demo3. In this directory, copy the index.md and cats.md files from the first demo. Open the first file and modify it to add front matter.
Listing 2.5 Updated index.md file with front matter
---
layout: main
---

## Hello World

This is my first page in lovely markdown.

Here's a list for fun:

* Cats
* Dogs
* More Cats
The change here is the addition of the front matter block on top, with one value specified: layout. The cats.md file can also be similarly modified.
Listing 2.6 Updated cats.md file
---
layout: main
---

## Cats

Cats are the best, aren't they?
When Eleventy parses these files, it will read in the front matter and notice the layout setting. This will tell Eleventy to try to load a layout file named main dot something. Why “dot something”? As stated previously, Eleventy supports many different template formats with different extensions. By specifying just “main” in the front matter, Eleventy will check for any of the supported template types. Where does it check? By default, layout files are searched in a directory named _includes. This is in the root of your project and the same directory you run the Eleventy command line. As you are working in the demo3 folder, the _includes folder would go under there. You can, if you choose, change this directory name. Let’s use Liquid to build a layout file and store it in _includes/main.liquid. Listing 2.7 demonstrates the layout file we built.
Listing 2.7 The site layout file
<html>

<head>
<title>My Site</title>
<style>
body {
    background-color: #ffaa00;
    margin: 50px;
}

footer {
    background-color: #c0c0c0;
    padding: 10px;
}
</style>
</head>

<body>

    {{ content }}     ❶

    <footer>
    <a href="/">Home</a> | <a href="/cats">Cats</a>
    </footer>
</body>
</html>
❶ This is where page content will be included.
For the most part, this looks like a regular HTML template. You can see some styling (ugly, to be sure) and a footer, but make special note of {{ content }}. When Eleventy parses a file that uses front matter and that specifies this layout, it will take the resulting HTML generated by the page and place it in a variable named content. My Liquid template can then simply output that variable wherever it makes sense. In this case I’ve done it right after the body tag and before the footer. To be clear, this is arbitrary. If you fire up an Eleventy server in this directory (remember to quit any previous test by pressing CTRL+C), you’ll see in figure 2.7 why I’m not allowed to design websites.

Figure 2.7 Our site with the layout applied
If you want, try changing the style declarations and pick different (better) color choices. Now that you’ve got a complete HTML page being used you’ll finally see Eleventy’s hot reload feature in action.
Before leaving the topic of layouts, note that you can also have layouts that have layouts. For example, instead of specifying a main layout for a page, you could specify another one that then specifies the main layout itself. The first one will run, include your page contents, and then return its HTML to the main layout. You’ll see an example of this later.
Now let’s demonstrate includes. This is typically rather simple. You create a file to be included and store it in the _includes folder where your layouts reside as well. How you include the file depends on your template engine. For Liquid, it looks like this:
{% include footer %}where footer.liquid should be found in the _includes folder. For Handlebars, it looks a bit different:
{{> footer}}In Handlebars, these are referred to as partials, but they act the same way. Eleventy has documentation (https://www.11ty.dev/docs/languages/) for all its supported template languages, so check to see how this feature is supported in your template language of choice.
2.1.4 Using collections in your Eleventy site
Thus far you’ve seen how to “translate” input files, in Markdown and other languages, into HTML. Now it’s time to demonstrate another powerful feature—collections. A collection is exactly how it sounds: a set of files that are grouped together by some logical pattern. In Eleventy, there’s a few different ways of doing this, but the simplest way is via front matter and using the tags value. Consider the following front matter example:
---
layout: main
tags: pressReleases
title: Press Release One
---
Here, I’ve used three front matter values. The first, layout, we’ve already discussed. The second, tags, specifies a tag value for this file. Any file that uses the same value will be in the same collection. You can choose multiple tags for a file if you want, and it will be available in multiple collections. The last value, title, is one I haven’t shown before. As you can guess, this specifies a title for your file and will be available in your templates to output if you choose.
By default, this won’t do anything on its own. But your templates can iterate over collections and create lists. Let’s build an example that works with a collection and creates a list of them dynamically.
Create a new directory named demo4 (or use the source from the repository). This should not be in the same folder as demo3. Copy the same contents from demo3 and rename index.md to index.liquid. We’re going to add press releases to our site, so add a subdirectory named press-releases. In this directory, create a few files. The names aren’t terribly important, nor is the content, but if you want to follow along with the repository, name the first one cats-are-cool.md.
Listing 2.8 The first press release
---
layout: pr
tags: pressReleases
title: Cats are Cool
---

Just some text here for filler.
As we discussed, we’re using our front matter to specify a tag for the file to add it to a collection. We’ve also specified a layout and title. Repeat this a few times (the repository has three files), but the names, titles, and content don’t really matter. The repository has a file named dogs-are-not-cool.md and have-we-said-how-cool-cats-are.md.
The next step is to add the layout. We mentioned earlier that layouts can include other layouts. For our press releases, we want them to have some additional layout.
Listing 2.9 The “pr” layout in _includes/pr.liquid
---
layout: main
---

<h2>Press Release: {{ title }}</h2>      ❶

{{ content }}Notice that it specifies main for its layout. This means the press release will first run the pr.liquid template and then send that output to main.liquid. Also notice the title is output in the layout. This value comes from the title in the front matter of the press release. We can also make use of this in our core layout file.
Listing 2.10 Updated layout file supporting a title (_includes/main.liquid)
---
title: Default title
---

<html>

<head>
<title>{{ title }}</title>
<style>
body {
    background-color: #ffaa00;
    margin: 50px;
}

footer {
    background-color: #c0c0c0;
    padding: 10px;
}
</style>
</head>

<body>

    {{ content }}

    <footer>
    <a href="/">Home</a> | <a href="/cats">Cats</a>
    </footer>
</body>
</html>
There are only two changes in this version of the file. First, a title value is specified in the front matter. This will only be used if a template doesn’t specify its own title. Next, the title is output between the title tags.
The end result is that our press release files will automatically get a bit of additional layout and then use the main layout the rest of the site has. Now that we’ve got press releases and we know they’re in a collection, the next step is to expose this to the user by creating a new home page that uses the Liquid template engine to output these values.
Listing 2.11 The index.liquid with press release support (/index.liquid)
layout: main
title: Home Page

Welcome to our home page. Here's our press releases:

<ul>
{% for pr in collections.pressReleases %}                ❶
<li><a href="{{ pr.url }}">{{ pr.data.title }}</a></li>
{% endfor %}
</ul>
❶ Note the use of collections.pressReleases.
When Eleventy encounters templates using tags in their front matter, it puts them in an object called collections. You can then access that data by using collections .nameoftag. Since we used pressReleases as the tag value, this collection will consist of three items. (Again, feel free to make more press releases and see the changes.) We loop over each item and assign the object to a pr variable. That variable has multiple different properties in it. One is url, which is created by Eleventy and represents the location of the page. The data property will contain any data defined in the front matter of the page. Since our press releases have titles, we can output them here. There are more variables you can use, and you can check the collections documentation (https://www.11ty.dev/docs/collections/) for details. The end result is shown in figure 2.8.

Figure 2.8 Our home page with press releases driven by the Eleventy collection
If you click on one of the press releases, you can see the multilayered layout in effect (figure 2.9).

Figure 2.9 A sample press release
Now that you’ve seen some examples of using front matter and collections, it’s time to look at data in Eleventy at a high level.
2.1.5 Working with data
You’ve had a small introduction to how data works in Eleventy, but now we’re going to dig a bit deeper. There are multiple ways of providing data to Eleventy pages. Front matter is one way and is specific to a page. Collections are another way and provide data that can be iterated and used anywhere. Another way to provide data to Eleventy sites is by creating files with a special folder: _data. You can create two types of files here, JSON and JavaScript. The name of the file will define how it’s available to your site. For example, imagine a file named site.json within your _data folder. It has the following contents:
{
"siteName": "The Cat Site",
"siteOwner": "Raymond Camden",
"siteEmail": "[email protected]"
}
This JSON file defines three variables. It could also be an array, or an array of objects—basically any valid JSON. Because the file is named site.json, your templates can access values like so (again, assuming Liquid syntax): {{ site.siteName }}.
JavaScript data files work a bit differently because, of course, JavaScript is a programming language, and JSON is just static information. JavaScript data files let you perform any operation you may need, and when done the result of the file is the final available data. Imagine a sample JavaScript file named build.js:
module.exports = function() {
    let buildTime = new Date();
    let randomNumber = Math.random();
    return {
        buildTime,
        randomNumber
    }
}
This JavaScript file creates two variables, one representing the current time and one a random number. An object containing both values is then returned. Because the file is named build.js, our templates can use the values like {{ build.buildTime }} or {{ build.randomNumber }}. Note that this logic is evaluated when the site is built (the file name doesn’t have anything to do with that), so when the static site is deployed, the values won’t change. Let’s look at an example of both kinds of data files in action.
Begin by once again copying the previous directory (demo4) to a new one (demo5), or simply using the GitHub repository code. Create a new folder inside demo5 named _data, which will store the data files. The folder name used for data files can be configured in Eleventy if you wish. The first file we’ll add is site.json.
Listing 2.12 The site.json definitions (_data/site.json)
{
    "siteName":"The Cat Fan Site",
    "contactAddress":"[email protected]"
}
The values are arbitrary and hopefully self-explanatory. We’ve defined a name for the site as well as a contact address. Now define a new file, breeds.js. For this file we’re going to make use of the Cat API site (https://thecatapi.com/). This site provides free APIs related to cats, but you have to sign up (https://thecatapi.com/signup) for a key first as shown in figure 2.10.
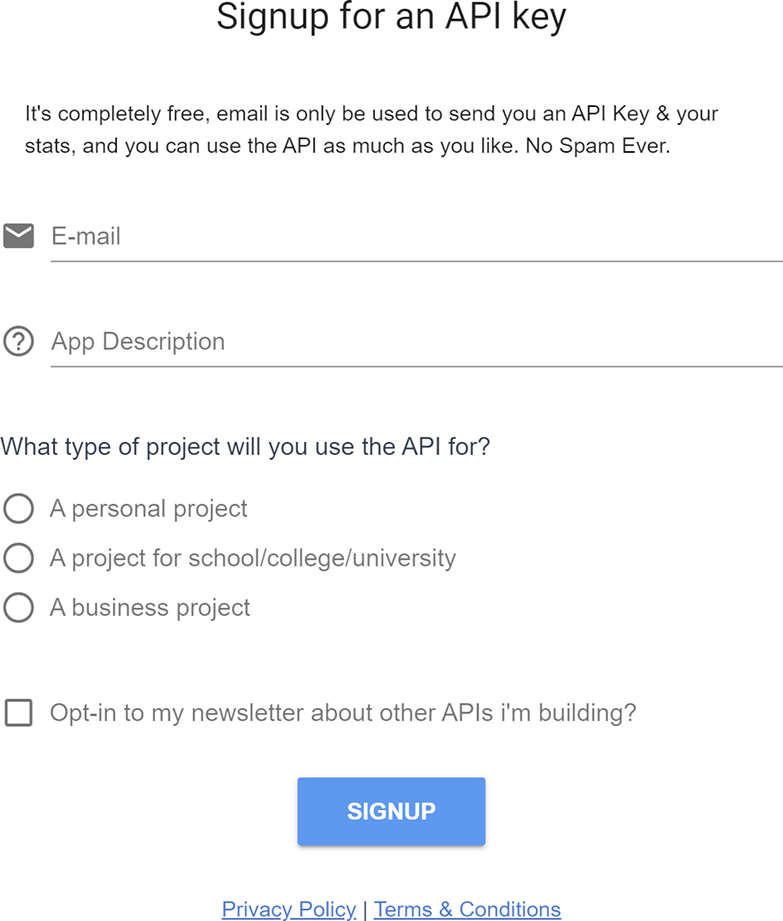
Figure 2.10 The sign-up page at the Cat API
One of the APIs they provide is to return a list of cat breeds. The API is rather simple and can be called with this URL: https://api.thecatapi.com/v1/breeds?limit=5&api _key=yourkey. The limit value in the URL restricts the amount of data returned, and the key value should be replaced with the one you get.
Listing 2.13 Retrieving a list of cat breeds (_data/breeds.js)
const fetch = require('node-fetch');
require('dotenv').config();               ❶

const KEY = process.env.CAT_API_KEY;      ❷

module.exports = async function() {

    let breedUrl = 'https://api.thecatapi.com/v1/breeds?limit=5' +
    '&api_key=' + KEY;

    let resp = await fetch(breedUrl);

    let data = await resp.json();

    return data;
}
❶ Loading the 'dot.env' package
❷ Reading in the .env key value
In general, this is a simple Node script that makes use of node-fetch to make easier HTTP calls. The body of the function makes the call and returns the results as-is. (It could be modified to transform the code, too.) The important bit here is the use of the 'dot.env' package on line 2. This will look for a file named .env in the root of your project. This file is a simple set of name value pairs. You won’t find this in the GitHub repository as it’s a standard way of including keys in your code. The Node script will read this and set every value equal to a value in the process.env scope. In the .env file at the root of the demo5 folder, add the following:
CAT_API_KEY=yourkey
Replace yourkey with the key you got from the Cat API.
There’s one last step to do. Our function made use of node-fetch and 'dotenv'. In order to make those available, you’ll need to install them via npm. In your terminal, in the same directory as the demo5 folder, run
npm install node-fetch@2
npm install dotenv
This will install the required dependencies.
Now that we’ve set up the data files, let’s use them. To keep it simple, let’s use them both in index.liquid.
Listing 2.14 Making use of Eleventy data files
---
layout: main
title: Home Page
---

Welcome to our home page. Here's our press releases:

<ul>
{% for pr in collections.pressReleases %}
<li><a href="{{ pr.url }}">{{ pr.data.title }}</a></li>
{% endfor %}
</ul>

Here's a list of cat breeds:

<ul>
{% for breed in breeds %}
<li>{{ breed.name }} - {{ breed.description }}</li>
{% endfor %}
</ul>

You can contact me at {{ site.contactAddress }}
The modifications begin right after the press release display, though note that the logic is pretty much the same: loop over the value and output data from each item. The Cat API returns a lot of data about cat breeds, but to keep it simple, we’ve output the name and description. Finally, the site contact address is displayed at the end. Figure 2.11 shows the result.

Figure 2.11 The updated home page driven by dynamic data files
Be sure to check the “Using Data” section (https://www.11ty.dev/docs/data/) of the Eleventy docs for more examples. Eleventy also supports specifying data at a directory level, as well as other options.
2.2 Let’s build Camden Grounds
Now that we’ve seen a bit (certainly not all!) of what Eleventy can do, it’s time to look into building our simple restaurant site. The site we will be building in this chapter is for a fictional coffee shop named Camden Grounds. This will follow the typical pattern of most restaurant sites by offering a few basic features:
-
A home page that’s mostly just pretty pictures to help entice the visitor.
-
A Locations page showing where different Camden Grounds stores may be found.
-
An About Us page that talks about the history of the store. No one will ever actually read this, but the owner insists on it.
To begin, you need to determine the design of the site. If you’re like me and design challenged, the simplest solution is to find a template you can use. Luckily, there’s a large number of websites that cater to this need. We’re going to use a simple Bootstrap store template named “Shop Homepage” (http://mng.bz/Dxy0). You can see a preview of this in figure 2.12. Note that this is how it looks in its template form, not the final form we’ll be creating.
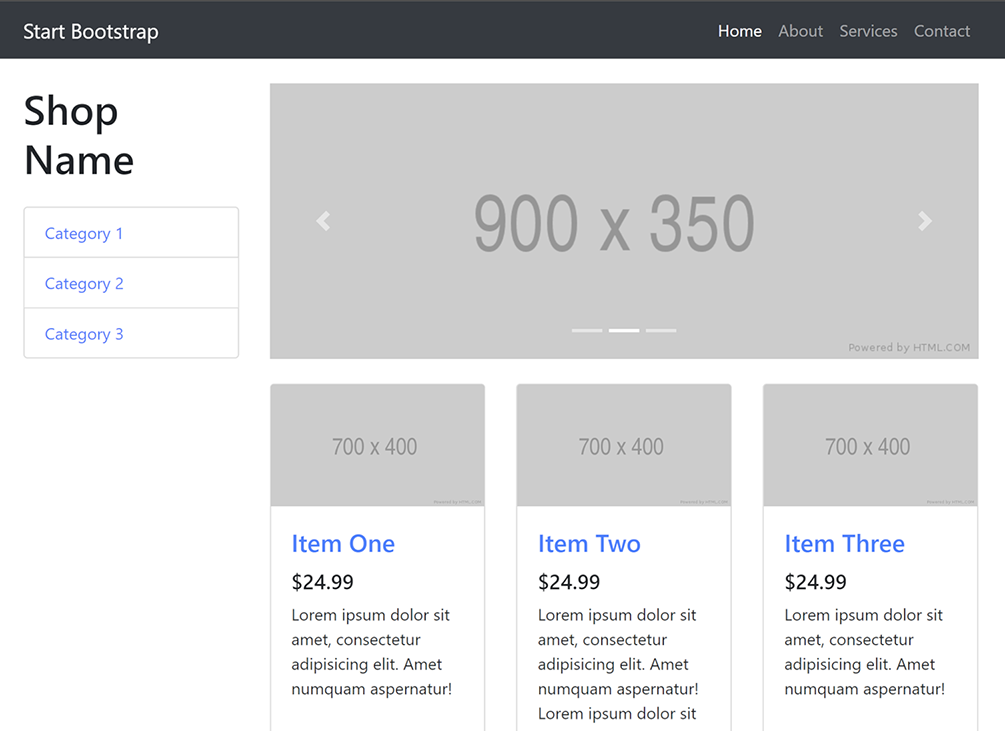
Figure 2.12 The shop template with products and a rotating banner on top
NOTE Since this chapter was created, the template updated to a newer version with a slightly different design. The version used in this chapter is still available at http://mng.bz/2j6w and can be used. Also remember that the template can be found in the completed code for the book at http://mng .bz/1j5R.
This template can be freely downloaded and modified. The full source code of the final demo can be found in the GitHub repository in the chapter2/camdengrounds folder. As there’s a lot of boilerplate HTML (Bootstrap is nice, but a bit verbose), we’ll be focusing on the modifications of the template rather than sharing every line of code.
Note While a template may look pretty, before you commit, look at the code. It may be difficult to modify for your needs.
As stated earlier, you can think of a typical template as a “wrapper” around your pages. You figure out where your content can be stuffed, insert the token that Eleventy will use to put page content in, and then ensure your pages specify that layout.
You can see the template for Camden Grounds in the _includes/main.liquid file. As there’s a lot of HTML in this file, the next few listings will highlight the important parts. First, the very top of the template specifies a title in front matter.
Listing 2.15 Front matter for the layout
---
title: Camden Grounds
---
This will be used as a default when individual pages do not specify one. You can see this a few lines later.
Listing 2.16 The dynamic title
<title>{{ title }}</title>Now let’s look at the navigation menu. One of the features this template supports is the ability to highlight a tab when you’re on a particular page. How do we use that on a static website? Eleventy provides access to a page variable that provides information about the current page being rendered. One of the values is the relative URL of the page. Given that we can use a template language and examine that value, we can create a dynamic menu.
Listing 2.17 The template’s dynamic menu
<ul class="navbar-nav ml-auto">
    <li class="nav-item {% if page.url == '/' %}active{% endif %}">
    <a class="nav-link" href="/">Home
    </a>
    </li>
    <li class="nav-item {% if page.url == '/about/' %}active{% endif %}">
    <a class="nav-link" href="/about">About</a>
    </li>
    <li class="nav-item {% if page.url == '/services/' %}active{% endif %}">
    <a class="nav-link" href="/services">Services</a>
    </li>
    <li class="nav-item {% if page.url == '/contacts/' %}active{% endif %}">
    <a class="nav-link" href="/contact">Contact</a>
    </li>
</ul>
Our navigation consists of four main pages. For each page, Liquid code is used to look at the URL value, and when it matches the relative path of the page in question, the active class is added. The last part of the template we’ll share is where the contents are included.
Listing 2.18 Including page content in the template
<div class="col-lg-9">

{{ content }}

</div>
To be honest, it took a bit of digging to find the optimal place to add the content variable. As stated, Bootstrap is a great design framework but can be both verbose and a bit complex at times. You are highly encouraged to keep a tab open at the official Bootstrap site (https://getbootstrap.com/). It has extensive documentation and examples to help you better use the framework.
The home page is going to be a bit complex, so let’s look at the three simple pages, one by one.
Listing 2.19 The About page (about.html)
---
layout: main
title: About Camden Grounds
---

<div class="row my-4">
    <div class="col">

    <h2>The About Page</h2>
    <p>
    Let's talk about the site.
    </p>

    </div>
</div>
If you look at the source of the layout file, you’ll see it’s nearly 100 lines long. This template is far shorter, as Eleventy will handle wrapping it with the content. You can look at contact.html and services.html if you wish; they follow the exact same format. Figure 2.13 shows the how the About page displays (notice the highlighted menu tab).
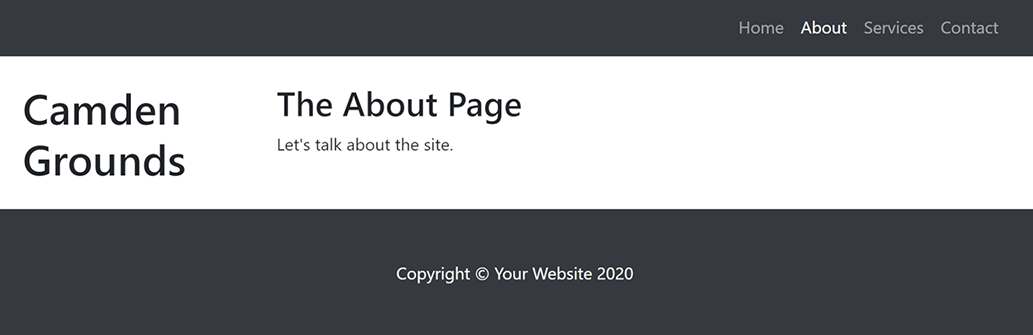
Figure 2.13 The Camden Grounds About page
Before this will work, though, it’s time to point out an interesting issue with Eleventy. When it encounters a file it doesn’t know how to process, it ignores it. This ends up being a big deal as our Bootstrap template has multiple folders of CSS, JavaScript, and images that make up the look and feel of the design.
What we need to do is tell Eleventy to copy these files as-is. Eleventy supports dynamic configuration by specifying a .eleventy.js file in your project root. While you can do a lot in this file, the main feature we want to enable is called Passthrough File Copy (https://www.11ty.dev/docs/copy/). In the root of the Camden Grounds site is the following configuration.
Listing 2.20 The Eleventy configuration file (.eleventy.js)
module.exports = function(eleventyConfig) {

  eleventyConfig.addPassthroughCopy("css");
  eleventyConfig.addPassthroughCopy("vendor");
  eleventyConfig.addPassthroughCopy("img");

};
We’ve specified that three paths, css, vendor, and img, should be copied as-is. Eleventy won’t try to process anything here, but will simply copy the files, recursively, into the generated _site folder.
All right, we’ve done the easiest bits first (always a good idea), but now it’s time to tackle the home page. If you look back at figure 2.12, you’ll see that the home page has a rotating banner of images on top and then a list of images. If you look at the source of the index page in the template’s original code, you’ll see that the animated images (called a carousel ) are displayed.
Listing 2.21 Image carousel code
<div class="carousel-inner" role="listbox">
<div class="carousel-item active">
    <img class="d-block img-fluid" src="http://placehold.it/900x350"
    alt="First slide">
</div>
<div class="carousel-item">
    <img class="d-block img-fluid" src="http://placehold.it/900x350"
    alt="Second slide">
</div>
<div class="carousel-item">
    <img class="d-block img-fluid" src="http://placehold.it/900x350"
    alt="Third slide">
</div>
</div>
You can see each image is using the Placeholder service to display a temporary image. We’re going to replace this with three images from Unsplash (https://unsplash.com/). Unsplash provides free images for use on websites with the simple request that you attribute them. I searched for “coffee” and found three images and placed them in the img folder.
Listing 2.22 The image carousel with our new images specified
   <div class="carousel-inner" role="listbox">
    <div class="carousel-item active">
      <img class="d-block img-fluid" src="img/coffee1.jpg"
      alt="Coffee!">
    </div>
    <div class="carousel-item">
      <img class="d-block img-fluid" src="img/coffee2.jpg"
      alt="Coffee beans">
    </div>
    <div class="carousel-item">
      <img class="d-block img-fluid" src="img/coffee3.jpg"
      alt="Coffee cup">
    </div>
  </div>
Now for the products. The original template shows six products using what’s commonly referred to as a card format. We want to make that dynamic, so let’s add a JSON file with products in _data/products.json.
Listing 2.23 The products for Camden Grounds
[
    {
        "name" : "Coffee",
        "price" : 2.99,
        "description" : "Lorem ipsum dolor sit amet, consectetur adipisicing
         ➥ elit. Amet numquam aspernatur!",
        "thumbnail" : "http://placehold.it/700x400",
        "image" : "http://placehold.it/900x350"
    },
    {
        "name" : "Espresso",
        "price" : 3.99,
        "description" : "Lorem ipsum dolor sit amet, consectetur adipisicing
         ➥ elit. Amet numquam aspernatur!",
        "thumbnail" : "http://placehold.it/700x400",
        "image" : "http://placehold.it/900x350"
    },
    {
        "name" : "Americano",
        "price" : 5.99,
        "description" : "Lorem ipsum dolor sit amet, consectetur adipisicing
         ➥ elit. Amet numquam aspernatur!",
        "thumbnail" : "http://placehold.it/700x400",
        "image" : "http://placehold.it/900x350"
    },
    {
        "name" : "Double Espresso",
        "price" : 8.99,
        "description" : "Lorem ipsum dolor sit amet, consectetur adipisicing
         ➥ elit. Amet numquam aspernatur!",
        "thumbnail" : "http://placehold.it/700x400",
        "image" : "http://placehold.it/900x350"
    },
    {
        "name" : "Tea",
        "price" : 1.99,
        "description" : "For those who prefer tea.",
        "thumbnail" : "http://placehold.it/700x400",
        "image" : "http://placehold.it/900x350"
    }
]
Note that the text was slightly reduced for space. Instead of finding a custom picture for each product, we use an image placeholder service from http://placehold.it that produces a basic gray image that is useful for temporary images. Now that this has been set, Eleventy provides access to them in a products variable. We can modify the index template (camdengrounds/index.html) to loop over and create a card for each product.
Listing 2.24 Displaying products
{% for product in products %}
<div class="col-lg-4 col-md-6 mb-4">
<div class="card h-100">
    <a href="products/{{ product.name | slug }}"><img class="card-img-top"
    src="http://placehold.it/700x400" alt=""></a>
    <div class="card-body">
    <h4 class="card-title">
        <a href="products/{{ product.name | slug }}">{{ product.name }}</a>
    </h4>
    <h5>${{product.price}}</h5>
    <p class="card-text">{{product.description}}</p>
    </div>
</div>
</div>
{% endfor %}
Basically all we did was remove the boilerplate text and replace it with variables defined by the loop itself. If we had unique pictures for our products (hopefully), they could also be specified in the JSON file and used here.
The last aspect of the site is the pages for each individual product. You can see the links used in listing 2.25: products/{{ product.name | slug }}. The first thing to note is the slug aspect. This is called a filter and takes the input provided (product .name) and then passes it through a formatting function. The slug function creates a URL-safe version of a string. As an example of this, the value “Double Espresso” turns into “double-espresso.” But where do the pages themselves come from?
Eleventy supports a powerful Pagination system (https://www.11ty.dev/docs/pagination/) that can be used in multiple ways. It can take a list of data and create pages (e.g., hundreds of press releases split into pages of 10 each) or take a list and generate one page each. Eleventy also provides support for linking to pages, either the next or previous one, and even makes it easy to tell if you are at the beginning of a list of pages or the end. As with most things in Eleventy, it’s pretty powerful and flexible, but we’re going to use a simple example of it in our shop to help create one page for each of our products.
To use this feature, a page must define pagination settings in the front matter, as shown in the following listing.
Listing 2.25 The Products pagination page
---
layout: main
pagination:
    data: products
    size: 1
    alias: product
permalink:      "products/{{ product.name | slug }}/index.html"
---

<div class="row my-4">
  <div class="col">

     <div class="card mt-4">
          <img class="card-img-top img-fluid"
          src="http://placehold.it/900x400" alt="">
          <div class="card-body">
            <h3 class="card-title">{{ product.name }}</h3>
            <h4>${{product.price}}</h4>
            <p class="card-text">
            {{ product.description }}
            </p>
          </div>
        </div>

  </div>
The front matter makes use of pagination by first specifying the data that will be iterated, then the size (how many per page), and finally that it should use an alias in the page itself for easier use. Using a page size of 1 basically means we want one product per page. Another feature of Eleventy is demonstrated here as well: permalink. Eleventy gives you precise control over how files are generated by letting you specify exactly where they should end up. The rest of the template is basically a modified version of the cards used earlier but could certainly be more unique.
If you fire up the Eleventy server and click on one of the products, you see a product page, as figure 2.14 demonstrates.
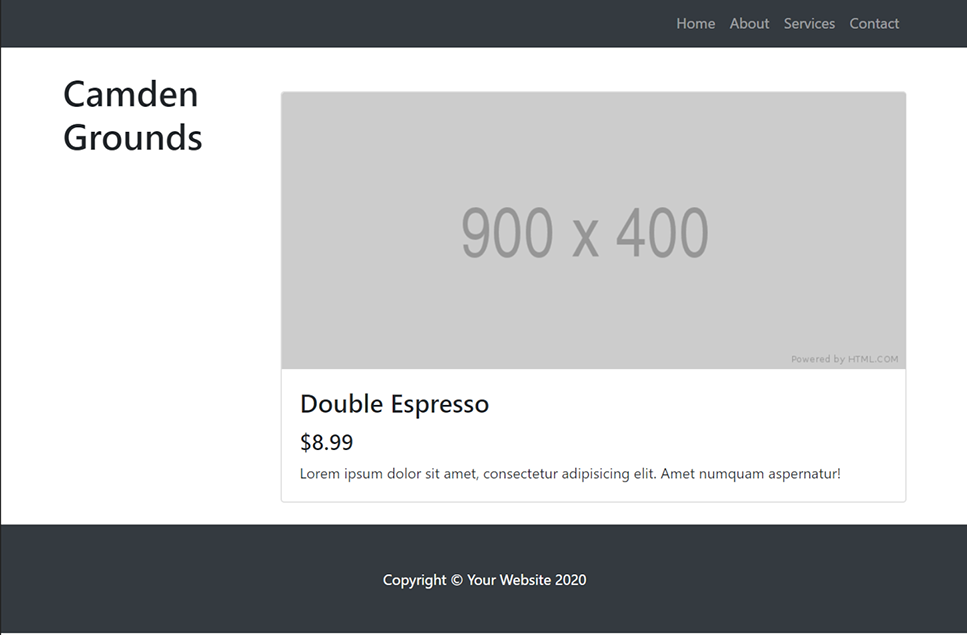
Figure 2.14 A Camden Grounds product
2.3 Going further with Eleventy
In this chapter, you’ve reviewed the Eleventy static site generator and used it to build a simple but flexible shop for a fictional store. However, there are many features in Eleventy we didn’t touch upon:
Be sure to check the Eleventy documentation (https://www.11ty.dev/docs/) for more information. I’d also suggest following the official Twitter account for Eleventy (@eleven_ty) as well as joining the Discord channel (https://www.11ty.dev/news/ discord/). Finally, you can peruse the source code and current open issues on their GitHub repository: https://github.com/11ty/eleventy/.
In the next section, you’re going to look at another static site generator, Jekyll. Jekyll is tailor-made for blogs, so you’ll build a blog as a way to help you learn. Best of all, Jekyll also makes use of Liquid, so if you enjoyed using it in Eleventy, you’ll have the opportunity to use it more!
Summary
-
Eleventy is a flexible static site generator and a good way to build Jamstack sites.
-
Eleventy supports different types of template languages and lets you select one that best matches your style.
-
Multiple different template languages can be used in one project if you discover that you need a particular feature from multiple options.
-
Simple sites, even ones with only a few pages, are excellent candidates for the Jamstack.