9 Adding a content management system
- The pros and cons of the two types of headless CMSs
- Choosing between the Contentful and Sanity API-based headless CMSs
- Using WordPress as a headless CMS
- Building a site using Gatsby’s WordPress integration
- Using site builders to create Jamstack sites connected to a CMS
Jamstack is often associated with a file-based content management system that uses a combination of manually edited Markdown and YAML files. That’s because many static site generators default to this type of manual content management, even today. But the reality is that some form of headless content management system has become a de facto integration in most Jamstack sites.
Jamstack.org maintains a list of headless CMSs (https://jamstack.org/headless-cms) that you can search by type and license (i.e., whether they are open or closed source). Currently, it lists 87 options. Needless to say, that’s a lot of choices and more than we can cover in a chapter. Instead, we’ll look at the different types of headless CMS available and then explore some options to give you a sense of how their approaches differ and to help you make informed choices about what you are looking for.
9.1 Types of headless CMSs
As we discussed in chapter 4, there are two broad types of headless CMS:
-
Git-based headless CMSs—These CMSs store everything as files in a Git repository. The CMS is an editing layer that allows the user to edit the Markdown, JSON, and YAML files containing the site’s content via a browser-based what-you-see-is-what-you-get (WYSIWYG)-style interface. In many cases, these editing layers are deployed with the site’s files or exist locally on the user’s machine. The user’s changes are committed back to the Git repository by the CMS. Git handles versioning the content. Since changes are committed to Git, deploying content typically happens as part of whatever continuous deployment process was set up for the site. For example, Netlify will detect changes to the repository and automatically build and deploy the updated content.
-
API-based headless CMSs—These CMSs store content within their systems. This is similar to a traditional CMS, but the system does not have a frontend; instead, content is only accessible via an API. Content editing is typically performed via an admin dashboard on the CMS provider’s site. For example, if a site used Contentful, a popular API-based headless CMS, the site’s content editors would log in at contentful.com to make changes to the content. When a user makes a change to a Jamstack site’s content, Jamstack usually needs to trigger a rebuild via a web hook connected to the site’s continuous deployment process. The user does not need to wait for the rebuild to complete in order to view and test their changes. Most API-based headless CMSs have a live preview feature that can display unpublished content changes on a Jamstack site built with popular frontend frameworks like React or Vue.
Which type should you choose for your project? That depends on your specific needs, but here are some guidelines.
9.1.1 Pros and cons of Git-based headless CMSs
-
They’re inexpensive. Since they rely on a Git repository for all the storage and versioning of content, Git-based headless CMSs are usually inexpensive or, in some cases, completely free and/or open source.
-
They’re very easy to set up. Integration frequently consists of ensuring that the editing layer understands the form (i.e., content model) of the content in your files. For example, you may need to tell it what types of data are in the front matter for Markdown files or the type of data in your JSON and YAML data files, although some systems will even attempt to auto-detect these.
-
They have a short learning curve. Because they are file-based, they are generally easier for content editors to learn, as data models are typically not as complex as those of their API-based alternatives.
-
They offer easy paths for external contributions. Third-party contributors can get access to editing content directly through the CMS via features such as open authoring in Netlify CMS, for example, or can make direct file edits via the Git repository on a site like GitHub or GitLab. This can be an especially important consideration for things like documentation sites, as we explored in chapter 4.
-
They’re not proprietary. All of your content is stored in files in your own Git repository, meaning that you can easily swap to another Git-based CMS solution without any direct impact on your site’s code or content.
-
Content reuse is limited. Content in a Git-based headless CMS is generally specific to the web, meaning content can be difficult to reuse across a website and mobile app, for instance. In addition, content reuse across the site itself is limited. For example, I may have a marketing headline and tagline that gets used in multiple locations on a site, but this kind of reuse is usually not possible with a Git-based CMS.
-
Data models are difficult to enforce. Since the content is file-based, direct changes to the files in the Git repository can break the data model’s integrity, potentially causing the build to fail. For instance, the CMS may require that every blog post have an author defined in the front matter, but this cannot be enforced on direct file changes in the repository. If someone were to manually change the file and remove the author field, the site build would likely break.
-
Content relationships are difficult to maintain. Most Git-based CMSs have a way of defining the relationship between two pieces of content. For example, a blog post could be related to an author page with an author name and bio. However, there is generally no way to enforce these relationships, meaning that someone could remove the author page even though the posts assigned to it still exist.
9.1.2 Pros and cons of API-based headless CMSs
-
They’re designed for content reuse. This means both reusing content across multiple properties, including multiple sites or a site and a mobile app, and across the same site. To enable content reuse across different types of applications (e.g., mobile app and web app), API-based headless CMSs generally separate the content from the presentation (i.e., the content is not stored in HTML or formats like Markdown that only generate HTML). This allows the content to be used across different types of applications or different parts of the same application without worrying about how the content is displayed.
-
They enforce data integrity of the content. The content model can be designed to ensure not just that a content type always has certain fields, but that those fields contain the proper values. For example, I may want to ensure that a property of a content item is a number but also within a specific number range. The CMS provides tools for defining field validation that ensure the values are correct before a user is able to publish an item.
-
They enforce content relationships. Enforcing content relationships makes them easy to maintain. For example, it can ensure that a post always has an author and disallow removing an author that is assigned to published posts. The CMS is designed to prevent the removal of content that would damage the integrity of any references. The references would have to be removed or modified before the content could be deleted. They can also allow relationships within rich text or structured content, which are types of content that allow both rich formatting that isn’t tied to HTML and embedding of reusable content items defined within the CMS.
-
They can handle a complex content workflow. Git-based CMS systems usually only support a very basic workflow, but API-based systems can typically handle even complex and custom approval workflows for content.
-
They can be expensive. Many of these solutions are priced for companies, not individual developers. While they may have generous free tiers, the pricing can often escalate quickly.
-
They often have steep learning curves. Since these are designed to meet the needs of even large enterprises, they are often full of features that can make them a bit complex for the average content editor.
-
They are proprietary. There is a built-in vendor lock-in, largely because moving from one system to the other can be a complex and expensive project to undertake. This involves not only moving the content from one proprietary system to another, including data models, users, validation rules, and workflow. It also will involve major modifications to the site’s code, pulling out the SDK and/or completely overhauling the API calls that get content.
9.2 Exploring popular headless CMSs
Since we discussed the popular Git-based headless CMS in chapter 4, let’s explore some of the widely used API-based solutions. We’ll also look at some options to get started implementing them in some of the SSGs discussed throughout this book, although a full discussion of how to implement each headless CMS in each specific SSG is outside the scope of this chapter.
The first step in using any headless CMS is building a content model. Let’s look at how you’d build a content model in two different headless CMS options that have two distinctly different approaches in order to give you a sense of the different options available to you.
9.2.1 Contentful
In my opinion, one of the strongest selling points of Contentful (https://www.contentful.com/) is the ease with which you can define a content model. Its web-based visual interface is easy enough to use that the content model could be built by a nontechnical user.
Once you’ve logged into Contentful, you’ll need to create your first “space.” This is how Contentful groups projects. In the case of a Jamstack project, one space might be the backend for one site. However, a space can technically serve as the backend to any logical grouping of sites and apps. Keep in mind that Contentful currently provides only one limited space under its free plan.
Once you’ve created a space, you’ll need to add content types. Under the Content Model heading, click the blue Add content type button. This will open a window to give your type a name and an API identifier and description. The name can be anything you like. The API identifier is essentially a slug for your content type and will generate automatically, though you can customize it.
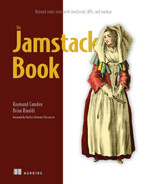
Once you’ve created a type, you’ll need to add fields to it. Every field must be assigned one of nine different types. Within Contentful’s system, each type has a limited set of validations that can be applied to them (figure 9.1).
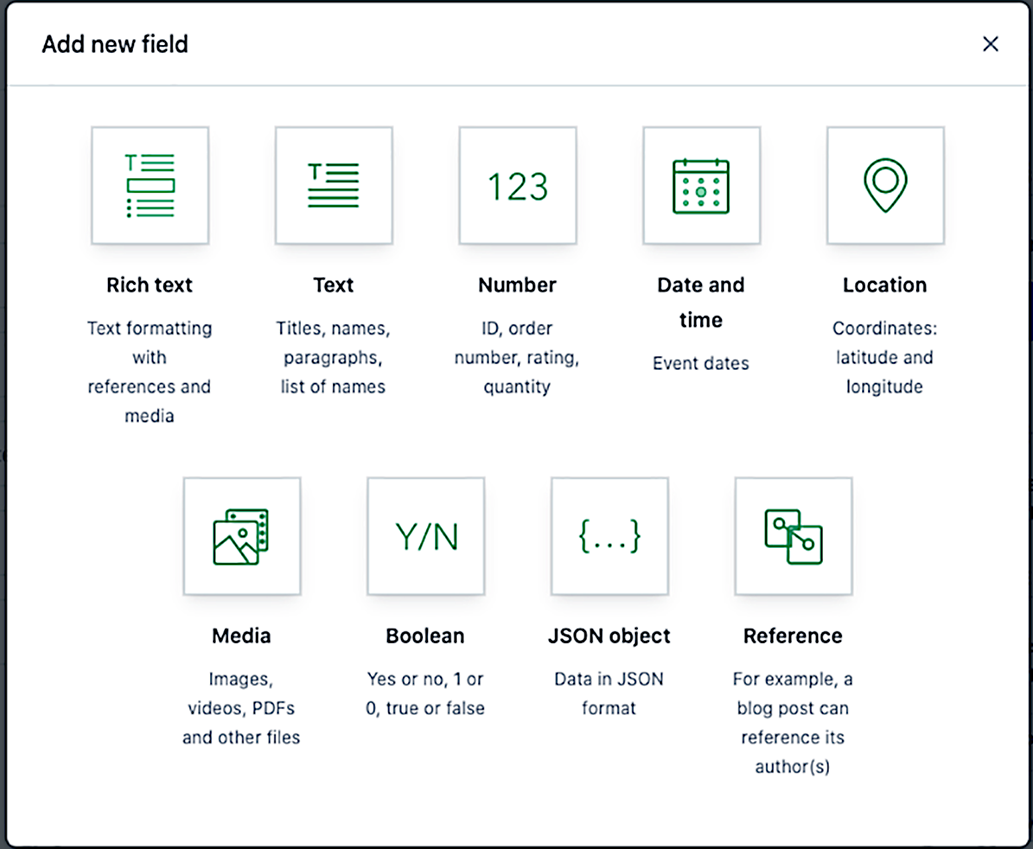
Figure 9.1 The nine different types of fields that Contentful provides
-
Rich text—It is important to note that this is not HTML, but rather the rich content stored in a JSON format that allows it to be converted to whatever format needed. This allows rich text to include embedded assets and entries within the rich text format. For the content creator, this will look and feel much like a standard WYSIWYG editing experience. There are quite a few validation options beyond simply making it required or limited to a specific character count, all of which relate to embedded links, entries, or assets.
-
Text—There are two types of standard text fields in Contentful: short text that is limited to 255 characters and long text of up to 50,000 characters. You can sort short-text fields and search for exact matches; while you cannot sort on a long-text field you can do a full-text search. Long text is primarily for the long-form content of an item, such as the blog post body or the author bio (either can be rich text as well). If you are storing Markdown content, you will use a long-text rather than rich-text field. The validation options include things like ensuring the text field matches a specific pattern (e.g., an email or a URL) or prohibiting specific patterns (e.g., preventing the use of swear words).
-
Number—This can be either an integer or a decimal. Validation can require that the value be unique (no two entries can have the same number), must be within a specific range, or can accept only specific values.
-
Date—Date does not have many options or validations, although you can limit it to dates within a specific range.
-
Location—This will be stored as latitude and longitude within Contentful, although content editors will be able to choose a location by address or location on a map. The only validation offered is to make this required.
-
Media—This is any type of media you’d upload, such as images or PDFs. You can choose to allow a single file or multiple files to be uploaded. Validation allows you to specify file size limits, accept only specific types of files, or limit image uploads to specific dimensions.
-
Boolean—This is a basic yes/no response. The only validation that can be set is to make it required.
-
JSON object—This allows the content editor to directly write a JSON object via a JSON editor. JSON validation is built into the editor. You can limit the number of properties the JSON object has via the validation.
-
Reference—This is a relationship to another content item within Contentful. For instance, a blog post may reference its author or authors. You can have a reference to a single item (a one-to-one relationship) or multiple items (a one-to-many relationship). Validation allows you to limit the option to a specific type (e.g., the author relationship would limit you to choosing content items of the author type).
Once you’ve built a content model, you and/or your content editors can begin adding content items to Contentful via the content editor, as shown in figure 9.2.

Figure 9.2 Editing content for a “blog post” content type within the Contentful admin UI
Contentful offers seven different APIs (http://mng.bz/raAe) for retrieving and managing content and assets. For the purposes of pulling data for the frontend of a Jamstack site, you’ll be primarily interested in three:
-
The Content Delivery API is a REST API that only allows you to retrieve published content. This is the primary API that you’ll use to pull content from when generating static pages for the published site. (See http://mng.bz/VlmW for more details.)
-
The Content Preview API is a REST API that allows you to pull unpublished changes to content. This is important to allow content editors to view what their changes to content will look like on the live site via a preview version of the site available at a different URL or available to logged-in users on the main site, for example. (See http://mng.bz/xvAg for more details.)
-
The GraphQL Content API is a GraphQL API that allows you to retrieve both published and unpublished content. This can take the place of the REST APIs, provided you are comfortable working with GraphQL. (See http://mng.bz/ Ax7g for more details.)
In most cases you probably won’t be directly interacting with the API and will be using one of Contentful’s provided SDKs (http://mng.bz/Zzv5) instead. For instance, you can integrate the JavaScript SDK (http://mng.bz/mxAM) with SSGs like Eleventy or Next.js. Gatsby already has a gatsby-source-contentful (http://mng.bz/5KRD) plug-in that is already designed to work with the GraphQL content API to enable both published and preview content. Next.js has an example that you can use as a starter (http://mng.bz/6ZR6).
Integrating with other traditional SSGs, like Hugo or Jekyll, requires a different approach since neither has a method for directly fetching content from an API nor for generating pages. However, there are tools that can provide ways to import your Contentful content into these tools. Contentful has a jekyll-contentful-data-import (http://mng.bz/oaAv) gem that can be used to import content into Jekyll. For Hugo, there is a contentful-hugo npm package (http://mng.bz/nYA4) that will pull all your Contentful content and convert it to Markdown.
9.2.2 Sanity
The experience of building a content model in Sanity is completely different from that of Contentful. Whereas Contentful primarily relies on its web-based GUI for building content models, Sanity’s content models are defined entirely in JavaScript code and managed via the Sanity CLI. (See table 9.1 for a comparison of the content types of Contentful and Sanity.)
Table 9.1 Comparing the different content types available within Contentful and Sanity
Sanity believes that defining content models in code can give you better control over the model while also enabling you to add your own custom validations. Nonetheless, it also means that building and maintaining the content model requires development resources, where alternatives that use a visual editor (like Contentful, for example) might not. In addition, Sanity deploys a new instance of Sanity Studio, its open source, web-based content management interface, with every project. Since you have access to the admin site code for the project, you are free to modify the interface however you choose, but the initial interface has fewer frills than the Contentful interface.
Sanity has 17 types compared to Contentful’s 9, but they are largely similar to Contentful’s types:
In many cases, where Contentful has subtypes, Sanity has multiple types. For example, Contentful has a single Reference type that refers to one-to-one and one-to-many relationships between content items. In Sanity, there is a Reference type as well, but it only refers to the one-to-one relationship. The one-to-many relationship refers to the Array type. Where Contentful has a single Media content type that refers to all types of media uploads, Sanity has a File and Image type for different types of media uploads.
Sanity also provides a structured text format similar to rich text in Contentful called Block. Sanity’s Block type follows the Portable Text specification (https:// github.com/portabletext/portabletext) for rich text, meaning it is made up of an array of subtypes that represent the types of content within the block. These can be standard types, like headings, lists, or links, but they can also be custom types. For instance, your content model may have an Employee type, and the block element for an Our Team page would allow you to add items of the Employee type.
Every content type in Sanity has properties such as whether it is readonly or hidden from the admin UI. All types share the same core properties, although some, like Block and Image, have additional properties that can be set. Each content type also has a set of predefined validations, such as whether the field is required or, in the case of Text, has a minimum, maximum, or specific length requirement. These validations vary per type. Sanity also allows you to specify a custom validation (http://mng.bz/voDr) on any type that is written as a JavaScript function. This means you can create complex validations that are not covered by the built-in validation types.
9.2.3 Defining a content model using Sanity
Since it is entirely code based and the editor UI can be run locally, the experience of building a content model using Sanity can be quite unique. Let’s walk through how to create a content model based on a Sanity-provided sample project and explore the sample schema code to give you a better sense of how Sanity works.
To create a Sanity project, you’ll need a Sanity account, and then you’ll use the Sanity CLI, which can be installed via npm. Then, you’ll initialize a new project:
npm install -g @sanity/cli
sanity init
If you haven’t logged in via the CLI yet, the CLI will open a browser window to authenticate you. After that you’ll be asked to either choose an existing project to launch, if you have one already, or create a new project. You’ll give your project a name and then choose if you want to use the default data set configuration (by default, the production data set can be queried without authentication). Next, you’ll choose an output path, which will default to the current project folder. This is where all the local files necessary to configure your Sanity schema and Sanity Studio will be placed. Finally, you can choose either a blank schema or start with a preexisting example:
> Movie project (schema + sample data)
  E-commerce (schema + sample data)
  Blog (schema)
  Clean project with no predefined schemas
The Movie project schema is a good beginner’s example for trying out Sanity, as it has both a simple schema and data to populate it. This offers you the opportunity to try out the studio without needing to manually populate it with data. You’ll want to answer yes when asked whether to import the sample data. Once the import is complete, run sanity start from the command line to start Sanity Studio. By default, it will run locally on http://localhost:3333.
All the files that make up the content model are in the schemas folder within the project. Let’s quickly explore the Person type defined in the person.js file in listing 9.1, and then we’ll dig into how it works.
Listing 9.1 The schema file defining a person content type in Sanity
import UserIcon from 'part:@sanity/base/user-icon'

export default {
  name: 'person',
  title: 'Person',
  type: 'document',
  icon: UserIcon,
  fields: [
    {
      name: 'name',
      title: 'Name',
      type: 'string',
      description: 'Please use "Firstname Lastname" format',
    },
    {
      name: 'slug',
      title: 'Slug',
      type: 'slug',
      options: {
        source: 'name',
        maxLength: 100,
      },
    },
    {
      name: 'image',
      title: 'Image',
      type: 'image',
      options: {
        hotspot: true,
      },
    },
  ],
  preview: {
    select: {title: 'name', media: 'image'},
  },
}
The name is the object name, while the title is what will appear in the navigation within the studio. The document type is a basic building block of types within Sanity. Content types can either be document or object. A document type is the type you’ll create and edit in the studio (i.e., they show up in the left-hand menu), whereas objects can be used to make up parts of a document (as in the castMember object type in this sample schema that contains a person with additional attributes that can be added to a movie). The icon is the icon that shows up in the left-hand navigation and is a visual cue for the type of content being created (in this case the user icon represents a person, as seen in figure 9.3).
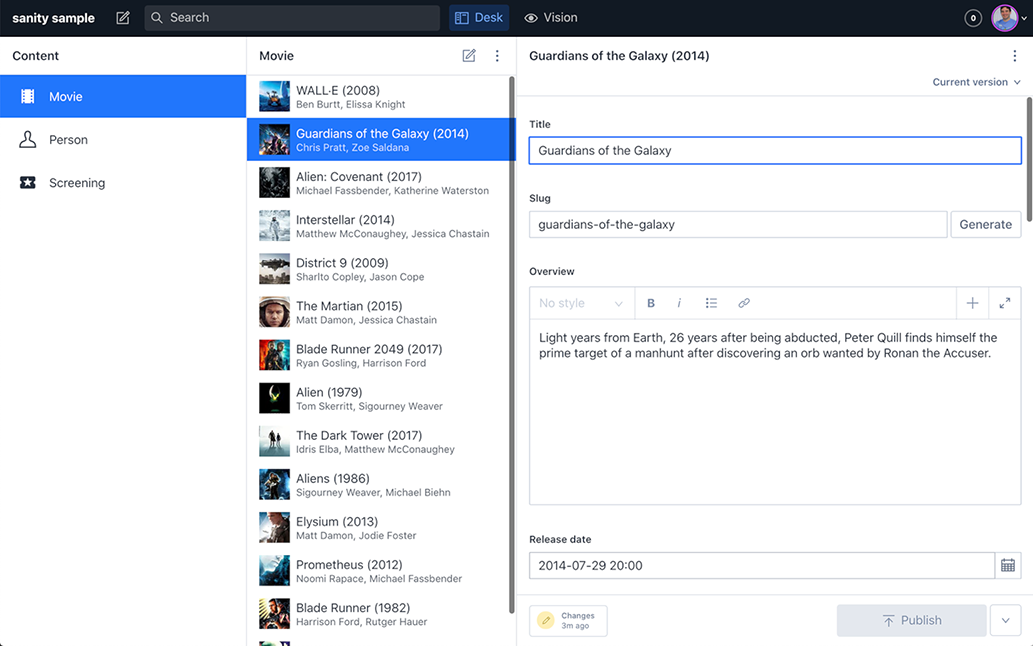
Figure 9.3 The default Sanity Studio editing experience. Sanity Studio is open source and customizable.
The fields are the different properties that our type contains. Each is assigned one of the 17 types. The options that can be defined in the options object vary depending on the type. For example, the slug type has a source option that will determine which field will be used to auto-populate a default slug value (in this case the person’s name).
The preview section determines what fields Sanity will display in the Sanity Studio navigation when listing objects of this type. Sanity will automatically make a best guess as to which fields to display, but you can supply this to customize the fields it displays.
Feel free to continue exploring the schema to learn how it was assembled and the various options for configuring a data model in Sanity. So far, we’ve set up the schema and studio locally. While Sanity’s system knows about it, we have not deployed it, and the studio is not available to other users. If we wanted to deploy the schema to Sanity and make the studio available, we’d run sanity deploy from the command line.
There are a number of example Jamstack projects that Sanity provides using SSGs, such as Next.js, Gatsby, Gridsome, Nuxt, and Eleventy. These provide examples of how to generate sites and previews using content stored in a Sanity project. All can be found at https://www.sanity.io/create.
9.3 Using WordPress
What’s WordPress doing in a book about Jamstack? If you’ve seen the many WordPress versus Jamstack posts and discussions in recent years, you’re probably thinking that you must choose one or the other. However, Jamstack doesn’t have any opinions about what backend you choose, and, it turns out, WordPress offers a REST API that makes it a perfectly good backend for Jamstack sites.
It’s true that the typical development scenario with WordPress involves a tightly coupled frontend and backend, but WordPress also brings a highly polished content editing experience that many content writers are already comfortable with and, in fact, may already be using. Rather than force them to move, there are a lot of options you can leverage to build a Jamstack frontend tied to a WordPress backend.
While you can integrate any Jamstack frontend with the Wordpress API, Gatsby, a very popular React-based SSG, has made it easy for developers to connect Gatsby to WordPress. Let’s look at how you’d connect a Gatsby site to a WordPress instance. Don’t worry if you don’t have a WordPress backend set up; we’ll walk through how to easily set up a local one.
9.3.1 Installing WordPress locally with Local
Let’s get a WordPress instance set up first. If you already have WordPress installed, feel free to use that for this walkthrough and skip the setup (jump to “Setting Up the Gatsby Plug-Ins”). You’ll need to be able to install plug-ins, which some hosts restrict.
One of the easiest ways to set up a local instance of WordPress is with a tool called Local (https://localwp.com/). While there is a paid pro version, you’ll only need the free version for this walkthrough. Once installed, open Local and click the button to add a new site. You can name it whatever you’d like. I named mine “gastby-sample.” Then you can choose the default “Preferred” environment. The final step is to choose a username and password for your site admin.
Local will set up the entire WordPress instance, with the MySQL database, and give you the site details. You can view the site running locally on your machine by clicking Open Site, or you can access the backend of your site running locally by clicking Admin. For now, open the admin.
9.3.2 Installing the Gatsby plug-ins for WordPress
In order to serve as a frontend to a WordPress backend, Gatsby requires two plug-ins to be installed:
-
WPGraphQL (https://github.com/wp-graphql/wp-graphql)—The purpose of this plug-in is to take the REST API of WordPress and enable it for GraphQL (https://graphql.org/). Gatsby’s data layer, which supplies the content that Gatsby uses to generate a site, is entirely based on GraphQL. Once enabled, your site will have a GraphQL API available at https://[YOUR_SITE_NAME]/ graphql. For example, my site, running locally on Local, has a GraphQL API URL of http://gatsbysample.local/graphql.
-
WPGatsby (https://wordpress.org/plugins/wp-gatsby/)—The primary purpose of this plug-in is to monitor changes on your WordPress site to keep your Gatsby frontend in sync with changes made in the WordPress backend. This plug-in monitors changes to things like posts or menus and calls a web hook in your Gatsby site to trigger a rebuild with the new information. It also enables WordPress previews to work with Gatsby pages. It is optional for our walkthrough, as it requires integration with your chosen deployment platform, like Netlify, Vercel, or Gatsby Cloud.
To install these plug-ins, open your site in Local and click on the Admin button. This will open your WordPress site’s admin panel. You’ll need to log in using the credentials you created earlier in the WordPress setup process using Local. Once you log in, click Plugins in the left-hand menu and then click the Add New button. In the search box, enter the names of the plug-ins, WPGraphQL (figure 9.4) and WPGatsby, and then click Install Now for each.
Figure 9.4 The WPGraphQL plug-in converts WordPress to work with Gatsby. This card will appear in the plug-in search UI within WordPress.
Once WPGraphQL is installed, you should see a GraphQL menu item added to the left-hand menu. Open that to view the plug-in settings, as shown in figure 9.5.
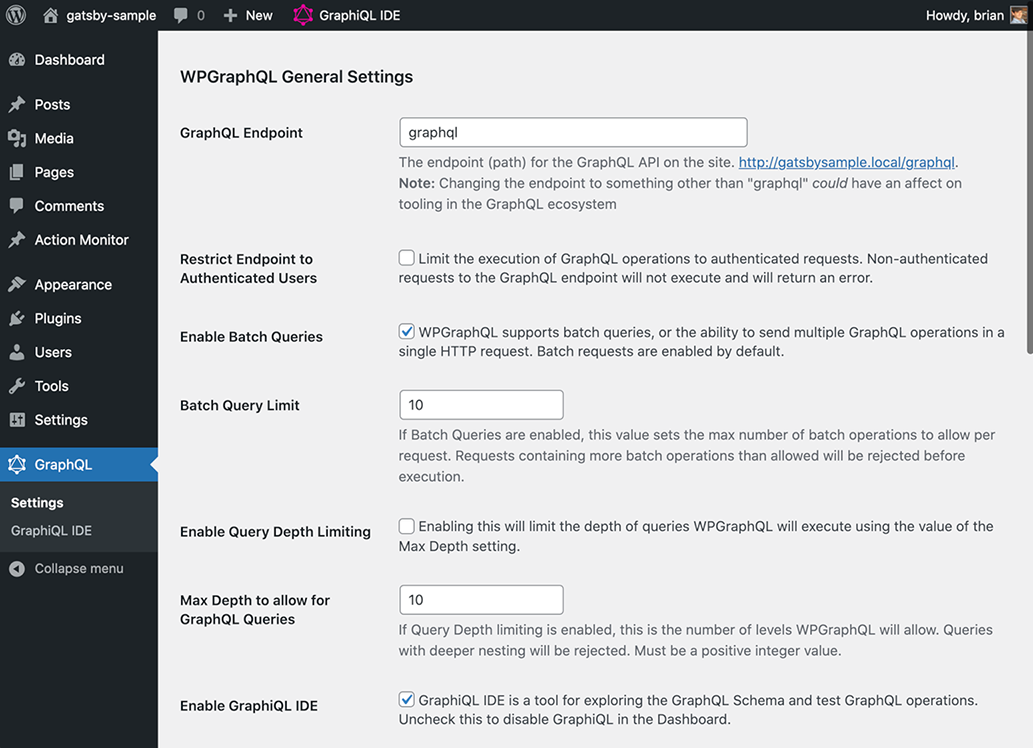
Figure 9.5 The plug-in settings screen for WPGraphQL within the WordPress admin allows you to set the endpoint location and change how your GraphQL endpoint will work.
Make note of the GraphQL endpoint URL linked beneath the GraphQL endpoint setting. This is the endpoint our Gatsby frontend will connect to. For example, mine is http://gatsbysample.local/graphql. While you are testing, you can also scroll down and check the Enable GraphQL Debug Mode box. This will enable debug information to be returned by GraphQL queries during development.
By default, WPGraphQL also added a GraphiQL IDE query editor to your WordPress admin, which is available via the GraphiQL IDE menu item on the top navigation bar. Click that to open a query editor and test GraphQL queries against your WordPress data.
The full schema that you can query against will load in the Explorer on the left. It’s pretty complex, but the Explorer lets you click around and create queries. Feel free to review this more on your own, but for now let’s test it with a query similar to what we’ll use in our simple example Gatsby app.
Listing 9.2 A query to get WordPress content from WPGraphQL
query MyQuery {
  posts {
    edges {
      node {
        title
        author {
          node {
            name
          }
        }
        slug
        excerpt
        content
      }
    }
  }
}
Click the play button (i.e., the right arrow) above the query editor to run the query.
Listing 9.3 The results returned by the query in listing 9.2
{
  "data": {
    "posts": {
      "edges": [
        {
          "node": {
            "title": "Hello world!",
            "author": {
              "node": {
                "name": "brian"
              }
            },
            "slug": "hello-world",
            "excerpt": "<p>Welcome to WordPress. This is your first post.
             ➥ Edit or delete it, then start writing!</p>
",
            "content": "
<p>Welcome to WordPress. This is your first post.
             ➥ Edit or delete it, then start writing!</p>
"
          }
        }
      ]
    }
  },
  "extensions": {
    "debug": []
  }
}
Figure 9.6 shows how this looks in the GraphiQL IDE.

Figure 9.6 Querying the GraphQL API generated by WPGraphQL within the GraphiQL interface, inside the WordPress admin
That’s all we need to do to set up WordPress. Feel free to populate the site with some posts or simply proceed using the default posts that WordPress provides.
9.3.3 Setting up Gatsby
There are a number of Gatsby starters that are designed to work with WordPress and will jumpstart your project. You can find those by going to the Gatsby Starters page (https://www.gatsbyjs.com/starters) and filtering by “CMS: WordPress.” However, for the sake of better understanding how all this works, we’re going to write our own simple Gatsby landing page that will list the posts within our local WordPress site.
Before we can connect Gatsby to WordPress, we’ll need to initialize a new Gatsby project using the CLI. To do this, open your project directory and run the following command (we’ll specify the folder we want the Gatsby project created in during the setup process):
npm init gatsby
This will run create-gatsby, which will ask you a series of questions via the command line to configure your new Gatsby site. Here are the responses you’ll need to create our sample project, which are illustrated in figure 9.7:
-
What would you like to name the folder where your site will be created? gatsby-wordpress.
-
Will you be using a CMS? Use your arrow keys to choose WordPress.
-
Would you like to install a styling system? No (or I’ll add it later).
-
Would you like to install additional features with other plugins? Use the arrow keys to scroll down and choose Done.
-
Configure the WordPress plugin. This is the GraphQL endpoint we noted from the GraphQL settings within our local WordPress instance. For example, mine is http://gatsbysample.local/graphql.

Figure 9.7 The Gatsby CLI provides a step-by-step setup process for a new Gatsby site.
This will start the process of generating the default files for our Gatsby site in the gatsby-wordpress directory. Once this is done, change the directory to the project folder and start Gatsby. Note that, due to an issue with the process in creating our Gatsby app, we may need to install the gatsby-plugin-sharp and gatsby-transformer-sharp plug-ins before running Gatsby:
cd gatsby-wordpress
npm install gatsby-plugin-sharp gatsby-transformer-sharp
npm run develop
Once the build is done, we can view our site at http://localhost:8000/, which should look like figure 9.8.

Figure 9.8 The default home page of the site generated by Gatsby’s CLI
9.3.4 Exploring Gatsby’s data layer
Before we begin coding, let’s explore Gatsby’s data layer. Gatsby prefers to get all data for your application from a GraphQL-based data layer. We can view the data and queries available in this data layer when our site is running locally by going to http://localhost:8000/graphql. Let’s open that in a new browser window.
Since we already explored the GraphiQL editor that WPGraphQL provided, this should look somewhat familiar. In this case, the queries in the Explorer panel include all of Gatsby’s default data queries as well as a number of WordPress queries. The latter were added to Gatsby’s data layer because we chose WordPress as our CMS during the site creation process.
Feel free to explore the queries available, but for now, let’s test the query we’ll use to populate data on our home page. Enter the query in the query editor and click the Play button to run it.
Listing 9.4 A query to retrieve WordPress content from within Gatsby’s data layer
{
  allWpPost {
    edges {
      node {
        title
        author {
          node {
            name
          }
        }
        slug
        excerpt
        content
      }
    }
  }
}
This query is very similar to the one we ran inside the WordPress GraphiQL editor, except that it uses the allWpPost query that it is provided by Gatsby’s data layer.
Listing 9.5 The results returned from the query in listing 9.4
{
  "data": {
    "allWpPost": {
      "edges": [
        {
          "node": {
            "title": "Hello world!",
            "author": {
              "node": {
                "name": "brian"
              }
            },
            "slug": "hello-world",
            "excerpt": "<p>Welcome to WordPress. This is your first post.
             ➥ Edit or delete it, then start writing!</p>
",
            "content": "
<p>Welcome to WordPress. This is your first post.
             ➥ Edit or delete it, then start writing!</p>
"
          }
        }
      ]
    }
  },
  "extensions": {}
}
Perfect! We’re ready use this data in our home page.
9.3.5 Consuming WordPress content in Gatsby
Open the project files in your code editor. The root project folder contains a gatsby-config.js that was generated for us during the creation process. It contains the name of the site that we specified as well as the WordPress plug-in configuration that we provided with our GraphQL endpoint URL. If we were to deploy our WordPress instance, this is where we’d update the endpoint URL:
module.exports = {
  siteMetadata: {
    title: "Gatsby Wordpress",
  },
  plugins: [
    {
      resolve: "gatsby-source-wordpress",
      options: {
        url: "http://gatsbysample.local/graphql",
      },
    },
  ],
};
The source of our site is under the src directory. Within that directory, the pages for our site are within the pages directory. We only have a home page (index.js) and a 404 page (404.js). Let’s open index.js and make some changes.
The page uses data that is defined inline as a links array and is right below the styles. We won’t need that, so let’s remove it. Let’s also remove the code to render the links list from the markup so that our IndexPage markup looks like the following:
// markup
const IndexPage = () => {
  return (
    <main style={pageStyles}>
      <title>Home Page</title>
      <h1 style={headingStyles}>My Blog</h1>
      <ul style={listStyles}></ul>
    </main>
  );
};
At this point, our page isn’t rendering anything but a h1 with the text “My Blog.” Before we can render the list of posts, we need to make the data available to the page. Let’s create the query that will be run against Gatsby’s GraphQL data layer directly beneath the export default IndexPage line. This query will look familiar, as it is the same one we tested earlier when exploring Gatsby’s data layer.
First, we need to add an import at the top of our index.js file:
import { graphql } from 'gatsby';export const pageQuery = graphql`
query IndexQuery {
allWpPost {
edges {
node {
title
author {
node {
name
}
}
slug
excerpt
content
}
}
}
}
`;Next, let’s make the data from this query available to the page. First, we need to add another import at the top of the index.js file:
import PropTypes from 'prop-types';
Then we can tell our Gatsby page about the data we’re providing via our allWpPost query. The PropTypes library is type checking to ensure the data matches what we expect. Place the following code after the export default IndexPage line:
IndexPage.propTypes = {
  data: PropTypes.shape({
    allWpPost: PropTypes.shape({
      edges: PropTypes.array,
    }),
  }),
};
Now we can update our markup to output the results from the query. The code destructures data from our page props and then uses the array of items within data.allWpPost, which contains the results of our query, to output our posts as a list with excerpts. Note that we have to use dangerouslySetInnerHTML to display the excerpt content because it is returned as HTML. This property is named this way because doing so makes DOM changes outside the scope of React’s virtual DOM, which is fine for our purposes but should generally be done judiciously.
Listing 9.6 Outputting a list of WordPress blog posts within Gatsby
// markup
const IndexPage = ({ data }) => {
  return (
    <main style={pageStyles}>
      <title>Home Page</title>
      <h1 style={headingStyles}>My Blog</h1>
      <ul style={listStyles}>
        {data.allWpPost.edges.map((post) => (
          <li key={post.node.slug}>
            <span>
              <a style={linkStyle} href={post.node.slug}>
                {post.node.title}
              </a>
              <p
                dangerouslySetInnerHTML={{ __html: post.node.excerpt }}
                style={descriptionStyle}
              ></p>
            </span>
          </li>
        ))}
      </ul>
    </main>
  );
};
Our updated home page running in the browser should look like figure 9.9, with the one post from our default WordPress install displayed, along with an excerpt from the post.
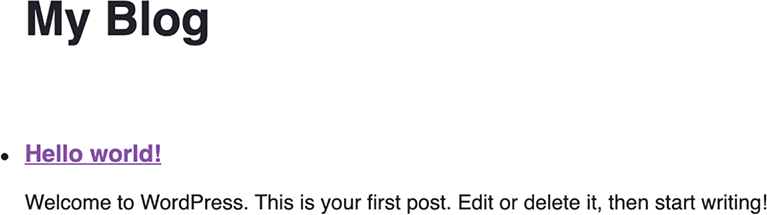
Figure 9.9 The edited blog home page outputs the blog posts and descriptions within our WordPress instance. By default, WordPress installs with a single dummy post. Add more posts to see them appear.
9.3.6 Next steps in using WordPress as a headless CMS
We’re using WordPress as a CMS to populate our Gatsby site. The next step in building this application is to create the dynamic route to handle displaying the individual WordPress posts in Gatsby. While we won’t cover that here, I encourage you to explore more about how to integrate Gatsby and WordPress via Gatsby’s WordPress guide (https://www.gatsbyjs.com/guides/wordpress/), or this tutorial on CSS-Tricks (http://mng.bz/4jEv) covering the Gatsby WordPress source plug-in.
It is important to remember that the WordPress REST API can be consumed by any Jamstack frontend, whether Gatsby or not. In fact, the GraphQL endpoint provided by the WPGraphQL plug-in can be consumed outside of Gatsby as well, using either Eleventy or Next.js, for example. While Gatsby provides some built-in connections for WordPress, WordPress is also a valid headless CMS backend for just about any Jamstack site, regardless of what SSG you choose.
9.4 Connecting a CMS using a site builder
Up to now, we’ve talked about ways you can connect a headless CMS using some of the starters that are provided by either the SSG or the headless CMS provider itself. We also looked at how to connect your own using WordPress. However, there is one more route I want to explore, which is using a site builder like WeWeb (https://www.weweb.io/), Strattic (https://www.strattic.com/), or Stackbit (https://www.stackbit.com/).
Site builders like these go a few steps beyond what a starter template provides by customizing the site that it generates based on your needs and providing web-based tools for either technical or nontechnical resources to edit that site. They also allow you to integrate the content management via popular existing headless CMS providers.
Keep in mind that these services are generally free to start but do charge you once you reach usage caps or want to lift feature restrictions.
9.4.1 WeWeb
WeWeb is a Vue-based site generator, so it does not rely on an SSG, that can generate a site that is fully editable directly in the browser. This means that you aren’t simply editing text content but can also add and rearrange elements on the page from within its web-based WYSIWYG editor (figure 9.10).
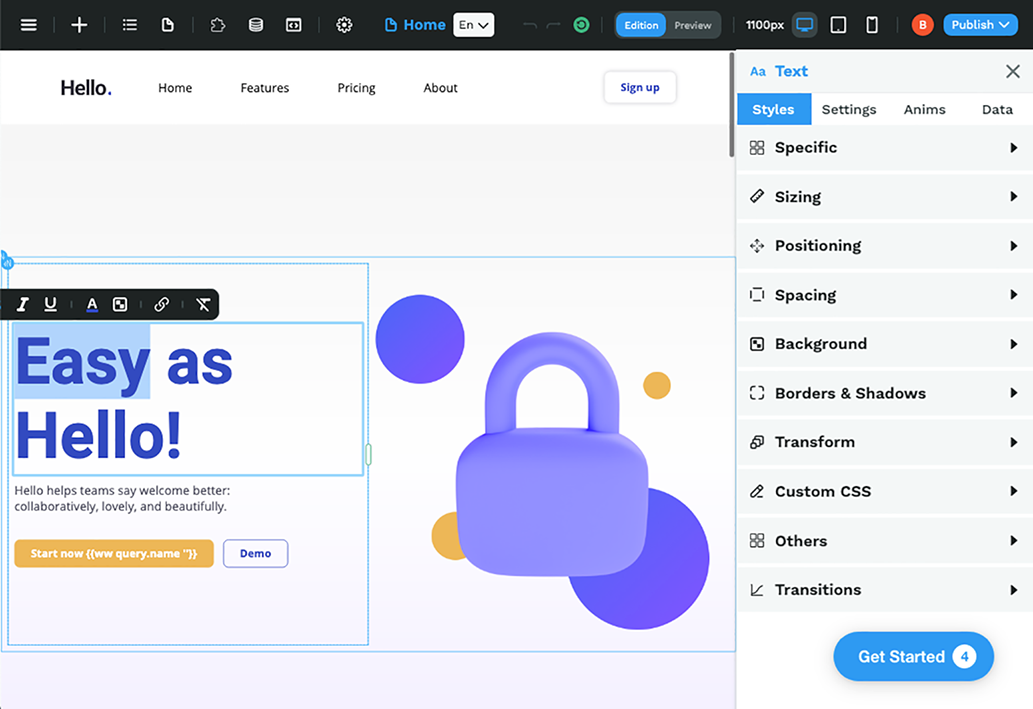
Figure 9.10 The WeWeb admin UI allows you to edit the text on the page and the properties that affect the look and feel of the web design.
You can build and customize a site based on prebuilt templates that WeWeb provides or start from a blank site. In both cases, you’ll be able to utilize the preexisting site components to create and modify your site. These components allow for dropping in common website elements like contact forms or rich text. You can also create and upload your own custom WeWeb components to use.
WeWeb has built-in connections to a number of headless CMS offerings, including Strapi, Ghost, or WordPress. Other data sources it provides are Airtable, any REST API, Google Sheets, any RSS Feed, any GraphQL endpoint, an SQL database, or any endpoint you can connect to using JavaScript.
9.4.2 Strattic
Strattic takes a very different approach to building a Jamstack site connected to a CMS. Essentially, Strattic deploys a full WordPress setup for you on its servers. You manage content as you normally would via the WordPress admin. Strattic even supports most standard WordPress themes and many plug-ins, though due to the nature of the static site files, you’ll want to check compatibility (http://mng.bz/QW6Q) with your favorite plug-ins first.
When you are ready to publish, you use the installed Strattic plug-in to deploy a Jamstack version of the site to Strattic’s servers (figure 9.11). The site looks and feels just like a WordPress site, but it is built with static files and serverless APIs. These serverless APIs make things like site search, comments, forums, and other dynamic functionality work.

Figure 9.11 The Strattic WordPress plug-in provides several publishing options for your site. Once the static site code is generated and deployed, you’ll be able to view it running on Strattic’s servers.
Keep in mind that even though this is a Jamstack site, by most people’s definition, you don’t have access to the frontend files. However, Strattic does give you SFTP access to the WordPress PHP files. Strattic offers a free trial but requires a paid account after that expires.
9.4.3 Stackbit
Stackbit follows a more traditional Jamstack approach than WeWeb in that it leverages SSGs within its site builders. In fact, it supports multiple SSGs as well as multiple headless CMS options. The site builder is free to use, and the code is pushed to your own GitHub account and deployed on your Netlify account. However, the optional site editing suite does require a paid account to use a number of the features.
The first step in building a Jamstack site using Stackbit is to choose a theme (figure 9.12). There are 17 different themes to choose from as of this writing, based on a number of archetypes, such as a blog or e-commerce. You can add a custom theme, but this does require the proper stackbit.yaml configuration file that tells Stackbit how to map the content on your page to the content in a CMS.
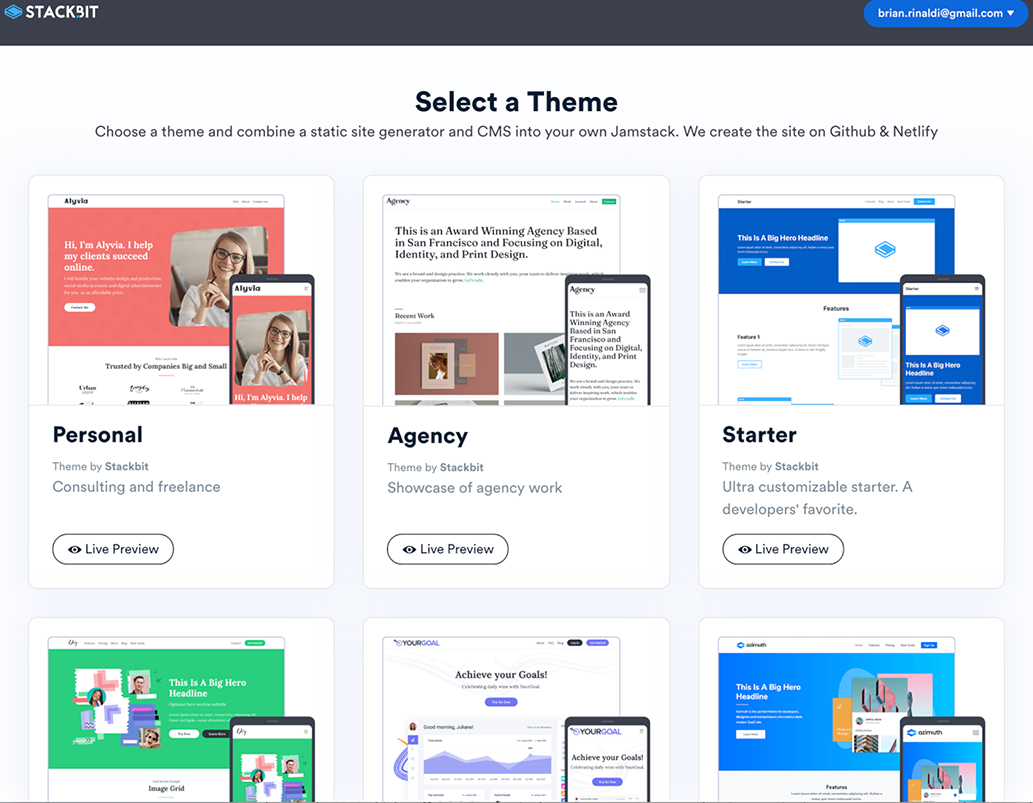
Figure 9.12 The first step in generating a Jamstack site using Stackbit is choosing one of its 17 available themes or uploading a custom theme of your own.
Next, you are brought to a summary screen that allows you to modify the other default site build options, as seen in figure 9.13. The default SSG is Next.js; however, you can also choose Jekyll, Hugo, or Gatsby. It’s worth noting that not all the available headless CMSs are currently compatible with Next.js within Stackbit’s system.
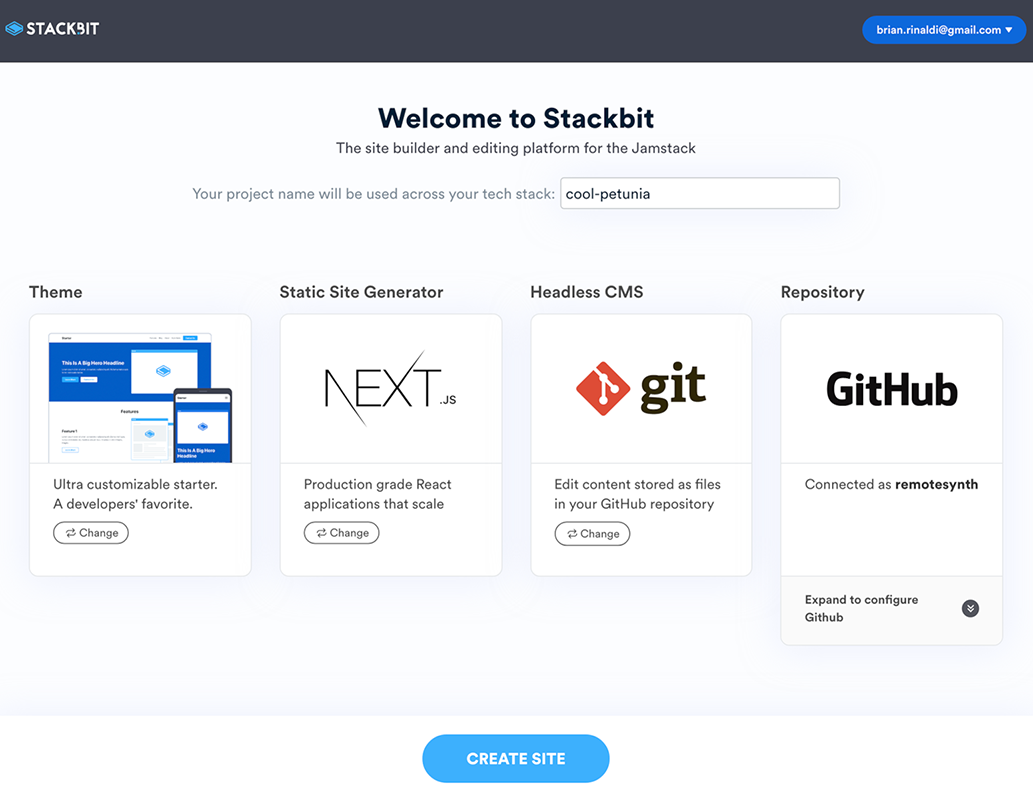
Figure 9.13 Once you’ve chosen a theme, you can customize the SSG and headless CMS that Stackbit will use. All the code will be pushed to your connected GitHub account.
The default CMS is Git. This is a pure Git-based CMS that manages content directly in your connected Git repository. It handles draft and preview changes within Stackbit’s editor by maintaining a separate branch for unpublished changes. While this option is completely free, you’ll want to consider whether a Git-based CMS is the right fit for your project, and you’ll likely require a paid Stackbit account if you have multiple content contributors/editors.
The other headless available options are Sanity, Contentful, Netlify CMS, Dato CMS (an API-based CMS), and Forestry (a Git-based CMS).
You’ll need to connect Stackbit to your GitHub account in order to create a site, but, once that is complete, clicking the Create Site button will generate all the site files using your chosen theme and SSG, as well as provision your headless CMS and populate some default content. If you’ve connected your Netlify account, it will also deploy on Netlify. When the site is done generating and deploying, you’ll be brought into Stackbit’s content editor. The editor is free to use for one user, with some feature limitations, but it’s worth noting that the editor is entirely optional. You can modify your code directly in GitHub, and your content directly in your chosen CMS.
9.5 What’s next?
We’ve explored a few different options available to you when choosing a headless CMS, and even looked at some tools and resources for integrating these. As we discussed in the beginning of the chapter, there are about 87 different options for headless CMS, so it may feel overwhelming to make an informed choice. Here are just a handful of questions to ask yourself to help refine the options worth evaluating:
-
Does the file-based editing of a Git-based headless CMS fit my project, or do I need the added flexibility of an API-based headless CMS? We discussed the pros and cons of each earlier in the chapter to help you decide which option best suits your project.
-
Does the solution need to be open source? If so, a solution like Netlify CMS or Strapi is worth investigating. You can find other open source options by going go Jamstack’s list of headless CMSs and filtering by open source licenses.
-
Do we have an existing CMS that I can leverage as headless (e.g., WordPress)? If so, do we want to continue to maintain and manage the CMS ourselves or consider moving to a hosted third-party service? In many cases, when it is possible, keeping your existing CMS will be the most straightforward solution, as it doesn’t require retraining all of the content contributors on a new system. This can also ease getting buy-in on moving to the Jamstack from other stakeholders.
-
Does the editing experience meet the needs of my content editors? How difficult will it be for them to learn? If a user hasn’t worked in Markdown before, it can be a difficult transition. If a user is used to page-based editing (like in WordPress), then a move to a modular system used by an API-based CMS can take some time and training. It may be that these difficult transitions for content contributors are unavoidable, but you should at least be aware of them and plan for them.
-
Does the CMS offer integrations with my SSG that will reduce the difficulty of connecting our Jamstack frontend to the headless CMS? Not every CMS has templates for every SSG, but many do. Be sure to investigate whether a prebuilt integration already exists before you start building one from scratch.
Obviously, there will be more questions specific to the needs of your project and your team, but even just asking these five will, hopefully, help you narrow down the options before evaluating them.
For a good list of additional considerations when choosing a headless CMS, check out “How to Choose a Headless CMS” by Emmanuel Tissera in Smashing Magazine (http://mng.bz/aD57).
Summary
-
There are two main types of headless CMSs: Git-based and API-based. Git-based CMSs store content in files that are managed within your Git repository and edited via an admin UI. API-based CMSs store and edit the content within their systems and provide it to your application via an API.
-
The primary benefit of a Git-based headless CMS is cost. The primary benefit of an API-based headless CMS is the ease of content reuse.
-
Contentful is a popular API-based headless CMS that is configured and managed entirely via its admin UI. Sanity is another popular API-based headless CMS, but it is configured entirely via JavaScript and edited via the open source Sanity Studio.
-
WordPress provides an API that can be used as the backend for a Jamstack site. Gatsby provides a number of tools for integrating the API into the Gatsby data layer that provides all the data and content for generating sites using Gatsby. We walked through getting a local WordPress site connected to a new Gatsby site using these tools.
-
Site builders offer an easy, though generally not free, way to generate a Jamstack site that can connect to a variety of headless CMSs. We explored three site builders: WeWeb, Strattic, and Stackbit.