
4. Snap!: The Xoom’s Cameras
About ten years ago, someone decided that digital cameras should become standard in cell phones. Seemingly overnight, and probably due to the relatively low cost, digital cameras became basic cell-phone features. This one simple change altered the way that news was gathered. Today, anyone with a cell phone in hand can capture a still picture—or, better yet, video—of any event that occurs in front of him or her.
Now fast-forward through multiple generations of phones and other small devices to the Motorola Xoom tablet computer, which has not one but two fancy cameras for your enjoyment. Why does a tablet need two cameras? That’s a good question, and I’m not sure that I can answer it adequately here. Suffice it to say that the dual cameras let you use the Xoom as a video recorder, a still camera, and a webcam (showing off your pearly whites as you use the device).
In this chapter, I look at the Xoom’s cameras and their built-in software.
Exploring the Xoom’s Cameras
The Xoom has two built-in cameras: one front-facing and the other rear-facing. These two cameras allow you to take pictures and capture video by using the screen as a viewfinder, as well as take pictures of yourself using the screen as a viewfinder (because the camera is pointing right back at you). What’s more, the front-facing camera lets you stream video to the Web or engage in video phone calls over the Internet or via Skype.
Skype is a free online service that allows users to talk over the Internet from anywhere in the world. It also supports video chat so that people can speak face to face. You can obtain Skype through the Android Market or at www.skype.com.
The rear-facing camera
The rear-facing camera is the deluxe one of the Xoom’s two cameras. Its 5-megapixel capability means that it’s possible to take some reasonably nice pictures with it. That said, it’s unlikely that you’re going to be winning any photo contests using the Xoom as your primary digital camera, but a 5-megapixel camera is good enough to capture some decent shots. The rear-facing camera also has a dual LED (light-emitting diode) flash ![]() so that it can take pictures in the dark.
so that it can take pictures in the dark.
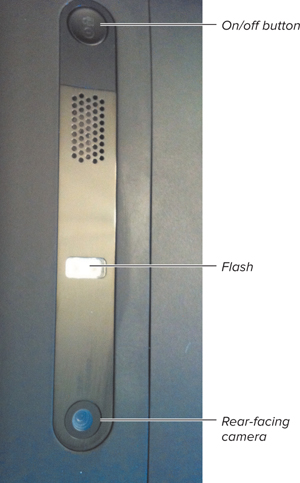
![]() The camera lens and dual LED flash.
The camera lens and dual LED flash.
The front-facing camera
The front-facing camera sits dead center along the top edge of the Xoom. It faces you so that you can project your face to someone you’re communicating with over the Internet via Skype or some other communication program. This camera is also very handy for taking pictures of yourself, of course, or even for seeing what’s behind you while you’re looking into the Xoom’s screen.
With 2-megapixel capability, the front-facing camera isn’t as powerful as the rear-facing camera. Also, it doesn’t have a flash, which means that it can capture pictures only when there’s adequate light.
Opening the Camera App
As straightforward as the Xoom’s camera software is, the various icons in the Camera app ![]() have particular functions.
have particular functions.
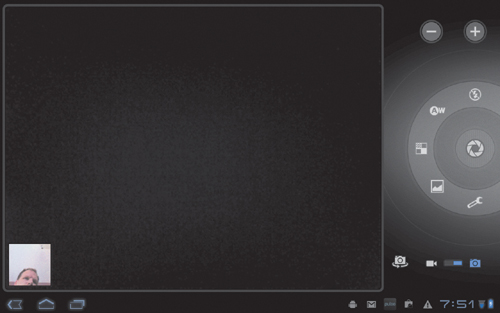
![]() The Camera app’s icons.
The Camera app’s icons.
To open the photo software
- Touch and hold an open area of the home screen
 .
.
 Home screen.
 - Pull the screen to the left, as shown in
 , so that a new home screen slides over.
 Pull the home screen to the left.
 - Touch the Camera icon
 .
.
 Find the Camera icon, and touch it.
Voilà! The Camera app
 opens.
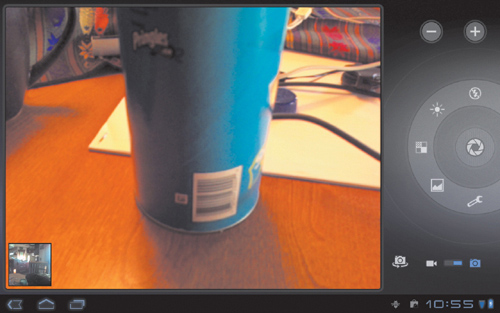 The Camera app opens.
Configuring Camera Settings
Although the Xoom’s cameras are never going to be mistaken for state-of-the-art photojournalism devices, they do have some remarkable capabilities when you consider just what they are, not to mention where they are (in a thin but powerful computer). This section shows you how to get the most from your Xoom’s cameras through adjusting the various photographic parameters available.
Accessing the Xoom’s Camera Settings panel
The settings portion of the Xoom’s camera controls deal with basics like picture size and quality, as well as where the photos are stored in memory, how the exposure is set, and whether you focus the camera yourself or let the Xoom do it for you.
To open the Camera Settings panel
- If the Camera app isn’t already open, complete the steps in “To open the photo software” earlier in this chapter.
- Touch the Settings icon
 .
.
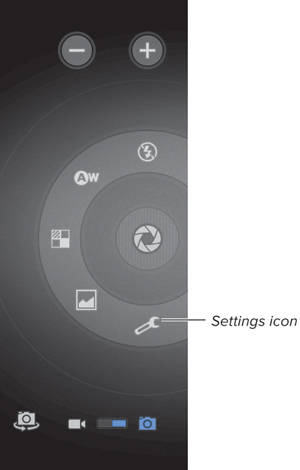 Touch the Settings icon.
The Camera Settings panel
opens.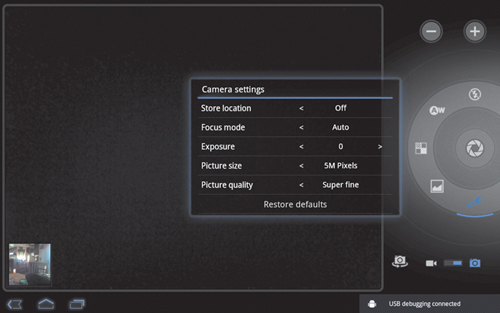 Camera Settings panel.
This panel displays five categories:
• Store Location. This option is a toggle (On or Off).
• Focus Mode. You can set this option to Auto, Infinity, or (for those close-up shots) Macro.
• Exposure. Set this option from –2 to +2 to adjust for lighting.
• Picture Size. Your choices include VGA and 1, 2, 3, 4, or 5 megapixels. The VGA option sets the lowest resolution; the 5M Pixels option sets the highest resolution.
• Picture Quality. Your choices are Normal, Fine, and Super Fine.
Setting effects and balance
Several effects and balance settings are available to you:
• Scene mode. The Xoom’s Camera app has some cool preset scene modes available. Scene modes make taking pictures easier because they automatically adapt the camera to the lighting that’s expected in each setting.
• Color effect. You can apply color effects applied to a picture before you take it. (Very cool.)
• White balance. The white-balance setting allows you to adjust the white balance of a shot before you take it.
White balance is the process of removing unrealistic colors so that white colors that look white to human eyes (and brains) look white to the camera too.
To set a scene mode
- If the Camera app isn’t already open, complete the steps in “To open the photo software” earlier in this chapter.
- Touch the Scene Mode icon .
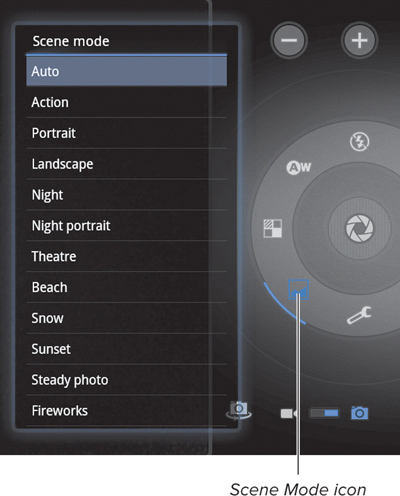 Touch the Scene Mode icon.
The Scene Mode panel opens, as shown in
. Your choices are Auto, Action, Portrait, Landscape, Night, Night Portrait, Theatre, Beach, Snow, Sunset, Steady Photo, and Fireworks. The Scene Mode panel lists 12 categories.
To set a color effect
- If the Camera app isn’t already open, complete the steps in “To open the photo software” earlier in this chapter.
- Touch the Color Effect icon .
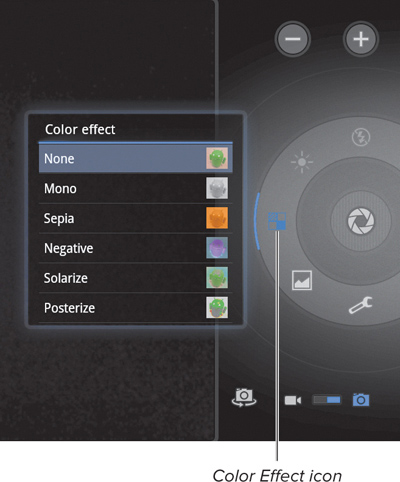 Touch the Color Effect icon.
The Color Effect panel opens, as shown in
 . It lists six options: None, Mono, Sepia, Negative, Solarize, and Posterize.
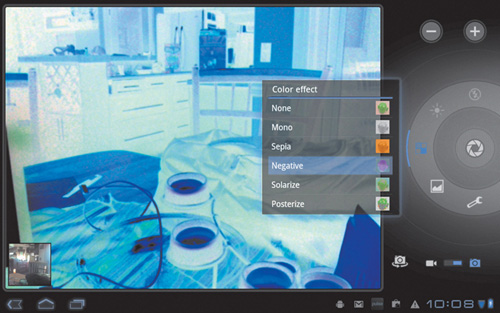 Color Effect panel.
To set white balance
- If the Camera app isn’t already open, complete the steps in “To open the photo software” earlier in this chapter.
- Touch the White Balance icon
 .
.
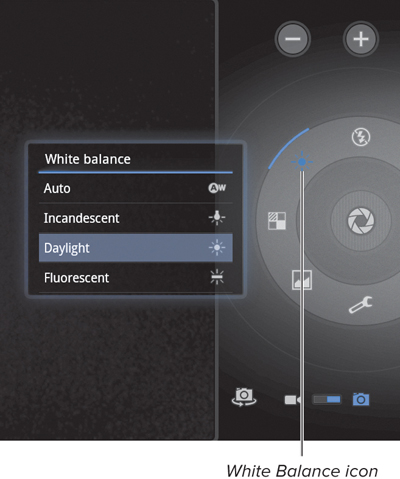 Touch the White Balance icon.
Depending on what white-balance mode is active, this icon changes. In automatic mode, the icon reads A/W; in manual mode, the icon looks like a sun (
 ).
).The White Balance panel opens, as shown in
 .
.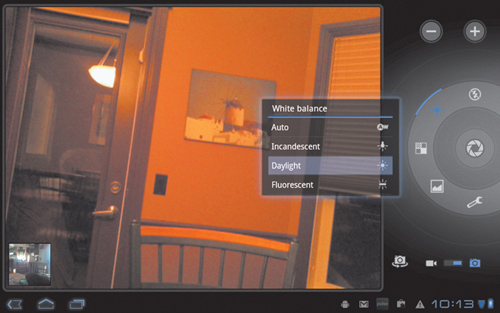 White Balance panel.
This panel lists four categories:
• Auto
• Incandescent (warm feel)
• Daylight (deep colors)
• Fluorescent (cool feel)
Taking Still Photos
The Xoom’s built-in camera software is highly intuitive and very usable, letting you take both still pictures and video, including HD video. In this section, I cover taking still photos.
To take a picture
- If the Camera app isn’t already open, complete the steps in “To open the photo software” earlier in this chapter.
- Line up a shot in the Xoom’s viewfinder, as shown in .
 Line up a shot.
 - Touch the Flash icon to open the Flash Mode panel, and set the appropriate option (On, Off, or Auto).
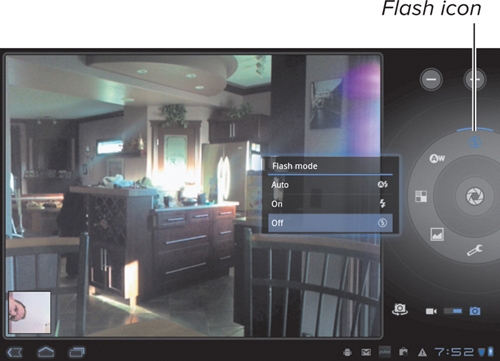 Touch the Flash icon to set a flash option.
 - Touch the plus (+) and minus (–) buttons at the top of the screen
 to set the exact level of zoom needed.
In
, for example, zoom is set at 2.5x. Adjust the zoom.
 - Touch the button in the center of the circle to capture the picture.
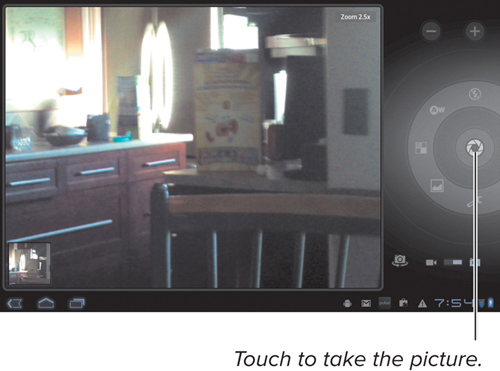 Snap the shot.
When the picture is taken, you hear a camera shutter open and close—a recorded sound, but realistic.
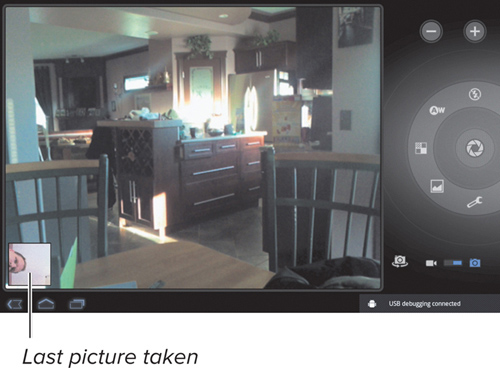
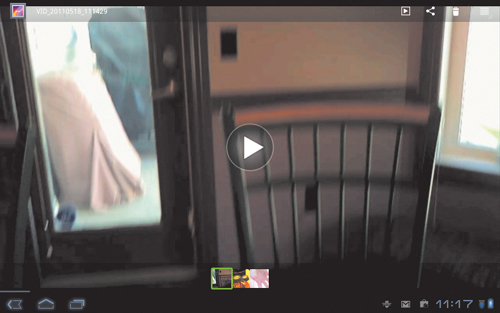
To view a photo you’ve taken
- Touch the thumbnail image in the bottom-left corner of the screen
 to go to the Gallery .
 The Gallery holds all your recent shots.
 - To find the photo you want, scroll through the pictures in the Gallery by touching a picture and sliding it left or right, as shown in .
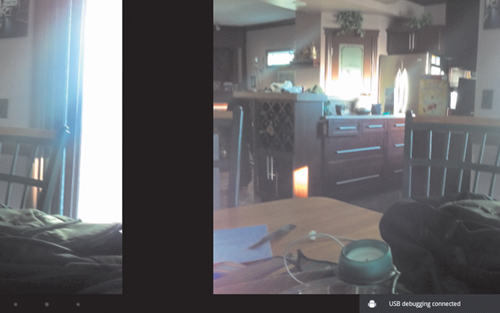 Scroll through the pictures in the Gallery by sliding them with your finger.
Shooting Video on the Xoom
As I mention earlier in this chapter, the Xoom’s rear-facing 5-megapixel camera can record HD video. This section goes over this procedure.
The video software uses the same controls as the photo software (see the preceding section), plus a few extra ones that I cover in this section.
You can record video or take pictures on either the front or rear camera. To switch between these cameras, touch the Switch Camera button in the bottom-right corner of the screen.
To open the video software
- Open the Camera app by completing the steps in “To open the photo software” earlier in this chapter.
- Move the slider in the bottom-right corner of the screen from the Photo icon to the Video icon, as shown in .
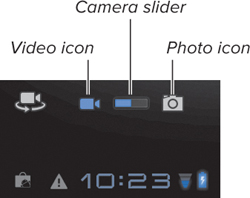 Set this slider to Video.
To set video options
- Touch the Video Quality icon to set video quality.
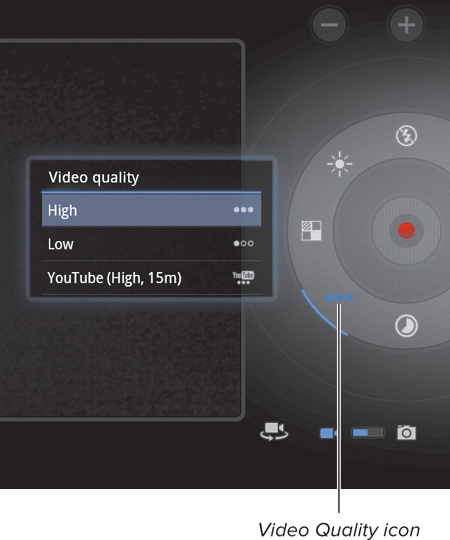 Touch the Video Quality icon to set video quality.
Your choices are High, Low, and YouTube.
- Touch the Time Lapse Interval icon to set time-lapse intervals (how often a frame is captured).
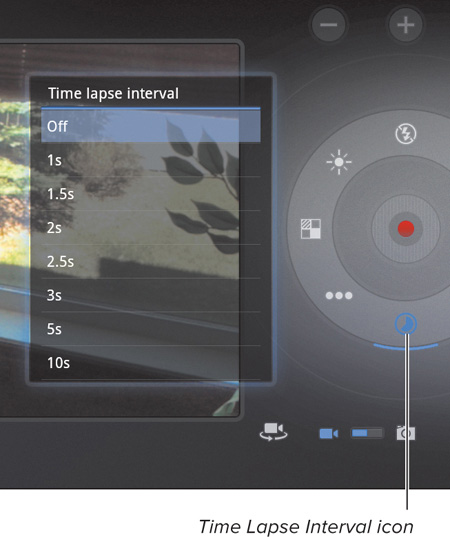 Touch the Time Lapse Interval icon to set the amount of time between frame captures.
To record video
- Touch the red Record button .
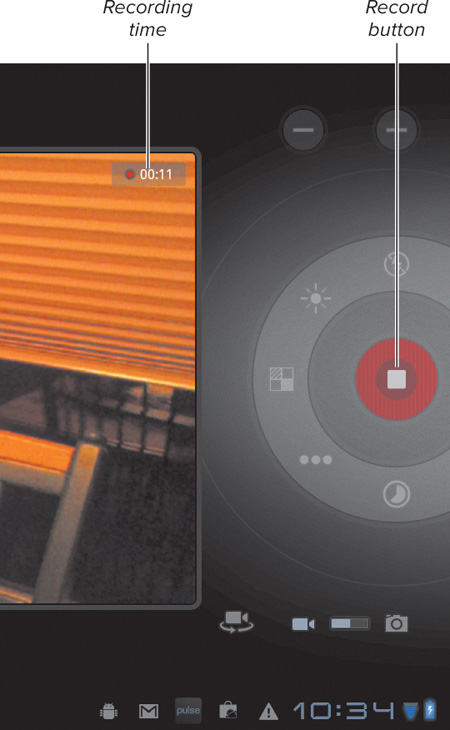 Touch the red button to start recording.
As you record, the elapsed time appears in the top-right corner of the screen
. - Touch the red and white Stop Record button .
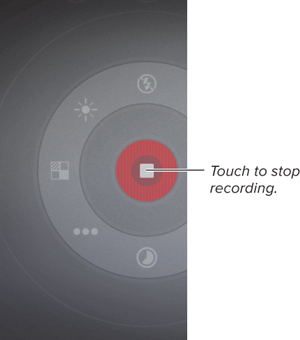 Touch the button in the middle of the circle to stop recording.
To play back your video
- Touch the thumbnail image in the bottom-left corner of the screen to go to the video player .
 You can view your video right away.
 - Use the player’s controls
 to play your video.
The controls are simple. Touch the right-facing arrow to start the video and the pause symbol to stop or pause the video.
Creating Movies with Movie Studio
The folks at Motorola have made sure that the Xoom is an extremely capable device right out of the box. Indeed, the Xoom includes a piece of software called Movie Studio that allows you to create and edit movie masterpieces. This software allows you not only to edit video, but also to create slideshows or incorporate still photos into a video.
This section shows you to how to start a Movie Studio project and tinker with some of the settings of Movie Studio. Entire books have been written on the subject of video-editing software, but this section gives you enough info to start you on your way to becoming an auteur.
Everything in Movie Studio is touch-based. If you want to move a clip or a photo from here to there in the flow of the movie, just reach out and touch it until it pops up and then move it where you want to move it. In this respect, Movie Studio is highly intuitive.
To start a new project in Movie Studio
- Slide the home screen to the left to see the Movie Studio icon .
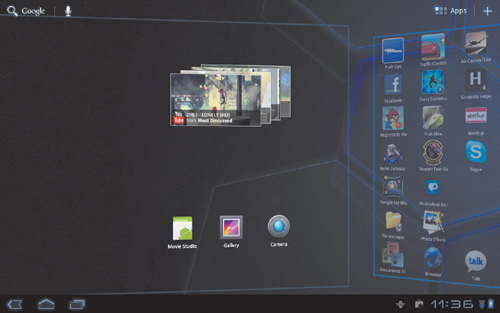 Switch between home screens to find the Movie Studio icon.
 - Touch the Movie Studio icon
 to activate the program.
When Movie Studio starts, you see a New Project icon
.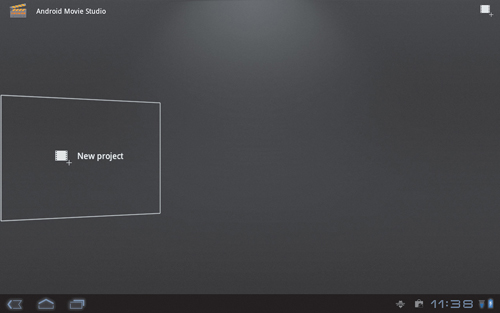 New Project icon in Movie Studio.
 - Touch the New Project icon.
The Project Name panel appears.
- Enter a project name on the onscreen keyboard, as shown in , and touch the OK button.
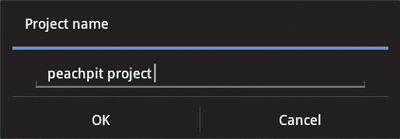 Enter the name of your project, and touch the OK button.
The Movie Studio app opens a project screen
. New project screen.
To import video into a Movie Studio project
- In the project screen , touch the Add Video icon (the filmstrip with the plus sign).
Movie Studio displays two import options, as shown in
. Import options.
 - To import video that’s already on your Xoom, touch the Camera icon; to download video from the Web, touch the Download icon.
- Select the video you want to import .
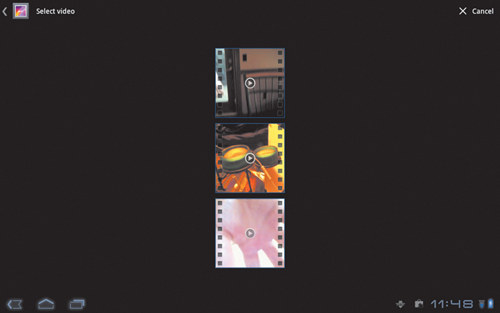 Select the video you want to import from the videos available on your Xoom.
The video file shows up in the main screen of Movie Studio
. Your video appears in Movie Studio, ready to be edited.
 - If you want to import music, change the name of the project, or export a finished movie, touch the Settings icon in the top-right corner .
 Touch the Settings icon to import music, change the project’s name, export the project, or delete it.
 - If you want to import a still photo, touch the Gallery icon
 , and select a photo to insert into the movie
  .
.
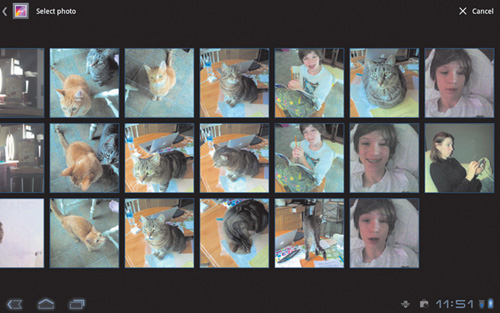 Choose a photo from the Gallery to insert into your movie.