
2
Bring It All In – Importing Photographs into Lightroom
If, by this point, you are using only your computer's native software to browse files or maybe work with something such as Photoshop or Bridge, you will have to develop a new way of thinking about managing your assets. To work on any photographs in Lightroom, we must first import them, which means that we need to tell Lightroom where they are. By doing this, we will create a database with our files' locations, and from that point, we will be able to not only work on them using Lightroom but also move folders or delete images from within Lightroom itself. As we mentioned earlier, Lightroom offers a non-destructive process of working with photographs. By creating a database called Catalog, Lightroom leaves our original files untouched, adds a description of what we want to do with them, and visually displays the results. We need to create this library by importing images into Lightroom and pointing it to the files we want to edit.
The topics we are going to cover in this chapter are as follows:
- Opening Lightroom for the first time
- Understanding the import dialog functionality
- A few tips and tricks to remember
Opening Lightroom for the first time
When we start Lightroom for the first time, it asks us to either create a new catalog or locate an existing one. Whether you have put any thought into this decision or not, we will go through the whole process so that everyone understands the aftermath of this choice.
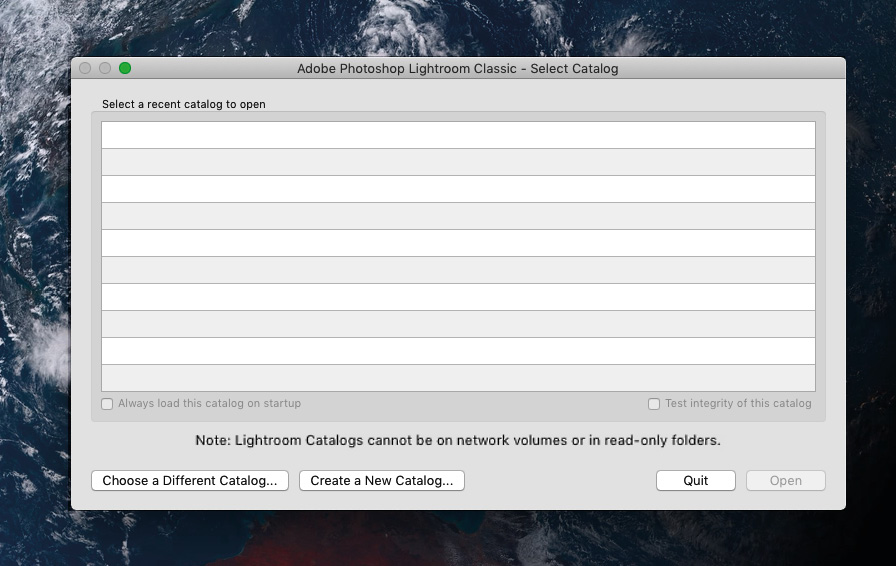
Figure 2.1 – The Select Catalog dialog
This catalog that Lightroom asks us to create is a database that will house references to all the photographs we will ever import into Lightroom in the future. Once we create our catalog, which will have the lrcat file extension, Lightroom will also create a few additional files with the same base name and added words – Sync, Previews, Smart Previews, and Helper. These files will hold information that helps us to keep Lightroom working as smoothly as possible.
This is how it looks on my computer.
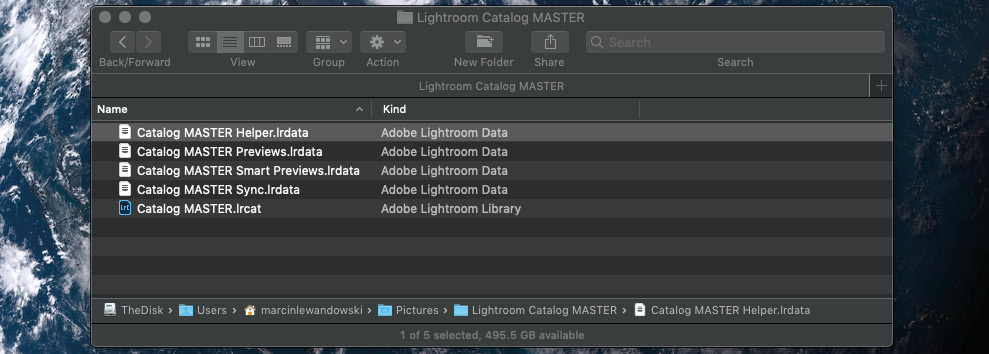
Figure 2.2 – The catalog structure
Our first and last catalog
I use just one catalog to house all of my photographs, and after testing various catalog combinations over the years, I found it most efficient for the way I work. I tried separate catalogs for work and personal photographs, which was not ideal because some personal photos may crossover to work and vice versa – especially things that I planned to use solely for blogging, Instagram, or other social media. I tried a setup with a catalog named OTHER for these "crossover" category images, but this just proved to add unnecessary work to my workflow. Other experiments involved creating separate catalogs year by year and even different catalogs for large projects. Again, it all proved to be just a waste of time, causing a lot of switching between catalogs when I wanted to find a particular picture or move something across. Now, I structure everything inside Lightroom in a way that reflects my work. I have separate folders for personal photographs, folders for commissioned work, and different folders for anything that doesn't fit into these two categories – that is, multi-year projects or things destined only for social media use. I always have everything in one catalog, and as long as I maintain good housekeeping within that catalog, it all works smoothly.
Whatever you might decide works best for you at a later stage when you know Lightroom better, for now, let's start with the single catalog structure and import the first set of photographs into Lightroom Classic.
Setting up general preferences before starting the import dialog
There is one more thing I would like you to know before we go into the actual import module. Please go to Menu > Lightroom Classic > Preferences > General.
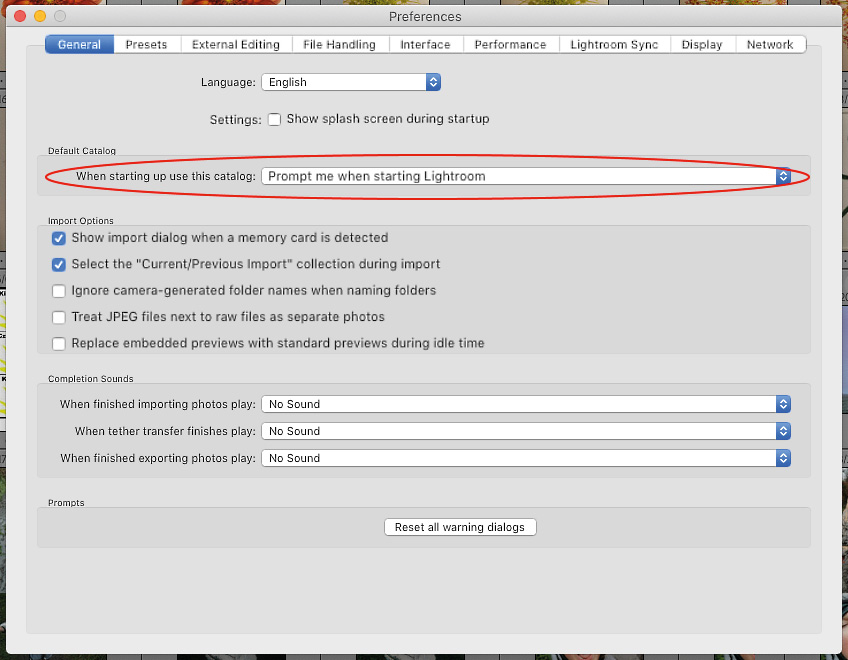
Figure 2.3 – General preferences
At the very top, you can change the language and turn off the splash screen during startup – this is entirely up to you. After that, we have an option to choose the catalog that Lightroom will open during startup. I suggest that at this time, you choose Prompt me when starting Lightroom to use it as a reminder that Lightroom works with catalogs, folders, collections, and so on. You can change it later to suit your style of work.
In the second paragraph of this window, you will see an option called Show import dialog when a memory card is detected. If the box next to this sentence is checked, it means that each time we insert a memory card into our computer's reader, Lightroom will automatically open the import dialog.
The same box's second line reads Select the "Current/Previous Import" collection during import. With this box checked, Lightroom will go automatically to the collection of currently imported photographs upon the start of the import process; if we don't check this box, Lightroom will stay within the selection we viewed before starting the import process, and we will have to navigate to this collection manually. I almost always keep it checked when importing anything because I usually look at the photographs straight away, but your workflow might be different; I just want to make you aware of it.
The third option is Ignore camera-generated folder names when naming folders. There is no significance to this box as long as we understand what's happening during the import process and set everything we want in the import panel. Checking this box means that if you import everything at once without proper management, Lightroom will import all images on a memory card regardless of the folder structure created by the camera. For some camera systems, new folder creation can be set in intervals of hundreds or thousands of photographs, by date, and so on. I never have it checked and always set everything manually in the import module itself. For now, let's keep it unchecked – you can always come back here and change it.
The fourth option is Treat JPEG files next to RAW files as separate photos. If you shoot RAW and JPG and want to keep both files during import, you have to keep this option checked; if you keep it unchecked, Lightroom will treat JPG files as duplicates and discard them.
Lastly, for this part, we have the Replace embedded previews with standard previews during idle time option. It is a great function, but its potential usability will be impacted by choosing how we import the photographs; thus, we leave this unchecked for the moment and come back to it later.
Having the preceding covered lets us slot that memory card into the reader or attach the camera to our computer and bring our photographs into Lightroom.
Understanding the import dialog functionality
If you checked the box for Show import dialog when a memory card is detected, then the import module will open automatically. If you didn't tick that box earlier, click on the Import button in the bottom left corner of the Library module's bottom left corner.
Alternatively, you can even drag images from outside of Lightroom and drop them into the Library module to open the import dialog. I find the last option helpful when I want to bring into Lightroom a particular image I just downloaded and I don't feel like browsing folders on my computer from within the import module. Still, I'm getting ahead of myself here.
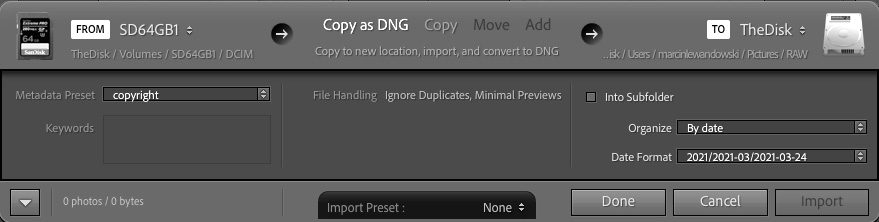
Figure 2.4 – A miniature version of the import dialog
Default view
If you see the miniature version of the import dialog, like the one illustrated in Figure 2.4, then click on the arrow in the bottom left corner to open it up to the full view. And voila, we are in, and we'll see that it's all simpler than it might look right now. Let's start at the beginning.

Figure 2.5 – The full import dialog
The import dialog is split into three main parts, as are all Lightroom modules. The left-side panel is where we choose our source, from where we want to import our photographs. The middle of the import dialog shows photos that we will be importing and a few associated tools. The right panel is where we choose our photographs' destination and any additional settings to apply during import.
The left panel
We start off with the left panel and the options we have under it that help us choose our source.
Source
Starting with the left panel, we have a few ways to choose where to import from.
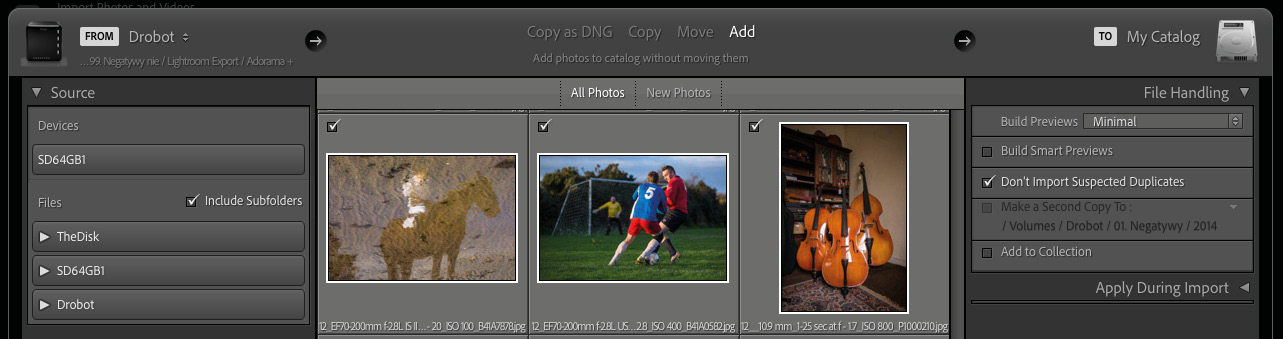
Figure 2.6 – The import dialog top part with an external drive named Robot chosen
Even though Lightroom will automatically choose the inserted memory card as a default source, we have a choice and can change it by clicking on the memory card symbol. You will notice that the corner changes color to a slightly brighter hue when we hover the cursor over it; we can click that to choose any source currently present or attached to our computer, memory cards, hard drives, and so on. I never use that for access and prefer to go directly to the Source tool placed directly below. Typically, you will see your freshly inserted memory card at the top, above other locations.
I say typically, as, now and then, your computer might not see the inserted memory card. In a scenario like that (and after making sure you have correctly ejected the card if necessary), re-insert the card into your card reader or turn on your camera; this should show the new source on top in a matter of seconds in the Devices field. By clicking on the memory card name (it will change hue to a lighter gray), we choose it as a source from which to import.
Devices versus files
Instead of choosing our memory card from the devices, we have an option to select it from Files just below it. Choosing from the Files tab will add an Include Subfolders option. It is needed to cover the fact that some of us choose cameras that split files on memory cards in folders of hundreds or create a new folder each day. Some cameras, such as Sony models, hide files in unusual places; by checking this box, we can make sure that Lightroom sees them all as ready for import.
We can also, by "CTRL clicking", choose multiple folders to import from a few of them. In addition to the memory card, we can also choose to import files we already have on our computer's hard drive. To do that, we select our hard drive tab and then find the folders we want to import. It is handy for importing already existing collections of photographs. One more thing to notice in this section is the Eject after import box - checking it will eject our memory card after importing all photographs, so we don't have to think about manually ejecting it later. We can remove the memory card straight away after the import finishes. It is a tiny but convenient option, working well whenever I need to import multiple memory cards, when it speeds up the process, or when I forget to pull the card out and it's sitting in the reader, ejected. This way, I don't need to worry about accidentally frying the card and irreversibly damaging it a few hours later when pulling it out in a hurry.
At any time during this process, we can right-click on one of the sources to get more info about them, show their location on our hard drive, and choose to include/exclude subfolders. We can also eject the memory card/external memory or even change its icon, which is what I just did to illustrate it in the following screenshot. You can change this icon by right-clicking on your device (in this case, a SanDisk 64GB card) and saving a .png file of your choice in the Device Icons folder, which that action will open. You also need to rename this file to match your device's name.
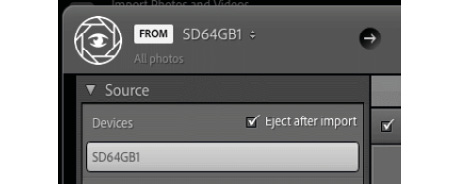
Figure 2.07 – The changed icon of the memory card
The top panel
Continuing clockwise from the left panel we just discussed, we arrive at the top part of the import dialog, which gives us a few options on what to do with the files we want to bring into Lightroom.
Copy or move – that is the question
The most common choice is Copy.
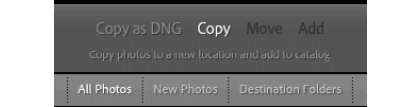
Figure 2.8 – The Copy option highlighted
This option is for copying images we pick from the location of our choice (in this case, a memory card) to another location of our choice (in this case, a folder on a hard drive). Just before that, we have a Copy as DNG option.
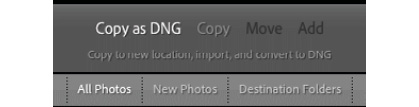
Figure 2.9 – The Copy as DNG option Highlighted
DNG files
DNG might need a few words of explanation, so let me go into detail; if you already know all about it, you can skip to the next paragraph. DNG means Digital Negative, and it's an Adobe-made and patented open source, lossless RAW file format. There is a short list of advantages and disadvantages that we need to consider when thinking about choosing this option. First of all, here are some benefits:
- DNG files are slightly smaller than our initial RAW pictures, and so we will be saving about 2–3 MB on a file from a 26 MP camera. In the long run, that is a lot of space.
- DNG is an Adobe-made format, so Lightroom and Photoshop handle these files better.
- Some actions within Lightroom will work much faster compared to RAW formats, especially within the Library module.
- Converting files into DNG might be time-consuming, especially on slower computers, and with a large number of pictures, you will have to test your particular setup to see the difference. Another disadvantage is that some of the metadata might get lost.
- As you can imagine, each camera manufacturer has a different idea about storing different picture data. Things such as the focus point or other manufacturer-specific details might get lost in translation. It is not a deal-breaker for me, but it might be for you.
- Lastly, what I think is the most significant difference is how DNG stores any Lightroom edits versus RAW edits. As we already mentioned, Lightroom is non-destructive editing software, and all changes are stored as additional data. In the case of RAW files, this data is stored as .xmp (sidecar) files, containing all the changes we made. In the case of DNG files, these changes are stored within the file itself, which means two things – we will have far fewer files to manage on the hard drive, but there is a slightly larger possibility of these files being corrupted during the read/write processes. It is a puzzle that you will have to resolve to decide which option is better for you.
For now, I suggest we go with the RAW files, and if you later decide to work with DNG format across the board, no worries – there is a tool within Lightroom to convert already existing files en masse. You can access it by going to Library > Convert Photos to DNG; for now, let's get back to the import dialog.
Move and add
We looked at the Copy as DNG and Copy options, but there are two more – Move and Add. These two options are only available when we are working on files already present on the hard drive. When importing photos from a memory card, these two options will be inaccessible.

Figure 2.10 – The Move option highlighted

Figure 2.11 – The Add option highlighted
Choosing the Move option will move all images from the source folder we just picked on the left into the destination folder we will select on the right side. It is an excellent option if we want, for example, to bring structure to this library and turn a big folder of unsorted photographs into a group of day-by-day folders. In that scenario, we can use Lightroom to create these new folders depending on the photographs' creation date and move them into their new location. I think it is a great function; however, I don't use it myself. It is probably professional paranoia of not being in total control of everything that's happening on my hard drive. In any scenario, I always let Lightroom copy all the files, check whether Lightroom copied everything, and then delete them from their source.
The Add function imports photographs we choose into Lightroom but leaves them in their original location. Remember when we mentioned earlier about importing into Lightroom a library of images where we might have a structure of folders that we want to keep and be available in the same arrangement within Lightroom – this is the place to do it. There are also other scenarios when you might find this function helpful – that is, I use the Add function when importing files from the downloads folder and don't want to interfere with my main structure of files. In that scenario, Lightroom will "take note" of the downloads folder's location and make it available in our library.
Viewing options
Under these four options, and still above the photographs that we are importing, we find three options for how they are displayed as follows.

Figure 2.12 – The viewing options
The All Photos function does what it says on the tin – it shows all photographs present in the source medium we chose to import from. They will be all visible without any folder structure and sorted in the order we choose in the bottom bar, just below the actual photographs. When importing from a memory card, I most often keep this sorted by Capture Time unless I know I have some video files mixed in with photographs; then, I sort it by media type to work with them separately. Some of the photographs in our source location might appear dimmed; this happens when we choose the Don't Import Suspected Duplicates option. It looks for pictures with the same original filename, same capture time, and the same file size as photos already in our Lightroom library. It's a great option if we, for example, forget to format the memory card and shoot more new photographs on it. The Don't Import Suspected Duplicates function will ensure that the photos we already imported are not imported again.
The New Photos view will ignore all duplicate photographs grayed out in the previous view and display only photos that are not yet on our hard drive.
Destination folders will display the same photos as All Photos, but it will split the view into sections, reflecting the structure we are choosing in the right-side panel, which we will discuss in the next paragraph.
The right panel
The right-side panel splits into four tabs, and we will look at them in order of their appearance.
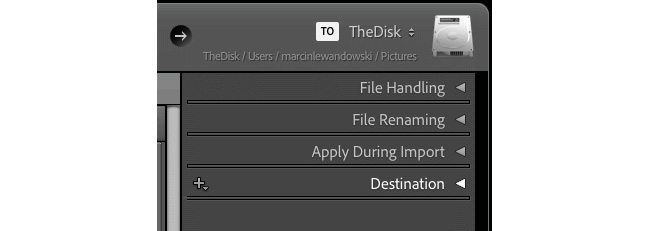
Figure 2.13 – The right panel tabs
File handling – building previews
To access this option, go to File Handling > Build Previews. This option will hugely impact our workflow with the imported set on a few different levels:
- If we want absolute performance in terms of availability to scroll through thumbnails, then Build Previews > Minimal is the way to go. With this option chosen, Lightroom will make the smallest possible previews of our photographs and only start rendering larger-size previews when required.
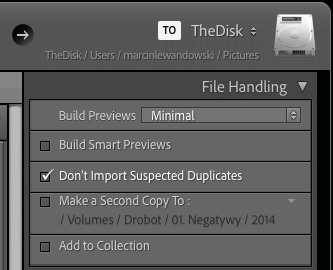
Figure 2.14 – The File Handling tab
- Build Previews > Embedded and sidecar – this option renders the largest previews generated by the camera. It's a slightly slower process but still much faster than the next ones we will mention.
- Build Previews > Standard – this option renders images ready for viewing at the fit zoom level, which is almost a full-screen view. We can easily adjust the size of standard previews in Lightroom Classic by going to Catalog Settings > File Handling > Standard Preview Size. A smaller size equals a faster rendering speed, while a larger size equals a slower rendering of each photograph.
- The last option is Build Previews > 1:1, which builds previews at a 100% view of the actual pixels. This process will take the most time, but once completed, zooming each photograph to a 100% view will be readily available at the click of a mouse.
I approach these differently, depending on the situation, but when I need to start working on images straight away, standard previews are my preferred way. Having them available, I can run through them in a full-screen size, with Lightroom rendering 1:1 previews only for the images, which I'm zooming in on during the editing process. It is not the fastest way to import images, but it is the fastest way to review work. I look at it as an investment in saving time down the line during the editing process.
Build Smart Previews
Smart previews are miniature yet fully editable versions of our RAW files that we can edit even when original files are not accessible. They are made based on Adobe's lossy version of their DNG format. To give us a size perspective, the RAW file from a 26 MP camera is about 30 MB in size, so, after a full day in the field, we might have about 1,500 images to go through; that's approximately 40 GB and often more, especially for sport and wedding photographers, but I'm digressing here. The same files in their smart preview versions will take up about 1.5 GB. It is a huge difference, especially when we plan to work with these photographs on the go, using a smartphone, tablet, or even a laptop with a small-size SSD (short for solid state drive). The part about it that I like is that we can export developed pictures – up to a specific size, that is. We can import images to our "master computer" and then work on them on a different device without the need for access to the originals. It is also a great way to work on photographs that we might have stored on an external hard drive. All smart previews are stored within a smart previews file assigned to our catalog. This way, we can work and edit/develop photographs that are not physically present on our computer, and once we reconnect our external hard drive, all changes will sync to the original RAW files.
Don't Import Suspected Duplicates
As we already mentioned, by enabling this function, we ask Lightroom to look for pictures with the same original filename, same capture time, and the same file size as photos already in our Lightroom Library. Lightroom will not import any of these duplicates to our Library again.
Make a Second Copy To:
This quite self-explanatory function will appeal to the most cautious of us. In principle, it works similarly to the secondary backup memory card in many cameras. When Make a Second Copy To: is enabled, Lightroom will create a duplicate copy of the currently imported photographs in a location we specify. I, personally, never use this option due to how I manage my library, but I can see its use, especially if we created this second copy on an external hard drive that we use for backups.
Add to Collection
This function will make much more sense once we go through the following two chapters, where we will dive deep into working within the Library module, which includes collections. In short, once we have any collections in our library, choosing this option will present us with a list of all of them, and we will be able to decide where we want them.
File Renaming
With this tool, we can automatically rename all of the files during the import process. When enabled, Lightroom gives us a prepopulated list of renaming templates to choose from and an edit function just under the list, which opens an all-inclusive menu for renaming photographs.

Figure 2.15 – The File Renaming tab
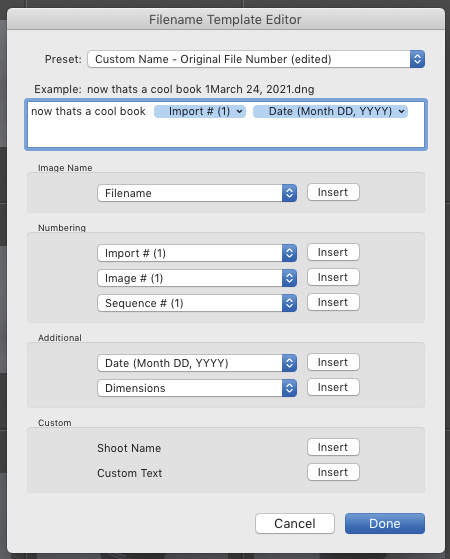
Figure 2.16 – The File Renaming tool
There is no right or wrong way of doing this, but my suggestion is to keep everything simple. We can rename our exports from Lightroom in the same way, and I see no need to rename original files elaborately.
Apply During Import
Let's take a look at the options we have under this feature:
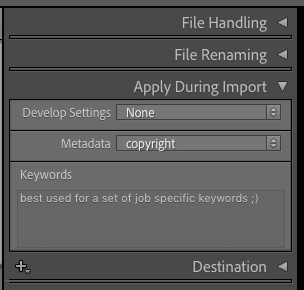
Figure 2.17 – The Apply During Import tab
- Develop Settings: This tab allows us to apply any presets that we have created and saved within our Develop module's Presets tab. It's a function that will be much better understood once we go through the Develop module. We can apply predefined adjustments to all imported photographs, which can be massive for specific workflows. Some presets are practically a must, such as Lens Correction, and some presets can be just great fun, such as black and white profiles or Hue, Saturation, and Luminosity (HSL) tweaks.
- Metadata: Once we create our metadata profile, this is the place to apply it to all imported photographs. A crucial thing to note is that Lightroom does not make changes to original camera RAW files when adding metadata to photographs but creates them in sidecar XMP files. I always add all necessary copyright information to all of my imports.
- Keywords: Any keywords we decide to apply to our import will be added to all imported files. We will talk more about keywords in the next two chapters.
Destination
This is the moment we were all waiting for – choosing where to import our new photographs so that we can finally bring them inside Lightroom and start some real work with them.
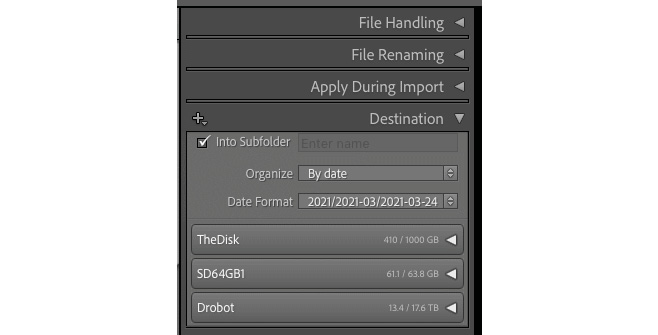
Figure 2.18 – The Destination tab
The first choice we have to make is to decide whether we want photographs to import into a subfolder. Once we tick the Into Subfolder box, Lightroom will create a folder in the location we choose as a destination for our photographs and save them into that folder, using a structure we pick in the next step.
Organizing imported files
We have three straightforward options here – we can either save and import all our photographs into one folder chosen as a destination, a subfolder in that location, or order them by the creation date. I always import my photographs ordered by date, using a few variations when choosing locations. My basic structure looks more or less like this – I create separate folders for WORK, PRIVATE, VIDEO, PROJECTS, and OTHER for each year. Within each of these folders, I split photographs by date using the YYYY-MM-DD format – that is, when I'm importing from memory cards that have strictly "work images" on them, I choose the WORK destination folder and organize by date (YYYY-MM-DD). I will usually add a description to this folder's name once I start reviewing the newly imported photographs. When I import from a memory card that is a mixture of everything, then I always import into a day-by-day structure (YYYY/YYYY-MM/YYYY-MM-DD) and later sort images manually into their final destination folders. There are naturally many ways to organize the Library in Lightroom, and when we get to collections, there will be even more things to consider. The default idea of importing everything into Pictures/YYYY/YYYY-MM/YYYY-MM-DD is a perfect starting point and helps us keep track of our photographs. It provides the basis for a good structure and a system in which it will be hard to get lost. As long as we are smart about keywords during review and rename folders by giving them custom names, Lightroom will help us stay organized with the organize-by-date structure.
The Bottom Tool tab
As we go from left to right, let's continue clockwise to the bottom of the import dialog, where we have a few different viewing options.

Figure 2.19 – Viewing options – the Bottom Tool tab
We will ignore for the moment the Done / Cancel / Import buttons and come back to them in one of the following paragraphs.
Starting from the left, we can choose Grid (the "G" keyboard shortcut) or Loupe view (the "E" keyboard shortcut). These two viewing options are followed by the Check All and Uncheck All buttons, which will do exactly that – check or uncheck to import all photographs from our current import source. The Check All behavior will depend on whether we chose Don't Import Suspected Duplicates, ignoring or including these for import depending on our choice.
Next on the right is the Sort option and the choice of ascending or descending order. I usually have this set to ascending by capture date, but there are moments where other options are more beneficial. For example, when I have video files mixed in with stills, I will sort by media type. You might also want to separate RAW and JPG images by sorting by the import file type, and so on.
Please look at the available options because once you are aware that they are here and remember it, there will be a time when they come in really handy.
Lastly, we have a slider to adjust the size of the thumbnails we are currently viewing.
On that thought, let's continue and look at the pictures in our view. We can check and uncheck all the tick boxes for import manually by clicking on them directly in Grid View or choosing the Include in Import checkbox in Loupe View. We can do this not only with single pictures but also with more extensive selections of them. We make these selections in the same way we select files and folders on the computer by either "Ctrl-clicking" multiple items or selecting an area with "Shift-clicking". Once we choose and click Check/Uncheck for one of the photographs within our pick, the same option will apply to all selected photos. In addition to that, we can also check/uncheck these boxes by using the "X" keyboard shortcut for unchecking and the "P" keyboard shortcut for checking.
Tip
You might think about this as e"X"clude from import and "P"ick for import to remember it better.
Hitting that Import button
Finally, we are ready to click the Import button:

Figure 2.20 – The bottom right corner buttons
Just in case we don't want to do it, we can always hit Cancel, which will revert all settings to their state from our previous import, or choose Done, which will also cancel the current import but save all our current settings.
Here's one last reminder on the basic workflow of importing photographs:
- Choose where to import from, and make sure to include subfolders.
- Choose what to import, what to do with duplicates, and manually exclude or pick any photos for import.
- Choose how Lightroom will import images – by adding, copying, moving, or converting to DNGs.
- Choose the destination.
- Choose the import folder structure.
- Hit that Import button.
The import dialog's top tab is a friendly reminder of how our workflow within this panel will look. It reminds us of the three decisions we will be taking to get images into Lightroom:
- Where to import from (source)
- How to import (copy, move, add, or convert)
- What their destination is on our hard drive
Import Preset
All the hard work we did setting everything up is not lost as we can save it as a preset that can be used in our future work.
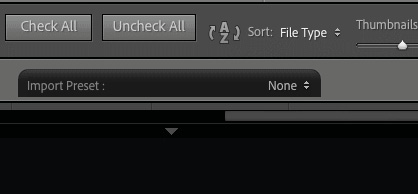
Figure 2.21 – Import Preset
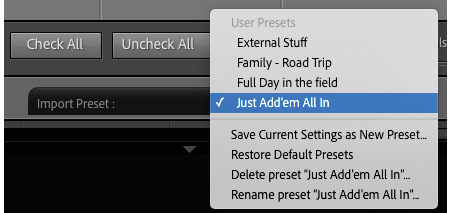
Figure 2.22 – All my import presets
Lightroom always opens the import dialog with the same settings we used for our previous import. If you think you might use different settings for different kinds of imports, there is an exquisite solution tucked away at the very bottom of the import dialog called Import Preset. If we want to approach, for example, wedding imports differently from our hiking treks, photographs from a busy festival, or maybe a portrait session, saving our settings for later can be a real time saver. I suggest you wait for a while and complete at least a few imports to think about setting this up. As we already mentioned at the beginning of this book, there is no one set way of working with Lightroom. Once we know what every tool does, it is up to us to utilize them most conveniently and wrap Lightroom around our workflow, not the other way around. After using Lightroom for about 15 years, I still don't use these presets too much.
As you can see in the screenshot, there are a few different settings. I usually have it set as Just Add'em All in, which is my default setting, created to ensure that I have all options turned on in the way I like, even after making some changes. I will always modify it slightly anyway, especially in terms of keywords and destination.
Now that we have understood the whole process of importing and bringing our photographs into Lightroom, let's look at some tips and tricks that will make this process a little easier to work with.
A few tips and tricks to remember
Once we initialize the import dialog, we can toggle between its miniature and full version by clicking on the small arrow in the bottom-left corner.
If we can't see pictures on the inserted memory card, it's good to make sure that the computer can see it, and if it does, remember to tick Include Subfolders.
Remember to check whether photos will be copied, moved, or added upon import to avoid unnecessary cleanup work later.
Remember to set Don't Import Suspected Duplicates ON or OFF, depending on your preferences.
If you shoot RAW and JPG and want to keep both files, remember to check the Treat JPEG files next to RAW files as separate photos box in Menu > Lightroom Classic > Preferences > General.
Use the "Shift + ⌘ + I" keyboard shortcut to initialize the import dialog from any Lightroom module.
Keyboard Shortcuts within the Import Dialog
"G" – enter Grid View (the same shortcut works in the Library module).
"E" – enter Loupe View (the same shortcut works in the Library module).
"X "– exclude a photo from import (in the Library module – used to flag a photo as rejected).
"Shift + X" – exclude a photo from import and go to the next photo.
"P" – pick a photo for import (in the Library module – used to flag a photo as a pick).
"Shift + P" – pick a photo for import and go to the next photo.
The preceding covers the import dialog; we will pop back here when discussing other modules when there is a crossover between any functions.
Summary
In this chapter, we learned how to create a catalog, what it means, and then imported a batch of photographs into Lightroom. It's a relatively simple process that follows a simple path from (where we import) > to (where we save), which we can translate as source > path > destination. The whole chapter contained quite a lot of information regarding a seemingly straightforward process. However, most of the options we discussed are set up only once in a while and for many photographers only once. It will all depend on your process and approach. As with everything, it takes a bit to get used to this process, and I encourage you to get into the habit of having a quick circular look each time you import images, following the guidance of this chapter. Even if it's only a glance, it will help you imprint the image of import dialog options in your head. This way, every import that follows will be more intuitive, and you won't become complacent, make a simple mistake, and waste time reorganizing everything again.
This brings us to the topic of our next chapter, which is the Library module, where we will look through and potentially reorganize images we just imported.