1
An Overview of Lightroom Classic
Lightroom was first introduced as a beta release back in 2006 and almost immediately revolutionized how photographers work with their pictures. Its biggest "out-of-the-box advantage" over everything else was the ability to manage, edit, and develop photographs in one place—all of that without needing to go to Camera Raw or Photoshop, editing photographs by opening them one by one, and saving them as new images. Lightroom offers a non-destructive approach to working with our photos. We can see and work on seemingly infinite copies of photographs with different looks. In reality, we are only creating additional "develop recipes" applied to the original photograph. All visual changes made to pictures are saved in Lightroom's database as a text "recipe." This approach nullifies the need for multiple copies of any stored photos. You will learn a little bit more about this when we will talk about the Library module in later chapters. The main thing to know about the advantages of this type of editing is that it takes up less storage space and allows better performance for both the software itself and us—the photographers.
This chapter will briefly discuss where Lightroom comes from, what sets it apart from other software, and how it helps photographers streamline their work. We will look at how all the tools are laid out throughout the modules and understand how much we can personalize its layout.
In this chapter, we will cover the following areas:
- Introducing Lightroom
- Looking at a simple sample of a Lightroom Classic workflow
- Getting familiar with the Lightroom interface
- Customizing Lightroom
Introducing Lightroom
In its first iteration, Lightroom was missing many features such as watermarking or localized corrections. Year after year, Adobe listened to photographers and added all "missing" functions, plus many more. Expanding Lightroom's functionality cemented its position as an industry standard and a go-to tool for professionals and amateurs alike. The amazing thing about Lightroom is that its user interface (UI) looks almost the same since its inception, which says a lot about how well designed it is. All that Lightroom needed was the addition of more tools and expansion of already available ones. The principle of using sliders as controllers for most adjustments proved both intuitive and easy to master.
Adobe Photoshop Lightroom Classic is an all-in-one tool for photographers, providing a simple solution to everything from management of a photography collection to the detailed post-production stage. Lightroom Classic also provides tools for printing, designing photo books and slideshows, and publishing simple web galleries—all from within the same software. By reading this book, you will learn how to make working with photographs as simple, pleasurable, and fun as possible. Lightroom helps photographers to get the best out of photos. Whether you are a professional looking for a tool to help you in streamlining your workflow or an amateur who wants to improve their approach to editing and developing photos, Lightroom has it all. In my opinion, a great thing about Lightroom is that there is no one right way to use it. Specific patterns can increase productivity and make a photographer's life easier and more enjoyable, but there is a lot of flexibility to work the way anyone might like.
Most of the Lightroom's tools are available through various "access points". By different "access points", I mean that the same function can be accessed through an onscreen button, menu option, or keyboard shortcut, allowing users to choose the most convenient way to use them and, with time, to streamline workflows in a very personalized and convenient manner.
Looking at a simple sample of a Lightroom Classic workflow
You might say, "That sounds great, but how does all this work?" In this section, you will find a small example of how a Lightroom workflow can be used in a real-life situation. This is a "quick and dirty" example of how I might use Lightroom on a daily basis. To make this as real as possible, I grabbed my pocket camera and went out to make a few photos—luckily, it had just started to snow, which hardly ever happens here. As you will see in this example, a Lightroom workflow is a very organic process, and as you read this book and practice a bit, it will become a very natural process for you as well.
Let's get started:
- The first step is to move photographs from a memory card into Lightroom by importing them. We will be covering this in Chapter 2, Bring It All In – Importing Photographs into Lightroom, but please also see the following screenshot:

Figure 1.1 – Importing images: sub-module view
It's a fairly simple process where we will choose where to save our photographs, in which structure, and how to rename them. We will also choose any presets that we might want to see applied, add keywords, and more.
- Once all images are imported, it's a matter of selecting our favorites, which is quickly achieved with a very flexible built-in system for rating and filtering—you will learn all about this in Chapter 3, Tools Available Within the Library Module, but in a nutshell, while looking through each important image, we will apply a star rating of one to five stars, add "pick/reject" flags, and include color labels. We will apply filters to see our top picks and further narrow down our selection with additional ratings. Here, you can see the Library module view after filtering for images rated with one star:
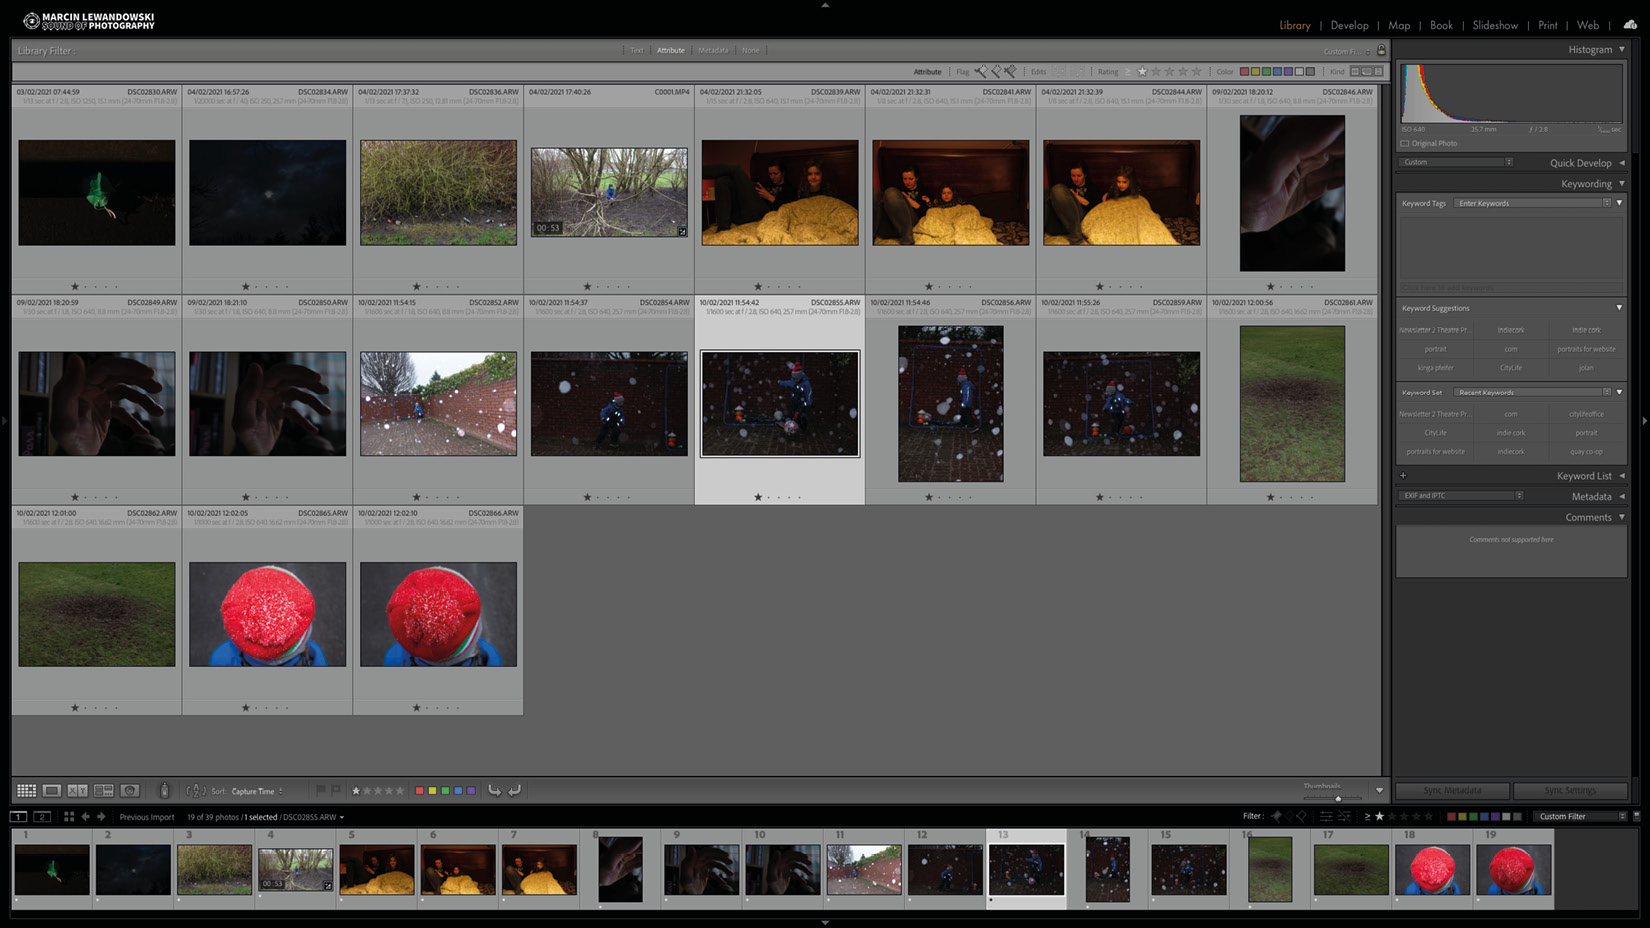
Figure 1.2 – Library module view after filtering for images rated with one star
- Once all of the "looking through" is done and we have a selection of our absolute favorites, it's time to give them the desired look. For that, we move to the Develop module (covered in detail in Chapter 5, An Introduction to the Develop Module). In this module, we will make adjustments, compare different looks, and pick the one we like most.
First, let's have a peek inside the Develop module, where we can make all desired adjustments and later compare the finished version to the original file. You can see an overview of this here:

Figure 1.3 – Comparing finished/developed photograph to the original file (please note all the adjustments I made on the right side and multiple versions with a different look in the filmstrip)

Figure 1.4 – Comparing a few different versions in Survey mode to pick a favorite
- Options within the Develop module are vast; we will cover all of this in Chapter 5, An Introduction to the Develop Module, and Chapter 6, A Detailed View of the Develop Module's Functions. Once we are finished, there is also a lot of flexibility regarding what can be done next. Let's say that we want to post this photograph on Instagram. In that case, we can sync with Lightroom for mobile devices, which is included in the package, by simply marking them for syncing (which is covered in Chapter 10, Final Notes and Summary) and from there, share to Instagram, as illustrated in the following screenshot:

Figure 1.5 – On the left is a screen from Lightroom Mobile showing the synced photo; on the right is my Instagram feed where I posted this photo directly from within Lightroom
Figure 1.5 is just a simple workflow example that I based on a small series of photographs quickly made to illustrate this chapter. As you can see, working within Lightroom is simple to follow once we know what we are doing. There are many options to choose from along the way to get to the desired final result. Whatever this final result might be for everyone, the principle always remains the same: import, edit, develop, and go from there.
You should now have a better idea of what Lightroom can do for you and what you can do with Lightroom. Please read on to learn a little bit more about how to control all of this functionality.
Starting with the Library module, Lightroom's layout revolves around photographs that are always the central point of all operations, regardless of whether we choose to view one photo or a selection of them. For example, please see the following screenshots of the same selection of photographs viewed in a few different ways within the Library module:

Figure 1.6A – Tiny cells in grid view with filmstrip and no side panels

Figure 1.6B – Bigger cells in grid view with color-label tinted cells, side panels, and no filmstrip

Figure 1.6C – Selected photographs only with "lights out"; Selected photographs in Survey mode, all panels closed

Figure 1.6D – Selected photographs in Survey mode, all panels opened
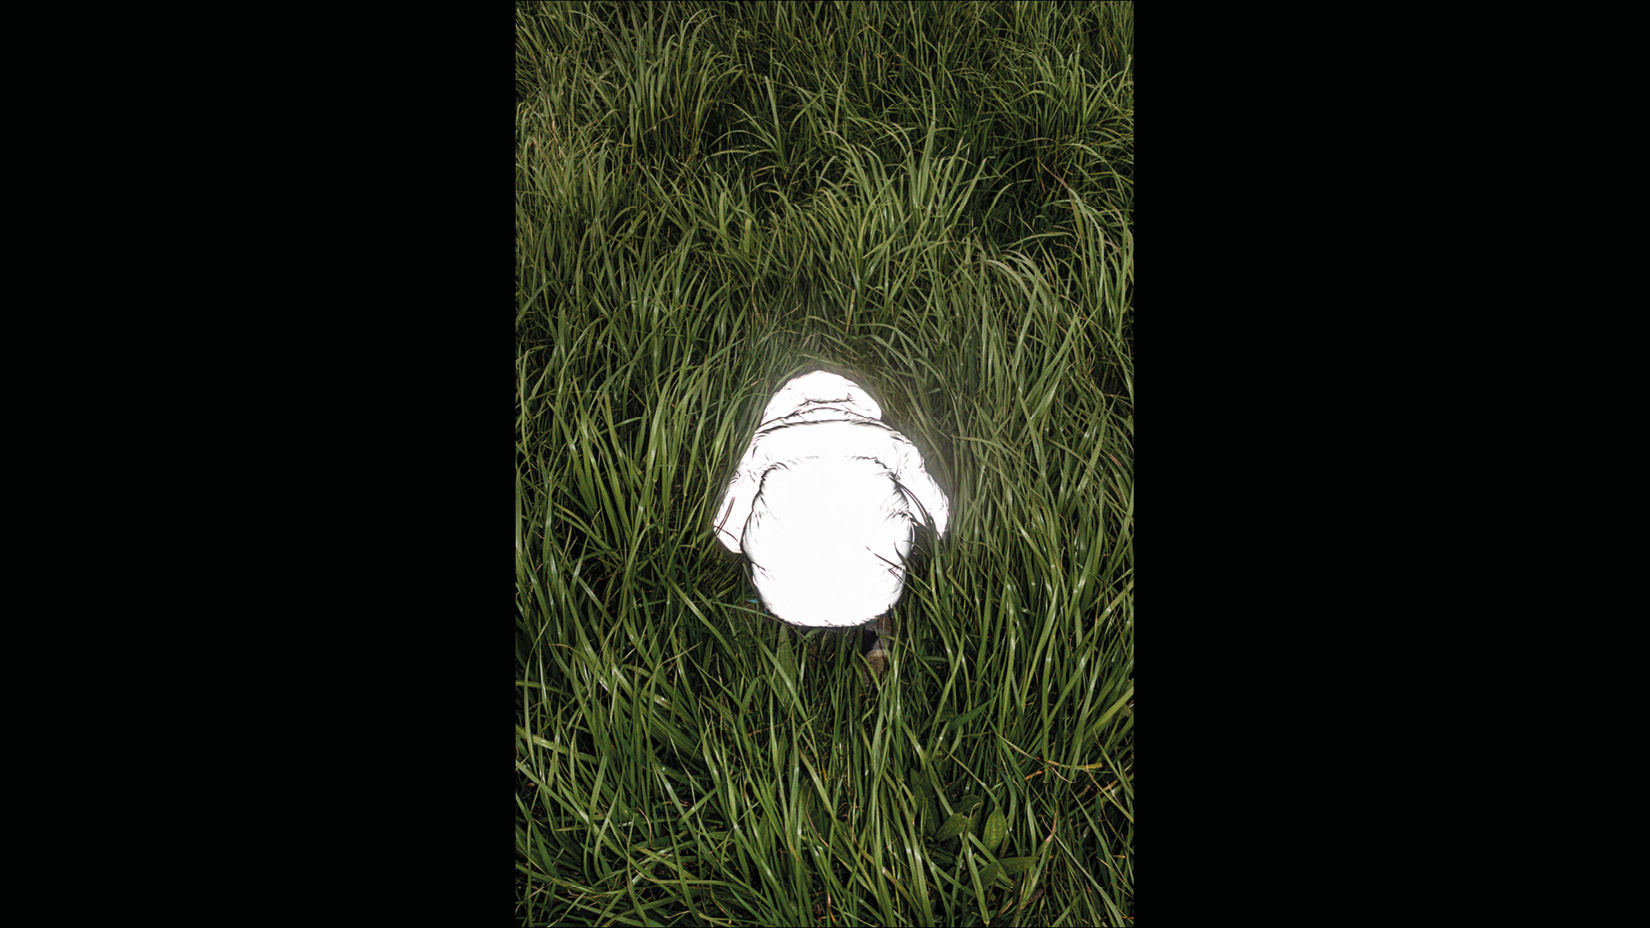
Figure 1.6E – Selected photograph in fullscreen mode
All these different views are only a click of a mouse button or a simple keyboard shortcut away. By the end of this book, you will be moving effortlessly between all viewing options, knowing exactly how to tailor each of them to your needs. You will understand their advantages and recognize differences in using each of them. Most of this information is available in Chapter 2, Bring It All In – Importing Photographs into Lightroom, and some module-specific options will be distributed throughout the book.
Whether we work on an extensive edit from a multiple-day photoshoot or choose a selection from a family meeting, Lightroom provides several tools to make this as easy as possible. We will cover this and more in the next section.
Getting familiar with the Lightroom interface
Lightroom consists of seven main modules, additional sub-modules for importing/exporting images, and different popups for preferences and syncing photos with Adobe cloud storage (included with Lightroom Classic).
The UI of Lightroom revolves around an idea of a workspace surrounded by tools. That workspace is where we will see the effect of any actions taken with the said tools. Each module contains side panels, and these panels are split further—into tabs.
The left-side panel is used to move around our collections and folders or to apply module-specific presets; the right-side panel contains all module-specific tools. The bottom part of each panel is always occupied by a filmstrip with our photographs. This filmstrip remains in the same spot between modules and is always accessible. You can see a representation of this in the following screenshot:

Figure 1.7 – Filmstrip along the bottom of Lightroom is always accessible from within all modules
Even if you haven't imported any photographs into Lightroom so far and it's the first time you are turning it on, I encourage you to look at the different modules as you progress through this chapter to get more familiar with their layout.
Access to all of the modules is always located on the top-right side of the screen as a Module Picker, as illustrated in the following screenshot:

Figure 1.8 – Module Picker in the top-right corner
It's possible to change the appearance of this menu and even hide modules we don't use or don't need; they will always be accessible in other ways. I will describe how to do this toward the end of this chapter. For the moment, let's go through each panel and look briefly at their functions in Lightroom Classic.
First, take a look at the following screenshot:
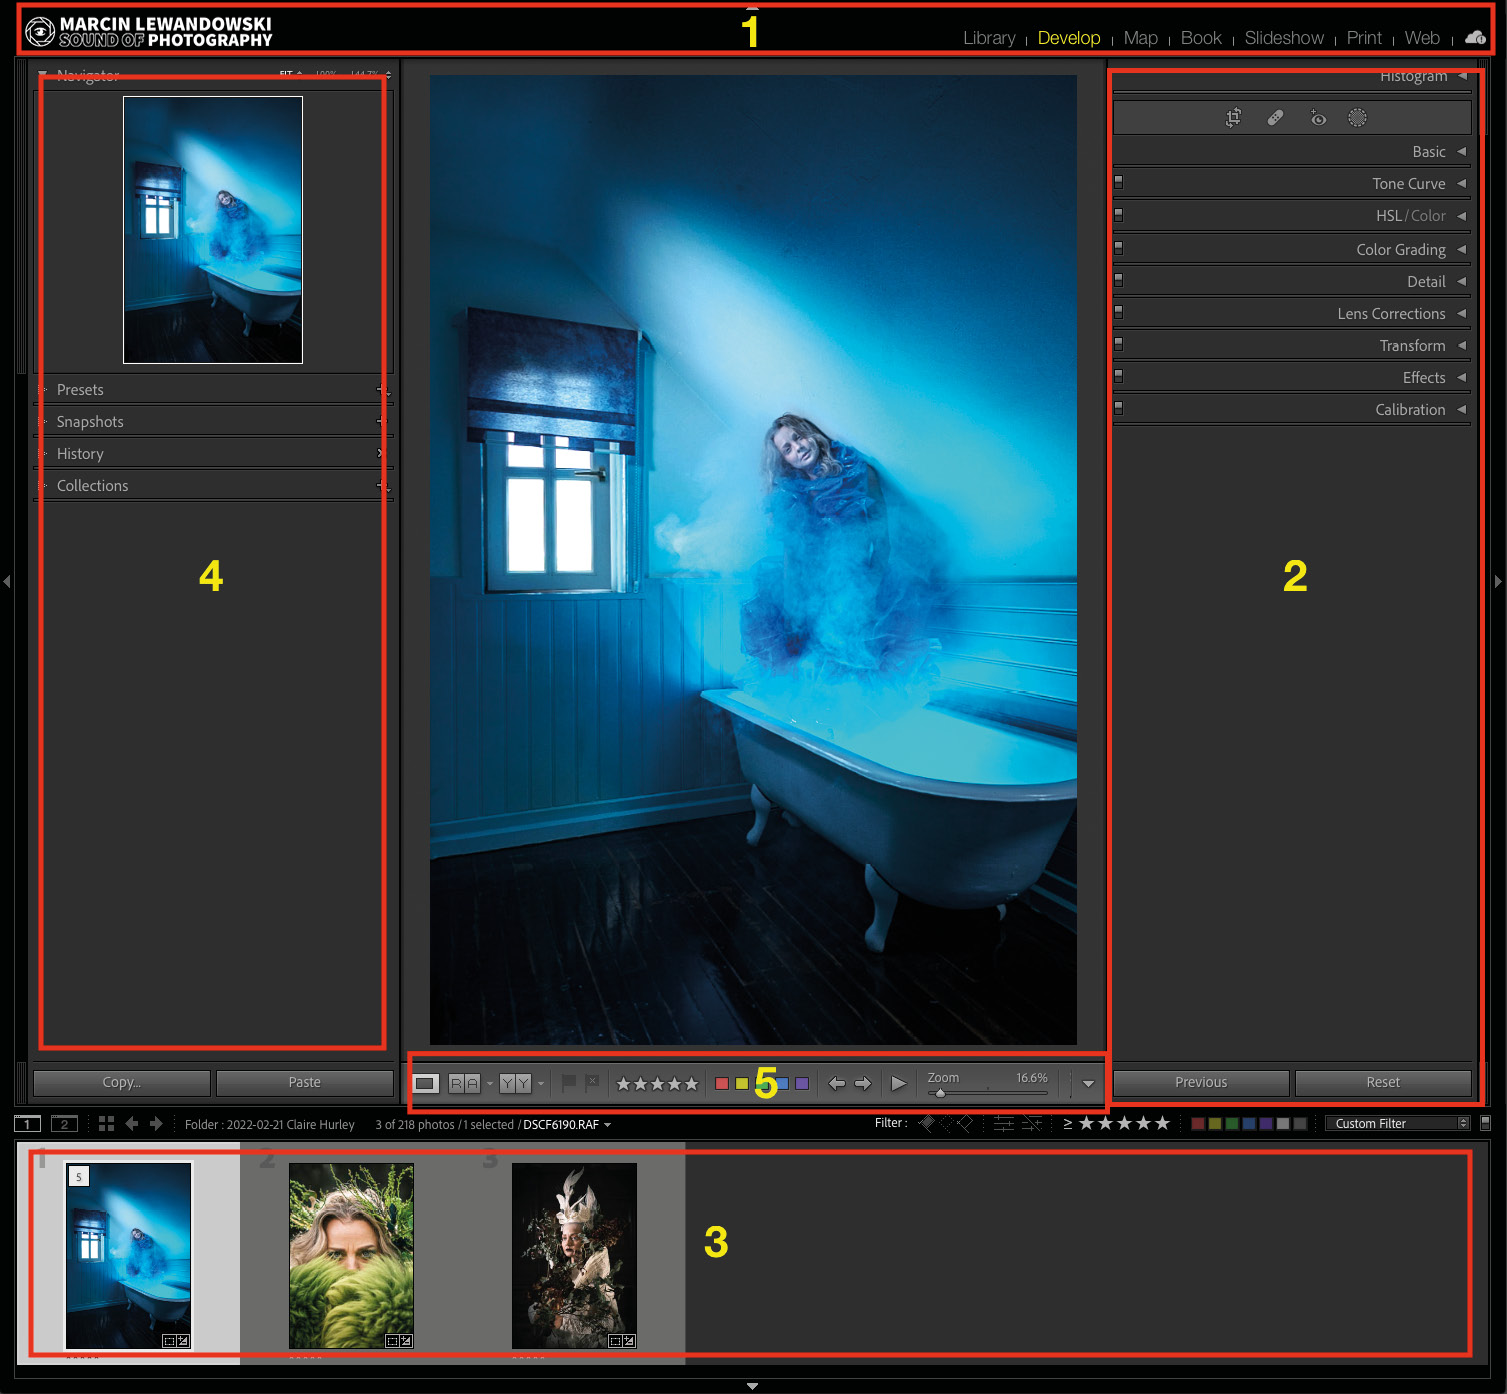
Figure 1.9 – Develop module with all panels opened and all tools and tabs within panels closed
The preceding screenshot illustrates all panels opened, as follows:
- Module Picker (top panel)
- Right Modules panel
- Filmstrip (bottom panel)
- Left Modules panel
- Toolbar (above the filmstrip)
All of the tabs and panels within Lightroom Classic can be opened and closed to simplify the layout and make it better suited to our needs. The first important part of the UI—to help us with it—is the small arrows located in the middle of the external edge of each panel, as illustrated in the following screenshot:
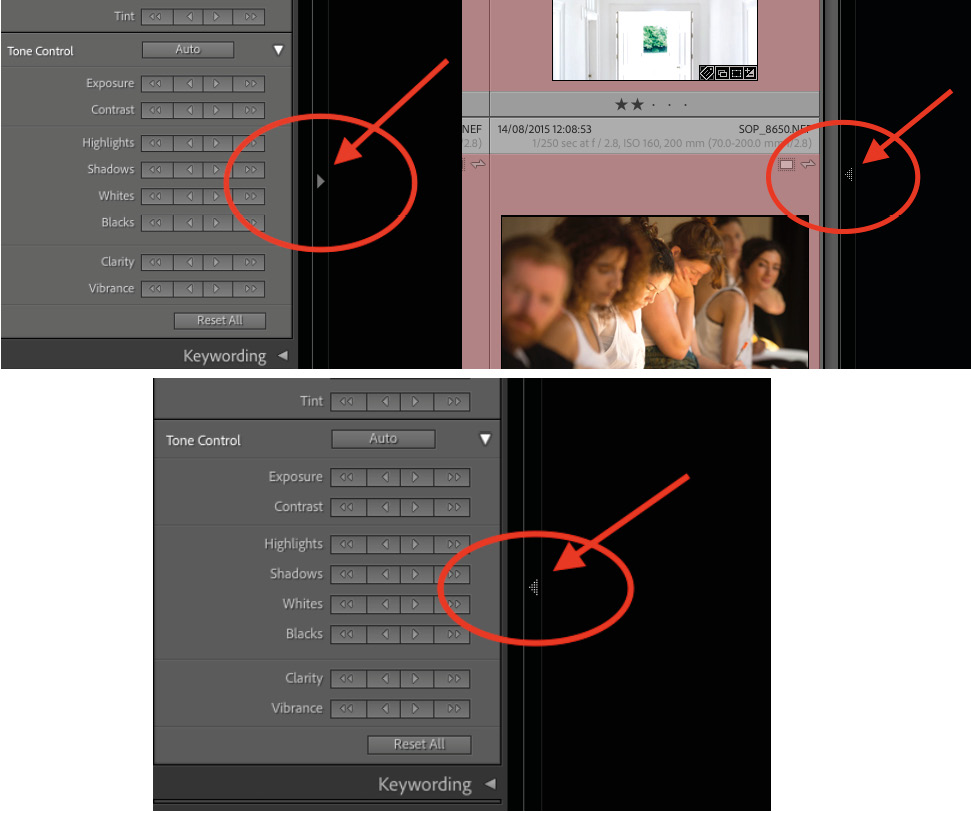
Figure 1.10 – Small arrows on the side of each panel, for opening and closing panels
When the little arrow is gray, this means that the panel is currently open, and you can click on it to close the panel. You can also click on the narrow frame where the arrow is located to do the same. When the little arrow is made of white dots, the panel is closed, and you can open it up. Instead of opening it back up, you can also just hover on the narrow frame where the arrow is. This will temporarily preview the panel and keep it in Preview mode as long as the cursor is hovering over it. As long as this preview is initiated, we can access all of the functionality of the panel. The same rule applies to each of the four panels located around the central area of Lightroom. It's a handy thing to remember later when you want, for example, a photograph that you are working on to occupy a larger part of the screen.
Handy Keyboard Shortcuts to Remember
"Tab": Show/hide both side panels
"Shift + Tab": Show/hide all panels
"F5": Show/hide Module Picker (top panel)
"F6": Show/hide Filmstrip (bottom panel)
"F7": Show/hide Left Modules panel
"F8": Show/hide Right Modules panel
The second type of small arrow you will notice within each module's panels is the one responsible for opening and closing tabs. You can open and close these at will by clicking on the arrow, tab title, or the narrow frame where it is located. The same principle applies to opening tools within tabs and folders/collections, except that to expand the tools within tabs, we need to click directly on the small arrows. There are keyboard shortcuts for many of these functions, and they will be mentioned throughout the book and available as a "cheat sheet". Try opening and closing everything you see to feel more comfortable with this functionality, and take a look at the following screenshot to guide you further:

Figure 1.11 – Left: click these to open tabs; Right: click these to open tools within each tab
As we look through all the modules in this chapter, I encourage you to open and close each of the tabs to get a better sense of moving around Lightroom's workspace.
Without further ado, let's have a quick look through all the available modules.
Library module
This is our HQ within Lightroom. From here, we are managing our whole photography collection imported into Lightroom (importing is covered in Chapter 2, Bring It All In – Importing Photographs into Lightroom).
The left panel starts with the Navigator, but beyond that, it's essentially a list of all our imported folders and collections. The left panel also contains a few handy publishing tools for services such as Adobe Stock (yes—there is an option to earn some money through it as well), Facebook, or Flickr (the Library module is covered in Chapter 3, Tools Available Within the Library Module).
You can see an overview of the Library module in the following screenshot:

Figure 1.12 – Library module with all panels and tabs enabled: grid view
The Library module's right panel includes Histogram, Quick Develop tools that allow simple adjustments to be made to reviewed photographs, and tools for editing a picture's metadata. These right-side panel tabs are where we can add and manage keywords, captions, and copyright notices, change the time when photos were made, or add and amend Global Positioning System (GPS) data. All available information about each photograph can be accessed and changed through this panel, including mass changes applied to groups of photos.
The Library module's top part contains a panel with a powerful search tool to make queries based on fields available within photographs' metadata. The same top panel also includes a search engine based on the text and rating we applied to our photographs. You can see a metadata filter example in the following screenshot:

Figure 1.13 – Metadata filter example of query columns
On the bottom part of the screen, we can always find the filmstrip (also see Figure 1.7), as illustrated in the following screenshot:

Figure 1.14 – Right-clicked toolbar reveals access to folders, collections, and so on
Directly above the ever-present filmstrip is a toolbar with access to a personal selection of folders, collections, and customizable filters to see only the images we choose. Again, the filmstrip is the only panel that remains unchanged throughout Lightroom and is accessible within every single module. The Library module offers us also an ad hoc slideshow functionality and control over the potential second screen.
Folders are a mirror image of a file-and-folder structure on the hard drive. When we import into Lightroom, we can choose how and where photographs import to keep everything structured. Suppose we already have an extensive library of images in perfect order. In that case, we can add them to Lightroom without changing their position on the hard drive. From that moment, Lightroom folders will reflect the folder structure of our hard drive. We can naturally choose different approaches for different files and folders. We can even edit the folders' content when external drives are not connected—that is a whole other topic, though described in detail later in this book.
Collections, on the other hand, do not have any significant physical presence on the hard drive. They are simply a visually presented database containing references to actual files. Collections can be made up of photographs present in folders located on various hard drives, and we will still be able to browse, reorder, and edit collections, even when our external hard drives are not connected.
This is an example of the Compare view, available in the Library module:

Figure 1.15 – Compare view with the developed photograph on the left and the original photo on the right
Develop module
This is the heart of Lightroom's workshop where most of the magic happens (we will be learning all about the Develop module in Chapter 5, An Introduction to the Develop Module and Chapter 6, A Detailed View of the Develop Module's Functions). You can see an overview of it here:

Figure 1.16 – Develop module with all panels enabled
The top-left corner starts again with the familiar Navigator. The three following tabs are exclusive to the Develop module and are outlined in more detail here:
- Presets is where you will store all different "looks and recipes" that can be later applied to any photographs.
- Snapshots will keep various versions and different looks of the same picture that we can choose from later when we cannot decide which definitive version to go for.
- The History tab is a time-machine type of tool. Lightroom keeps every single change we ever made to our photographs, and all this history is always accessible to us. We have unlimited undos always available to us. We can revisit each photograph to see how it looked at any stage of being developed.
We also have a tab called Collection. It is a familiar tab that we can access without leaving the Develop module.
The right-side panel starts with the familiar sight of the Histogram, which is by default in the same position as within the Library module. In the default view, the Histogram is followed by a collection of all available tools that we will use to adjust our photographs and give them the desired look.
The first tab contains all basic tone-correction tools, from exposure and contrast through more nuanced controls over shadows and highlights to photo enhancers such as clarity or vibrance. This is just a peek at all available tools; going further into menus and opening subsequent tabs, we will be able to do the following:
- Correct an image's tonality with the Curves tool.
- Adjust the colors of a photograph with Hue, Saturation, and Luminance (HSL).
- Colorize highlights and shadows of a picture with Color Grading.
- Work on sharpness, reduce noise, and apply lens-specific corrections.
- Transform the geometry of our photographs.
- Add vignetting or grain.
- Apply camera-specific color calibration.
Note
Let's not forget about the Crop overlay, Spot removal, Red eye correction, and Masking tools just below the Histogram at the top of this panel. We will be using adjustment brushes for dodging, burning, and other localized work, from darkening a sky that is too bright to removing blemishes and softening the skin on portraits. That is an extensive list of capabilities, and all of them are provided in a package that is easy to use and instantly gratifying. All adjustments and effects are visible straight away and easily changed, adjusted, or completely reversed. All changes can be immediately applied to all the photographs we choose in just one click, which is an incredibly powerful feature, saving hours of work. We will look in detail at each of these functions in Chapter 5, An Introduction to the Develop Module, and Chapter 6, A Detailed View of the Develop Module's Functions.
Tip: The fastest way to enter the Develop module is to press the "D" key on the keyboard.
Map module
This one is quite self-explanatory—all photographs in your library containing geographical coordinates will be distributed on a map to help us find photographs that we might be looking for. The task of pinpointing "that one" photograph might sound easy when our library is still small, but after years of photographing, the library builds up and makes things harder to find.
You can see an overview of the Map module in the following screenshot:

Figure 1.17 – Map module with all panels enabled: synced smartphone folder view
The Map module can help us to locate folders we are searching for. The familiar tab with all collections is at our disposal on the screen's right side—more about the Map module in Chapter 9, Slideshow, Map, and Web Modules.
Book module
This is the best tool for creating book layouts without the need to learn any additional graphic software.
You can see an overview of the Book module here:
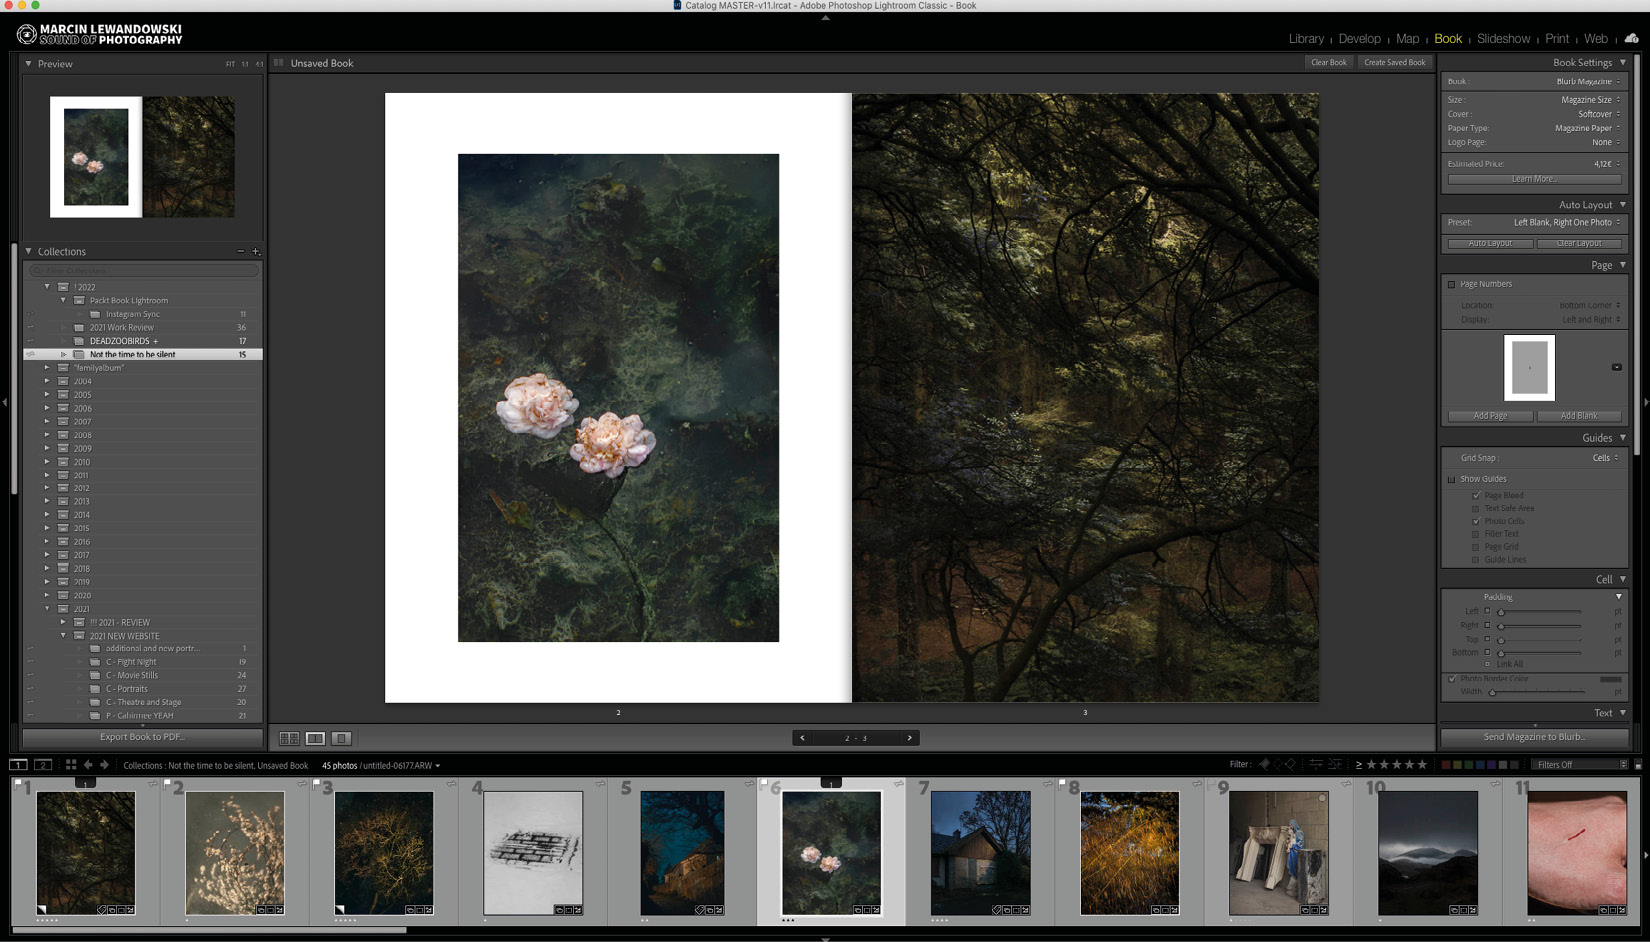
Figure 1.18 – Book module with all panels enabled with sample layout
It is as easy as "choose-place-print", with all adjustments to the layout that you might think of in-between. Once the design is finalized, it can be saved as print optimized files or sent directly to Blurb for printing as a book or magazine in multiple sizes and aspect ratios. More about the Book module can be found in Chapter 9, Slideshow, Map, and Web Modules.
Slideshow module
Forget PowerPoint or Keynote. The process of creating visually striking slideshows within Lightroom is as simple as choosing the right collection and pressing GO.
You can see an overview of the Slideshow module in the following screenshot:
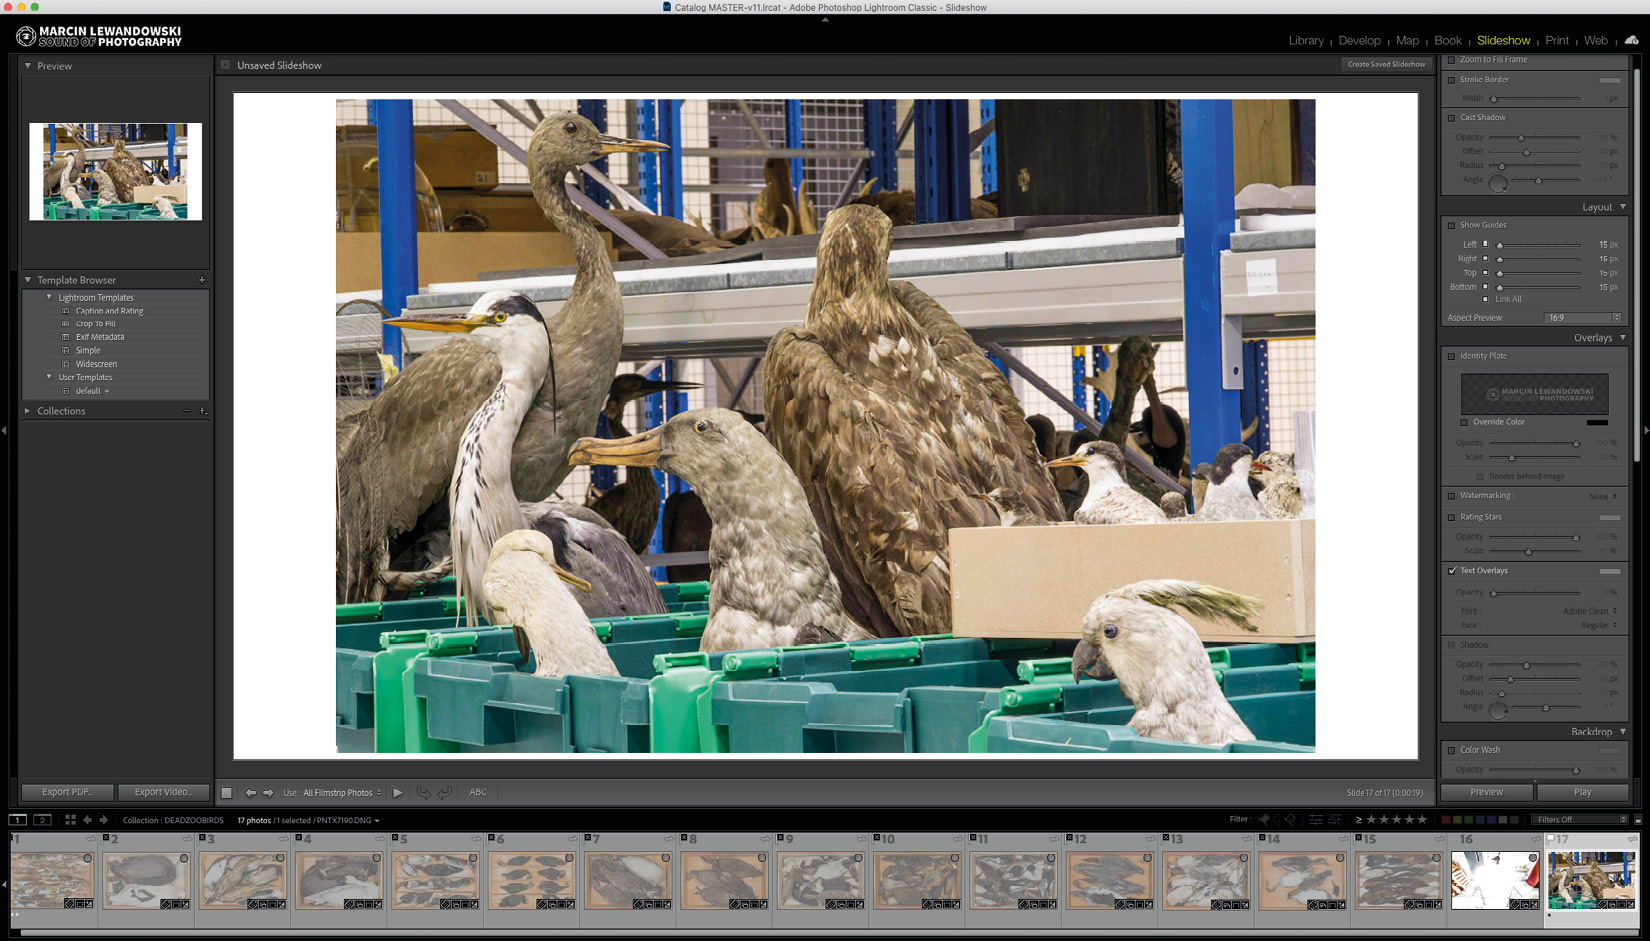
Figure 1.19 – Slideshow module with all panels enabled
As with most other modules, we are greeted with a large view of selected work accompanied by the Collections tab on the left and current panel-specific adjustments on the right. We can use the slideshow module to export Portable Document Format (PDF) files or videos, and we can run a slideshow on a secondary screen while we work on our photographs. We'll learn all about this module in Chapter 9, Slideshow, Map, and Web Modules, of this book.
Print module
Just as with all other modules, Print also has the Collections module available on the right-side panel, and a template browser accompanies it to save our print-specific layout designs.
You can see an overview of the Print module here:
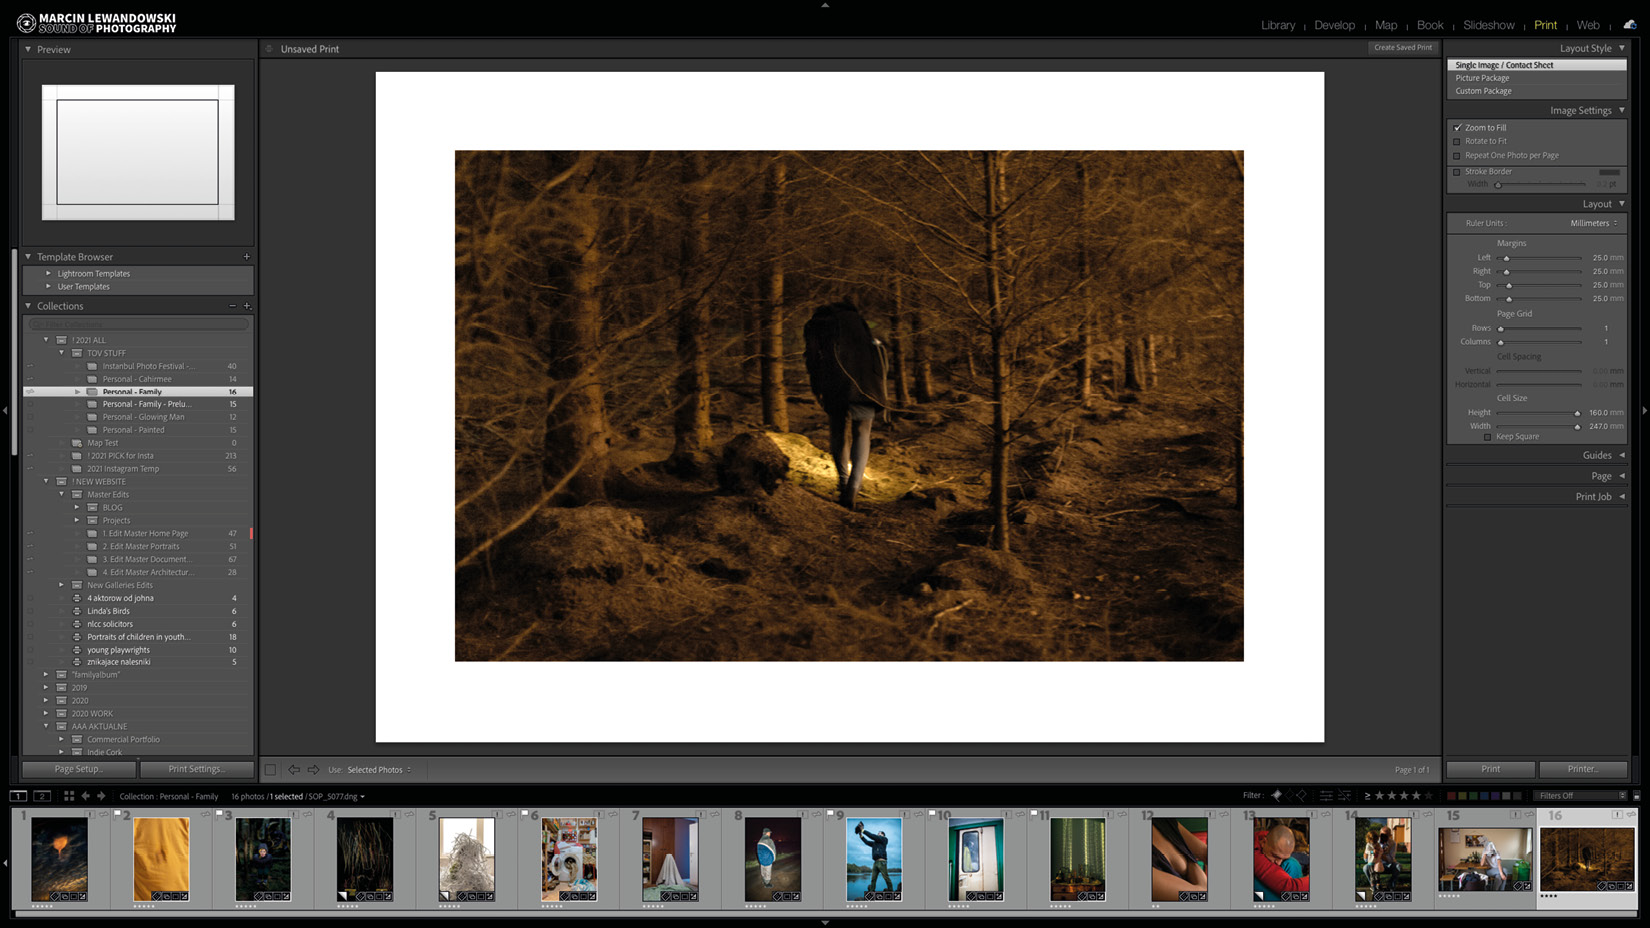
Figure 1.20 – Print module with all panels enabled
As with each module, it also offers the ever-present filmstrip on the bottom of the panel. The right-side panel has all the necessary tools to adjust the size, placement, and appearance of images we print. Adjustments include everything from margin sizes, multiple-copies picture packages, borders, watermarking, and color management, down to the use of International Color Consortium (ICC) profiles. It is a precise and very flexible module to work with. We can prepare print files in any chosen specification for printing with an outside service as much as we can do it ourselves. We'll learn about this module in Chapter 8, Get them All Out - Using the Print and Book Modules.
Web module
If you do not have a website, this module has everything you need to build one. Simple customization and the ability to create templates mean that you can build a website in no time at all, including direct upload via the File Transfer Protocol (FTP).
You can see an overview of the Web module here:

Figure 1.21 – Web module with all panels enabled
We can access all Lightroom modules from the menu in the top-right corner through the File menu and multiple keyboard shortcuts. Please see a handy reference sheet with all keyboard shortcuts at the end of this book.
Customizing Lightroom
This is an excellent place to mention the possible customization of Lightroom, which can be done on many levels—from purely aesthetical to functional. Regarding the practical part, we will be mentioning all of its aspects as we go through each panel. However, in a nutshell, practically everything can be temporarily disabled and removed from our view to create a clutter-free environment that suits our needs. Some tabs can even be moved around, especially within the Develop module. Please look at the following example with the default Module Picker and Develop module layout versus an example of a simplified Module Picker and changed layout and content of the Develop module's right panel.
See the following screenshot and read on to learn how to change it yourself:
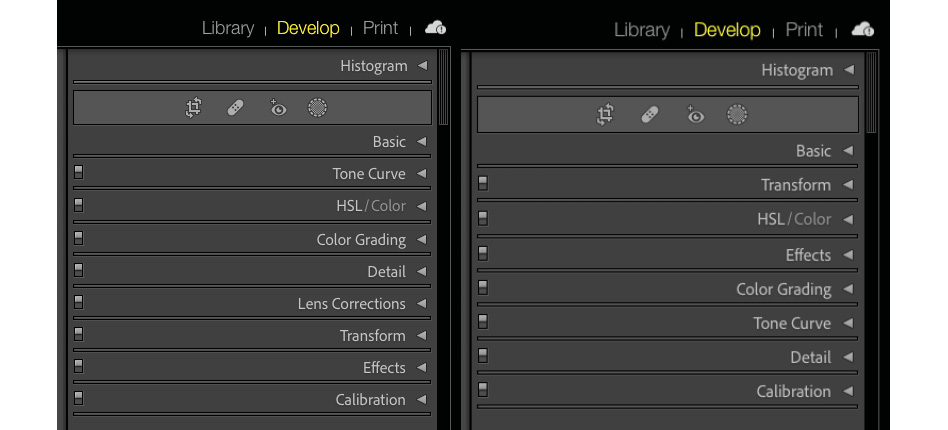
Figure 1.22 – Default Module Picker layout on the left and customized version on the right
When it comes to visual customization, we can change end panels and identity plates. Both of these are fairly simple operations.
We can access the end panels' settings through the Preferences menu (also accessed by "⌘"). Just go to Lightroom Classic > Preferences > Interface > End Marks > Go To Panel End Marks Folder. This folder is by default empty, but once you save any .png files in there, they will be available to use as end marks. We can use something purely aesthetical such as a logo or something more functional, such as a reminder about keyboard shortcuts or keywording principles; our imagination is the limit!
We have the same freedom with the identity plate, which will be populated with our Adobe identifier (ID) by default. This can be changed by right-clicking anywhere on the Module Picker's left side. From the pop-up menu, we choose the Edit Identity Plate… option, which gives us full control over its look. You can see an illustration of this in Figure 1.23.

Figure 1.23 – Default Identity Plate example and Accessing Identity Plate Editor menu
Just as with end marks, the files you want to use must be in .png format, and once you decide what you want to use, just click Locate File… and choose the image you want. I suggest you start experimenting with a picture that's not taller than 250 pixels (px) so that it can fit snuggly in the corner. Once we pick our branding, this is also the place to change the font face and font size for the Module Picker. If you can't see it, click on the Show Details button in the bottom-left corner, as illustrated in Figure 1.24A.
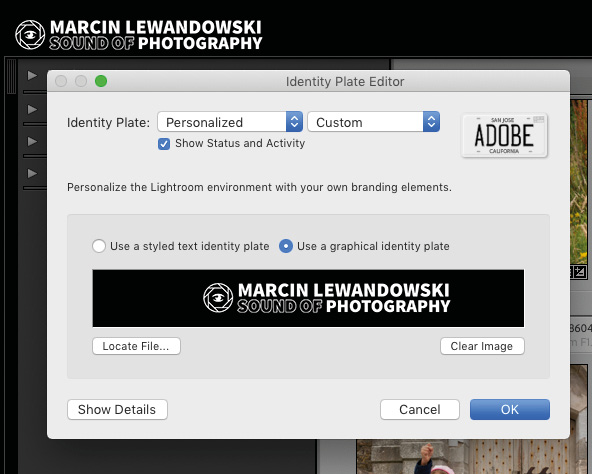
Figure 1.24A

Figure 1.24B – Identity Plate Editor
Summary
Even though we didn't go into much detail in this chapter, you can see that it is a very comprehensive tool that will help any photographer in their work or hobby. Even if you only use Lightroom for asset management, which we will cover in the next two chapters describing Import dialog and the Library module, you will save a ton of time and develop a way of thinking about your collection that is impossible outside of Lightroom. If you travel a lot, Lightroom will help in tracking your trips. If you print your photographs, Lightroom will help you manage that process, just as it will if you are designing books or presentations. Even simple touches such as the customization of your logo can be beneficial—think about showing your work to a client on your laptop/tablet and always having your name and the name of your website present; this can be a powerful branding tool. The remote usage capabilities and syncing can be advantageous, too—Lightroom offers it all within the same package and without the need for any plugins or additional software. Saying all this, the true power of Lightroom lies in its Develop module, where we will polish our photographs and make them stand out from the crowd, quite often with just a few simple clicks.
As you can see, Lightroom is a very capable piece of software designed for photographers to make their work easier and more enjoyable. Now, it's time to learn how to utilize all of these tools to the photographer's benefit.
