
Chapter 12. Extending SO

So far, we’ve been working with the default installation of SO. This chapter introduces a few ways to extend it. You just need to edit a few configuration files and download some external content to get more from your SO setup.
To move beyond the “stock” SO installation, we’ll look at three ways to leverage additional functionality provided by the Bro suite:
Use the MD5 hashes logged by Bro with the website VirusTotal or other third-party analysis engines.
Configure Bro to extract binaries from network traffic, so that you can submit those artifacts to third-party analysis engines.
Integrate external intelligence from Mandiant’s APT1 report with Bro to generate alert data.
The chapter concludes with an example that shows how SO reports and extracts the download of a malicious binary.
Using Bro to Track Executables
When trying to defend an enterprise, CIRTs can benefit by knowing which executables users are downloading over the network. Usually, these executables are benign tools or packages that people need to do their jobs, but sometimes they’re malicious software. Bro can help you to discover the sorts of executables people are downloading in order to protect them from harm.
Hashing Downloaded Executables with Bro
By default, the version of Bro shipped with SO calculates an MD5 hash (a cryptographic representation of a file’s contents) for every executable downloaded via HTTP. These hash values can help us track the executables downloaded by users. For example, Example 12-1 shows how Bro tracks executable downloads. The notice.log file records data about hashes that Bro generates when it sees executables transferred over HTTP.
2013-04-12T13:33:47+0000 mBNkJTlLBfa 192.168.2. 108 49630 23.62.236.50 80 1 GET download.cdn.mozilla.net /pub/mozilla.org/ firefox/releases/20.0.1/ win32/en-US/Firefox Setup 20.0.1.exehttp://www.mozilla.org/en-US/products/download. html?product=firefox-20.0&os=win&lang=en-US Mozilla/5.0 (Windows NT 6.1; WOW64; rv:19.0) Gecko/20100101 Firefox/19.0 0 21036128 200 OK - - - (empty) - -- application/x-dosexec
1e39efe30b02fd96b10785b49e23913b
You can see the download of Firefox Setup 20.0.1.exe ![]() , a file of type
, a file of type application/x-dosexec ![]() , with the hash
, with the hash 1e39efe30b02fd96b10785b49e23913b ![]() . By default, Bro reports when it hashes executables and writes an event to the Bro notice.log file, as shown in Example 12-2.
. By default, Bro reports when it hashes executables and writes an event to the Bro notice.log file, as shown in Example 12-2.
2013-04-12T13:34:01+0000 mBNkJTlLBfa 192.168.2.108 49630 23.62.236.50 80 tcp HTTP::MD5192.168.2.108 23.62.236.50 80 - sov-eth0-1 Notice::ACTION_LOG 6 3600.000000 F - - - - - -- -
Here, you see the download of Firefox Setup 20.0.1.exe ![]() , with Bro’s recognition that this is an HTTP and requires MD5 hashing
, with Bro’s recognition that this is an HTTP and requires MD5 hashing ![]() and a matching hash
and a matching hash 1e39efe30b02fd96b10785b49e23913b ![]() . You can use third-party sources with the hash to get more information about this download.
. You can use third-party sources with the hash to get more information about this download.
Submitting a Hash to VirusTotal
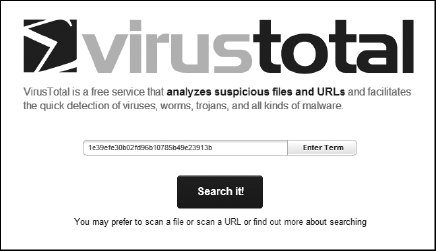
VirusTotal (http://www.virustotal.com/) is a popular online resource for learning more about binaries. In addition to submitting actual files, users can also submit hashes of binaries to VirusTotal to see if those hashes are present in the VirusTotal database. If a previous user has already uploaded a binary with the same hash to VirusTotal, a search for that hash should reveal what VirusTotal knows about the binary submitted earlier.
To see this functionality at work, we’ll submit the hash logged by Bro from Example 12-1, as shown in Figure 12-1.
Within a few seconds, we see results like those shown in Figure 12-2.

VirusTotal has a match for this hash (notice the four angels), and no antivirus engines have detected the binary as malicious, as shown in the Detection Ratio field.
The Additional Information tab offers more data on the binaries that VirusTotal has seen with the matching MD5 hash, as shown in Example 12-3.
First seen by VirusTotal 2013-04-10 22:10:23 UTC ( 6 days, 20 hours ago ) Last seen by VirusTotal 2013-04-17 15:29:15 UTC ( 3 hours, 8 minutes ago ) File names (max. 25)Firefox_Setup_20.0.1.exeFirefox Setup 20.0.1.exetest.exe 7zS.sfx.exe Firefox_Setup_20.0.1GB32.exe TtfjHao4.exe.partFirefox_Setup_20.0.1.exe7zS.sfx file-5362262_exe Firefox%20Setup%2020.0.1.exe
As highlighted in bold, names referencing Firefox setup (Firefox_Setup_20.01.exe) are the same as the binary we observed in our Bro logs, but others, like file-5362262_exe, are completely different.
This analysis is helpful, but not conclusive. It would be better to have copies of the binaries themselves, not just their hashes. We could do more analysis with the original artifacts.
Using Bro to Extract Binaries from Traffic
By default, Bro with SO logs MD5 hashes of binaries downloaded over HTTP, but it does not extract the binaries and save them to disk. It’s easy to configure Bro to take these actions, however, but we do need to be careful not to overwhelm the sensor with the extracted binaries. To reduce that potential problem, we’ll tell Bro to extract Windows executables downloaded over HTTP and FTP only.
Configuring Bro to Extract Binaries from Traffic
Bro inspects traffic and generates logs based on the policy scripts that ship with the default installation. Policy scripts are the ways analysts use the Bro network programming language (a term popularized by Liam Randall) to tell the Bro engine what to do with the traffic it sees.
Bro reports what it finds using logfiles and messages that it creates using its notice framework. (You’re encouraged to leave the default scripts alone, and to make changes to the policy scripts found in the /opt/bro/share/bro/site/ directory.)
To reconfigure Bro to extract Windows executables downloaded over HTTP and FTP, we start by creating a place to store extracted content with this command:
$ sudo mkdir -p /nsm/bro/extracted/http/ /nsm/bro/extracted/ftp/Next, we create a copy of the local.bro policy script for safekeeping.
$ sudo cp /opt/bro/share/bro/site/local.bro /opt/bro/share/bro/site/local.bro.origNow we edit the local.bro file. (I’m using the vi editor, but use any editor you like, such as the Leafpad program bundled with SO.)
$ sudo vi /opt/bro/share/bro/site/local.broExample 12-4 shows the content to add at the very bottom of the local.bro file.
# Extract EXEs redef HTTP::extract_file_types += /application/x-dosexec/;
If you wanted Bro to extract executables from Simple Mail Transfer Protocol (SMTP) as well, you could add more lines similar to those in Example 12-4, replacing HTTP with SMTP. Support for extracting binaries from Internet Relay Chat (IRC) is possible using the same method. To extract more than Windows executables, you could alter ![]() and
and ![]() so that the application portions read as follows:
so that the application portions read as follows:
/application/.*/;
Replacing x-dosexec with .* tells Bro to extract any application type it recognizes. You should not run this sort of configuration in production because you could overload your sensor as it tries to rebuild and write everything Bro recognizes. Use /application/.*/; only to process saved traces with limited amounts of traffic.
Now that we’ve altered Bro’s local.bro policy script, let’s test our new functionality.
Collecting Traffic to Test Bro
When adding new capabilities to Bro and your SO installation, you should test the changes manually before committing them. Bro allows you to run policy scripts and other functionality against saved traffic, and we’ll do this to test its newly configured ability to extract binaries from packets.
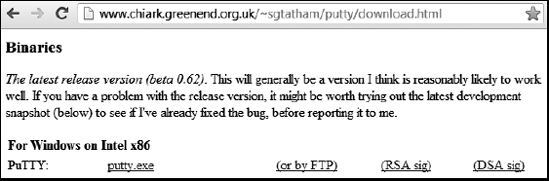
To provide the traffic for this test, we will download the Windows SSH client PuTTY via HTTP and FTP. The PuTTY website (http://www.chiark.greenend.org.uk/~sgtatham/putty/download.html) provides links for downloading PuTTY via HTTP (http://the.earth.li/~sgtatham/putty/latest/x86/putty.exe) and FTP (ftp://ftp.cMark.greenend.org.uk/users/sgtatham/putty-latest/x86/putty.exe), giving us ways to test the capabilities we added to Bro. To save the traffic for the test, we will determine the IP addresses of the two servers hosting putty.exe via HTTP (the.earth.li) and FTP (ftp.chiark.greenend.org.uk), as shown in Example 12-5, using the Linux host command in a terminal window.
$host the.earth.lithe.earth.li has address 46.43.34.31host ftp.chiark.greenend.org.ukftp.chiark.greenend.org.uk is an alias for service-name.chiark.greenend.org. uk. service-name.chiark.greenend.org.uk has address 212.13.197.229
Next, we run two instances of Tcpdump: one configured to log traffic to and from the HTTP server at 46.43.34.31 ![]() , and another to log traffic to and from the FTP server at 212.13.197.229
, and another to log traffic to and from the FTP server at 212.13.197.229 ![]() . Be sure to run the first command in one terminal, for the HTTP traffic:
. Be sure to run the first command in one terminal, for the HTTP traffic:
$ sudo tcpdump -n -i eth0 -w http-putty.pcap -s 0 host 46.43.34.31Run the second command in another terminal, for the FTP traffic:
$ sudo tcpdump -n -i eth0 -w ftp-putty.pcap -s 0 host 212.13.197.229Now we visit the PuTTY download website, shown in Figure 12-3, and download putty.exe via HTTP and then FTP.
Once the download is finished, stop each Tcpdump instance by pressing ctrl-C, and then use Capinfos to look at the metadata for each trace, as shown in Example 12-6.
$capinfos putty-http.pcap putty-ftp.pcapFile name: putty-http.pcap File type: Wireshark/tcpdump/... - libpcap File encapsulation: Ethernet Packet size limit: file hdr: 65535 bytes Number of packets: 509 File size: 521880 bytes Data size: 513712 bytes --snip-- File name: putty-ftp.pcap File type: Wireshark/tcpdump/... - libpcap File encapsulation: Ethernet Packet size limit: file hdr: 65535 bytes Number of packets: 558 File size: 525649 bytes Data size: 516697 bytes --snip--
Testing Bro to Extract Binaries from HTTP Traffic
With the test traffic data ready, let’s run Bro against each trace to see what logs it creates. Example 12-7 runs Bro against the putty-http.pcap file ![]() and tells Bro to reference our modified local.bro file
and tells Bro to reference our modified local.bro file ![]() . (Notice that I run these commands in a directory called bro-http to separate the output from the second test for FTP.)
. (Notice that I run these commands in a directory called bro-http to separate the output from the second test for FTP.)
$ sudo bro -r putty-http.pcap
We can now see which logs Bro generated. First, we’ll look at the contents of the current working directory, as shown in Example 12-8.
$ls -altotal 560 drwxrwxr-x 3 sov sov 4096 Apr 17 19:33 . drwxr-xr-x 29 sov sov 4096 Apr 17 19:32 .. -rw-r--r-- 1 root root 280 Apr 17 19:33 capture_loss.log -rw-r--r-- 1 root root 763 Apr 17 19:33 conn.log -rw-r--r-- 1 root root 1376 Apr 17 19:33 http.log
Now let’s examine the http.log file ![]() in more detail with the
in more detail with the cat and bro-cut commands in tandem, as shown in Example 12-9. The -d flags tells bro-cut to display a human-readable timestamp, and -C tells it to preserve the file headers to show the fields that are present.
$cat http.log | bro-cut -d -C#separator x09 #set_separator , #empty_field (empty) #unset_field - #path http #open 2013-04-17-19-33-23 #fields ts uid id.orig_h id.orig_p id.resp_h id.resp_p trans_ depth method host uri referrer user_agent request_body_len response_body_len status_code status_msg info_code info_msg filename tags username password proxied mime_type md5 extraction_file #types string string addr port addr port count string string string string string count count count string count string string table[enum] string string table[string] string string file 2013-04-17T17:53:28+0000http://www.chiark.greenend.org.uk/˜sgtatham/ putty/download.html Mozilla/5.0 (Windows NT 6.1; WOW64) AppleWebKit/537.31 (KHTML, like Gecko) Chrome/26.0.1410.64 Safari/537.31 0 300 302
Found - - - (empty) - - - text/html - - 2013-04-17T17:53:28+0000
192.168.2.108 53999 46.43.34.31 80 2 GET the.earth.li /˜sgtatham/putty/0.62/x86/putty.exe
http://www.chiark.greenend.org.uk/˜sgtatham/putty/ download.html Mozilla/5.0 (Windows NT 6.1; WOW64) AppleWebKit/537.31 (KHTML, like Gecko) Chrome/26.0.1410.64 Safari/537.31 0 483328 200
OK - - - (empty) - - - application/ x-dosexec a3ccfd0aa0b17fd23aa9fd0d84b86c05
/nsm/bro/extracted/http/http-item_192.168.2.108:53999-46.43.34.31:80_resp_2.dat
#close 2013-04-17-19-33-23
The two log entries ![]() and
and ![]() show traffic over a single web connection, because Bro assigned the same tracking ID
show traffic over a single web connection, because Bro assigned the same tracking ID ![]() and
and ![]() to both records. In the first record
to both records. In the first record ![]() , the web server replies with a
, the web server replies with a 302 code ![]() that directed the download from /~sgtatham/putty/latest/x86/putty.exe
that directed the download from /~sgtatham/putty/latest/x86/putty.exe ![]() to /~sgtatham/putty/0.62/x86/putty.exe
to /~sgtatham/putty/0.62/x86/putty.exe ![]() . In the second record
. In the second record ![]() , the web server replies with a
, the web server replies with a 200 code ![]() showing that it has the requested file. Finally, the second record shows that Bro extracted putty.exe to a specific directory and file, /nsm/bro/extracted/http/http-item_192.168.2.108:53999-46.43.34.31:80_resp_2.dat
showing that it has the requested file. Finally, the second record shows that Bro extracted putty.exe to a specific directory and file, /nsm/bro/extracted/http/http-item_192.168.2.108:53999-46.43.34.31:80_resp_2.dat ![]() . We also have an MD5 hash for the file,
. We also have an MD5 hash for the file, a3ccfd0aa0b17fd23aa9fd0d84b86c05 ![]() .
.
Bro is processing this HTTP traffic as we expected.
Examining the Binary Extracted from HTTP
Now that we have indicators that Bro extracted a file from the HTTP traffic, we can examine it on disk. Example 12-10 shows the results of that analysis.
$ls -al /nsm/bro/extracted/http/http-item_192.168.2.108:53999-46.43.34.31:80_resp_2.dat-rw-r--r-- 1 root root 483328file /nsm/bro/extracted/http/http-item_192.168.2.108:53999-46.43.34.31:80_resp_2.dat/nsm/bro/extracted/http/http-item_192.168.2.108:53999-46.43.34.31:80_resp_2. dat: PE32 executable (GUI) Intel 80386, for MS Windowsmd5sum /nsm/bro/extracted/http/http-item_192.168.2.108:53999-46.43.34.31:80_resp_2.data3ccfd0aa0b17fd23aa9fd0d84b86c05
Here, we see that the extracted file is 483,328 bytes ![]() , with file type
, with file type PE32 executable (GUI) Intel 80386, for MS Windows ![]() and a hash (
and a hash (a3ccfd0aa0b17fd23aa9fd0d84b86c05 ![]() ) that matches the values Bro reported in Example 12-9.
) that matches the values Bro reported in Example 12-9.
To confirm that the hash matches the values of the binary downloaded to the Windows system, we look at the file properties, as shown in Figure 12-4. I used HashTab by Implbits (http://www.implbits.com/hashtab.aspx) to generate these hashes in the File Hashes tab of the Properties dialog.

Testing Bro to Extract Binaries from FTP Traffic
As with our HTTP test, we can run Bro against the FTP example to see the logs it creates. Example 12-11 demonstrates running Bro against putty-ftp.pcap ![]() and telling Bro to again reference our modified local.bro
and telling Bro to again reference our modified local.bro ![]() file. (Notice that I run these commands in a directory called bro-ftp to keep the output separate from the HTTP test results.)
file. (Notice that I run these commands in a directory called bro-ftp to keep the output separate from the HTTP test results.)
$ sudo bro -r putty-ftp.pcap
We can now see which logs Bro generated. First, we examine the contents of the current working directory, as shown in Example 12-12.
$ls -altotal 560 drwxrwxr-x 3 sov sov 4096 Apr 17 20:30 . drwxr-xr-x 29 sov sov 4096 Apr 17 20:30 .. -rw-r--r-- 1 root root 281 Apr 17 20:30 capture_loss.log -rw-r--r-- 1 root root 1531 Apr 17 20:30 conn.log -rw-r--r-- 1 root root 731 Apr 17 20:30 ftp.log
Let’s look at the ftp.log ![]() . Example 12-13 shows the results of using the
. Example 12-13 shows the results of using the cat and bro-cut commands in tandem.
$cat ftp.log | bro-cut -d -C#separator x09 #set_separator , #empty_field (empty) #unset_field - #path ftp #open 2013-04-17-20-30-56 #fields ts uid id.orig_h id.orig_p id.resp_h id.resp_p user password command arg mime_type mime_desc file_size reply_code reply_msg tags extraction_file #types string string addr port addr port string string string string string string count count string table[string] file 2013-04-17T18:06:59+0000
This one log entry at ![]() tracks a single FTP session, because Bro assigns one tracking ID
tracks a single FTP session, because Bro assigns one tracking ID ![]() to the session. Here, we see the artifacts of downloading a binary via Google Chrome. The username supplied is
to the session. Here, we see the artifacts of downloading a binary via Google Chrome. The username supplied is anonymous ![]() , and the password is [email protected]
, and the password is [email protected] ![]() . We see that the file retrieved, putty-latest/x86/putty.exe
. We see that the file retrieved, putty-latest/x86/putty.exe ![]() , is of type
, is of type MS-DOS executable, MZ for MS-DOS ![]() . We also see that the transfer completed successfully
. We also see that the transfer completed successfully ![]() and that Bro extracted the binary that it observed: /nsm/bro/extracted/ftp/ftp-file_192.168.2.108:54106-212.13.197.229:38177_1.dat
and that Bro extracted the binary that it observed: /nsm/bro/extracted/ftp/ftp-file_192.168.2.108:54106-212.13.197.229:38177_1.dat ![]() .
.
Examining the Binary Extracted from FTP
Now that we have indicators that Bro extracted a file from the FTP traffic, we can examine it on disk. Example 12-14 shows the results of that analysis. In this example, we’ll only confirm that the MD5 hash matches what we saw earlier.
$md5sum /nsm/bro/extracted/ftp/ftp-file_192.168.2.108:54106-212.13.197.229:38177_1.data3ccfd0aa0b17fd23aa9fd0d84b86c05
Notice that the MD5 hash ![]() matches the values listed in the HTTP examples, Example 12-10 and Figure 12-4.
matches the values listed in the HTTP examples, Example 12-10 and Figure 12-4.
Submitting a Hash and Binary to VirusTotal
Now that we have both the hash of a binary and the binary itself (recovered from network traffic), we can submit them to VirusTotal for analysis. Whereas in Figure 12-1 we submitted only a hash of a binary for analysis, in this section, we’ll submit the hash and then the binary in order to compare the results. In Figure 12-5, we submit the hash.
Figure 12-6 shows what VirusTotal knows about this hash.
The results of this analysis are a little mixed, with two antivirus engines (in the Detection Ratio field) reporting the file associated with this hash as malicious! We know this file is legitimate, however, because we downloaded it from the publisher’s website. If we’re still suspicious, we could use the cryptographic signatures published on the PuTTY download page to verify that the file we downloaded is the file posted on the website, but that would only confirm that someone with access to the private key posted a binary signed by that key. (Trust only goes so far in the digital world.)


VirusTotal publishes other information along with antivirus results, such as the output of running Mark Russinovich’s Sigcheck (http://technet.microsoft.com/en-us/sysinternals/bb897441.aspx), which checks to confirm that a file is digitally signed, as shown in Example 12-15.
Sigcheck
publisher................: Simon Tatham
product..................: PuTTY suite
internal name............: PuTTY
copyright................: Copyright (c) 1997-2011 Simon Tatham.
original name............: PuTTY
file version.............: Release 0.62
description..............: SSH, Telnet and Rlogin client
Sigcheck’s results appear to confirm that the hash we submitted matches a PuTTY binary uploaded by previous VirusTotal users.
We can also upload the binary Bro extracted for us, as shown in Figure 12-7.

VirusTotal knows about this binary, and it should: it’s the binary Bro extracted, and we just saw that the hash for it was already known to VirusTotal.
This general approach shows a powerful way to extend Bro to extract Windows binaries from HTTP and FTP traffic. However, the current instance of Bro is running with the previous configuration files in memory. Unless we restart Bro, it won’t know to apply the new local.bro configuration file to the running configuration.
Restarting Bro
Until you restart Bro, or reboot the SO system, Bro will continue running with the original local.bro script loaded. In order to benefit from Bro’s ability to extract Windows executables from network traffic, we need to have Bro reread its local.bro script. To tell Bro to process the script, use the broctl interface, as shown in Example 12-16.
broctl$sudo broctlcheckinstallrestartexit
In Example 12-16, broctl is started ![]() from a terminal that launches the
from a terminal that launches the broctl interface and accepts commands. Next, we run the check command ![]() to determine if the configuration files Bro reads are formatted properly. If so, Bro reports the status as
to determine if the configuration files Bro reads are formatted properly. If so, Bro reports the status as ok, and we install them ![]() . Next, we
. Next, we restart Bro ![]() , and after seeing the components restart, we
, and after seeing the components restart, we exit the broctl interface ![]() .
.
The last step is to confirm Bro’s status using the NSM scripts shipped with SO, as shown in Example 12-17. (You could do the same thing with the sudo broctl status command.)
$ sudo nsm_sensor_ps-status --only-bro
Status: Bro
Name       Type       Host       Status      Pid    Peers    Started
manager    manager    192.168.2.102 running     19555  2        18 Apr 00:29:37
proxy      proxy      192.168.2.102 running     19603  2        18 Apr 00:29:40
sov-eth0-1 worker     192.168.2.102 running     19647  2        18 Apr 00:29:42
Status: sov-eth0
According to the output of the nsm_sensor_ps-status --only-bro command, Bro is running properly with the new configuration.
To test the live configuration, we’ll download another executable and watch for entries in the Bro logs. Example 12-18 shows commands to test the new functionality on a production SO sensor configured to extract Windows executables.
$wget http://www.etree.org/cgi-bin/counter.cgi/software/md5sum.exe--2013-04-18 00:44:06-- http://www.etree.org/cgi-bin/counter.cgi/software/md5sum.exe Resolving www.etree.org (www.etree.org)... 152.19.134.46 Connecting to www.etree.org (www.etree.org)|152.19.134.46|:80... connected. HTTP request sent, awaiting response... 200 OK Length: 49152 (48K) [application/octet-stream] Saving to: `md5sum.exe' 100%[======================================>] 49,152 --.-K/s in 0.1s 2013-04-18 00:44:07 (398 KB/s) - `md5sum.exe' saved [49152/49152] $grep md5sum.exe /nsm/bro/logs/current/*
Example 12-18 shows two commands to validate Windows executable extraction on a production sensor. First, we download a Windows executable called md5sum.exe using the wget tool ![]() . Once the download is complete, we use
. Once the download is complete, we use grep to look for instances of the string md5sum in the current Bro logs ![]() .
.
There are two results:
The presence of these logs indicates that Bro is extracting Windows executables from HTTP traffic, thanks to our configuration changes and application restart.
Using APT1 Intelligence
In February 2013, Mandiant released a report on a Chinese military unit known as Advanced Persistent Threat 1 (APT1). Within China, APT1 is the Second Bureau of the Third Department of the General Staff Directorate of the People’s Liberation Army. Also known by its Military Unit Cover Designator, 61398, this Army team targets English-speaking companies and steals trade secrets, intellectual property, and other sensitive information.
In its report, Mandiant released 3000 IOCs (discussed in Chapter 9), including domain names, IP addresses, X.509 encryption certificates, and MD5 hashes of malware used by APT1. Mandiant also published video of the intruders interacting with victim Western computers to send phishing email, establish command-and-control channels, and exfiltrate data.
Although Mandiant published intelligence in OpenIOC (http://www.openioc.org/) format, it was not immediately clear how network defenders and NSM analysts could apply those indicators to their network. Within two days of the report’s arrival, Seth Hall from the Bro project published one answer: a new Bro module called APT1, incorporating Mandiant’s APT1 intelligence (https://github.com/sethhall/bro-apt1/). Network defenders running NSM shops using SO now had an easy way to search for APT1 indicators on the network.
Using the APT1 Module
So far, we’ve explored how Bro works with SO to create a variety of useful logs, and we’ve modified local.bro to enable the extraction of Windows executables from HTTP and FTP traffic. Now we will extend Bro by adding a new module to its configuration.
Seth’s APT1 module consists of three policy scripts:
- data.bro
This script contains a list of the domain names, MD5 hashes, and elements of the X.509 certificates Mandiant provided, formatted for consumption by Bro.
- main.bro
This script tells Bro’s notice framework to watch for matches against elements in data.bro.
- load__.bro
This script tells Bro to load data.bro and main.bro.
The module also includes a file called README.rst, which contains instructions on how to install the script, discusses new notices generated by Bro, and offers related information.
The IOCs in data.bro are formatted as shown in Example 12-19.
snip-- };snip-- };snip-- };
The data.bro file contains four main parts:
As you can see, it’s very easy to add IOCs to this file or a copy, in order to detect different activities. The main.bro file generates alert data in the Bro notice.log file, as shown in Example 12-20.
APT1::Domain_Hit
APT1::Certificate_Hit
APT1::File_MD5_Hit
We’ll see one of these alerts in a live example when we test the APT1 module, but first we need to get that module and install it.
Installing the APT1 Module
We can test the APT1 module using techniques like the ones we tried when enabling binary extraction from HTTP and FTP traffic. Example 12-21 shows this process in action.
$sudo apt-get install git--snip-- $cd /opt/bro/share/bro/site/$sudo git clone git://github.com/sethhall/bro-apt1.git apt1lsapt1 local.bro.orig local-proxy.bro local.bro local-manager.bro local-worker.bro $cd apt1$lsdata.bro __load__.bro main.bro README.rst
To acquire the APT1 module, first install the Git version control software ![]() , and then clone the Git repository of Seth Hall’s APT module
, and then clone the Git repository of Seth Hall’s APT module ![]() .
.
Once the APT1 module has been downloaded into the /opt/bro/share/bro/site/ directory, tell Bro about it by adding the following line to the bottom of local.bro:
@load apt1
With local.bro modified, we’re almost ready to test the APT1 module, but we still need to take one more step.
Generating Traffic to Test the APT1 Module
To test the APT1 module, we launch a terminal on our sensor and tell Tcpdump to capture traffic. We apply a BPF to focus on traffic to and from port 53 that involves our test system 192.168.2.102. Tcpdump will save what it sees to a trace file called port53.pcap.
$ sudo tcpdump -n -i eth0 -s 0 -w port53.pcap port 53 and host 192.168.2.102In a second terminal, query for one of the domains listed in the APT1 data.bro policy script advanbusiness.com, as shown in Example 12-22.
Next, we use the Linux utility host to query for advanbusiness.com ![]() , and see that the result is the IP address 50.63.202.91
, and see that the result is the IP address 50.63.202.91 ![]() .
.
Returning to Tcpdump, we stop the capture with ctrl-C and review the results, as shown in Example 12-23.
$tcpdump -n -r port53.pcapreading from file port53.pcap, link-type EN10MB (Ethernet) 14:30:15.622379 IP 192.168.2.102.57097 > 172.16.2.1.53: 57373+ A? advanbusiness.com.
Example 12-23 shows the query for advanbusiness.com ![]() , followed by the result: IP address 50.63.202.91
, followed by the result: IP address 50.63.202.91 ![]() . With this traffic, we can now test the APT1 module.
. With this traffic, we can now test the APT1 module.
Testing the APT1 Module
To test the APT1 module, we run Bro against the trace file we just captured. Example 12-24 shows the result.
$ sudo bro -r port53.pcap
Example 12-24 shows Bro reading a network trace ![]() , while the presence of the local.bro
, while the presence of the local.bro ![]() file in the command line tells Bro to read that file for additional configuration information. We can now see which logs Bro generated.
file in the command line tells Bro to read that file for additional configuration information. We can now see which logs Bro generated.
First, we examine the contents of the current working directory, as shown in Example 12-25.
$ls -altotal 52 drwxrwxr-x 3 soe soe 4096 Apr 18 14:52 . drwxr-xr-x 33 soe soe 4096 Apr 18 14:52 .. -rw-r--r-- 1 root root 278 Apr 18 14:52 capture_loss.log -rw-r--r-- 1 root root 865 Apr 18 14:52 conn.log -rw-r--r-- 1 root root 932 Apr 18 14:52 dns.log -rw-r--r-- 1 root root 8020 Apr 18 14:52 loaded_scripts.log -rw-r--r-- 1 root root 864 Apr 18 14:52 notice.log
Example 12-25 shows a variety of files created when Bro processed the network trace. Let’s look at the notice.log ![]() to see if the APT1 module detected the DNS query we made for the reportedly malicious advanbusiness.com domain. Example 12-26 shows the output.
to see if the APT1 module detected the DNS query we made for the reportedly malicious advanbusiness.com domain. Example 12-26 shows the output.
$cat notice.log | bro-cut -C -d#separator x09 #set_separator , #empty_field (empty) #unset_field - #path notice #open 2013-04-18-14-52-57 #fields ts uid id.orig_h id.orig_p id.resp_h id.resp_p proto note msg sub src dst p n peer_descr actions policy_items suppress_for dropped remote_location.country_code remote_location.region remote_ location.city remote_location.latitude remote_location.longitude metric_ index.host metric_index.str metric_index.network #types string string addr port addr port enum enum string string addr addr port count string table[enum] table[count] interval bool string string string double double addr string subnet 2013-04-18T14:30:15+0000 IVCYGEfpRya 192.168.2.102 57097 172.16.2.1 53 udp APT1::Domain_Hit
Example 12-26 shows Bro reporting an APT::Domain_hit alert ![]() , followed by information about the domain seen, advanbusiness.com
, followed by information about the domain seen, advanbusiness.com ![]() . Our test was successful, but this was only a test. To make Bro run the new configuration, we need to restart Bro, as shown in Example 12-27.
. Our test was successful, but this was only a test. To make Bro run the new configuration, we need to restart Bro, as shown in Example 12-27.
$ sudo broctl install && sudo broctl restart
removing old policies in /nsm/bro/spool/installed-scripts-do-not-touch/site ... done.
removing old policies in /nsm/bro/spool/installed-scripts-do-not-touch/auto ... done.
creating policy directories ... done.
installing site policies ... done.
generating cluster-layout.bro ... done.
generating local-networks.bro ... done.
generating broctl-config.bro ... done.
updating nodes ... done.
stopping ...
stopping soe-eth0-1 ...
stopping proxy ...
stopping manager ...
starting ...
starting manager ...
starting proxy ...
starting soe-eth0-1 ...
Remember to check Bro’s status using the sudo nsm_sensor_ps-status --only-bro command as well.
Reporting Downloads of Malicious Binaries
As you learned earlier, Bro can calculate MD5 hashes of Windows executables downloaded over HTTP. In this section, we’ll examine how SO and Bro integrate with a third-party malware hash registry to warn analysts when users download malicious software using a database offered by the Team Cymru organization.
Using the Team Cymru Malware Hash Registry
Team Cymru, formally known as Team Cymru Research NFP, describes itself as “a specialized Internet security research firm and 501(c)3 non-profit dedicated to making the Internet more secure” (http://www.team-cymru.org/About/). We can use their free Malware Hash Registry (MHR, at http://www.team-cymru.org/Services/MHR/) to match MD5 hashes against known malware.
Most analysts query the MHR via DNS. Example 12-28 shows how to use the Linux dig command to run DNS TXT record queries for a malware hash against MHR.
TXT and whois records$dig +short 733a48a9cb49651d72fe824ca91e8d00.malware.hash.cymru.com TXTdate -d @1277221946dig +short 1e39efe30b02fd96b10785b49e23913b.malware.hash.cymru.com TXTwhois -h hash.cymru.com 1e39efe30b02fd96b10785b49e23913b
The first example shows a DNS TXT records query for malware with hash 733a48a9cb49651d72fe824ca91e8d00 ![]() . (Search VirusTotal to see what it is!) The first part of the response shows the date when the MHR last saw the sample
. (Search VirusTotal to see what it is!) The first part of the response shows the date when the MHR last saw the sample ![]() . The second part of the response is a rough antivirus detection metric, as a percentage
. The second part of the response is a rough antivirus detection metric, as a percentage ![]() . We convert the timestamp from Unix epoch time to human-readable format with the
. We convert the timestamp from Unix epoch time to human-readable format with the date command ![]() , and see that it was June 22, 2010
, and see that it was June 22, 2010 ![]() .
.
The second example shows what happens when you query the MHR and it sends no response ![]() . The hash supplied is the value for the Firefox binary. Because the MHR has no data on this hash, we switch to the MHR WHOIS query functionality
. The hash supplied is the value for the Firefox binary. Because the MHR has no data on this hash, we switch to the MHR WHOIS query functionality ![]() . The
. The NO_DATA ![]() response proves the MHR doesn’t know the supplied hash.
response proves the MHR doesn’t know the supplied hash.
The example in Example 12-29 shows another query using dig, but not requesting a TXT record.
$dig +short 733a48a9cb49651d72fe824ca91e8d00.malware.hash.cymru.com127.0.0.2
We query for the same first hash from Example 12-28, but we let the default be an A record.
A query for an A record asks a DNS server to return an IP address for the requested fully qualified domain name. In contrast, a query for a PTR record asks a DNS server to return a fully qualified domain name for the requested IP address. A query for a TXT record asks a DNS server to reply with any text records associated with a domain name.
Our only result is the IP address 127.0.0.2. This is the MHR’s way of responding to A record queries that have a match. If we want more information about a match, we need to run a DNS query for a TXT record, as shown earlier in Example 12-28.
The MHR and SO: Active by Default
By default, Bro on SO is configured to work with the MHR to help detect malicious downloads. SO relies on Bro to calculate MD5 hashes of Windows executables downloaded over HTTP, and that Bro automatically submits those hashes to the MHR. We can see this activity in action if we query Bro logs via ELSA, as shown in Figure 12-8.

In Figure 12-8, we query ELSA for 1e39efe30b02fd96b10785b49e23913b.malware.hash.cymru.com—the MD5 hash of the Firefox binary from an earlier example (1e39efe30b02fd196b10785b49e23913b), plus the domain malware.hash.cymru.com. Figure 12-8 shows eight results, all of which are pairs. The first entry in the pair is a lookup for an A record for IPv4, and the second entry is a lookup for an AAAA record for IPv6. Thus, we have four unique queries for this particular MD5 hash.
We can use one of two approaches to determine if any of the lookups returned results:
Inspect the results returned by ELSA directly. For example, a result with no indication of malicious entries in the MHR looks like
|1|C_INTERNET|1|A|-|-|F|F|T|F|0|-|-for IPv4 and|1|C_INTERNET|28|AAAA|-|-|F|F|T|F|0|-|-for IPv6. We see these results for each of the entries in Figure 12-8, indicating that there are no matches in the MHR. This tells us that the MHR doesn’t think the download of a binary with MD51e39efe30b02fd96b10785b49e23913bis malicious.Query ELSA for
Malware_Hash_Registry_Match. This is part of the event returned by Bro when it queries the MHR and gets a positive response. In this case, the query finds no records in ELSA for a binary with hash1e39efe30b02fd96b10785b49e23913b.
The MHR and SO vs. a Malicious Download
Because SO and Bro query the MHR by default, in production, any match for a malicious download will appear in ELSA and the underlying Bro logs.
For example, suppose that one day you’re working with SO and your NSM data, and you run a query for Malware_Hash_Registry_Match. You get the result shown in Figure 12-9.
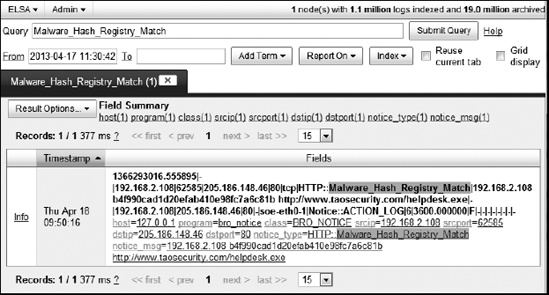
I’ve reproduced the same log entry as text only in Example 12-30 for easy reference.
Malware_Hash_Registry_Match1366293016.555895 - 192.168.2.108
This log result from the Bro notice.log file indicates that a computer with IP address 192.168.2.108 ![]() visited 205.186.148.46
visited 205.186.148.46 ![]() and triggered an
and triggered an HTTP::Malware_Hash_Registry_Match ![]() alert for MD5 hash
alert for MD5 hash b4f990cad1d20efab410e98fc7a6c81b ![]() from www.taosecurity.com and the helpdesk.exe file
from www.taosecurity.com and the helpdesk.exe file ![]() . We can learn more about this connection if we query ELSA for the filename helpdesk.exe, as shown in Figure 12-10.
. We can learn more about this connection if we query ELSA for the filename helpdesk.exe, as shown in Figure 12-10.
The results show three records:
The first record in Figure 12-10 is Bro’s way of telling us that it computed an MD5 hash of the helpdesk.exe binary.
The second record is the same as what we saw in the MD5 lookup.
The third record shows that Bro extracted the binary from the HTTP traffic and saved it as /nsm/bro/extracted/http/http-item_192.168.2.108:62585-205.186.148.46:80_resp_1.dat.

Identifying the Binary
We know that Bro and SO performed a lookup for the binary based on an MD5 hash, and we know that a match was found because Bro reported a Malware_Hash_Registry_Match event. We can take a different look at this result by querying ELSA using the hash and domain method demonstrated earlier in Figure 12-8.
We’ll modify the query slightly by adding a +127.0.0.2 after the hash and domain. The plus sign (+) tells ELSA to query for the term after it—specifically 127.0.0.2, which is the IP address that the MHR returns when Bro queries it for malware hashes. (We saw this difference in Example 12-28.) Figure 12-11 shows the result of looking for MHR matches for the hash and domain b4f990cad1d20efab410e98fc7a6c81b.malware.hash.cymru.com.

We get one result. The presence of the 127.0.0.2 reply tells us that the MHR recognized the hash.
At this point, we could take a few different paths to identify the binary:
Because the binary is stored in /nsm/bro/extracted/http/http-item_192.168.2.108:62585-205.186.148.46:80_resp_1.dat, we could perform manual analysis.
We could submit the extracted binary to a third-party engine like VirusTotal.
We could submit the hash to VirusTotal, which returns the results shown in Figure 12-12.

VirusTotal identifies the malware as a Poison Ivy variant—a popular remote-access Trojan (RAT) available from several websites. We hope the user identified through this case downloaded the tool only for testing purposes. If not, it’s time to begin looking for signs of outbound command-and-control traffic, as described in Chapter 10 and Chapter 11. Good hunting!
Conclusion
This chapter has introduced you to four ways to extend and make better use of functions packaged with SO. We covered how Bro creates MD5 hashes for executables, and showed how to use them with VirusTotal. We configured Bro to extract executable binaries from network traffic, and demonstrated how to integrate external intelligence from Mandiant’s APT1 report. We also generated alerts in Bro to simulate suspicious DNS lookups for an APT1 domain. We finished the chapter by showing how SO reports and extracts the download of a malicious binary in production, which we learned was the Poison Ivy RAT.
In the next chapter, we’ll take a look at two challenges to conducting NSM: proxies and checksums.