
A common complaint from project-studio operators is that too much sound either leaks into or out of their studios. Clearly, sound leaking out can cause problems with neighbours or other members of the household, while sound leaking in may get onto recordings made using microphones. However, the techniques used to stop sound getting in will also prevent from it getting out, so whether your concern is leakage in or leakage out, the approach to fixing it will be the same.
The subject of soundproofing is very different from that of room acoustics and is generally more complex to implement in a project studio situation, but sometimes attention to this area is necessary to make the operation of the studio viable. Unfortunately there is no lightweight solution to problems in this area, and foam and fibre materials that work to improve the acoustics of your room do little or nothing to improve sound isolation.
At the outset maybe we should drop the term soundproofing and replace it with the term ‘sound isolation’ as there is rarely such thing as total soundproofing, at least when talking about domestic studios. In reality the best you can hope for is to improve the situation, so you really need to determine whether the measures that you are able to take (both practically and economically) can reduce sound leakage to an acceptable level before you spend any money. For example, if you live in a rented apartment with only drywall partitions between you and the neighbours, it would be wishful thinking to imagine that there could be any practical or affordable solution that would allow you to practise on your double-kick drum, powermetal kit at 2am without everyone else in the building being aware of it. One reader contacted us to ask about a cheap soundproofing solution because they were only playing cheap instruments. Sadly the laws of physics don’t care about your budget! On the other hand, if you have more realistic expectations there’s a lot that can be done without breaking the bank, and a little DIY skill can save you a lot of money. Most of the isolation improvement solutions outlined in this chapter are within the scope of a DIY enthusiast, mostly using common materials available from your local builders’ merchant, although some more specialised items may be required from a studio materials supplier.
The quest for sound isolation has many different paths, one of the more common ones in professional circles being the construction of a full ‘room within a room’ – a completely separate inner room inside the existing space and isolated from the original floor by blocks of neoprene rubber or suspended on metal springs. This, however, is hardly a suitable approach for most home studios where space is often already limited, although if you’re setting up in a rented industrial unit it may be worth considering. There’s plenty of documentation on the subject available in acoustic design reference books and online, but it is rather beyond the scope of most DIY studio projects. Fortunately, you rarely need to go quite that far – we’ve seen a number of perfectly adequate studios, often in colleges, where additional studding and plasterboard walls have simply been added to the existing structure to give a worthwhile improvement.
Where Does Sound Go?
As with any other form of energy, sound energy can’t be destroyed or lost, it can only be converted to another form of energy. The vibrational energy of sound is converted into heat via the mechanism of friction, as the vibrating air transfers its energy to the walls and to objects within the room, trying to make them move in sympathy with the sound vibrations. Even the air itself absorbs some sound energy through frictional losses. However, it is important to understand that the actual amount of heat generated from the conversion of sound energy sound is always very small, and no one has yet managed to burn their house down just by turning their stereo up too loud!
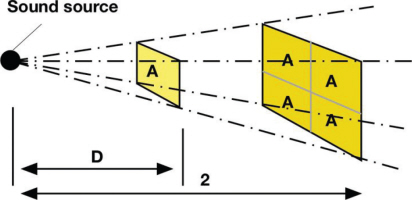
The Inverse Square Law – as the sound wave radiates away from the sound source, the larger the spherical wavefront becomes, so the more thinly the sound energy is spread over its surface. D, the sound covers an area represented by the square of area A. After travelling twice the distance the same sound energy now covers an area four times that of A, so it now has only one quarter of the intensity for each A-sized square. Doubling the distance reduces the sound intensity by a factor of four, so if we were to double the distance to 4D, the energy reaching each A-sized square would only be one sixteenth of that at distance D.
The intensity of a sound wave reduces in level the further it travels away from the source, as its energy is spread over an ever-increasing surface area. Where the sound source is able to transmit equally in all directions, producing an expanding spherical wavefront, its intensity follows what we know as the ‘inverse square law’, which states that sound intensity decreases at a rate which is proportional to the square of the distance from the source. So as the sound wave radiates away from the sound source, the larger the spherical wavefront becomes and so the more thinly the sound energy is spread over its surface and the less energy there is at any one point on the surface to hear.
Sound Meets Wall
Sound is essentially rapidly repeating changes in air pressure occurring at frequencies that fall within the range of human hearing, which we put at broadly 20Hz to 20kHz. The vibrations are carried through our atmosphere, travelling at roughly 343 metres per second, at room temperature (the speed of sound changes slightly with variations in temperature and humidity). Sound can also be conducted via solids or liquids, although the speed of transmission will be different from that in air – and usually a great deal faster. The reason sound leaks from an enclosed room (let’s assume no doors or windows for the moment) is that its vibrational energy causes the walls to vibrate in sympathy so that they in turn launch new sound waves on the other side of the wall and hence some of the sound inside the space can be heard outside too. Lower frequency sounds tend to carry more energy and cause greater sympathetic vibrations in the structure, and so it is the bass that tends to leak the most.
The more massive the wall, the less it will move in response to the sound, resulting in less sound being produced on the other side. For example, a dual layer ‘cavity’ brick wall, as used in much modern building construction, may attenuate the sound transmission by more than 50dB which is often all we need. Those of you thinking ahead might then make the intuitive leap that if one cavity wall can attenuate the sound transmission by 50dB, then building a second cavity wall spaced a little way from it might drop that sound by another 50dB giving us a fabulous 100dB of isolation in total... If only the laws of physics were so accommodating!
Unless the walls are separated by a large distance, the air filling the space between the two walls couples energy from one wall to the other, reducing the actual isolation to well below our hoped-for figure of 100dB. However, an air gap is still beneficial in reducing sound leakage by a useful amount, as double glazing aptly demonstrates. The wider the air gap, the better the isolation, especially at low frequencies, and a correctly built double-layer structure invariably provides better isolation than a single wall of similar mass. This is true even if the air space is just a few centimetres wide, although in commercial studios, corridors and machine rooms are often planned to form part of the sound isolating structure. The width of the corridor provides the air gap between the two walls, making the low-frequency isolation much more impressive.
However, in general, to reduce the amount of sound leaking out of a room we need to reduce the amount that the outside of the wall can move, and adding mass to the walls by using heavier materials or by making them thicker will reduce the amount of sound transmission. If we double the mass of a brick wall by doubling its thickness, the same amount of sound energy will only be able to move it half as far, so the amount of sound leakage will be halved, or reduced by 6dB. At this point you might be thinking that 6dB doesn’t seem that great for all that extra mass, especially if you were hoping to reduce the sound leakage by something closer to 50dB! If you can build one-metre-thick heavy stone walls you might be in with a chance of that kind of reduction, but that’s hardly practical in most cases.
A more practical alternative is to choose lighter materials that are more ‘lossy’ to sound transmission. For example, a layer of sand could be expected to transmit less sound than the equivalent mass of rigid material as the movement of the individual sand grains would cause more ‘sound to heat’ conversion via friction. Various commercial materials are available that include lossy layers, with the most effective solutions often combining high mass with a lossy structure. For example, using a sandwich of limp-membrane barrier mat (mineral loaded vinyl) or lead sheet in between drywall boards can be a very effective solution.
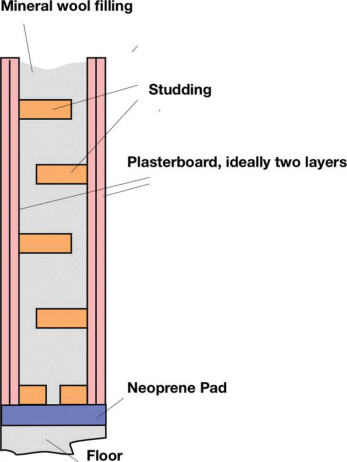
A simple plasterboard-on-studding construction, with mineral wool or glass fibre in the cavity to reduce resonances, can be highly effective. Where possible, the two frames should not be in contact with each other.
So if you need to create a new partition wall, but you don’t want to use brick or concrete block, a plasterboard-on-studding construction is often adequate, ideally with both sides built onto separate frames that are not in contact with each other. Mineral wool or glass fibre can be used to fill the cavity to reduce resonances, while multiple layers of plasterboard on at least one side helps maximise the mass of the partition – but do check that the floor is strong enough first!
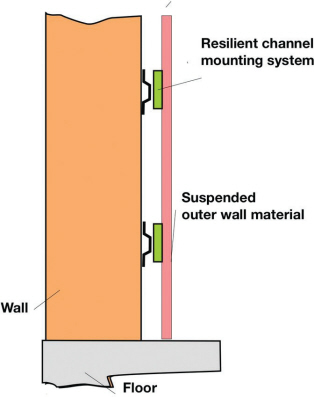
Simplified view of a resilient-channel suspension system. The channel flexes to absorb the sound energy rather than transmitting it through to the wall behind.
The bigger the air gap between walls the better the performance, and isolating the partition from the floor and adjoining walls using neoprene blocks will also help considerably, although all air gaps around the edges must be filled with a resilient material such as silicone rubber or mastic. An alternative is to build a single-stud partition with plasterboard on both sides, and then create a further inner layer, using a decoupled mounting system. There are also commercial systems available that mount a lightweight inner wall on resilient metal fittings attached to the existing wall in a way that reduces the amount of energy transmitted through the whole structure. Many of these kinds of solution can also be fitted by any reasonably DIY-capable person. A flexible metal channel or series of isolation clips are fitted to the original wall, then the new drywall sheet is screwed to the channel or clips.
And The Bad News...
The degree of sound isolation provided by a structure reduces with frequency, so the most common sound leakage complaints usually relate to low-frequency sounds, such as kick drum and bass guitar. This is largely attributable to the mechanical inertia of the wall.
Since sound attenuation is frequency-dependent the attenuation of a particular material is generally measured in decibels at a number of specific frequencies between around 100Hz and 3kHz. This figure is called the Sound Reduction Index (SRI) and while most materials also come with an average specified SRI value, what you really need to know is how much attenuation you can expect at the lowest frequencies you’re trying to isolate. Online data is available from many building material manufactures giving SRI figures at all the specified frequencies, so it is worth taking some time to browse these to see what you can realistically expect to achieve by using them.
The practical SRI of a material or wall structure is affected by a number of factors. We’ve already mentioned the importance of sheer mass and also the way the stiffness of the material affects how lossy it is. However, there’s also the subject of resonance. If a partition exhibits a strong resonance whenever a specific note is played the sound energy will pass through the wall with far less reduction in intensity than other frequencies. Multiples of the resonant frequency will also be attenuated less. Lossy materials or multiple sandwiched layers of materials with different acoustic properties can help damp or remove these undesirable resonances.
In a domestic room with drywall/stud internal walls, the best compromise is usually to fit one or more additional layers of drywall. This works best with a further damping layer between the original and new sheets of drywall. Suitable drywall products are available with a resilient layer already bonded to the back, or self-adhesive damping sheets or specialist pastes are also available for the purpose. The idea of this constructional technique is that not only does the additional drywall layer add mass, but it also damps resonances and changes the frequency of such lesser resonances that do remain so that they don’t coincide with those of the single drywall on the other side of the wall.
If you need to treat a wall which adjoins neighbours and the budget allows, then consider consulting a professional company with a view to fitting an internal wall suspended on a resilient channel system as these can be extremely effective in reducing the transmission of unwanted low frequencies, without having to add excessive amounts of extra mass to the wall structure.
The Weakest Link
While a solid wall can give around 50dB of isolation, a studding/drywall partition wall will provide significantly less, and a lightweight domestic door might struggle to give you more than 15dB of isolation. Likewise, windows, even double-glazed ones, provide far less isolation than a solid wall. You can make your own ball-park measurements by playing pink noise or a sound loop in your studio and using a sound level meter app on a smart phone to compare the sound pressure levels (SPLs) inside and outside the room.
The weakest areas for sound leaking in or out of most project studios are the doors and windows. Treating the walls to improve their isolation may be beneficial where one or more of the walls adjoins neighbours or rooms used by other family members, but usually the most immediate benefits will be gained by sorting out problems involving doors and windows. How effective the isolation needs to be depends both on your surroundings/neighbours and on the time of day (or night)
you plan to work. Low-level noise leakage is often masked by ordinary daytime sounds such as traffic, but may be much more noticeable at night when the ambient sound level outside falls significantly. Often the answer to problem sound leakage out of a studio is to combine a practical level of soundproofing treatment with a pragmatic reduction in the sound level being made in the studio.
Whilst double-glazed windows offer only a limited amount of sound isolation when compared to a solid wall, they are far more efficient than single-glazed units, partially because of the dual-layer, air-gap structure, but also because they tend to have much better, airtight seals than single-glazed windows. Which brings me to a very important point: rooms that are sound-tight are also air-tight: just a 2mm gap under a door can leak an enormous amount of sound and so must be dealt with or it will negate the effects of anything else you have done to achieve isolation. You may have to open the door from time to time to allow in some fresh air, but that’s a small price to pay for being able to actually work in your studio!
Window Upgrades
The performance of double-glazed windows can be boosted even further where necessary by adding an extra heavy-glass or acrylic-sheet internal window (or even a secondary double-glazing system) with as large an air gap as possible between it and the original double-glazed window. Heavy curtains can help a little and will also provide some absorption to help with the room’s own acoustics, but they won’t be very effective at low frequencies. Small windows, or those comprising multiple separate panels, work best because large sheets of glass tend to be quite resonant, although if you can fit a separate internal window using a different thickness of glass from the original double-glazed unit, the severity of any resonances can be reduced.
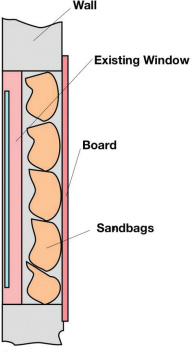
Where you don’t need the daylight you can fill the window space with sandbags or high-density mineral wool slab and then board over it with a couple of layers of thick plasterboard or chipboard. Even in a rented room this is a practical temporary solution that will leave only a few screw holes to be filled when you move. Note that if the window you are boarding over isn’t airtight, but you don’t want to replace it, you can use some acrylic or silicone frame sealant applied from a mastic gun to seal around the edges first. In a rented property you can use gaffa tape to seal around the window frame.
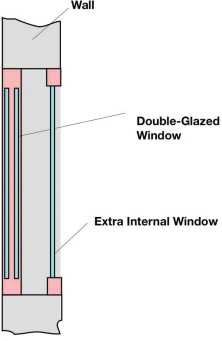
Adding an extra heavy-glass or acrylic-sheet internal window, with as large an air gap as possible, will boost the isolation performance of any window, even a double-glazed one.
Windows should be airtight and ideally either double-glazed or blocked off. Blocked off windows can be filled with sandbags to give much improved isolation.
Doors
While you can seal up unwanted windows, you’ll always need at least one working door! Domestic doors are often made from two very thin plywood or MDF panels separated by a lightweight frame, so they don’t have the necessary mass to act as effective sound isolators – and they can also be very resonant. They are not designed with airtight seals either as this would not usually be a domestic requirement, but when it comes to sound isolation the door must be airtight on all four sides.
Doors need to be heavy with airtight seals on all four sides. A heavy compression latch will keep the door closed tight. Double doors work even better, if you have the space to fit them.
To add mass to the door the simplest and cheapest solution is to fix a layer of 12 to 18mm chipboard, MDF or even drywall board to both sides, although replacing a lightweight door with a commercial ‘fire door’ is also worthwhile as these are necessarily heavy. Some form of sealing strip can then be applied around all four edges to form an airtight seal when the door is fully closed (see below).
Where space permits an even better solution, and one that is employed in many commercial studio designs, is to use a double-door entrance lobby with an air gap between the two doors. In a commercial studio this may take the form of a large ‘air lock’, often combined with storage space for unused gear, but in a home studio even a space of only the wall thickness between the two doors will make a big difference. It is possible to modify most door frames quite easily to take two doors, one flush with the inside of the wall and one flush with the outside.
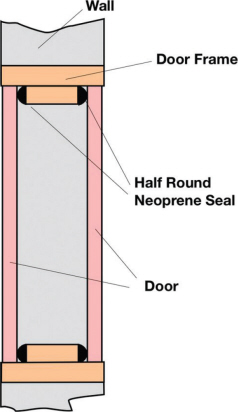
When it comes to installing airtight seals around doors, consumer draught-proofing isn’t very effective for acoustic purposes, and we recommend using the kind of semi-circular, neoprene, sealing strip available from a studio-materials supply company instead. It is also best to fit the door (just one of the doors in a double-door system) with a compression latch that presses the door face firmly against the seals when closed. A typical domestic door latch won’t usually keep the door pulled tight against the seal.
Commercial studio doors often incorporate a sealing strip on their lower edge that is automatically raised and lowered as the door is opened and closed, as this avoids having to have a raised threshold strip on the floor. However, the only practical solution when using modified standard doors or fire doors in a domestic situation is to employ a raised threshold strip to give the lower edge of the door something to seal against.
TIP : Rather than fitting the wooden ‘closing strips’ to the door frame first, it is far better to glue your neoprene seals to the wooden strips using contact adhesive, before pinning them in place. You can then precisely position the strips against the closed door so that the neoprene seal is just tight enough against the face of the door to hold a sheet of paper – any tighter and you may have problems closing the door. Ensure the corners are mitred neatly so there are no gaps in the seal and use a silicon sealer, if necessary, to ensure the corners are airtight.
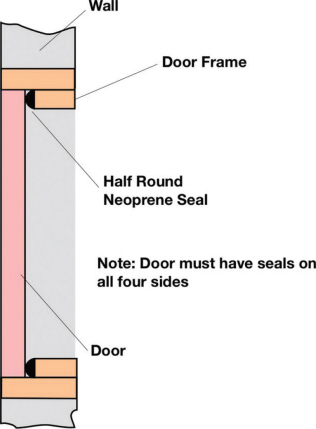
Typical consumer draught-proofing isn’t very effective for acoustic purposes – we recommend using semi-circular, neoprene sealing strip, available from all good studio-materials supply companies.
Floors
Suspended concrete floors can offer a reasonable amount of sound isolation from airborne sound because of their significant mass, but sound energy coupled into the floor through direct physical contact will be transmitted with very little attenuation at all. Consequently, it is usually necessary to provide some additional means of isolating any direct source of vibration, such as footfall, kick drum pedals, guitar amps and so on. Suspended wooden floors generally offer poor isolation because of their lighter construction and also because most are not airtight. The airtight issue can be solved easily enough using flexible mastic filler, but to provide a good level of contact-sound isolation is for wooden or concrete floors to create a so-called ‘floating floor’ on top.
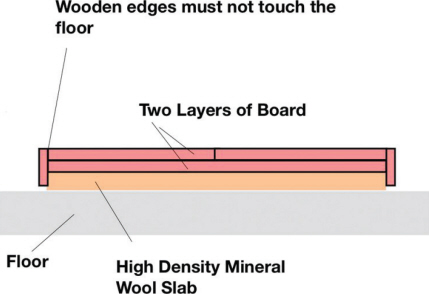
Professional floating floors can be extremely complex, some comprising thick concrete structures suspended on springs, but fortunately you don’t need to worry about that kind of expense for home use! A simple DIY technique that we’ve tried – both for complete floors and for sound-isolating drum plinths – is build a simple structure comprising two layers of 16mm chipboard glued and screwed together, resting on a bed of 30mm or 60mm thick mineral wool cavity wall insulation laid upon the original floor surface. The mineral wool should have a density of around 60kg per cubic metre or higher in order to provide sufficient stiffness to take the weight of the new flooring. Using two layers of board not only adds mass but also ensures the structure is rigid if one set of boards is arranged lengthways and the layer above orientated widthways (i.e. at 90 degrees to the first layer). If you aren’t planning on carpeting the floating floor, then plywood may make a more durable and attractive upper surface. Alternatively you could fit standard laminate flooring on top of the chipboard.
Of course, this arrangement will result in a small step up into the room, and it will be necessary to modify the doors (and possibly the skirting boards) to fit above the new floor level.
It is essential to avoid vibrations from the floor coupling into the surrounding structure, so if installing a floating floor across the entire room, strips of felt or neoprene should be fitted around the walls to prevent the new floor from touching them. If the new floor was allowed to touch the existing walls sound would be transmitted via direct mechanical contact, essentially ‘shorting out’ the new resilient floor completely! Similarly, if you fit a skirting board you must leave a small gap below it so it doesn’t touch the new floating floor layer.
If the room has a wooden floor and sound transmission to the room below is a problem, you may get a worthwhile improvement by laying 20kg per square metre barrier mat,
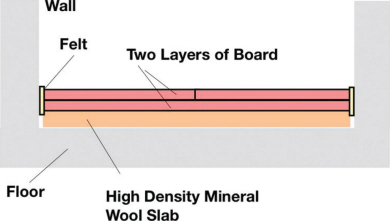
A basic DIY floating floor can be built with two layers of 16mm chipboard, glued and screwed together, resting on a bed of high-density, 30mm- or 60mm-thick mineral-wool cavity wall insulation.
sometimes called dead-sheet, on the floor before putting down the mineral wool. Barrier mat is a flexible vinyl material loaded with clay particles, and in this application it adds mass, seals gaps between the floorboards, and absorbs a useful amount of energy due to its ‘lossy’ structure. Most studio-materials suppliers have various types in their catalogues.
However, while the improvement in sound attenuation should be significant if you install a floating floor, it’s still unlikely that you will be able to use an acoustic drum kit in a woodenfloored room without some of the sound still being audible in the room below. And even if you use an electronic kit, the thump from the mechanical pedal action still tends to come through, so a separate floating drum plinth, using the construction just described, is still a worthwhile addition.
Ceilings
Ceilings are more difficult to treat, as to bring about any serious improvement you need to construct a suspended ceiling below the original ceiling leaving as big an air gap as possible – and even then the results may not be as good as might be hoped for. Few DIY enthusiasts will want to tackle this job, and this is one area where you might want to think about calling in the professionals. However, if the room above is part of your own building, installing a layer of barrier mat (or other specialist noise absorbing underlay material) on the floor above, between the floor surface and the normal floor covering, will certainly help. In more extreme cases, building a floating floor in the room above might do the trick, so long as you don’t mind the slight step up into the room and having to modify the doors and skirting to fit above the new floor level. Where the budget allows, there are also commercial systems for improving ceilings, some of which rely on sound-deadening panels fixed to flexible metal channel, similar to that used for walls.
Good Vibrations
Although we’ve already hinted at it, one area that we haven’t discussed in detail so far is the potential problem of sound being conducted along solid materials in a building, sometimes known as ‘flanking transmission’. Such vibration-borne sound can bypass or short-circuit all your isolation work. One obvious scenario would be where a loudspeaker is rigidly mounted onto a steel joist that passes through to the next room. Vibration, and therefore sound, will readily travel along the joist, circumventing any barrier in between the rooms – I’m sure you’ve seen those prison-escape films where the inmates pass messages by tapping on the water pipes! It’s the same principle.
This is the reason why we have described isolating secondary walls and floating floors from the original room structure as much as is possible by the use of resilient mountings, neoprene pads, flexible hangers, flexible adhesive and flexible jointsealing compound. Similarly, any noise-making gear in the studio, such as guitar amps, monitor speakers, drum kits and so on, should be isolated from the floor as best you can. The spiked feet on speaker stands can be important in ensuring that the stand is stable, especially on carpet, but those metal spikes will also conduct vibrations directly into the floor, necessitating the use of speaker-isolation pads or platforms to decouple the speaker from its support. Larger isolation platforms are also available for guitar amps, though you could make your own by gluing spare acoustic foam to the underside of a wooden board. Drums, including electronic kits, can be isolated from the floor by making a kit-sized section of floating floor, as we have already seen.
Noise-producing items should, where possible, be isolated from the floor or other parts of the structure. Commercial isolation platforms are available, but it is perfectly feasible to build your own.
Whilst you may not be able to get as much sound isolation as you’d ideally like, you will usually see a significant improvement if you address the weakest areas first, specifically doors, windows and any ‘noisy’ equipment placed directly on the floor. Start with air-tight seals around doors and windows, then re-evaluate the situation to see where the remaining weak spots are, tackling them in order of seriousness. After that, look to upgrade any particularly lightweight walls and consider building a floating floor. When you have reached the limit of what can be done practically or cost-effectively, you will need to compromise how you use the room, such as generally adopting with lower sound levels or only monitoring via headphones when working late at night.
Since a ‘soundproof’ room needs to be an airtight room, you also need to think about how to get fresh air into your studio. Full air-conditioning systems can be noisy, while ducted ‘quiet’ air systems tend to be costly and may also require space that you simply don’t have. However, computers and outboard equipment nevertheless generate a lot of heat, which, in a wellinsulated studio, may build up very quickly. The simplest and cheapest solution is to take regular breaks, leaving the door open to let the air circulate for a while! But perhaps a more practical and reasonably affordable compromise, (and the one that Paul uses in his own studio), is a basic air conditioner called a ‘split system’. This involves an air cooler on the wall inside the room, with a linked heat exchanger outside the building. Although not silent, this kind of system only needs to be run for few minutes at a time to bring the temperature down. Whereas most portable air conditioners either need a large pipe running to the outside world (which will negate much of your sound isolation) to prevent them releasing a lot of potentially corrosive water vapour into your studio, split systems need only a small hole in the wall, which can be sealed with mastic once the installation is complete. Of course, cooled air isn’t the same thing as fresh air, so you’ll still need to open the door on a regular basis to ensure a change of air in the studio to bring in some new oxygen!