
Most contemporary popular music relies on a rhythm section of some kind, and in pop music this is usually the acoustic drum kit, although some dance genres rely solely on synthesized electronic drum sounds. We’ve visited a number of small studios that have had problems getting a good acoustic drum sound which is not entirely surprising as most professional drum recordings are made in spaces rather larger than those available to the home studio operator. There are, however, some useful tricks you can try to improve the sound.
Getting a good drum sound in the studio starts with a well-maintained drum kit that’s properly tuned and skilfully played. Unfortunately, the latter is not always something you can take for granted – there are countless stories of how a top-name drummer came into a studio, tuned up the house kit, and went on to record some great sounding parts, while later the same day a different drummer playing the same kit without changing anything sounded totally different. How you hit the drums is actually a vital component of the sound, just as much as the precise tuning and damping. If you know any drummers in your area who get a consistently good sound, then ask them to show you how to tune a drum kit as it is an art that many drummers, let alone budding engineers, have yet to fully master.
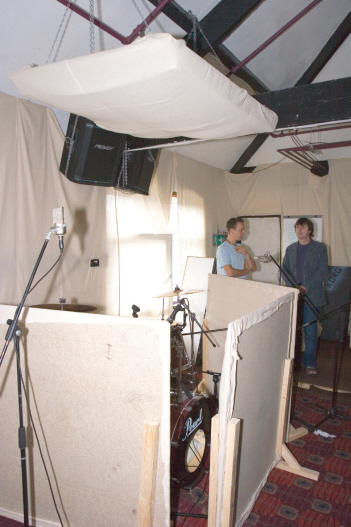
The other components of a great drum sounds are a musically sympathetic room and appropriate microphones, correctly placed. While the close mics on the individual drums don’t pick up much in the way of room sound, the overhead mics are very much influenced by the character of the acoustic space, and that’s where many home recordings run into difficulty. The best professional studios have specially constructed drum rooms, with a high ceiling and well-controlled reflections, but for most of us working in home studios that kind of recording space simply isn’t available. The best most of us can hope for is to use acoustic absorbers to remove as much of the room’s influence as possible so that you can then use a suitable reverb to add back a more desirable impression of ambience, as a post-production process. This tends to be our typical Studio SOS approach whenever we come across a drum kit that is set up in a small room.
Getting a good drum sound in the studio requires a well-maintained drum kit that’s properly tuned and skilfully played, plus a musically sympathetic room and appropriate microphones, correctly placed.
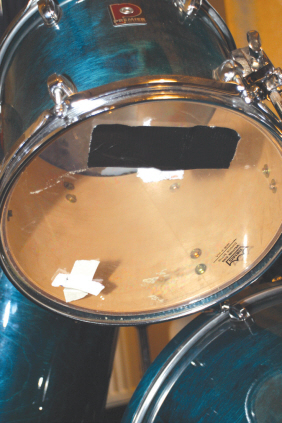
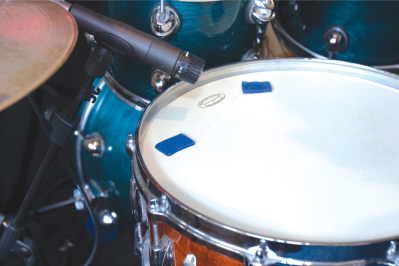
If you are close-miking the drums, you’ll almost certainly need to tame excessive ringing with tape or a commercially produced damping product.
As long as the kit to be recorded is well maintained and fitted with good quality heads, it should be possible to get a good sound out of it relatively quickly, so long as the player, or recording engineer, knows how to tune it effectively. Worn drum heads tend to stretch unevenly, causing a loss of tone that tuning and damping can’t fix, so always check the condition of the heads before starting any important recording work. Usually, a little careful damping is also needed to tame excessive ringing, but this shouldn’t be overdone, as the sound can easily end up being too dead when heard in context. A little Gaffa tape on the head is often all that is needed, though there are also tacky rubber pads such as Moon Gel available from drum stores that do the job more efficiently, with the benefits of being reusable and less messy!
Tuning the Kit
The easiest kit to tune is one that uses single-headed toms, although these are currently not very fashionable.
Double-headed toms are more difficult to tune, but when you get it right they sound wonderful. Of course, you may need to apply damping to both the upper and lower heads to kill excessive ringing but, again, don’t overdo it, as what sounds too ringy in isolation may sound perfectly acceptable when the whole kit is playing. If you decide to remove the bottom tom heads for recording you may need to restrain any loose parts, like the nut boxes, which may have a tendency to rattle.
An un-damped tom or kick drum can have an excessively long decay time, and will ring in sympathy whenever other drums are hit, or when bass guitars are played in their vicinity. However, if you apply too much damping the drums end up sounding like old suitcases! Remember that even if the toms seem to ring a little too much every time you hit another drum, this probably won’t be a problem when you come to mix as you can either silence the tom signal between hits or insert a gate on each of the tom tracks.
Individual drummers will have their own ideas on tuning but, as a rule, any combination of drum and head has a fairly narrow range over which it will sound its best, and some drum manufacturers now go as far as to print on the drum what note it is intended to be tuned to. If the sound has a dull, ‘splatty’ quality, with little resonance, the drum head is probably tuned too low in pitch. Conversely, a ‘boing-like’ resonance usually indicates that the head is tuned too high in pitch.
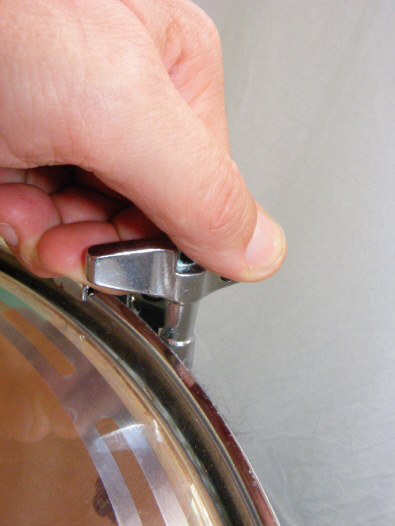
As a starting point the drum heads should be tensioned as evenly as possible, and you can check this by lightly tapping the head around the edges between the tuners with a drum stick – adjust the tuners until you hear the same pitch all the way around the head. If you need to retune the whole drum to a higher or lower pitch the best way is to adjust opposite tuners in sequence, rather than working your way around the drum from your starting point. Pressing firmly in the centre of a newly-fitted head will help to seat it correctly. A useful technique to create a more dynamic tom sound is to first tune the drum a semitone or so above the pitch you want it to be, then slacken off one tuning lug slightly. This will drop the pitch of the drum again and impart a slight pitch drop after the drum is hit.
Drum tuning is a fairly simple concept, but it’s amazing how many drummers, and indeed recording engineers, have no idea how to get the best out of a kit with tuning.
Snares
Most snare drums have 13- or 14-inch metal, synthetic or wooden shells, and they vary in depth with deeper shells tending to produce a deeper tonality. Metal shells give a brighter, more ringing tone, while wooden snare drums tend to sound more mellow and fat. The snare wires must be in good order and properly adjusted to minimise rattling, though eliminating all sympathetic buzzing and rattling is virtually impossible. Some rattles and buzzes are usually accepted as part of the natural sound of the drum kit but, where sympathetic rattles are deemed excessive, the sound can usually be improved by gating the close drum mics.
It is usually a mistake to try to damp the snare wires with tape to cure rattling as by the time you’ve cut down on the sympathetic buzzing, you’ve probably also killed the tone of the drum.
Kick Drum
Most drummers will have a hole cut in the front head of the kick drum to make miking from the front practical, although today’s fashion seems to be for a smaller hole which often makes mic positioning fiddly. In a commercial studio it might be prudent to keep a selection of standard kick drum heads in the popular sizes with larger holes cut into them which could be swapped over prior to recording. However, in a typical home studio it is more likely you’ll be using your own kit or working with the same drummer most of the time. In this case you need to ensure that you have a front head hole large enough to allow you to insert the kick drum mic on a short boom arm, and to allow you some flexibility in positioning it. An alternative approach is to remove the front head completely and despite concerns that this can put uneven stress on the drum shell and cause it to distort, I’ve never known this to happen.
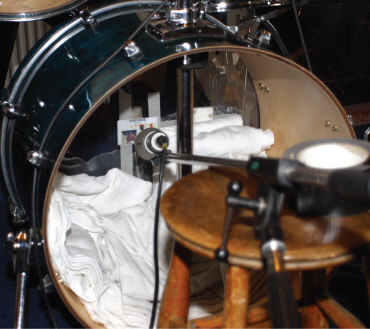
You may need to damp the front head as it can ring on for quite some time, and the standard way of damping a kick drum is to place a folded blanket in the bottom so that the blanket rests up against the edge of the batter head, then you further adjust the position to achieve the desired amount of damping. We’ve visited more than one home studio where the kick drum has been overstuffed with blankets and cushions or even blocks of foam. You only need enough damping to apply pressure to the bottom quarter of the batter head – any more will kill the natural resonance of the drum causing it to sound thin and lifeless.
Wood, cork, plastic and felt bass-drum beaters all sound different, with the harder materials giving a predictably brighter sound that may be more suitable for some styles of rock music. A commercial pad or even an old plastic credit card taped to the head where the beater hits will further emphasise the beater impact, if this is deemed necessary.
Your kick drum will almost certainly need some damping inside to achieve a tight, modern drum sound, but too much damping will kill the natural resonance of the drum, causing it to sound thin and lifeless.
The best kick mic position is different for every drum but we often come across kick mics set up too close to the batter head and aimed directly at the point where the beater hits. This tends to produce a gutless ‘knocking’ sound rather than a satisfying thump, so we suggest starting with the mic halfway between the centre and edge of the shell, initially projecting only 50 to 100mm into the drum. Make a few test recordings and then try moving the mic until you find the ‘sweet spot’ that combines the right amount of attack and depth.
Specific mics optimised for drum applications are available, but they don’t necessarily need to be incredibly expensive or sophisticated. There are some very respectable budget sets available for those on a tight budget, although their kick-drum mics often produce a ‘smaller’ sound than more upmarket versions. Dynamic mics are often used for the close mics as their inherent slight transient compression sometimes helps to produce a thicker, weightier sound. Other manufacturers favour small electret models as close mics, as these are light and easy to position, particularly in clip-on format. Capacitor mics are usually employed for the overheads as they have to pick up the high-frequencies of the cymbal sound as well as the dynamic attack of the whole kit, although ribbon mics are also popular in many situations.
TIP : If the drum kit doesn’t sound good when you’re standing in front listening to it, then it is very unlikely that you’ll get a good, recorded sound – a good drum sound always starts with good-sounding drums!
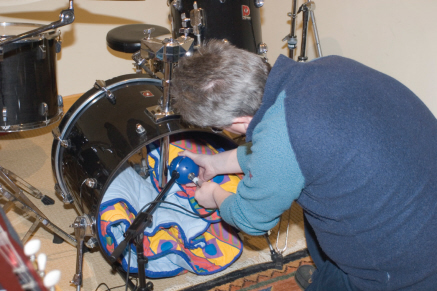
A good starting point for a kick-drum mic is halfway between the centre and edge of the shell, initially projecting only 50 to 100mm into the drum. Make a few test recordings and then try moving the mic a little until you find the ‘sweet spot’ that combines the right amount of attack and depth.
The kick mic obviously needs to have a very good low-end response, but most dedicated kick-drum mics actually have a fairly ‘lumpy’ frequency response to accentuate the 80Hz thump and 3kHz beater-click characteristics associated with the modern pop kick-drum sound. If you use a nominally ‘flat’ mic, you may need to apply a lot of mid-cut EQ to prevent the sound being ‘boxy’. Most engineers seem to choose the AKG D112 or Audix D6 for kick drums, although there are other popular alternatives including the Electrovoice RE20 and Sennheiser MD421. If you try your vocal stage mic on a kick drum you’ll still get a sound but you’ll probably find you end up with little low-end punch as most dedicated vocal dynamic mics have a low-end roll-off starting as high as 200Hz.
Mic Positioning
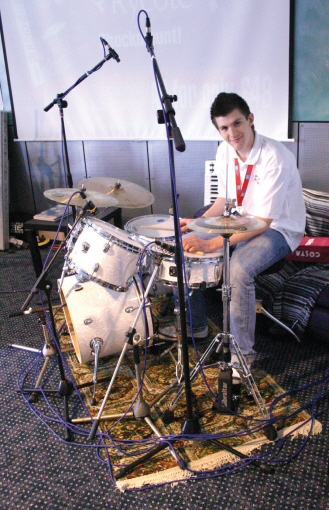
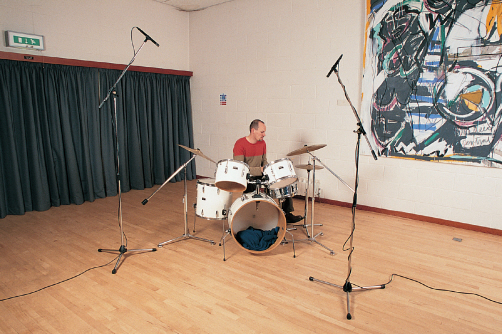
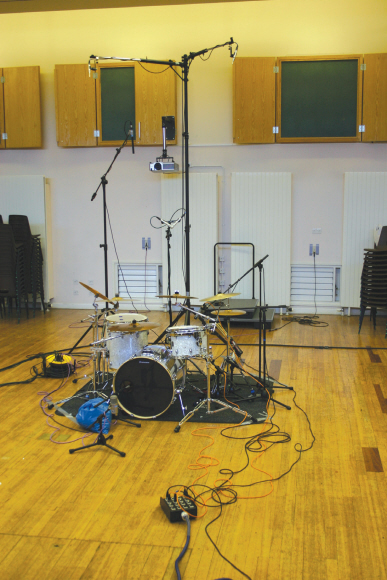
There are a number of different ways of miking a drum kit, each capable of producing great results under the right circumstances. If you are lucky enough to have a brilliantsounding kit in a fabulous room, you may be able to get a great sound with just a single mic (mono or stereo) placed a few feet in front of the kit. However, in the project studio this happens about as often as a squadron of pigs applying for landing clearance, and for any serious work the bare minimum technique involves a pair of overheads, panned slightly left and right to give a suitable stereo image width, and augmented with a kick drum mic.
Where other instruments are playing in the same room, you may need to take some measures to help minimise the spill of unwanted sounds into the drum overhead mics. Solutions might include facing guitar amplifiers away from the drum kit, and/or using power soaks to reduce their volume in the room. Drum overhead mics are typically cardioid-pattern, capacitor models, as these are good at capturing the transient detail of the drum and cymbal sounds, although where spill is not an issue, omni models may give a more open sound. Ribbon mics are also making a comeback in this role, now that more affordable models are available, and being figure-of-eight mics, you can aim their ‘dead’, 90-degree axis at potential sources of spill, whilst using absorbers behind them. Ribbons usually produce a smoother cymbal sound, too.
Drum overheads are usually set up a metre or so above the kit and spaced around one to one-and-a-half metres apart, although you may sometimes get a better balance by bringing the mics slightly forward of the cymbals to prevent the cymbal sound dominating the drums. You can also use coincident (XY) techniques with cardioid mics for overheads, if preferred. As with any spaced mic technique, care should be taken when positioning the mics to minimise phase cancellation problems.
The above guidelines are all very well and good in a large room, but in a typical home studio the overhead mics will also pick up strong reflections from the walls and ceiling, and these can degrade the sound significantly, making it seem boxy and congested. The most practical option in such cases is to try to remove the natural room sound as much as is practical, using acoustic absorbers such as foam or mineral-wool panels suspended above the overhead mics, and on the walls close to the kit (if necessary). Mattresses propped around the walls can also help. If you can keep the overheads sounding reasonably dry, the illusion of a nice drum room can be added back afterwards using a suitable ambience reverb setting – most DAWs come equipped with a reverb plug-in that will do this job adequately. Some of the software convolution reverbs
TIP : If you set the two overhead microphones at exactly the same distance from the snare drum, you’ll ensure that the snare sound doesn’t suffer tonal changes caused by phasing issues if the track is played back in mono.
In a good room, with a really good drummer and a well-tuned kit, you can achieve a perfect balance of all the kit elements with just a kick-drum mic and a pair of overheads. Using fewer mics generally results in a cleaner, less coloured sound.
include libraries of real drum rooms, which can sound very flattering without washing the sound out in obvious reverb, but be warned that even the best reverb won’t hide a nasty room acoustic that has already been captured in the recorded sound due to lack of treatment of the recording room. So your first priority should be keeping as much reflected sound out of the overheads as possible.
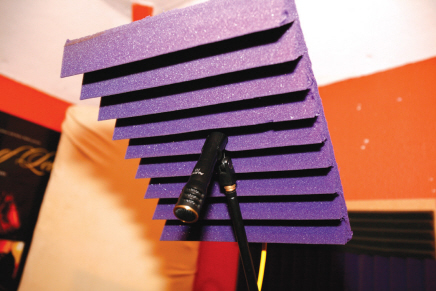
The tactic we have used on many Studio SOS visits is to glue foam panels to the ceiling above the overhead mics where this has been permissible, but where gluing is not appropriate we improvise less permanent means of supporting the foam panels such as creating a web of nylon line onto which the foam can be laid, with the nylon cord being attached to hooks screwed into opposite walls. It is also possible to deploy microphone or lighting stands to temporarily hold the absorbing panels just below the ceiling.
It’s certainly no substitute for proper acoustic treatment, but shielding the rear of the overhead mics from the higher-frequency components in the ceiling reflection, using these easily mounted foam screens, can still offer a worthwhile improvement.
The ideal drum room, as far as many engineers are concerned, will always have a high ceiling, but if you don’t have that you can make a big difference to the ceiling reflection by suspending absorption above the kit.
Alternatively, ceiling reflections can be eliminated altogether by using boundary mics (sometimes called PZM or Pressure Zone Microphones) fixed to the ceiling above the kit, instead of conventional overheads, so if you record a drum kit on a regular basis and in the same place, this option is well worth considering in rooms with typical domestic-height ceilings.
Using the basic, three-mic technique, you can usually achieve a fairly natural drum sound. However, the obvious compromise is that, other than the kick drum, there is no means of balancing the sounds of the individual elements of the drum kit apart from a little bit of leeway afforded by moving the overhead mic positions slightly. The next step is to add a fourth mic to capture the snare drum directly, since that is the next most important element after the kick. If even more control is needed, then the next step is to close mic all the drums individually – and in this case the overheads may sometimes be high-pass filtered to capture just the cymbals, rather than provide the overall kit sound.
Close miking
For most rock and pop work the basic kick-plus-overheads arrangement is further augmented by close mics on the snare and each of the toms, and sometimes with an additional mic capturing the hi-hat, too. As well as making it easier to balance the kit sound, the close mics are less influenced by the room acoustics and so may make it easier to get an acceptable sound in a less than ideal space.
Some engineers also mic the snare-drum wires from underneath, blending it with the top mic to add more snap and brightness to the sound. Because the under-snare mic is pointing the opposite way to the top head mic, it is essential to reverse the polarity of its output to keep the signals from the top and bottom heads in the same acoustic polarity.
Snare drums and toms can be miked with either dynamic or capacitor mics. A typical starting position for both the snare and tom mics is to arrange the mic 50mm or so above the drum head, just in from the edge and angled towards the centre of the head. Damping pads should be fixed well away from the part of the head the mic is aimed at, and the mic position should be checked to ensure that it isn’t in the drummer’s way when playing. Small changes to the mic position or angle can make a big difference to the sound, so if the tone doesn’t seem right at first, change the mic position rather than going straight for the EQ. Some EQ will probably still be necessary when you come to mix your song, but the closer you can get to your target sound by fine-tuning the mic positions, the less EQ you’ll need. Mics that clip directly onto the snare and tom rims have become popular in recent years, as these keep the kit free of mic stands and ensure a consistent relationship between the mic and the drum, even if the drum itself shifts position slightly. Just be careful to make sure everything is tight and cables are dressed to avoid creating new rattles.
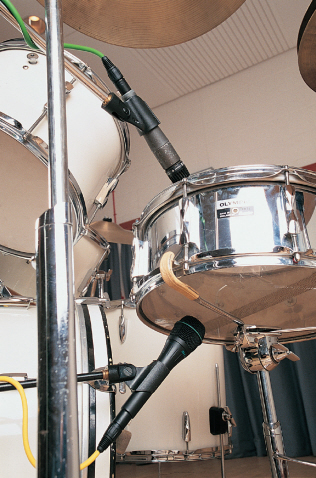
Miking both the top and bottom of a snare gives you a lot more options in the mix – blending in a bit more of the under-snare mic is usually a better way of adding more snap and brightness than EQing.
A separate hi-hat mic is not always necessary, but where required for balance reasons, a small-diaphragm capacitor model, placed around 140 to 200mm from the hi-hat at the side furthest from the rest of the kit, is typical. It is important to ensure the mic doesn’t get hit by a blast of air every time the hi-hat closes, so never place the mic looking into the gap between the hi-hats – set it just above or below the level of the cymbals! Where the snare is to be gated to reduce the effect of spill, a separate hi-hat mic may also help avoid the hi-hat level changing as the gate opens and closes, although with a normal balance of overheads and close mics, we’ve rarely found this to be a problem.
TIP : You can optimise the separation between drums by choosing mic placements that direct the mics away from rather than towards adjacent drums. Similarly, you may wish to angle the snare mic away from the hi-hat to minimise the amount of hi-hat getting onto the snare track.
Sometimes you just want every option covered!
Most of the studios we’ve visited use DAWs rather than hardware recorders, which means there are plenty of tracks available to record all the drums on separate tracks (assuming a suitable multi-channel interface). Where you have fewer recording tracks available you can still get a perfectly acceptable kit sound by mixing the various elements to stereo (or even mono) using a small hardware mixer, and then recording the pre-mixed output. Indeed, this is how many records were made in the past, as anything over four tracks was considered a luxury until the late 1960s – yet some of those records still have great-sounding drums. Having said that, you retain the greatest flexibility if you record each drum and overhead mic to separate tracks, since that gives you more opportunity for gating the individual drums or for manually silencing any ringing between tom hits.
We’ve demonstrated to many home studio operators that cleaning up tom ringing is actually a very important part of getting a clean, well-focused drum sound. To confirm this for yourself just try soloing a tom track when the toms aren’t playing and listen to how much ring and drone there is! Computer users may wish to use their track level automation facility to turn down the tom track levels except for the brief periods when the toms are being played, as this is usually more reliable than using a gate, and still doesn't change the audio file in an irreversible way. Once you get more confident, though, you may choose to do a destructive edit to silence all the spaces between hits – the outcome is much the same.
It’s really easy to manually clean up tom tracks in a DAW, muting the areas where there is nothing but spill – it’s probably quicker than trying to set up a noise gate to trigger reliably on every hit!
Whether recording individual drums or a pre-mixed track, you should always aim to leave around 12 to 18dB of headroom to keep the transients clean and to avoid running your software mixer levels too hot when all the tracks are combined.
Pre-Mixing and Panning
By convention, the stereo placement of the drums is from the audience’s perspective, not from the drummer’s, although some producers take the opposite view. The snare and kick are usually panned centrally with the close mics panned to match their instruments’ positions in the stereo overheads. A common mistake is to pan some kit elements too far apart, making the drum kit seem unnaturally wide, so use your ears to judge what sounds realistic or appropriate, depending on what else is in the mix.
A suitable ‘ambience’ reverb on the overheads can put back the sense of a good live drum room, providing you’ve recorded the tracks as dry as possible by putting up suitable absorbers. A touch of bright plate reverb is often used to liven up the snare, but fashions change so quickly in music that it’s worth listening to commercial recordings and focusing on the drum sounds to hear how they’ve been treated. As you might expect, a common problem we come across when looking at other people’s mixes is that they’ve added too much reverb, which has the effect of filling up all the space, creating a sense of congestion.
You will almost certainly need to EQ the kick and snare to some extent, but if they are well recorded you shouldn’t ever need to apply excessive amounts. Furthermore, as long as the kit sounds tonally balanced you can apply more overall EQ, if required, when you hear the drum kit in context with the rest of the tracks. The best way to do this is to route all your drum tracks to a stereo bus, which will allow EQ and compressor plug-ins on the bus to affect the overall kit sound, while the whole kit level can be controlled conveniently using a single fader. If you have a convolution reverb that offers some nice, short, drum-chamber treatments, putting one of these on the drum bus can create a better-integrated drum sound, but it is worth attenuating everything below 200Hz in the reverb send (input) so that the reverb doesn’t add too much to the kick drum.
In difficult situations where even your best efforts to control room reflections have been only partially successful, we’ve managed to arrive at an acceptable sound by applying quite strong low-cut filters to the overhead mics so that you hear mainly the cymbals and the transients of the individual drums being hit – the close mics are used to provide the main body of the sound. A little shelving-EQ boost at around 8kHz injects a bit of life and sparkle into the cymbals. There’s more to follow on the subject of mixing drums in the next chapter.
Of course, there are some home studios where there isn’t space to mic up a drum kit at all, or perhaps the proximity of neighbours makes bashing around on a drum kit unacceptable. Fortunately, this needn’t be a major obstacle to your recording ambitions, as there are other practical options that can produce great results.
Sampled Drums
There are some superb sample-based drum instruments available today, with drum hits recorded at every possible velocity level in world-class studios and using mics that most of us can only dream of owning. But it’s not just about the sounds themselves – what you do with them will have a great bearing on the quality of the results you get. Even if you can’t play drums yourself, provided that you are able to think like a drummer (no jokes, please!), you can play the samples from a MIDI keyboard in real-time as long as your system is set to a suitably low latency. You probably won’t be able to play everything all at once, but it is easy to build the part up in layers. If you can actually play drums recording programmed parts from MIDI drum pads will always result in a more natural feel – full electronic kits and compact pad sets are now available in a range of sizes and prices.
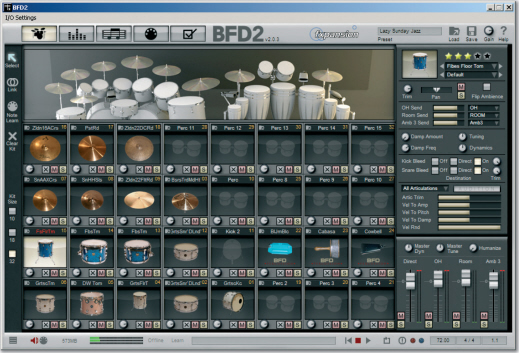
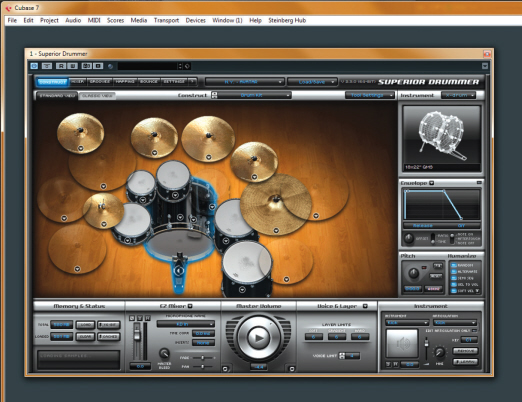
There are some superb sample-based drum instruments available today, including FXPansion’s BFD, Toontrack’s EZ/Superior Drummer series.
Of course, there’s no reason to use samples for all of your drum parts, or to record them all in the same way. For example, you could program the kick and snare to provide the backbone for the track using samples, and then play in the tom fills and hi-hat patterns afterwards, in separate passes, using real drums and cymbals. If nothing else, this approach eliminates snare rattle, as you don’t need to have a snare drum in the room when recording the other parts.
TIP : Tempting though the Quantize button is when you’re playing to a click, it helps to maintain a human feel if drum fills programmed via pads or a MIDI keyboard are either left unquantized or subjected to a percentage-quantise operation, to prevent them becoming too machine-like.
For our own sessions extremely good results have been obtained triggering sampled drum sounds from a set of drum pads, while miking real cymbals and hi-hats at the same time. The sound of the sticks hitting the pads is lost when you put the whole drum sound together and, because sampled cymbals don’t respond in the same way, capturing real ride and hi-hat cymbals reinforce the illusion that the entire kit is real. You need only add a touch of ambience to make the sound of the cymbals match the rest of the kit. We’ll often still use sampled crash cymbals, as they are always recorded using high-quality cymbals, with a choice of several different sizes and types, and as they are generally hit only once or twice during a fill, they don’t get the opportunity to sound unnaturally repetitive.
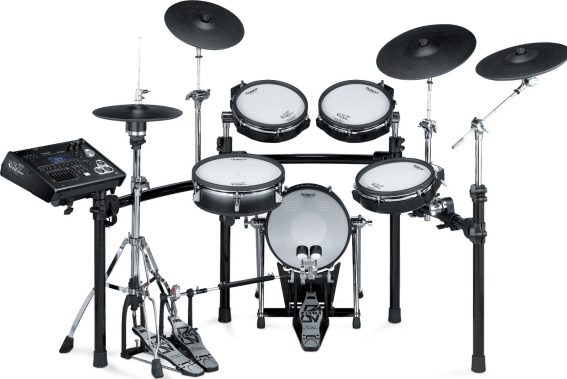
The expressive playing surfaces of today’s electronic drum kits make them an excellent way to capture high-quality recorded drum parts. They can also be combined with real hi-hats and cymbals to good effect.
Provided that the performance isn’t too sloppy, the slight timing variations of a real drum performance can make the whole rhythm track sound more human and interesting, but by using sampled sounds for the main drums you will be able to achieve a far more professional result than you could through miking up an indifferent kit in a small, untreated room.
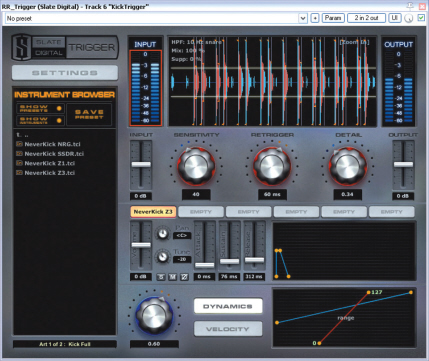
Drum Replacement
Some sequencing software includes the ability to turn monophonic audio parts into MIDI data and I’ve found these to be particularly useful for generating MIDI parts from individual drum tracks. Dedicated drum-replacement software is also available that can detect drum hits and trigger samples automatically. Using this technique allows you to record drum parts using a real kit, then, provided that you have enough separation between the drums, you can use the recorded hits to trigger high-quality samples to replace or layer on top of the original recorded sounds.
Most drum replacement software uses a gate-like threshold system to detect hits, with a further setting that prevents a new note being generated for a user-defined time. This ‘trigger inhibit time’ prevents double-triggering caused by spill or stick bounce. We’ve used such software many times during our Mix Rescue series to replace indifferent drum recordings with suitable-sounding samples, and the beauty of working this way is that the feel and hit intensity of the original performance is retained. The only catch is that the drums generally need to be on separate tracks – although you can sometimes separate out hits individually – and the level of spill must be reasonably low to allow reliable triggering. In most cases, we still retain a low-cut-filtered version of the overhead track to provide the cymbals as it isn’t possible to separate sounds out of the overhead mics to any satisfactory degree. Where the overhead recordings are too poor to rescue, a more pragmatic solution may simply be to replay the cymbal parts from a keyboard using suitable samples.
Drum replacement or layering has become a mainstay of contemporary music recording, allowing you to retain the feel and detail of a real drummer’s performance, whilst beefing up the key sounds, such as kick and snare, with samples that were recorded under optimum conditions.
Using Loops
In addition to sample-based instruments that provide only single hits, there’s a wealth of library material using complete drum performances recorded as rhythmic loops of one or two bars. Loops based on recordings of real drum performances always sound very natural with a great feel, and it is usually possible to change the tempo of a loop over a useful range without it sounding too processed. By combining variations on the same rhythm with loops containing drum fills it is possible to create a plausible drum part for an entire song section without any practical knowledge of drumming, and this is certainly a practical option for the home-studio musician who doesn’t feel able to devise their own drum parts. Many sampled drum instruments also come with drag-and-drop MIDI files of drum rhythms, which has the advantage that the MIDI data can be edited so that off-theshelf rhythm patterns can be adapted to fit your own songs exactly, rather than you having to make do with whatever comes closest. There’s also no sound-quality penalty for changing the tempo of a MIDI drum pattern.
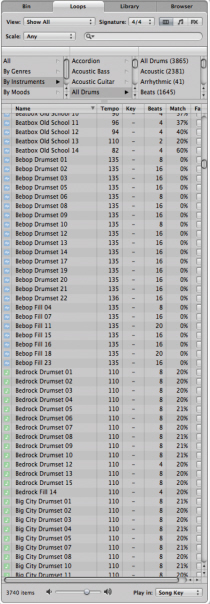
There’s a vast array of complete drum performances recorded as rhythmic loops of one or two bars or eight-bar sections for you to choose from, to use as a guide part to get you started, or as the rhythmic basis of your track.
Summary
Recording drums in a less than optimal space invariably involves compromises, even where the kit is well tuned and well played. Wall and ceiling reflections getting into the overhead mics cause the greatest problems, so this issue should be tackled first. If the results still don’t come up to expectations, there’s the option of using drum-replacement software to substitute high-quality samples in place of the existing drum hits.
Another valid approach is to use drum pads to trigger drum samples, and to use these instead of a conventional drum kit. These may be used to provide all the drum sounds, although using them in combination with real hi-hats and ride cymbals usually results in a more believable overall sound. Non-drummers will usually achieve better results by using commercial MIDI drum patterns to trigger drum samples, or using pre-recorded audio drum loops in a format that allows some tempo adjustment.