Recording acoustic guitars
After vocals, the acoustic guitar is probably the next most common musical source in the typical project studio to be recorded using a microphone. Many acoustic guitars come with a factory-fitted piezo-based undersaddle pickup and preamp, and whilst these can be effective in a live performance environment, they don’t offer anything like the same complex tonality you can achieve by miking the real thing. There are dedicated acoustic guitar preamps that use digital modelling to achieve a more realistic representation of the complete sound of the guitar, and they can work well in the context of a mix if you are in a situation where spill precludes using microphones, but where possible we’d always recommend that you use microphones for this particular source.
In the course of our Studio SOS ventures we’ve encountered many acoustic guitar recordings that could easily have been improved, with typical problems ranging from basic tuning issues to poor choice of microphone or mic position. Provided that the strings are reasonably new, it should always be possible to get a usable recorded sound from all but the very cheapest acoustic guitars. So long as the action is adequately low for comfortable playing, without any significant fret buzz, you probably don’t need to go to the expense of a full professional setup. If you are competent with these things and have the necessary tools, it might be worth ensuring that your guitar’s truss rod is set to keep the neck just short of perfectly flat (just marginally concave) as this usually helps to minimise buzzing and choking, as the vibrating strings have a tiny bit more excursion room.
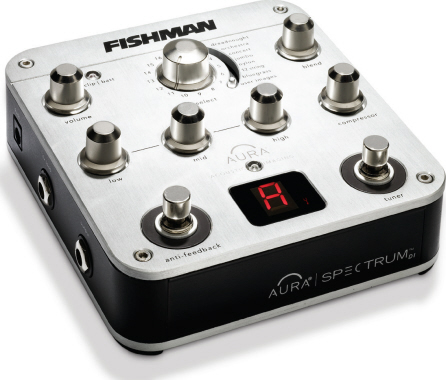
The rather one-dimensional sound typical of an under-saddle, piezo-based acoustic-guitar pickup can now be transformed into something rather more realistic by the sophisticated digital EQ and phase manipulation offered by this Fishman Aura pedal.
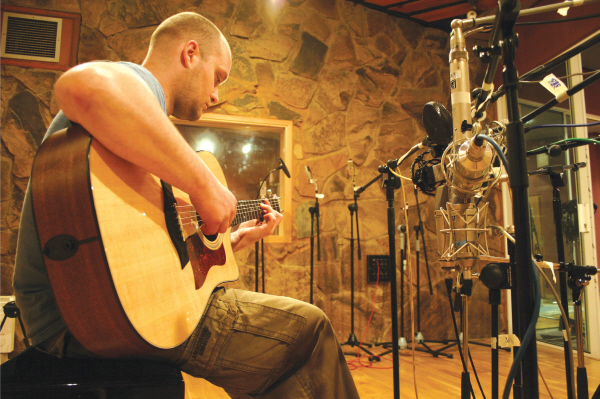
A common reason why a recording of a good guitar may sound less great than it should, even with a well-chosen mic and suitable mic position, is that the recording environment is too dead. We’ve heard this on many occasions where the guitar has been recorded in a carpeted bedroom surrounded by lots of soft furnishings. Having a fairly dead acoustic environment works well for vocals, but in the case of acoustic instruments some reflections from hard surfaces can help breathe life into the sound.
Acoustic guitars usually sound best when played above a hard, acoustically reflective floor surface, such as tiling, solid or laminate wood, or linoleum, as this brightens the sound. In situations where people have had to record in carpeted rooms we’ve been able to demonstrate that putting a modestly-sized sheet of MDF or hardboard on the floor between the guitar and the mic works almost as well as having a room with a hard floor throughout.

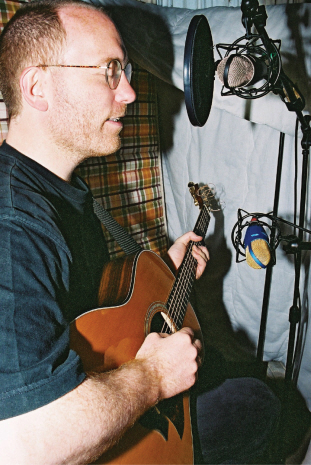
Acoustic guitar recording benefits from controlling room colouration just as much as a vocal recording.
As when recording vocals, it is usually best to keep the guitar and microphone away from the walls and also away from the exact centre of the room. Exactly the same acoustic treatment strategies for killing unwanted reflections can be used when recording acoustic guitar as you might when recording vocals – duvets, acoustic foam, heavy blankets and so on. Where a reflective floor can’t be improvised, siting the instrument between the centre of the room and one reflective wall can also help the tone, but as a rule try to avoid multiple reflective paths, as that can lead to a coloured, ‘roomy’ sound. One reflective surface close to the instrument usually works best. Furthermore, as explained in earlier chapters, try different places in the room as the room’s modal resonances can have a profound effect on the recorded result, especially at the bass and low-mid end of the spectrum.
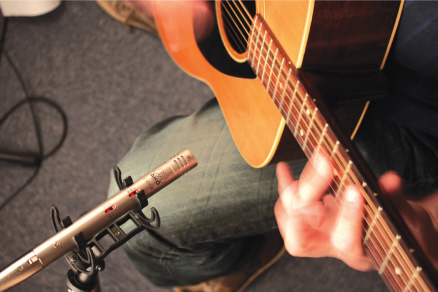
Small-diaphragm capacitor mics are often favoured for acoustic instruments because of their excellent transient performance and extended high-frequency response.
As the acoustic guitar covers a wide frequency range with a strong transient content, the best recording results are usually achieved using capacitor microphones. It is no surprise then that many of the less satisfactory results we’ve come across have been due to the use of dynamic vocal microphones but, with care, even these can yield passable results with appropriate placement and some EQ. Small-diaphragm capacitor models are the first choice for most acoustic instruments because of their excellent transient response and extended high-frequency capture, but you can also get good results with a large-diaphragm model too. Some home studios may only have one really good mic, and the chances are that will be a large-diaphragm capacitor model, usually with a fixed cardioid pickup pattern.
It is also possible to get a very nice, natural sound using a ribbon mic, although you may need to employ EQ to tame the inherent low-end boost due to proximity effect, and perhaps enhance the highs a little, in some cases. Ribbon mics have a fairly low output and so require quiet preamps with plenty of gain, so the kind of preamps typically found in budget audio interfaces might struggle when used with a ribbon mic on a relatively quiet source like acoustic guitar.
Although we tend to think mainly of cardioid-pattern mics for project-studio recording, a microphone with an omnidirectional pattern often produces the nicest sound for acoustic guitar – although you will probably need to put absorbers around the mic to cut down on the capture of unwanted room reflections other than from the floor. Omni mics don’t have the off-axis colourationor the low-frequency phase shifts that are inherent in most cardioid microphones, and so tend to produce a more natural sound. An omni-pattern mic picks up sound equally well from all directions so mic positioning with respect to the instrument is actually less critical than when using a cardioid-pattern mic, and there’s also no proximity effect to cause unwanted bass boost. With such a physically wide sound source as a guitar body, pretty much all of which vibrates, much of the sound will be occurring away from the main axis of the microphone, so an omni model clearly has the best chance of capturing this more accurately than a cardioid pattern mic.
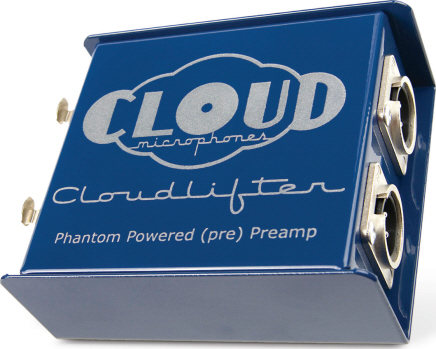
Ribbon mics require quiet preamps with plenty of gain. Cloud Microphone’s Cloud Lifter can significantly improve the performance of the typical preamps found in budget audio interfaces when using any type of low-output moving coil or ribbon microphone.
Figure-of-Eight Microphones
It is rare that home studio owners reach for a figure-of-eight microphone, as the fact that they are equally sensitive front and back tends to make them worry about spill or picking up excessive room sound. However, we’ve demonstrated on more than one occasion that a figure-of-eight microphone can be a real life-saver when you have a performer who, in order to get the right performance, needs to sing and play guitar at the same time. Miking both sources with cardioids rarely achieves sufficient isolation between the guitar and the voice to allow you to optimise both of them. The reason is that the unwanted sound source arrives at around 90 degrees off-axis, and the cardioid pattern is only about 6dB less sensitive at that angle than it is directly on-axis. So the vocal mic inherently picks up a lot of guitar sound, and vice versa – but if you’re using large diaphragm mics that off-axis sound will also be quite coloured and unnatural-sounding.
The real strength of the figure-of-eight mic in this situation is it is has a ‘deaf’ null at 90 degrees off-axis on both sides. If you can arrange the guitar mic so that its deaf axis points towards the singer’s mouth and, similarly, that the singer’s mic has its dead angle aimed towards the guitar body, you can claw back quite a lot of separation. Of course, it is important that the performer stays quite still and doesn’t sway about, to avoid moving the unwanted sources away from the null axes. This arrangement may also require more acoustic screening to prevent unwanted sound getting into the rear of the mics, but sometimes it presents the only practical solution. Note, though, that unless you intend to use pitch correction software or heavy effects on the voice (or guitar), you don’t need to achieve perfect separation – just enough to allow you to balance and, if necessary, EQ the two sounds adequately.
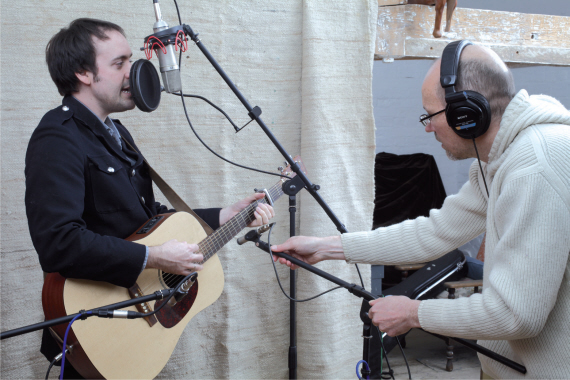
Figure-of-eight mics have a ‘deaf’ null at 90 degrees off-axis on both sides. Arranged carefully, they can offer a worthwhile amount of separation even on sources that are quite close together, such as someone singing and playing guitar simultaneously.
TIP : The commercially available curved sound absorbers designed to be used behind vocal mics are also very effective if placed behind omni or figure-of-eight mics when recording acoustic instruments, as they cut down on the unwanted room reflections reaching the rear of the mic. Rather like an omni, most figure-of-eight mics don’t suffer tonal colouration as you move off-axis, though the overall level falls away to zero once you get to 90 degrees off-axis. However, you do have to take into account the fact that figure-of-eight mics have a strong proximity effect, which means you either have to position them further from the source or employ a low-cut filter to balance the sound.
Finding the Optimum Mic Position
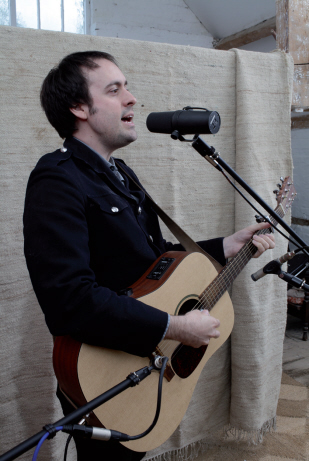
When trying to record an acoustic guitar, the first challenge is to locate the best position for the mic. Usually the optimum microphone distance is between 10 and 18 inches (25–45cm) from the guitar body where the mic will ‘hear’ a large part of the guitar’s vibrating surfaces, and there will be little proximity effect if using a directional mic. A mistake commonly made by inexperienced musicians is to place the mic directly in front of the guitar’s sound-hole. It may seem like this is where most of the sound comes from, but unless the guitar has a very small body this position invariably produces an unpleasantly muddy and boomy tone with poor definition. A much better starting point is to direct the microphone towards the point where the guitar’s neck joins the body, as this usually produces a much better-balanced sound. However, every guitar is different and while this mic position will probably provide a very acceptable sound, don’t automatically assume this will give you the best or most representative sound for the specific guitar. One of the things we often do during Studio SOS visits is to ask the client to play the guitar while monitoring the sound via headphones. As they play we move the mic around so that they can hear the effect of changing the mic position, and in most cases they’re absolutely astounded at how dramatic a difference this makes.
Where somebody else is playing the guitar, we have found that the best method for finding the optimum mic position is simply to monitor the microphone’s output using good quality headphones, and while the musician plays you can then move the mic around by hand until you find a position that delivers the best sound. With the ideal positioning identified you can then fix the mic on a stand. What you’re listening for is a tone that’s both warm and lively, but without being harsh or boomy and without any unnatural phasiness. Two common mic position alternatives to the neck/body joint, that often work well, are firstly below the guitar body looking back up towards the bridge – which tends to give a more rounded lower end weight with many guitars (and less fret noise) – or to place the mic alongside the player’s right or left ear looking down over their shoulder. If you want a thinner tone, perhaps to help the guitar cut through without muddying the mix, then moving the mic more towards the headstock end often helps.
Provided that you take care with the microphone placement at the recording stage, you should be able to capture a natural sound that works well in the mix without requiring much further processing. However, unless the recording is of just a solo guitar, some equalisation often helps to make it blend with other components in the mix. Where a strummed acoustic guitar is part of a busy arrangement alongside bass and drums, filtering the low end quite severely – reducing everything below maybe 300Hz using an 18dB/octave low-cut filter – is standard practice, as this produces a guitar sound with very little body but plenty of percussive definition. Don’t worry about how the guitar sounds in isolation when soloed – it will obviously sound quite thin – it’s how it works in the context of the complete mix that’s important. If used as a rhythmic bed, the equalised acoustic guitar should almost blend with the hi-hat sound.
Finding the ‘sweet spot’ is much easier if you are monitoring the output as you move the mic around.
If you feel the guitar needs more clarity and presence, a shelving-EQ boost in the 7 to 10kHz region will add sparkle and polish to the result without reaching far enough down the spectrum to give the sound an aggressive edge, but once again you must evaluate the results by listening to the complete mix rather than just the guitar in isolation. Problems we’ve encountered often involve the user boosting at too low a frequency, typically in the 2 to 4kHz range which, although it helps the guitar cut through in a mix, can also make it sound unpleasantly harsh. Boominess or boxiness can be tackled using a suitably tuned parametric equaliser in ‘cut’ mode, if a simple, shelving low-cut doesn’t do the trick – but it’s always better to avoid this problem in the first place by taking the time to find the best mic position that avoids capturing a boomy sound. If you need to cut out boominess using EQ, start by
Narrow-band EQ cut can help tackle a single boomy or boxy-sounding frequency without altering the overall tonality.
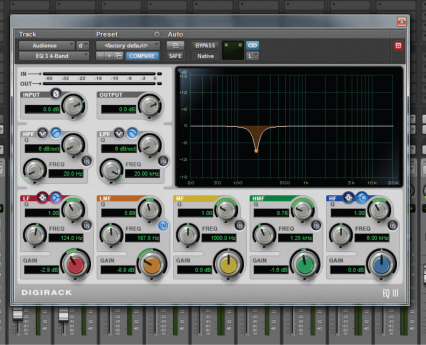
sweeping through the 100Hz to 300Hz range with a moderately narrow-bandwidth EQ boost, in order to locate the trouble spot. When you’ve found the unpleasant boomy frequency adjust the gain control to apply as much cut at that frequency as is necessary, while also tweaking the bandwidth or Q control to affect only the troublesome frequency range.
TIP : Ultimately every sound has to be judged in the context of the whole mix. It is best not to spend too much time trying to equalise individual instruments to sound as close as possible to the ‘finished’ sound you think they will need in the mix, whilst recording them. You may well have to change your approach once the rest of the track is playing and if you have used too much EQ or compression, you may have already compromised your options.
Stereo Recording
It might be tempting to record the acoustic guitar in stereo, and for solo performances this approach can work well. However, as with any multi-mic technique you can run into phase-cancellation problems if a spaced mic technique is employed and the stereo mix is later summed to mono, so always double-check the stereo miking using the mono button in the monitor controller or software. You can use any of the standard spaced or coincident (including MS) stereo mic techniques if you wish, but a lot of engineers take a more pragmatic approach and settle for two physically unrelated mic positions and then pan the microphones to achieve a musically pleasing spacious result, rather than a theoretically ‘accurate’ stereo image. A common ploy is to mic the guitar’s body, as described earlier, to get a rich and full tone, combined with a second mic part way up the neck to create a brighter, thinner tone. Although this obviously doesn’t give a true stereo picture of the instrument, it often works well in practice. The main pitfall we encounter when the guitar is recorded using spaced microphones is that the stereo image shifts as the performer moves, even if the movement is only slight.
Where the recording environment has a very attractive acoustic of its own, a more traditional coincident or near-spaced mic technique might be appropriate to place the guitar within that acoustic in a natural way that captures the spaciousness of the room in stereo. The coincident XY or Mid-Side techniques usually work well in this context, as does the ORTF arrangement (cardioid mics spaced 17cm apart and angled at ±55 degrees). In this scenario the mic distance from the instrument needs to be adjusted in order to pick up just the right amount of room sound.
Mic positions are often chosen to try to give a complete picture of the tonality of the guitar, rather than a spatially accurate stereo image – in this instance, the body mic gives fullness, whilst the neck mic adds articulation.
In most cases, however, we’ve found that the guitar presents a more stable sound source if recorded in mono, as this avoids any phase-related mono-compatibility issues and image-stability complications. You can add a sense of ‘space’ later, if desired, by using a suitable stereo reverb. Compared to the dimensions of the listening space, the acoustic guitar is a relatively small sound source, so at the typical listening distance of an audience there is no significant source sound width anyway. Any stereo information you hear is coming from room reflections, and these can be emulated perfectly adequately using a suitable reverb – whether a hardware unit or a DAW plug-in. This ‘keep it simple’ mantra crops up often, as many of the problems we discover during Studio SOS visits are due to a process being made more complicated than is strictly necessary.
Improving DI’d Guitar
Sometimes there is just no practical alternative to DI’ing the guitar (recording the output of the pickup directly) – such as when it is being recorded at the same time as other, louder instruments, or where adequate separation can’t be achieved when using a microphone. Some specialised acoustic guitar preamps attempt to put back what the DI process leaves out – specifically the complex body resonances of the instrument – using digital modelling, but if you don’t have access to one of these products, there’s an alternative that is well worth trying.
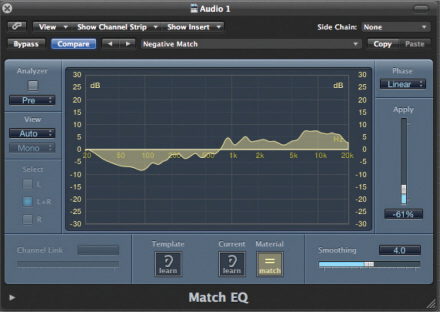
Many DAWs now include a ‘Fingerprint EQ’ or ‘Match EQ’ plug-in, but if your particular DAW doesn’t have one there are several third-party versions available. Essentially the fingerprint EQ combines a multi-band equaliser with a spectrum analyser, allowing you to analyse a recording of the sound you want to achieve – the ‘target’ sound – and then use that data to automatically EQ your source sound to achieve a similar spectral balance. It is a process that can be a bit hit and miss, especially when used on complete mixes, but it can produce very good results and is always well worth trying. You can use someone else’s recording for your target sound, of course, but the best results usually come from miking the actual guitar you are using and playing the same chords as you will be using in the recorded DI part, as the lumps and bumps in the frequency response are key-related, to some extent. If the calculated EQ doesn’t sound quite right you can sometimes get better results by manually applying a similar, but simpler, EQ shape using an ordinary EQ plug-in instead.
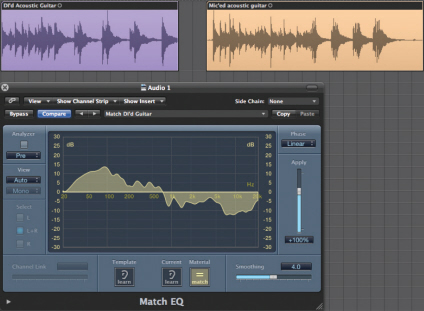
‘Fingerprint EQ’ imposing the response shape of a miked instrument onto a DI’d pickup signal.
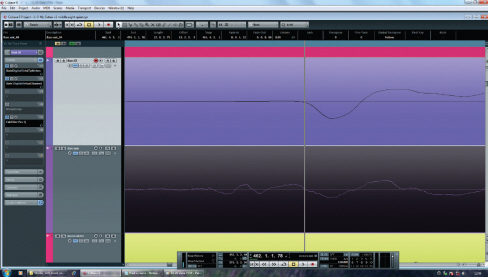
Simultaneously-recorded mic and DI signals from any instrument will often benefit from being pulled into time alignment – the DI signal will always have an earlier arrival time than the mic.
We’ve also had good results using both the miked and DI’d output from an acoustic guitar, panning both signals a little left and right of centre to create the illusion of stereo spread. Where spill was previously a problem, this may allow it to be brought under control without losing the contribution from the microphone entirely. If you try this dual approach, it is worth zooming in on the two audio waveforms to ensure that they are in exact alignment as the mic signal will be slightly behind the DI signal and the timing difference can compromise the tonality. You may also find that one of the waveforms is inverted in polarity relative to the other, in which case one of them needs to be inverted again to bring it back in phase. Where there is a timing discrepancy, the miked track can be advanced in time slightly so that it aligns with the DI’d version.
TIP : An unlikely ‘improver’ trick – most fingerprint EQs have an ‘amount’ slider that lets you adjust the degree to which the source sound’s spectrum is modified to match that of the target sound, and in some cases the amount slider will include a ‘negative’ capability so that you can make sounds more dissimilar. The initial idea was to use a section of vocal as the target sound, then to apply this setting to the guitar sound to try to achieve more separation by moving the fader into its negative area. Used this way, it works, in theory at least, to carve vocal-shaped holes in the guitar spectrum. We wanted to know if this would help make clearer-sounding mixes while still keeping the guitar sounding reasonably loud. It did work to a degree, but more importantly the complex peaks and troughs in a typical vocal spectrum, when applied in reverse to the guitar sound, seem to add a surprising degree of complexity to the sound and can help make a rather bland acoustic guitar part sound as though it was played on a better instrument. We can’t guarantee this will always work, as it depends both on the original guitar sound and on the vocal spectrum used as a target, but it is certainly worth experimenting with the idea.