8. Creative Construction
In This Chapter
![]() Time for a block party! Build your first aboveground base.
Time for a block party! Build your first aboveground base.
![]() Decorate your pad with chairs, tables, and paintings.
Decorate your pad with chairs, tables, and paintings.
![]() Chill out Zen-style with flowing water, pools, and fountains.
Chill out Zen-style with flowing water, pools, and fountains.
![]() Warm things up with a fireplace or two—and don’t forget the barbecue.
Warm things up with a fireplace or two—and don’t forget the barbecue.
![]() Follow the steps to build an underwater abode.
Follow the steps to build an underwater abode.
![]() Protect your perimeter and take potshots at mobs with a water trap.
Protect your perimeter and take potshots at mobs with a water trap.
![]() Stage a fireworks display to celebrate your completed construction.
Stage a fireworks display to celebrate your completed construction.
This chapter is packed to the brim with construction ideas, from a few starting tips on finding sources of inspiration to a detailed list of all the things you can add that go beyond the basic functional elements.
Construction is easy—basically just put one block on top of another. But take heed: Once you start, it’s hard to stop. Every step is like opening another door, and you’ll soon find your imagination running riot.
Even if you have no particular architectural talent—and I must confess that I am absolutely astonished by the incredible feats some have achieved with soaring Gothic cathedrals and entire cities that are nothing short of wonderlands—construction starts with a single click.
Leaving the Cave
If you’ve been busy mining, farming, and doing all the other Minecrafty things that get you established, you probably haven’t had the time to build a glorious aboveground structure or to decorate your home with nonfunctional items. Well, now’s as good a time as any to take a bit of a break. Unleash Minecraft’s bevy of building blocks and unlock your creative potential.
Some of the incredible structures players have already created include:
![]() Models of famous locations and buildings, including cathedrals, towers, castles, palaces, and cultural landmarks. Think the Reichstag, Taj Mahal, Louvre, Westminster Abbey, Sydney Opera House, Empire State Building, and much more.
Models of famous locations and buildings, including cathedrals, towers, castles, palaces, and cultural landmarks. Think the Reichstag, Taj Mahal, Louvre, Westminster Abbey, Sydney Opera House, Empire State Building, and much more.
![]() Fictional locations either as faithful replicas or as near as can be achieved, including Tolkien’s Middle Earth, Caribbean pirate towns, and, in the ultimate homage, levels and locations from other video games, movies, and TV series, including, of course, Game of Thrones (see Figure 8.1).
Fictional locations either as faithful replicas or as near as can be achieved, including Tolkien’s Middle Earth, Caribbean pirate towns, and, in the ultimate homage, levels and locations from other video games, movies, and TV series, including, of course, Game of Thrones (see Figure 8.1).
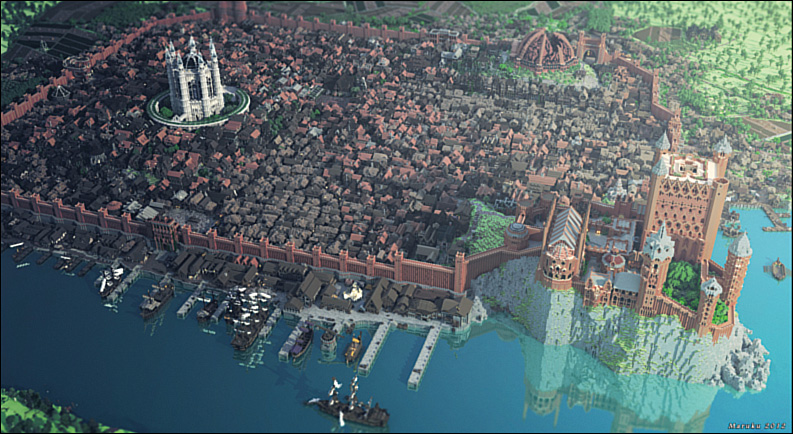
FIGURE 8.1 King’s Landing from Game of Thrones, built in Minecraft with incredible attention to detail. (Image courtesy of WesterosCraft)
![]() Giant pixel art depicting almost anything at all: statues and sculpted creations that are glorious explorations of the maker’s creative capabilities.
Giant pixel art depicting almost anything at all: statues and sculpted creations that are glorious explorations of the maker’s creative capabilities.
The list could go on, but I’ll curtail it here. Suffice to say that anything is possible—and probable.
Note: Get a Whole New Look with Resource Packs
In a standard installation, Minecraft has an organic, pixelated appearance, but it’s possible to completely change the look of every block. Resource packs (which used to be called texture packs) make this easy and can change the way your creation looks from the default to rustic, realistic, modern, hi-tech, or even cartoon-like. Hundreds of resource packs are available. More on this and some handy download links can be found in “Resource Packs: Change Your World” on page 296. If you can’t wait to see how these look, click over to http://www.minecrafttexturepacks.com to get a feel for them now. I recommend the Faithful 32×32 for a higher-resolution world with crisper textures and, therefore, a smoother look. Another fun one I like to use when in superflat worlds is one of the many TRON-themed resource packs. Try a few, but be warned: Quality varies.
Each Minecraft block is 1 cubic meter, so many replicas are built to a 1:1 scale—even the entire center of historic Beijing, from the ancient city walls torn down by Mao all the way back toward the Forbidden City, with, it seems, every hutong in place.
Many of these creations are too much for one person, so they have sprung up on multiplayer servers. Others, though, represent thousands of hours of effort by dedicated individuals who will often then share their maps as free downloads.
So, having set the scene, what’s the easiest way for you to get started without necessarily budgeting the next six months to a building project?
You can take several approaches:
![]() Extend your current shelter—Keep all the basics in place while building out and up a little at a time.
Extend your current shelter—Keep all the basics in place while building out and up a little at a time.
![]() Start from scratch aboveground—Pick a location close to your current spawn point or strike out to a better location with your bed in hand to reset your spawn. Figure 8.2 shows an example.
Start from scratch aboveground—Pick a location close to your current spawn point or strike out to a better location with your bed in hand to reset your spawn. Figure 8.2 shows an example.

![]() Head to the nearest village—A village is a handy location to set up a home if you don’t mind the villagers’ constant creaky grumbling that makes them sound like they require a squirt of WD-40. There’s often at least one villager happy to swap wheat for emeralds, which you can then trade for more valuable items. You can also harvest their fields of wheat, potatoes, and carrots—and wipe the sweat from your brow while the villagers get busy replanting.
Head to the nearest village—A village is a handy location to set up a home if you don’t mind the villagers’ constant creaky grumbling that makes them sound like they require a squirt of WD-40. There’s often at least one villager happy to swap wheat for emeralds, which you can then trade for more valuable items. You can also harvest their fields of wheat, potatoes, and carrots—and wipe the sweat from your brow while the villagers get busy replanting.
![]() Dive—Not all shelters need to be aboveground or deep in a cave. I’ve included a tutorial on building underwater later in this chapter.
Dive—Not all shelters need to be aboveground or deep in a cave. I’ve included a tutorial on building underwater later in this chapter.
Minecraft ignores basic physics on almost all the standard blocks except for sand and gravel. This enables the creation of gravity-defying structures. Stack them as high as you like and build a platform to create a structure floating in the sky.
Imagine a fortress connected to the ground with just a single block. It’s perfectly possible. You don’t need to build up from the ground to start, either. The new /fill command is a huge time saver. Its syntax is /fill XX1 YY1 ZZ1 XX2 YY2 ZZ2 blockname, and you can use it to a maximum of 32,768 blocks (32×32×32). You can see the blockname options under the Name column by opening this link http://goo.gl/QYTVb3.
For example, start a world in Creative mode and then start flying by pressing the spacebar twice, and teleport to a central location by typing tp/ 0 200 0. Then type /fill 1 201 1 32 232 32 minecraft:planks to create a gigantic 32×32×32 block of planks in the sky. The /fill command replaces any other blocks with its own if they intersect its coordinates. Try replacing minecraft:planks with a smaller amount of the block minecraft:tnt at ground level, and then set it off with a flint and steel, fly up, and enjoy the destruction.
Note that too much TNT will bring your PC to its knees, and once the explosions stop, you may need to back out and reenter your world for it to correctly update the display.
There are as many approaches to building aboveground as there are different worlds in Minecraft. The easy way is to go for a box design. It doesn’t take much effort and is something of a natural starting point. You could also go for a walk around your actual neighborhood, grabbing photos with your phone or camera. If you’d prefer not to have a run-in with Neighborhood Watch, check out some online real estate sites. They often have multiple photos and architectural plans. YouTube also hosts numerous videos that players have created to show off their amazing creations.
Note: Multiplayer Construction Rules
Multiplayer servers implement different sets of rules around construction with blocks that may be locked down to prevent griefing (a.k.a. wanton vandalism by random visitors). Knock a block out, and it immediately pops back. Trusted, or whitelisted, players typically gain greater access to allow for cooperative builds, or to build on their own lots. Gaining this trust can be as simple as registering your email address or as complicated as submitting the equivalent of a résumé to prove that you have the necessary construction credentials prior to being let loose. For more information on Minecraft servers, a great resource to consult is The Ultimate Guide to Minecraft Server, by Tim L. Warner (9780789754578).
Building a Custom World
Before you learn how to make a world your home, let’s examine how to create your own custom world in the first place. Minecraft v1.8 gives you a new world type called Customized, in which you have great control over all aspects of world/biome structure and composition.
Because these world customization options are so comprehensive, it helps to start with one of the seven environment presets already provided. From the title screen, click Singleplayer, Create New World, More World Options.
On the Create New World screen, change the World Type to Customized and then click Customize. You’ll see the first of four Customize World Settings screens, as shown in Figure 8.3.
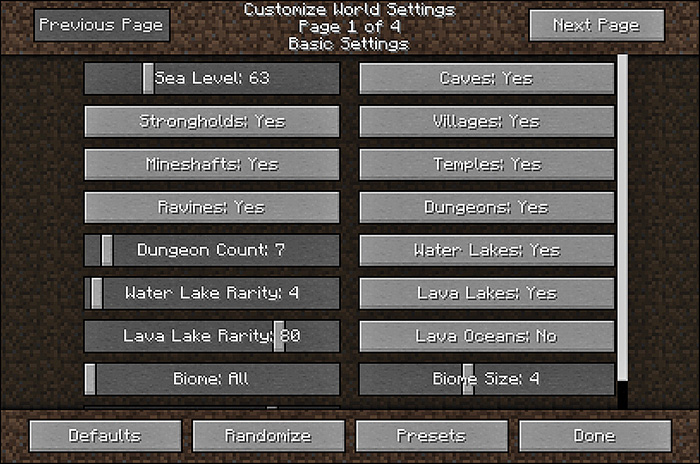
FIGURE 8.3 In Customized mode, you can control just about every environmental aspect of a new Minecraft world.
Click Presets. Here you can avoid getting bogged down with making a number of granular choices concerning the presence or absence of strongholds, mine shafts, ravines, and the like. Instead, you can decide on one of the following premade world environments:
![]() Water World
Water World
![]() Isle Land
Isle Land
![]() Caver’s Delight
Caver’s Delight
![]() Mountain Madness
Mountain Madness
![]() Drought
Drought
![]() Good Luck
Good Luck
Each of these presets does a good job explaining the kind of biomes you can expect from each.
The Good Luck preset, shown in Figure 8.4, is particularly interesting for experienced players. Minecraft’s developers made this world as inhospitable as possible for all but the most diehard (pun intended) players.

FIGURE 8.4 Talk about inhospitable! The Good Luck world customization preset includes tough terrain and huge lava oceans.
Should you decide to forgo using one of the presets, you can turn to the four settings pages that give you full management of world options. Here are some of the major choices, along with their value ranges:
![]() Sea level: 1–255
Sea level: 1–255
![]() Strongholds: Yes/No
Strongholds: Yes/No
![]() Mineshafts: Yes/No
Mineshafts: Yes/No
![]() Ravines: Yes/No
Ravines: Yes/No
![]() Dungeon Count: 1–100
Dungeon Count: 1–100
![]() Water Lake Rarity: 1–100
Water Lake Rarity: 1–100
![]() Lava Lake Rarity: 1–100
Lava Lake Rarity: 1–100
![]() Biome: All/individual biomes
Biome: All/individual biomes
![]() Villages: Yes/No
Villages: Yes/No
![]() Temples: Yes/No
Temples: Yes/No
![]() Dungeons: Yes/No
Dungeons: Yes/No
![]() Water Lakes: Yes/No
Water Lakes: Yes/No
![]() Lava Lakes: Yes/No
Lava Lakes: Yes/No
![]() Lava Oceans: Yes/No
Lava Oceans: Yes/No
![]() Biome Size: 1–8
Biome Size: 1–8
You’ll also notice that the Basic Settings page has a handy Randomize button, which gives you a “roll the dice” approach to world generation. If you’ve decided to let Minecraft generate your world according to its natural order, click Defaults and be done with it.
Cool! Now that you know how to generate a world that is more to your preference, it’s time to turn your attention to how you can inhabit that world with style and grace.
Unleashing Your Interior Decorator
Not everything in Minecraft has to be functional. Figure 8.5 shows all kinds of components that can be put together in different ways to create a homey ambience, both indoors and out. While it’s a little frustrating that you can’t sit at a table or relax on a lounger, furniture stills makes a very nice addition to any home.
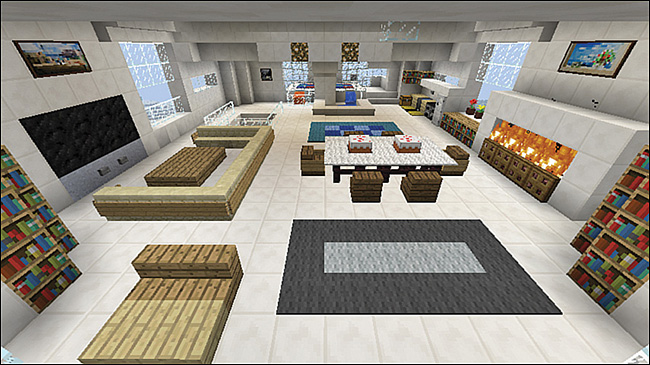
FIGURE 8.5 An open-concept living area with a wide-screen TV, modular lounge with coffee table, sun bed, dining table, and fireplace. There’s also a kitchen tucked in the back-right corner.
I’ve put together a collection of different ideas for you, but this is also one of those areas where your own creativity and experimentation come into play. Try out some of these in a world set to Creative and let the juices flow:
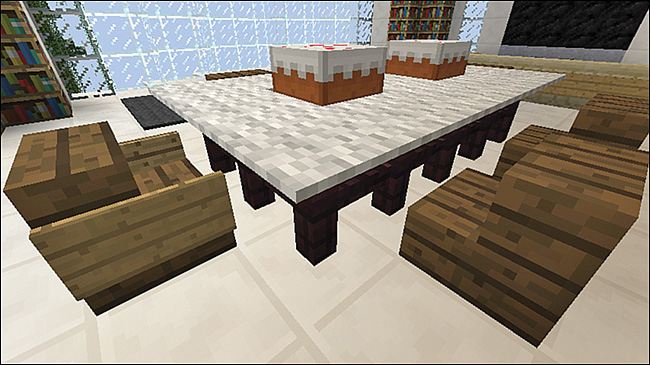
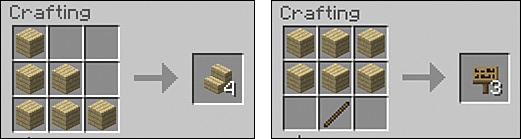
![]() Chairs—Chairs are made from staircase blocks. Craft a staircase from six wood blank blocks. The chairs can be as long or as short as you want, from single seats to a modular lounge. Place signs or trapdoors (in their open position—right-click to toggle them) on the sides to create armrests. Extend the base of the chair with a slab to create a deck-chair effect that’s perfect around a pool or on a sun deck. Figure 8.6 shows a view of chairs around a dining table (see the next bullet).
Chairs—Chairs are made from staircase blocks. Craft a staircase from six wood blank blocks. The chairs can be as long or as short as you want, from single seats to a modular lounge. Place signs or trapdoors (in their open position—right-click to toggle them) on the sides to create armrests. Extend the base of the chair with a slab to create a deck-chair effect that’s perfect around a pool or on a sun deck. Figure 8.6 shows a view of chairs around a dining table (see the next bullet).
Note: Placing Signs
Signs placed against a block attach to the side of that block. Signs placed on top of a block become freestanding, with their orientation fixed so that they face toward you when placed.
![]() Dining table—Create a table by placing a single fence block, which becomes the stand. Then place a pressure plate on top of the post to form the table’s surface. Pressure plates don’t create a seamless surface, so for larger tables, consider using squares of carpet instead. Surround the table with a few chairs to complete the picture. If you make a giant dining table, use regular blocks and then place pressure plates or carpet as placemats. Remove some squares of the table’s surface and pop some cake down in their place to finish the picture.
Dining table—Create a table by placing a single fence block, which becomes the stand. Then place a pressure plate on top of the post to form the table’s surface. Pressure plates don’t create a seamless surface, so for larger tables, consider using squares of carpet instead. Surround the table with a few chairs to complete the picture. If you make a giant dining table, use regular blocks and then place pressure plates or carpet as placemats. Remove some squares of the table’s surface and pop some cake down in their place to finish the picture.
![]() Beds—Think of the standard Minecraft bed as just the starting point. Put two side by side for a double, or make a king size bed out of three and some blocks behind for a headboard. Then place some slabs at the foot to get the proportions right.
Beds—Think of the standard Minecraft bed as just the starting point. Put two side by side for a double, or make a king size bed out of three and some blocks behind for a headboard. Then place some slabs at the foot to get the proportions right.
![]() Bedside table—Use a standard construction or wood block or a bookcase—anything that matches your color scheme. Then put a torch on top, in the middle of the block. The torch will burn permanently, but if you put a redstone torch in the middle and then a lever on the side of the block, you’ll have a light you can switch on and off. Replace the redstone torch with a redstone lamp for much brighter lighting.
Bedside table—Use a standard construction or wood block or a bookcase—anything that matches your color scheme. Then put a torch on top, in the middle of the block. The torch will burn permanently, but if you put a redstone torch in the middle and then a lever on the side of the block, you’ll have a light you can switch on and off. Replace the redstone torch with a redstone lamp for much brighter lighting.
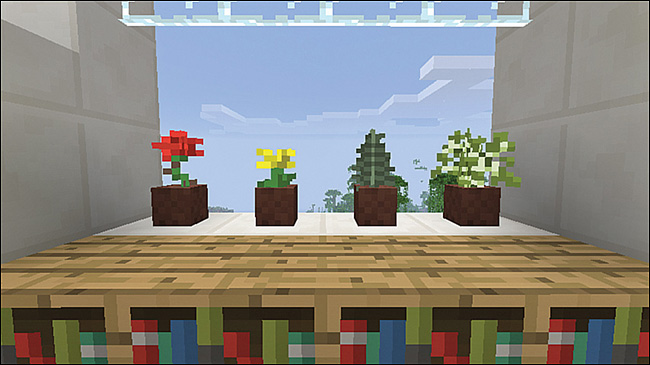
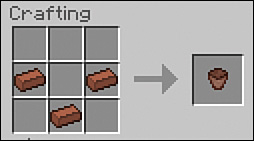
![]() Indoor plants—Choose a plant such as a flower, sapling, cactus, or leaf block cut from a regular tree with shears or a tool enchanted with silk touch. Pick a base block such as grass, dirt, or sand, plant it, and attach signs or trapdoors to its sides to give it a nice boxed look, as shown in Figure 8.7, or create a flower pot from three bricks. Smelt clay to make bricks, arrange them into pots, and plant flowers, saplings, ferns, and mushrooms (see Figure 8.8).
Indoor plants—Choose a plant such as a flower, sapling, cactus, or leaf block cut from a regular tree with shears or a tool enchanted with silk touch. Pick a base block such as grass, dirt, or sand, plant it, and attach signs or trapdoors to its sides to give it a nice boxed look, as shown in Figure 8.7, or create a flower pot from three bricks. Smelt clay to make bricks, arrange them into pots, and plant flowers, saplings, ferns, and mushrooms (see Figure 8.8).
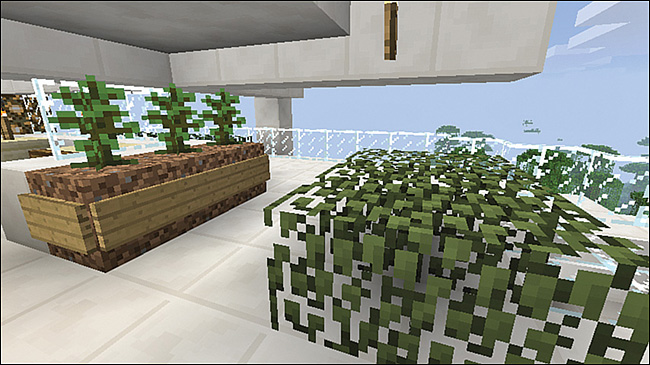
FIGURE 8.7 Planter boxes and hedges add a leafy touch to rooms and balconies. It’s safe to plant saplings indoors because they won’t grow without empty blocks above.
![]() Hedges—Leaf blocks also work well in decorative construction. Use them to build hedges lining a path or parkway. You can even use them for the walls of a tree house. The blocks won’t decay, unlike regular leaf blocks that are no longer attached to their trunk. Gather leaf blocks from trees by snipping them with shears.
Hedges—Leaf blocks also work well in decorative construction. Use them to build hedges lining a path or parkway. You can even use them for the walls of a tree house. The blocks won’t decay, unlike regular leaf blocks that are no longer attached to their trunk. Gather leaf blocks from trees by snipping them with shears.
![]() Fantasy trees—Use wood and leaf blocks to create unique trees dotted around your estate. You can even place them inside a giant atrium to create your own Crystal Palace.
Fantasy trees—Use wood and leaf blocks to create unique trees dotted around your estate. You can even place them inside a giant atrium to create your own Crystal Palace.
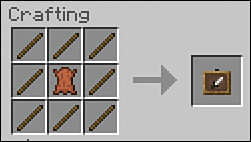
![]() Item frames—Crafted from eight sticks and one piece of leather, item frames serve a decorative and practical purpose as single-item storage. Place a frame on any wall and then take the object you’d like to store in hand and right-click the frame to place it inside. Store that enchanted diamond sword you plan to save for later combat, or maybe a diamond pick for when you need to retrieve more obsidian. Left-click the frame to retrieve both it and the object later, or right-click the item in the frame to rotate it through eight possible orientations. Use an item frame and a clock to create a wall clock, or place a map in the frame for permanent reference. The map updates to show the locations of all other item frames containing maps, making it the only way to actually place a “pin.” Make a grid of multiple frames and maps to create a single seamless picture of your entire explored domain.
Item frames—Crafted from eight sticks and one piece of leather, item frames serve a decorative and practical purpose as single-item storage. Place a frame on any wall and then take the object you’d like to store in hand and right-click the frame to place it inside. Store that enchanted diamond sword you plan to save for later combat, or maybe a diamond pick for when you need to retrieve more obsidian. Left-click the frame to retrieve both it and the object later, or right-click the item in the frame to rotate it through eight possible orientations. Use an item frame and a clock to create a wall clock, or place a map in the frame for permanent reference. The map updates to show the locations of all other item frames containing maps, making it the only way to actually place a “pin.” Make a grid of multiple frames and maps to create a single seamless picture of your entire explored domain.
Tip: Opening the Door to Style
Minecraft has six types of wooden doors, as well as one made from iron. The standard door is made from oak, but you can also use spruce, acacia, dark oak, jungle wood, and birch. Choose the right material to match the door to your building’s style.
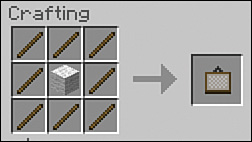
![]() Paintings—These are purely decorative. You create them with the same recipe you use for an item frame, but with the leather swapped for any piece of wool. Placing paintings is a little bit random because Minecraft tries to scale up to suit the flat space available, with some limits. There’s a built-in inventory of 26 pieces of art in different shapes and sizes, although the art itself varies with different resource packs. One way to try to force a painting to be sized a particular way is to first surround the target area with other blocks and then click in the lower-left corner of the target space and remove the additional blocks. It doesn’t always work, but this is a little less random than other methods, although there’s nothing wrong with placing, removing, and repeating until you’ve found the best image and fit.
Paintings—These are purely decorative. You create them with the same recipe you use for an item frame, but with the leather swapped for any piece of wool. Placing paintings is a little bit random because Minecraft tries to scale up to suit the flat space available, with some limits. There’s a built-in inventory of 26 pieces of art in different shapes and sizes, although the art itself varies with different resource packs. One way to try to force a painting to be sized a particular way is to first surround the target area with other blocks and then click in the lower-left corner of the target space and remove the additional blocks. It doesn’t always work, but this is a little less random than other methods, although there’s nothing wrong with placing, removing, and repeating until you’ve found the best image and fit.
![]() Fountains—Build fountains as simple or complex as you like. Place a water source on top of any other structure. Glass blocks work quite well for this, but any block will do. Create a hollow fountain by removing the blocks after you’ve placed the water. The original water source will stay elevated in its original position. Also, don’t forget to put a surround around the base so the cascade doesn’t turn into a flood. Figure 8.9 shows an example.
Fountains—Build fountains as simple or complex as you like. Place a water source on top of any other structure. Glass blocks work quite well for this, but any block will do. Create a hollow fountain by removing the blocks after you’ve placed the water. The original water source will stay elevated in its original position. Also, don’t forget to put a surround around the base so the cascade doesn’t turn into a flood. Figure 8.9 shows an example.
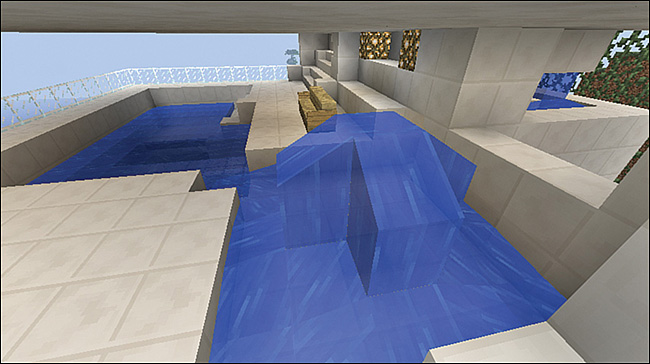
FIGURE 8.9 This small indoor fountain feeds the swimming pool located on the recreation level of the house.
![]() Ponds and pools—As long as water drops one level every seven blocks, it can flow on forever from a single source. Take advantage of this to create water features that flow down and through your house into a pond. Add a few floating lily pads to complete the effect. Pools are a nice touch that can look good surrounded by almost any smooth blocks, especially with the addition of deck chairs, mentioned above.
Ponds and pools—As long as water drops one level every seven blocks, it can flow on forever from a single source. Take advantage of this to create water features that flow down and through your house into a pond. Add a few floating lily pads to complete the effect. Pools are a nice touch that can look good surrounded by almost any smooth blocks, especially with the addition of deck chairs, mentioned above.
![]() Netting and wisps—Cobwebs gathered with shears or silk touch can stand in as netting between two posts. Tennis, anyone? Use redstone to draw lines on the court. Cobwebs can also suggest smoke billowing from a chimney, or you can use them for lashings and cargo nets on ships.
Netting and wisps—Cobwebs gathered with shears or silk touch can stand in as netting between two posts. Tennis, anyone? Use redstone to draw lines on the court. Cobwebs can also suggest smoke billowing from a chimney, or you can use them for lashings and cargo nets on ships.
Tip: Getting Colorful
Minecraft includes a collection of stained objects that are all craftable in Survival mode and easy pickings in Creative. These include stained glass, stained glass panes, stained clay, colored carpet tiles, and colored wool blocks. Use these to add a dash of color to every structure.
![]() Bookshelves—Although bookshelves have an official use for enhancing enchantments (see Chapter 10, “Enchanting, Anvils, and Brewing,” for the full details and crafting recipes), they’re also excellent decorative items. Stack them up where needed to build a library or add some interesting ambience to any living room. Slabs also work well and are easier to make than a bookshelf item. Stack them up to create multiple shelves and dress the sides with regular blocks or just run them straight to the wall to make them appear as built-in shelves.
Bookshelves—Although bookshelves have an official use for enhancing enchantments (see Chapter 10, “Enchanting, Anvils, and Brewing,” for the full details and crafting recipes), they’re also excellent decorative items. Stack them up where needed to build a library or add some interesting ambience to any living room. Slabs also work well and are easier to make than a bookshelf item. Stack them up to create multiple shelves and dress the sides with regular blocks or just run them straight to the wall to make them appear as built-in shelves.
![]() Raised and lowered floors—Slabs are half a block high, making them ideal for creative flooring and embedded fixtures. Although items placed on a slab seem to float, two sets of slabs can lead down to a sunken lounge or an indoor pool. And if your design extends to the bathroom, create a slab floor and leave a one-piece hole against the wall. Place a cauldron in it and fill it with water to make a recessed sink, then attach a lever to the wall with the handle facing down to simulate a spout. Using slabs is also a useful way to hide redstone wiring. They’ll float one block up, with the redstone running underneath and out of sight, saving an additional layer of trench digging. More on this in Chapter 9, “Redstone, Rails, and More.”
Raised and lowered floors—Slabs are half a block high, making them ideal for creative flooring and embedded fixtures. Although items placed on a slab seem to float, two sets of slabs can lead down to a sunken lounge or an indoor pool. And if your design extends to the bathroom, create a slab floor and leave a one-piece hole against the wall. Place a cauldron in it and fill it with water to make a recessed sink, then attach a lever to the wall with the handle facing down to simulate a spout. Using slabs is also a useful way to hide redstone wiring. They’ll float one block up, with the redstone running underneath and out of sight, saving an additional layer of trench digging. More on this in Chapter 9, “Redstone, Rails, and More.”
![]() Fireplaces—You need to know just two things about fireplaces. Netherrack (a block from The Nether) burns forever. Set it on fire with a flint and steel and bask in the glow. The other thing, perhaps slightly more important, is that fire is catching. Don’t surround your fireplace with wood blocks. As a matter of fact, don’t have anything flammable within at least two blocks—or more, just to be sure. Use nonflammable materials such as cobblestone and bricks. A fireplace looks great with a glass pane in front of it (see Figure 8.10). Fireplaces also make pretty decent firepits or barbecues (see Figure 8.11). S’mores, anyone?
Fireplaces—You need to know just two things about fireplaces. Netherrack (a block from The Nether) burns forever. Set it on fire with a flint and steel and bask in the glow. The other thing, perhaps slightly more important, is that fire is catching. Don’t surround your fireplace with wood blocks. As a matter of fact, don’t have anything flammable within at least two blocks—or more, just to be sure. Use nonflammable materials such as cobblestone and bricks. A fireplace looks great with a glass pane in front of it (see Figure 8.10). Fireplaces also make pretty decent firepits or barbecues (see Figure 8.11). S’mores, anyone?
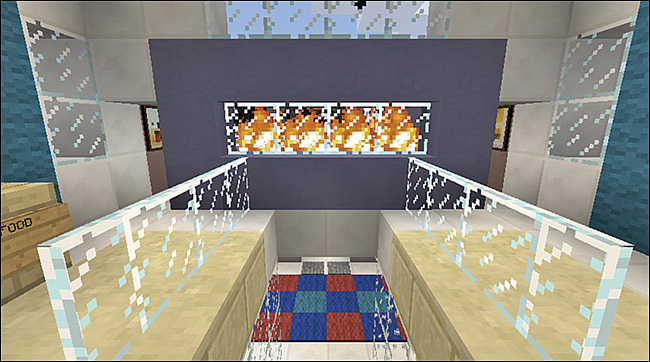
FIGURE 8.10 A modern fireplace set inside a wall with a glass pane in front. The fire provides a dynamic animation, making a room feel warm and alive.

FIGURE 8.11 This barbecue is made from a mix of brick blocks and staircases. Note that the trapdoor, like a door, doesn’t burn, so it is safe to position it above the fire. You can also use iron trapdoors for the grill if you prefer that look.
Note: Baking Your Own Banners
A banner is like a coat of arms that you can design yourself—a heroic heraldry, if you like, or just a statement or personal mark. You can plant banners on almost any block, facing in any direction, or hang them from walls and even transfer them onto shields. They are crazily customizable, and once you have created your own design, no matter how many steps it took, you can copy it quite easily to new banners. Figure 8.12 shows a variety of them, but the possibilities are almost endless. For inspiration, check out the ever-changing list at http://www.planetminecraft.com/banners, along with step-by-step instructions on completing each. You’ll be amazed at the creative possibilities.

FIGURE 8.12 Banners provide a uniquely personalized decoration to Minecraft. You can hang them, have them freestanding, or even add and rotate them within an item frame.
Blank banners are crafted from six blocks of wool and a stick. Dyeing the wool first by combining white wool with dye or breeding colored sheep also changes the banner’s background color.
Build a banner from that starting point by adding various patterns and graphical adornments. You can add up to six additional layers by using the flag again each time in the crafting grid.
The additions include a wide range of block-type patterns that can form stripes, crosses, and so on, and more specific graphics from a selection of in-game items. Look to http://minecraft.gamepedia.com/Banner for the full compendium of banner recipes.
Construction is one of the indulgent pleasures in Minecraft. In Creative mode, you’ll have access to the full range of available materials, but there is also something to be said for building an amazing structure in Survival mode. Having to find the materials first really adds to the experience.
Building Underwater
There’s not a lot of justification for undertaking the effort to build an underwater house, except for that most important of reasons: because you can! It’s a fun challenge. An underwater house provides great visibility, is immune to hostile mobs, including the creeper, and, well, is just pretty darn cool. Building this type of house can take a little bit of extra work, but it’s fairly easy, and you can let your imagination take you anywhere you want to go, from the equivalent of a reversed aquarium, with you as the soul internee, to a full remake of Bioshock’s Rapture. Figure 8.13 shows a small underwater base.

Building underwater is a methodical process. The trick is to consider it the inverse of mining. Instead of removing material, you actually want to fill in the entire shape of your structure to displace the water, place the final shell of the building around that (for example, glass blocks), and then remove the internal material to create the living area. There’s no method of pumps or pipes to suck water out or pump air in, so this displacement system is the only viable method.
There are a few ways to go about it. In Creative mode, it’s pretty much a matter of taking the time and a bit of care. You can stay underwater as long as you need.
Survival mode adds a twist because running out of air is a constant risk. It becomes vitally important to keep a close eye on your oxygen bar and health bar. Swimming up from the bottom of a lake always takes longer than expected, causing hits on your health, so the real trick is to find a way to create an air supply down below.
At a minimum, ensure that your kit includes these items:
![]() One bucket—Crafting a bucket takes just three iron ingots and provides you with the equivalent of a limitless tank of air.
One bucket—Crafting a bucket takes just three iron ingots and provides you with the equivalent of a limitless tank of air.

![]() Doors, ladders, and signs—These blocks displace water but leave space for you to stand and grab a breather. You can make do with just one of any type, but it’s best to pack a few.
Doors, ladders, and signs—These blocks displace water but leave space for you to stand and grab a breather. You can make do with just one of any type, but it’s best to pack a few.
![]() Light sources—Torches go out in a soggy fizz as soon as they hit water. Jack-o’-lanterns work best and can be smashed up and repositioned as required. Glowstone from The Nether also works well. See the “Light Up Your (Underwater) Life” tip, later in this chapter, for another option.
Light sources—Torches go out in a soggy fizz as soon as they hit water. Jack-o’-lanterns work best and can be smashed up and repositioned as required. Glowstone from The Nether also works well. See the “Light Up Your (Underwater) Life” tip, later in this chapter, for another option.

![]() Construction equipment—Bring the usual suspects—a couple of shovels for digging sand, dirt, and gravel, as well as some pickaxes for the harder stuff. Having an axe also makes it easier to reposition other equipment, such as doors.
Construction equipment—Bring the usual suspects—a couple of shovels for digging sand, dirt, and gravel, as well as some pickaxes for the harder stuff. Having an axe also makes it easier to reposition other equipment, such as doors.
![]() Soft blocks—You need several full stacks of dirt, sand, or gravel as temporary filler material to remove the water from your construction. By the way, I use the term soft blocks to refer to the temporary blocks you’ll use during construction—those you can remove quickly with a shovel while underwater.
Soft blocks—You need several full stacks of dirt, sand, or gravel as temporary filler material to remove the water from your construction. By the way, I use the term soft blocks to refer to the temporary blocks you’ll use during construction—those you can remove quickly with a shovel while underwater.
![]() Construction materials—You need lots of glass blocks for the outer shell, as well as any other material you want to use.
Construction materials—You need lots of glass blocks for the outer shell, as well as any other material you want to use.
![]() Food—It’s important to keep a full hunger bar underwater so that your health recovers quickly if you run out of air.
Food—It’s important to keep a full hunger bar underwater so that your health recovers quickly if you run out of air.
Tip: Survive with an Island Spawn Point
Underwater construction can be a hazardous business, so place a bed nearby and take a nap before you begin. If your spawn point is nearby, you can get back down quickly enough to pick up any dropped items should you suffer a watery demise. If you are building too far offshore, use a boat to return quickly or build an island platform on the surface, perched on top of a single block tower. It just needs to be big enough for a bed and a torch to prevent mob spawns at night. Alternatively, find a good location and type /spawnpoint to reset your spawn to your current position.
Getting Started
There are plenty of methods for getting started, including tunneling in from the side of a lake, but these aren’t always practical. The most comfortable I’ve found is to jump right in. Here’s how:
1. Find a location. You need a body of water that is at least four blocks deep. This gives you two blocks of standing room, a glass roof (because it looks awesome), and one block of water over the top, but you may also want to go deeper. There are no practical limits; the only concerns are having sufficient air and light, but keep the structure on the conservative side initially. Figure 8.14 shows the exterior view of the structure you already saw in Figure 8.13.

FIGURE 8.14 Keeping your initial structure to a conservative size helps you get used to building underwater while providing plenty of room to breathe. This one is 9×9×3 high.
2. Keep the bucket handy in your hotbar, along with a door or three. If you are using ladders or signs, have some soft blocks and either of those at the ready.
3. Head to the bottom and keep a close eye on the oxygen bar. It depletes in 16 seconds. As it drops, take a practice breath. Right-click with the bucket selected to create a brief pocket of air. If it doesn’t work on the first go, click again. Once you start the cycle, it takes one click to empty the bucket and one more to refill it, so as soon as you get used to the double-click, you shouldn’t have any problems grabbing a quick gasp to fully reset the oxygen bar in a split second.
4. Place the door as soon as you reach the seabed (see Figure 8.15). If you are using ladders or signs, create a stack of two blocks and then put the ladder or sign on the top block. Any of these actions creates a permanent air pocket you can step into to breathe. Incidentally, jumping into a lake with any of these items at the ready is also a good way to escape hostile mobs at night, and you can poke at the bottom sides of any curious creepers that swim by. What’s not to like?

FIGURE 8.15 Doors create a two-block-high breathing space. The jack-o’-lantern provides a waterproof source of light.
Tip: Light Up Your (Underwater) Life
Things get gloomy in the deep. Anything over seven blocks down comes close to pitch black, even during the day, and torches need a full block of clear air to stay lit. How can you light up the murky mire? Jack-o’-lanterns and glowstone both work well, as does the sea lantern found in ocean monuments. Another option: Change your screen settings. Press Esc to open the Options menu. Select Video Settings and shift the Brightness slider all the way to the right.
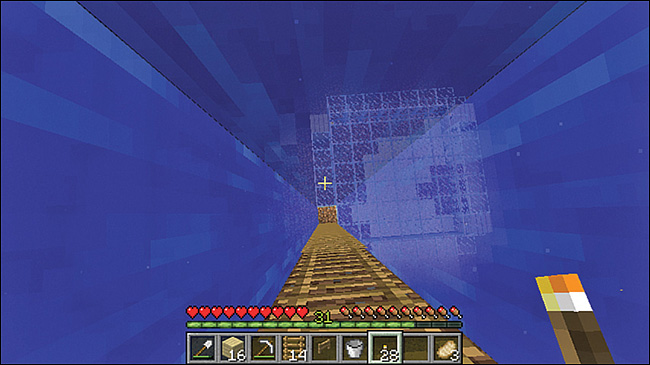
Light tunnels also work well. Place blocks and ladders above your first air-pocket block until you reach the surface. The light flows down the tunnel, brightening up the sea floor, and provides a convenient access shaft for your submaritime traversals, as shown in Figure 8.16.
Building the Structure
Now that you have a survivable location on the seabed, it’s time to get started on the structure. Building underwater takes a few steps and a lot of care:
1. Plan the perimeter. I find it easiest to create an air tunnel around the edges by using dirt blocks and ladders at eye height, and I fill in the interior as I go. Figure 8.17 shows an example. All the ladders are recoverable later, and I generally put them on the interior wall so that I can work on the exterior without worrying about removing a ladder and getting swamped by an inrush of water.
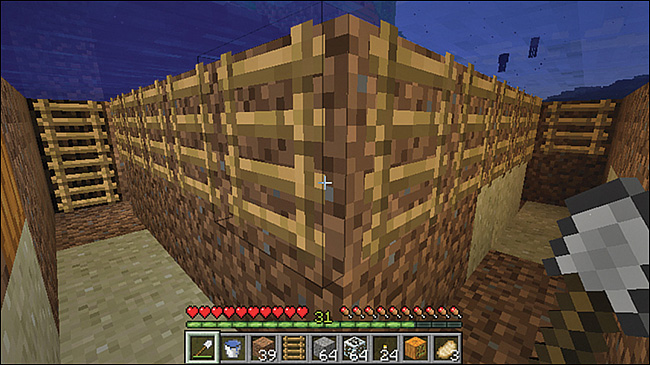
FIGURE 8.17 A one-block-wide tunnel and ladders keep the water at bay. I’ve removed all the stray water sources in the lower half of the tunnel by swamping them with sand blocks dug out earlier.
2. As you fill in the interior, also start building up the external shell on the outer side of the tunnel. Use your final construction materials such as glass blocks because this will form the permanent structure. Keep some soft blocks at the ready to plug up any water breakthroughs. The wall only needs to be two blocks high. Given that you’re on the bottom of the sea, you can always dig down later to create more height. Place some torches as you go to create additional light, although know that they won’t attach to glass.
Note: Flooded In? Head to the Source
It’s quite usual to find your tunnels still half flooded even after all the walls are done and every ladder is in place. The damp ankles are caused by water source blocks that still exist on the floor of your perimeter tunnel. To remove them, place any kind of soft block wherever you can see anything that looks like the head of the water spring. This kills the water source, and you can then quickly shovel out the soft block. Repeat until all the source blocks have been extinguished and your tunnel has dried. The sponge block found in ocean monuments (and dropped by the monument’s elder guardians), or in the Creative inventory, also makes it easy to soak up water across a larger area. In Survival mode, a used sponge becomes a wet sponge that must be dried in a furnace before reuse.
3. With the interior full and the external wall done, attach the ceiling. This is easy. All you need to do is jump out of the tunnel into the water and run backward across the interior fill, placing blocks as you go. Unless you’ve planned an enormous structure, it’s easy to do a row or two without having to stop for air, but keep your bucket handy just in case. Fill in any gaps you spot in the interior as you go. You’re almost there!
4. Dig out the internal material to fully open the space. Breaking up the soft blocks dislodges the ladders so they can be scooped up into your inventory and perhaps used to create a laddered pillar all the way to the surface.
5. Make an access point. You can place a door or just use a pillar and a ladder outside the wall. Add some finishing touches to the interior, and you’re done!
Once you’ve built this one room, the rest is even easier. Place a bed down in your new home and sleep in it to reset your spawn point to the ocean floor. Then you can take it bit by bit. You should have just about all the materials you need, except maybe wood. And you are on the ocean floor, so there’s plenty of sand for glass, and there’s nothing stopping you from digging straight down and mining other materials as required.
Several enchantments and potions help with underwater work. The most important is the respiration enchantment, which applies to helmets and increases the length of time you can breathe underwater while also reducing suffocation damage. In addition, like the night vision potion, it improves your underwater vision. The second is water affinity, a speed boost for tools when they’re mining underwater. Finally, the depth strider enchantment applied to boots enables much faster walking when underwater.
One of the key advantages of underwater dwellings is that they don’t require protection against mobs, at least not until the squids launch their revolution. But houses on land do. Let’s look at some key strategies for protecting your other perimeters.
Protecting Your Perimeter
There’s nothing worse in the Minecraft world than stepping outside your front door only to hear the quick hiss of a creeper’s fuse running down and finding two seconds later that a massive crater has replaced half your house. (Creepers can take out a dirt block that measures 5×5×5.) If the explosion doesn’t kill you, the next influx of hostile mobs probably will. In any case, rebuilding will be a painful experience, especially if you’ve gone all out with a delicately aesthetic blend of textures and materials. (A cobblestone wall—okay, that’s not so bad, but that’s the Building 101 course.)
There is an easy way to step out in the morning and enjoy a breath of fresh air without a pang of fear interrupting the ritual. It’s the perimeter—your stake in the world. Varmints, be gone!
Become a Ditch Witch
Ditches provide protection without interrupting the view. They were even a feature of English country gardens, known as the invisible fence, designed to keep the sheep from trampling the peonies without the fence line blotting the landscape.
In Minecraft, no mobs can cross a ditch that is two blocks deep and just one block wide except for cave spiders, but they usually exist deep underground. However, creepers can still detonate when close. Build three blocks deep, and they won’t trouble you unless you fall in. Or dig two blocks deep and put a fence around the inside edge of the ditch. You won’t need to worry about an inadvertent stumble, and creepers will stay nicely defused.
So what about spiders? I don’t worry about them too much. They’re easy to kill, don’t explode, and provide string for bows, fishing rods, and, with sufficient numbers, enough string to make the wool for a bed—handy if sheep aren’t around.
Place water sources in strategic locations in the ditch to wash the mobs downstream, away from critical areas (see Figure 8.18). This can help you build a smaller perimeter because you can force the hostiles to bunch at the far end of your property.
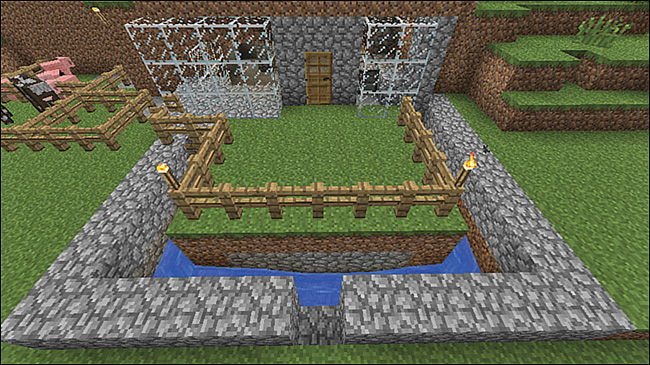
FIGURE 8.18 A ditch with water flowing to a central point (the middle front here) sweeps any mobs away from the entrance so they can exit through the gap in the front.
If spiders still give you the shivers and you want to keep your AAA insurance rating, build a ditch for all other mobs and then a wall behind it, with an overhang. Get a little fancier by making the middle layer of the wall iron bars or a glass pane so you can still look out on the marauding hordes.
Caution: Knobble Their Knees
The ditch gathers all kinds of mobs. Some, such as zombies and skeletons, burn up during the day, but others, such as creepers, stay put. Leave an easy egress of steps out of the ditch to the exterior if you want your ditch to self-clear and aren’t using the mob pit and water-clearing method described later, in the “Mob Pitfalls” section. Or cut in a tunnel under the wall at eye level for you and knee level for the mobs so that you can hack at their feet to collect their drops while being safe from attack. This works best if the tunnel is two steps back from the edge of the ditch so that creepers don’t detonate. Your sword can still reach them just fine.
Alternatively, put your house in an unassailable position atop a small stone tower. Enter through a door in the base, build a stairway or ladder going up at least three blocks (or many more, if there’s a good view!), and create as large a platform as you like. The overhang from the platform keeps spiders at bay. Use other perimeter fences to provide protection for farmland if you don’t want to build them all in the air.
Caution: Don’t Forget the Torches
It’s easy to forget, while focusing on the defensive perimeter around the house, that an unlit roof also provides a mob spawning platform at night. If you’re wondering how that spider surprised you in the bedroom, it could be that it simply dropped from the sky and climbed in through that opening you left leading out onto a sunny morning verandah. Always place a few torches on your roof to keep things clear. Torches can also help you spot home when you’re out exploring.
Mob Pitfalls
Mobs may be a nuisance, but they’re also a boon as they carry all sorts of useful items, from enchanted weapons to food. Why not reap the benefits of their fall?
Here’s how to do it:
1. Dig a ditch two blocks deep and nine blocks long around your perimeter.
2. Create a vertical pit in the ninth block. The most effective height is a drop of 22 blocks because this leaves spiders, skeletons, and creepers with just one point of health—enough to dispatch them with a single punch and gather the resultant experience points that help with enchanting and anvil repairs. However, if you don’t mind using weapons instead, the pit can even be just two blocks lower than the water flow.
3. Place a water source at the other end. It flows for 8 blocks, pushing mobs toward the pit. You can also place a second water source coming in from the other direction, providing a total of 19 blocks of coverage around your perimeter, and the water can flow around corners if required.
4. Choose a safe location inside your perimeter or even inside your house and tunnel down toward the bottom of the pit so that your eye height ends up at the same level as the lowest part of the pit. Any mobs that stray into the ditch gradually wash down toward the pit, fall in, and gather at the bottom. Head down the access tunnel to safely finish them off and collect the spoils. Figure 8.19 shows a trapped creeper.

FIGURE 8.19 Creeper knobbled: The water keeps it in place while attacked, and the water washes its drops (gunpowder in this case) toward you.
Tip: Ding! Your Zombies Are Ready
For extra points and convenience, add a pressure plate to the bottom of your pit, connected to a redstone lamp sitting somewhere in normal sight. When a mob hits the bottom of the pit, the pressure plate sends a signal to the lamp, lighting it up. Be sure to use normal wooden or stone pressure plates. Weighted pressure plates only react to items, not mobs.
If you have no particular interest in collecting mob drops, fill the pit with lava. Keeping a mob’s feet to flame will see the mob off quite quickly, but it also burns up any items. You can also use cacti in the ninth hole of the ditch to serve up death by a thousand cuts. Just place a cactus block instead of digging the pit but keep in mind that cacti can also destroy any dropped items.
Thick as a Brick
The defenses previously mentioned are designed to keep mobs at a distance, but the final line in the sand, or cobblestone, will be your own building’s walls. This is also an aesthetic choice. Design your castle’s keep, so to speak, more than one block thick. A direct creeper hit can take out a couple of layers of cobblestone and up to five layers of other materials. If you really do want that log cabin look, consider creating a sandwich of wood outside, an internal cobblestone section, and then a wood interior. Switch these around to suit your own needs. A couple of layers of external cobblestone with a wood interior is much safer than a single layer of wood. Sandstone has little blast resistance, so definitely create a three-ply if you like the sandstone look.
Keeping with the concept of a castle’s keep, attack is also part of any defensive strategy. Knock out a 1×1 block in a wall and then fill with a slab, leaving just a half-block gap. Fire arrows at targets through the slit. You’ll have an excellent field of fire, and skeletons will have a much more difficult time getting a clear shot at you.
Finally, obsidian is the toughest material you can mine in Minecraft. It’s a little difficult to collect, but you’ll find a guide that makes it easy in Chapter 10.
Making Fireworks
What better way to celebrate your construction than with a grand opening replete with fireworks?
Fireworks are easy to make and even more fun to set off (see Figure 8.20). They’re created through crafting: You first make a firework star and then turn that star into a rocket. You can add optional colors, effects, and a shape for the burst at the same time, and then you can include an optional fade with the firework in a further crafting operation. There are numerous combinations of ingredients, so I’ll provide a quick decode here. Table 8.1 shows the prototypical examples for each step. Each recipe is shapeless, meaning the ingredients can be placed in any position on the crafting grid.


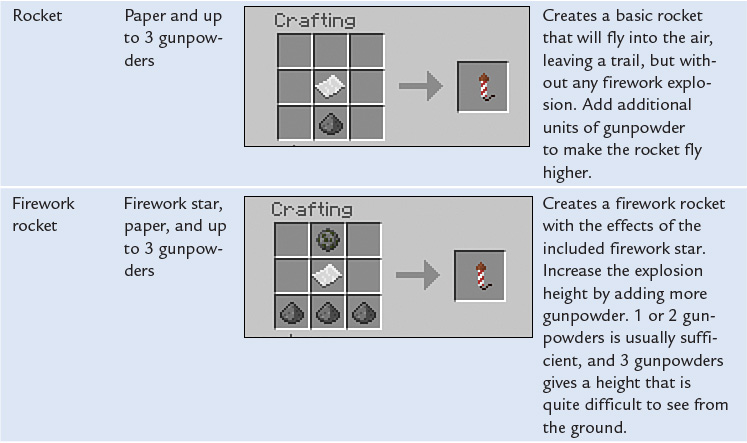
The firework star uses a basic recipe of gunpowder and any combination of up to eight dyes. Build in either or both of the two explosive effects at the same time that you’re creating the firework star, using the following:
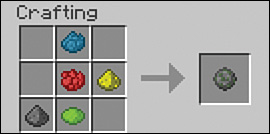
![]() Trail—Add a diamond gem to the base recipe to create a trail behind the burst particles when the firework explodes.
Trail—Add a diamond gem to the base recipe to create a trail behind the burst particles when the firework explodes.
![]() Twinkle—Add glowstone dust to the base recipe to cause the particles to crackle before the firework fades.
Twinkle—Add glowstone dust to the base recipe to cause the particles to crackle before the firework fades.
Adding one further ingredient to the same recipe gives the firework a shape other than the default small ball:
![]() Large ball—Add a fire charge to give the firework’s explosion a much larger radius.
Large ball—Add a fire charge to give the firework’s explosion a much larger radius.
![]() Star shape—Add a gold nugget to give the explosion a star shape.
Star shape—Add a gold nugget to give the explosion a star shape.
![]() Burst—Add a feather to give the explosion a random effect.
Burst—Add a feather to give the explosion a random effect.
![]() Creeper shape—Add a mob’s head (you can find them in the Creative inventory) to make the firework explode in the shape of a creeper.
Creeper shape—Add a mob’s head (you can find them in the Creative inventory) to make the firework explode in the shape of a creeper.
If desired, place the completed firework star and any dye on the crafting grid to add a fade effect with a secondary color.
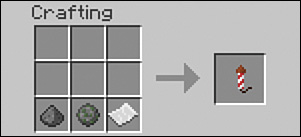
Transform the completed firework star into a rocket by adding up to three gunpowders and a piece of paper. To launch the firework, right-click on the ground at night, in an open area, with the rocket held in hand. Or you can load it into a dispenser facing sideways or upward and then activate the dispenser, or an entire string of them. Add repeater delays between dispensers and various timed loops to create your own fireworks display. See Chapter 9 to learn more.
The Bottom Line
It takes a little bit of time to build a beautiful home, but it does provide a pleasant interlude between mining, farming, and fighting mobs. Enjoy the time. As you master the different techniques, you’ll no doubt develop your own and create soaring, graceful masterpieces in the sky—or under the sea.
This chapter has been about letting your imagination take flight. In the next, you’ll explore a completely different side to Minecraft: redstone and transport. It may be enough to make you think about all construction from a different perspective.