3. Gathering Resources
In This Chapter
![]() Never get lost. Learn the secrets of the HUD and its hidden GPS.
Never get lost. Learn the secrets of the HUD and its hidden GPS.
![]() Improve your tools with more durable materials.
Improve your tools with more durable materials.
![]() Safely store your hard-earned resources.
Safely store your hard-earned resources.
![]() Learn the easy way to manage hunger.
Learn the easy way to manage hunger.
![]() Build your first outdoor shelter and enjoy the view.
Build your first outdoor shelter and enjoy the view.
![]() Access the full Creative mode inventory.
Access the full Creative mode inventory.
It might not look like it on the surface, but each Minecraft world is rich with resources. Making the most of them is the next step in getting the most out of the game. In Chapter 2, “First-Night Survival,” you put together a pack of essentials sufficient to last the first night, but this is really just the smallest prequel to the real game, and describing how to find, create, and use other types of resources forms much of this book. This chapter is about building a foundation you can use to launch into the rest of the game. The focus is on a few key points: building an outdoor shelter, finding food to stave off hunger, improving your collection of tools, and building a chest to safely store items. Mastering these processes solidifies your position, makes your base more defensible, allows you to do all sorts of Minecrafty things more efficiently, and helps you set yourself up for longer excursions above and below ground.
The good news is that you already have a base, so you can explore during the day (trying not to lose your way) and head back at night. However, you still need to avoid at least some of the hostile mobs that persist during the day.
Introducing the HUD
Let’s start by taking a look at the Heads-Up Display (HUD)—that collection of icons and status bars at the bottom of the screen. Figure 3.1 shows the HUD as it appears in Survival mode, with all possible indicators displayed. (The Creative mode HUD only shows the hotbar.)
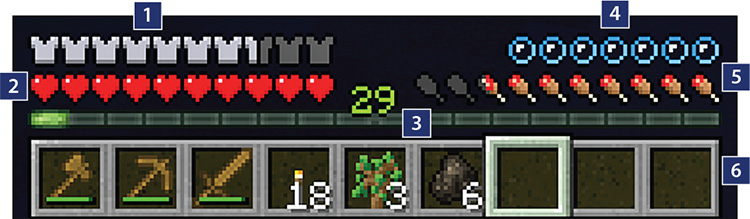
FIGURE 3.1 The HUD provides key status indications. Health is all-important, but low hunger also leads to low health, so keep a close eye on both.
1. Armor bar
2. Health bar
3. Experience bar
4. Oxygen bar
5. Hunger bar
6. Hotbar
Each section of the HUD provides a key nugget of information about the health or status of your avatar:
![]() Armor bar—The armor bar appears when you’ve equipped your avatar with any type of armor and shows the current damage absorption level. Each armor icon represents an 8% reduction in the damage you’ll take, so a 10/10 suit of armor reduces the damage you take by 80%, whereas a 1/10 suit absorbs only 8%. Armor becomes less effective the more damage it absorbs, although the rate at which it deteriorates also depends on its material—leather being the weakest and diamond the strongest. While the HUD shows only 10 armor icons, each represents 2 points, making 20 points in all.
Armor bar—The armor bar appears when you’ve equipped your avatar with any type of armor and shows the current damage absorption level. Each armor icon represents an 8% reduction in the damage you’ll take, so a 10/10 suit of armor reduces the damage you take by 80%, whereas a 1/10 suit absorbs only 8%. Armor becomes less effective the more damage it absorbs, although the rate at which it deteriorates also depends on its material—leather being the weakest and diamond the strongest. While the HUD shows only 10 armor icons, each represents 2 points, making 20 points in all.
![]() Health bar—You also have up to 20 points of health available, represented by the 10 hearts shown. Each time you endure damage—such as from hunger, spider bites, zombie slaps, a fall, being under water too long, and so on—half a heart or more disappears, accompanied by a distinctive click noise. Health and hunger have a complicated relationship. You can read more about this later in this chapter, in the section, “Hunger Management.”
Health bar—You also have up to 20 points of health available, represented by the 10 hearts shown. Each time you endure damage—such as from hunger, spider bites, zombie slaps, a fall, being under water too long, and so on—half a heart or more disappears, accompanied by a distinctive click noise. Health and hunger have a complicated relationship. You can read more about this later in this chapter, in the section, “Hunger Management.”
![]() Experience bar—The experience bar increases the more you mine, smelt, cook, kill hostile mobs, trade with villagers, and fish. Your current level is shown in the middle of the bar. You move to the next experience level when it’s full. Experience isn’t generally important until you start enchanting and giving additional powers to items such as swords (see Chapter 10, “Enchanting, Anvils, and Brewing”). Unlike in other role-playing games, experience in Minecraft is more like a currency that you spend on enchantments, so it waxes and wanes. But all experience gained since your last death, even experience you spend on enchantments, counts toward the final score shown on the screen when you die. Killing a mob drops experience orbs that either fly directly toward you or float to the ground, waiting for you to collect them. You can also gain experience by smelting certain items in a furnace and carrying out other activities such as finding rare ores, breeding animals, fishing, and more. Dying, however, drops your experience level to zero, although you can rebuild it a little by picking up your own experience orbs (seven for each level you’ve attained) after you respawn if you can make it back within five minutes.
Experience bar—The experience bar increases the more you mine, smelt, cook, kill hostile mobs, trade with villagers, and fish. Your current level is shown in the middle of the bar. You move to the next experience level when it’s full. Experience isn’t generally important until you start enchanting and giving additional powers to items such as swords (see Chapter 10, “Enchanting, Anvils, and Brewing”). Unlike in other role-playing games, experience in Minecraft is more like a currency that you spend on enchantments, so it waxes and wanes. But all experience gained since your last death, even experience you spend on enchantments, counts toward the final score shown on the screen when you die. Killing a mob drops experience orbs that either fly directly toward you or float to the ground, waiting for you to collect them. You can also gain experience by smelting certain items in a furnace and carrying out other activities such as finding rare ores, breeding animals, fishing, and more. Dying, however, drops your experience level to zero, although you can rebuild it a little by picking up your own experience orbs (seven for each level you’ve attained) after you respawn if you can make it back within five minutes.
![]() Oxygen bar—The oxygen bar appears when you are underwater and quickly starts to drop. You can probably hold your own breath for longer! (The world record, at an impressive 22 minutes, is held by Stig Severinsen.) As soon as your oxygen level hits zero, your health starts taking a two-point hit every second, but it resurfaces for just an instant if you hold down the jump key until you’ve reached air once more. There’s no danger with deep dives, either. You can use this ability to do interesting things like building an underwater base. Figure 3.2 shows an example, and you’ll learn how to build your own in Chapter 8, “Creative Construction,” along with some tricks for staying under longer than Stig.
Oxygen bar—The oxygen bar appears when you are underwater and quickly starts to drop. You can probably hold your own breath for longer! (The world record, at an impressive 22 minutes, is held by Stig Severinsen.) As soon as your oxygen level hits zero, your health starts taking a two-point hit every second, but it resurfaces for just an instant if you hold down the jump key until you’ve reached air once more. There’s no danger with deep dives, either. You can use this ability to do interesting things like building an underwater base. Figure 3.2 shows an example, and you’ll learn how to build your own in Chapter 8, “Creative Construction,” along with some tricks for staying under longer than Stig.

FIGURE 3.2 Underwater bases are impervious to mob attacks (but watch your oxygen while building one). In fact, the only mobs that spawn underwater outside of the huge ocean monument structures are squids, which pose no danger to you.
![]() Hunger bar—You also have 20 points of hunger available, as well as a hidden value called Saturation. Like armor and health, each hunger bar icon holds 2 points and can reduce by half an icon (that icon is, incidentally, a shank, or the lower part of a leg of meat) at a time. You’ll learn more about hunger later in this chapter, in the section “Hunger Management.”
Hunger bar—You also have 20 points of hunger available, as well as a hidden value called Saturation. Like armor and health, each hunger bar icon holds 2 points and can reduce by half an icon (that icon is, incidentally, a shank, or the lower part of a leg of meat) at a time. You’ll learn more about hunger later in this chapter, in the section “Hunger Management.”
![]() Hotbar—These nine slots represent items you can select with the mouse scroll wheel or by pressing the 1–9 keys. Press E to access your full inventory and to change the items in these slots. The white number next to a slot shows that slot’s count of stacked identical items. A durability bar also appears, in green, under each tool’s icon, and it gradually reduces as you use the tool until that tool actually breaks and disappears from your inventory. You’ll have some warning of this because the bar turns red when it’s close to zero. See “Improving Your Tools,” later in the chapter, to learn more about the durability of different materials. Finally, any item you are dual-wielding shows up as an icon to the left of the hotbar.
Hotbar—These nine slots represent items you can select with the mouse scroll wheel or by pressing the 1–9 keys. Press E to access your full inventory and to change the items in these slots. The white number next to a slot shows that slot’s count of stacked identical items. A durability bar also appears, in green, under each tool’s icon, and it gradually reduces as you use the tool until that tool actually breaks and disappears from your inventory. You’ll have some warning of this because the bar turns red when it’s close to zero. See “Improving Your Tools,” later in the chapter, to learn more about the durability of different materials. Finally, any item you are dual-wielding shows up as an icon to the left of the hotbar.
Tip: Showing Durability Stats in the HUD
Press F3+H (or fn+F3+H on OS X) to display the current and maximum durability values of all the tools in your inventory. A durability value appears in a ToolTip when you hover your mouse over an item.
Note: The HUD Changes When You’re Mounted on a Horse
The HUD changes when you ride a horse so that it shows the horse’s health in place of your hunger bar. The experience bar also changes to the jump bar. You can learn more about horses and other mountable mobs on page 148 in the section “Taming and Riding Horses, Donkeys, and More.”
In Multiplayer mode, your HUD also displays a chat window in the bottom-left corner. Press T to expand the chat window.
Toggle the entire HUD display off and on by pressing F1. Press F3 with the HUD turned on to view a much more detailed HUD debug screen (see Figure 3.3.)
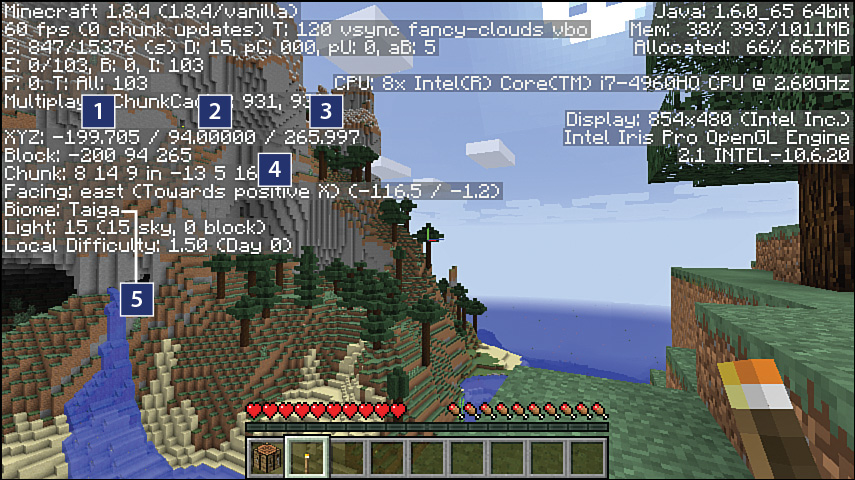
FIGURE 3.3 The Debug HUD provides a lot of cryptic information but can also help you navigate home. It also provides information about your system, available memory, and more.
1. Your location in blocks east of your original spawn point. Blocks west are shown as a negative value.
2. Your current vertical height in layers above bedrock.
3. Your location in blocks south of your original spawn point. Blocks north are shown as a negative value.
4. The direction you are facing and how moving forward will change the current coordinates.
5. The current biome type.
Note: Hiding the HUD in the Xbox/PS3 Editions
You cannot hide the HUD in Minecraft Pocket Edition, but there is an option for doing so on the console editions. Press the Start key and open the Help & Options menu. Scroll down to Settings→User Interface and deselect Display HUD. There isn’t a quicker way to do this at present.
The coordinates shown in the debug screen are based on the world’s origin, where x=0 and z=0. (y shows your current level above bedrock.) Take note of the current values. If you become lost before you have a chance to build a bed and reset your spawn point, you can always find your way back to your original spawn and, presumably, your first shelter, by facing in a direction that brings both x and y back to those noted values. If you sleep in a bed and reset your spawn, turn on the debug screen and write down the coordinates shown before you head out. This is particularly useful if you plan to use the teleport cheat (/tp xxx yyy zzz).
Incidentally, just so we’re clear: Cheating in Minecraft doesn’t carry with it the negative connotations of cheating in most other contexts. If you have enabled cheats in the game menu, type a forward slash (/) followed by the cheat text to customize the running state of the game. Make sure to press Enter or Return after you type your cheat to submit the command to Minecraft.
When you need to return to those earlier coordinates—and I should warn you that this can take some experimentation and a little practice—turn and take a few steps and note the change in values of your current coordinates. Shift those x and z values back toward the coordinates you originally recorded. You’ll probably wander around a bit, but eventually you’ll get there.
Improving Your Tools
Wooden tools wear out fast, so it’s best to upgrade your kit as quickly as possible.
Each type of material has a different level of durability. Think of durability as the number of useful actions the tool can perform before wearing out completely and disappearing from the inventory. I’ve included the durability in parentheses after each material’s description, listed from least to most durable:
![]() Gold (33)—Although it is the least durable material, gold happens to be the most enchantable material, so you can imbue it with superpowers (see Chapter 10). But given that gold is about five times as rare as iron, and it can be used to craft many other useful items, I wouldn’t recommend using gold for tools.
Gold (33)—Although it is the least durable material, gold happens to be the most enchantable material, so you can imbue it with superpowers (see Chapter 10). But given that gold is about five times as rare as iron, and it can be used to craft many other useful items, I wouldn’t recommend using gold for tools.
![]() Wood (60)—Wood is easy to obtain, especially in an emergency above ground, but wooden tools can’t mine the more valuable ores, such as iron, gold, diamond, and redstone. You will need a pickaxe of any kind to mine stone because digging with bare hands will just break the stone down into unusable dust.
Wood (60)—Wood is easy to obtain, especially in an emergency above ground, but wooden tools can’t mine the more valuable ores, such as iron, gold, diamond, and redstone. You will need a pickaxe of any kind to mine stone because digging with bare hands will just break the stone down into unusable dust.
![]() Stone (132)—With over twice the longevity of wood, stone makes a great starting point for more serious mining and other activities. Stone tools are built from cobblestone blocks, which in turn come from stone. That may seem a little circuitous, but it will feel natural enough after a while.
Stone (132)—With over twice the longevity of wood, stone makes a great starting point for more serious mining and other activities. Stone tools are built from cobblestone blocks, which in turn come from stone. That may seem a little circuitous, but it will feel natural enough after a while.
![]() Iron (251)—Iron is your go-to material. It is found between bedrock, the lowest possible level in The Overworld, and up to about 20 levels below sea level. Iron is used for building all kinds of tools, implements, and devices, including armor, buckets (for carrying water, lava, and milk), compasses, minecarts, and minecart tracks. All these require at least iron ingots, which you obtain by smelting iron ore in a furnace; each block of ore produces one ingot. Ingots and many other items are found scattered throughout the world in village chests, mineshafts, dungeons, and strongholds. You might also find them dropped from killed zombies and iron golems, if you dare tackle them.
Iron (251)—Iron is your go-to material. It is found between bedrock, the lowest possible level in The Overworld, and up to about 20 levels below sea level. Iron is used for building all kinds of tools, implements, and devices, including armor, buckets (for carrying water, lava, and milk), compasses, minecarts, and minecart tracks. All these require at least iron ingots, which you obtain by smelting iron ore in a furnace; each block of ore produces one ingot. Ingots and many other items are found scattered throughout the world in village chests, mineshafts, dungeons, and strongholds. You might also find them dropped from killed zombies and iron golems, if you dare tackle them.
![]() Diamond (1562)—Diamond is the strongest material of all but also the most expensive, given that it is relatively rare (about 25 times as scarce as iron). A diamond pickaxe is the only kind that can successfully mine obsidian, a material required for creating the portal to reach The Nether dimension. Use iron pickaxes as much as possible and switch to diamond only when you need to mine obsidian. You’re better off saving any diamonds you find for weapons, armor, and enchantment tables.
Diamond (1562)—Diamond is the strongest material of all but also the most expensive, given that it is relatively rare (about 25 times as scarce as iron). A diamond pickaxe is the only kind that can successfully mine obsidian, a material required for creating the portal to reach The Nether dimension. Use iron pickaxes as much as possible and switch to diamond only when you need to mine obsidian. You’re better off saving any diamonds you find for weapons, armor, and enchantment tables.
Note: Different Materials for Different Items
Durability applies to all tools, weapons, and armor, although there are differences in the materials you use to make different items. For example, you can craft leather armor from leather, and you can make stone tools from cobblestone, but you can’t make armor from stone or tools from leather.
Caution: Don’t Let Tools Wear Out
Try not to let a tool become so worn that it actually breaks down completely and disappears. Instead, place two of the same type of worn tools in the crafting grid to combine their remaining strength into another and give it a second shot at busting blocks. Consider it recycling, Minecraft style. You can also repair tools and weapons at an anvil found in the smithy in villages, or at one you’ve crafted yourself.
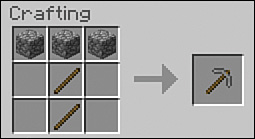
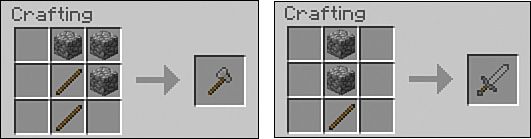
The recipes for crafting tools from all materials are identical, except that you can replace the head of an implement with the material of your choice:
![]() To make a stone pickaxe, you need two wooden sticks for the handle and three cobblestone blocks.
To make a stone pickaxe, you need two wooden sticks for the handle and three cobblestone blocks.
![]() Replace the planks with stone in the crafting recipes for the axe and the sword to create stone versions of those.
Replace the planks with stone in the crafting recipes for the axe and the sword to create stone versions of those.
![]() You might also want to add a shovel to your collection, because using one is about four times faster than using hands to harvest softer materials such as dirt, gravel, sand, clay, and snow, and using a shovel helps some of those blocks deliver resources rather than just dig them out.
You might also want to add a shovel to your collection, because using one is about four times faster than using hands to harvest softer materials such as dirt, gravel, sand, clay, and snow, and using a shovel helps some of those blocks deliver resources rather than just dig them out.

As you craft more items, you need to find a place to store the ones that you don’t need to use right away. You should also store other resources and food you come across on your travels. That comes next.
Chests: Safely Stashing Your Stuff
Whenever you head away from your secure shelter, there is always a reasonably high risk of death. Creepers, lava pits, long falls—they can all do you in. While your new life when you respawn is only a moment away, the real danger is that any items you’ve collected will drop from your character’s inventory at the place of death. You’ll have about five minutes of real time before they vanish forever. If the site of your death proves impossible to return to, your hard-earned tools and supplies will be lost.
You can think of a chest as an insurance policy. Put everything you don’t need in a chest before you embark on a mission, and those things will be there when you get back or after you respawn.
The natural place to leave chests is in your shelter, but you can also leave them elsewhere, perhaps at a staging point as you work deep in a mine, or far afield outside. Mobs will leave them alone, and the only real risk you face is leaving them out in the open on a multiplayer server where they can be ransacked by other players, or that you could get blown up by a creeper while you’re rummaging around inside.
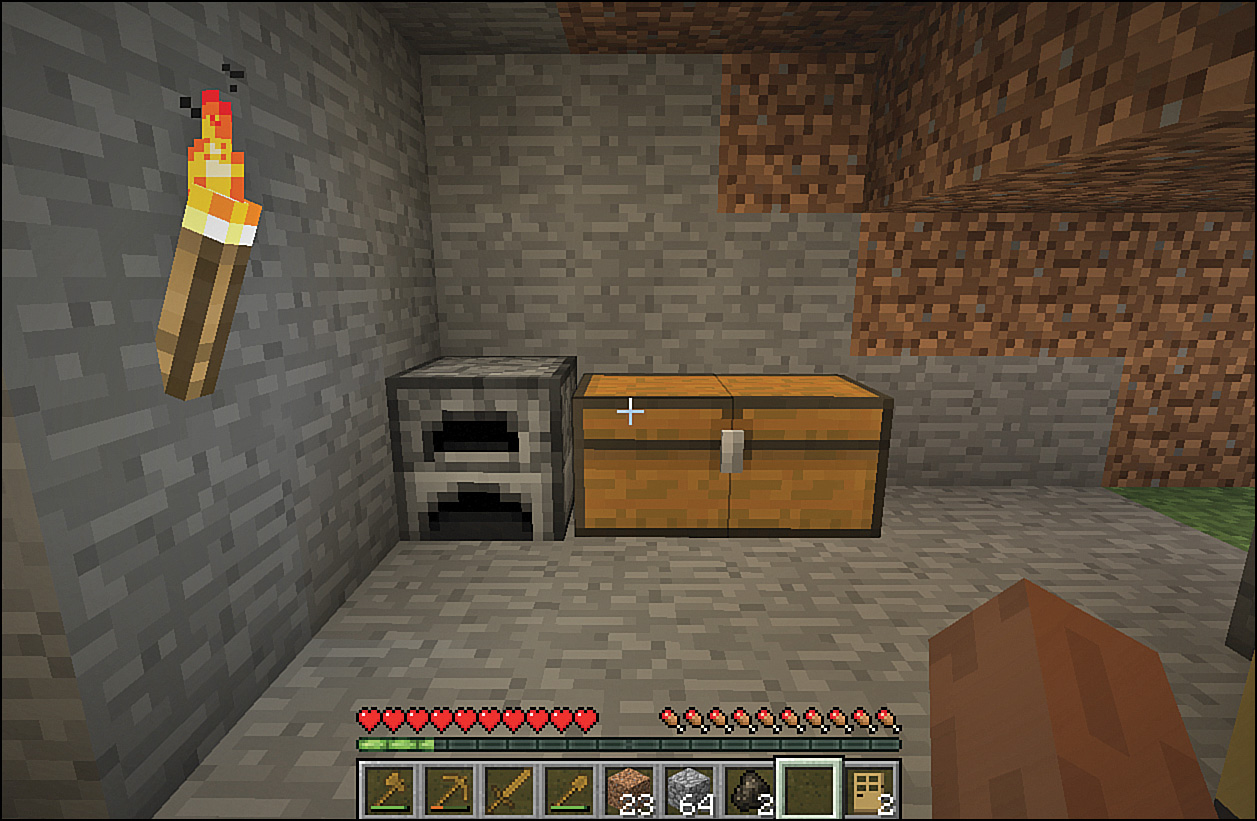
Chests come in two sizes: single and double. A single chest can store 27 stacks of items. A double chest, which you create by placing two single chests side by side, stores up to 54 stacks of items. Given that a stack can be up to 64 items high, that’s an astonishing potential total of 3,510 blocks in a crate that takes just 2×1 blocks of floor space. If you’ve ever followed the Doctor Who TV series, consider chests the TARDIS of storage! Or in Dungeons & Dragons terms, it’s a Bag of Holding. Figure 3.4 shows a chest in one of my personal hidey holes.
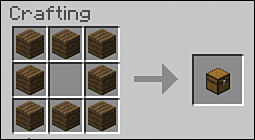
Create a chest at your crafting table with eight blocks of wooden planks arranged around the outside, leaving a space in the middle.
Place the chest and then right-click it to open it. You can then move items back and forth between your inventory and the chest. In Figure 3.5, I’ve transferred to the chest all the items I don’t need for the next expedition.

FIGURE 3.5 Chests act as an insurance policy for your items so that they aren’t lost if you die. Use the inventory shortcuts you learned earlier to quickly move items between your active inventory and the chest’s storage slots.
Before you head out, you should know two other things: how to avoid monsters and how to deal with hunger. Read on.
Avoiding Monsters
There’s a key difference between the Minecraft world on the first day and the second day. In a word, mobs (hostile ones, to be specific). Mobs spawn only in dark areas, and some only during the night, so if you are outside during your first day and stay in well-lit areas, you’ll be reasonably safe. By the second day, however, mobs have had a chance to build their numbers and wander about. It’s not very likely you’ll encounter them on day 2, but it’s best to be prepared.
There are over two dozen types of hostile mobs: Enderman, Iron Golem, The Wither, Creeper, Ender Dragon, Zombie, Baby Zombie, Zombie Villager, Endermite, Giant, Blaze, Slime, Wither Skeleton, Ghast, Silverfish, Witch, Human, Skeleton, Spider, Cave Spider, Wither Skeleton Jockey, Magma Cube, Spider Jockey, Zombie Chicken Jockey, Guardian, and Elder Guardian. Of those, here are the ones you might meet on your second day outside:
![]() Zombies—Zombies burn up in sunlight but can still survive in shadows or rain or when wearing helmets, and, of course, they’re fine in caves all hours of the day or night. They are relatively easy to defeat, and if any come after you from out of the shadows, just head to a well-lit area and keep your distance while they burn up in the sun.
Zombies—Zombies burn up in sunlight but can still survive in shadows or rain or when wearing helmets, and, of course, they’re fine in caves all hours of the day or night. They are relatively easy to defeat, and if any come after you from out of the shadows, just head to a well-lit area and keep your distance while they burn up in the sun.
![]() Skeletons—Skeletons also burn up in sunlight unless they’re wearing helmets, and they can survive at any time in lower light conditions. They’re quite deadly with a bow and arrow and best avoided for now.
Skeletons—Skeletons also burn up in sunlight unless they’re wearing helmets, and they can survive at any time in lower light conditions. They’re quite deadly with a bow and arrow and best avoided for now.
![]() Spiders—Spiders come in two varieties: large and cave. You’ll probably only see the large spiders at this stage. They are passive during the day but become hostile in shadows and can attack at any time if provoked. They’ll climb, they’ll jump, and they are pretty darn fast. Fortunately, they’re also easy to kill with some swift sword attacks. The blue spiders are the smaller, poisonous cave spiders. They live only in abandoned mineshafts underground, but they do so in substantial numbers. If you suffer from arachnophobia, I don’t have much good news for you, except that with a little time, you’ll get used to them, and they won’t seem quite so nasty. If you see a skeleton riding a spider, you’ve just encountered the rather rare spider jockey.
Spiders—Spiders come in two varieties: large and cave. You’ll probably only see the large spiders at this stage. They are passive during the day but become hostile in shadows and can attack at any time if provoked. They’ll climb, they’ll jump, and they are pretty darn fast. Fortunately, they’re also easy to kill with some swift sword attacks. The blue spiders are the smaller, poisonous cave spiders. They live only in abandoned mineshafts underground, but they do so in substantial numbers. If you suffer from arachnophobia, I don’t have much good news for you, except that with a little time, you’ll get used to them, and they won’t seem quite so nasty. If you see a skeleton riding a spider, you’ve just encountered the rather rare spider jockey.
![]() Creepers—Creepers have a well-earned reputation as the Minecraft bad guys. They are packed to their green gills with gunpowder, and they’ll start their very short 1.5-second fuse as soon as they are within three blocks of you. Their explosion can cause a lot of real damage to you, nearby structures, and the environment in general. If you hear a creeper’s fuse—a soft hissing noise—but can’t see it, run like heck in the direction you’re facing. Remember to sprint by double-tapping and holding your W key. With a little luck, you’ll get three blocks away, and the creeper’s fuse will reset. Creepers are usually best dealt with using a ranged attack from a bow and arrow. However, if you sprint at them with an iron or diamond sword and take a swipe at just the right moment, you can send them flying back out of their suicidal detonation range, causing the fuse to reset. Most creepers despawn around noon, leaving the afternoon generally free of their particular brand of terror.
Creepers—Creepers have a well-earned reputation as the Minecraft bad guys. They are packed to their green gills with gunpowder, and they’ll start their very short 1.5-second fuse as soon as they are within three blocks of you. Their explosion can cause a lot of real damage to you, nearby structures, and the environment in general. If you hear a creeper’s fuse—a soft hissing noise—but can’t see it, run like heck in the direction you’re facing. Remember to sprint by double-tapping and holding your W key. With a little luck, you’ll get three blocks away, and the creeper’s fuse will reset. Creepers are usually best dealt with using a ranged attack from a bow and arrow. However, if you sprint at them with an iron or diamond sword and take a swipe at just the right moment, you can send them flying back out of their suicidal detonation range, causing the fuse to reset. Most creepers despawn around noon, leaving the afternoon generally free of their particular brand of terror.
![]() Slimes—Slimes spawn in the swamp biome and in some places underground. They initially spawn as small, medium-sized, or quite large gelatinous green blocks and are more than capable of causing damage. Attacking eventually breaks them up into two to four new medium-sized slimes. These slimes can still attack but are relatively easily killed, at which point they spawn a further two to four tiny slimes each. These last slimes don’t cause any attack damage but may still push you into peril if you’re unlucky.
Slimes—Slimes spawn in the swamp biome and in some places underground. They initially spawn as small, medium-sized, or quite large gelatinous green blocks and are more than capable of causing damage. Attacking eventually breaks them up into two to four new medium-sized slimes. These slimes can still attack but are relatively easily killed, at which point they spawn a further two to four tiny slimes each. These last slimes don’t cause any attack damage but may still push you into peril if you’re unlucky.
If you come across a lone spider, a zombie, or even a slime, that’s as good a time as any to get in some sword practice. Just point your crosshairs at the creature and strike with the left mouse button. Keep clicking as fast as you can, and you’ve got a very good chance of killing the mob and picking up any items it drops before it lands too many blows. Try to avoid the other mobs for now.
Tip: Switch to Peaceful Mode to Get a Break
Getting mobbed by mobs? Click Esc to open the Options window and change your difficulty level to Peaceful. This despawns all hostile mobs and allows your health to regenerate.
Use these tips to survive and avoid mobs:
![]() Stay in the open as much as you can, and avoid heavily wooded areas if possible.
Stay in the open as much as you can, and avoid heavily wooded areas if possible.
![]() Most mobs have a 16-block detection radar. If they can also draw a line of sight to your position, they will enter pursuit mode. (Spiders can always detect you, even through other blocks.) At that point, they’ll relentlessly plot and follow a path to your position, tracking you through other blocks without requiring a line of sight. Pursuit mode stays engaged much farther than 16 blocks.
Most mobs have a 16-block detection radar. If they can also draw a line of sight to your position, they will enter pursuit mode. (Spiders can always detect you, even through other blocks.) At that point, they’ll relentlessly plot and follow a path to your position, tracking you through other blocks without requiring a line of sight. Pursuit mode stays engaged much farther than 16 blocks.
![]() Keep your sound turned up because you’ll also hear mobs within 16 blocks, although creepers, as their name suggests, are creepily quiet.
Keep your sound turned up because you’ll also hear mobs within 16 blocks, although creepers, as their name suggests, are creepily quiet.
![]() Avoid skirting along the edges of hilly terrain. Creepers can drop on you from above with their fuse already ticking. Try to head directly up and down hills so you have a good view of the terrain ahead.
Avoid skirting along the edges of hilly terrain. Creepers can drop on you from above with their fuse already ticking. Try to head directly up and down hills so you have a good view of the terrain ahead.
![]() Mobs are quite slow, so you can easily put some distance between them and yourself by keeping up a steady pace and circling around to get back to your shelter. Sprint mode will leave them far behind.
Mobs are quite slow, so you can easily put some distance between them and yourself by keeping up a steady pace and circling around to get back to your shelter. Sprint mode will leave them far behind.
Caution: Sprinting Makes You Hungry
Sprint mode burns up hunger points, so try to use it only in emergencies (and if you have food ready).
Hunger Management
Hunger plays a permanent role in Minecraft, much as in real life. While it’s only possible to starve to death on Hard difficulty, hunger lowers your hit points, leaving you vulnerable, so it’s always important to ensure that you have the equivalent of a couple of sandwiches packed before heading deep into a mine or going on a long trek.
Hunger is a combination of two values: the one shown in the HUD’s hunger bar and a hidden value called saturation. The latter provides a buffer to the hunger bar and decreases first. In fact, your hunger bar doesn’t decrease at all until saturation reaches zero. At that point, you see the hunger bar start to jitter, and after a short while, it takes its first hit. Saturation cannot exceed the value of the hunger bar, so with a full hunger bar of 20 points, it’s possible to have up to 20 points of saturation. However, a hunger level of 6 points also provides only a maximum of 6 points of saturation, and that makes you vulnerable.
You’ll find some key information about the hunger system here:
![]() On Easy and Normal Survival modes, there is no need to worry too much about hunger because your character won’t drop dead from it. If you’re close to home and pottering around in your farm or constructing some building extensions, you’re fairly safe, but your health starts to drop. Eat something as soon as you can to fill your hunger bar and start rebuilding your health.
On Easy and Normal Survival modes, there is no need to worry too much about hunger because your character won’t drop dead from it. If you’re close to home and pottering around in your farm or constructing some building extensions, you’re fairly safe, but your health starts to drop. Eat something as soon as you can to fill your hunger bar and start rebuilding your health.
![]() Sprinting isn’t possible when the hunger bar drops below 6 hunger points, or 3 shanks, as shown in the HUD.
Sprinting isn’t possible when the hunger bar drops below 6 hunger points, or 3 shanks, as shown in the HUD.
![]() Keeping a relatively full stomach at 18 hunger points (9 shanks in the HUD) allows health to regenerate at 1 point (half a heart) every 4 seconds.
Keeping a relatively full stomach at 18 hunger points (9 shanks in the HUD) allows health to regenerate at 1 point (half a heart) every 4 seconds.
![]() Health depletes if the hunger bar drops to zero, increasing the risk of dying in one of the many imaginative ways Minecraft has on offer (see Figure 3.6).
Health depletes if the hunger bar drops to zero, increasing the risk of dying in one of the many imaginative ways Minecraft has on offer (see Figure 3.6).
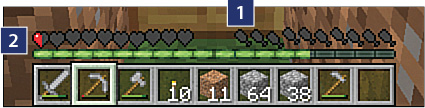
FIGURE 3.6 The effects of extreme hunger on Normal difficulty: Health depletes to just one point, or half a heart.
1. Hunger at zero
2. Health at one point
![]() Some limits apply to the amount that health can drop, according to the difficulty level. On Easy, health cannot deplete from hunger further than 10 points, or half the full quotient. On Normal, it drops to 1 point, which is an extreme level of vulnerability. On Hard difficulty, there are no limits, so don’t ignore the hunger bar, or death from starvation could be just moments away. See “Getting Food on the Run,” later in this chapter, to help avoid this.
Some limits apply to the amount that health can drop, according to the difficulty level. On Easy, health cannot deplete from hunger further than 10 points, or half the full quotient. On Normal, it drops to 1 point, which is an extreme level of vulnerability. On Hard difficulty, there are no limits, so don’t ignore the hunger bar, or death from starvation could be just moments away. See “Getting Food on the Run,” later in this chapter, to help avoid this.
Your Mission: Food, Resources, and Reconnaissance
Your second day is the perfect time to gather food and other resources and to take a quick survey of the landscape surrounding your first shelter. In particular, you want to find somewhere suitable for your first outdoor shelter. Keep an eye out for any of the following:
![]() Passive mobs—Chickens, pigs, rabbits, sheep, and cows all provide a ready source of food, raw or cooked, although cooked meat restores more hunger points than raw. Cows also drop leather that you can use for your first armor, and when you have an iron bucket, you can milk cows, and milk gives you an instant cure for poisoning. Chickens also lay eggs, so gather any that you find.
Passive mobs—Chickens, pigs, rabbits, sheep, and cows all provide a ready source of food, raw or cooked, although cooked meat restores more hunger points than raw. Cows also drop leather that you can use for your first armor, and when you have an iron bucket, you can milk cows, and milk gives you an instant cure for poisoning. Chickens also lay eggs, so gather any that you find.
![]() Natural harvest—The harvest includes cocoa pods, apples, sugar cane, carrots, wheat, and potatoes (found in villages), as well as seeds. Knock down tall grass to find seeds (see Figure 3.7). When you plant the seeds, they mature into wheat within five to eight day/night cycles. From wheat, it’s easy to bake bread, one of the simplest but most effective sources of food, especially if there are no passive mobs nearby. See Chapter 6, “Crop Farming,” for more on agricultural techniques.
Natural harvest—The harvest includes cocoa pods, apples, sugar cane, carrots, wheat, and potatoes (found in villages), as well as seeds. Knock down tall grass to find seeds (see Figure 3.7). When you plant the seeds, they mature into wheat within five to eight day/night cycles. From wheat, it’s easy to bake bread, one of the simplest but most effective sources of food, especially if there are no passive mobs nearby. See Chapter 6, “Crop Farming,” for more on agricultural techniques.
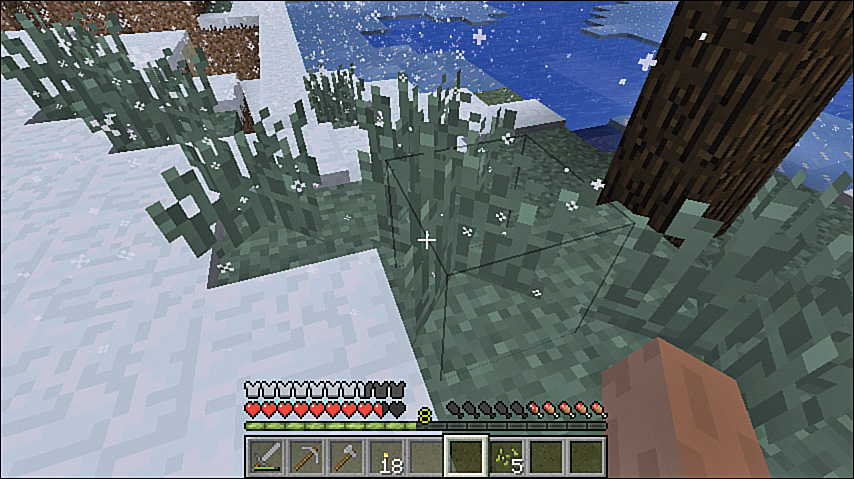
FIGURE 3.7 Knock down grass to gather seeds to plant wheat, an easy crop to farm. You can then turn the wheat into bread—a handy food if you’re stuck with no other options.
![]() Construction resources—You can mine plenty of cobblestone quite safely by digging into the terrain to expand your original shelter. But some other resources will definitely come in handy:
Construction resources—You can mine plenty of cobblestone quite safely by digging into the terrain to expand your original shelter. But some other resources will definitely come in handy:
![]() Wood—Wood is always useful, both for crafting and for fueling your furnace, where you can convert it into charcoal and then create torches.
Wood—Wood is always useful, both for crafting and for fueling your furnace, where you can convert it into charcoal and then create torches.
![]() Sand—You can smelt sand into glass blocks, which you can then use as is or turn into glass panes to allow daylight into your shelter.
Sand—You can smelt sand into glass blocks, which you can then use as is or turn into glass panes to allow daylight into your shelter.
![]() Coal—Coal is used to fuel your furnace and make torches. You can often see it in veins on the surface of the walls of small caves or on the sides of cliffs. If you can safely get to it, make like a miner and dig it out.
Coal—Coal is used to fuel your furnace and make torches. You can often see it in veins on the surface of the walls of small caves or on the sides of cliffs. If you can safely get to it, make like a miner and dig it out.
Tip: Making Use of Bones
The morning sun burns skeletons, leaving bones behind that you can craft into bone meal. Bone meal acts as a fertilizer, helping your crops grow faster—much faster! You can also use bone to tame wolves (changing them into dogs), which gives you an extra level of protection. Chapter 7, “Farming and Taming Mobs,” has a lot more information on breeding and taming mobs in Minecraft.
Back to your mission. Start early, heading out with a stone sword at the ready, just in case. If you are low on wood, swing an axe at a few nearby trees.
Move carefully so that you don’t lose your bearings. The sun rises in the east and sets in the west, and the clouds always travel from east to west, so you can always at least get your bearings. The sun also appears as a face (a recent addition) that is upside down in the east and right-side up in the west. Following a compass cardinal point (north, south, east, or west) using the sun and clouds as a reference can reasonably and accurately lead you away and back home again.
Tip: Finding Your Way
It’s easy to become lost in Minecraft. Run helter-skelter from your base, chase a herd of livestock, discover a natural cave system, or take a shot across the sea like that famed Norseman Leif Eriksson. It’s all part of the Minecraft charm. But don’t become Columbus in the process.
A few quick tips:
![]() When you’re able, craft a compass. It takes redstone and iron, and both are relatively easy to obtain with some assiduous mining. The only problem with a compass is that it’s not a GPS; it always points to your original spawn point in the world. Think of that point as the magnetic north pole. Sleeping in a bed resets your spawn point but not your compass, so this method falls out of date as soon as you move to new dwellings and update your spawn point. You can also use a cheat code /spawnpoint, to reset your spawn point.
When you’re able, craft a compass. It takes redstone and iron, and both are relatively easy to obtain with some assiduous mining. The only problem with a compass is that it’s not a GPS; it always points to your original spawn point in the world. Think of that point as the magnetic north pole. Sleeping in a bed resets your spawn point but not your compass, so this method falls out of date as soon as you move to new dwellings and update your spawn point. You can also use a cheat code /spawnpoint, to reset your spawn point.
![]() Also, obtaining a compass is the first step in crafting a map. A compass is actually much more useful to your quest when crafted into a map; see “Mapping, or There and Back Again” on page 257.
Also, obtaining a compass is the first step in crafting a map. A compass is actually much more useful to your quest when crafted into a map; see “Mapping, or There and Back Again” on page 257.
![]() Don’t forget that you can always use the built-in GPS that’s available through the debug screen; see “Introducing the HUD” on page 51 earlier in this chapter.
Don’t forget that you can always use the built-in GPS that’s available through the debug screen; see “Introducing the HUD” on page 51 earlier in this chapter.
Getting Food on the Run
If you are getting dangerously hungry, head to the nearest equivalent of a fast food outlet—a passive mob—sword at the ready. Your best bet is to look for cows and pigs. Each cow drops up to three pieces of raw meat when killed, with each piece restoring 3 hunger units and 1.8 in saturation, making for an excellent target of opportunity. Kill sheep to gather up to two pieces of raw mutton. You can also eat raw chicken and rabbits, but there’s a 30% chance of developing food poisoning from them.
Rotten meat harvested from zombies is guaranteed to give you a stomach ache, but there is a quick fix. Cure any type of food poisoning by drinking milk obtained with a bucket from a cow. You can then eat any amount of poisoned meat, gain its restorative benefits, and cure the whole lot with one serving of milk. In other words, keep that rotten flesh the zombies drop just in case you need a quick top-up, and chase it down with a gulp of milk. (You can also feed rotten flesh to tamed dogs to keep up their health with no fear of them suffering any ill effects.)
Unless you are desperate, though, it is actually much better to take the time to cook all your meat first. There’s less health risk, and you’ll end up restoring more hunger and saturation points. It’s therefore quite handy to always carry a furnace in your inventory, along with fuel. Think of it as a camping stove and cooler chest. When you’ve finished cooking, break down the furnace with a pickaxe, and it floats back into your inventory. If your tastes run to cookouts over an open fire, you can kill and cook pigs, chickens, rabbits, and cows in one blazing swoop by setting the ground beneath them on fire with a flint and steel. To do this, right-click on the ground, not the animal. Just take care that you don’t do this anywhere near that fantastic wood cabin you just spent the last three weeks building. Fire can leap up to four blocks away.
Note: Fishing in the Sea of Plenty
Unlike hostile mobs, mobs such as chickens, cows, sheep, and pigs don’t spawn on their own, so consider them a nonrenewable resource if you kill them in the wild. You’re better off breeding them in a farm so they can be harvested and readily replaced. Fish, in contrast, are unlimited in quantity and very plentiful, especially if you fish when it’s raining. By the way, your hunger bar never decreases when travelling by boat, making it the perfect opportunity to get in a spot of fishing. You also will never ever get food poisoning from chomping on raw fish. And they come pre-filleted. Sushi, anyone? Fishing is also something of a lucky dip, as you will pull up different types of fish and have a slim chance of hooking other valuable items such as saddles. See Chapter 7 for more information on saddles and slipping on some spurs.
Tip: Let Them Eat Cake
What’s the quickest way to fill your hunger bar? Eat cake! Unlike in another well-known game, Minecraft’s cake is not a lie. Each full cake provides up to 6 slices, each worth 1.5 hunger points, or 9 in total, and it’s less resource intensive than creating golden apples. However, as in the real world, it won’t last. The nutrients are lacking, so cake doesn’t provide any saturation benefit. Make sure you eat some more nutritional foods such as protein as your hunger bar starts to top out to ensure that you also get that extra boost. A balanced diet is important in Minecraft, too!
Finally, if you simply cannot find mobs, your hunger bar has dropped to zero, and your health has plummeted to half a point, consider at least planting a wheat field and waiting it out in your shelter for the wheat to grow so you can harvest it and bake bread.
There’s one final option if you’re desperate: dying. If you are near your spawn point, place all your items in a chest and then find some quick way to die, such as drowning, falling, or mob baiting. You respawn back in your shelter with full health, a restored hunger bar, and all your possessions waiting for you. Get dressed, fully equipped, and head out there to try again.
Finding a Building Site
As you scout around, keep an eye out for a new building site. It doesn’t have to be fancy or even particularly large. A 6×5 space manages just fine, and even 6×4 can squeeze in the basics. You can also level ground and break down a few trees to clear space. I did this in Figure 3.8. The site is located just up the hill from the first dugout, overlooking the same lake and river system.

FIGURE 3.8 A nice, flat, elevated building site after clearing some trees and filling some holes in the ground with dirt.
I usually prefer space that’s a little elevated because it provides a better view of the surroundings, but it’s perfectly possible to create a protected space just about anywhere. You may even decide to go a little hybrid, building a house that’s both tunneled into a hill and extending outside.
Tip: Light Those Caves
Check for any caves or tunnels close to your site’s location. If they aren’t too big, light them up with torches to prevent mobs from spawning inside and wandering out during the day. Or you can just block their entrance for now.
So, what can you build on this site? Figure 3.9 shows a basic structure. It takes 34 cobblestone blocks that you dig out of the first shelter and 12 wood blocks for the roof, which you obtain by cutting down the three trees that were occupying the site.
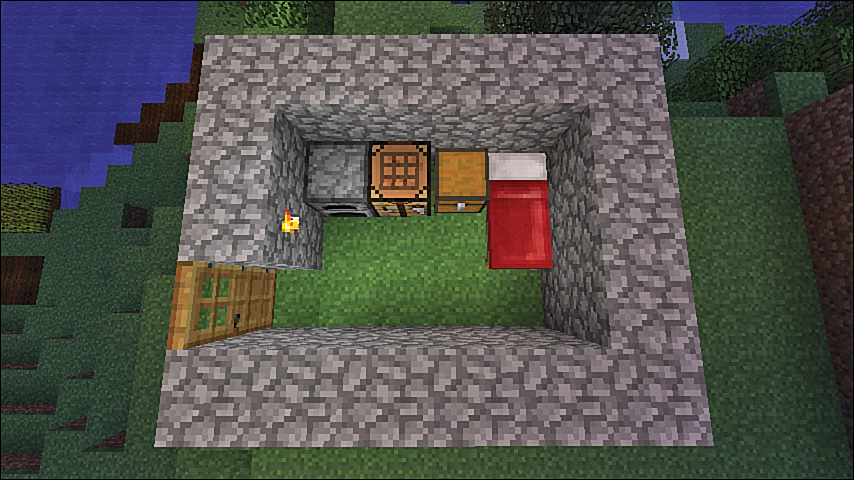
FIGURE 3.9 The layout for a small cobblestone cabin using 46 blocks, roof not shown. The sharp-eyed will notice that it can be reduced in width one space further, but the extra space is worth the cost of the four blocks.
You can build the roof from almost any handy material, including dirt, cobblestone, or wood. Avoid blocks that fall down, such as gravel and sand. A two-block-high wall keeps out all mobs except for spiders. Spiders can easily scale two blocks, but an overhang on the wall keeps them out as they can’t climb upside-down. However, it’s easier to just add a roof, especially if there are trees nearby that the spiders can climb up and use as springboards to jump straight into your dwelling. (Yes, it’s happened to me more than once. Having a large hairy spider drop on your head at night is not for the faint of heart.) Figure 3.10 shows the finished hut with a few torches on the outside to keep things well lit.
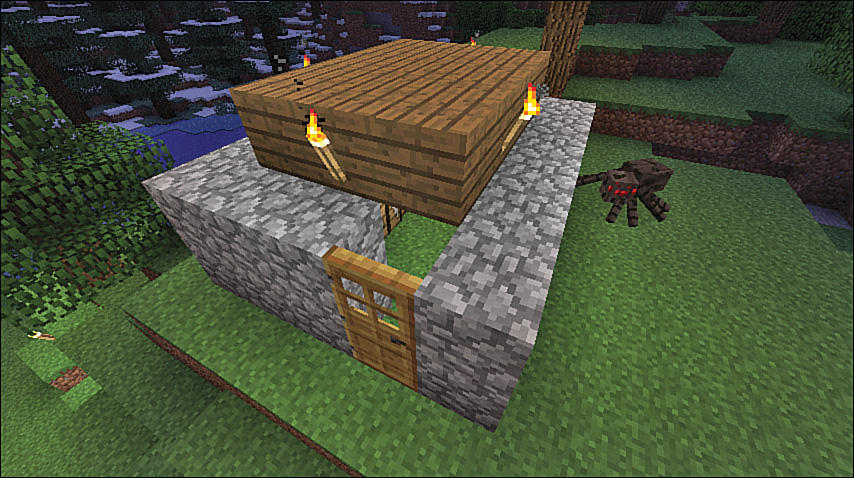
FIGURE 3.10 The finished hut—basic but serviceable. And it’s spider proof. Although there is a large gap above the door, in Minecraft’s geometry, the door fills the entire space, keeping the mobs out.
Tip: No Housing Codes in Minecraft
The roof in Figure 3.10 rests right on the lip of the inner wall. You can’t directly build a roof like this from scratch. First, place a block on top of the wall and then attach the inner block for the roof. Remove the first block, and the inner block floats. Attach new blocks to that to build out the roof structure. It won’t pass a building inspection in the real world, but it certainly works in Minecraft.
Building a wall even two blocks high can take a little bit of fancy footwork. Some basic techniques help:
![]() Place your walls one layer at time. Put down the first layer and then jump on top to place the second.
Place your walls one layer at time. Put down the first layer and then jump on top to place the second.
![]() If you fall off your wall, place a temporary block on the inside of your structure against the wall and use it to climb back up. You can remove it when you’re finished.
If you fall off your wall, place a temporary block on the inside of your structure against the wall and use it to climb back up. You can remove it when you’re finished.
![]() Use pillar jumping if you need to go higher. While looking directly down, press the spacebar to jump and then right-click to place a block underneath you. You land on that block instead of the one below. Repeat as often as necessary. To go back down, dig out the blocks from directly underneath you.
Use pillar jumping if you need to go higher. While looking directly down, press the spacebar to jump and then right-click to place a block underneath you. You land on that block instead of the one below. Repeat as often as necessary. To go back down, dig out the blocks from directly underneath you.
![]() Hold down the Shift key as you work around the top of a tall wall so you don’t fall off. You can even use this technique to place blocks that are normally beyond sight on the side of your current layer.
Hold down the Shift key as you work around the top of a tall wall so you don’t fall off. You can even use this technique to place blocks that are normally beyond sight on the side of your current layer.
See Chapter 8 for more building techniques and ideas.
You might want to consider building a pillar and platform on top of your new shelter. This can help you survey your terrain and provides an easy-to-see landmark when you’re further afield. Put some torches on top because mobs can spawn on any platform, even those that are quite small, and you don’t want to poke your head up through the platform only to discover a creeper on a short fuse.
Using the Creative Mode Inventory
Minecraft’s resources fall into several primary categories. Some of them are a natural early focus as you improve your position from first-night survival. Others come into more focus as you get further through the game, gear up for your exploration of The Nether and The End dimensions, and become more creative with all that Minecraft has to offer. You can view all the possible tools and resources by opening your inventory in Creative mode, as shown in Figure 3.11. The categories that follow correspond to the tabs running across the upper and lower sections of the Creative mode inventory.

Turn on cheats when you start a new world to quickly jump between different gameplay modes. Type /gamemode creative (or /gamemode 1) and /gamemode survival (/gamemode 0) to move between the main types.
Here’s a quick summary of the different resource categories:
![]() Building Blocks—Building blocks are used, as you might expect, for construction, including housing and almost anything else. Build a bridge for your redstone rail. Construct a dam. Elevate a farm above a level that won’t get trampled by mobs or put up a fence. Build a skyscraper or reconstruct a monument. Minecraft provides a large number of primary blocks—such as cobblestone, gravel, wood, and dirt—that can be harvested directly, but things definitely become more interesting once you start creating secondary types of blocks from primary materials. You can store many items more efficiently (for example, by converting nine gold ingots into a single gold block) and climb more efficiently by crafting stairs instead of jumping up and down blocks on well-traveled routes. Building blocks are punny enough—the building blocks of creativity.
Building Blocks—Building blocks are used, as you might expect, for construction, including housing and almost anything else. Build a bridge for your redstone rail. Construct a dam. Elevate a farm above a level that won’t get trampled by mobs or put up a fence. Build a skyscraper or reconstruct a monument. Minecraft provides a large number of primary blocks—such as cobblestone, gravel, wood, and dirt—that can be harvested directly, but things definitely become more interesting once you start creating secondary types of blocks from primary materials. You can store many items more efficiently (for example, by converting nine gold ingots into a single gold block) and climb more efficiently by crafting stairs instead of jumping up and down blocks on well-traveled routes. Building blocks are punny enough—the building blocks of creativity.
![]() Decoration Blocks—Decoration blocks are something of a catchall category. Generally, they are things you can use to make your constructions more interesting. Some of them are just visual, such as carpet, whereas others—such as crafting tables, chests, and the bed that keeps you safe at night—provide vital functions.
Decoration Blocks—Decoration blocks are something of a catchall category. Generally, they are things you can use to make your constructions more interesting. Some of them are just visual, such as carpet, whereas others—such as crafting tables, chests, and the bed that keeps you safe at night—provide vital functions.
![]() Redstone—Redstone is an almost magical resource. You can use it to build powered circuits—quite complex ones—and then activate pistons to automatically harvest a farm plot, set up traps, open and close doors, and much much more. The limits are set only by your imagination. Redstone is also used to craft powered rail tracks and a range of other useful items, such as a compass and clock. See Chapter 9, “Redstone, Rails, and More,” for more information.
Redstone—Redstone is an almost magical resource. You can use it to build powered circuits—quite complex ones—and then activate pistons to automatically harvest a farm plot, set up traps, open and close doors, and much much more. The limits are set only by your imagination. Redstone is also used to craft powered rail tracks and a range of other useful items, such as a compass and clock. See Chapter 9, “Redstone, Rails, and More,” for more information.
![]() Transportation—Transportation is a small category but one that’s a lot of fun and very useful. It includes powered and unpowered rails, minecarts, a saddle, a boat, and anything else related to moving yourself and other items around. There are enough options there to enable you to build everything from massive transportation systems to incredible roller coasters.
Transportation—Transportation is a small category but one that’s a lot of fun and very useful. It includes powered and unpowered rails, minecarts, a saddle, a boat, and anything else related to moving yourself and other items around. There are enough options there to enable you to build everything from massive transportation systems to incredible roller coasters.
![]() Miscellaneous—Miscellaneous contains a range of useful and obscure items. You’ll find the buckets quite handy for setting up new water and lava sources, and you can use the eggs to spawn most of the mobs, populate a farm, and more.
Miscellaneous—Miscellaneous contains a range of useful and obscure items. You’ll find the buckets quite handy for setting up new water and lava sources, and you can use the eggs to spawn most of the mobs, populate a farm, and more.
![]() Search Items—This category isn’t for items, per se, but instead allows you to quickly locate particular items by using free-text search.
Search Items—This category isn’t for items, per se, but instead allows you to quickly locate particular items by using free-text search.
![]() Foodstuffs—This category contains the full range of edibles, including the enchanted form of the golden apple, the rarest edible in the game. Take a few of these with you the next time you think you’ll be in a tight spot, and you may just be able to make it through that moaning zombie horde.
Foodstuffs—This category contains the full range of edibles, including the enchanted form of the golden apple, the rarest edible in the game. Take a few of these with you the next time you think you’ll be in a tight spot, and you may just be able to make it through that moaning zombie horde.
![]() Tools—Tools can be wielded as weapons, but not very effectively. They are, however, great for digging, chopping, and hoeing. You can use flint and steel to set Nether Gates on fire. You’ll also find shears for stripping the wool from sheep, a fishing rod, and a few enchanted books that can add special powers to your tools.
Tools—Tools can be wielded as weapons, but not very effectively. They are, however, great for digging, chopping, and hoeing. You can use flint and steel to set Nether Gates on fire. You’ll also find shears for stripping the wool from sheep, a fishing rod, and a few enchanted books that can add special powers to your tools.
![]() Combat—Combat provides your weapons and armor, as well as the remaining enchanted books that relate to combat items.
Combat—Combat provides your weapons and armor, as well as the remaining enchanted books that relate to combat items.
![]() Brewing—The Brewing tab contains all possible potions and a number of rare ingredients that don’t fit into other categories. Potions are incredibly handy. Caught outside at night? The Potion of Night Vision triples the brightness to almost daylight conditions. You can learn more about brewing in Chapter 10.
Brewing—The Brewing tab contains all possible potions and a number of rare ingredients that don’t fit into other categories. Potions are incredibly handy. Caught outside at night? The Potion of Night Vision triples the brightness to almost daylight conditions. You can learn more about brewing in Chapter 10.
![]() Materials—Materials is the final catchall category, along with the miscellaneous and decoration blocks. However, it differs because it is composed of secondary items that are derived from other actions. For example, killing a chicken can drop feathers, and you’ll need those for the fletching on arrows unless you gather them from skeletons. Grow wheat to get bushels that can be used to tame horses, donkeys, and mules.
Materials—Materials is the final catchall category, along with the miscellaneous and decoration blocks. However, it differs because it is composed of secondary items that are derived from other actions. For example, killing a chicken can drop feathers, and you’ll need those for the fletching on arrows unless you gather them from skeletons. Grow wheat to get bushels that can be used to tame horses, donkeys, and mules.
![]() Survival Inventory—Here is where you can equip your avatar with clothing and other items to take into Survival mode if you so choose. (Remember that you can do this from a Creative session by simply typing /gamemode survival.) Survival mode inventory also contains any items you were carrying when you switched to Creative mode. (It is empty if you started your world in Creative mode.) You can shift items between the Creative mode inventory and your Survival mode inventory. Any items you drag down to the hotbar are common across both inventories. Remove items from your Survival mode inventory by dragging them down to the square on the lower right that shows an X.
Survival Inventory—Here is where you can equip your avatar with clothing and other items to take into Survival mode if you so choose. (Remember that you can do this from a Creative session by simply typing /gamemode survival.) Survival mode inventory also contains any items you were carrying when you switched to Creative mode. (It is empty if you started your world in Creative mode.) You can shift items between the Creative mode inventory and your Survival mode inventory. Any items you drag down to the hotbar are common across both inventories. Remove items from your Survival mode inventory by dragging them down to the square on the lower right that shows an X.
The Bottom Line
Congratulations! You’ve now learned everything you need to know to monitor your health, improve your tools for better longevity, avoid getting lost on your travels, and create your first mob-proof outdoor shelter.
These are the keys to Minecraft. Just remember to head back to your chest often to store the valuables you’ve gathered. Or build other chests further afield.
The next chapter is all downhill: It will take you deep into your first mine.