9. Redstone, Rails, and More
In This Chapter
![]() Create automated contraptions with redstone power sources and components.
Create automated contraptions with redstone power sources and components.
![]() Build cool circuits with redstone wiring.
Build cool circuits with redstone wiring.
![]() Understand different types of power to avoid wiring problems.
Understand different types of power to avoid wiring problems.
![]() Create perimeter warning systems, piston-powered doors, repeater loops, and more.
Create perimeter warning systems, piston-powered doors, repeater loops, and more.
![]() Learn to use AND, OR, and NOT gates.
Learn to use AND, OR, and NOT gates.
![]() Use redstone to build powered rails for a minecart transport system.
Use redstone to build powered rails for a minecart transport system.
![]() Hop into hoppers to automatically load and unload items from containers and carts.
Hop into hoppers to automatically load and unload items from containers and carts.
Redstone and rails create an entirely new Minecraft experience.
![]() Redstone is one of the ores you probably have seen in mines. When dug out and placed on the ground, it provides a way to transmit power between different devices, like a strand of electrical wire. It’s used for operating pistons, controlling doors, and doing all sorts of other neat tricks.
Redstone is one of the ores you probably have seen in mines. When dug out and placed on the ground, it provides a way to transmit power between different devices, like a strand of electrical wire. It’s used for operating pistons, controlling doors, and doing all sorts of other neat tricks.
![]() Rails are tracks on which minecarts run, and when those rails are powered by redstone, they provide a system like an electric train track that can transport goods between different areas and also give you, sitting in a minecart, quite a thrill ride.
Rails are tracks on which minecarts run, and when those rails are powered by redstone, they provide a system like an electric train track that can transport goods between different areas and also give you, sitting in a minecart, quite a thrill ride.
It’s a brilliant, almost magical system that makes some real-life parallels with electrical circuits but is different enough to be absolutely confusing, even baffling, at the same time. It will challenge you to rethink everything you already know. Is it worth the effort? Absolutely.
The trick to understanding redstone is to try your very best to not bring any real-world assumptions with you. It’s a different type of energy than electricity. For example, it runs on a single strand so doesn’t have positive and negative wires, and it can be created by many types of devices, even a lever stuck in the ground, or a wooden button attached to the wall. Redstone has its own rules, its own behavior, and its own results. Some of those are almost beyond imagination. I’m betting when the folks at Mojang started thinking about adding a few logic circuits to redstone, they didn’t think someone would spend possibly months of his life building a simulacrum of a computer, complete with a 1,000-pixel graphical display, the entire system filling hundreds of acres and using tens of thousands of components.
In the same way that the building blocks of Minecraft deliver an architecturally infinite construction playground, redstone adds a whole new dimension. In some ways, it harks back to the genesis of the electronics industry, simulating the breadboarding of electronics with wires and vacuum tubes. Very retro.
This chapter is an introduction to redstone and transport. It teaches you the essentials, and you won’t need an engineering degree to succeed. Even if you’re not switched on by some of the more complex aspects of this extraordinary system, it is definitely worth coming to grips with a few core techniques. They go well beyond the water harvester from Chapter 6, “Crop Farming,” and you’ll have fun exploring this creative new world.
Seeing Red: A Beginner’s Guide
Certain aspects of Minecraft are completely intuitive and can be understood through the usual process of discovery. Redstone is different, but getting a handle on it isn’t so hard. The complete redstone system is made up of just a few core concepts: power sources, wire, modifiers, and output devices.
Tip: Use Creative Mode
I recommend that you test and explore this chapter in a world set to Creative mode and perhaps even Superflat, using the Redstone Ready preset. It’s just so much easier as a learning exercise to place and wire up components, including the more exotic ones, this way.
Once you get a grip on redstone essentials and start to figure out how to put these building blocks together into more interesting systems, you will never think of Minecraft the same way again.
Power Sources and Signals
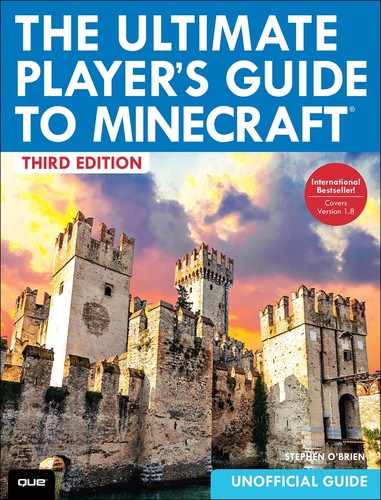
Power sources provide the energy to power devices or to signal that an event has occurred, such as a mob (or someone in Multiplayer mode) stumbling over a tripwire. Figure 9.1 shows the complete set of power sources.
FIGURE 9.1 Redstone power and signal sources.
1. Redstone torch
2. Redstone block
3. Tripwire with hooks shown on either side
4. Wooden and stone buttons
5. Daylight sensor
6. Lever
7. Wooden and stone pressure plates
8. Detector rail
9. Iron and gold weighted pressure plates
Signals and power sources provide the same redstone energy and are somewhat interchangeable as terms, but consider signals to be intermittent, providing that energy when an event occurs, such as someone or something stepping on a pressure plate. Power sources provide a continuous flow of power, like a signal switched on permanently. Here’s the most essential information on each type of signal or power source:

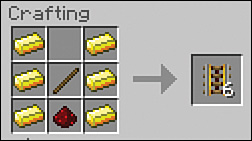
![]() Redstone torch—The torch is Minecraft’s electric utility. It’s clean, green energy, even if it’s red. It provides a continuous source of power but also has a few handy tricks up its sleeve. Feed a power source into a torch, and you will be able to turn the torch off and on, making it a useful switching mechanism for almost every circuit. You’ll see many examples of this later. Craft a torch from a stick and a chunk of redstone.
Redstone torch—The torch is Minecraft’s electric utility. It’s clean, green energy, even if it’s red. It provides a continuous source of power but also has a few handy tricks up its sleeve. Feed a power source into a torch, and you will be able to turn the torch off and on, making it a useful switching mechanism for almost every circuit. You’ll see many examples of this later. Craft a torch from a stick and a chunk of redstone.


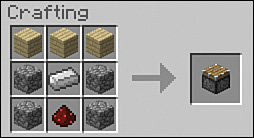
![]() Redstone block—A redstone block is crafted from nine pieces of harvested redstone. It acts as a continuous power source to any nearby wiring, modifiers, and devices. It is also the only power source that can be moved by pistons, which turns a block into a handy mechanical junction box. Redstone blocks are useful for storing large quantities of redstone ore. A stack of 64 redstone blocks can hold up to 576 pieces of ore in a single storage slot in your inventory or a chest.
Redstone block—A redstone block is crafted from nine pieces of harvested redstone. It acts as a continuous power source to any nearby wiring, modifiers, and devices. It is also the only power source that can be moved by pistons, which turns a block into a handy mechanical junction box. Redstone blocks are useful for storing large quantities of redstone ore. A stack of 64 redstone blocks can hold up to 576 pieces of ore in a single storage slot in your inventory or a chest.


![]() Tripwire hook—Use string and two tripwire hooks to create a devious detection system, with two tripwire hooks placed up to 40 blocks apart in a straight line. Join them by placing string between. The string creates a tiny, difficult-to-see texture between the hooks, making it a favorite trap creator. It’s also an efficient way to “string up” a perimeter alarm. The hooks generate power while any mob is standing on or in the same block occupied by the string. Elevate a tripwire to one block above a minecart track, and it can detect a minecart carrying a mob, including yourself, making it an easy way to separate minecarts by load and switch tracks, shunting items in one direction and players in another.
Tripwire hook—Use string and two tripwire hooks to create a devious detection system, with two tripwire hooks placed up to 40 blocks apart in a straight line. Join them by placing string between. The string creates a tiny, difficult-to-see texture between the hooks, making it a favorite trap creator. It’s also an efficient way to “string up” a perimeter alarm. The hooks generate power while any mob is standing on or in the same block occupied by the string. Elevate a tripwire to one block above a minecart track, and it can detect a minecart carrying a mob, including yourself, making it an easy way to separate minecarts by load and switch tracks, shunting items in one direction and players in another.

![]() Button—There are two types of buttons: stone and wooden. A stone button provides a 1-second pulse of power. A wooden button delivers a pulse for 1.5 seconds and, if you’re a sharp enough shot, you can activate the wooden button by shooting it with an arrow. For an extra challenge, try doing that while galloping by on horseback. Craft a button from one wood plank block or a block of stone obtained by mining stone with a pickaxe charmed with silk touch or by smelting cobblestone back into a stone block.
Button—There are two types of buttons: stone and wooden. A stone button provides a 1-second pulse of power. A wooden button delivers a pulse for 1.5 seconds and, if you’re a sharp enough shot, you can activate the wooden button by shooting it with an arrow. For an extra challenge, try doing that while galloping by on horseback. Craft a button from one wood plank block or a block of stone obtained by mining stone with a pickaxe charmed with silk touch or by smelting cobblestone back into a stone block.


![]() Daylight sensor—These sensors act similarly to a solar panel, outputting a current directly proportional to the amount of daylight they are currently receiving. You’ll need Nether quartz, wooden slabs, and glass blocks to build one. Right-clicking a daylight sensor causes it to invert and change color slightly and become a night-time sensor that sends out full current in pitch-black and none in broad daylight.
Daylight sensor—These sensors act similarly to a solar panel, outputting a current directly proportional to the amount of daylight they are currently receiving. You’ll need Nether quartz, wooden slabs, and glass blocks to build one. Right-clicking a daylight sensor causes it to invert and change color slightly and become a night-time sensor that sends out full current in pitch-black and none in broad daylight.


![]() Lever—A Minecraft lever acts like an on/off switch, but spruced up with its own built-in power generation. Like buttons, they’re also safe from being flipped by any of the nonplayer mobs. Wire up a set of levers as described under “Redstone Wiring,” later in this chapter, to create a secure keypad entry.
Lever—A Minecraft lever acts like an on/off switch, but spruced up with its own built-in power generation. Like buttons, they’re also safe from being flipped by any of the nonplayer mobs. Wire up a set of levers as described under “Redstone Wiring,” later in this chapter, to create a secure keypad entry.


![]() Pressure plate—Like buttons, pressure plates come in wood and stone variants. Both varieties deliver continuous power while activated. Stone plates react to mobs and minecarts containing mobs; you can also activate a stone plate with a low-level fly-by in Creative mode. Dropped items, all minecarts (regardless of contents), lures on fishing rods, and arrows all trigger wooden plates.
Pressure plate—Like buttons, pressure plates come in wood and stone variants. Both varieties deliver continuous power while activated. Stone plates react to mobs and minecarts containing mobs; you can also activate a stone plate with a low-level fly-by in Creative mode. Dropped items, all minecarts (regardless of contents), lures on fishing rods, and arrows all trigger wooden plates.

![]() Detector rail—Detector rails send off a signal as a minecart rolls over the top. You can use them to switch tracks, turn off other powered rails to prevent collisions, open doors, fill and empty hoppers, and so on. Connect a comparator to a detector rail to trigger a signal that can shunt full minecarts in one direction and empty ones in another. This is useful for shunting aside empty minecarts, ready for reuse, while sending a full one (one that you might be riding) to another destination, such as a train station, but there also are many other ways to use them.
Detector rail—Detector rails send off a signal as a minecart rolls over the top. You can use them to switch tracks, turn off other powered rails to prevent collisions, open doors, fill and empty hoppers, and so on. Connect a comparator to a detector rail to trigger a signal that can shunt full minecarts in one direction and empty ones in another. This is useful for shunting aside empty minecarts, ready for reuse, while sending a full one (one that you might be riding) to another destination, such as a train station, but there also are many other ways to use them.

![]() Weighted pressure plate—Although similar to a standard plate, a weighted pressure plate emits a signal of strength 1 to 15, according to the number of items on the plate. There are two versions. The gold plate, made from two gold ingots, is more sensitive, stepping the signal 1 lever for every 4 items placed. The iron plate, made from two iron ingots, jumps the signal output every 42 items. The plates can count dropped items, but the items must be loose and risk despawning unless they’re sucked back up into a hopper. They also can work for creating a lock where placing a particular weight of items unlocks a door, or even for creating a payment system in an adventure map. A sign placed nearby might say “Place eight gold bars on the plate to move to the next stage.”
Weighted pressure plate—Although similar to a standard plate, a weighted pressure plate emits a signal of strength 1 to 15, according to the number of items on the plate. There are two versions. The gold plate, made from two gold ingots, is more sensitive, stepping the signal 1 lever for every 4 items placed. The iron plate, made from two iron ingots, jumps the signal output every 42 items. The plates can count dropped items, but the items must be loose and risk despawning unless they’re sucked back up into a hopper. They also can work for creating a lock where placing a particular weight of items unlocks a door, or even for creating a payment system in an adventure map. A sign placed nearby might say “Place eight gold bars on the plate to move to the next stage.”
Caution: Don’t Run Off the Rails
Pressure plates disrupt a contiguous minecart rail, so they are most reliably used at the end of a line. Detector rails and tripwire are often better alternatives.
Tip: Trapped Chests in Multiplayer Worlds
Place a tripwire hook and a standard chest on a crafting table to create a trapped chest. This sends a signal when opened and is great for Multiplayer mode. You can use the signal for almost anything, from kind intent to evil. Play a happy note from a note block or slide open the floor under the player’s feet to boil him in a lake of lava. You can be as nice or as diabolical as you like.
A trapped chest has a small red square surrounding the latch that may send a warning to an alert player. Place a sign on the front to hide the texture. (You’ll need to sneak place by holding down the Shift key while right-clicking.) The text is up to you, but saying “FREE TOOLS; HELP YOURSELF” or “DIAMOND STORE” can be devilishly effective. A small amount of the red texture remains visible but probably won’t be seen by a marauding player intent on stealing your cache. You can also hide the texture entirely by digging a hole and sinking the chest into the ground.
All other containers (the chest, hopper, furnace, dropper, dispenser, jukebox, and brewing stand) also emit signals that vary in strength according to their contents. Tap the signal with a redstone comparator, described later in the chapter, to turn it into an output that you can use elsewhere.
Redstone Wiring

You harvest redstone from redstone ore with an iron, gold, or diamond pickaxe. When placed on the ground, the redstone transforms into a trail, also called redstone wire, that carries power or signals between other components.
Redstone wire has some interesting properties (see Figure 9.2):
![]() Laying a trail is quite easy because the wire automatically connects adjacent nodes. Just click on blocks where you’d like to place the wire, and it bends around corners, goes up and down solid block ramps, and creates three- and four-way junction points, as required. It’s sticky stuff, so prevent separate circuits from connecting by keeping them separated by at least one block, or they’ll join together to form a lattice. If space is tight and you must run two separate strands side by side, use a parallel run of repeaters instead.
Laying a trail is quite easy because the wire automatically connects adjacent nodes. Just click on blocks where you’d like to place the wire, and it bends around corners, goes up and down solid block ramps, and creates three- and four-way junction points, as required. It’s sticky stuff, so prevent separate circuits from connecting by keeping them separated by at least one block, or they’ll join together to form a lattice. If space is tight and you must run two separate strands side by side, use a parallel run of repeaters instead.
![]() Water and electricity don’t mix—but not as dangerously as in our physical world. Water just washes away the redstone wire and other devices, turning them back into collectable items. Be prepared to climb over or tunnel under any water blocks.
Water and electricity don’t mix—but not as dangerously as in our physical world. Water just washes away the redstone wire and other devices, turning them back into collectable items. Be prepared to climb over or tunnel under any water blocks.
![]() Powered wire sparkles with a red glow that gradually diminishes until the current runs out in 15 blocks. You need repeaters or torches to boost the power for longer circuits, as described later in this chapter.
Powered wire sparkles with a red glow that gradually diminishes until the current runs out in 15 blocks. You need repeaters or torches to boost the power for longer circuits, as described later in this chapter.
![]() The current runs in the space above the block on which the trail appears but provides power to the block underneath and the block directly in front of the end of the wire. Redstone powers the blocks on which the wire is drawn but conducts the power through the block above that. Think of the wire as actually occupying the space above its depicted location. That space must be contiguous, with the exception of slabs or transparent blocks such as glass, ice, leaves, and glowstone. Figure 9.3 shows a blocked current.
The current runs in the space above the block on which the trail appears but provides power to the block underneath and the block directly in front of the end of the wire. Redstone powers the blocks on which the wire is drawn but conducts the power through the block above that. Think of the wire as actually occupying the space above its depicted location. That space must be contiguous, with the exception of slabs or transparent blocks such as glass, ice, leaves, and glowstone. Figure 9.3 shows a blocked current.
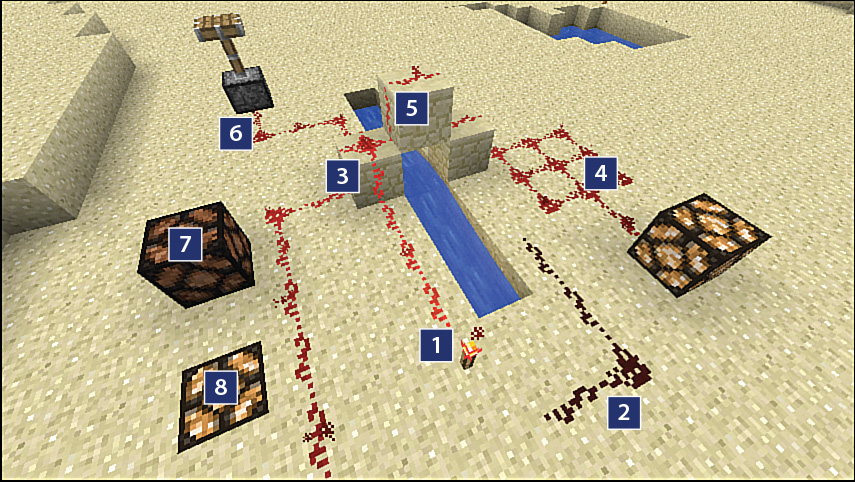
FIGURE 9.2 Redstone properties.
1. Powered wire emits a glow and sparkles.
2. Unpowered wire has a dull red color.
3. Wire transforms automatically into junctions as you place nearby nodes.
4. Connecting nearby blocks creates a lattice but continues to transmit power, without short circuits.
5. Wire can climb up and down blocks arranged in a stair-step pattern.
6. Devices can activate at the end of a wire at the same level...
7. ...but don’t activate when placed next to an adjacent wire.
8. Wire powers the block below, lighting up this adjacent glowstone lamp that is sunk one block into the ground.

FIGURE 9.3 Blocks can break a wire’s current: The block on the left prevents the current from flowing down and to the glowstone lamp, while the slab on the right (taking up just half an actual block space) allows the power to flow through it and down to the ground, lighting up the lamp. Replace the interfering block with a slab or a transparent block if keeping a similar texture is important.
Powered Blocks
Redstone power propagates from the source as strong power. Strong power can light up redstone wire and activate devices. Feed strong power into a normal opaque block such as dirt, cobblestone, or wood, and that block will propagate weak power, which can only activate devices. Basically, weak power is not strong enough to reconnect with a redstone wire and continue acting like a partial insulator. Figure 9.4 illustrates this concept.

FIGURE 9.4 Strong and weak power.
1. The cobblestone emits weak power, sufficient to activate the lamp and other devices but not enough to power the wire leading to the second lamp.
2. Running wire over a block continues the current through the space above the block.
3. The lever provides strong power to the block, firing up the wire.
It’s also worth mentioning that a wired connection between a power source and a device isn’t always necessary. Most of Minecraft’s blocks—the opaque ones—can be powered directly by a source. This enables the creation of very small circuits. I included one example of this in Chapter 6, where the piston was powered by a button placed on a block. You’ll see some other examples later in this chapter.
Most redstone sources are attached to a block of some kind. For example, buttons are placed on the vertical surface of a block, such as a wall, a lever to any surface, or even the ceiling. Generally speaking, the source powers the block to which it is attached (the anchor block), and this can then activate any devices adjacent to it. This is why a button placed on a block beside a door opens that door. It’s not the button acting directly on the door through some hidden link. Rather, pushing the button powers the block to which it is attached, and that block being adjacent to the door triggers it to open.
Note: Torches Power the Block Above
There is an important exception to the rule about redstone devices powering the block to which they are attached. The redstone torch provides strong power to the block directly above it as well as to adjacent redstone wiring and devices—but not to the block to which it is attached. That said, feeding another source of power into that block, such as from a button, lever, or wire, causes the redstone torch to turn off, allowing it to act as an inverter.
Now, here’s the important part. All sources except the redstone block also strongly power the space they occupy, not just the anchor. (Redstone blocks are anchored on themselves, so they only provide strong power to the space they occupy.) This provides a choice of two blocks to which you can attach components: either the anchor block or the block occupied by the power source item. Figure 9.5 shows how this works.
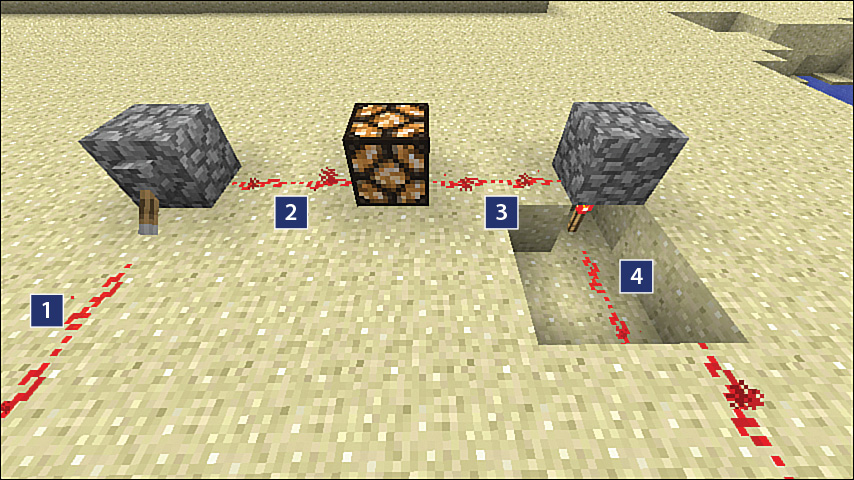
FIGURE 9.5 Sources provide strong power to two blocks each.
1. This wire is powered by the space occupied by the lever.
2. This wire gets its power from the block the lever is anchored to.
3. Redstone torches power the block above, so this wire gets its power from the cobblestone block above the torch.
4. The torch also powers the space it occupies, firing up this redstone wire.
Keeping the two-block rule in mind gives you many more options for linking components and running circuits. In other words, more power to you!
Modifiers
Modifiers change the current in useful ways but can also be more than a little confusing. Don’t worry if it doesn’t all make sense right away. A little practice goes a long way.
There are two types of modifiers: repeaters and comparators.
Repeaters

Redstone repeaters can amplify a strong or weak current and add a 0.1- to 0.4-second delay that is useful for adding timing to circuits. A repeater also acts like a diode, ensuring that current flows in only one direction.

The power-boosting function allows current to flow through solid blocks such as walls without finding a way to go over or under them. This in itself can solve some otherwise difficult design problems. Figure 9.6 shows two examples.
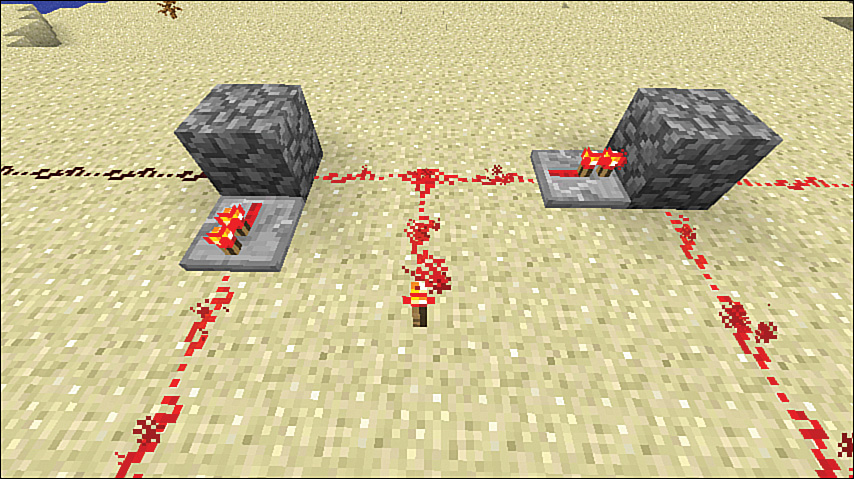
FIGURE 9.6 The repeater on the left picks up the weak current reaching the block and amplifies it back to strong. Without this, the block just emits a weak current that’s insufficient to light the wire on the far left. The repeater on the right turns the block into a strong emitter, lighting up both redstone trails.
A repeater’s current always flows in the direction of the single fixed light on the repeater. You may be able to make out a faint triangular texture on top of the repeater that shows this direction. Place the repeater facing in the direction you want the current to flow, and it will align correctly.
Right-click the repeater to add a delay to the circuit. The default is 0.1 second, increasing to 0.4 second with each right-click until the light has slid fully back to the base of its channel.
Repeaters are also useful for running current in tight spaces because they can be placed next to each other without forming the lattice effect that placed wire develops. Place them in series, as shown in Figure 9.7.
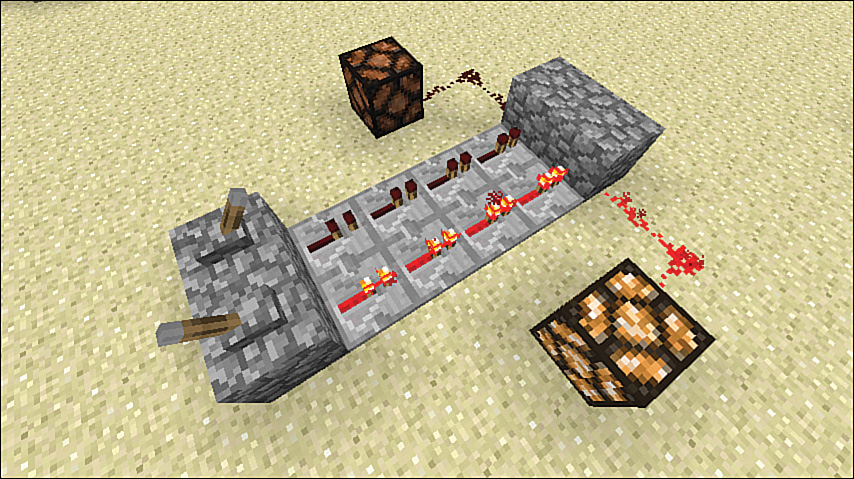
FIGURE 9.7 Two sets of repeaters keep current separate. Terminate the sets with blocks and use the sides of the blocks to run the separate strands to their destination.
Repeaters have one other useful feature: You can T-bone one repeater’s output into the side of another, and any power applied to the first locks the output of the second. This creates a latch—and, quite literally, something that can be used to provide a master lock for a door or even to create a 1-bit memory cell (see Figure 9.8).
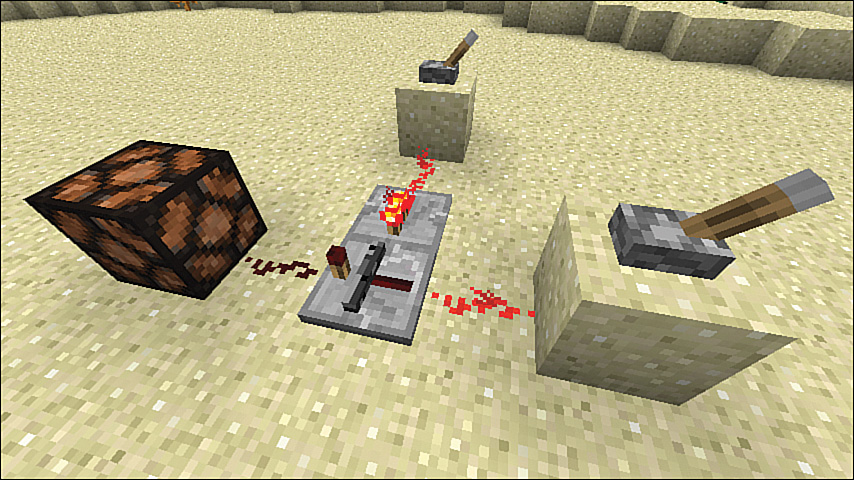
FIGURE 9.8 The back repeater has latched the front repeater in a power-off state (shown by the block across the top that replaces the sliding torch), even though power reaching the repeater would normally flow through and light the lamp.
Comparators

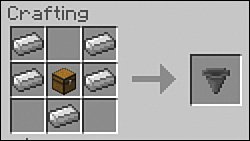
A redstone comparator increases or decreases an output signal according to the strength of the input signal. Comparators can check the contents of a chest, hopper, furnace, dropper, dispenser, jukebox, or brewing stand. They can also compare the relative storage of each and then trigger another function, such as making a railcart with a hopper move to another location for unloading (see Figure 9.9). Comparators also “read” the rotated position of an item stored in an item frame and deliver a current that ranges from a value of 1 to 8. The examples that follow show a few more useful scenarios. The comparator requires Nether quartz, which is available only in The Nether region.

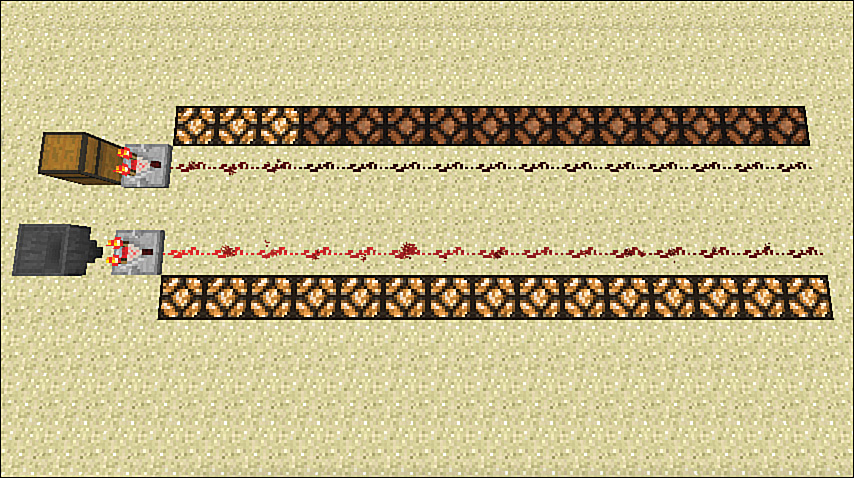
FIGURE 9.9 Comparators report inventory contents by emitting signal strength equal to the number of slots available in that item divided by the number of full slots available, converted to a percentage out of 15. The hopper and the chest shown here each have 5 full slots. Because the hopper also has only 5 slots available in total, the comparator issues a 15-strength signal, or 100%. The chest has 27 slots in all and is approximately 18% full, so the rounded emitted signal strength is 3.
Comparators always output a signal the same strength as their input signal unless they also receive a side signal, which can be delivered by any input source. In this case, they operate in two modes:
![]() Compare mode—If the side signal is greater than the input, the output is zero. In all other cases, the input equals the output.
Compare mode—If the side signal is greater than the input, the output is zero. In all other cases, the input equals the output.
![]() Subtract mode—If the side signal is lower than the input, the output is the input minus the side signal. In all other cases, output is zero.
Subtract mode—If the side signal is lower than the input, the output is the input minus the side signal. In all other cases, output is zero.
As of Minecraft v1.8, redstone comparators can detect which way an item frame is rotated and deliver a signal that ranges from 1 to 8, according to the item’s position. Dimmer switches, anyone?
This is a lot to take in, understandably. Some examples later in this chapter will help.
Output Devices
All of Minecraft’s power sources, wiring, and modifiers are a bit useless without the circuit actually doing something. Minecraft provides a large number of devices, activators, gadgets, and more. Figure 9.10 shows the full set, described in the following list:
FIGURE 9.10 All of Minecraft’s output devices.
1. Redstone lamp
2. Iron and wooden doors
3. Trapdoor (available in wood and iron variants)
4. Fence gate
5. Regular and sticky pistons
6. Powered rail
7. Dispenser
8. Hopper
9. TNT block
10. Note block

![]() Redstone lamp—The lamp, as you’ve seen from many of the figures in this chapter, is a handy tool for checking the output of circuits. It also happens to make a pretty good light source, although crafting one requires glowstone from The Nether. Glowstone is plentiful, but obviously you’ll have to venture into The Nether to get it.
Redstone lamp—The lamp, as you’ve seen from many of the figures in this chapter, is a handy tool for checking the output of circuits. It also happens to make a pretty good light source, although crafting one requires glowstone from The Nether. Glowstone is plentiful, but obviously you’ll have to venture into The Nether to get it.


![]() Doors—Doors are the de rigueur entryway. Doors come in iron and wood variants and switch between a fully open or closed state instantaneously, meaning one can’t hit you on the rear on the way out. Iron doors can only be opened with some sort of power input. They also keep zombies out when you’re playing on Hard difficulty.
Doors—Doors are the de rigueur entryway. Doors come in iron and wood variants and switch between a fully open or closed state instantaneously, meaning one can’t hit you on the rear on the way out. Iron doors can only be opened with some sort of power input. They also keep zombies out when you’re playing on Hard difficulty.

![]() Trapdoors—Trapdoors aren’t going to trick anyone when used in a trap, but they’re still handy. A pressure plate in front of a trapdoor will save you from fumbling for a right-mouse click. Iron trapdoors require power to open, similar to an iron door. They are crafted from iron ingots placed in the same pattern as planks for the wooden trapdoor.
Trapdoors—Trapdoors aren’t going to trick anyone when used in a trap, but they’re still handy. A pressure plate in front of a trapdoor will save you from fumbling for a right-mouse click. Iron trapdoors require power to open, similar to an iron door. They are crafted from iron ingots placed in the same pattern as planks for the wooden trapdoor.
![]() Pistons—Both the regular and sticky variants are incredibly useful. You’ll see some examples soon.
Pistons—Both the regular and sticky variants are incredibly useful. You’ll see some examples soon.

![]() Powered rails—Sure, you can power a minecart by jumping on board while riding a pig, but is that any way to get around? You’ll be the laughing stock. Powered rails provide a more stylish way to move you and your minecarts from A to B.
Powered rails—Sure, you can power a minecart by jumping on board while riding a pig, but is that any way to get around? You’ll be the laughing stock. Powered rails provide a more stylish way to move you and your minecarts from A to B.

![]() Fence gates—They open, they shut, and they’re good for keeping livestock in place. Place two fence gates beside each other to create a larger opening that is easier for larger livestock to navigate through. Fence gates are opened with a right-click but can also be powered with redstone, such as from a pressure plate.
Fence gates—They open, they shut, and they’re good for keeping livestock in place. Place two fence gates beside each other to create a larger opening that is easier for larger livestock to navigate through. Fence gates are opened with a right-click but can also be powered with redstone, such as from a pressure plate.


![]() Dispensers—A dispenser pumps out almost anything that’s been put inside it. Typically used for firing arrows, supplying a flood of water or lava, and, well, an enormous range of other things, dispensers are an indispensable (sorry) part of any automated system. Place flint and steel inside a dispenser to make it shoot out a tongue of fire; then place a pressure plate in front and wait for mobs to wander by. (And try to not laugh evilly.)
Dispensers—A dispenser pumps out almost anything that’s been put inside it. Typically used for firing arrows, supplying a flood of water or lava, and, well, an enormous range of other things, dispensers are an indispensable (sorry) part of any automated system. Place flint and steel inside a dispenser to make it shoot out a tongue of fire; then place a pressure plate in front and wait for mobs to wander by. (And try to not laugh evilly.)


![]() Hoppers—Hoppers move items between other objects. Although hoppers don’t rely on power, they’ll stop transferring contents out or in when they receive a redstone signal from the side.
Hoppers—Hoppers move items between other objects. Although hoppers don’t rely on power, they’ll stop transferring contents out or in when they receive a redstone signal from the side.

![]() TNT—TNT is the most destructive force in Minecraft, except for a creeper that’s been hit by lightning, but that’s incredibly rare. Set it off with a power pulse or use a minecart crafted with TNT to create a rolling disaster zone that’s set off by an activator rail. Craft TNT with gunpowder collected from slain creepers (which is easier said than done) and regular sand.
TNT—TNT is the most destructive force in Minecraft, except for a creeper that’s been hit by lightning, but that’s incredibly rare. Set it off with a power pulse or use a minecart crafted with TNT to create a rolling disaster zone that’s set off by an activator rail. Craft TNT with gunpowder collected from slain creepers (which is easier said than done) and regular sand.


![]() Note blocks—Note blocks add a nice aesthetic to the game and let you easily create audible notifications or warnings of certain events. Right-click a note block to change the tone that plays when it receives power. You can even create your own doorbell with a string of blocks hooked up using repeaters to create delays. Try changing the instrument used by placing the note block on other types of materials and bring out your inner composer.
Note blocks—Note blocks add a nice aesthetic to the game and let you easily create audible notifications or warnings of certain events. Right-click a note block to change the tone that plays when it receives power. You can even create your own doorbell with a string of blocks hooked up using repeaters to create delays. Try changing the instrument used by placing the note block on other types of materials and bring out your inner composer.

The output devices make quite a collection. You’ll use them in various ways later.
You can make advanced circuits and mechanisms by combining all the components in different ways. The redstone system can do a lot more than connect a button to a light or a lever to a water dispenser.
Automatic Doors
Automatic doors can be simple and useful. You may have already experimented with them. Place a wooden or stone button on the wall next to any single door, and it will spring open. You can do the same with two doors placed side by side, but a single button placed on one side won’t open them both. Wouldn’t it be nice if you could link that button to both doors so they both swing open the way you’d expect?
All you need is a little redstone dust. Follow these steps and refer to Figure 9.11:
1. Position the doors. The order in which you place them is important. Place the left door first and then the right. This causes the right-hand door to flip around, becoming a mirror image of the left.
2. Place blocks to surround the doors as shown, a stack of two on each side.
3. Position the button on the top-left block. Wooden buttons provide a 1.5-second pulse of power, whereas stone buttons provide a 1-second pulse.
4. Run a trail of redstone dust from the base of one door pillar to the other in a U-shaped bend until it drives directly into the base of the other. The redstone receives its current from the space the button block occupies, transmitting the current to the opposite base block, powering that and triggering the opposite door to open.

The only obvious problem is one of aesthetics. You can’t throw a welcome mat over it to hide the wire, but there are other ways to improve the look. One, if it suits, is to use carpet created from two blocks of wool placed side by side on the crafting table. Place that directly on top of the wiring. It will appear one block above but will create just a small step above any adjacent blocks running on either side of the redstone trail, and you can then place carpet on the adjacent blocks to completely hide the path the redstone takes. The other is to use slabs, and I’ll show you how to do that here, so get ready to remove the wiring you just installed and start again.
Take a look at Figure 9.12. It’s still the same concept, but the wiring now runs from the side of the button’s anchor block, down a few blocks to where it can be hidden by ground cover, and back up the other side, in a mirror image.

FIGURE 9.12 It takes only a few minutes to rerun the wiring so that it can be hidden from sight. Going two blocks deep leaves room for a layer of flooring above the wire that is flush with the ground.
Follow these steps:
1. Dig out the blocks shown in Figure 9.12, although you can leave the forwardmost row in place; I removed those just to better show the circuit.
2. Add the two single side blocks on either side of the doorjambs and run redstone along the top of the blocks and down into the trench.
3. When you reach the middle, stop and place a redstone repeater to amplify the current because it needs to run a touch longer than 15 steps. Place it facing in the direction the current should run (in this example, facing toward the right) and then continue the redstone wiring out the other side and up the steps on the other side.
4. To test your setup, click the button, and both doors should spring open—the left one first, followed by the right, after a tiny tenth-of–a-second delay caused by the current running through the repeater.
5. To cover up the new wire, fill in the main trench using any material you prefer, even glass blocks if you want to see the current fire up each time you enter. Leave the two blocks at the far end empty for now. Figure 9.13 shows the blocks at the end of the trench. One is one block deep, and the other is two blocks deep.
FIGURE 9.13 Cover the space on the right with a slab to allow the current to run down and into the trench.
6. Place a slab instead of a full block over the space that is two blocks deep. This gives you a surface flush with the ground while also letting the current run underneath.
7. Build up other blocks around and on top of the wiring until you’ve achieved the desired result. Figure 9.14 shows an example that turns the entry into something a little grander while also hiding all the wiring.
8. Position a couple of pressure plates behind the door for an easy exit. The plates aren’t quite perfect. Each one opens just the door directly in front. For extra props, dig a trench two blocks deep under the plates and lay some redstone under both plates that connects somewhere with the other wire originating from the button. This ensures that no matter which plate is jumped on, the original double-opening circuit receives the hit and swings both doors open.
Tip: Forgot to Shut the Door on Your Way Out?
Place a wooden pressure plate inside every door leading outside, even if you don’t do any other wiring. You won’t need to click the door to get out, and the door will automatically close behind you every time. Dropped items also trigger wooden pressure plates. Switch to one of stone if you don’t want inadvertent drops to triggers the doors.
This is just one example of connecting doors and running wiring, but there are many ways to slice this problem. The wiring could run over the top of the door. You could also make it shorter on the delivery side by placing a redstone torch two blocks under the door and powering it through an inverter—but the repeater significantly simplifies the design. And, of course, the entire thing could be flipped so that the wiring runs behind the doors.
Let’s get a touch more sophisticated. Swinging doors are great, but if you have in mind something more high tech—perhaps a modern fortress decked out with everything that opens and shuts (literally)—you might consider leveling up to doors that glide open before you. They’re not whisper quiet, and they don’t even give that swoosh sound of the doors in every sci-fi show. However, they do look great, and you can make them from any material, including glass blocks, so they’ll add a certain something to any construction.
For sliding doors you add an extra circuit to the loop. The pistons have to stay powered and therefore extended for the door to stay closed. But pressing the button delivers power rather than cutting it off, and flipping a lever will just keep the doors in one state or the other. What this circuit needs is a method of keeping the pistons powered constantly and a way of interrupting only when the button supplies its own current. This setup is known as an inverter, or a NOT gate, and is provided by a redstone torch attached to the button block.
Figure 9.15 shows the basic layout, with all components identified. The image shows the pistons powered. They’ll be retracted at first, but you can place the actual door blocks either in the middle or up against the pistons, and they’ll work just fine as soon as the pistons are extended for the first time.
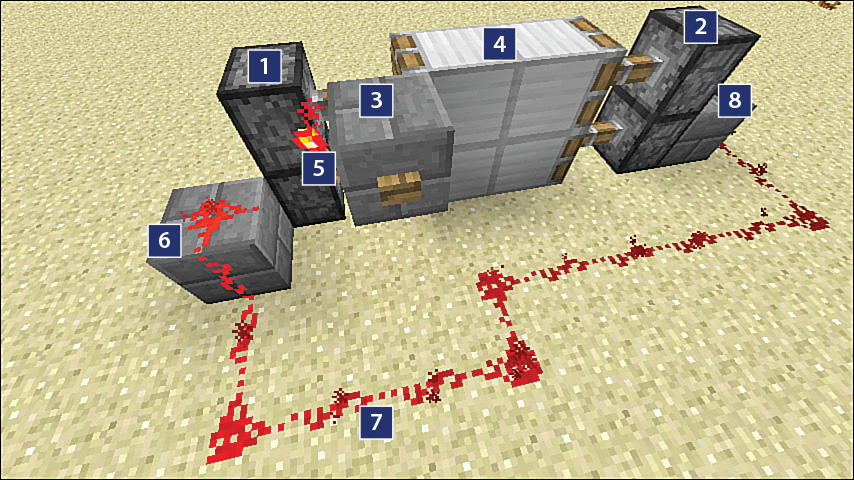
FIGURE 9.15 Place these components to create the mechanics of a sliding door.
1. A double-stack of sticky pistons
2. The second stack of sticky pistons required for the opposite slider
3. Block with button attached
4. Blocks for the door; I’ve used iron for that fortress look
5. Redstone torch attached to button block, forming an inverter
6. Start of redstone wiring
7. The wiring must step around the block beneath the button’s own space so it isn’t fired when the button is pressed.
8. Place the trail up and onto the block behind the second piston stack.
I’ve shown the wiring at ground level for simplicity, but you can bury it the same way as for the wooden doors example and then build up the rest of the entry way to hide everything. Figure 9.16 shows one example, but feel free to create any look you like. Piston doors provide quite an entrance into a fortress buried into the side of a hill, where you can place natural terrain to hide the inner workings. You can also flip the workings 90 degrees and make doors open vertically or add some vertical doors and pistons on top of the horizontal ones to create a three-way iris.

Try the same design with an added latch circuit: Run wire from pressure plates through the latch, feeding the power into the side repeater from a lever inside. Use the pressure plates to get in and out quickly and then use the lever to lock the doors closed at night.
One final example of piston-controlled devices: Figure 9.17 shows a set of three automatic iron block storm shutters hidden within a wall cavity. (I’ve opened up the inner wooden wall and floor so you can see the workings.) A system like this, controlled by a lever, provides more blast resistance than glass, and you can open it up to take pot shots at mobs. Wire this up to a lever and bury the wiring under your floor.

FIGURE 9.17 Sliding windows created with sticky pistons. The repeaters keep the current feeding directly into the base block under the pistons. Without them, the wiring would revert to a lattice and stop working.
Vertical Currents
Although redstone wiring can easily climb and descend steps, you’ll sometimes want to send it vertically instead. The easiest way to do this is to use an alternating series of redstone torches and ensure that the final one is in sync (not inverting) with the current at the base of the tower. See Figure 9.18 for an example.
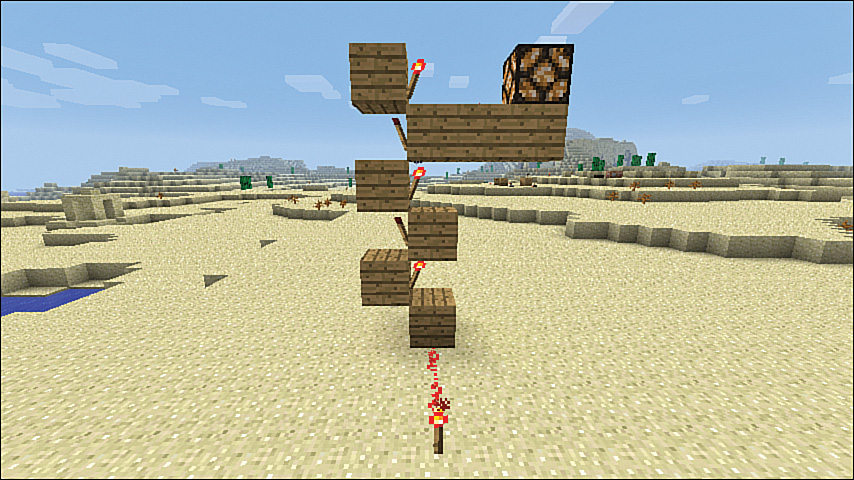
FIGURE 9.18 Redstone torches power the block above, so using them is an easy way to create a vertically ascending current.
Tip: 1×1 Vertical Ascending Alternative
You can make current (or, really, the current’s signal) ascend in a 1×1 pattern by placing redstone torches on top rather than on the side of each block. This requires a temporary tower behind the planned ascent that you can remove when you’re done, but it’s also ideal if you can just place the ascent against a wall. Attach blocks to the tower or wall every second space. Fix redstone torches to the top of each block, and they’ll pass their signal to the block above until you can draw power from a final torch placed into the side of the uppermost block.
The only way to descend a current is through a 2×2 staircase (see “The Spiral Staircase” on page 85). You may want to use this in Survival mode as well as for ascending currents because it provides an easy way to get up and down the circuit.
Advanced Circuits
The creators of Minecraft did something interesting when they designed the redstone system: They made it possible to mimic the binary logic system that is also at the heart of every integrated circuit that runs your electronics. It’s nowhere near as crazily complicated as today’s CPUs, and it’s more like a breadboard of wires studded with vacuum tubes, but the basics are there. Let’s take a look at some prototypical logic gates and how they’re used to do actually useful things.
NOT Gates, aka Inverters
A NOT gate takes an input value and flips the output value. For example, if the incoming current is on, the output of the NOT gate is off. If the current is off, the output is on. Redstone torches act like this. By default, they supply a current, but if the block they are attached to is powered by another source, the torch flips off. NOT gates are also known as inverters because they invert the current.
We used an inverter to flip the current from the torch with a button in the sliding doors example. Inverters have many other uses, though. For example, two inverters in a row act as an amplifier, just like a repeater (see Figure 9.19).
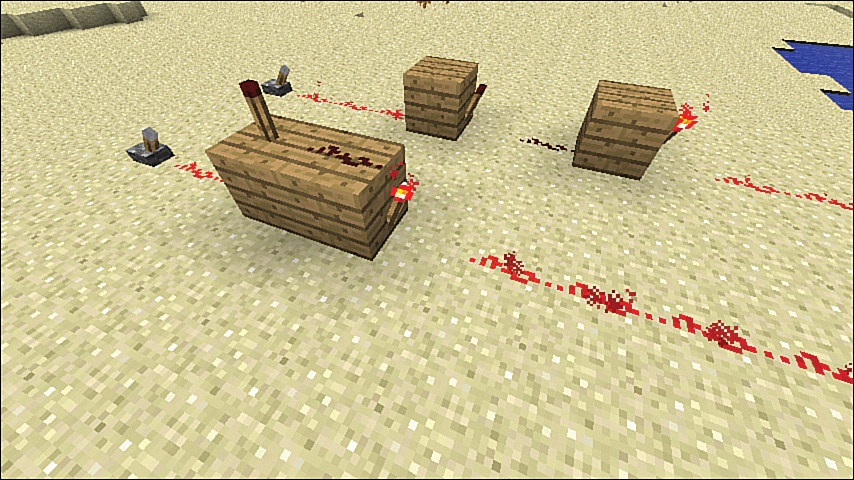
FIGURE 9.19 Inverters as amplifiers: The foremost inverter pair is a more compressed version of the furthest set (two inverters in sequence).
Inverters can also turn a daylight sensor into a night-light, as shown in Figure 9.20. The daylight sensor emits a signal according to the amount of light it’s receiving. Feeding this into an inverter turns the lamp on when the sensor is off and vice versa.

FIGURE 9.20 Need a night-light? That’s easy to arrange, and you can add further lamps and note blocks to create a full lighting system with an audible sound as night hits.
OR Gates, or Any Input Will Do
OR gates provide a positive output if any of the inputs is also true. This is a natural function of redstone wiring. Just connect two or more wires to a T-junction, and the single output will always be on if any input is on or off if all inputs are off. Figure 9.21 shows an OR gate with three types of input, any of which can light the lamp.
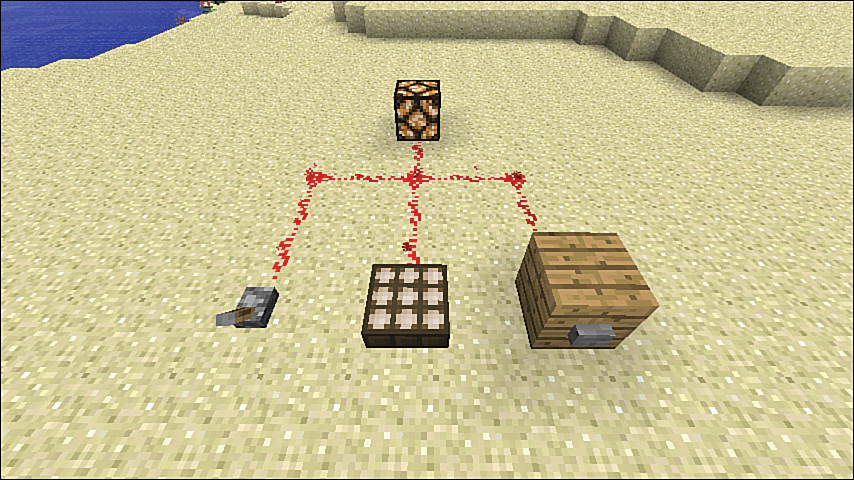
FIGURE 9.21 The OR gate is represented by the junction point of the wiring. In this case, the daylight sensor is providing the power that lights up all the wires. Use repeaters or inverters on each strand if it’s important for the current to always flow in just one direction.
OR gates have many uses, primarily because they allow multiple inputs to feed into the one circuit. For example, a row of pressure plates or strands of tripwire around the perimeter can hook up to a single wire that runs into your house, creating a perimeter alarm system. You can also add a timed circuit to a note block to create an audible beeping alarm.
I’m sure you’ll find many other uses.
Note: If It’s Not OR, It’s NOR
NOR gates operate as OR gates but with the output signal inverted. Think of it as NOT+OR. In these gates, the output signal is TRUE only if both inputs are FALSE. Just place an inverter on the single-wire output from the OR gate to create a NOR.
AND Gates, Two TRUE
AND gates output current (or a value of TRUE) only if both inputs are also TRUE. In real life, this is often used in security systems where two keys must be inserted to open a vault. You can do something similar to create a secure room, and this can be especially useful in Multiplayer mode. Place a lever close to the door (although not so close that it can directly activate it) and hide a lever in another part of the structure. String them together and feed the output to the door. Now the obviously placed button won’t work unless the hidden lever is also flipped on.
The AND gate is a more complex construction, using three inverters for two inputs and one output. Figure 9.22 shows the gate with both inputs on, and Figure 9.23 shows the same with one input off.

FIGURE 9.22 An AND gate with both levers switched on. This cuts both torches above the levers, ensuring that no current flows to the inverter on the side of the block. That inverter therefore sends power to the output wire lighting the lamp.

FIGURE 9.23 With one lever turned off, current flows from its torch to the output inverter, cutting its own current.
Repeater Loops
Loops set up a pulsing circuit. They’re possible with just some redstone torches, but you can use redstone repeaters to make them more compact, with adjustable timing, by changing the repeater delays with a right-click.
Figure 9.24 shows a prototypical design with a single repeater adjusted back to provide a 0.4-second delay. The torch adds another 0.1 second to that, making this a 0.5-second loop. You can extend the circuit by adding more repeaters to increase the delay. Replace the lever with wire connected to any other power source or signal to hook up the repeater to other circuits.
For an extra challenge, turn the repeater into a trip circuit—so that the loop runs permanently on the input of any signal until it’s reset, like an alarm system. An easy way to do this is to use a redstone block sliding between two regular (not sticky) pistons. Figure 9.25 shows this approach. Note that an inverter has been added before the lamp so that its usual condition is off. The additional repeater is just there to extend the circuit.
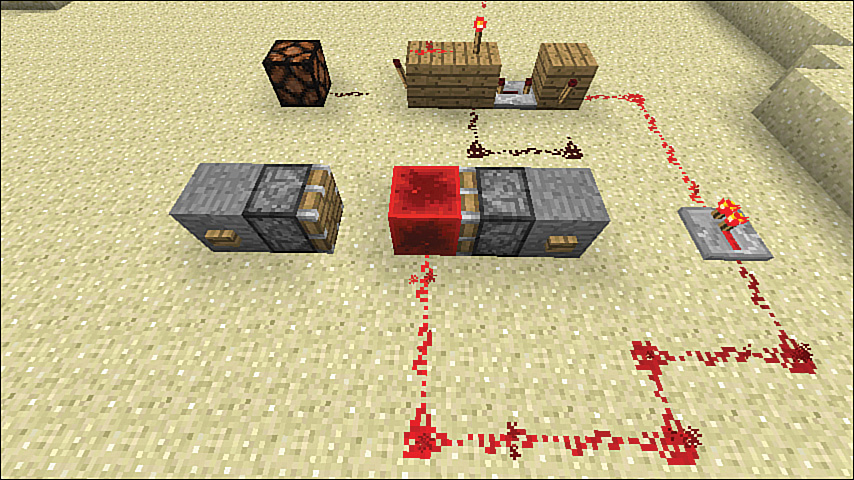
FIGURE 9.25 A repeater circuit with a trip system. The push button on the right triggers the repeater loop by pushing the block away from the circuit, allowing the repeater loop to fire. The loop will keep running until the push button on the left pushes the redstone block back to its original position.
Rail Transport
Minecraft’s rail transport system, like a lot of other things in Minecraft, can be as simple or crazily complex as you like. It is definitely part of the charm and the challenge. It can operate in a simple way, but the tendrils of redstone work their way deep into the rail system. Powered and detector rails provide key hooks that integrate rail and redstone into a homogenous whole.
In earlier versions of Minecraft, before the Horse Update (v1.6) that introduced a slew of equine-related features, rail travel was the fastest way to get from A to Z, via B to Y if you prefer a scenic route. The carts travel at an average speed of 8 meters (or blocks) per second and can climb hills, traverse valleys, and, depending on how you design the track, offer something of a rollercoaster thrill ride in between. You won’t break any land-speed records, and it’s not as fast as a fast horse, but it’s definitely better than walking, and it remains a great system for moving items, resources, and yourself, especially from the depths of a mine.
The system is limited only by your imagination. This section introduces you to the basic components, track-laying strategies, and some more advanced hints and tricks—enough to get you more than chugging along.
Have Minecart, Will Travel
A rail without rolling stock is about as useful as a car jacked on bricks. (I’m waiting for a maglev mod—maybe TrainCraft will float one in. See Chapter 13, “Mods and Multiplayer.”)
There are several versions of the standard carriage shown in Figure 9.26. It would be wonderful if these were glorious celebrations of the gilded age of the iron horse; they aren’t. They’re not even steampunk. But they do the job. Let’s take a look in the stable:

![]() Minecart—This is the barebones version of the rolling chariot. Hop aboard by right-clicking the empty cart and get taken for a ride. Use the forward key (W) to move in the direction you’re facing. There’s no way to slow down or reverse direction except to press the left Shift key to exit the minecart, after which it will quickly stop. Interestingly, other mobs can also ride in this type of minecart, and pigs will give it a good kick along. Self-propelling is effective but slow. Downward slopes (if you have the inclination), a powered minecart, or powered rails will speed things up.
Minecart—This is the barebones version of the rolling chariot. Hop aboard by right-clicking the empty cart and get taken for a ride. Use the forward key (W) to move in the direction you’re facing. There’s no way to slow down or reverse direction except to press the left Shift key to exit the minecart, after which it will quickly stop. Interestingly, other mobs can also ride in this type of minecart, and pigs will give it a good kick along. Self-propelling is effective but slow. Downward slopes (if you have the inclination), a powered minecart, or powered rails will speed things up.


![]() Minecart with furnace (powered minecart)—Burn, baby, burn! The furnace cart is powered by coal or charcoal and can push other carts in front. It’s bidirectional: Just click on one with the fuel in hand facing in the direction you want it to go. You can also change its direction at any time with another click. The engine runs for 3 minutes on each piece of fuel (enough to travel about 600 blocks), and you can fuel it for a long haul (a little more than 3 hours) by providing it with a full stack of 64 pieces of coal or charcoal. A single powered cart can push numerous other minecarts, although some glitches may occur, leaving carts jammed or stranded. It can also pull a string of carts if they have first been shunted together, such as by being backed up against a wall.
Minecart with furnace (powered minecart)—Burn, baby, burn! The furnace cart is powered by coal or charcoal and can push other carts in front. It’s bidirectional: Just click on one with the fuel in hand facing in the direction you want it to go. You can also change its direction at any time with another click. The engine runs for 3 minutes on each piece of fuel (enough to travel about 600 blocks), and you can fuel it for a long haul (a little more than 3 hours) by providing it with a full stack of 64 pieces of coal or charcoal. A single powered cart can push numerous other minecarts, although some glitches may occur, leaving carts jammed or stranded. It can also pull a string of carts if they have first been shunted together, such as by being backed up against a wall.

![]() Minecart with chest (storage minecart)—Add a chest to a standard minecart to gain another 15 fully stackable slots. This minecart rolls with the same momentum as an occupied minecart, regardless of the contents of the chest. Place a hopper underneath the track to automatically unload the chest and a chest under the hopper to create an automated unloading and storage system.
Minecart with chest (storage minecart)—Add a chest to a standard minecart to gain another 15 fully stackable slots. This minecart rolls with the same momentum as an occupied minecart, regardless of the contents of the chest. Place a hopper underneath the track to automatically unload the chest and a chest under the hopper to create an automated unloading and storage system.


![]() Minecart with hopper (hopper minecart)—Craft a minecart with a hopper to create a hopper minecart. These minecarts automatically scoop up loose items lying on the track and can be filled up with the contents of a container such as a chest or another hopper placed in the space above the track.
Minecart with hopper (hopper minecart)—Craft a minecart with a hopper to create a hopper minecart. These minecarts automatically scoop up loose items lying on the track and can be filled up with the contents of a container such as a chest or another hopper placed in the space above the track.


![]() Minecart with TNT (a.k.a. the TNT minecart)—Exploding minecarts? Why not? Actually, they’re a little special because the TNT will destroy nearby blocks but doesn’t destroy the rail tracks or their directly underlying blocks. This is a little hit and miss, though, and you may find some unintended collateral damage. TNT carts are a fun addition to Minecraft, but they aren’t the most effective method for mining. Use a powered activator rail to set them off. They can also be set off through collisions with other blocks or carts, by falling more than three blocks, and by fire, lava, or other explosions.
Minecart with TNT (a.k.a. the TNT minecart)—Exploding minecarts? Why not? Actually, they’re a little special because the TNT will destroy nearby blocks but doesn’t destroy the rail tracks or their directly underlying blocks. This is a little hit and miss, though, and you may find some unintended collateral damage. TNT carts are a fun addition to Minecraft, but they aren’t the most effective method for mining. Use a powered activator rail to set them off. They can also be set off through collisions with other blocks or carts, by falling more than three blocks, and by fire, lava, or other explosions.

FIGURE 9.26 Minecarts.
1. Standard minecart
2. Powered minecart
3. Storage minecart
4. Hopper minecart
5. TNT minecart
If you plan to build a bunch of minecarts and treat them like a train, keep in mind that they don’t latch together but instead can be used to push each other along. This works best with a powered cart doing the pushing. But even if you’re just propelling yourself in a standard minecart, you’ll find that you can push a practically unlimited string of storage carts ahead of you simply by bumping into them—shunting them along, as it were—as long as you stay on the flat. A powered minecart can push about four carts up a hill, but this doesn’t always work out well in practice because the minecarts sometimes get stuck as the chain works its way around corners and over slope transitions.
As Mojang developed version 1.8 of the game—in particular the 14w11a development snapshot—it made some significant changes to minecart mechanics. For example, the standard running speed was boosted to 20 meters/second—which is fast!
A complication with the speed increase was the chance that minecarts can derail if you hit a corner too quickly. Minecarts could also “refuse” to go uphill if the minecart was traveling too rapidly.
Due to customer outrage, Mojang reverted to the old minecart physics as of snapshot 14w17a. However, this doesn’t mean it won’t tweak the system in the future.
Note: Destroying and Reusing Minecarts
You can destroy minecarts with a few hits from any tool and place them back in your inventory for reuse. You can also load them into a dispenser placed at the start of your track for easy one-click deployment.
Tip: Build Now, Rail Later
Real-life cities tend to be a mess of transportation compromises. Roads and rails fight for space with buildings, sidewalks, parks, and utilities, not to mention utility infrastructure. Take a leaf from their book: tunnel. Put your rails underground rather than demolishing your hard-built structures and pop aboveground with access points when you can. The ability to run rails on a 45-degree slope makes your life much easier than that of a city planner, and subways with underground concourses add unique ambience to a vibrant metropolis.
Rolling on Rails
Minecraft has four types of rails. Some are more resource expensive than others, but fortunately they don’t need to be used all the time. Here’s a quick guide:

![]() Normal rail—Use six iron ingots and a stick of wood to create 16 rail track segments. Place them with a right-click, and the system takes care of bending them around corners or up and down terrain. You can use normal rail exclusively if you like, trundling along in a minecart, but your speed is somewhat limited. Only normal rails can bend into curves or a T-junction.
Normal rail—Use six iron ingots and a stick of wood to create 16 rail track segments. Place them with a right-click, and the system takes care of bending them around corners or up and down terrain. You can use normal rail exclusively if you like, trundling along in a minecart, but your speed is somewhat limited. Only normal rails can bend into curves or a T-junction.


![]() Powered rail—Powered rail is expensive. For six gold ingots, a stick, and a lump of redstone, you get just six segments, so use wisely! Fortunately, you don’t need a lot because a single rail can boost an occupied minecart or storage minecart for 80 blocks on level ground. (Unoccupied minecarts lose steam after just 8 blocks.) The rail is itself powered by any redstone source, but some of those sources work better than others, and I’ll use them in the examples that follow. These rails light up when powered and so are easy to recognize.
Powered rail—Powered rail is expensive. For six gold ingots, a stick, and a lump of redstone, you get just six segments, so use wisely! Fortunately, you don’t need a lot because a single rail can boost an occupied minecart or storage minecart for 80 blocks on level ground. (Unoccupied minecarts lose steam after just 8 blocks.) The rail is itself powered by any redstone source, but some of those sources work better than others, and I’ll use them in the examples that follow. These rails light up when powered and so are easy to recognize.

When this type of rail is unpowered, it slows you down, so it’s a good rail for placing at the start and end of a track for a soft landing. Just one block can stop a minecart, even one that’s trundling down a slope. Powered rails provide a boost in the direction the minecart is moving, or, if stopped on a slope, the minecart will always head down the slope when the rail becomes powered.
If the minecart is stationery and at the end of a track with a block in front, the rail will instead give the minecart a kick in the direction it can travel. This is really the key to making a station where you can board a cart without trying to jump on one that’s trundling past.
A single power source such as a redstone torch stuck in the ground beside the rail can provide juice to a chain of up to eight powered rail segments. Generally speaking, one powered rail is needed for every four steps up a slope, although you can work this as two rails in every eight to make it a bit easier to manage the power supply. On the flat, you should place one powered rail every 37 blocks to keep an occupied minecart zipping along at a moderate pace or two powered rails to stay at high speed.

![]() Detector rail—These rails are like a standard rail combined with a pressure plate, emitting a redstone current when a minecart rolls over the top. You can use this current or signal for anything really, including controlling hoppers, opening doors to a tunnel, setting off a note block, switching tracks at a T-junction, and so on.
Detector rail—These rails are like a standard rail combined with a pressure plate, emitting a redstone current when a minecart rolls over the top. You can use this current or signal for anything really, including controlling hoppers, opening doors to a tunnel, setting off a note block, switching tracks at a T-junction, and so on.


![]() Activator rail—These rails have just two purposes: to enable or disable a hopper minecart passing over the top and to set off a minecart with TNT. The size of the explosion is proportional to the speed of the TNT minecart, and the rail needs to be powered before it becomes operational. When unpowered, it acts like any other rail track.Powered activator rails also shake up minecarts, potentially causing riders to fall out.
Activator rail—These rails have just two purposes: to enable or disable a hopper minecart passing over the top and to set off a minecart with TNT. The size of the explosion is proportional to the speed of the TNT minecart, and the rail needs to be powered before it becomes operational. When unpowered, it acts like any other rail track.Powered activator rails also shake up minecarts, potentially causing riders to fall out.

Making Tracks and Stations
It’s easy to lay tracks: Just right-click where you want to place them. If you make a mistake, you can easily dig up the tracks and reuse them. This allows for some trial and error, especially when you’re working out the minimum placements required for the expensive powered rails.
Tip: Zigzag to Speed Up
Whereas a cart travels on level ground at a maximum of 8 blocks per second, a slight sideways dodge boosts this to 11 blocks. Lay diagonal tracks in a continuous zigzag pattern to get this free speed boost. They’ll look a little off on the ground, but the minecart will travel over them smoothly. Lay the tracks on diagonally adjoining blocks, and they’ll connect with a series of corner tracks, creating the zigzag pattern for you.
Tip: Efficient Powered Rails
The cheapest way to permanently power a rail is with a lever rather than a redstone torch. You just need a piece of cobblestone and a stick to craft the lever. Then place it by the track and flick it on. If you prefer to leave your power sources hidden, place a redstone torch under one of the blocks holding a powered rail, and the rail will transmit the power to any adjoining powered rails.
As you lay tracks, you need to consider inserting powered rails. The first place to start is really at the beginning of the track. Create a small launch station, using Figure 9.27 as a guide. The station works like this:
1. The single powered track at the end acts as the launcher, gaining its power from the button attached to the wood block.
2. You place a cart at the end, hop aboard, and push the button.
3. You accelerate out of the dip and then get a speed boost from the track powered by the lever.
4. When you return, that same powered track gives your cart a speed boost sufficient to nestle it back against the block at the end of the line, ready for the next launch.

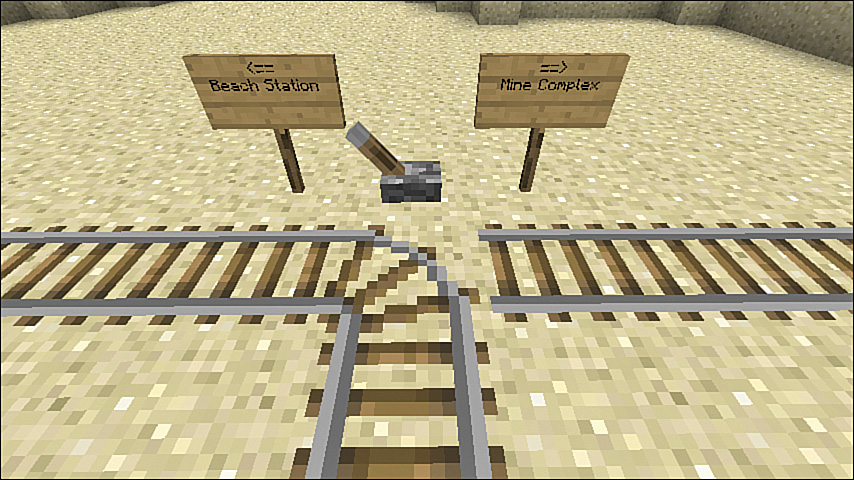
T-Junctions
A T-junction allows a train track to branch off in two directions, with the direction controlled either via detector plates or some other power source. Create this track by placing your rails into a T-section. Minecraft takes care of converting the head of the T into a working junction. Generally speaking, the most useful way to switch the tracks is to place a lever at the top of the T, as shown in Figure 9.28, but you can also run redstone to achieve the same result—perhaps all the way back to a destination switching board at the station. The power needs to terminate at the block underneath the track, making it possible to hide any wiring from view.
Halfway Stations
One final note before I leave you to your own track-laying devices. So far, you’ve seen stations at the end of a track, but what about those along the way? Creating a midpoint station provides a convenient stop ‘n’ go system. Midpoint stations use the same principle as the end stations, with powered rails in an unpowered state to slow you down. Create them by digging a trench one block deep and two blocks long and place the track in the trench so it forms a V shape, as shown in Figure 9.29.
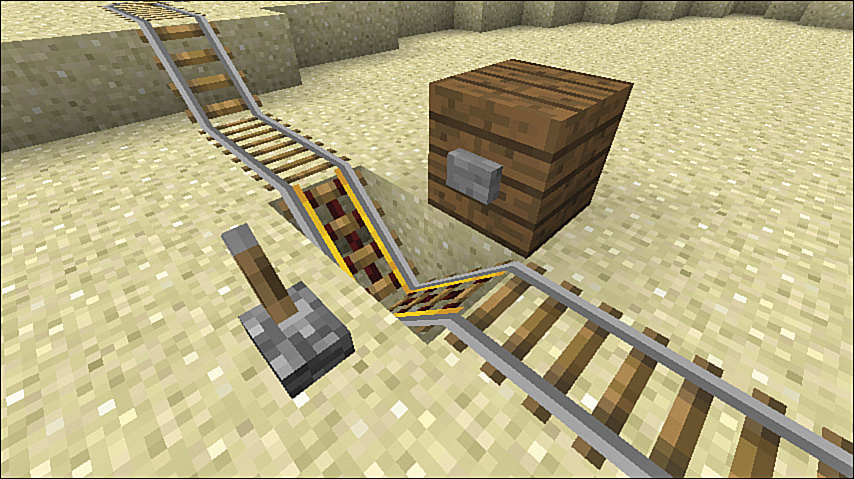
The minecart will stop on a downward-facing track in the direction of travel, and a quick click of the button on the side will get you moving again. The lever provides an override that permanently powers the tracks in case you decide you don’t always need to stop here. If you do have to bail out as you go flying by, you can be thankful that empty minecarts stop after 8 blocks or so rather than 80! It’s easy to collect again and be on your way.
Caution: Protecting Tracks from Mobs
In Survival mode, you are as vulnerable riding in a minecart as you are at any other time. Carts don’t, unfortunately, run over hostile mobs and turn them into mincemeat. They just stop or bounce off them. Either way, it’s a problem. If you are serious about using minecarts to get around, consider building them underground in well-lit, protected corridors or put up fences when they have to run aboveground.
A Word About Hoppers

Before I close this rather lengthy chapter, there’s one final, brief topic: hoppers. The humble hopper is really like an automatic item-feeding system. It connects containers such as chests to other things, like a furnace or a dispenser. Essentially, it moves items between containers while also offering five inventory slots of its own. As mentioned earlier, you can also place a hopper on wheels by combining it with a minecart, and you can use a hopper to unload a minecart with a chest when placed underneath the track. (You’ll need to place the hopper first and then hold down the left Shift key while right-clicking to sneakily place the rail on top of the hopper.)
Figure 9.30 shows a fairly extreme example to demonstrate how wildly complicated a hopper system can become—although even this layout could be extended more or less indefinitely. Once you’ve fed in enough raw materials, the entire thing automatically drops raw materials into the top of the furnace, fuel into the side, and the end result into the chest at ground level. It’s set and forget.
Hoppers configure themselves automatically, according to their attachment point. (You need to sneakily place them onto chests and other containers that react to a right-click.) You can also connect them to each other to create a sort of endless conveyor belt that feeds items to the side and down.
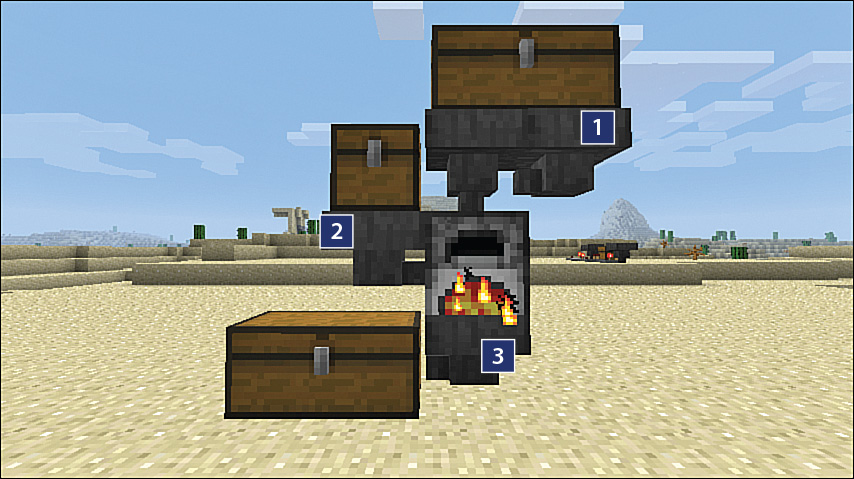
FIGURE 9.30 Switch the lever to choose a different track branch.
1. Two hoppers side by side can support a large chest—in this case feeding raw material into the top of the furnace.
2. The side hopper supplies fuel, even buckets of lava to provide an incredible amount of smelting power from a single chest.
3. The hopper under the furnace collects its output and sends it to the large chest next door.
Craft a hopper from five iron ingots and a chest. The hopper has five inventory slots of its own but acts to transfer items stored above it to anything below it at a rate of 2.5 items per second unless the transfer is stopped with a redstone signal. Place a redstone comparator next to a hopper to receive a signal when it contains items.

The Bottom Line
As you’ve seen, redstone offers many interesting possibilities. Like so much else in Minecraft, redstone is limited only by your imagination. Although redstone differs enough from electricity to give an engineer conniptions, it’s a lot easier to work with, and you’re not going to die from an electric shock if you cross wires. You’ll just get a nice little wire lattice instead.
Redstone also plays nicely with the rail transport system, providing fast transport and an easy way to move items and other resources. Rails are quite resource intensive, so in most survival worlds, you’ll probably start with something simple and efficient. But when you spend just a few hours digging out mines and exploring caverns, you will uncover more than enough iron and gold to build extensive railways. And, of course, in pure Creative mode, there really are no limits at all.