
5. Capture Photos and Video
The iPad 2 includes two built-in cameras for capturing photos and video: one mounted on the back and one at the front. I’ll be upfront and say that they aren’t spectacular cameras: The rear-facing one captures 720p HD video, but only 0.7-megapixel stills; the front-facing one captures VGA 640 by 480-resolution video and stills.
And yet, specifications quickly lose their importance when you’re video-chatting with a friend in another city, or you’re capturing a photo or video that you otherwise might have missed. Specs will improve over time, but events happen now.
Shoot Photos
Many apps take advantage of the cameras—if you haven’t already played with the included Photo Booth app (Figure 5.1), definitely check it out for a lot of fun—but I’ll cover the basics of using the iPad’s Camera app.
Figure 5.1. The many faces of Photo Booth

Capture a photo
You know how camera manufacturers boast that their cameras have large 2.5-inch or 3-inch LCD screens? How about a 9.7-inch screen? When you open the Camera app, nearly the entire screen is a preview of what you’re about to capture. Here are the basics of getting a shot; I’ll go into some of the options shortly.
1. Tap the Camera app to open it.
2. Compose your shot using the preview on the screen (Figure 5.2); you can hold the iPad in portrait or landscape orientation and it senses the difference.
To toggle between the rear and front cameras, tap the Camera Switch button.
Figure 5.2. The Camera app interface
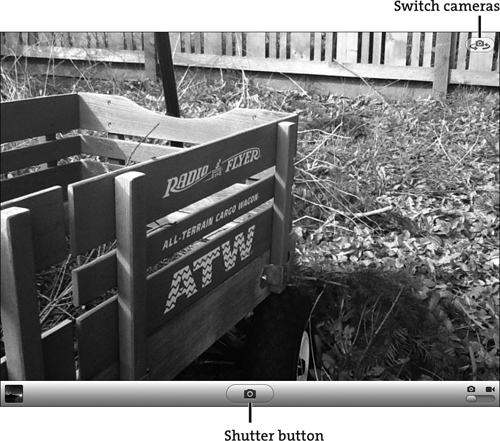
3. Press the shutter button to take a shot.
The photo is saved in the iPad’s Camera Roll, which is accessible by tapping the preview button in the lower-left corner of the screen or by opening the Photos app. (See Chapter 6 for more on viewing photos.)
Tapping the shutter button can sometimes result in a blurry photo due to the vibration from making the tap. If you’re seeing excessively fuzzy pictures, try this: Tap and hold the shutter button. Then, line up your shot and release the button when you’re ready to capture the photo.
The iPad 2’s camera shutter is really fast. Tap the shutter button several times in quick succession to grab a bunch of shots.
Choose a focus point
The camera usually focuses on the center of the screen, but you can specify any area of the screen on which to focus. Tap once to set the focus point, which is represented by a white square (Figure 5.3).
The iPad also uses that focus area as the basis to set lighting and white balance. So, for example, if a person in the foreground is silhouetted by a bright background, tap the person to lighten the foreground.

Zoom in on a subject
Is the thing you want to photograph a bit too far away? Using the Camera app’s digital zoom feature, you can enlarge the image up to five times. Digital zoom works only for capturing still images, not video, and only when shooting with the rear-facing camera.
1. Tap once on the screen, as you would to set a focus point.
2. Drag the zoom slider at the bottom of the screen to increase the zoom level (Figure 5.4).
Figure 5.4. Zoom in to get closer.

Expect the image to degrade when you use the digital zoom feature. Unlike optical zoom, where a telephoto lens moves to enlarge the image, digital zoom accomplishes the resizing solely in software. The processor is making a best-guess estimate of what the image looks like blown up, so the result may be softer than you’d prefer.
Capture Video
Shooting video is similar to capturing still photos.
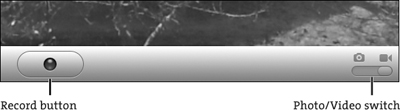
1. In the Camera app, tap the Photo/Video switch to enter video mode (Figure 5.5).
You can tap the screen to set focus and exposure, but video capture doesn’t offer the digital zoom feature. Also, once you begin recording, you can’t change the focus point.
2. Optionally, choose which camera to use by tapping the Camera Switch button.
3. Tap the Record button (which now includes a red recording indicator instead of a camera icon) to start recording.
4. Tap the Record button again to stop.
As with photos, the video you shoot is added to the Camera Roll.
Make FaceTime Calls
Videoconferencing on computers has been around for years—iChat, Skype, and Windows Messenger are just a few options. But as I’ve learned recently, a toddler’s desire to sit in front of a computer screen, even when talking to grandparents, is short-lived. FaceTime on the iPad brings video chatting to wherever you are, and the capability to switch cameras lets you follow your subject around or point to something you want to feature (like the child’s latest dance moves).
Set up your FaceTime account
FaceTime uses your Apple ID to identify itself on the network, so that other people using FaceTime can connect with you.
1. Open the Settings app and select FaceTime in the left column.
2. Enter your Apple ID and password. Or, tap the Create New Account button to create a new Apple ID.
3. Tap the Sign In button.
Once you’ve set up the Apple ID, you can assign other email addresses (for example, if you don’t want to give out your Apple ID to others). Also in the FaceTime settings, tap the Add Another Email button and enter a valid email address. With multiple addresses available, a new Caller ID field appears, which is the address that appears in a friend’s copy of FaceTime when you call them. Tap it to choose from your list of addresses.
Set up a FaceTime contact
1. Tap the FaceTime app to open it.
2. Tap the Contacts button to view the people in your Contacts list. If you’re just starting out, the list may be empty. Otherwise, if you synced contacts from your computer, they should appear here. I’m assuming here you’re starting from scratch; if not, skip ahead to “Make a FaceTime call.”
3. Tap the + button to create a new contact.
4. Enter the person’s first and last name, phone number (if you know it), and email address (again, if you know it) (Figure 5.6).
Figure 5.6. Creating a new FaceTime contact
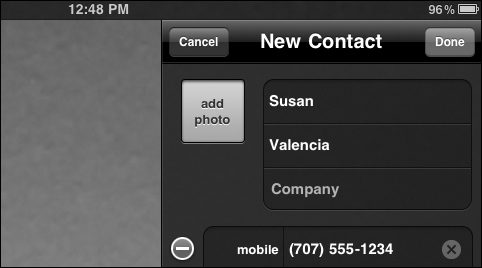
If the person owns an iPhone 4, they’re capable of chatting via FaceTime using their mobile number. Other iPad 2 owners, or friends who have the FaceTime application installed on their Macs, are identified by their email addresses.
5. Tap Done to finish setting up the contact.
If you’re planning to travel outside your home country, FaceTime needs to know where you are so it can properly dial contacts whose FaceTime devices are accessible via phone number. In the FaceTime settings, tap your Account button, and then tap the Change Location button that appears. Lastly, tap Region and choose a country from the list. Tap the Save button to finish.
Make a FaceTime call
1. Tap the Contacts button to view your list of contacts.
2. Tap the name of the person you want to chat with.
3. Tap the person’s phone number or email address to initiate a call.
4. When the other person accepts the FaceTime request, you’re connected (Figure 5.7).
Figure 5.7. A FaceTime video chat

The small window in the corner displays what your camera is sending so you can make sure your face is in the frame. If you wish to move it to another corner, drag it there.
5. To switch between the iPad’s two cameras, tap the button at the right in the control bar. You can also mute the audio of your side of the conversation by tapping the Mute button at left.
6. When you’re finished with the call, tap the End button to disconnect.
Tapping the Mute button only silences the audio; it does not pause the video image. If you want to mute the audio and also pause the image, first tap the Mute button and then press the iPad’s Home button to switch to the Home screen. The FaceTime call is still active—you can see a status indicator in the menubar (Figure 5.8 )—but your image is frozen to the other person. (If you just exit FaceTime without first tapping the Mute button, you can still talk to the person at the other end of the connection.) Tap the green indicator to return to FaceTime.
Figure 5.8. A green status bar indicates a FaceTime call is active.

View recent calls
FaceTime keeps track of previous calls and attempted calls. Tap the Recents button to view them. You can also use this area to add an incoming caller to your list of contacts. Tap the detail (![]() ) button next to a person’s name to view details about the call. Then tap either the Create New Contact or the Add to Existing Contact button (Figure 5.9).
) button next to a person’s name to view details about the call. Then tap either the Create New Contact or the Add to Existing Contact button (Figure 5.9).

Add a contact to the Favorites list
Rather than search through your contacts for people you frequently call, add them to the Favorites list, accessible by tapping the Favorites button.
1. In the Contacts list, tap the name of a person to view their details.
2. Tap the Add to Favorites button (Figure 5.10).
Figure 5.10. Add a contact to your Favorites list.

3. If there are multiple contact possibilities, such as a mix of phone numbers and email addresses, choose one from the popover that appears.