
9. Find Yourself with Maps
If there’s anything about the iPad that makes me feel like I’m living in the future (well, there are a lot of things), it’s the Maps app. Within a few seconds, I can look up an address, find a nearby business, go virtual sightseeing with my daughter, or get directions from my current location—wherever that happens to be—to any address.
The Maps app uses Google’s mapping technology to deliver results that can be a typical street map or a top-down satellite view that really does feel like science fiction. As long as you have an Internet connection, you can find yourself. As someone who’s never had a good sense of direction, that’s incredible.
The iPad Wi-Fi + 3G model includes a GPS chip for accurate location discovery, but the Wi-Fi–only model can also use Maps well.
Find Yourself
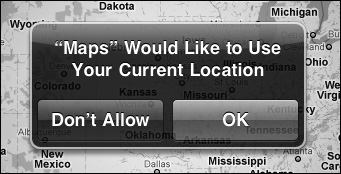
For a quick taste of what the Maps app can do, launch it and tap the Current Location (![]() ) button. The first time you do this, Maps asks for your permission to use your location (Figure 9.1).
) button. The first time you do this, Maps asks for your permission to use your location (Figure 9.1).
Figure 9.1. Allowing Maps to find you
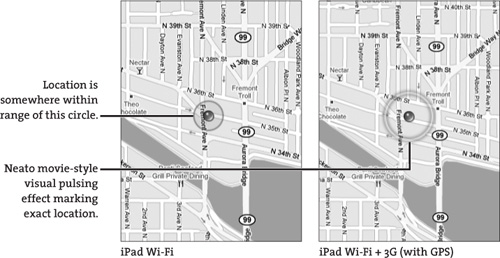
The map zooms in, indicating your location with a blue sphere (Figure 9.2). The pale circle emanating from the sphere represents how accurate the location is: A large circle means you’re located somewhere within that area. If you see no circle (other than a faint pulse to make the sphere more visible), it means the iPad has pinpointed its location.
Figure 9.2. Finding location, Wi-Fi versus GPS
To navigate the map, do any of the following:
• Drag with one finger to reposition the map. As you move around, the map redraws areas previously outside the borders of the frame. At any time you can tap the Current Location button to re-center the map on your position.
• Pinch two fingers to zoom in or out. You can pinch and move at the same time, too.
• Double-tap anywhere on the screen to zoom in on that area.
• Both iPad models include a compass, a chip that can determine which direction it’s pointed. Tap the Current Location button again to orient the view according to the direction you’re facing (Figure 9.3).

The compass works best when the iPad is held flat, parallel to the ground. You may need to recalibrate it occasionally by (I’m not kidding) waving the iPad in a figure-eight motion in the air.
Map views
The Maps app offers four map views that cater to people who find routes in different ways. If you feel turned around using the Classic style, you may find it helpful to see landmarks in the Satellite view, for instance. To access the other styles, tap the page curl at the lower-right corner of the screen (Figure 9.4). Tap a style to switch to it (Figure 9.5).
Figure 9.4. Tapping the page curl to reveal Maps settings
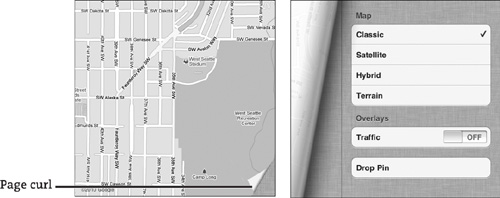
It’s easiest to tap the page curl to view the Maps settings, but for a more leisurely experience, touch and drag the paper’s edge. Why? Because you can, of course!
Figure 9.5. A composite of the map styles

Find Locations
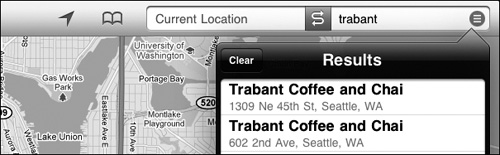
Now that you know where you are, it’s time to go exploring. The Search field can accept nearly any query, not just addresses. Type “coffee,” for example, and results appear as red pins on the map. You can also start typing a specific company name, the name of a person or company in your Contacts list, or the name of an earlier search result.
Tap a pin to identify the location (Figure 9.6, on the next page). If you don’t see what you’re looking for, the match may be outside the current screen view. Tap the ![]() button in the Search field to display a popover containing all the results.
button in the Search field to display a popover containing all the results.
Figure 9.6. Search results as pins

Get information about a location
To learn more about a location, tap the ![]() button. The label expands to display more information and options (Figure 9.7).
button. The label expands to display more information and options (Figure 9.7).
Figure 9.7. More information about a location
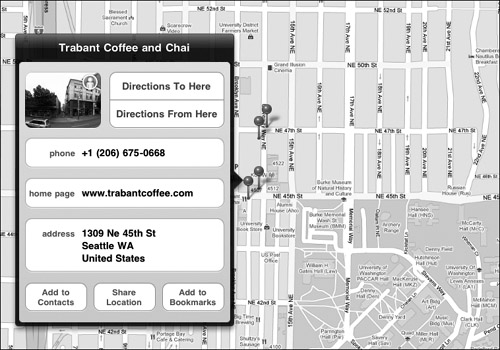
• Tap the Home Page label to visit the site in Safari.
• Tap the Add to Contacts button to create a new contact record containing all of the information.
• Tap the Share Location button to compose an email message containing a URL to view the location on Google Maps and the location as a vCard file (for easy import into most address book applications).
• Tap Add to Bookmarks to save the location for the future. It will be available by tapping the Bookmarks button in the toolbar.
• Tap one of the Directions buttons to view a route to the location; see “Get Directions,” coming up in this chapter.
• Touch and hold any field, and then tap the Copy option that appears to copy just that information for pasting elsewhere (such as in an outgoing email message).
Visit the Street View
If you see a Street View icon (![]() ) on a location’s label, tap it to see what the place looks like if you’re standing in front of it. I like this feature a lot, because I can better see what a building looks like so I don’t miss it (Figure 9.8).
) on a location’s label, tap it to see what the place looks like if you’re standing in front of it. I like this feature a lot, because I can better see what a building looks like so I don’t miss it (Figure 9.8).
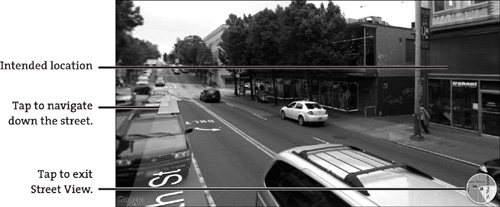
Double-tap or pinch within the Street View mode to zoom in. Tap once again to view the address larger at the top of the screen, as well as a Report button that can be used to report inappropriate content captured by the Street View cameras.
Consider Street View images a rough reference, because often something will have changed—a building repainted, a tree removed—in the time since the photo was taken.
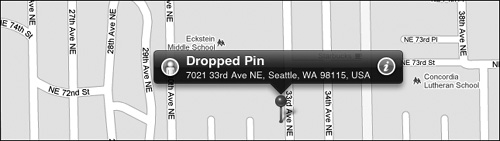
Drop a pin
In addition to finding locations through a search, you can drop a pin on an arbitrary location to get a little more information about it, or to mark a spot for reference.
1. Touch and hold an area of the screen. A purple pin lands there, with the address of the location listed in its label. (Figure 9.9).
2. Touch and hold the pin to lift it from the map, and then drag it to a more specific location if you want.
Tapping the ![]() icon reveals the options for copying and saving the address. If Street View is available for that location, tap the Street View button to see the location.
icon reveals the options for copying and saving the address. If Street View is available for that location, tap the Street View button to see the location.
A more laborious way to drop a pin is to tap the page curl to reveal the Maps settings and then tap the Drop Pin button.
To remove a pin, tap the ![]() icon and then tap the Remove Pin button.
icon and then tap the Remove Pin button.
If you tap and hold the screen to drop a new pin, the previous one disappears. You can have only one purple pin on the map at one time.
Get Directions
I used to think that getting and printing directions from a mapping service on my computer was pretty cool, but now I don’t even bother with the paper. It’s easy to get directions between two locations in the Maps app—and not just driving directions, but walking and bus routes, too (where that information is available).
1. Tap the Directions button in the upper-left corner to switch to Directions mode. The Search field splits into two fields: the starting point and the destination. The iPad assumes you want to start at your current location.
2. Enter a destination by performing a search in the second field (Figure 9.10).
Figure 9.10. Searching for a destination
To change the starting point, tap the first field and enter a search term or address. If you had previously dropped a pin, you can select its location by tapping the first field and selecting the address in purple text.
If you’re viewing information about an address, tap the Directions From Here or Directions To Here button to initiate a search.
3. Tap Search on the onscreen keyboard to reveal the route, which appears as a blue line between the two points (Figure 9.11). For easier identification, the starting point is a green pin and the destination is a red pin.
Figure 9.11. Destination, known
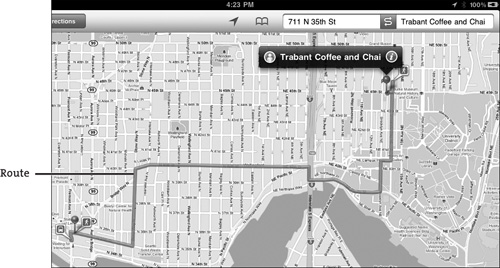
4. Driving is the default mode of transport, but you don’t need to be car-centric. Using the directions bar at the bottom of the screen, tap an icon to reveal bus route or walking directions.
The bus route is particularly helpful. Tap the clock icon on the directions bar to look up schedules and connections; you can also tap a bus stop to view the route number and departure time (Figure 9.12).
Follow the directions
As you travel, the Maps app can give you step-by-step directions (presumably so someone in the passenger seat can guide you if you’re driving; be safe out there, kids).
1. Tap the Start button in the directions bar.
Figure 9.12. Bus route information

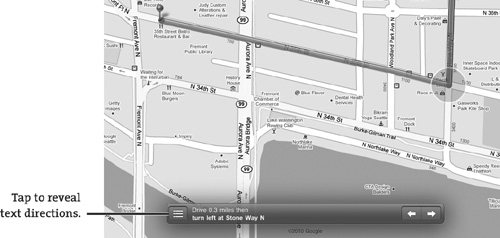
2. Tap the arrow buttons to go to the next or previous step in the route. The bar lists directions for each step, and the route indicates where you are and where you’ve been (Figure 9.13). If you prefer a text list of directions, tap the button at the left of the bar.
Figure 9.13. A trip in progress
3. Continue tapping the arrow button until you’ve reached the destination.