
12. Troubleshooting
As I write this, the iPad is barely a year old and in its second generation of hardware—quite young by technology standards. When something truly new comes out, not just an update to something long familiar, we expect to run into problems that the engineers could not have anticipated under lab conditions.
And yet, the iPad is surprisingly stable. Since receiving my original model on the first day they were available in the U.S., and now including my iPad 2, I’ve experienced maybe a couple of dozen application crashes and only one hard freeze that made the iPad unresponsive—all easily fixed.
But that’s the point, isn’t it? It should all just work, and for most of the iPad experience, it does. When it doesn’t, a few simple steps will solve the majority of problems that crop up.
Restart the iPad
I don’t want to sound flip, but restarting the iPad is almost a universal cure-all. If the iPad’s internal working memory gets full or fragmented, you may see problems or sluggish performance.
1. Press and hold the Sleep/Wake button on the case. A red slider labeled “Slide to power off” appears at the top of the screen.
2. Drag the slider. After a few seconds, the iPad turns off.
3. Count to ten, and then restart the iPad by pressing the Sleep/Wake button until the Apple logo appears.
When an App Crashes
The iPhone OS, which runs the show, is designed so that if an app crashes, it does it without affecting other processes. A crashed app typically just disappears, at which point you’ll find yourself back at the Home screen. Tap the app to launch it again and you should be fine.
If the problem persists, check for an update at the App Store. Also read the release notes for the app; developers must submit their apps to Apple for approval, and if a bug has crept in, there’s a lag between when an updated version is submitted and when it becomes available.
If that doesn’t work, delete the app from the iPad and reinstall it.
If an App Is Sluggish or Unresponsive
Someimes an app can start to have problems, but not crash outright. In that case, you can force it to quit by doing the following:
1. Press the Home button to go to the Home screen (or switch to another app, as long as the troublemaking app isn’t the one running).
2. Double-press the Home button to reveal the recents list.
3. Tap and hold the app until the icons begin to shake.
4. Tap the Delete button in the upper-left corner of the app’s icon (Figure 12.1). The app quits immediately.
5. Press the Home button to exit the app editing mode.
Figure 12.1. Force-quitting an app

Reinstall an App
If the copy of an app on the iPad has become corrupted for some reason, try a fresh copy.
1. On the iPad, touch and hold the app’s icon until all of the icons begin to shake, then tap the Delete button (the X) to remove the app.
2. Connect the iPad to your computer and perform a sync.
3. In the Apps pane within iTunes, locate the app and make sure it’s enabled for syncing. When you delete an app from the iPad, you still have a backup version in iTunes.
4. Click the Apply button to re-sync and transfer the app back to the iPad.
If that doesn’t solve the crashing problem, and it seems clear that other people are not having the same issue, try starting over with the app.
1. Delete the app from the iPad.
2. Also delete the app from iTunes: Click the Apps icon in the sidebar, locate the app in the list, and press Delete. Verify that you want to remove the app (Figure 12.2), and in the next dialog choose to move the file to the Trash.
Figure 12.2. Deleting an app from iTunes

To find an app in iTunes easily, switch to the list view and then click the Kind column heading. Apps are then grouped by device, such as “iPad app” and “iPhone/iPod touch/iPad app.” Or, start typing the name of an app in the iTunes Search field in the upper-right corner of the window.
3. Go to the App Store (in iTunes or on the iPad) and tap Install (Figure 12.3). Since you’d bought it previously, you aren’t charged again.
Figure 12.3. Reinstall an app.

4. Sync the iPad if you downloaded the app from iTunes. If you downloaded it on the iPad, open the app.
Connectivity Issues
The iPad was designed to connect to the Internet over a wireless connection, so not having that connection can be frustrating. If you can’t connect, try the following:
• Look for a connection indicator in the upper-left corner of the screen (Figure 12.4). The Wi-Fi icon appears when you’re connected to a Wi-Fi network. If you’re using a Wi-Fi–only iPad, the lack of the Wi-Fi icon means you have no connection. If you’re using a 3G iPad, as shown here, the cellular 3G network is active when Wi-Fi isn’t available.
Figure 12.4. Wireless connection icons
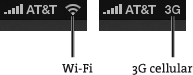
• On a 3G iPad, the network indicator icon and signal strength bars appear even if you haven’t paid for an active data plan. If the signal is there but you can’t get online, make sure you’ve activated a data plan, or that you’ve not reached the limit of your data plan (see Chapter 1 for more information).
• Try turning off Wi-Fi and turning it back on again. In Settings > Wi-Fi, set the Wi-Fi switch to Off, wait a minute, and then set it back to On.
• Similarly, try turning off the cellular radio on a 3G iPad and then turning it back on. In Settings > Cellular Data, toggle the Cellular Data switch.
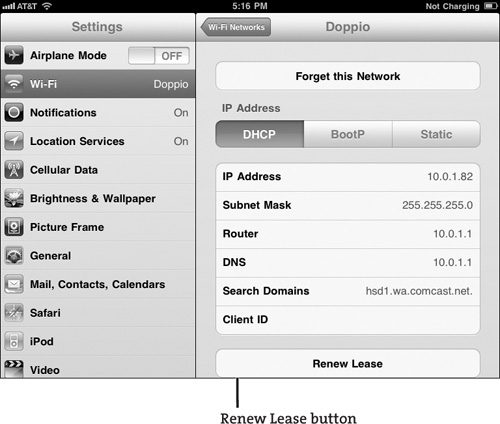
• In the Wi-Fi settings, tap the Detail (![]() ) button next to the name of the active network to view its advanced settings (Figure 12.5). Then, tap the Renew Lease button, which makes the iPad request a new temporary IP address from the Wi-Fi base station.
) button next to the name of the active network to view its advanced settings (Figure 12.5). Then, tap the Renew Lease button, which makes the iPad request a new temporary IP address from the Wi-Fi base station.
Figure 12.5. Renewing the Wi-Fi network lease
If the iPad Doesn’t Appear in iTunes
The iPad needs to connect to iTunes, but sometimes that may not happen. Try these solutions, in order of least to most inconvenient:
• Make sure iTunes is up to date. On the Mac, go to the iTunes menu and choose Check for Updates. Under Windows, choose Check for Updates under the Help menu.
• Connect the iPad to a different USB port on your computer.
• Use a different sync cable.
• Restart the iPad and the computer.
Download a new copy of iTunes (from www.apple.com/itunes/) and reinstall the software on the computer.
If none of those suggestions work under Mac OS X, you may need to replace the Apple Mobile Device Service. Find detailed instructions in the following article: http://support.apple.com/kb/HT1747.
Battery Issues
The iPad’s battery requires more power to charge than what many computers put out through their USB ports, which can be a shock to some people who buy the device, plug it into their computers, and see a Not Charging indicator in the status bar (Figure 12.6). Actually, the iPad is charging, but at a very low rate. If you left it asleep and connected overnight, you’d see more power than when you went to sleep. See “Charge the iPad battery” in Chapter 1 for more information.
Figure 12.6. Not Charging indicator
![]()
If battery life seems dramatically worse than it did when you bought the iPad, contact Apple about possibly getting a replacement under warranty.
If you’re out of warranty and the iPad “requires service due to the battery’s diminished ability to hold an electrical charge,” in Apple’s words, then you can take advantage of Apple’s battery replacement service. For $99, Apple will replace the entire iPad (so be sure you’ve synchronized it before sending it off). See www.apple.com/support/ipad/service/battery/ for more information.
Reset the iPad
If the iPad does not respond to input at all, it needs to be reset.
Press and hold the Sleep/Wake and Home buttons simultaneously for 10 seconds, or until the Apple logo appears. Resetting does not erase the iPad’s memory.
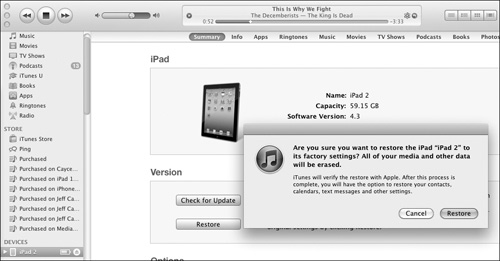
Restore the iPad to Factory Defaults
If you continue to have problems, or if you simply want to start over from scratch, you can restore the iPad to its initial state. Remember, this action erases your data from the iPad, so make sure you sync first (if the iPad is working properly) to back up your data.
1. Connect the iPad to your computer.
2. In iTunes, select the iPad in the sidebar and click the Restore button in the Summary pane.
3. In the confirmation dialog that appears, click the Restore button (Figure 12.7).
Figure 12.7. Restoring the iPad to its initial state
The first time you do this, iTunes downloads a clean version of the iPad’s software; subsequent restores pull the data from your hard disk. In either case, you must have an active Internet connection, because iTunes verifies the iPad with Apple’s servers.
4. Wait. iTunes copies the data to the iPad, which installs it. After a few minutes, the iPad is ready.
5. In iTunes, choose a backup to restore to the device. Or, you can opt to set it up as a new iPad with just the data that ships on it.
For more detailed options, see the following article at Apple’s Web site: “Update and restore alert messages on iPhone, iPad, and iPod touch” (http://support.apple.com/kb/TS1275).
Force the iPad into Recovery Mode
Although unlikely, the iPad may not even get to the point where you can select it in iTunes and restore the software. In that case, try forcing the iPad to load in its recovery mode:
1. Make sure the sync cable is connected to your computer and iTunes is running.
2. Press and hold the Home button.
3. Connect the sync cable to the iPad’s dock connector.
The iPad should appear as if it were a new, empty device. Follow the steps on the previous page to restore the software.