
6. View Photos
Just look at that screen! Full color, Retina resolution, larger than a phone, attached to a device that’s more comfortable to hold than a laptop. If the iPad didn’t already do a thousand other things, you’d think it was designed solely for displaying digital photos.
When you have an iPad stocked with your favorite photos, you have a portable presentation machine. Maybe you want to show off your latest snapshots. Maybe you’re a photographer (or real estate agent, or designer, or...) showing a portfolio to a prospective client. Maybe you want to store photos on the iPad while on vacation instead of toting a laptop. Maybe you need to display a slideshow using a projector or on an HDTV. Or maybe you just want to be able to look at your favorite photos whenever you feel like it. The Photos app can deliver your images.
Getting Photos onto the iPad
Where are your photos coming from? You have four options: sync photos from your computer; import photos directly from a camera or memory card using an adapter; send photos to an email account you check on the iPad; or copy pictures from Web pages in Safari.
Sync photos from the computer
With most photos now being captured digitally, it’s likely you use photo management software to keep track of them all. Or, you might prefer to organize the image files in a folder on disk. iTunes can handle both.
Sync with photo management software
iTunes recognizes libraries in iPhoto 4.0.3 or later and Aperture 3.0.2 or later on the Mac, and Photoshop Elements 3.0 or later for Windows.
1. Connect the iPad to the computer, open iTunes, and select the iPad in the sidebar.
2. Click the Photos tab.
3. Enable the Sync Photos From option and choose your photo software from the pop-up menu (Figure 6.1).

Figure 6.1. Photos pane in iTunes
4. To transfer your entire library, choose the first option: All photos, albums, events, and faces.
Or, enable the second radio button and then mark the checkboxes of any albums, events (or projects, in Aperture), or faces.
Note
The option to group photos based on events/projects or faces is supported only if you’re syncing with iPhoto or Aperture. If you’re using Photoshop Elements in Windows, you get the option of syncing all photos and albums or specifying selected albums.
Using the radio button’s pop-up menu, you can make some items appear automatically. For example, regardless of which checkboxes are selected in the Events or Projects list, you can choose to have the photos from all events from the last month appear on the iPad.
5. To copy video files located in your library, select the Include Videos checkbox.
6. Click the Sync button. iTunes transfers the photos to the iPad.
Tip
The information in this chapter really only touches on what’s possible with photos on the iPad. In fact, I wrote an entire book about the subject: The iPad for Photographers, available from Peachpit Press and your favorite bookstore. See http://ipadforphotographers.com/ for more information.
Sync with a folder
Some people prefer to manage image files manually or use software—such as Adobe Photoshop Elements—that organizes and displays photos in folders. iTunes can use the folder contents, including subfolders, as the media source for the Photos app.
1. In the Photos pane, choose the Pictures (Mac) or My Pictures (Windows) default locations. Or, click Choose Folder and specify a different folder.
2. To include everything in the folder, choose the All Folders option. Or, click the Selected Folders button and mark the checkboxes for the folders you wish to sync in the Folders list (Figure 6.2).

Figure 6.2. Sync photos from subfolders.
3. Click the Sync button to start the transfer.
Tip
The iTunes interface is a little confusing on this part. In the previous example, the only photos transferred are the ones in the selected folders (44 pictures). What’s not synced are the photos in the parent folder, “JC Photo Library.” If I wanted just the images in that folder, and none of the images from the subfolders, I’m out of luck: I’d get either the contents of specific subfolders (Selected Folders option) or everything in “JC Photo Library,” subfolders included (All Folders option). So, if you’re going to organize photos at the folder level, I recommend storing image files in subfolders, not parent folders.
Import photos from a camera
Using Apple’s optional iPad Camera Connection Kit, you don’t need iTunes as a middleman for your photos. The kit includes two adapters that connect to the iPad’s dock connector: one that accepts SD memory cards and one that accepts a standard USB cable.
Wait, did I just say that the iPad can gain a regular USB port? Yes...but there are strings attached. The iPad uses the USB camera connector for transferring image and video files only—but there are a couple of surprises, too. Plug in a USB headset to listen to audio or use a headset’s microphone. The benefit of this approach over plugging iPhone-compatible headphones into the iPad’s headphone port is the ability to use higher-quality audio electronics. For example, I own a Sennheiser headset that’s normally connected to my Mac for Skype calls; I can do the same (using the Skype app) on my iPad now. The other surprise is that the connector recognizes some USB keyboards, which is great if you don’t own the iPad Keyboard Dock or a Bluetooth wireless keyboard. (You may need to connect devices through a powered USB hub for them to work.)
To import photos via a camera adapter, do the following:
1. Plug one of the adapters into the iPad.
2. Insert an SD card or plug in a USB cable connected to your camera, depending on which adapter you’re using. If the latter, turn on the camera’s power.
Tip
To transfer photos directly from an iPhone, connect the iPhone’s sync cable to the USB connector. (Unfortunately, the iPad can’t charge the iPhone’s battery over this connection, which would be cool in a pinch.)
3. Wake the iPad (and unlock it, if you use a passcode). The Photos app opens and displays the photos on the card or camera.
4. To import all photos, skip to the next step.
If you’d rather import just some of the images, tap the ones you want; a blue checkmark indicates the ones you’ve selected (Figure 6.3).

Figure 6.3. Selecting photos for import
5. Tap the Import All button at the bottom of the screen to begin copying the files.
If you made selections in step 4, tap the Import button, which brings up a popover with options to Import All (overriding your selections, in case you changed your mind at the last minute) or Import Selected. Tap one to begin copying the images to the iPad.
Click the Stop Import button if you want to halt the transfer; doing so doesn’t remove any selections you made before importing.
6. When importing is complete, you’re given the option to delete or keep the images on the camera or SD card. I advise tapping Keep, and then erasing the card later using the camera’s format controls.
7. Remove the SD card or turn off the camera. The transferred photos appear in a new album called Last Import.
Tip
Photos imported directly from a camera or card can be deleted later by viewing the image and tapping the Trash button (![]() ). To turn the picture 90 degrees counterclockwise, if necessary, tap the Edit button and then the Rotate button.
). To turn the picture 90 degrees counterclockwise, if necessary, tap the Edit button and then the Rotate button.
Import photos from email
Do you have a family member who likes to send photos via email? Rather than digging through your old messages to view those photos later, add them to the iPad’s photo collection.
1. In the Mail app, open the message containing the photo attachments.
2. Touch and hold a photo to bring up a popover containing actions you can take (Figure 6.4).

Figure 6.4. Saving images from Mail
3. Tap the Save Image button. Or, if several images are included, tap the Save [number] Images button. The photos are added to the Camera Roll album in the Photos app.
Import photos from other apps
The ability to save images from Mail also applies to other apps. In Safari, for example, touch and hold any image and then tap Save Image to store it. However, keep in mind that images on the Web don’t have the same high resolution as ones you’d import from your digital camera, so they may not look as good when expanded to fill the iPad’s screen.
View Photos
We’ve covered all the ways to get photos onto the iPad, but that’s just preamble for viewing them.
View a photo
Open the Photos app and tap the Photos button at the top of the screen to see thumbnails of all the photos stored on the iPad. Tap a photo to open it.
The onscreen controls disappear after a few seconds so you can enjoy just the image. Rotate the iPad to match the photo’s orientation for the best effect (Figure 6.5, on the next page).

Figure 6.5. A photo viewed widescreen
While viewing an image, you can do a number of things:
• Tap once anywhere to make the controls reappear. Tap again to make them go away again, or wait a few seconds.
• Double-tap anywhere on the photo to zoom in. Double-tapping again zooms back out to fit.
• To zoom with more control, pinch two fingers outward. Swipe anywhere on the image to view a different area of the photo. To zoom back out, pinch two fingers together or double-tap the screen.
• To quickly skim all of the photos, tap once to view the controls and then drag the navigation bar at the bottom of the screen (Figure 6.6). The preview is extremely fast because the Photos app displays low-resolution images as you drag, giving you a sense of what the photo is without having to draw all of the detail. If you pause, the higher-resolution version appears.

Figure 6.6. Quickly navigating photos
• Tap the button at the upper-left corner (which displays the name of the current album) to return to the Photos pane.
View a collection
In addition to the big free-for-all that is the Photos pane, your images are also organized into collections. These can be albums, events, or faces, depending on the software on your computer. Each type is a different way of categorizing the photos, but the controls are the same.
1. Tap the Albums, Events, or Faces button to switch to that pane (if the option is available).
2. Pinch outward with two fingers on a collection you want to open. As you do so, the photos within unstack themselves so you can preview what you’re about to open (Figure 6.7). If it’s not the set you were expecting, just pinch your fingers together to return the collection to its stacked state.
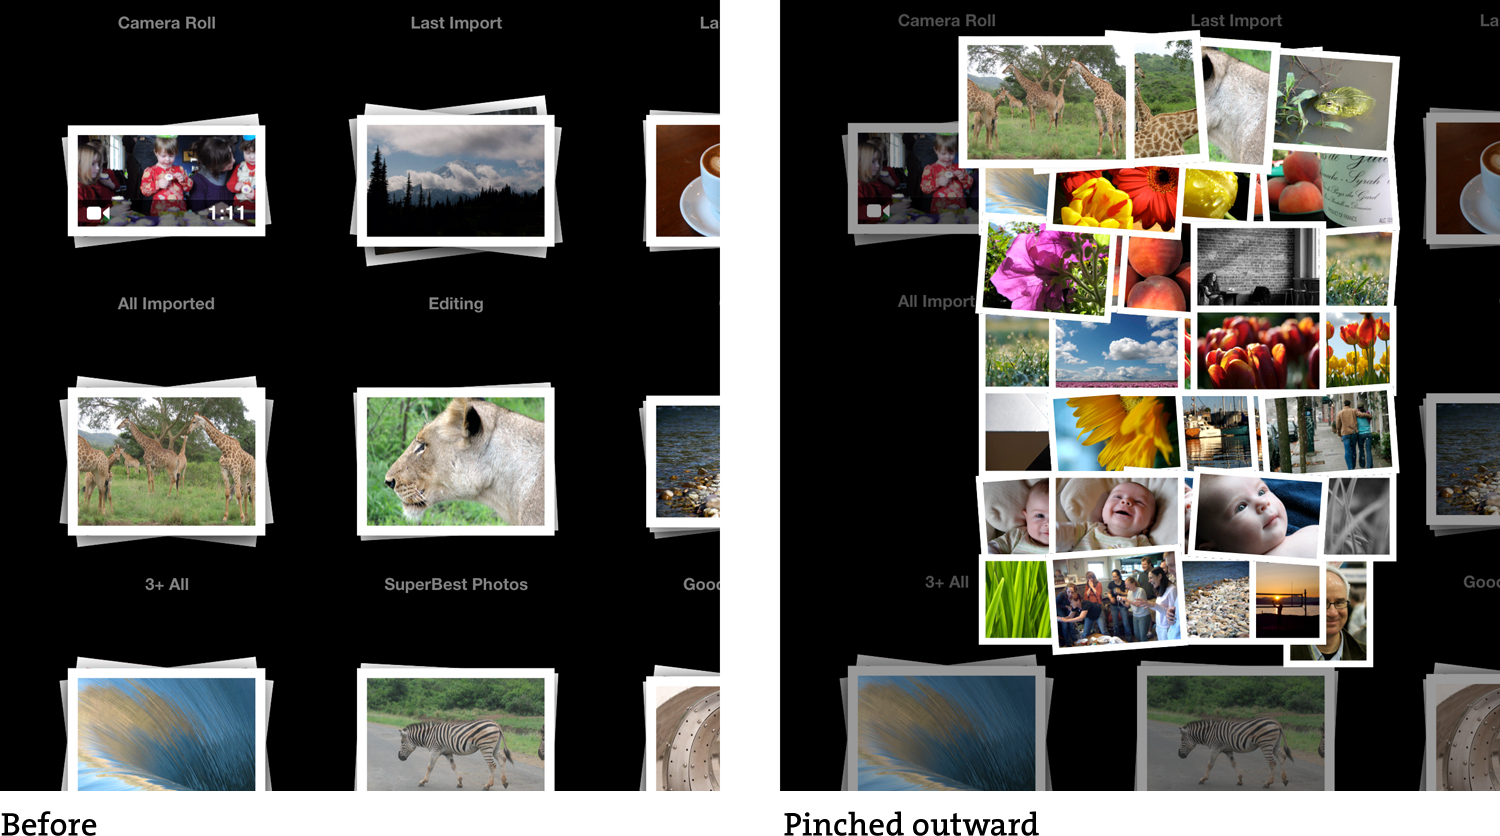
Figure 6.7. Previewing a collection
3. When you’ve expanded a collection far enough, it takes over the entire screen. Tap a photo thumbnail to view the image.
Tip
I’m a big fan of useless shortcuts—things that were implemented just because they could be—and here’s a great one. Instead of just tapping a thumbnail to view the photo full screen, use the expanding pinch gesture to enlarge it. Now, before you let go, rotate your fingers. The image can be freely rotated and scaled as long as your fingers are touching the glass. Why? I couldn’t tell you. Maybe to preview a landscape photo in portrait orientation without rotating the iPad. Or maybe because the graphics capabilities inside the iPad can do it, and that’s a good enough reason. I don’t know, but it’s fun to play with.
Tip
I think this is my favorite Photos tip: Instead of trying to tap the back button in the upper-left corner of the screen (which is labeled with the name of the enclosing folder), pinch two fingers together to collapse the stack you’re currently viewing. It’s much faster, because your fingers are likely already in place from opening a stack or zooming in on an image.
Tip
To change the photo used for someone’s Faces collection, go to iPhoto or Aperture and switch to the Faces view. Move your mouse pointer over the person’s image to preview their photos, and find one you want. If you’re in iPhoto, double-click the photo to view all photos associated with that name; if you’re in Aperture, you don’t need to take that extra step. Next, right-click or Control-click the photo and choose Set Key Photo. Sync again to apply the change.
View photos in Places
The Photos app offers one more type of collection, and it works a bit differently than the others. A Places pane appears if any of your images include location tags—GPS coordinates marking where the photos were shot, either written to the file when captured (the iPhone can do this, as can some GPS add-on devices for some cameras) or applied in iPhoto, Aperture, Photoshop Elements, or other software.
When you tap the Places button, you see a map that features red pins marking where photos were taken. Tap a pin to view a stack (Figure 6.8). As with other collections, pinch or tap the stack to view its photos.

Figure 6.8. Photos with location information
Edit photos
The Photos app offers a few basic editing features for quick adjustments.
1. With a photo open, tap the Edit button.
2. Do one of the following:
• Tap the Rotate button to turn the image counterclockwise in 90-degree increments. This is useful when a photo’s correct orientation wasn’t picked up during import.
• Tap the Enhance button to let the Photos app adjust exposure and color as it sees fit.
• If someone in the photo suffers from red-eye, tap the Red-Eye button and then tap the affected eyes.
• To adjust the visible area of the photo, tap the Crop button and drag a corner handle or edge; drag the center of the crop area to reposition it. After you resize the crop area, tap the Constrain button to choose an aspect ratio to enforce. If the photo needs straightening, use two fingers to zoom and then rotate as needed. Tap the Crop button to make the change stick.
3. When you’re done making edits, tap the Save button and then the Save to Camera Roll button. The app saves a new, edited version of the photo. Or, you can discard the edits by tapping the Revert to Original button.
Even after you’ve edited a photo, the Photos app remembers the original. So you can always open the edited version, tap the Edit button, and then tap the Revert to Original button.
Tip
Want more editing capability? A lot more? Apple’s iPhoto for iOS is an impressive app for making detailed adjustments to photos without leaving the iPad. It’s available from the App Store for $4.99.
Play a video
Most digital cameras now shoot video as well as stills, so the Photos app can play video, too. In iTunes, make sure you enable the Include Videos option in the Photos pane. The iPad Camera Connection Kit also allows you to import videos you’ve shot directly into the iPad. Some cameras’ video may not play, though. When you come across a video clip in the Photos app, do any of the following:
• Tap the Play button that appears in the middle of the screen to start playing. Or, you can tap the Play button in the toolbar (Figure 6.9).

Figure 6.9. Viewing video clips
• Touch and hold the playhead to skim through the filmstrip and locate a particular section of the video. If you hold for a moment, the filmstrip spreads out horizontally to give you finer control while skimming.
• While the video is playing, tap the Pause button (![]() ) to stop playback.
) to stop playback.
A video in the Photos app benefits from the photo controls, which means you can pinch to zoom a video while it’s playing.
Tip
Here’s a cool side effect of playing videos in the Photos app. Using the iPad Camera Connection Kit, you can import movies—the Hollywood kind—and watch them on the iPad. For example, if you’re going on vacation and you don’t want to bring a laptop, but the number of movies you want to watch won’t fit on the iPad’s internal storage, load up on some inexpensive SD memory cards. Using a program such as HandBrake (www.handbrake.fr) on your computer, digitize your DVDs to digital M4V files. Copy those to one or more SD memory cards, then insert one into the memory card adapter. Transfer a movie to the iPad in the Photos app and then watch it there. (It won’t show up in the Videos app.) When you’re done, delete the movie and transfer another one. However, there’s a catch: The video file must be named something similar to what a digital camera would use. The Photos app won’t recognize a file named “Star Wars.MP4”, but it will play “IMG_1234.MP4”.
Tip
Another way to beat the limitation of the iPad’s internal storage—especially if you bought the 16 GB model and are bumping up against its limit—is to buy an external wireless hard disk, such as the Seagate GoFlex Satellite. It acts as a portable wireless server, enabling you to stream photos or movies over Wi-Fi. It’s great for a long vacation involving lots of movies.
View a Slideshow
Swiping is fine for showing off a few pictures, but there are times when you’ll want the iPad to drive a photo presentation. In that case, set up an impromptu slideshow of one of your albums.
1. Open a collection in any of the panes, or go to the Photos pane if you want to play back all of your pictures in the slideshow.
2. Tap the Slideshow button. The Slideshow Options popover appears (Figure 6.10).

Figure 6.10. Slideshow options
3. If you want music to play during the slideshow, set the Play Music switch to On. If not, make sure the option is off and skip the next step.
4. Tap the Music button to choose which music to use. The popover becomes a compact version of the music list in the Music app, where you can navigate your music library by song title, artist, album, play-list, and other criteria.
Note
Surprisingly, the Photos app lets you play only one song during a slideshow—not a playlist, not an album, just one song. Even more mind-bending is that this behavior has never changed, even through several major releases of iOS.
5. Tap the Transitions button and choose a transition style to use.
6. Tap the Start Slideshow button. If you need to cancel the slideshow while it’s playing, tap once anywhere on the screen.
The slideshow plays until all photos have been displayed or until the music ends. However, you can customize a few of the slideshow parameters. Go to Settings > Photos, where you can specify how long each slide appears onscreen (in increments from 2 to 20 seconds), whether the photos (and music) repeat after they’ve initially appeared, and whether the order should be shuffled. These settings apply to any slideshow you run in the Photos app.
Tip
The Photos app respects the order in which the pictures were sorted before you synced them. If you want a custom order, set it up in your photo software.
Tip
What do you do with an iPad when you’re not using it? Instead of setting it down on a table or a stack of mail, put that big screen to use as a picture frame. To activate the feature, simply press the Picture Frame button that appears to the right of the Slide to Unlock control on the lock screen. While remaining locked, the screen switches into a slideshow mode. Tap the screen and then tap the button again to exit the Picture Frame mode. You can change some aspects of how the slideshow is presented by going to Settings > Picture Frame.
Share Photos
On more than one occasion I’ve shown a photo to someone who then said, “Ooh, can you send that to me?” Why yes, I certainly can, and it’s easy to do.
The Photos app features several methods of getting photos off the device.
Share one photo via email
To attach a photo to an outgoing message, do the following:
1. Open a photo and tap the Action button (![]() ).
).
2. In the popover that appears, tap Email Photo. A new outgoing mail message appears.
3. Add a recipient, a subject, and optional message text.
4. Tap the Send button to dispatch the photo.
Share multiple photos via email
It’s possible to group several photos into an email message.
1. In the Photos app, tap a collection to open it.
2. Tap the Action button (![]() ).
).
3. Tap the photos you wish to send. Selected ones are marked with a blue checkmark (Figure 6.11).

Figure 6.11. Selecting multiple photos for sharing
4. Tap the Share button.
5. From the popover that appears, tap the Email button to create a new outgoing message with the photos as attachments.
6. Address the message and tap the Send button.
Many photo sharing services, like Flickr (www.flickr.com), accept uploads via email. You’re given a personal Flickr email address, and any image files sent to that address are posted to your photostream.
Note
Although sending files via email is convenient, I don’t recommend ganging up a bunch of images together in one message. That increases the chance that a mail server might think you’re sending spam or viruses; or your recipient may not have the bandwidth to deal with such large messages.
Print a photo
If you’re connected wirelessly to a supported printer, choose Print from the Action popover to print a copy of the photo. To print more than one photo, tap the Action button, tap the Share button, and then choose Print. (See Chapter 1 for more on printing.)
Copy a photo
To copy the image to the iPad’s temporary memory, choose Copy Photo from the Action popover. When viewing a collection, you can also touch and hold a photo thumbnail and choose Copy.
Or, with multiple images selected, tap the Copy button in the toolbar. After copying the photo, you can paste it elsewhere, such as in another app or in an email message.
Assign a photo to a contact
If you have a photo of a friend whose information is in your Contacts app, choose the Assign to Contact option from the Action popover. Select the person’s name in the Contacts list that appears, then pinch and drag to position the photo in the frame. Tap the Use button to assign the photo.
Use a photo as wallpaper
Chapter 2 covers how to set wallpapers in the iPad’s Settings app, but in Photos you can do it directly. Choose Use as Wallpaper from the Action popover, then choose Set Lock Screen, Set Home Screen, or Set Both.
View photos on a TV or projector
For a real big-screen slideshow experience, display your photos on an HDTV or a digital projector. The iPad offers two ways to do it: sharing via AirPlay, or connected by special video cables.
Using AirPlay
If you own an Apple TV or other AirPlay-enabled video device, you can send photos to your television wirelessly.
1. Tap a photo to view it on the iPad.
2. Tap the AirPlay button (Figure 6.12).

Figure 6.12. Choosing an AirPlay device
3. Tap the name of the AirPlay device. The AirPlay button turns blue to indicate it’s active, and your photo appears on the television. You can swipe to view other photos, or tap the Slideshow button to start a slideshow. Tap anywhere on the screen to stop the slideshow.
Using a video cable
A number of adapters and cables enable you to connect the iPad to a television. Apple’s Digital AV Adapter connects the iPad via HDMI; the Apple VGA Adapter works with older VGA connections, as found on many projectors; and the Apple Component AV Cable and Composite AV Cable work with devices using those connectors.
Sync imported photos and videos back to the computer
You probably don’t intend to keep photos you imported using the iPad Camera Connection Kit in the iPad’s memory. When you get back to your computer, do the following to move them to its hard drive:
1. Connect the iPad to the computer.
2. Open your photo management software.
3. Use the software’s feature for importing photos, just as if you’d attached a camera.
The computer sees the iPad as a USB storage device. Under Windows, you can view it as you would view an attached disk. On the Mac, you need to use the photo software or the Image Capture application to access the iPad’s pictures.
4. After importing the files, delete them from the iPad: Open a collection, tap the Action button (![]() ), tap to select the images you want to remove, and then tap the Delete button. Tap the Delete Selected Photos button that appears (to confirm your action).
), tap to select the images you want to remove, and then tap the Delete button. Tap the Delete Selected Photos button that appears (to confirm your action).
Use iCloud Photo Stream
When the Photo Stream feature of iCloud is enabled, images you capture using the iPad (or an iPhone or iPod touch) appear in the Photos app. Enable the Photo Stream option in Settings > iCloud.
Photo Stream automatically keeps 1000 photos, including the last 30 days’ worth of new photos. If you run across a photo you want to keep on the iPad (before it’s rotated out by new photos), add it to the Camera Roll or to an album, as follows:
1. In the Photos app, tap the Photo Stream button to view your stream.
2. Tap the Action button (![]() ).
).
3. Select the photo or photos you wish to keep.
4. Tap the Save button.
5. Tap Save to Camera Roll, Save to Existing Album, or Save to New Album (Figure 6.13).

Figure 6.13. Copying a Photo Stream photo to an album
Similarly, you can delete photos from your Photo Stream. With one or more photos selected, as in the steps above, tap the Delete button. Tap the Delete Selected Photos button that appears to confirm that you want to remove the images from all devices that share your Photo Stream.