1. Meet the iPad
It’s not often that something really new appears. Desktop and laptop computers are so commonplace, it’s hard to believe that not too long ago you could go to the airport and see maybe one or two personal computers, total. The iPhone represented a new direction for Apple—and, it turns out, the cell phone industry—but it was still just a smartphone executed really well. (What’s interesting is that the iPad actually came first: Apple took the work it put into developing a tablet operating system and decided to bring it to market first as a phone.)
Companies—Apple included—had tried to create tablet computers for years and failed. So what makes the iPad different? The iPad isn’t the same old desktop software pressed into a laptop case that’s missing a keyboard. It was designed from scratch to be a mobile tablet. And as you’ll see when you use it and as you read this book, that’s a profound difference. It’s not a laptop replacement (although it takes that role for some people), and it’s not a limited handheld device, either. The iPad shares the same underlying operating system as the iPhone, so many aspects may be familiar if you already own an iPhone or iPod touch, but it doesn’t rely on old computing crutches like using a mouse pointer or forcing the user to wrangle a sprawling file system.
Instead, the iPad is a big step forward based on an old, simple idea: Anyone can take advantage of computing and digital media, without needing to be a computer expert—or even a “computer person.” People shouldn’t have to understand a hierarchical file system or virtual memory. This idea sounds simple, yet it’s extremely difficult to do. Even after years of making computers “for the rest of us,” Apple is very close to doing it.
The iPad is the first step toward a new future. I’m not talking about robots and jet packs—though you might think I sound like I’ve spent too much time at a high altitude—but rather a dramatic break from what we expect computers to be. And that’s a truly new idea.
Power On and Set Up the iPad
An iPad doesn’t require a computer at all—though one is definitely helpful to have. Apple’s step-by-step getting started process is easy to follow, but you’re prompted to make several decisions about how your data is synchronized and where it will live. (If you’ve already done this stage, skip ahead to “iPad Essentials.”)
1. To power the iPad on for the first time, press and briefly hold the button at the top of the iPad until the Apple logo appears.
2. Slide the “Slide to set up” slider to get started, then choose a language and your geographic region.
3. On the Location Services screen, tap the Enable Location Services button. This option allows apps such as Maps to use data related to your whereabouts. You can choose to disable Location Services if you’re concerned about privacy, but that limits the functionality of many things, such as Find My iPad. (You can enable or disable the option later in the iPad’s settings, too.) Tap the Next button.
4. Tap the name of a nearby Wi-Fi network and enter its password to get online. Tap Next.
5. Choose whether to set up the device as a new iPad or to restore data from an iCloud or iTunes backup, and then tap Next.
• To set up a new iPad, you’ll need to enter an Apple ID (or create a new one if you don’t have one). The Apple ID is what you normally use to buy media from iTunes, the App Store, or the Mac App Store.
• For iCloud, you’ll need to enter your iCloud user name and password.
• For iTunes, you’ll need to connect a sync cable between the iPad and the computer running iTunes. In iTunes, choose the name of the device you want to use as the backup source. The iPad will restart, and iTunes will sync the settings and content from the backup to it. You will then need to repeat some of the setup steps.
6. Review the Terms and Conditions for using the iPad, and agree to them by tapping the Agree button.
7. Choose whether to use iCloud to sync data using Apple’s cloud service. It enables you to automatically synchronize contacts, calendars, email, photos, and documents among all of your devices, as well as optionally back up your iPad’s data. Tap the Use iCloud button, and then tap Next.
8. If you want to back up your iPad’s data using iCloud, tap the Back Up to iCloud button on the next screen. When the iPad is connected to a power source (whether that’s a computer or just the charging plug and sync cable) and is on a Wi-Fi network, your data is copied to Apple’s iCloud servers. (See “Use iCloud,” later, for more information.)
If you prefer to keep your backup local—for example, perhaps your Internet connection is metered or especially slow—tap the Back Up to My Computer button and then tap Next. Although I have a good Internet connection, I still prefer to back up to my computer because that’s the easiest and fastest way to restore the data in case anything goes wrong.
9. Tap the Use Find My iPad button to enable the fantastic Find My iPad feature. This option lets you locate the iPad on a map, play an alert sound (which is handy if you know the iPad is somewhere in your house, but you can’t find it), or display a message.
10. Tap the Use Dictation button to be able to dictate text. Apple needs your permission because your voice data is transmitted to the company’s servers and processed there.
11. If you want Apple to receive anonymized usage data and diagnostic information in the event something crashes, tap the Automatically Send button in the Diagnostics screen. If you’d prefer not to share the data, tap Don’t Send. Tap Next to continue.
12. Lastly, tap the Start Using iPad button to finish setup.
Tip
If you already have a lot of apps for your iPhone or iPod touch, iTunes may want to transfer them all to the iPad. Instead of deselecting unwanted apps one by one, do this: In the Apps tab in iTunes, Command-click (Mac) or Control-click (Windows) one app’s checkbox to deselect them all. Then, go through the list and enable the apps you want to transfer.
I own an iPhone, which goes with me everywhere. Because my iPad acts as an extension of all of my important data, I chose to use the data from my iPhone instead of configuring the iPad from scratch. If you take this route, you’ll still need to do some cleanup work; I found that some universal iPad apps (ones which can run on either an iPhone or the iPad) did not transfer automatically, but otherwise the process was smooth.
iPad Essentials
After the iPad is set up, and each time you press the power button or Home button, a Slide to Unlock control appears. Drag your finger left to right along the slider to advance past the opening screen.
Sleep and wake
Once powered on, the iPad rarely needs to be turned off. Instead, when you’re finished using it, press the power button once (without holding it) to put it into a low-powered sleep mode.
Note
The iPad automatically goes to sleep after 5 minutes of inactivity to conserve battery power. You can change that amount in the Settings app by tapping General, then Auto-Lock, and tapping a time duration (1 to 5 minutes, or Never if you want to always put the iPad to sleep manually).
To wake the iPad, press the power button or the Home button and then use the Slide to Unlock control.
Sleep and wake using a Smart Cover
Apple’s Smart Covers were designed alongside the iPad: They interact with magnets built into the iPad’s case to align the cover and also provide a nifty sleep/wake feature. Open the Smart Cover to wake the iPad, or close the cover to put the iPad to sleep. (Other companies also make cases that interact with the magnets in the same way.)
You can disable this behavior by going to Settings > General and then turning off the iPad Cover Lock/Unlock option.
Power off
It’s rare that I turn off the iPad completely—usually only when something seems to be wrong and I want to restart it, or if I know I won’t be using it for an extended period of time (like that’s realistic). To do so, press and hold the power button until the red Slide to Power Off control appears. Slide it to turn off the power.
Tip
To prevent just anyone from unlocking your iPad and accessing your data, I highly recommend that you specify a passcode that must be entered first. See Chapter 11 for more information.
Home screen
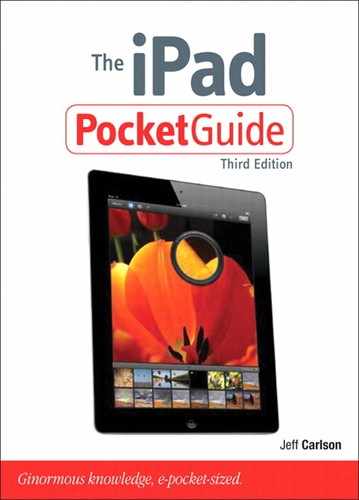
After you’ve unlocked the iPad, you’re taken to the Home screen, which displays the software applications (or “apps”) stored on the device (Figure 1.1). When your iPad holds more than 20 apps, a new Home screen is created; you can see how many screens are available by looking at the dots near the bottom of the screen. Swipe left or right to switch between each screen. The shelf at the bottom of the screen holds up to six apps that remain visible on every Home screen.
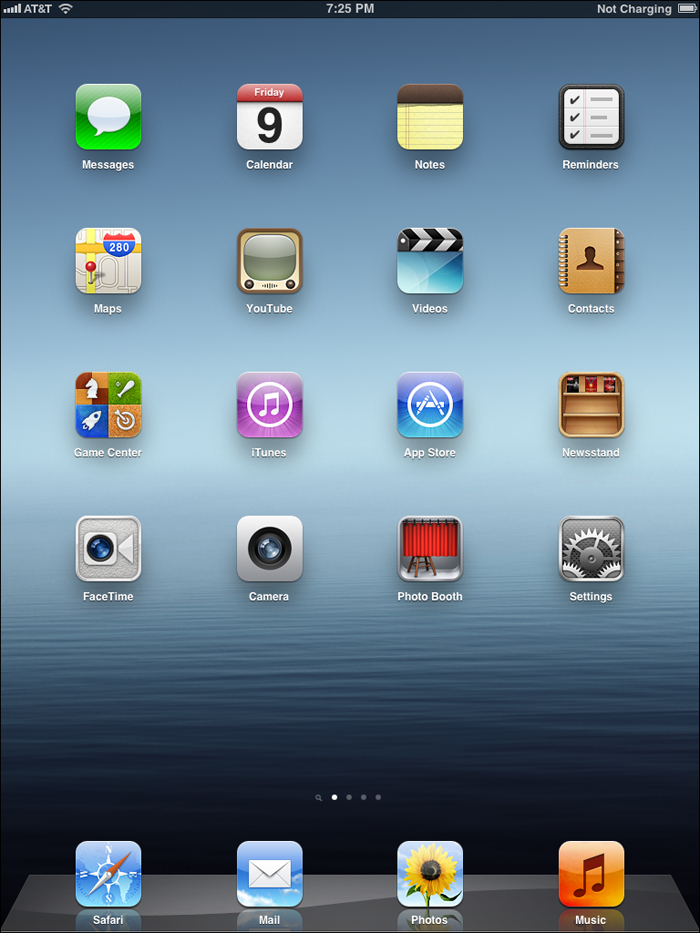
Figure 1.1. Apps on the Home screen
Tip
Yes, that’s right. Although the shelf holds four apps initially, you can add two more apps of your choosing.
Press the Home button in the bezel at any time to exit an app and go to the last Home screen you were viewing. If you press the button when you’re already on a Home screen, you’re taken to the first screen. Or, if you’re currently viewing the first screen, pressing the button displays the Spotlight search page; see “Search Using Spotlight,” later in this chapter.
Launch and run apps
Tap once on an app’s icon to launch it. (That’s it. No double-clicking, pressing Command-O, or hitting Return and wondering if Windows is actually opening the program.)
Unlike most desktop or laptop computers, the iPad displays one app at a time, which takes over the entire screen; it’s not possible, for example, to have Mail on one side of the screen and Safari on the other. To switch to a different app, press the Home button and then tap the other app’s icon from the Home screen.
Switch quickly between apps
Even though only one app is visible at a time, the iPad runs several apps at the same time (a feature known as multitasking). When you exit one app, it’s effectively frozen until you return to it. Some apps can continue to work in the background—Mail can send and receive messages, iPod can play music, and so forth—but most apps wait until they’re activated, at which point they resume where they left off.
• To view your most recent apps, press the Home button twice quickly. (You can also swipe up with four or five fingers, but first go to Settings > General and turn on the Multitasking Gestures option. It’s off by default, but I recommend enabling it.) The multitasking bar appears at the bottom of the screen (Figure 1.2). Flick left on the list to view more apps, and tap the app you wish to open.

Figure 1.2. The multitasking bar
• When you’re viewing an app, swipe left or right with four or five fingers to switch to the next or previous app, bypassing a trip to the Home screen.
• Pinch with five fingers to return to the Home screen without pressing the physical Home button.
Change screen orientation
One of the coolest features of the iPad is the accelerometer, a sensor inside that knows how the iPad is being held, including whether the screen is in a tall (portrait) or wide (landscape) orientation. Knowing the position is important, because the iPad’s operating system adjusts to the orientation: Hold the Notes app in portrait position and the screen is filled with the yellow pad; rotate the display to the landscape position and a list of notes appears to the left of the pad (Figure 1.3).

Figure 1.3. Screen rotation
Simply turn the iPad to change its orientation. In fact, from the software’s point of view, there is no “correct” orientation. No matter how you hold it, the screen contents rotate to be right-side up.
Screen orientation is just a parlor trick for the accelerometer, however. Because it calculates the iPad’s position in three dimensions, it also knows at what angle you’re holding the device and responds to that. Plus, a built-in gyroscope and compass make it possible for the iPad to calculate where it’s being held in physical space. Many games take advantage of these features, turning the entire iPad into the game controller to affect what’s happening onscreen.
Lock screen rotation
You may not want the screen to adjust its orientation at times, like when you’re reading while lying down. The iPad offers two ways to do this: The iPad side switch, located next to the volume adjustment button, can be set to lock the orientation or to mute audio; or, you can tap a control in the multitasking bar.
Tip
When the side switch is configured to lock screen orientation, you can still easily mute the iPad’s audio: Press and hold the volume-down button for a couple of seconds. The volume level dips and then drops to zero.
To choose which behavior to use, you need to specify how the iPad side switch is used:
1. Open the Settings app and tap the General setting.
2. Under the “Use Side Switch to” heading, tap to choose either Lock Rotation or Mute.
Based on your choice here, the opposite action becomes the option available in the multitasking bar.
To lock screen orientation or mute the iPad volume using the multitasking bar, do the following:
1. Double-press the Home button to reveal the multitasking bar.
2. Swipe left-to-right to reveal a set of system-wide controls (Figure 1.4).

Figure 1.4. Lock orientation in the multi-tasking bar
3. Tap the left-most button to either lock orientation or mute audio, depending on the side switch setting.
Adjust screen brightness
Normally, the iPad’s ambient-light sensor adjusts the screen brightness automatically according to its surroundings. If you’d like to dim the light or punch it up manually, you can do so in two places:
• Go to Settings > Brightness & Wallpaper and drag the slider left (darker) or right (brighter). To always adjust manually, turn off the Auto-Brightness switch.
• Double-press the Home button to bring up the multitasking bar, swipe right, and adjust the brightness slider (located just to the left of the audio playback controls).
Charge the iPad battery
The iPad includes a non-removable lithium-polymer battery that provides up to 10 hours of use on a single charge. (In fact, Apple claims that 10 hours of video playback, surfing the Web using Wi-Fi, or listening to music are possible.) You can check the state of the battery by looking at the indicator in the upper-right corner of the screen (Figure 1.5).

Figure 1.5. Battery indicator
Tip
To show or hide the percentage next to the battery indicatory, go to Settings > General > Usage and tap the Battery Percentage switch.
Actual battery life depends on how you use the iPad, of course—playing a video game that makes extensive use of 3D graphics is more demanding on the processor and will eat up power faster than reading a book in iBooks. As the battery nears depletion, warning messages appear when 20 percent and 10 percent of the power remains. After that, the iPad becomes unresponsive and needs to be charged to function again.
To replenish the battery’s charge, plug the iPad’s sync cable into the included power adapter (charging takes about four hours if the battery is nearly spent).
You can also plug the sync cable into your computer to sync and recharge, but there’s a catch: Your computer’s USB port may not have the oomph to do it. If that’s the case, you’ll see “Not Charging” in the power indicator at the upper-right corner of the screen.
The specifications for running power over USB call for at least 5V (volts), but the iPad requires more than that. Some computers, such as recent Apple laptops and desktops, can optionally provide as much as 12V when a device that requires it is connected. In that case, the iPad will charge, but more slowly than when connected to the power adapter. The upside is that when the iPad is connected to a low-power USB port, the battery does not deplete; in fact, it will trickle-charge slowly when the iPad is asleep, and keep a steady level when it’s awake.
Conserve battery life
You can take steps to make the most of the battery’s charge. No need to be slavish about these, but you’ll definitely want to implement them when you get a low battery notice:
• Turn down the screen brightness.
• Turn off Wi-Fi if you’re not within range of a wireless network.
• Turn off Bluetooth if you’re not using it.
• Disable notifications.
• Disable cellular networking (provided you own the 4G model) if you’re not accessing data online (discussed later in this chapter).
What if the battery dies?
Batteries lose capacity over time, but sometimes a battery won’t hold a charge for nearly as long as it once did. If the iPad is still under warranty (one year, or two years if you also purchased AppleCare for it), contact Apple and ask for a replacement iPad. If an Apple retail store is nearby, an Apple Genius will be able to diagnose whether the battery is faulty.
If you’re out of warranty and the iPad “requires service due to the battery’s diminished ability to hold an electrical charge” (in Apple’s words), then you can take advantage of Apple’s battery replacement service. For $99, Apple will replace the entire iPad (so be sure you’ve synchronized it before sending it off). See www.apple.com/support/ipad/service/battery/ for more information.
Multi-Touch Gestures
You probably noticed that when you opened the iPad’s box, no stylus fell out. Until recently, most tablet computers and handhelds required that you use a plastic pencil to do anything. The iPad, instead, is designed for your fingers. You interact with the software on the screen by touching, tapping, swiping, and performing other Multi-Touch gestures. Many controls are intuitive: Tap the Edit button in Contacts, for example, to edit a person’s information. Other motions may not be obvious at first, but they quickly become natural.
Tap
As you’ve no doubt discovered, the most obvious action is to point at an area of the screen, like a button or other control, and lightly tap with one finger. Sometimes, you’ll want to double-tap the screen, such as when you want to zoom in on a section of a Web page in Safari.
When you encounter an On/Off switch, you can slide the switch if you want, or simply tap it to change its state.
Touch and hold
Instead of quickly tapping and lifting your finger from the screen, there are times when you want to touch the screen and maintain contact to elicit an action (for example, see “Work with Text,” ahead).
Drag
Touch and hold a point on the screen, then move your finger across the glass. Drag a Web page in Safari from bottom to top to scroll as you read.
Flick and swipe
A flick (yes, that’s Apple’s official name for it) is like a drag, but faster. On a Web page, touch the screen and flick your finger to “throw” the page in any direction. The software simulates the physics of the motion and slows the scrolling page until it comes to a stop, based on the velocity of the flick.
A swipe is similar to a flick, but you drag something (usually horizontally) a bit more slowly. You swipe a photo from right to left to advance to the next picture, for instance.
Note
The iPad’s screen responds to the electricity in your fingers, not to pressure. Pressing harder on the display doesn’t improve its response.
Pinch
When you want to zoom in or out on an item, such as a map, a photo, or a Web page, touch two fingers to the screen and pinch them together (to zoom out) or spread them apart (to zoom in).
Rotate
Press two fingers to the screen and rotate them in a circle to rotate something, such as a photo in the Photos app.
Shake
Yes, that’s right, give the iPad a good shake. The accelerometer recognizes the motion as an intentional vibration, and software that’s been written to handle the gesture can act on it. For example, when you’re typing in the Notes app and make a mistake, shake the iPad to bring up a dialog that gives you the option to undo the last action. I’ve found that shaking front to back, not side to side, seems to be more responsive.
Use two hands
The iPad’s entire screen is filled with sensors, so take advantage of the large display area and use both hands. One obvious application is the keyboard that appears when you’re entering text; since it’s nearly full size, you can type as you would on a physical keyboard.
For another example, look to Apple’s Keynote app: Touch and hold a slide with the finger of one hand, and then use your other hand to tap other slides to select them all in a group. Numerous games and other apps also accept two-handed input.
Work with Text
It’s one thing to view photos and movies, but how do you enter and edit text? Whether you’re typing a Web address, adding an event to your calendar, or composing a letter, you need to know how to put letters to screen. You’ll encounter the following basic operations throughout the iPad environment.
Type text
Whenever you tap an editable text area, the iPad’s software keyboard slides up from the bottom of the screen (Figure 1.6). Type on it as you would a regular keyboard, keeping a few things in mind:
• The screen can’t accommodate a full-sized keyboard, so some characters appear where you may not expect them. For example, you type an exclamation point (!) by holding the Shift (![]() ) key and tapping the comma (,) key. Number keys are accessed by tapping the “.?123” key, and symbols such as the equals sign (=) are available after next tapping the “#+=” key.
) key and tapping the comma (,) key. Number keys are accessed by tapping the “.?123” key, and symbols such as the equals sign (=) are available after next tapping the “#+=” key.
• The keyboard varies depending on the context of the text field. When you’re in the Address field in Safari, you’ll see a “.com” key—a shortcut for the often-typed end to a Web address—and the Return key reads “Go.” At other times, you may not see letters at all, such as when a number keypad and options for different functions appear when you edit values in Numbers.
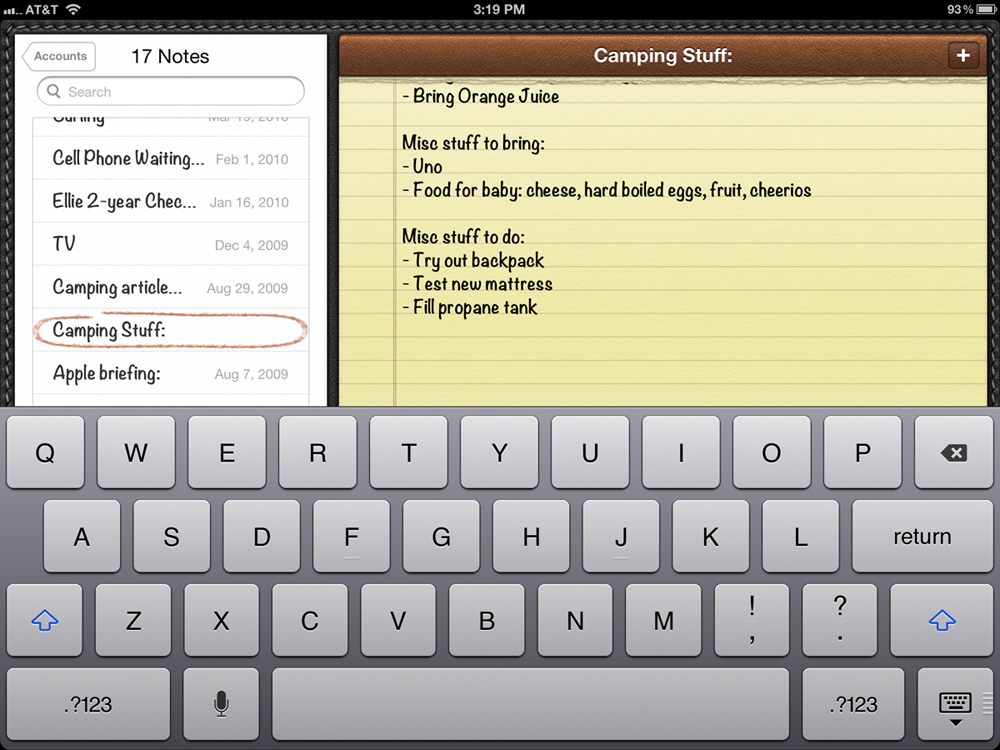
Figure 1.6. The onscreen keyboard
To quickly enter other domain name suffixes, like .net or .org, touch and hold the “.com” key. A pop-up menu presents other options for you to tap to add to the text. The same is true for typing accented characters.
• To hide the keyboard without exiting the text field, tap the ![]() key.
key.
• You can end a sentence with a period by simply tapping two spaces after a word. (This shortcut came about on the iPhone, where the period key doesn’t appear on the first screen of keys.) If you’d rather turn off this feature, go to Settings > General > Keyboard and disable the “.” Shortcut option.
Tip
Want to know the most useful iPad keyboard tip? To type an apostrophe, which isn’t on the main screen, touch the comma (,) key and slide your finger up to insert the apostrophe character. You can do the same with the period (.) key to get a double-quotation mark.
• By default, the Caps Lock feature is disabled (nobody likes it when PEOPLE SHOUT, after all), but if you often type acronyms or otherwise want the option, go to Settings > General > Keyboard and turn on the Enable Caps Lock option. When typing, quickly double-tap the Shift key to enter Caps Lock mode; the face of the key is highlighted (versus just the up-arrow icon when normal Shift is active).
Note
If you look closely at the software keyboard, you’ll see faux raised bumps on the F and J keys, which on a physical keyboard help touch-typists determine their finger position without looking at the keys. There’s no raised portion of glass on the screen, of course, but it’s a subtle visual clue, meant to make you feel more at home typing on the smooth surface. All sorts of little “real-world” touches like this one are scattered throughout the iPad interface.
Split or move the keyboard
When you’re holding the iPad, versus resting it on a flat surface, how do you type? Balanced on one hand and typing with the other hand? With your thumbs, like on a smartphone? I fall in the latter camp, and my fingers are just barely long enough to accommodate the onscreen keyboard when the iPad is in its portrait orientation.
To make it easier for people to type, Apple introduced a new split-keyboard option in iOS 5. The keys can also be repositioned vertically on the screen.
1. In an app that accepts text input, tap to place the cursor and bring up the onscreen keyboard.
2. Drag the right edge of the ![]() key up the screen; as you drag, the keyboard splits (Figure 1.7).
key up the screen; as you drag, the keyboard splits (Figure 1.7).

Figure 1.7. The split keyboard
3. To position the split keyboard higher on the screen, continue dragging up.
To return the keyboard back to its original, joined state, drag the ![]() key back to the bottom of the screen.
key back to the bottom of the screen.
Auto-Correction
This extremely helpful feature debuted on the iPhone, where the smaller screen size makes it more challenging to hit the right keys as you’re typing. As you type, the iPad analyzes your letters to look for patterns and offers suggestions in a little pop-up box (Figure 1.8). To accept the suggestion, type a space or punctuation. To ignore it, either tap the X on the pop-up or continue typing letters. (Also see “Cut, Copy, Paste, and Suggest,” just ahead.)

Figure 1.8. Text auto-correction
If the feature is getting in your way, go to Settings > General > Keyboard. While there, you can also disable Auto-Capitalization, which automatically enables the Shift key after you’ve applied punctuation.
Shortcuts
If you frequently type the same phrases, you can set up shortcuts that expand to longer items. For example, instead of writing “Cheers! Jeff” at the end of every email message, I could set up a shortcut of “cjf” to insert that text for me.
1. Go to Settings > General > Keyboard, and tap Add New Shortcut.
2. Type the text you want expanded in the Phrase field.
3. Type the shortcut text in the Shortcut field.
4. Tap the Save button.
Select text
On a computer, selecting text is easy: You position your mouse pointer, then click and drag to select the text you want. The iPad has no mouse pointer, so the process of selecting text is slightly different.
1. Within any range of text (not just in text-entry fields), touch and hold where you want to start selecting. A magnified view of the area appears above your finger (Figure 1.9).

Figure 1.9. Select text with magnification.
2. Position the insertion point and release your finger. As you’ll see in a moment, you don’t need to put the insertion point at the exact start of your selection.
3. In the pop-up that appears, choose Select to highlight the closest word; or, tap Select All to highlight a full sentence.
4. Drag the handles to the left and right of the initial selection to define the full area you wish to select (Figure 1.10). If you drag beyond a paragraph, the selection area broadens to include blocks of text instead of letter-by-letter selections.

Figure 1.10. Drag to highlight text.
Tip
If you’re in an editable text area (versus a read-only area like a Web page), double-tap a word to select it. Or, tap four times quickly to select an entire sentence. Or, here’s a quick tip that doesn’t apply just to editable areas: Double-tap a word, but hold the second tap to make a selection, and then drag to expand it without lifting your finger.
Note
Selecting text occasionally works differently depending on which app you’re using. In Safari, for example, touching and holding on text on a Web page selects whichever word is under your finger; drag to select any word, lift your finger, and then expand the selection.
Cut, Copy, Paste, and Suggest
When you make a selection, a set of options appears above the text.
• Cut: The selection is copied to memory and then removed from the content you’re editing.
• Copy: The selected content is just copied to memory.
• Paste: If you’ve previously cut or copied some text, the Paste option appears. Tap Paste to add the content stored in memory; if a selection is made, the pasted content overwrites the selection.
• Suggest: Does a word look misspelled? Select it and tap the Suggest button. If the iPad comes up with a different spelling (or a similar word), it appears in a pop-up—tap the suggestion to replace the selected word (Figure 1.11).
Figure 1.11. Selection options
Misspelled words also appear with a dotted red underline. Tap once on the word to view suggestions (Figure 1.12).

Figure 1.12. A misspelled word underlined
Tip
Selecting, copying, and pasting aren’t reserved solely for text. In Safari, for example, you can select a range of text that also includes an image, copy it, and then open Mail and paste the formatted content into an outgoing message.
Voice dictation
The third-generation iPad didn’t get one of the signature features of the iPhone 4S—the Siri voice-activated personal assistant—but it did gain access to part of Siri’s technology: voice dictation. If you’re more comfortable speaking instead of typing on the iPad’s keyboard, definitely give voice dictation a try; I’m regularly amazed at the quality of the transcription.
1. Tap any text field (such as the Messages app) to make the onscreen keyboard appear.
2. Tap the Voice Dictation button (Figure 1.13).

Figure 1.13. The Voice Dictation button during dictation
3. Speak the text you’d like to type. Remember to speak punctuation, like “period” or “question mark,” to include it. For example, to type Robert, did you remember to buy groceries?, you’d say, “Robert comma did you remember to buy groceries question mark.”
4. Tap the Done button, or pause long enough for the iPad to guess that you’re finished.
Sync with a Computer
Although an iPad can do everything you need it to do by itself, chances are your music, movies, and other data reside on a Mac or Windows PC. A computer is also the easiest way to keep a backup of the iPad’s data. iCloud backup is great, but it isn’t appropriate for all situations (namely, when you don’t have robust Internet connectivity).
The iPad’s home base is iTunes, Apple’s media hub software. If you don’t have the latest version, go to www.apple.com/itunes/ to download and install it.
When you connect the iPad using the USB cable, the iPad appears in the iTunes sidebar. Select it to view information and options for synchronizing your data (Figure 1.14).

Figure 1.14. The iPad in iTunes
Note
You’ll be surprised at just how infrequently you may need to sync the iPad. Using iCloud, for example, you can wirelessly sync your calendars and contacts. Application updates are also available using the included App Store app (see Chapter 2).
Here’s what gets transferred when you connect the iPad:
• Any new or changed data, which is added to the backup of the iPad on your computer
• Personal information such as calendars and contacts (unless you’re syncing over the air; see Chapter 10)
• New and updated apps (those downloaded on the iPad and in iTunes)
• Music, movies, and TV shows
• Podcasts
• iTunes U (university courses available via iTunes)
• Photos
• Files used by iPad apps
Disconnect the iPad
When you want to take the iPad somewhere, simply disconnect the sync cable. Unlike other USB devices, the iPad doesn’t need to be ejected first.
If you already own an iPad, iPhone, or iPod touch, any apps you’ve purchased are automatically transferred to the iPad. However, that means all apps you own, including ones not currently installed on a device; the apps still reside in iTunes. Depending on the number of apps, this situation may mean just a few more minutes during the initial sync. If you’ve gone app-crazy, you may want to cancel the sync: Click the cancel button (![]() ) in the iTunes status display. Then manually choose which apps are transferred within the Applications tab. (You don’t have to click every box individually. To deselect all apps, Command-click on the Mac or Control-click under Windows.) See “Find and Install Apps” in Chapter 2 for more details.
) in the iTunes status display. Then manually choose which apps are transferred within the Applications tab. (You don’t have to click every box individually. To deselect all apps, Command-click on the Mac or Control-click under Windows.) See “Find and Install Apps” in Chapter 2 for more details.
Set up Wi-Fi sync
If you ask me, one of the best unheralded features of the iPad (and any device running iOS 5) is the ability to sync wirelessly. As long as your iPad is on the same Wi-Fi network as the computer to which you sync, you can leave that 30-pin USB cable in a drawer or use it on a bedside table for charging. Here’s how to set it up:
1. Connect the iPad to the computer using the sync cable.
2. Select the iPad in the sidebar in iTunes.
3. On the Summary screen, scroll down to the Options section and select “Sync with this iPad over Wi-Fi.”
4. Click the Apply button.
Whenever the iPad is plugged into power and on the Wi-Fi network, a sync operation occurs. You can also initiate a manual sync from the iPad: Open Settings > General > iTunes Wi-Fi Sync, and tap the Sync Now button.
Note
Even if Wi-Fi sync is enabled, the iPad will still sync when connected via the USB cable. If you’re transferring a lot of data, the cable is a much faster option.
Special sync options
Synchronization mostly concerns transferring your media and related files. These options, found on the Summary screen, refine how iTunes handles the sync.
• Open iTunes when this iPad is connected: Select this option to launch iTunes if it’s not running when you plug in the iPad.
• Sync only checked songs and videos: In iTunes, you can uncheck a song’s checkbox to prevent it from playing (such as when you like every song on an album except one). If this option is deselected, all songs and movies are copied to the iPad, taking up more memory.
• Prefer standard definition videos: Although the iPad can play Apple’s HD videos, they take up much more memory. Select this option to transfer standard-definition versions of movies to conserve storage.
• Convert higher bit rate songs to [128/192/256] kbps AAC: Selecting this option can significantly reduce the amount of space your music collection occupies by making lower- (but still decent-) quality versions of songs: 128 kbps, 192 kbps, or 256 kbps. If you’ve ripped your own music at higher bit rates, choose a quality level to eke out some space on the iPad.
• Manually manage music and videos: Wield more control over what gets transferred to the iPad. When this option is selected, you can drag songs and videos from your iTunes library to the iPad name in the sidebar. If you decide to turn off this feature later, however, your music and videos are erased and replaced according to the options you set up in each media tab.
• Configure Universal Access: Click this button to enable options that make the iPad more usable for people with impaired vision or hearing. These controls mirror those found in Settings > General > Accessibility.
• Encrypt local backup: The data on the iPad is encrypted—scrambled so that if the iPad is lost or stolen, its contents can’t be read. The backup stored on your computer’s hard disk, however, is not encrypted. To make it inaccessible to prying eyes, activate this option, which is listed in the Backup section of the Summary screen when “Back up to this computer” is selected. A dialog appears, asking you to define a password and verify it.
What if you want to connect the iPad to your computer but don’t want to sync? You can’t change the automatic sync preference without the iPad connected. Instead, press and hold Command-Option (Mac) or Shift-Control (Windows) when you connect the iPad, and hold them until the iPad appears in the sidebar. It won’t sync.
Update the system software
When Apple releases updates to the iOS, iTunes informs you with an alert. You can also click the Check for Update button on the Summary screen to query manually. If an update is available, you’re given the option of downloading and installing it.
On the iPad itself, you can check for updates by going to Settings > General > Software Update.
Tip
If you say yes to the update in iTunes, you get to choose whether to download and install it right away or just download the software for later. The second option is good if you want to take advantage of a robust Internet connection (for example, you’re at the office or in a coffee shop with your laptop) but plan to update the iPad at another time (when you get home).
Connect to the Internet Using Wi-Fi
Every iPad supports Wi-Fi wireless networking, enabling you to connect to the Internet using nearby access points; you may have a Wi-Fi network set up in your house or office, or you might go to a nearby “hotspot,” usually a coffee shop or restaurant. A Wi-Fi network usually covers the space of a house or small building. Compare that to 4G cellular wireless (more on that shortly), which is designed to offer miles of coverage.
Once the iPad is connected to a Wi-Fi network, you can browse the Web, send and receive email, view maps, and perform other tasks that require an Internet connection. Wi-Fi also lets you interact with other devices and computers sharing the network connection; for example, you can play a game against another iPad owner or control music playback of a computer running iTunes.
Choose a Wi-Fi access point
When the iPad requires an Internet connection, such as for accessing email or a Web page, it checks to see if an active Wi-Fi network is within range. A dialog appears with a list of nearby networks (Figure 1.15). Tap the name of a network you want to join, type its password if required, and then tap the Join button on the keyboard.
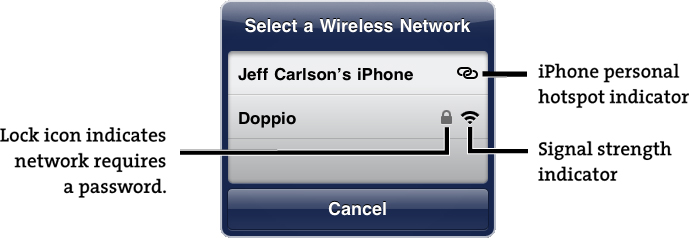
Figure 1.15. Available Wi-Fi networks
Note
Many public Wi-Fi hotspots don’t require a password to join the network but do need you to log in using a Web form once you’re connected. After you get onto the network, go to Safari and enter any valid Web address. A login page should appear if you need to sign in (or pay) for access.
Tip
If you’d rather not be interrupted by a pop-up list of networks, go to Settings > Wi-Fi and then turn off the Ask to Join Networks option.
Tip
Exercise good judgment when joining open, unprotected Wi-Fi networks. It’s possible (and easy, for those who are savvy) to intercept the data passing between the iPad and the base station running the network. A nefarious network owner—or even someone at the next table in a coffee shop—could collect the data stream and mine it for things like passwords and credit card numbers. Unless you can vouch for the network owner, avoid paying bills or making purchases on public networks. See Chapter 11 for more information.
Connect to a Wi-Fi network manually
The iPad is helpful in displaying and connecting to available Wi-Fi networks, but there are times when you will want to link up with one manually—when you accidentally connected to the wrong network or the owner has hidden the network name for security, for instance. Here’s how to connect using the Settings app (Figure 1.16).
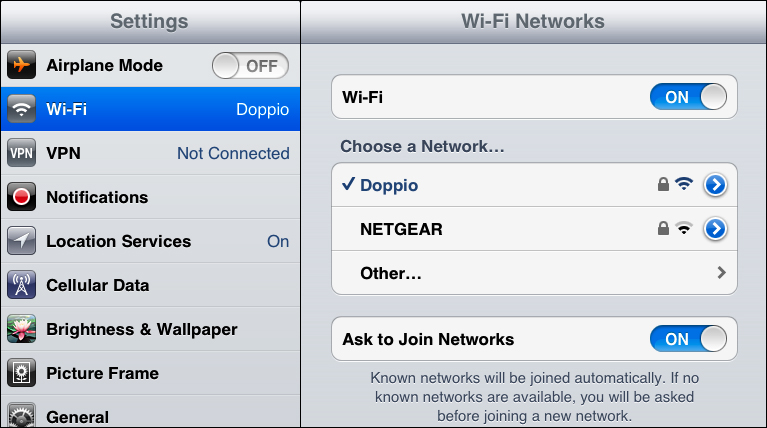
Figure 1.16. Connect to Wi-Fi in Settings.
1. Tap Settings > Wi-Fi.
2. From the list that appears under Choose a Network, tap a network name.
3. If a password is required, type it into the Password field and then tap the Join button.
The network name gains a checkbox, and a Wi-Fi signal strength icon appears in the upper-left corner of the screen.
To connect to a network that isn’t broadcasting its name, or if the iPad isn’t listing the one you expect, do the following (Figure 1.17):

Figure 1.17. Join a hidden Wi-Fi network.
1. In the Wi-Fi screen, tap the Other button.
2. Type the network name in the Name field.
3. Tap the Security button and specify which type of encryption the network is using. If you don’t know, try WPA2 first, followed by WEP (which is older and no longer secure, but still widely used).
4. Enter the network’s password in the Password field that appears.
5. Tap Join to establish a connection.
Tip
The iPad remembers Wi-Fi network names and settings, so the next time you’re within range of a network you’ve previously joined, a connection is automatically made.
Disconnect from a Wi-Fi network
If you accidentally join the wrong network, it’s easy to sever the connection. In Settings > Wi-Fi, tap the detail button (![]() ) and then tap Forget this Network.
) and then tap Forget this Network.
Turn off Wi-Fi
Go to Settings > Wi-Fi and set the Wi-Fi switch to Off. You may want to do this when conserving battery power or if you’re in an area where you know a Wi-Fi network isn’t available.
Connect to the Internet Using Cellular Data
For people who tend to travel more or who need more frequent access to the Internet than is afforded by Wi-Fi hotspots, Apple offers an iPad model with 4G cellular data access built in, the same network used by modern cell phones. With 4G enabled, your iPad likely has Internet access nearly everywhere.
Note
The iPad can hop onto a cellular network, but it can’t place or receive calls like an iPhone. The cellular access is strictly for data. (But you can still place calls using a Voice-over-IP service such as Skype.)
However, 4G is more expensive: The 4G iPad model costs $130 more than the Wi-Fi–only model in the United States and requires an additional fee to access the network. The good news is that Apple negotiated great deals with AT&T and Verizon Wireless to provide 4G access. (I’m using the U.S. carriers as the examples here, but companies worldwide also offer the iPad with 4G access. Check with your carrier for specific pricing.)
Note
The AT&T and Verizon iPad models require different communications hardware to connect to their networks. Be sure you purchase the correct model if you haven’t done so already.
Here’s how it works for AT&T customers: For $14.99, you can transfer—both downloads and uploads—250 megabytes (MB) of data within a 30-day period. For $30, you get 3 GB of data transfer during the same period; $50 pays for 5 GB of data. If you use more than your allotment, you can pay for more data. The least expensive plan for Verizon customers is $30, but that counts for 2 GB of data; other prices include $50 for 5 GB of data and $80 for 10 GB. (These prices are current as of March 2012 and may have changed by the time you read this.)
The great part of these deals is that, unlike with the iPhone, there’s no contract that locks you in for a minimum length of time. Activate the plan when you need it (if you expect to travel a lot next month, for instance), and cancel when you’re done. If you bump against the limit of one plan, you can jump to another plan or wait until the 30-day cycle begins again.
And you do it all from the iPad directly.
Tip
The 4G iPad boasts a few other differences from the Wi-Fi model. It includes a GPS chip for identifying the iPad’s position in Maps and other apps; the Wi-Fi model uses a method based on wireless access points to determine its location. Also, when an AT&T 4G plan is active in the United States, you get free Wi-Fi access at AT&T-operated Wi-Fi hotspots, such as those in Starbucks, McDonalds, and many airports. The Verizon model, at least at the time of this writing, also offers the Personal Hotspot feature (see “Share the Internet connection using Portable Hotspot,” a few pages ahead).
Understand 4G LTE
The idea of “4G” cellular service is as much a marketing term as a description of technology, so here’s a quick overview of the iPad’s 4G capabilities. My apologies in advance for the alphabet soup here.
The iPad 4G model is capable of LTE (a meaningless acronym for Long Term Evolution) data transfer, which can achieve up to 72 megabits per second (Mbps). If you’re in a service area that offers LTE, that’s the theoretical fastest transfer rate.
The 4G model also supports three other varieties of cellular data: DC-HSDPA (42 Mbps), HSPA+ (21 Mbps), and HSPA (7.2 Mbps). To put these into context, the iPad 2 and iPhone 4 use HSPA, and the iPhone 4S uses a slightly slower variant of HSPA+.
However, don’t fret too much about these levels: The iPad 4G will connect to the best signal that’s available in your area, and fall back to 3G service if necessary. As it is, LTE is currently limited to a couple of handfuls of major markets, so many iPad owners may not get to sample higher speeds unless they’re on a business trip to one of those areas.
Activate cellular service
To enable cellular service, do the following:
1. Go to Settings > Cellular Data and make sure the Cellular Data option is set to On (Figure 1.18).
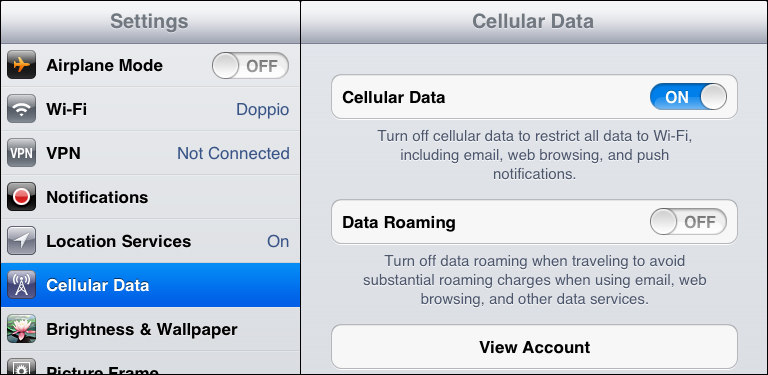
Figure 1.18. Cellular Data preferences
2. Tap the View Account button.
3. Enter your user information.
4. Enter login information. This is a new account for the iPad, not an existing account with your provider. (So even if you have an iPhone account, the iPad is separate.) Type an email address and a new password.
5. Tap a plan to choose it.
6. Enter your credit card and billing information and tap Next.
7. Read the terms of service and tap Agree.
8. Review the payment summary and tap Done.
After a few minutes, a dialog appears informing you that your data plan has been successfully activated.
Once cellular service is activated, you can access the Internet anywhere you have cellular reception.
Measure your cellular data usage
So, just how far will you get with 250 MB of data? As you might expect, that depends on your use. Go to Settings > General > Cellular Data > View Account. The Account Overview section tells you how much data you’ve used, how much remains, and how many days are left in the billing period.
Note
In an area where both Wi-Fi and cellular work, Wi-Fi supersedes the cellular network. Using the iPad at a Wi-Fi hotspot, for example, doesn’t count toward the data limit even if cellular service is active.
Add or cancel cellular service
As you approach the end of the allotted bandwidth on the 250 MB plan, the iPad displays warnings when you reach 20 percent of data left, then 10 percent, and then zero. At any point, if you want to add bandwidth, tap the Now button to bring up the Cellular Data Account window. You can also get there at any time by going to Settings > Cellular Data and tapping Add Data or Change Plan.
Note
International roaming data rates can be substantially higher than what your domestic carrier offers, so if you know you’ll be traveling out of the country, tap the Add International Plan button and set up a plan.
Share the Internet connection using Portable Hotspot
The iPad is capable of acting like a portable Wi-Fi hotspot, sharing its cellular Internet access with up to five devices (such as your computer or a friend’s iPad). The catch is that your cellular provider may not allow it. In the United States, AT&T did not offer this Portable Hotspot feature at launch (but it was “considering” it—likely for an extra fee, as with iPhone tethering), while Verizon not only includes the feature, but also doesn’t charge extra. The connection can be shared via Wi-Fi, USB, or Bluetooth.
1. Go to Settings > General > Network, and tap Set Up Personal Hotspot. After you enable the feature, a Portable Hotspot option appears on the first Settings screen.
2. Tap Portable Hotspot to view the settings, and then switch the feature to On.
3. On devices that want to connect, point them to the hotspot name (if sharing using Wi-Fi) and enter the password you set up in step 1.
Tip
The SIM card included with the AT&T iPad 4G model stores your name and account information. You can remove it from the iPad and put it into another device that accepts a Micro SIM card and still use your account. It ships with a PIN code that’s set by the network provider. To lock the SIM card for added security, tap the SIM PIN button in the Cellular Data settings, switch SIM PIN to On, and enter 1111 (the default for AT&T in the U.S.). To set a new code, tap Change PIN and follow the instructions. (If you enter the wrong passcode three times, the SIM will be shut down and you’ll need to contact the cellular provider to re-activate it. See http://support.apple.com/kb/HT4113 for more information.)
Use iCloud
iCloud is Apple’s ambitious, ubiquitous service for keeping all of your data in sync no matter which computer or iOS device you’re using. When you update some piece of information, such as an event in the Calendar app, the changes are copied to the iCloud servers and applied to every device that shares your iCloud account. You don’t need to sync using a cable or via Wi-Fi; as long as you have a connection to the Internet, the information is updated automatically.
This feature is especially helpful when editing documents in apps that support iCloud. The process of moving a word processing document in Apple’s Pages application from the computer to the iPad is cumbersome and requires a trip through iTunes. With iCloud, the file is copied wirelessly without fuss.
iCloud can sync email, contacts, calendar events, iOS reminders, Safari bookmarks, notes, music, and documents. For images, Photo Stream is a way to share new photos you capture using the iPad’s camera, or to view photos you shoot with an iPhone or iPod touch or that are saved in compatible photo applications such as iPhoto.
Set up iCloud
If you didn’t enable iCloud when you first set up your iPad, do the following:
1. Open Settings > iCloud.
2. Enter your Apple ID and password.
3. Tap the Sign In button. The iPad verifies the information.
4. In the dialog that appears, allow iCloud to use location information for your iPad.
The iCloud settings include On/Off switches for the types of data that can be synced (Figure 1.19). Tap to enable or disable any of them. For the Photo Stream and the Documents & Data options, tapping their names brings up additional options. (For example, Documents & Data lets you turn off cellular access for documents so you don’t inadvertently chew up your cellular bandwidth allotment.)
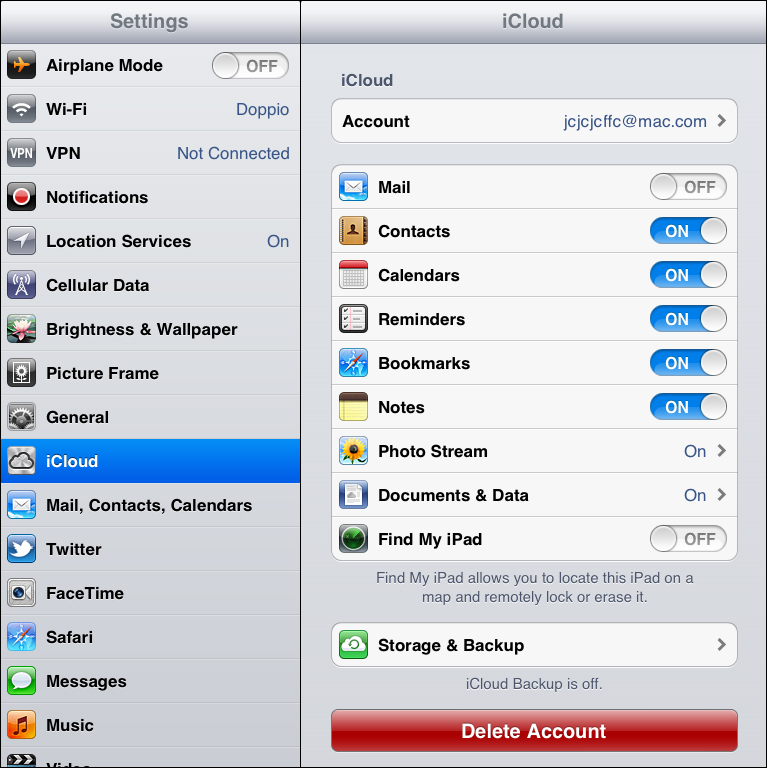
Figure 1.19. iCloud settings
Sync data to iCloud
The beauty of iCloud is that once it’s enabled, you don’t have to do much else. Contacts and calendars, for instance, are automatically updated. Some items require a small amount of manual intervention. For example, music, TV shows, or apps you’ve purchased from the iTunes Store on a separate device can be downloaded to the iPad (see Chapter 8).
An option in iTunes lets you download new music, apps, or books to all of your devices when you purchase them. Go to iTunes > Preferences, tap the Store icon, and turn on the Automatic Downloads options for the media you want.
Note
You can access your contacts, calendars, email, and iWork documents using any modern Web browser at www.icloud.com.
iCloud backup
Instead of backing up the iPad’s data to iTunes, you can back it up directly to iCloud when the iPad is connected to a Wi-Fi network and being charged. Go to Settings > iCloud > Storage & Backup and enable the iCloud Backup option. (You can also choose “Back up to iCloud” in iTunes on the iPad’s Summary screen.) Here you can also see how much of your free 5 GB capacity is being used. As you might guess, Apple is happy to sell you more storage space.
Click the Manage Storage button to view which items are being stored and how much space they occupy. Some types of data stored on your iPad don’t count against the 5 GB of free storage, such as Photo Stream images and purchased music, apps, books, and TV shows.
Read Notifications
Under previous versions of iOS, notifications were a hassle. If an app put up a notice—for example, I use Boxcar (www.boxcar.io) to alert me when I receive Facebook or Twitter direct messages—it appeared as a solitary box, obscuring everything else. iOS 5 revamped notifications, making them much more useful.
You can read notifications by doing one of the following:
• Swipe down with one finger from the top of the screen to view the Notifications drawer (Figure 1.20). Tap an item to go directly to it in the appropriate app. To hide the drawer, drag it back to the top of the screen.

Figure 1.20. Notifications drawer
• When a notification arrives as a dialog, swipe the icon next to the message to jump directly to that app (Figure 1.21).

Figure 1.21. A Messages notification as a dialog
• When you’re using the iPad, a new notification appears in a banner at the top of the screen. Tap it to view its app.
Tip
Customize the appearance of notifications (such as whether new alerts show up as a banner at the top of the screen, show up as a dialog, or do not show up at all) by going to Settings > Notifications.
Tip
The banner notifications are mostly unintrusive, but sometimes they do get in the way. To quickly dismiss one, swipe down and back up over the banner quicky.
Connect to Bluetooth Devices
The iPad includes just two ports for connecting cables: the headphone port at the top and the dock port at the bottom. The rest of the iPad’s communication happens wirelessly via Wi-Fi, cellular, or a third option: Bluetooth. Thanks to this short-range wireless technology, you can listen to music using Bluetooth headphones or speakers; you can also type using any Bluetooth keyboard instead of the onscreen keyboard or Apple’s optional keyboard dock accessory.
Note
When shopping for Bluetooth audio products, look for ones that support A2DP (Advanced Audio Distribution Profile). Also, the third-generation iPad supports the Bluetooth 4.0 protocol, a lower-power version that works with devices that maintain long connections (such as some fitness trackers).
Pair the iPad and the device
To communicate with the iPad, a Bluetooth device must be paired with it to ensure that the device is recognized and won’t get confused by other Bluetooth connections nearby. You need to pair the device only once, after which the iPad identifies and communicates with the keyboard or audio product automatically when it’s within range. Follow these steps:
1. Open the Settings app and tap the General category.
2. Tap the Bluetooth option.
3. Ensure that Bluetooth is on; if not, slide the Bluetooth switch to On.
4. Power on the Bluetooth device you want to pair, and put it into its pairing mode; you may need to press and hold a button on the device to switch modes. It will appear in the Devices list (Figure 1.22).
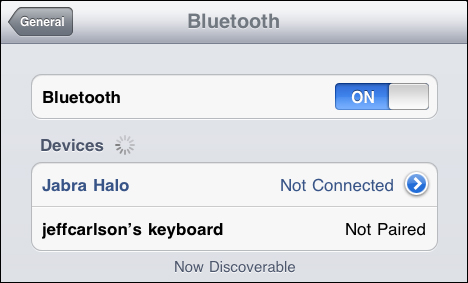
Figure 1.22. Paired and unpaired devices
5. If the iPad displays a dialog for pairing, skip to the next step. Otherwise, tap the name of the unpaired device.
6. Enter the device’s PIN number.
For headsets, this is usually “0000” (four zeros), but check the device’s instructions if that doesn’t work. For keyboards, the PIN is a series of numbers that appears on the iPad screen (Figure 1.23).

Figure 1.23. Pairing the Apple Wireless Keyboard
7. Tap the Connect button. If paired successfully, the device appears as Connected on the Bluetooth screen.
Tip
The iPad can be paired with more than one device at the same time. For example, you can listen to music through a wireless Bluetooth headset while typing on a Bluetooth keyboard.
When you’re using a Bluetooth keyboard, the iPad’s onscreen keyboard won’t appear. This makes sense, except when you’re close enough to be in range of the keyboard but not intending to use it. You may need to go into Settings and disable Bluetooth in that case (or turn off the keyboard’s power, but is it really worth getting off the couch to do that?).
Tip
I bought the Apple Wireless Keyboard to use with my iPad, but you can use nearly any Bluetooth keyboard. When you want to turn off the Apple model without disabling Bluetooth on the iPad, press and hold the keyboard’s power button for a few seconds until you see the status light disappear.
Forget the Bluetooth device
To remove a device from the list, tap the detail button (![]() ) and then tap the Forget this Device button.
) and then tap the Forget this Device button.
Mirror Video
On the original iPad, the only way for teachers or presenters to share what was happening on the tablet’s screen was to mount a camera above it and project the results. The iPad can mirror its video to an HDTV, digital projector, or other similar device. All you need is an Apple Digital AV Adapter or Apple VGA Adapter; plug it in and mirroring is automatically enabled. Better yet, if you also own an Apple TV, the iPad can mirror its screen over Wi-Fi. Here’s how to activate it:
1. Double-press the Home button or swipe up with four fingers to reveal the multitasking bar.
2. Swipe left to right to view the iPad’s audio playback, volume, and brightness controls. You should also see an AirPlay button to the right of the fast-forward button.
3. Tap the AirPlay button and choose the Apple TV on your network.
4. Set the Mirroring option to On (Figure 1.24).
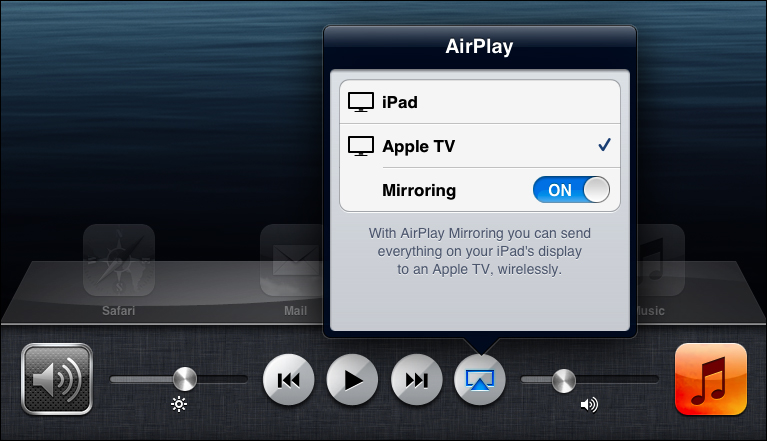
Figure 1.24. Start mirroring the iPad’s screen.
Tip
Here’s a related use for your iPad that you may not have considered: Using Air Display by Avatron Software (www.avatron.com), you can make the iPad act as a second monitor for your computer. Store chat windows, Photoshop tools, or anything else—the iPad’s screen becomes a spanned extension of your computer’s desktop.
Print using AirPrint
It’s fun to think we’re living in a post-paper world where our news and books are delivered electronically and we can zap documents across the world in an instant. But, darn it, sometimes you just need a printed copy of something. The printing architecture built into the iOS does the job, although currently Apple supports only a handful of HP printers to which you can print directly from an iPad.
Note
See the following technote at Apple’s site for a list of AirPrint-compatible printers: http://support.apple.com/kb/HT4356.
The act of printing is similar in all apps that support it, whether you’re printing a message in Mail or a picture in the Photos app.
1. Tap the Action button (![]() ) (Figure 1.25). The button may vary depending on the app; in Mail, for example, the Print command is accessible by tapping the Reply button.
) (Figure 1.25). The button may vary depending on the app; in Mail, for example, the Print command is accessible by tapping the Reply button.

Figure 1.25. Find the Print button in the Action menu.
2. In the Printer Options popover, tap the Printer button to choose a connected printer.
3. Choose the number of copies to print. This option may not always be available, depending on which app you’re in and which printer you’re printing to. Similarly, other options such as double-sided printing depend on the device.
4. Tap the Print button to print the document.
Tip
Wait, don’t give up on printing if you don’t have one of the compatible printers! If you own a Mac, download Printopia (www.ecamm.com/mac/printopia/), which enables AirPrint to printers that your computer can access. It also includes the capability to send a file to a Dropbox folder or directly to your Mac. If you run Windows, try the utility AirPrint Activator (www.macerkopf.de/airprint-ios-4-2-1-hack-fuer-windows-user-02481.html).
Search Using Spotlight
Even the smallest-capacity iPad model stores a lot of information. To locate something quickly, go to the Home screen and swipe to the right. (If you’re in any Home screen, you can also press the Home button twice; one press takes you to the first Home screen, and the second opens the Spotlight screen. Don’t be too quick about the two button presses, though, or you’ll open the multitasking bar.)
Type some text into the Search field to bring up results, sorted by apps (Figure 1.26). Tap the one you want to jump to. If you don’t find what you’re looking for, tap the Search Web or Search Wikipedia options to view those search results in Safari.
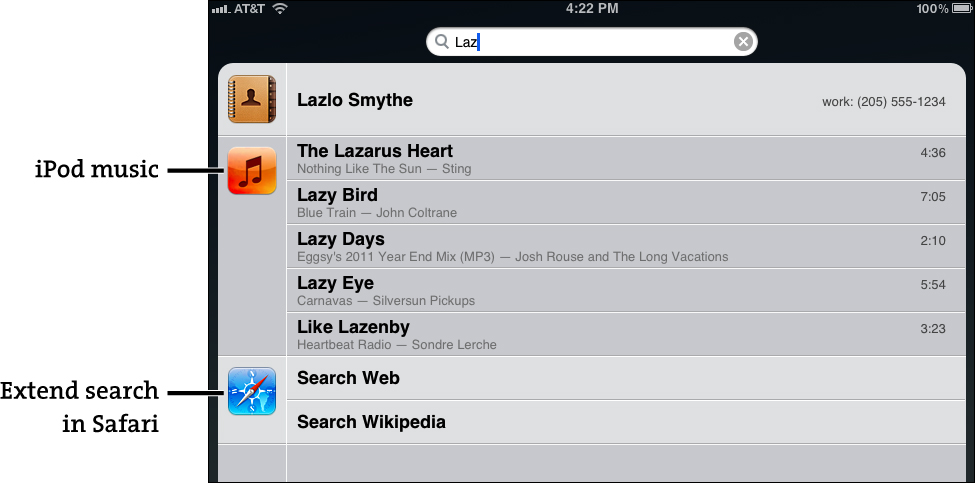
Figure 1.26. Spotlight search results
To quickly erase a term and start over, tap the cancel button (![]() ) to the right of the Search field.
) to the right of the Search field.
Tip
Spotlight also matches app names when you search, so if you have dozens of apps and don’t want to navigate to the screen containing the one you want, simply perform a Spotlight search to locate and launch it.