7. Read Books and Magazines
Under other circumstances, the subject of reading electronic books on a device would warrant a few paragraphs or maybe an extended sidebar. But the iPad’s handheld form factor and large storage capacity makes it an attractive ebook reader. It wouldn’t surprise me if some people view the iPad primarily as an ebook reader that also happens to do other stuff.
Instead of packing a tote bag bursting with hardcovers on your next vacation, Apple’s iBooks app offers an attractive alternative: Store digital versions of books on the iPad, and connect to the iBookstore to buy new ones when you need more. And ebooks aren’t just plain text anymore—the iBookstore offers illustrated works including children’s picture books and fine arts books as well as titles with embedded video.
In addition to purchased books, the iBooks app can also store Adobe Acrobat PDF files, enabling you to read titles from the wide swath of publishers who don’t publish in the EPUB format that iBooks uses.
Note that although this chapter focuses on the features of the iBooks app, that’s not the only player out there. If you prefer to buy ebooks from Amazon, the free Kindle app reads titles from the online retailer; and if you previously owned a physical Kindle e-reader, you can keep your existing library.
The iPad can also handle other types of electronic text, with a multitude of media companies offering digital versions of magazines and newspapers, most accessed in standalone apps or viewed in Safari.
Install the iBooks App
The iBooks app isn’t included on the iPad by default. In iTunes or using the App Store on the iPad, search for “iBooks.” Download and install the free app.
Note
The iBooks app is available to all international markets that have an App Store. However, the content available in the iBookstore varies from country to country.
Browse Your Library
When you open it, iBooks displays your books arranged on a faux wooden shelf (Figure 7.1). Swipe up to reveal more books as your library grows.

Figure 7.1. The iBooks bookshelf
Tip
Swipe down as far as you can to reveal a little hidden surprise carved in the back panel of the bookshelf.
Manage collections
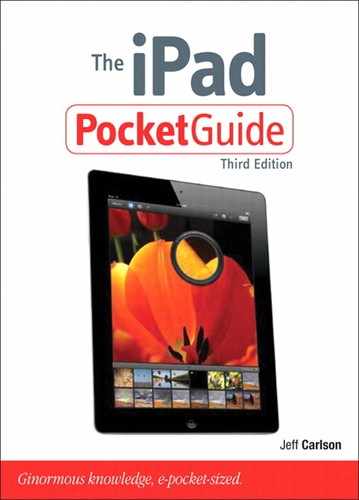
Imagine a real-world library where all the books are stacked haphazardly in the middle of the floor. That’s what the iBooks library could become, if not for collections and controls for organizing the titles. Right away, iBooks includes two collections: Books, for EPUB files; and PDFs, for files in Portable Document Format. If you’ve added any PDF files to iBooks, view them by doing one of the following:
• Tap the Collections button, then tap the PDFs button to see them arranged on another shelf (Figure 7.2).

Figure 7.2. Getting to the PDF shelf
• Swipe right or left to switch between collection shelves.
Note
Adding PDFs to your iTunes library is easy—simply drag and drop from your desktop into the iTunes application and they’re automatically added to iBooks. You can also send PDFs to iBooks from the Mail app on the iPad: Touch and hold the PDF file in an email, choose the Open In menu item, and then select iBooks from the list of compatible apps.
Rearrange or remove titles
Normally, books and PDFs appear in the order you add them to the library, with the most recent title appearing at the top-left location. You can move them around easily: Touch and hold a title, and drag it to a new spot.
To delete titles, do the following:
1. Tap the Edit button.
2. Select one or more titles by tapping their covers (which gain blue checkmarks).
3. Tap the red Delete button (you’ll be asked to confirm this deletion).
Tip
Books are backed up to your computer when you sync to iTunes. If you want to keep a book on your computer but remove it from the iPad’s library, make sure you sync before deleting it from iBooks.
Organize titles into collections
Collections let you do more than just separate books and PDFs—you can create multiple shelves based on whatever organizing criteria you come up with. For instance, you could separate biographies, science fiction, and historical romances on their own sets of shelves. To create a new collection, do the following:
1. Tap the Collections button, and then tap the New button.
2. Type a name in the blank field that appears, then tap Done (Figure 7.3).
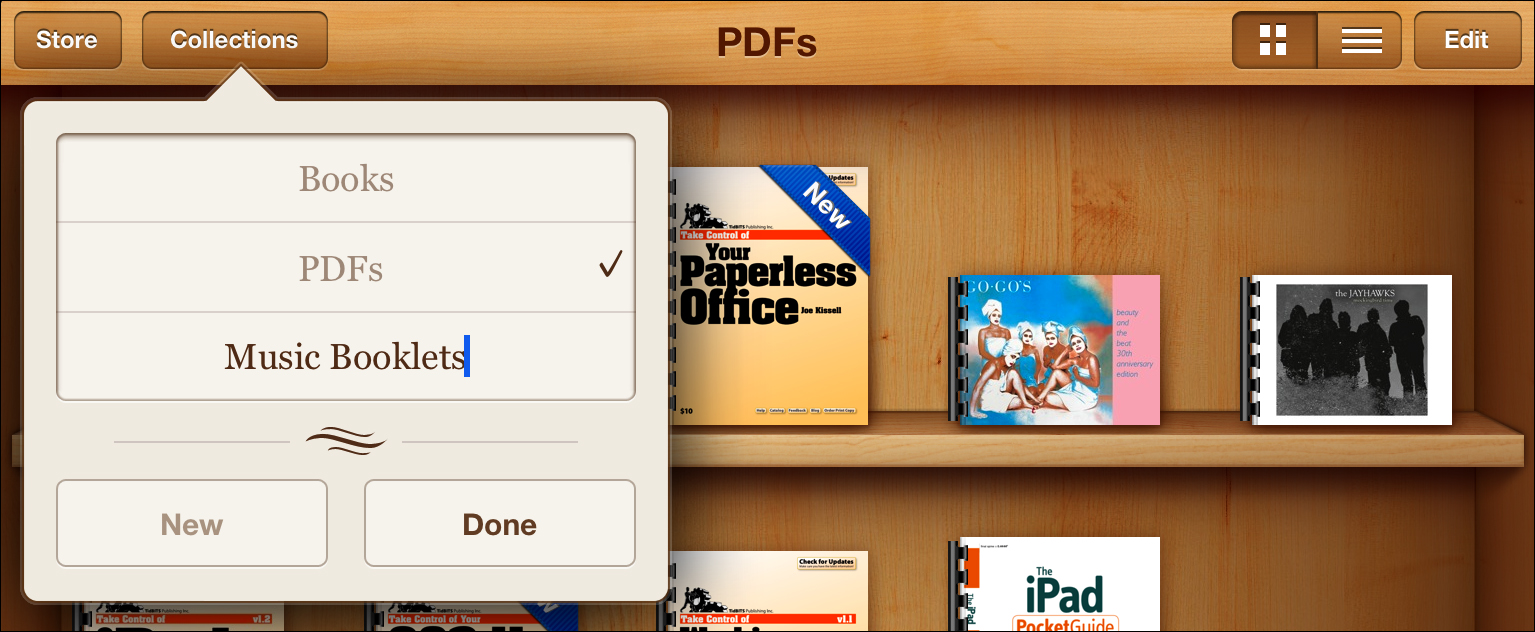
Figure 7.3. Creating a new collection
Tapping the Edit button in the popover enables you to reorder or delete collections (although Books and PDFs can’t be altered).
To view a collection, tap the Collections button and then tap that collection’s name. Or, swipe left or right to switch among them.
Despite the two default camps for books and PDFs, collections are agnostic as far as file format, allowing you to place books and PDFs side by side on a shelf.
Move titles to collections
After you’ve set up some collections, moving titles between them is similar to the steps for deleting books.
1. Tap the Edit button.
2. Tap to select the titles you wish to move.
3. Tap the Move button (Figure 7.4).

Figure 7.4. Moving selected titles to other collections
4. Tap the collection name to set the destination for the move. (You can also create a new collection at this step if you thought of a new categorization.) iBooks moves the titles and whisks you to that collection.
If you delete a title from a collection and then later decide to sync it back to your iPad, it will return to that collection. Also, if you delete a collection, you’ll be asked whether you want to remove titles on that shelf from the iPad or move them to their original collection.
Note
Keep the same collections across multiple iOS devices by turning on Sync Collections in Settings > iBooks.
Browse in List view
Should any of your collections get too full of titles, or you want a sorted view, tap the List view button (Figure 7.5).
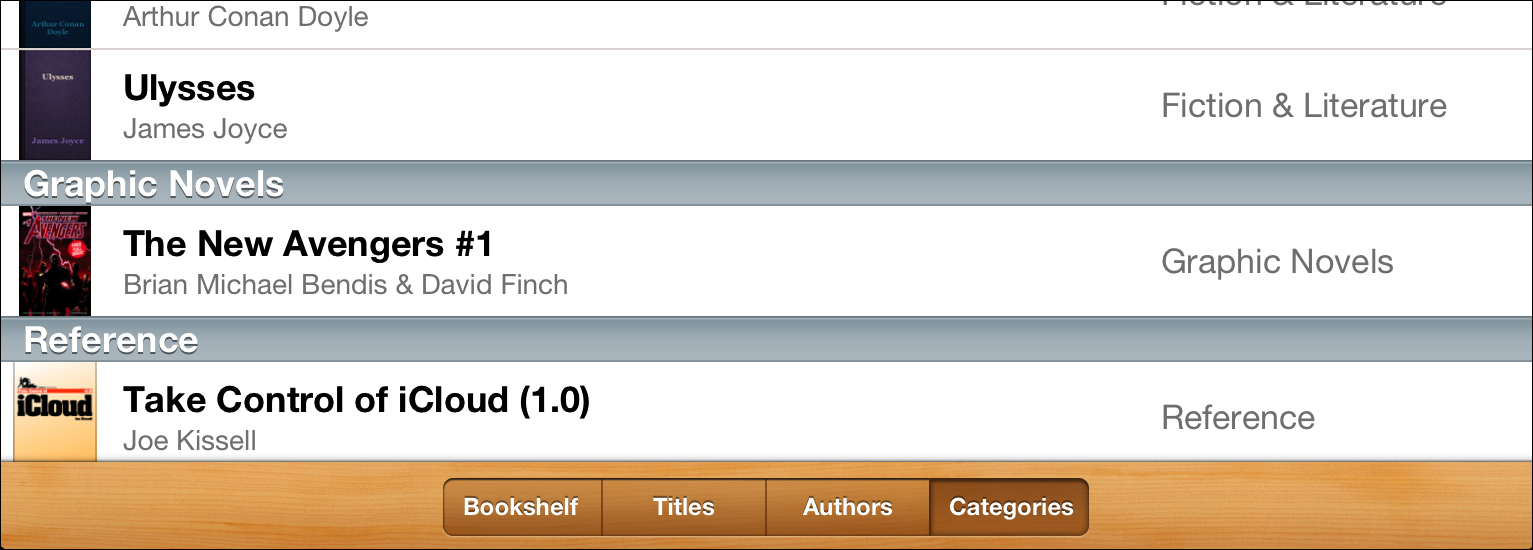
Figure 7.5. Sort options in List view
List view presents more options for organizing the library. Tap one of the buttons at the bottom of the screen to reorder the list.
Tip
Titles in the Bookshelf List view can be reordered, deleted, and moved to different collections, just as they can in the main Bookshelf view.
Tip
To delete a book quickly in List view, swipe its title left to right (or right to left) and then tap the Delete button that appears.
Search for books
When the number of books in your library starts to get really out of control (or, as my stepsister would say, “A good start”), you can use the Search Books field hidden at the top of both the Bookshelf and List views to locate a title. Swipe down until you reach the top to reveal the Search field in either view, tap inside the field, and then start typing a title or author name to narrow the list (Figure 7.6).
Figure 7.6. Searching your library
Read Books and PDFs
To open a book, tap its cover. The appearance of the book changes based on the iPad’s rotation. When viewed in portrait orientation, you see one page at a time. Turn it to landscape orientation and the text is split over two pages.
Tip
To get you started, Apple offers a free book—The Beatles’ Yellow Submarine, as I write this. If you’re not prompted after installing iBooks for the first time, go to the iBookstore, scroll to the bottom of the Featured page, and tap the Free Book link. Or, go to the iTunes Store and click Free Book in the Quick Links sidebar.
Tip
To keep the screen from rotating if you shift or change position, use your chosen method of locking the rotation—either double-pressing the Home button and swiping to the left, or using the side switch above the volume controls. (See Chapter 1 to learn how to configure the side switch.)
Navigate a book
It feels a little funny that I should tell you how to read a book (obviously, you’re doing a fine job reading my book), but there are a few things to note before you get absorbed by the content you’re about to read.
• Tap the middle of the screen to reveal the reading controls if they’re not visible. (Tap again to make them disappear.)
• To turn to the next page, swipe right to left. Swipe left to right to go to the previous page. You don’t need to swipe the width of the page; a small swipe works the same.
For kicks, drag the page edge slowly (Figure 7.7): Apple made a point of reproducing the look of curling the page, complete with a preview of what’s on the next page (in landscape mode) or ghosted, reversed letters that would show through typical book-quality paper.

Figure 7.7. Turning pages
• Tap the right or left edge of the screen to turn the page using a faster, minimal animation.
In the iBooks preferences (go to Settings > iBooks) is the option to specify what happens when you tap the left margin. By default it takes you to the previous page, but if you don’t anticipate going backwards (you forward-thinking reader, you), tap the Tap Left Margin button and choose Next Page instead of Previous Page. You can still go to the previous page by swiping left-to-right anywhere on the screen.
• Tap the Contents button (![]() ) to view the table of contents. You can tap a chapter or section to navigate to it, or tap the Resume button to go back to where you were.
) to view the table of contents. You can tap a chapter or section to navigate to it, or tap the Resume button to go back to where you were.
• Drag the navigation control at the bottom of the screen to jump to a specific page or chapter (Figure 7.8).
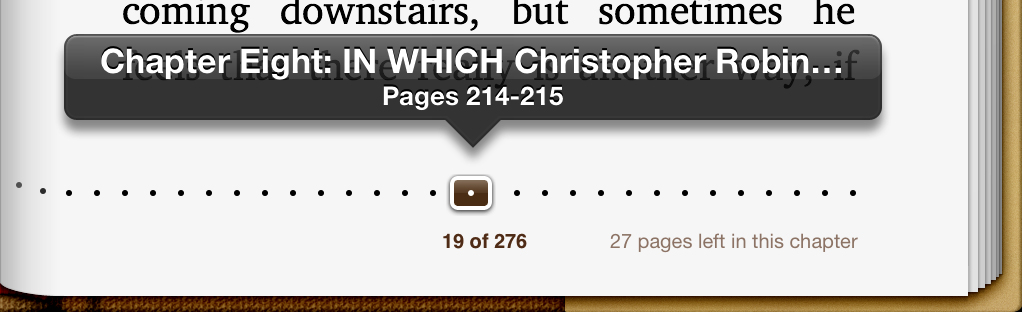
Figure 7.8. Advancing to another section of the book
Note
I love that the lower-right corner tells you how many pages are left in the current chapter. How many times have you been reading in bed, almost at the verge of sleep, but decided to push on until the end of the chapter? In iBooks, you don’t have to flip ahead to see how much further ahead the next chapter is.
Navigate an illustrated book
iBooks can render fully illustrated books—such as children’s picture books or fine art books—reproducing the “spread” layout of the original paper version, where illustrations can span across two opened pages. The free Yellow Submarine book is fully illustrated—and animated, too.
While most of the navigation tools are similar to text-based titles, illustrated books get a few navigation enhancements:
• The navigation control at the bottom of the screen displays page previews rather than just page numbers. Tap it to reveal a larger popover preview, and drag to jump to a new page (Figure 7.9).
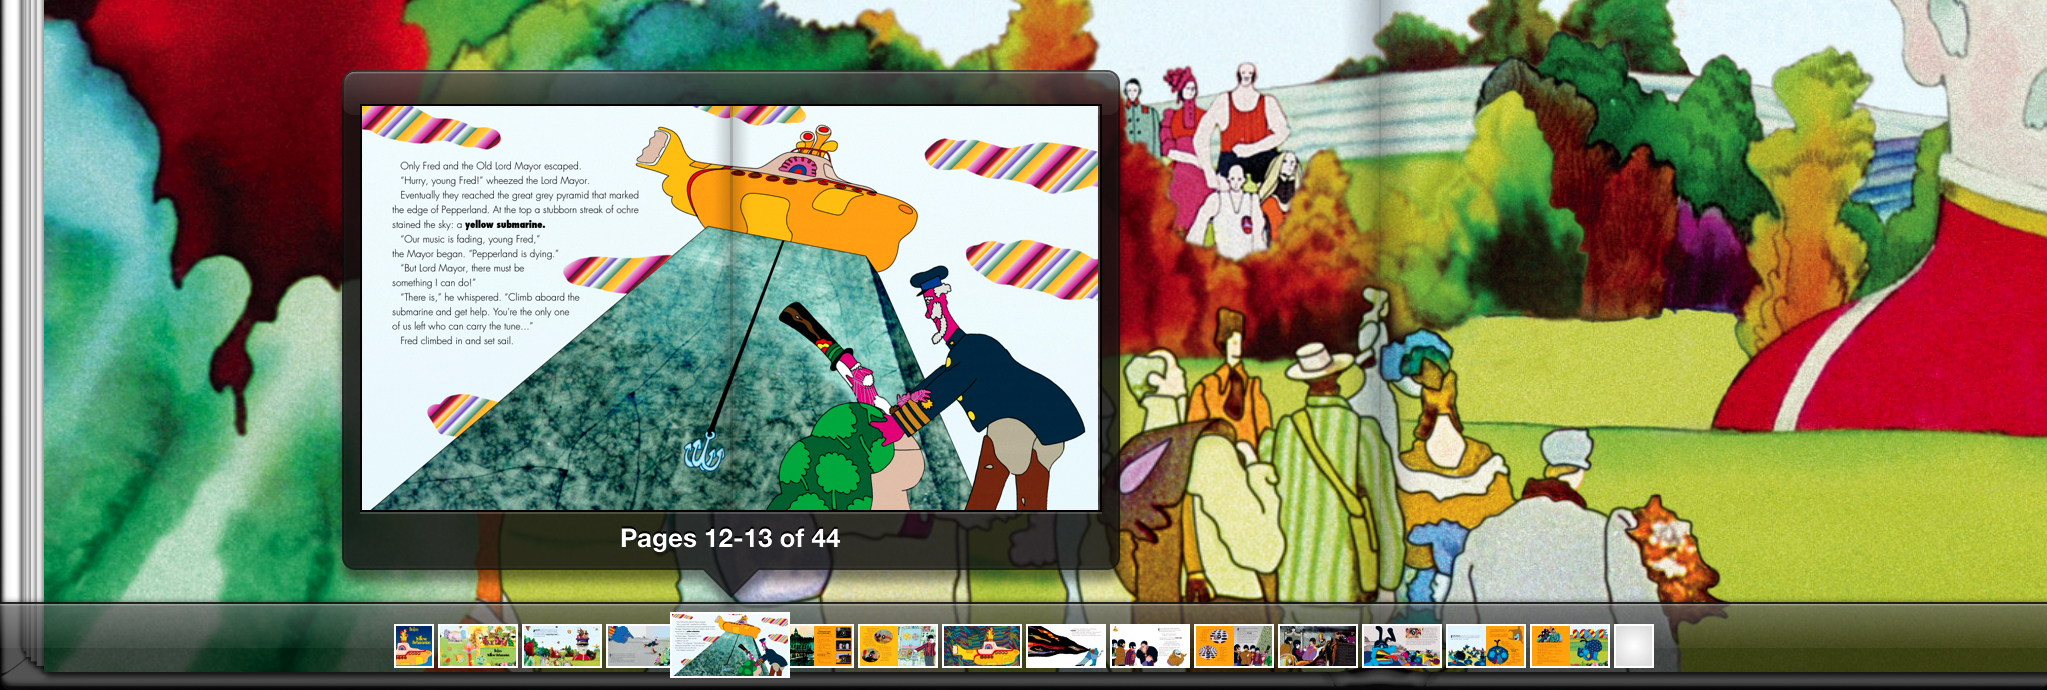
Figure 7.9. Navigating an illustrated book
• Tap the Contents button to also view page previews.
• Double-tap to get a closer look at a page.
• Pinch with two fingers to zoom in and out.
Navigate a PDF
Reading a PDF in iBooks is a bit like reading an illustrated book (minus the page curling effect when you turn a page), but with a few differences.
• The navigation control at the bottom of the screen displays small thumbnails of the pages, but you don’t get a larger preview popover.
• The reading controls at the top of the page are similar to books, save for the addition of an Action button, enabling you to attach the PDF to an email or send it to a printer.
Note
Unlike with books, you won’t get a two-page spread when viewing a PDF in landscape view. However, you’ll have more control over page display if you use another PDF-compatible app, such as GoodReader.
Search Text
Another way to navigate a book or PDF is to look for occurrences of specific text (or, I suppose, another way to find out how many times an author swears throughout the text). The number of matches appears at the bottom of the results list. This feature also provides convenient Search Google and Search Wikipedia buttons to expand your search in Safari.
1. Tap the middle of the screen to display the reading controls.
2. Tap the Search button (![]() ) in the upper-right corner.
) in the upper-right corner.
3. Type a search term, and tap the Search button on the onscreen keyboard or wait a few seconds for results to appear (Figure 7.10).

Figure 7.10. Searching the book
4. Scroll through the results to find the one you want, and then tap it to go to that place in the book. The term is highlighted so you can find it easily.
Tip
When you tap the Search button again, the previous results are still available.
A slightly faster method of searching is available when you select a word or phrase on a page.
1. Touch and hold to select the text you want to find.
2. From the options that appear, tap the Search button (Figure 7.11). The search results popover appears.
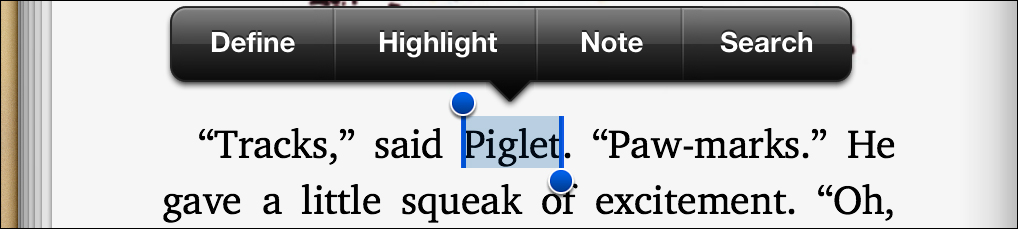
Figure 7.11. Searching by selection
Change Appearance
Reading is a personal experience, and iBooks offers a few options for customizing the appearance of your books and PDFs.
Adjust screen brightness
The iPad’s bright screen becomes a liability when it’s flooding the bedroom with light and preventing your partner from sleeping or when it’s intimidating the pets. Tap the Appearance button (![]() ) to expose a slider that changes the brightness level (Figure 7.12).
) to expose a slider that changes the brightness level (Figure 7.12).

Figure 7.12. The Brightness slider
Note
The Brightness setting in iBooks is applied system-wide, so it sticks when you leave the iBooks app. To bring the backlight level back up after leaving iBooks, double-press the Home button and then swipe to the right to access brightness controls (or, open Settings > Brightness & Wallpaper).
Change text size and font
One noticeable advantage of electronic books is that you can adjust the type size to match what’s comfortable for your eyes.
1. Tap the Appearance button (![]() ) to display a popover with text options (Figure 7.13).
) to display a popover with text options (Figure 7.13).

Figure 7.13. Adjusting text size and font
2. Tap the small A button to make the text smaller, or tap the large A button to make it larger.
3. Tap the Fonts button to reveal the typeface options.
4. Tap one of the font names to use that for the book’s text.
5. Tap outside the popover to dismiss it.
Tip
If you feel more comfortable reading larger fonts, go to the iBooks preferences and turn off Full Justification to render text with a ragged right edge—which should improve readability at increased point sizes. If you keep Full Justification turned on, it’s best to also keep Auto-hyphenation on to avoid some lines from having too much space.
Tip
Another way to turn down the bright backlighting of the white page background is to change the theme. Tap the Theme button and enable the Sepia (cream) or Night (reversed) option. Here you can also choose to turn on Full Screen mode, which dispenses with the faux book borders.
Use Bookmarks, Highlights, and Notes
iBooks offers a full toolset for jogging your memory after you’ve put the ebook down, including bookmarks, text highlighting, and the ability to add notes in the virtual page margins.
Note
For highlighting and note-taking capabilities in PDFs, you’ll need to turn to an alternative app, such as GoodReader. See “Other Ebook Readers,” later in this chapter.
Create a new bookmark
1. On a page with text you want to remember later, tap the Bookmark button (![]() ).
).
2. Depending on what format you’re reading, the bookmark appears differently:
• For EPUB ebooks, a red bookmark ribbon slides over the page’s Bookmark button. The ribbon stays on the page even when the reading controls disappear.
• In illustrated books and PDFs, the red bookmark isn’t visible on the page once the reading controls disappear. However, if you tap the Contents button, you’ll see the red bookmark on those thumbnail previews that have been bookmarked.
To remove a bookmark, simply tap the ribbon (or ribbon button) and it goes away.
Create a new highlight
Because text gets reflowed when you switch between portrait and landscape views, your bookmark placement might not end up where you thought it would go.
A more precise way to recall text or illustrations is to use the highlighting feature.
1. Touch and hold to select the text or illustration you want to highlight. By default, a single word or image is selected. Drag the selection handles to expand what you’ll highlight.
2. From the options that appear, tap the Highlight button. The selected text is then colored like it was drawn over with a real highlighter pen.
3. The options change to reveal the colors available (Figure 7.14); tap a color or the button to underline the selection.
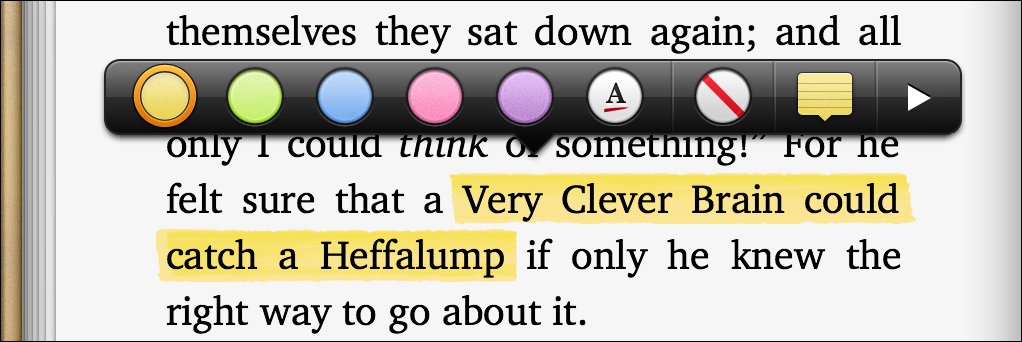
Figure 7.14. Highlighting text
Change highlight coloring
1. Tap on text or an image that’s been highlighted.
2. From the options that appear, tap the color to use.
Tip
I like to categorize things by color, so the fact that you can change highlight colors makes me happy (as does the highlighter pen rendering). I’m sure the point is to simply let you choose your favorite color, but I can imagine two people sharing an iPad using colored bookmarks to read the same book. Or marking up text for different categories in a textbook, for example.
Tip
Tapping on highlighted material also brings up the option to Remove Highlight—something that was impossible to do in your old college textbooks.
Create a new note
If something sparks an idea for next month’s book club gathering, you can mark up your electronic book with notes. The process is similar to highlighting, except you get to add a virtual Post-it note to the page.
1. Touch and hold to select text or an illustration.
2. Tap the Note button from the options that appear. A square notepad appears, allowing you to type as long or as succinctly as you wish.
3. Tap outside the note when finished. A small colored note is added to the margin (Figure 7.15).
Figure 7.15. A note in the margin
Return to a bookmark, highlight, or note
When it’s time to return to a placemarker or review your highlighting and notes, do the following:
1. Tap the Contents button to view the table of contents.
2. Tap the Bookmarks or Notes button.
3. Tap a bookmark, highlight, or note from the list to go to that page (Figure 7.16).

Figure 7.16. Notes list
Tap the Action button at the top of the Bookmarks list to print any notes or to share them via email.
Note
Make sure your bookmarks, highlights, and notes are synchronized across all of your iOS devices by turning on Sync Bookmarks in Settings > iBooks.
Look Up Word Definitions
One of the great joys (and sometimes great frustrations) of reading is coming across unfamiliar words. iBooks offers a built-in dictionary lookup feature.
1. Touch and hold a word to select it.
2. From the options that appear, tap the Dictionary button. A definition appears (Figure 7.17).
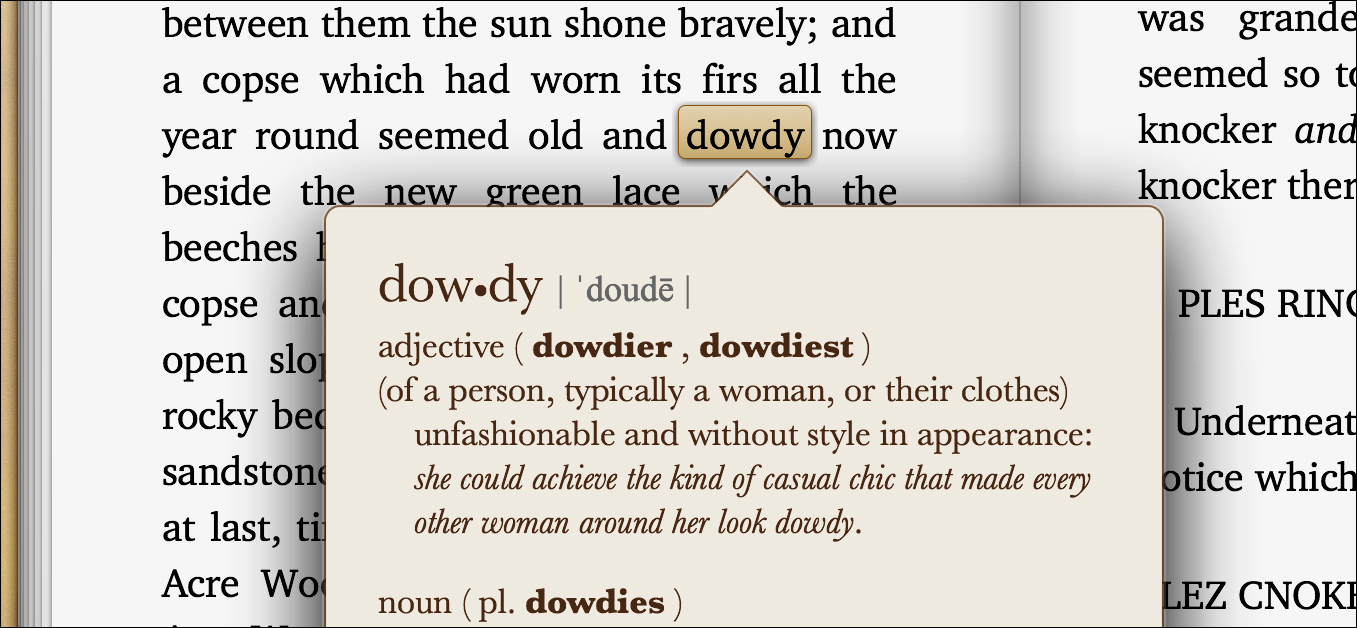
Figure 7.17. Viewing a definition
Buy Books from the iBookstore
This will come as a surprise, but Apple is ready and eager to sell you more electronic books in its iBookstore. The store is available only from within the iBooks app, but it uses your iTunes Store account.
To access the iBookstore from your library, tap the Store button. In a great bit of visual flair, the library rotates as if the store were a hidden passageway behind the bookcase (Figure 7.18).
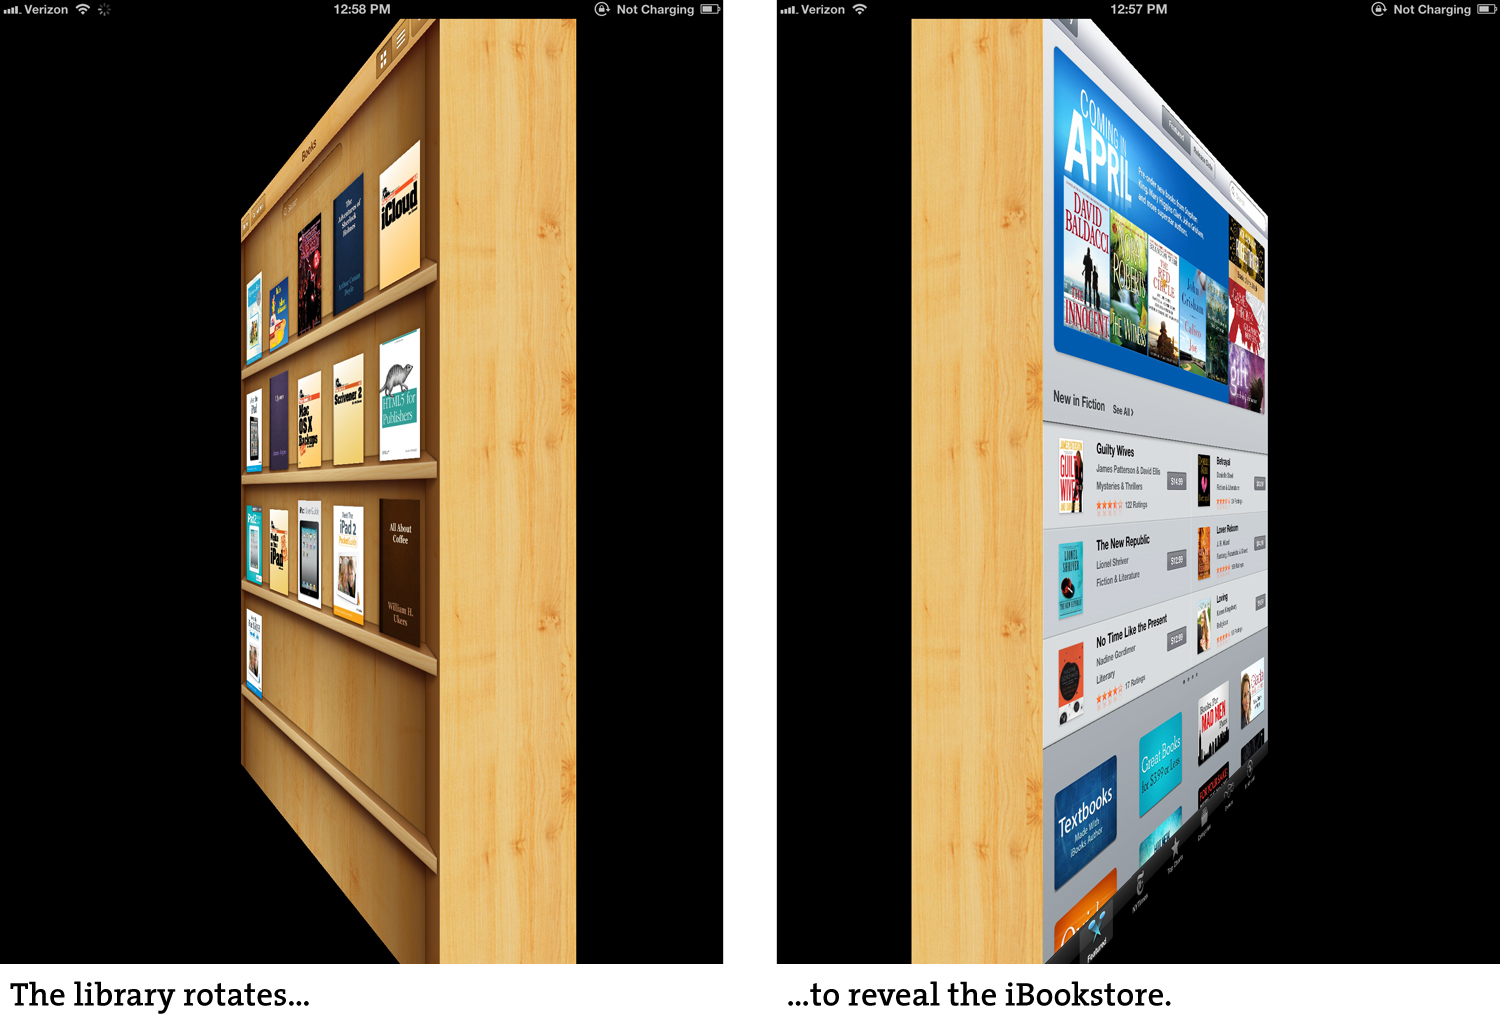
Figure 7.18. “Put...the...candle...back!”
Browsing the iBookstore is similar to shopping at the iTunes Store.
• Tap a book title to view more information about it (Figure 7.19).
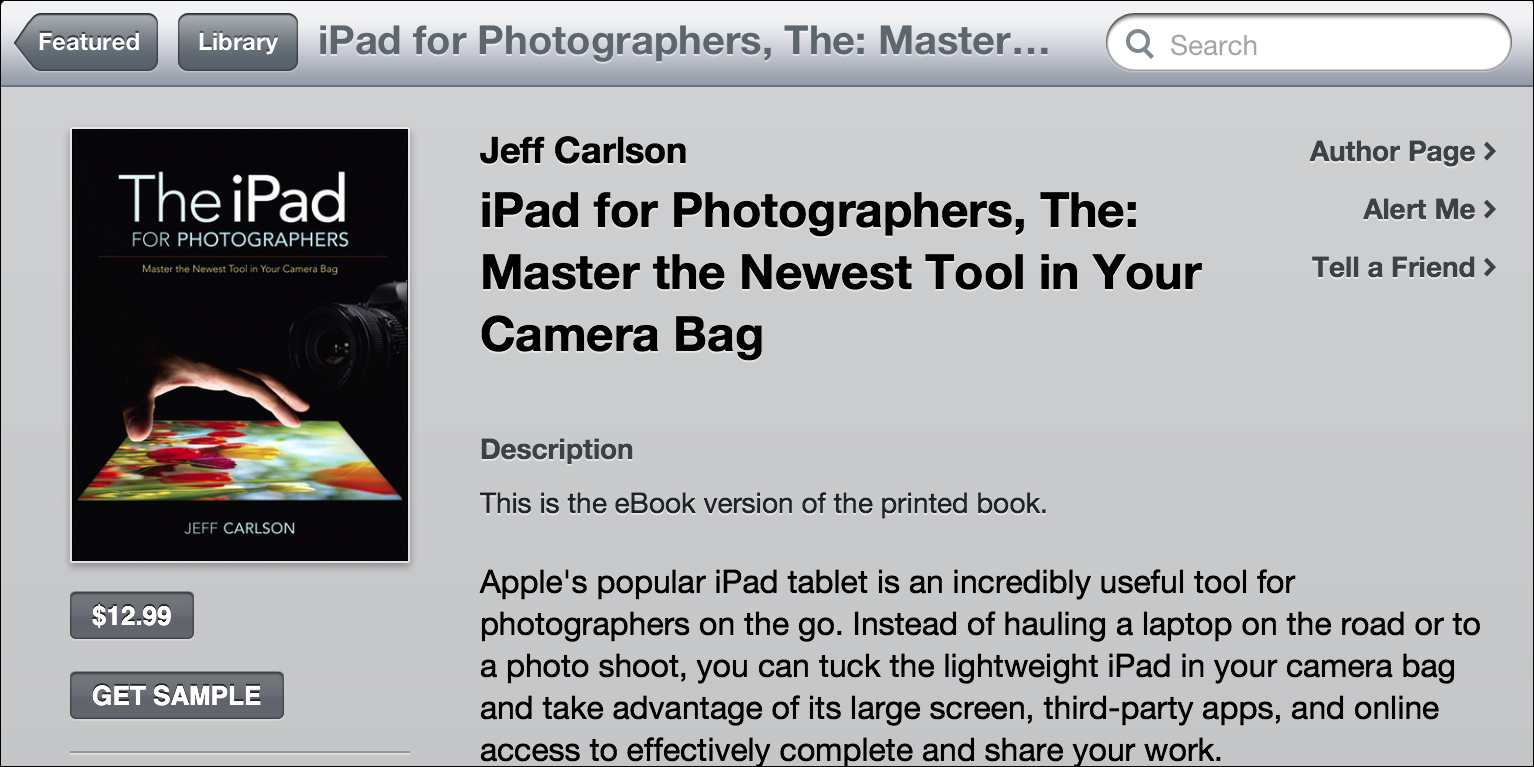
Figure 7.19. Viewing more info about a book
• To purchase the book, tap the price button, which changes to read “Buy Book.” Tap the button again to buy the book, which, after you enter your account and password, downloads to your library.
• Tap the Get Sample button to download a sample (usually the first chapter or a sizable excerpt). It appears in your library with a Sample banner on the cover (Figure 7.20). If you like the book, tap the Buy button that appears at the top of the screen or at the end of the sample.
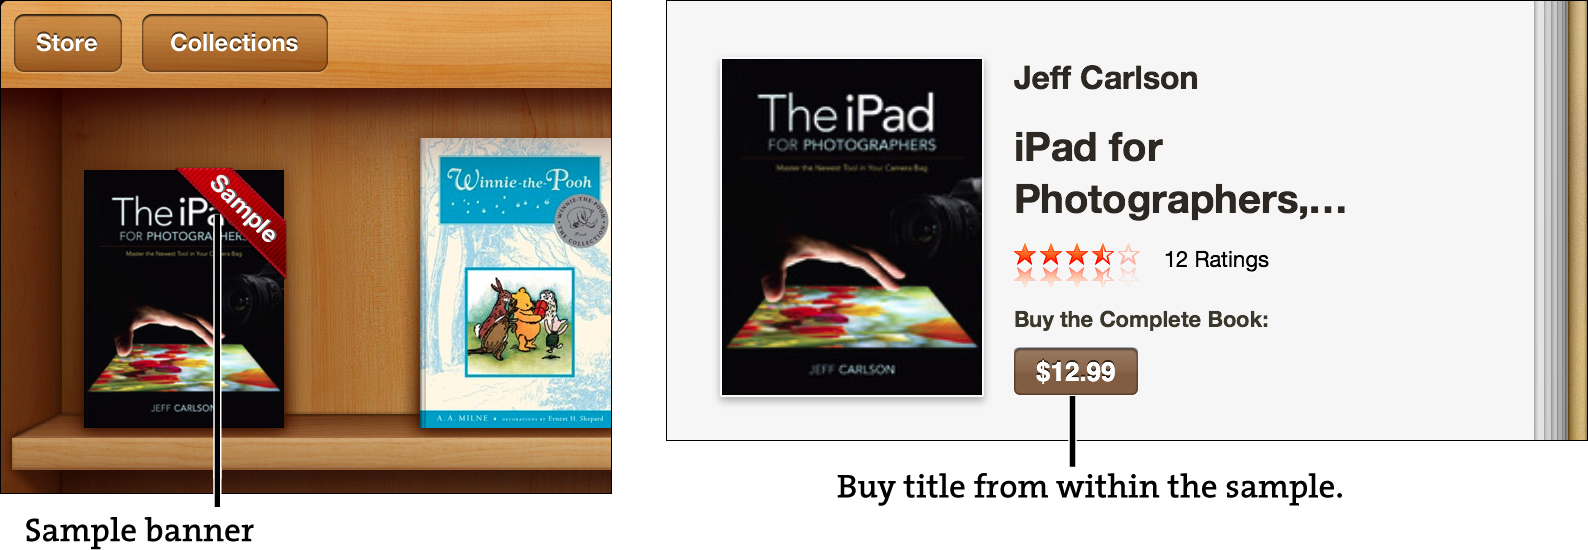
Figure 7.20. A sample of a book
Tip
Tap the Categories button at the top of the iBookstore screen to locate books in various genres. You can also browse the New York Times bestseller list by tapping the NYTimes button in the toolbar.
Tip
You don’t have to shell out money to get a taste of iBooks titles. Tap the Browse button at the iBookstore and then tap the Free button to view books.
Note
Books purchased from the iBookstore are protected by Apple’s FairPlay digital rights management (DRM) scheme, which means you can’t give the book to someone else when you’re finished reading it, as you can with a print book. That also adds an unfortunate (and stupid) limitation: You can’t copy any selected text in a book purchased from the store.
Import Your Own Ebooks
Books from the iBookstore are formatted as EPUB files, an open format designed for electronic publishing by the International Digital Publishing Forum. Titles from Project Gutenberg (www.gutenberg.org) are all EPUB files, without Apple’s DRM, and are available from other sources.
If you purchase or download an EPUB file, you can add the book to your iBooks library. In iTunes, drag the file to the Library section in the sidebar or to the iTunes application icon; you can also choose File > Add to Library and locate the file. The book is added to the iPad the next time you sync.
Before you purchase EPUB books online, make sure you know what you’re buying. Not every EPUB file will work with iBooks. Titles from Kobo (www.kobobooks.com), for example, are EPUB formatted but are protected by Adobe DRM. (You can download the free Kobo app to read them.)
Other Ebook Readers
iBooks is the Apple-designed option, but of course a plethora of other ebook reading applications are out there (such as a little Amazon.com offering you may have heard of). Publishers are also writing iPad apps, not just book files, that do so much more than turn pages.
• Kindle for iPad. When people think of Amazon’s Kindle, they picture the hardware: slim devices with grayscale E Ink screens that store lots of ebooks and have great battery life. What they may forget is that Amazon offers Kindle for iPad, a free app that brings the reading experience to the iPad. It’s a great alternative if you’re already using Amazon for purchases.
• Barnes & Noble Nook. Barnes & Noble got into the e-reader market with its Nook devices and multi-platform software, including two apps for the iPad. The Nook for iPad app differentiates itself with more choices for text rendering and layout. You can customize both text and page colors and save those combinations as themes, as well as modify leading (the space between lines) and margins. Barnes & Noble was also the first company to allow you to lend titles to others who have Nook devices or software, though not every title is available to lend (it’s up to the publisher to decide); Amazon has followed suit with a similar two-week lending feature.
While iBooks now offers children’s picture books, the Nook Kids app is dedicated exclusively to this genre. And some books can read to your toddler (with a more human-sounding voice than the iPad’s VoiceOver feature). Look for titles carrying the Nook Kids Read to Me marker on the Barnes & Noble Web site.
• Ebooks from public libraries. Voracious library users might feel a shock to the pocketbook, as the switch from free borrowing to ebook ownership can put a dent in the entertainment budget. But there’s hope for the book hungry, as more libraries are now lending ebooks.
Bluefire Reader (www.bluefirereader.com/bluefire-reader.html) reads files protected by Adobe DRM. OverDrive Media Console (www.overdrive.com) ties into a network of libraries.
• Standalone apps. Publishers also offer standalone apps for books that include not only the core text, but other multimedia content. For example, many children’s books have options to read the story aloud, play games, and color on the screen. Reference works, such as The Elements: A Visual Exploration, can convey much more information than the facts and some photos.
• Comic books. Since its release, I can’t tell you how many reviewers (myself included) have pointed out that the iPad could be the enticement that makes them start reading comics again. Apps like Marvel, DC, iVerse, and IDW provide the framework for reading and then let you purchase issues in the app. Apple has now started offering graphic novels in the iBookstore, too.
• Read PDF files and more with GoodReader. Download the reader to rule them all. GoodReader (www.goodiware.com) is one of those apps that does so much you feel like you’re scratching the surface. A more powerful PDF viewer than iBooks, GoodReader offers more options for viewing PDFs (including orientation adjustment and double pages) and can mark up pages (from highlighting and notes to drawing figures and underlining text).
In addition to viewing these static files, you can also play a wide range of video and audio files as well as view Web archives (which bundle all text and images from Web pages and preserve their original layout) saved from Safari on your Mac or Windows PC.
You can import files by using the drag-and-drop interface in the Apps pane within iTunes, by transferring files over a Wi-Fi network, by downloading from the Web, and even by accessing your Dropbox account. It preserves Web links, lets you add bookmarks, allows you to password-protect files, and so much more than I have room to go into here.
Read Magazines with Newsstand
Do your reading tastes veer more toward magazines? Newsstand provides an interface for getting and reading iPad versions of popular magazines. Tap the Newsstand icon to reveal magazines (Figure 7.21), and tap the Store button to locate others.
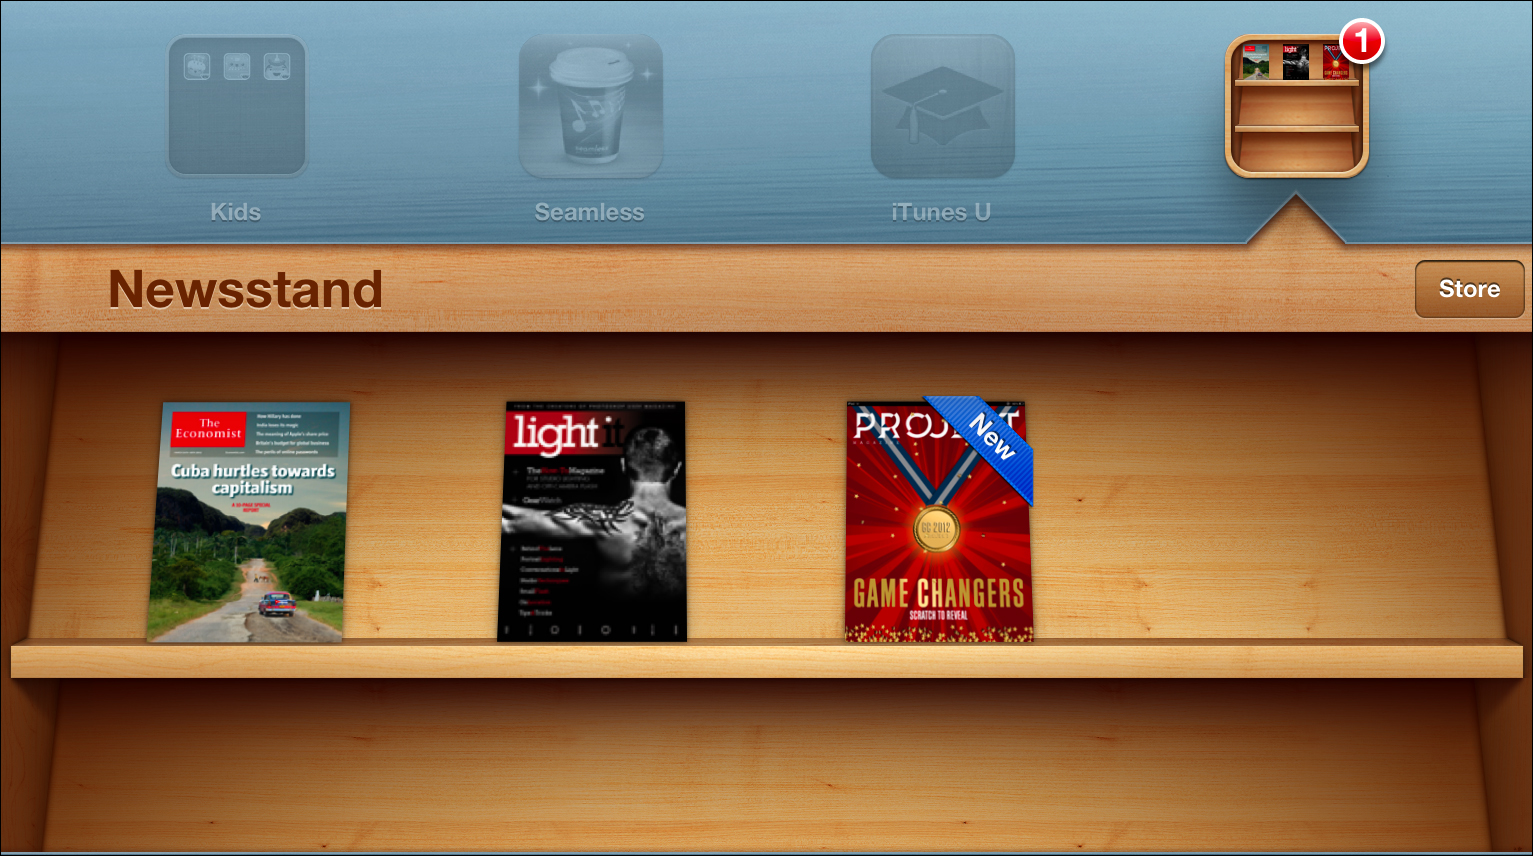
Figure 7.21. Newsstand
The magazines themselves are actually standalone apps that register as Newsstand items. The difference is that many magazines and newspapers can automatically download updates or alert you with notifications when new content is available. Also note that most magazines are free to download, but to actually read any content you must subscribe or buy issues within the apps.