
For detailed models, you require geometries with a large number of vertices and faces. If a geometry contains a very large number of vertices, loading the geometry and rendering it will take more time than it would take for a simple model. If you've got a scene with a large number of models, it is a good idea to try and minimize the number of vertices for better performance. There are a number of different techniques that you can use for this. In this recipe, we'll show you how you can use a bump map texture to add the illusion of depth to your model.
To get ready for this recipe, we need to get the textures that we want to use on our geometries. For this recipe, we require two textures: a color map, which is a standard texture, and a bump map, which describes the depth associated with the standard texture. The following screenshot shows you the color map that we will use (you can find these textures in the assets/textures folder in the sources provided with this book):
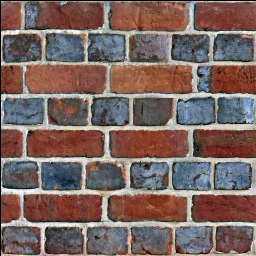
As you can see, this is a simple color map of a stone wall. Besides this texture, we also require the bump map. A bump map is a grayscale image, where the intensity of each pixel determines the height:
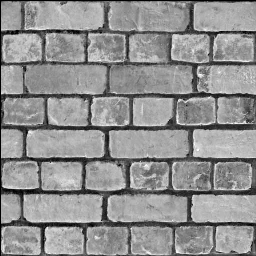
From the preceding screenshot, you can see that the parts between the stones and the mortar has less height, as it is a dark color, as compared to the stones themselves, which have a lighter color. You can see the result you end up with at the end of this recipe by opening up the 04.01-add-depth-to-mesh-with-bump-map.html example in your browser.
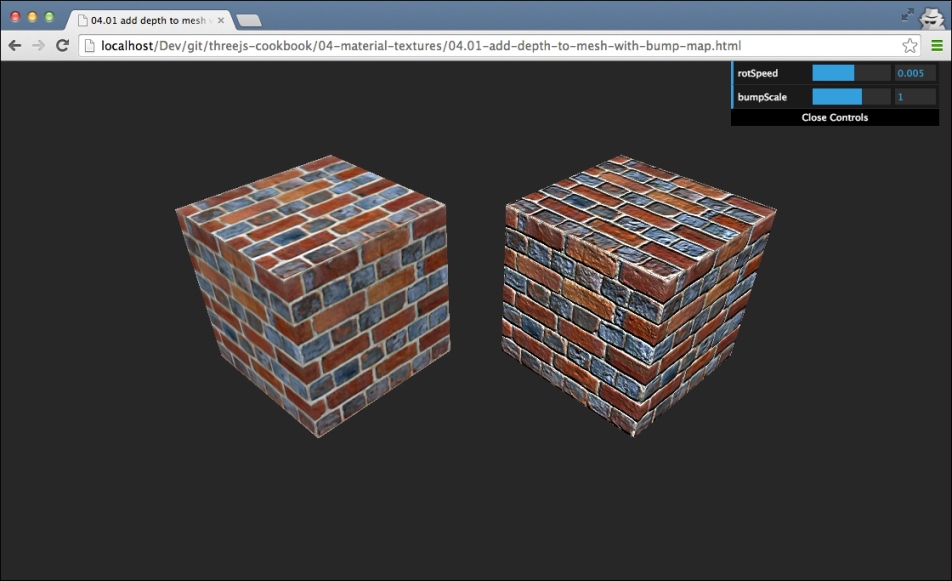
From the preceding screenshot, you can see two cubes. The cube on the left-hand side is rendered without a bump map, and the cube on the right-hand side is rendered with a bump map. As you can see, the right-hand side cube shows much more depth and detail than the cube on the left-hand side.
When you've got textures, using them to add depth to a model is very straightforward:
- First, create the geometry you want to use together with the bump map:
var cubeGeometry = new THREE.BoxGeometry(15, 15, 15);
In this recipe, we create
THREE.BoxGeometry, but you can use a bump map with any kind of geometry. - The next step is to create the material on which we define the bump map:
var cubeBumpMaterial = new THREE.MeshPhongMaterial();

cubeBumpMaterial.map = THREE.ImageUtils.loadTexture(
                    "../assets/textures/Brick-2399.jpg");
cubeBumpMaterial.bumpMap = THREE.ImageUtils.loadTexture(
            "../assets/textures/Brick-2399-bump-map.jpg");
Here, we create
THREE.MeshPhongMaterialand set itsmapandbumpMapproperties. Themapproperty points to the color map texture, and thebumpMapproperty point to the grayscale bump map texture. - Now you can just create
THREE.Meshand add it to scene:var bumpCube = new THREE.Mesh(cubeGeometry, cubeBumpMaterial); scene.add(bumpCube);
With these three simple steps, you've created a cube that uses a bump map for added depth.
The values of each pixel in the bump map determine the height associated with that part of the texture. When rendering the scene, Three.js uses this information to determine how light affects the final color of the pixel it is rendering. The result is that without defining a very detailed model, we can add the illusion of extra depth. If you want to know more details about how bump mapping works, look at this site for a very detailed explanation: http://www.tweak3d.net/articles/bumpmapping/.
In this recipe, we showed you the default way to define a bump map. There is, however, one additional property that you can use to tune bump mapping. The material we used in this recipe, cubeBumpMaterial, also has a bumpScale property. With this property, you can set the amount by which the bump map affects the depth. If this value is very small, you'll see some added depth, and if this value is higher, you'll see a more pronounced depth effect. You can set this property in the example for this cookbook (04.01-add-depth-to-mesh-with-bump-map.html).
- There is an additional way to add detail and depth to your meshes. In the Add depth to a mesh with a normal map recipe, we show how to add depth and detail with a normal map instead of a bump map. In the Creating geometries from height maps recipe, of Chapter 2, Geometries and Meshes, we showed you a different way to use bump maps by creating
THREE.Geometryfrom it.