
Chapter 8: Toward the Next TinyML Generation with microNPU
Here, we are at the last stop of our journey into the world of TinyML. Although this chapter may look like the end, it is actually the beginning of something new and extraordinary for Machine Learning (ML) at the very edge. In our journey, we have learned how vital power consumption is for effective and long-lasting TinyML applications. However, computing capacity is the key to unlocking new use cases and making the "things" around us even more intelligent. For this reason, a new, advanced processor has been designed to extend the computational power and energy efficiency of ML workloads. This processor is the Micro-Neural Processing Unit (microNPU).
In this final chapter, we will discover how to run a quantized CIFAR-10 model on a virtual Arm Ethos-U55 microNPU.
We will start this chapter by learning how this processor works and installing the software dependencies to build and run the model on the Arm Corstone-300 Fixed Virtual Platform (Corstone-300 FVP). Next, we will use the TVM compiler to convert the pretrained TensorFlow Lite (TFLite) model into C/C++ code. In the end, we will show how to compile and deploy the code generated by TVM into Corstone-300 FVP to perform the inference with the Ethos-U55 microNPU.
The purpose of this chapter is to get familiar with the Arm Ethos-U55 microNPU, a new class of processor for ML workloads on microcontrollers.
Attention
Since some of the tools presented in this chapter are still under heavy development, there is the possibility that some instructions and tools may change in the future. Therefore, we recommend checking out the software library repositories using the Git commit hash reported.
In this chapter, we're going to implement the following recipes:
- Setting up Arm Corstone-300 FVP
- Installing TVM with Arm Ethos-U support
- Installing the Arm toolchain and Ethos-U driver stack
- Generating C code with TVM
- Generating C-byte arrays for input, output, and labels
- Building and running the model on Arm Ethos-U55
Technical requirements
To complete all the practical recipes of this chapter, we will need the following:
- Laptop/PC with Ubuntu 18.04+ on x86-64
The source code and additional material are available in Chapter08 folder (https://github.com/PacktPublishing/TinyML-Cookbook/tree/main/Chapter08).
Setting up Arm Corstone-300 FVP
Arm Ethos-U55 is the first microNPU designed by Arm to extend the ML capabilities of Cortex-M-based microcontrollers. Unfortunately, there is no hardware availability with this new processor at the time of writing. However, Arm offers a free Fixed Virtual Platform (FVP) based on the Arm Corstone-300 system to quickly experiment with ML models on this processor without the need for physical devices.
In this recipe, we will give more details on the computational capabilities of the Arm Ethos-U55 microNPU and install the Corstone-300 FVP.
Getting ready
Let's start this first recipe by introducing Corstone-300 FVP and Ethos-U55 microNPU.
Corstone-300 FVP (https://developer.arm.com/tools-and-software/open-source-software/arm-platforms-software/arm-ecosystem-fvps) is a virtual platform based on an Arm Cortex-M55 CPU and Ethos-U55 microNPU.
Arm Ethos-U55 (https://www.arm.com/products/silicon-ip-cpu/ethos/ethos-u55) is a processor for ML inference that works alongside a Cortex-M CPU, as shown in the following diagram:
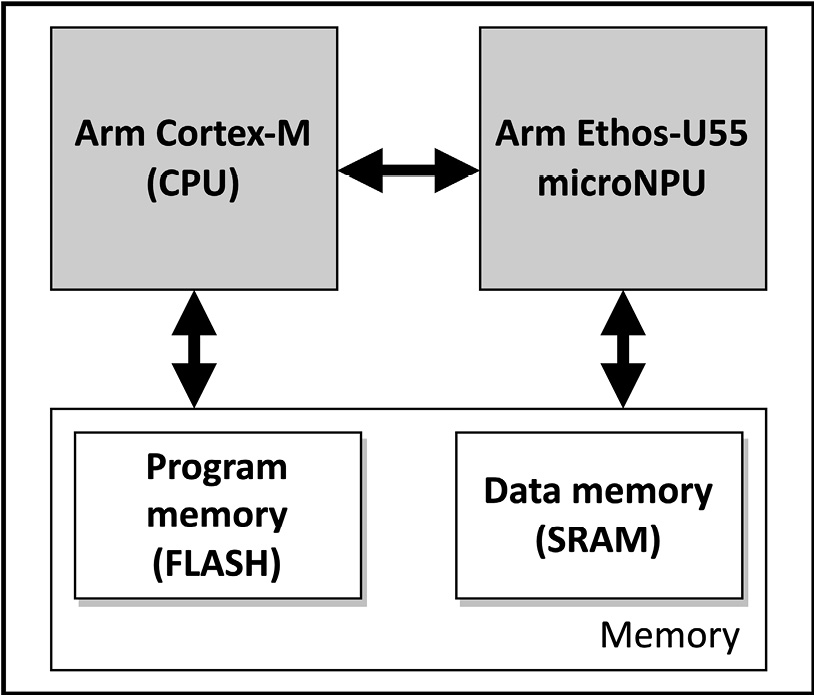
Figure 8.1 – Microcontroller with an Arm Cortex-M CPU and Ethos-U55 microNPU
The role of the CPU is to drive the ML workload on the microNPU, which independently runs the model inference. Arm Ethos-U55 has been designed to efficiently compute most of the elementary operations that we may find in quantized 8-bit/16-bit neural networks, such as the Multiply and Accumulate (MAC) at the heart of convolution, fully connected, and depthwise convolution layers.
The following table reports some of the operators supported by Arm Ethos-U55:
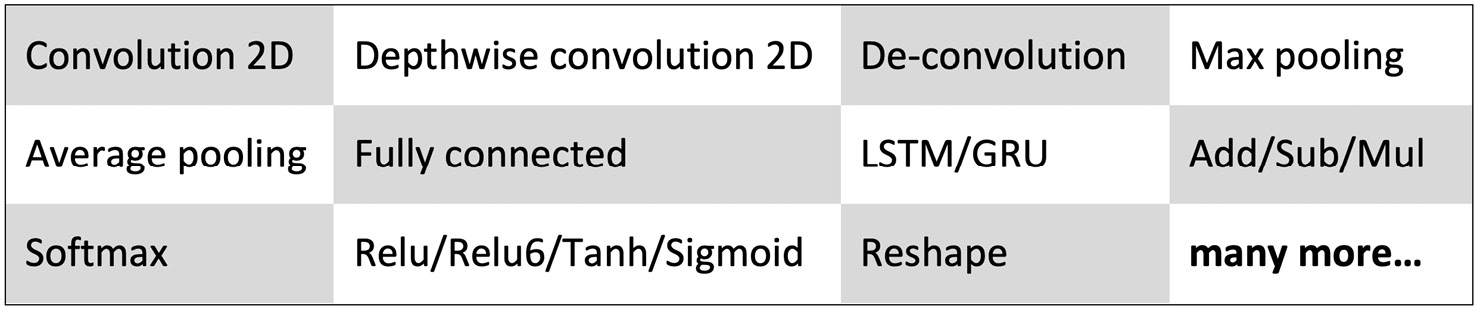
Figure 8.2 – Table reporting some of the operators supported by the Arm Ethos-U55 microNPU
From a microcontroller programming perspective, we still need to provide the model as a C/C++ program and upload it into the microcontroller. Furthermore, the weights, biases, and quantization parameters can still be stored in program memory, while the input and output tensors are stored in SRAM, as shown in the following figure:
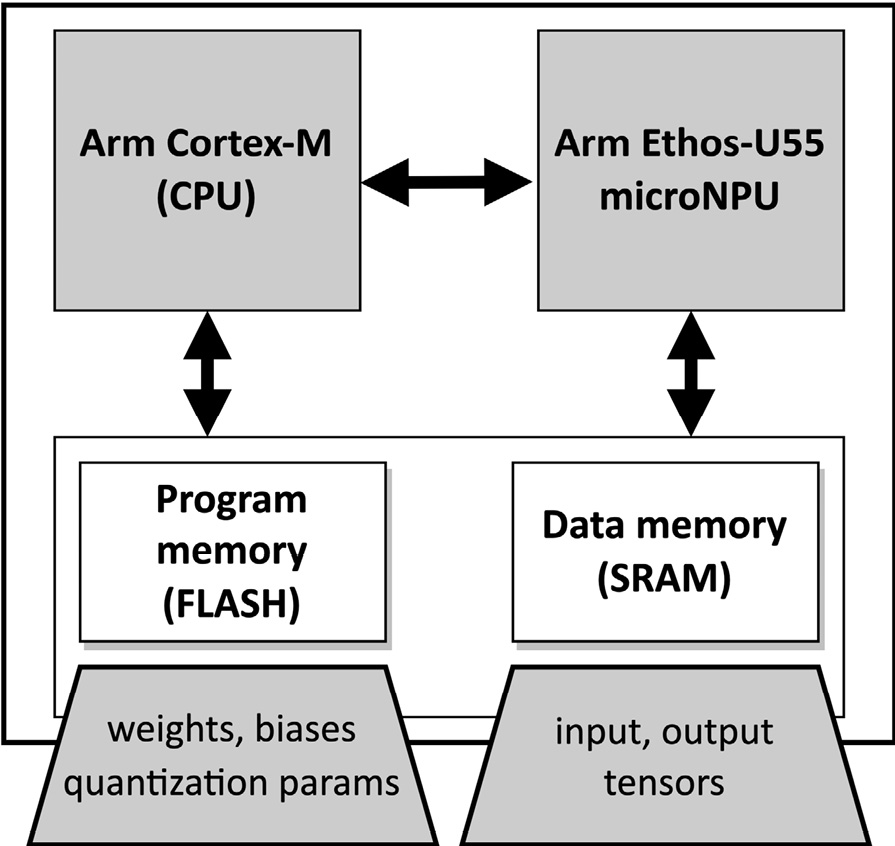
Figure 8.3 – Weights and biases can still be stored in the program memory
Therefore, nothing changes from what we have seen in the previous chapters regarding memory locations for the ML parameters and the input/output tensors. However, what differs from the traditional computation on a Cortex-M CPU is how we program the model inference on Arm Ethos-U55. When running the model inference on a microNPU, the program is a sequence of commands (that is, a command stream) to tell the processor the operations to execute and where to read/write data from/to memory.
Once the program has been uploaded into the microcontroller, we can offload the computation on the microNPU by specifying the memory location of the command stream and the region of SRAM dedicated to the input and output tensors. Next, Arm Ethos-U55 runs all commands independently, writing the output in the user-defined data memory region and sending an interrupt on completion. The CPU can use the interrupt to know when to read the output data.
How to do it…
Open the terminal and create a new folder named project_npu in the home directory (~/):
$ cd ~/ && mkdir project_npu
Enter the ~/project_npu folder and create three folders named binaries, src, and sw_libs:
$ cd ~/project_npu
$ mkdir binaries
$ mkdir src
$ mkdir sw_libs
These three folders will contain the following:
- The binaries to build and run the application on Arm Corstone-300 FVP (binaries/)
- The application source code (src/)
- The software library dependencies for our project (sw_libs/)
Now, take the following steps to install Arm Corstone-300 on an Ubuntu/Linux machine:
- Open the web browser and go to Arm Ecosystem FVPs (https://developer.arm.com/tools-and-software/open-source-software/arm-platforms-software/arm-ecosystem-fvps).
- Click on Corstone-300 Ecosystem FVPs and then click on the Download Linux button, as shown in the following screenshot:

Figure 8.4 – Download Linux button for Corstone-300 FVP
Download the .tgz file and extract the FVP_Corstone_SSE-300.sh script.
- Open Terminal again and make the FVP_Corstone_SSE-300.sh executable:
$ chmod +x FVP_Corstone_SSE-300.sh
- Execute the FVP_Corstone_SSE-300.sh script:
$ ./FVP_Corstone_SSE-300.sh
Follow the instructions on Terminal to install the binaries for Corstone-300 FVP under the ~/project_npu/binaries folder. To do so, enter ~/project_npu/binaries/FVP_Corstone_SSE-300 when the Where would you like to install to? question is prompted.
- Update the $PATH environment variable to store the path of the Corstone-300 binaries. To do so, open the .bashrc file with any text editor (for example, gedit):
$ gedit ~/.bashrc
Then, add the following line at the bottom of the file:
export PATH=~/project_npu/binaries/FVP_Corstone_SSE-300/models/Linux64_GCC-6.4:$PATH
The preceding line updates the $PATH environment variable with the location of the Corstone-300 binaries.
Now, save and close the file.
- Reload the .bashrc file in Terminal:
$ source ~/.bashrc
Alternatively to using the source command, you can simply close and re-open the terminal.
- Check whether the Corstone-300 binaries are installed by printing the version info of FVP_Corstone_SSE_Ethos-U55:
$ FVP_Corstone_SSE_Ethos-U55 --version
If the $PATH environment variable has been updated successfully, the preceding command should return the Corstone-300 version in Terminal, as shown in the following figure:

Figure 8.5 – Output message displayed after the command
As shown in the previous figure, the command returns the version of the Corstone-300 executable.
The virtual hardware with Arm Cortex-M55 and Ethos-U55 is now installed and ready to be used.
Installing TVM with Arm Ethos-U support
In the previous recipe, we briefly talked about the Ethos-U55 program, a command stream used to instruct the operations to execute on the microNPU. However, how is the command stream generated? In this chapter, we will be using TVM, a Deep Learning (DL) compiler technology that aims to generate C code from an ML model for a specific target device.
In this recipe, we will learn what TVM is by preparing the development environment that we will use later on in the chapter.
Getting ready
The goal of this recipe is to install the TVM compiler from the source. The installation needs the following prerequisites:
- CMake 3.5.0 or later
- C++ compiler with C++14 support (for example, g++ 5 or later)
- LLVM 4.0 or later
- Python 3.7 or Python 3.8
Before getting started, we recommend that you have the Python virtual environment (virtualenv) tool installed to create an isolated Python environment. You can refer to Chapter 7, Running a Tiny CIFAR-10 Model on a Virtual Platform with the Zephyr OS, to learn how to install and activate the virtual environment.
However, before showing how to install TVM straight away, we want to give you an overview of the main characteristics of this technology since you may not have prior knowledge about this tool and DL compiler stacks.
Learning the motivation behind TVM
TensorFlow Lite for Microcontrollers (TFLu) is the software library that made the creation of our DL applications possible in the previous chapters. TFLu takes advantage of vendor-specific optimized operator libraries (performance libraries) to execute the model on the target device efficiently. For example, TFLu can delegate the computation to the CMSIS-NN library, which yields superior performance and low memory usage on Arm Cortex-M-based microcontrollers.
Generally, these performance libraries provide a collection of handwritten operators optimized per processor architecture (for example, Arm Cortex-M0 or Cortex-M4) and underlying hardware capabilities. With the need to bring DL to a wide range of devices and the numerous functions to optimize, the significant engineering effort required to develop these libraries becomes clear. Therefore, driven by the necessity to bring efficient DL accelerations on various platforms, a research team at the University of Washington developed TVM, a compiler stack to generate optimized code from DL models.
Learning how TVM optimizes the model inference
Apache TVM (https://tvm.apache.org/) is a full-fledged open source compiler that aims to translate DL models (for example, TFLite models) to optimized code for any processor types:

Figure 8.6 – TVM generates optimized code from a pretrained model
The significant benefit of having a compiler stack is getting efficient code automatically for new DL accelerators without being an expert on performance optimizations.
As shown in the previous diagram, TVM accepts a pretrained model in various formats (for example, TFLite and PyTorch) and performs the code optimizations in two main steps, as shown in the following diagram:
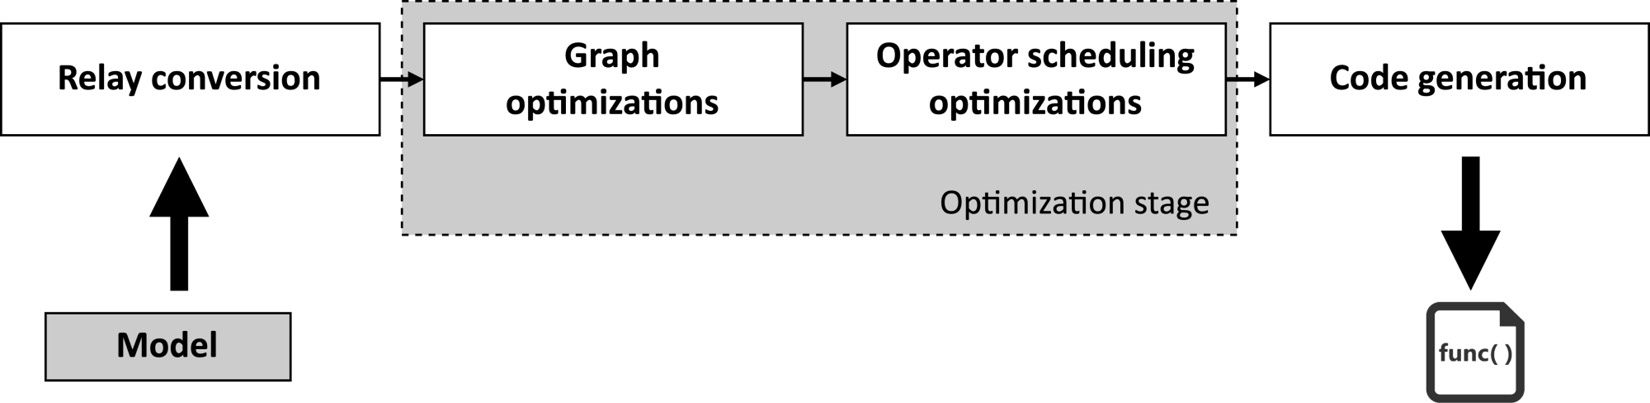
Figure 8.7 – Main optimization stages in TVM
The previous diagram shows that TVM first converts the input model into an internal high-level neural network language (relay). Next, the compiler does the first optimization step at the model level (graph optimizations). Fusion is the common optimization technique applied at the graph level, which aims to join two or more operators together to improve computational efficiency. When TVM spots fusion patterns, it transforms the model by replacing the original operators with the new fused one, as shown in the following example:

Figure 8.8 – Conv2D + ReLU fusion
In the preceding example, fusion aims to create a single operator for Convolution 2D (Conv2D) and ReLU activation instead of having two separate ones as in the original model.
When fusion happens, generally, the computation time decreases because the code has fewer arithmetic instructions and memory transfers from/to main memory.
The second optimization step performed by TVM is at the operator level (operator scheduling), which aims to find the most efficient way to execute each operator on the target device. This optimization is at the code level and affects the adoption of computing strategies such as tiling, unrolling, and vectorization. As we can imagine, the best compute method will depend on the target platform.
Note
What we have just described are just the main points to give you the big picture of how this compiler technology works. For more information about TVM architecture, please refer to the TVM introduction guide, which provides a step-by-step explanation of the model optimizations: https://tvm.apache.org/docs/tutorial/introduction.html#sphx-glr-tutorial-introduction-py.
How to do it…
The installation of TVM is made up of three parts:
- Installing TVM prerequisites
- Building the TVM C++ library from source
- Setting up the Python environment
With the following steps, we will explain how to install TVM:
- Use the Ubuntu Advanced Packaging Tool (APT) to install the required TVM dependencies:
$ sudo apt-get install -y python3 python3-dev python3-setuptools gcc libtinfo-dev zlib1g-dev build-essential cmake libedit-dev libxml2-dev llvm-dev
Verify the Python, CMake, g++, and llvm-config versions:
$ python –version && cmake –version && g++ --version && llvm-config –version
Check whether the versions satisfy the minimum required version for TVM, reported in the Getting ready section. If not, you can refer to the following links to update their versions manually:
- CMake: https://cmake.org/download/
- LLVM: https://apt.llvm.org/
- g++: https://gcc.gnu.org/
- Python: https://www.python.org/downloads/
- Enter the ~/project_npu folder and clone the TVM source code from the GitHub repository:
$ git clone –recursive https:// github.com/ apache/tvm tvm
- Enter the tvm/ folder and make TVM point to the dbfbd164c3 commit:
$ cd ~/project_npu/tvm
$ git checkout dbfbd164c3
- Create a new directory named build inside the tvm/ folder:
$ mkdir build
- Copy the cmake/config.cmake file to the build/ directory:
$ cp cmake/config.cmake build
- Edit the build/config.cmake file to enable microTVM, Ethos-U support, and LLVM. To do so, you must have set(USE_MICRO ON), set(USE_LLVM ON), and set(USE_ETHOSU ON) in build/config.cmake. As we will see later in this chapter, microTVM is an extension of TVM for microcontroller platforms.
- Build the TVM C++ library from the source:
$ cd build
$ cmake ..
$ make -j8
We recommend specifying the -j flag to run the building process simultaneously on different jobs. The number of jobs should be set accordingly with the number of cores available in the system, for example, 8 for a system with eight cores.
- Update the $PYTHONPATH environment variable to tell Python where to locate the library built in the previous step. To do so, open the .bashrc file with any text editor (for example, gedit):
$ gedit ~/.bashrc
- Add the following line at the bottom of the file:
export PYTHONPATH=~/project_npu/tvm/python:${PYTHONPATH}
Save and close the file once you have updated the $PATH environment variable.
- Reload the .bashrc file:
$ source ~/.bashrc
If you had virtualenv activated in the same shell, start the Python virtual environment again.
- Check whether Python is correctly locating the TVM Python library in the ~/project_npu/tvm/python directory:
$ python -c "import sys; print(sys.path)"
The preceding code prints the list of directories that the Python interpreter inspects to search modules. Since sys.path is initialized from PYTHONPATH, you should see the ~/project_npu/tvm/python path from the list of directories printed in the console.
- Install the necessary Python dependencies for TVM:
$ pip3 install --user numpy decorator attrs scipy
- Check whether TVM is correctly installed:
$ python -c "import tvm; print('HELLO WORLD,')"
The preceding code should print HELLO WORLD in the output terminal.
- Install the Python dependencies listed in ~/project_npu/tvm/apps/microtvm/ethosu/requirements.txt:
$ cd ~/project_npu/tvm/apps/microtvm/ethosu
$ pip3 install -r requirements.txt
TVM requires some of the dependencies installed with this step to generate code for the Ethos-U55 microNPU.
TVM can now generate C code for Cortex-M CPUs with an Ethos-U microNPU.
Installing the Arm toolchain and Ethos-U driver stack
TVM generates C code for the target device provided using the TFLite model as input. However, the generated source code needs to be compiled manually to run it on Corstone-300 FVP. Furthermore, the Cortex-M55 CPU needs additional software libraries to drive the computation on the Ethos-U55 microNPU.
In this recipe, we will install the Arm GCC toolchain to cross-compile the code for Arm Cortex-M55 and the remaining software libraries' dependencies required for our application.
Getting ready
In this section, we will give you an overview of the three remaining dependencies for our application: the Arm GCC toolchain, the Ethos-U core driver, and the Ethos-U core platforms.
Corstone-300 FVP is a virtual platform based on Arm Cortex-M55 and needs a dedicated compiler to build the application for this target device. The compiler is commonly called a cross-compiler because the target CPU (for example, Arm Cortex-M55) is different from the CPU of the computer building the application (for example, x86-64). To cross-compile for Arm Cortex-M55, we need the GNU Arm Embedded toolchain (https://developer.arm.com/tools-and-software/open-source-software/developer-tools/gnu-toolchain/gnu-rm/downloads/product-release), which offers a free collection of programming tools that includes the compiler, linker, debugger, and software libraries. The toolchain is available for various Operating Systems (OSs), such as Linux, Windows, and macOS.
The toolchain is not the only thing required, though. The Cortex-M55 CPU needs the Arm Ethos-U core driver (https://review.mlplatform.org/plugins/gitiles/ml/ethos-u/ethos-u-core-driver/) to offload the ML workload on Arm Ethos-U55. The Arm Ethos-U core driver offers an interface to execute command streams on the Ethos-U microNPU. The driver is OS-agnostic, which means that it does not use any OS primitives, such as queues or mutexes. Therefore, it can be cross-compiled for any supported Cortex-M CPU and work with any Real-Time Operating System (RTOS).
The last remaining library required for our application is the Arm Ethos-U core platform (https://review.mlplatform.org/plugins/gitiles/ml/ethos-u/ethos-u-core-platform/). This project primarily contains demonstrations to run ML workloads on Arm Ethos-U platforms, including Corstone-300 FVP. From this project, we will use the Makefile to build the application.
How to do it…
Open the terminal and take the following steps to install the GNU Arm Embedded toolchain and get the remaining software dependencies for our application:
- Enter the ~/project_npu/binaries folder and install the GNU Arm Embedded toolchain for Linux x86-64. To do so, create a new folder named toolchain in the ~/project_npu/binaries directory:
$ cd ~/project_npu/binaries
$ mkdir toolchain
- Download the GNU Arm Embedded toolchain. You can conveniently use the curl tool and uncompress the downloaded file into the toolchain folder:
$ gcc_arm='https://developer.arm.com/-/media/Files/downloads/gnu-rm/10-2020q4/gcc-arm-none-eabi-10-2020-q4-major-x86_64-linux.tar.bz2?revision=ca0cbf9c-9de2-491c-ac48-898b5bbc0443&la=en&hash=68760A8AE66026BCF99F05AC017A6A50C6FD832A'
$ curl --retry 64 -sSL ${gcc_arm} |
tar -C toolchain --strip-components=1 -jx
Note
This operation can take some minutes, depending on the internet connection speed.
- Open the .bashrc file with any text editor (for example, gedit):
$ gedit ~/.bashrc
- Add the following line at the bottom of the file to include the toolchain path to the $PATH environment variable:
export PATH=~/project_npu/binaries/toolchain/gcc-arm-none-eabi-10.3-2021.10/bin:$PATH
After updating the $PATH environment variable, save and close the file.
- Reload the .bashrc file:
$ source ~/.bashrc
- Check whether the GNU Arm Embedded toolchain is installed correctly by printing the list of supported CPUs:
$ arm-none-eabi-gcc -mcpu=.
The returned list of supported CPUs should include the Cortex-M55 CPU, as shown in the following screenshot:
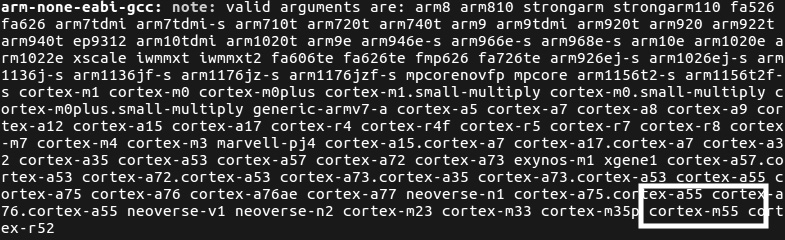
Figure 8.9 – The list of supported CPUs should include cortex-m55
- Enter the ~/project_npu/sw_libs folder and clone the CMSIS library:
$ cd ~/project_npu/sw_libs
$ git clone "https: //github.com/ARM-software/ CMSIS_5.git" cmsis
Next, check out the 5.8.0 release:
$ cd cmsis
$ git checkout -f tags/5.8.0
$ cd ..
- Enter the ~/project_npu/sw_libs folder and clone the Arm Ethos-U core driver:
$ cd ~/project_npu/sw_libs
$ git clone "https:// review.mlplatform.org/ml /ethos-u/ethos-u-core-driver" core_driver
Next, check out the 21.11 release:
$ cd core_driver
$ git checkout tags/21.11
$ cd ..
- Clone the Arm Ethos-U core platform:
$ git clone "https: //review.mlplatform. org/ml/ethos-u/ethos-u-core-platform" core_platform
$ cd core_platform
Next, check out the 21.11 release:
$ git checkout tags/21.11
$ cd ..
Now, we are definitely ready to prepare our application and run it on Corstone-300 FVP!
Generating C code with TVM
Compiling the TFLite model to C code is straightforward with TVM. TVM only needs an input model, a target device, and a single command line to generate a TAR package with the generated C code.
In this recipe, we will show how to convert a pretrained CIFAR-10 model into C code with microTVM, an extension of TVM for microcontroller deployment.
The following Bash script contains the commands referred to in this recipe:
- compile_model_microtvm.sh:
Getting ready
In this section, we will examine how TVM can generate C code and explain what microTVM is.
TVM is a DL compiler technology that we can use in Python and in the same environment where we build, train, and quantize the model with TFLite. Although TVM natively offers a Python API, there is an alternative and more straightforward API that is based on a command-line interface: TVMC.
TVMC is a command-line driver that exposes the same features that TVM offers with the Python API but with the advantage of reducing the number of lines of code. Only a single command line will be required to compile the TFLite model to C code in our specific case.
At this point, you may wonder: where can we find the TVMC tool?
TVMC is part of TVM Python installation, and you will just need to execute python -m tvm.driver.tvmc compile <options> in your terminal to compile the TFLite model. The options required by the compile command will be presented in the How to do it… section.
Tip
To discover more about TVMC, we recommend reading the following documentation: https://tvm.apache.org/docs/tutorial/tvmc_command_line_driver.
Although we have said that we will generate C code from the model, traditionally, TVM produces the following output files:
- .so: A C++ library containing the optimized operators to execute the model. The TVM C++ runtime will be responsible for loading this library and running the inference on the target device.
- .json: A JSON file containing the computation graph and weights.
- .params: A file containing the parameters of the pretrained model.
Unfortunately, the preceding three files are not suitable for microcontroller deployment for the following reasons:
- Microcontrollers do not have the Memory Management Unit (MMU), so we cannot load dynamic libraries at runtime.
- The weights are stored in an external file (.json), which is not ideal on microcontrollers for two reasons: the former is that we may not have an OS that provides an API to read external files. The latter is that weights loaded from an external file go into SRAM, which is generally smaller than the program memory.
For the preceding reasons, an extension to TVM was proposed to produce a suitable output for microcontrollers: microTVM.
Running TVM on microcontrollers with microTVM
microTVM (https://tvm.apache.org/docs/topic/microtvm/index.html) is an extension of TVM, which provides an alternative output format that does not require an OS and dynamic memory allocation.
Note
Devices without an OS are commonly called bare-metal devices.
The output format we refer to is Model Library Format (MLF), a TAR package containing C code. Therefore, the code generated by TVM/microTVM will need to be integrated into the application and compiled for the specific target platform.
How to do it…
The following steps will show how to convert a pretrained CIFAR-10 quantized model into C code with TVM/microTVM:
- Create a new folder named build/ in the ~/project_npu/src directory:
$ cd ~/project_npu/src
$ mkdir build
- Download the pretrained CIFAR-10 quantized model from the TinyML-Cookbook GitHub repository: https://github.com/PacktPublishing/TinyML-Cookbook/blob/main/Chapter08/cifar10_int8.tflite.
Alternatively, you can reuse the CIFAR-10 model you generated in Chapter 7, Running a Tiny CIFAR-10 Model on a Virtual Platform with the Zephyr OS.
Save the model in the ~/project_npu/src/ folder.
- Enter the ~/project_npu/src/ folder and compile the CIFAR-10 model into MLF with TVMC:
$ cd ~/project_npu/src/
$ python3 -m tvm.driver.tvmc compile
--target="ethos-u -accelerator_config=ethos-u55-256, c"
--target-c-mcpu=cortex-m55
--runtime=crt
--executor=aot
--executor-aot-interface-api=c
--executor-aot-unpacked-api=1
--pass-config tir.disable_vectorize=1
--output-format=mlf
cifar10_int8.tflite
In the preceding code, we pass several arguments to TVMC's compile subcommand. Let's unpack the most important ones:
- --target="ethos-u -accelerator_config=ethos-u55-256, c": This option specifies the target processors for the ML inference. In our case, we have two target processors: Arm Ethos-U55 and Cortex-M CPU. The primary target is the Ethos-U55 microNPU. As we know, the Ethos-U microNPU is a processor capable of performing MAC operations very efficiently. When passing ethos-u55-256, we tell TVM that the Ethos-U55 compute engine has 256 MACs. This value is not programmable by the user but fixed in hardware. Therefore, Corstone-300 FVP must use the same Ethos-U55 configuration to run the application properly. The other processor specified in the –target argument is the Cortex-M CPU through the c option. The CPU executes only the layers that cannot be offloaded on the microNPU.
- --target-c-mcpu=cortex-m55: This option tells the target CPU to execute the unsupported layers on the microNPU.
- --runtime=crt: This option specifies the runtime type. In this case, we must specify the C runtime (crt) since we will run the application on a bare-metal platform.
- --executor=aot: This option instructs microTVM to build the model graph Ahead of Time (AoT) rather than at runtime. In other words, it means that the application does not need to load the model during the program execution because the graph is already generated and known beforehand. This executor allows reducing SRAM usage.
- --executor-aot-interface-api=c: This option specifies the interface type for the AoT executor. We pass the c option because we generate C code.
- --pass-config tir.disable_vectorize=1: This option tells TVM to disable the code vectorization since C has no native vectorized types.
- --output-format=mlf: This option specifies the output generated by TVM. Since we want an MLF output, we must pass mlf.
- cifar10_int8.tflite: This is the input model to compile to C code.
After a few seconds, TVM will generate a TAR package file named module.tar and print the following output on the console:
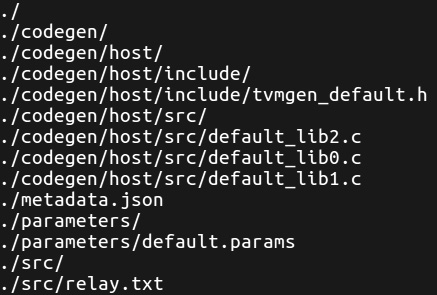
Figure 8.10 – TVM output after the code generation
The files and directories printed by TVM on the console are included in the module.tar file.
- Untar the generated module.tar file into the ~/project_npu/src/build folder:
$ tar -C build -xvf module.tar
Now, you should have the same files and directories listed by TVM in Figure 8.10 in the ~/project_npu/src/build directory.
Generating C-byte arrays for input, output, and labels
The C code produced by TVM does not include the input and output tensors because they need to be allocated explicitly by the user.
In this recipe, we will develop a Python script to generate three C-byte arrays containing the input and output tensors and labels required to report the classification result in the application. The input tensor will also be filled with a valid image to test the inference on a microNPU.
The following Python script contains the code referred to in this recipe:
- prepare_assets.py:
Getting ready
To get ready with this recipe, we need to know how to structure the Python script for the C-byte array generation.
The Python script should produce a C header file for each C-byte array. The generated files must be saved in the ~/project_npu/src/include folder and named as follows:
- inputs.h: Input tensor
- outputs.h: Output tensor
- labels.h: Labels
Important Note
The C header files must use the preceding filenames because our application will be based on a prebuilt example that expects these files.
To create the C-byte array for the input tensor, the script should accept the path to an image file as a command-line argument to fill the array with a valid image.
However, we cannot directly add the raw input image. As we know from Chapter 7, Running a Tiny CIFAR-10 Model on a Virtual Platform with the Zephyr OS, the CIFAR-10 model needs an RGB input image with 32x32 resolution with normalized and quantized pixel values. Therefore, the image needs to be preprocessed before storing it in the array.
The generation of the C-byte arrays for the output and labels is easier than the input one because of the following:
- The output array has 10 values of the int8_t type and can be initialized with all zeros.
- The labels array has 10 strings reporting the name of each class (airplane, automobile, bird, cat, deer, dog, frog, horse, ship, and truck).
As we mentioned in the first recipe of this chapter, the Cortex-M CPU needs to inform the Ethos-U55 microNPU of the location of the input and output tensors. However, not all parts of the memory system are accessible for reading and writing by the microNPU. Therefore, we need to pay attention to where we store these arrays. The following table gives us an overview of what memory Corstone-300 FVP has and which can be accessed by Arm Ethos-U55:
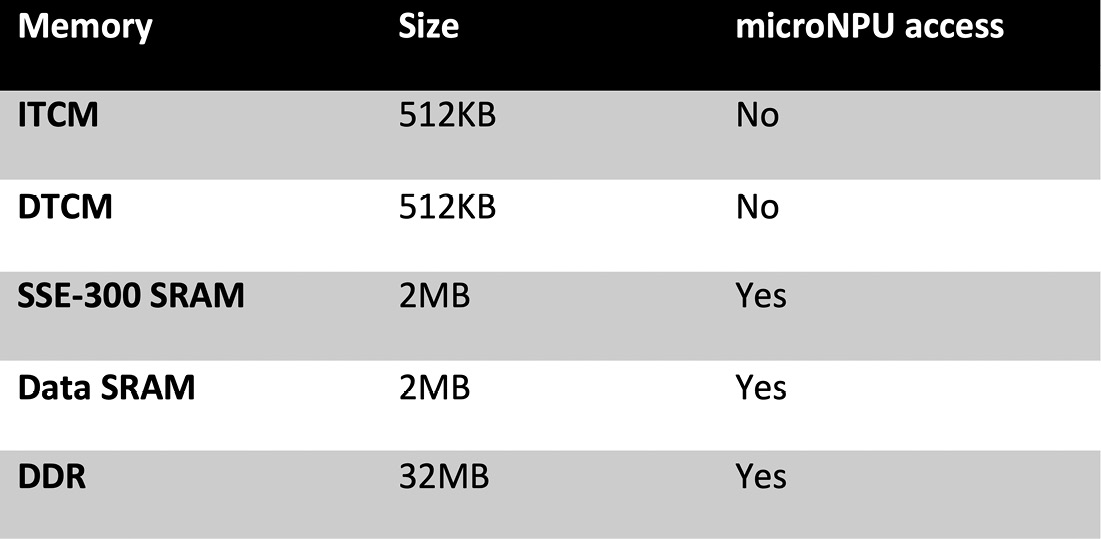
Figure 8.11 – System memory on Corstone-300 FVP
As you can see from the preceding table, Ethos-U55 cannot access Instruction Tightly Coupled Memory (ITCM) and Data Tightly Coupled Memory (DTCM), which are the program and data memory for the Cortex-M CPU.
If we do not explicitly define the memory storage for the input and output arrays, their contents could be placed in ITCM or DTCM. For example, if we initialize the input array with fixed values, the compiler may assume that it is constant data storage that can be placed in program memory. To ensure that the input and output tensors are in memory spaces accessible by the Ethos-U55 microNPU, we need to specify the memory section attribute when declaring the arrays. In this project, we will store the input and output tensors in DDR.
The following code shows how to place an int8_t array named K in the DDR storage with a 16-byte alignment on Corstone-300 FVP:
int8_t K[4] __attribute__((section("ethosu_scratch"), aligned(16)));
The name passed into the __attribute__ section specification (ethosu_scratch) and the alignment (16) must match what is reported in the Linker script used to compile our application. In our case, we will be using the Linker file available at the following link: https://github.com/apache/tvm/blob/main/apps/microtvm/ethosu/corstone300.ld.
How to do it…
Before developing the Python script, let's extract the input quantization parameters from the CIFAR-10 model. You can simply use the Netron web application (https://netron.app/) for this purpose. On Netron, click on the Open Model… button and read the quantization parameters displayed for the first layer of the network, as shown in the following screenshot:

Figure 8.12 – Netron output for the first layer
The quantization field reports the formula to convert the 8-bit quantized value into a floating point, also described in Chapter 3, Building a Weather Station with TensorFlow Lite for Microcontrollers. Therefore, the scale parameter is 0.0039215688… while the zero point is -128.
Attention
Pay attention to the zero point value. This parameter is not +128 because the 8-bit quantization formula subtracts the zero point from the integer 8-bit value.
Now, open your preferred Python editor and create a new file named prepare_assets.py in the ~/project_npu/src folder.
Open the prepare_assets.py file and take the following steps to generate the C-byte arrays for the input, output, and labels:
- Use two variables to keep the input quantization parameters of the CIFAR-10 model:
input_quant_offset = -128
input_quant_scale = 0.003921568859368563
- Write a function to generate the content of the input and output C header files:
def gen_c_array(name, size, data):
str_out = "#include <tvmgen_default.h> "
str_out += f"const unsigned int {name}_len = {size}; "
str_out += f'int8_t {name}[] __attribute__((section("ethosu_scratch"), aligned(16))) = '
str_out += " { "
str_out += f'{data}'
str_out += ' };'
return str_out
Since the format, type, and data storage are the same for the input and output tensors, we can have a template string to replace only the different parts, which are as follows:
- The name of the array (name)
- The size of the array (size)
- The values to store in the array (data)
As you can see from the preceding code, the function expects {data} to be a single string of integer values that are comma-separated.
- Write a function to convert a 1D NumPy array of np.int8 values into a single string of integer values that are comma-separated:
def array_to_str(data):
NUM_COLS = 12
val_string = ''
for i, val in enumerate(data):
val_string += str(val)
if (i + 1) < len(data):
val_string += ','
if (i + 1) % NUM_COLS == 0:
val_string += ' '
return val_string
In the preceding code, the NUM_COLS variable limits the number of values on a single row. In our case, NUM_COLS is set to 12 to add a new-line character after every 12 values.
- Define the function for generating the input C-byte array:
def gen_input(img_file):
img_path = os.path.join(f"{img_file}")
img_resized = Image.open(img_path).resize((32, 32))
In the previous code, the gen_input() function takes the path to the image file (image_name) as an argument. The image is then loaded and resized to 32x32 using the Python Pillow library.
- Convert the resized image into a NumPy array of floating-point values:
img_data = np.asarray(img_resized).astype("float32")
Next, normalize and quantize the pixel values:
img_data /= 255.0
img_data /= input_quant_scale
img_data += input_quant_offset
- Cast the quantized image to np.int8 and convert it into a single string of integer values:
input_data = img_data.astype(np.int8)
input_data = input_data.ravel()
val_string = array_to_str(input_data)
In the previous code, we used the NumPy ravel() function to return a contiguous flatten array since the array_to_str() function only accepts the input array as a 1D object.
- Generate the input C-byte array as a string and save it as the C header file (inputs.h) in the include/ folder:
c_code = gen_c_array("input", input_data.size, val_string)
with open("include/inputs.h", 'w') as file:
file.write(c_code)
- Write a function to generate the C header file of the output tensor (outputs.h) in the include/ folder:
def gen_output():
output_data = np.zeros([10], np.int8)
val_string = array_to_str(output_data)
c_code = gen_c_array("output", output_data.size, val_string)
with open("include/outputs.h", 'w') as file:
file.write(c_code)
- Write a function to generate the C header file of the labels (labels.h) in the include/ folder:
def gen_labels():
val_string = "char* labels[] = "
val_string += '{"airplane", "automobile", "bird", '
val_string += '"cat", "deer", "dog", '
val_string += '"frog", "horse", "ship", "truck"};'
with open("include/labels.h", 'w') as file:
file.write(val_string)
- Execute the gen_input(), gen_output(), and gen_labels() functions:
if __name__ == "__main__":
gen_input(sys.argv[1])
gen_output()
gen_labels()
As you can see from the preceding code, we pass the first command-line argument to gen_input() to provide the path of the image file supplied by the user.
At this point, the Python script is ready, and we just need to finalize the application to run the CIFAR-10 model on the Ethos-U55 microNPU.
Building and running the model on Ethos-U55
Here we are. Just this recipe keeps us from completing this book. All the tools are installed, and the TFLite model is converted to C code, so where does that leave us? We still need to build an application to recognize images with the CIFAR-10 model. Once the application is ready, we need to compile it and run it on Corstone-300 FVP.
Although it seems there is still a lot to do, in this recipe, we will modify a prebuilt sample for the Ethos-U microNPU to simplify all the remaining technicalities.
In this recipe, we will show you how to modify the Ethos-U example available in TVM to run the CIFAR-10 inference. The application will then be compiled with the Makefile and Linker scripts provided in the prebuilt sample and finally executed on Corstone-300 FVP.
The following Bash script contains the commands referred to in this recipe:
- build_and_run.sh:
https://github.com/PacktPublishing/TinyML-Cookbook/blob/main/Chapter08/BashScripts/build_and_run.sh
Getting ready
The prebuilt example considered in this recipe is available in the TVM source code within the tvm/apps/microtvm/ethosu folder. The sample is a demo to perform a single image classification inference with MobileNet V1 on Ethos-U55. Inside the sample folder, you'll find the following:
- Application source code in the include/ and src/ subdirectories
- Scripts to build the demo for Corstone-300 FVP (Makefile, arm-none-eabi-gcc.cmake, and corstone300.ld)
- Python scripts to generate the input, output, and label C header files (convert_image.py and convert_labels.py)
- Script to run the demo on Corstone-300 FVP (run_demo.sh)
From the preceding files, we just need the application source code and the scripts to build the demo.
How to do it…
Open the terminal and take the following steps to build and run the CIFAR-10 inference on Ethos-U55:
- Copy the application source code from the ~/project_npu/tvm/apps/microtvm/ethosu/ sample folder to the ~/project_npu/src directory:
$ cp -r ~/project_npu/tvm/apps/microtvm/ethosu/include ~/project_npu/src/
$ cp -r ~/project_npu/tvm/apps/microtvm/ethosu/src ~/project_npu/src/
- Copy the build scripts (Makefile, arm-none-eabi-gcc.cmake, and corstone300.ld) from the ~/project_npu/tvm/apps/microtvm/ethosu/ sample folder to the ~/project_npu/src directory:
$ cp -r ~/project_npu/tvm/apps/microtvm/ethosu/Makefile ~/project_npu/src/
$ cp -r ~/project_npu/tvm/apps/microtvm/ethosu/arm-none-eabi-gcc.cmake ~/project_npu/src/
$ cp -r ~/project_npu/tvm/apps/microtvm/ethosu/corstone300.ld ~/project_npu/src/
- Download the ship.jpg image from the TinyML-Cookbook GitHub repository: https://github.com/PacktPublishing/TinyML-Cookbook/blob/main/Chapter08/ship.jpg (source: Pixabay). Save the file in the ~/project_npu/src folder.
- Show the list of directories and files in the ~/project_npu/src folder:
$ sudo apt-get install tree
$ cd ~/project_npu/src/
$ tree
The expected output in the terminal is shown in the following figure:
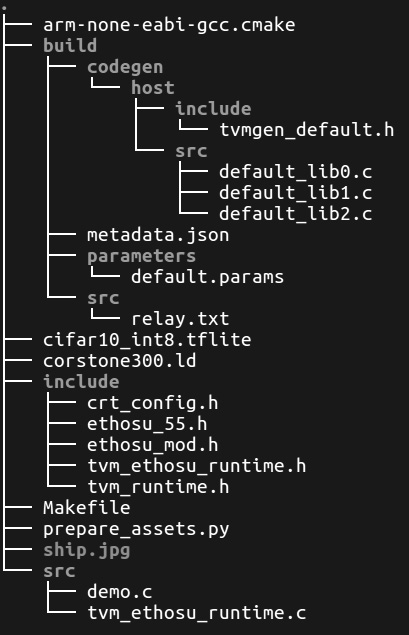
Figure 8.13 – Expected output after the tree command
Before continuing with the next step, check whether you have all the files and directories listed in the previous figure.
- Use the prepare_assets.py Python script to generate the C header files for the input, output, and labels:
$ cd ~/project_npu/src
$ python3 prepare_assets.py ship.jpg
In the preceding code, we pass the ship.jpg file as a command-line argument to initialize the input tensor with the content of a ship image.
The Python script will save the C header files in the ~/project_npu/src/include folder.
- Open the demo.c file in the ~/project_npu/src/src directory and go to line 46. Replace the .input field's name with the name used by TVM in the tvmgen_default_inputs struct. The tvmgen_default_inputs struct is declared in the ~/project_npu/src/build/codegen/host/include/tvmgen_default.h file. If you have downloaded the pretrained CIFAR-10 model from the TinyML-Cookbook GitHub repository, the name should be serving_default_input_2_0. Therefore, the demo.c file should have the following edit:
.serving_default_input_2_0 = input;
- Open the Makefile script in the ~/project_npu/src directory with any text editor. Go to line 25 and replace the /opt/arm/ethosu path with ${HOME}/project_npu/sw_libs:
ETHOSU_PATH=${HOME}/project_npu/sw_libs
The preceding change is required to inform the Makefile script on the location of the software libraries installed in the Installing the Arm toolchain and Ethos-U driver stack recipe. Next, save and close the file.
- Build the application using the make command:
$ make
The Makefile script will generate a binary named demo in the ~/project_npu/src/build folder.
- Run the demo executable on the Corstone-300 FVP:
$ FVP_Corstone_SSE-300_Ethos-U55 -C cpu0.CFGDTCMSZ=15
-C cpu0.CFGITCMSZ=15 -C mps3_board.uart0.out_file="-"
-C mps3_board.uart0.shutdown_tag="EXITTHESIM"
-C mps3_board.visualisation.disable-visualisation=1
-C mps3_board.telnetterminal0.start_telnet=0
-C mps3_board.telnetterminal1.start_telnet=0
-C mps3_board.telnetterminal2.start_telnet=0
-C mps3_board.telnetterminal5.start_telnet=0
-C ethosu.extra_args="--fast"
-C ethosu.num_macs=256 ./build/demo
From the previous command, pay attention to the ethosu.num_macs=256 argument. This option refers to the number of MACs in the compute engine of the Ethos-U55 microNPU and must match what is specified in TVM when compiling the TFLite model.
Once you have launched the Corstone-300 command, you should see the following output in the console:

Figure 8.14 – Expected output after the CIFAR-10 inference
As reported at the bottom of the previous screenshot, the image is correctly classified as a ship.
And…that's it! With this last recipe but first application on Arm Ethos-U55, you are definitely ready to make even smarter TinyML solutions on Cortex-M-based microcontrollers!