


Implementing high availability for the Tivoli Workload Scheduler master domain manager
This chapter describes implementing high availability for the Tivoli Workload Scheduler master domain manager by using Tivoli System Automation for Multiplatforms. The design of the automation policies is based on the concepts described in Chapter 24, “Tivoli Workload Scheduler: Architecture and concepts” on page 719 and Chapter 25, “Tivoli System Automation for Multiplatforms: Concepts” on page 745.
The policies used in this chapter can be downloaded from the ITSO FTP site. For download instructions, see Appendix A, “Additional material” on page 803.
This chapter contains the following topics:
26.1 Overview of the setup
The setup used in this chapter consists of two AIX 6.1 nodes: twspoc1 and twspoc2. Each is located in a separate computer room. The nodes have two logical volume manager (LVM) mirrored-volume groups: rootvg and twsvg.
The following software is used:
•AIX 6.1 TL 4 SP 4
•Tivoli System Automation 3.2 GA
•Tivoli Workload Scheduler 8.5.1 FP 1
•Tivoli Dynamic Workload Console 8.5.1 FP 1
•DB2 9.5 FP 4
26.2 Benefits
Using Tivoli System Automation for Multiplatforms, for automating the failover of the master domain manager, has the following advantages:
•By employing granular automation policies, the dependencies between all components are honored.
•The use of an external tool ensures that all components are monitored independently.
•The intelligence of the policies ensures that the required corrective actions are made.
•Compared to a manual failover of all impacted components, the amount of time required to perform a failover to the backup master domain manager are reduced significantly.
26.3 Installing DB2
This section describes the steps to install the DB2 instances on the master domain manager and the backup master domain manager. These instances host the Tivoli Workload Scheduler database.
26.3.1 Creating DB2 instance owner and file systems
Before installing DB2, the DB2 instance owner and file systems must be created on the twspoc1 and twspoc2 nodes. For demonstration purposes, the DB2 instance owner db2tws will be created. Figure 26-1 on page 765 shows the file system structure that is created in the twsvg volume group.

Figure 26-1 DB2 file system structure
The /db2 file system is contained in the DB2 9.5 binaries; the DB2 instance is created in the /db2/TWS file system. The table spaces are created in the /db2/TWS/data file system. Finally, the /db2/TWS/log_dir file system is used for the log files; the /db2/TWS/log_arch will contain the archived log files. The tasks must be performed as root on twspoc1 and twspoc2, as shown in Example 26-1.
Example 26-1 DB2 instance owner and file system creation
# crfs -v jfs2 -g twsvg -m /db2 -A yes -a size=2G
# crfs -v jfs2 -g twsvg -m /db2/TWS -A yes -a size=1G
# crfs -v jfs2 -g twsvg -m /db2/TWS/log_dir -A yes -a size=512M
# crfs -v jfs2 -g twsvg -m /db2/TWS/data -A yes -a size=2G
# crfs -v jfs2 -g twsvg -m /db2/TWS/log_arch -A yes -a size=1G
# mount /db2
# mkdir /db2/TWS
# mount /db2/TWS
# mkdir /db2/TWS/log_dir /db2/TWS/data /db2/TWS/log_arch
# mount /db2/TWS/log_dir
# mount /db2/TWS/data
# mkdir -p /db2/TWS/data/db2tws/NODE0000/SQL00001
# mount /db2/TWS/log_arch
# mkgroup -R compat id=500 twsgrp
# mkuser -R compat id=501 pgrp=twsgrp home=/db2/TWS rlogin=false cpu=-1 data=-1 stack=-1 cpu_hard=-1 data_hard=-1 stack_hard=-1 db2tws
# passwd db2tws
# chown -R db2tws.twsgrp /db2/TWS
26.3.2 Installing and upgrading DB2
Next, DB2 9.5 is installed in the /db2 file system on twspoc1 and twspoc2. After the installation of the GA release, DB2 9.5 is upgraded to FP 4 and the DB2 ESE restricted license is installed. The tasks must be performed as root on twspoc1 and twspoc2, as illustrated in Example 26-2.
Example 26-2 Instance owner and file system creation
# ./db2_install -b /db2/V9.5 -f NOTSAMP -p ESE -n
The execution completed successfully.
# ./installFixPack -b /db2/V9.5
DBI1017I installFixPack is updating the DB2 product(s) installed in
location /db2/V9.5.
...
The execution completed successfully.
# /db2/V9.5/adm/db2licm -a ./db2ese_o.lic
LIC1402I License added successfully.
|
Note: The version of Tivoli System Automation for Multiplatforms that is included with DB2 9.5 is not be used. Tivoli System Automation for Multiplatforms 3.2 is installed separately.
|
26.3.3 Creating DB2 instances
Following the DB2 installation, the DB2 instance db2tws is created on both twspoc1 and twspoc2. This task must be performed as root on both twspoc1 and twspoc2. See Example 26-3.
Example 26-3 DB2 instance creation
# /db2/V9.5/instance/db2icrt -u db2tws db2tws
DBI1070I Program db2icrt completed successfully.
Verify the DB2 level of the instance as db2tws. See Example 26-4.
Example 26-4 DB2 instance level verification
$ db2level
DB21085I Instance "db2tws" uses "64" bits and DB2 code release "SQL09054" with level identifier "06050107".
Informational tokens are "DB2 v9.5.0.4", "s090429", "U825478", and Fix Pack "4".
Product is installed at "/db2/V9.5".
26.3.4 Enabling TCP/IP communication
To communicate with the Tivoli Workload Scheduler database from the embedded WebSphere Application Server, TCP/IP communication must be enabled on the database manager. TCP port 50000 is used in this setup. Finally, the database manager is started.
Example 26-5 shows the commands to run as db2tws on twspoc1 and twspoc2.
Example 26-5 Enabling TCP/IP communication
$ db2 update dbm cfg using SVCENAME 50000
DB20000I The UPDATE DATABASE MANAGER CONFIGURATION command completed
successfully.
$ db2set DB2COMM=tcpip
$ db2start
05/18/2010 11:50:48 0 0 SQL1063N DB2START processing was successful.
SQL1063N DB2START processing was successful.
Next, verify that the database manager is listening on TCP port 50000 by using the netstat or lsof command, as illustrated in Example 26-6.
Example 26-6 Verifying TCP/IP communication
# netstat -anfinet | grep 50000
tcp4 0 0 *.50000 *.* LISTEN
# lsof –i 2>/dev/null | grep 50000
db2sysc 622648 db2tws 6u IPv4 0xf10002000283abb0 0t0
TCP *:50000 (LISTEN)
26.4 Installing Tivoli Workload Scheduler
This section describes the installation procedure for Tivoli Workload Scheduler. The master domain manager is installed on twspoc1; the backup master domain manager is installed on twspoc2.
26.4.1 Creating Tivoli Workload Scheduler user and file systems
Prior to installing the master domain manager and backup master domain manager, the Tivoli Workload Scheduler user and file systems must be created. For demonstration purposes, the Tivoli Workload scheduler user twsusr is used. Figure 26-2 illustrates the file system structure that is created in the twsvg volume group on both nodes.

Figure 26-2 Tivoli Workload Scheduler file system structure
The /TWA file system is the main entry point for the Tivoli Workload Automation installation. As part of this Tivoli Workload Automation installation, Tivoli Workload Scheduler is installed in the /TWA/TWS file system; the Dynamic Workload Broker Component is installed in /TWA/TDWB. Because the embedded WebSphere Application Server instance is common to Tivoli Workload Scheduler and the Dynamic Workload Broker Component, it is installed in the /TWA file system. Finally, a separate file system /TWA/TWS/stdlist for Tivoli Workload Scheduler traces and job logs is created.
Example 26-7 outlines the steps to be performed as root on twspoc1 and twspoc2.
Example 26-7 Tivoli Workload Scheduler user and file system creation
# crfs -v jfs2 -g twsvg -m /TWA -A yes -a size=1G
# crfs -v jfs2 -g twsvg -m /TWA/TWS -A yes -a size=2G
# crfs -v jfs2 -g twsvg -m /TWA/TWS/stdlist -A yes -a size=512M
# crfs -v jfs2 -g twsvg -m /TWA/TDWB -A yes -a size=512M
# mount /TWA
# mkdir /TWA/TWS /TWA/TDWB
# mount /TWA/TWS
# mkdir /TWA/TWS/stdlist
# mount /TWA/TWS/stdlist
# mount /TWA/TDWB
# mkuser -R compat id=502 pgrp=twsgrp home=/TWA/TWS rlogin=false cpu=-1 data=-1 stack=-1 cpu_hard=-1 data_hard=-1 stack_hard=-1 twsusr
# passwd twsusr
# chown -R twsusr.twsgrp /TWA/TWS /TWA/TDWB
26.4.2 Installing the Master Domain Manager
The following steps must be performed on twspoc1 as root.:
1. Start the setup.
2. Select the language for the installer. Click Next.
3. Click Next on the welcome window.
4. Accept the license agreement. Click Next.

Figure 26-3 Tivoli Workload Scheduler setup, 1
6. Specify the Tivoli Workload Scheduler user and password. Click Next. See Figure 26-4 on page 769.

Figure 26-4 Tivoli Workload Scheduler setup, 2
7. Specify the company name and workstation name (TWSPOC1). Do not select Add the FINAL job stream to the database to automate the production cycle because it will be done manually. Click Next.

Figure 26-5 Tivoli Workload Scheduler setup, 3
9. Select DB2 Database Enterprise Edition. Click Next.

Figure 26-6 Tivoli Workload Scheduler setup, 4
11. Enter the DB2 instance details (name, port, instance owner, password). Click Next.
12. Enter the table space details. Select Specify the advanced configuration parameters for the Tivoli Workload Scheduler database. The following path is for the table space:
TWS_DATA is /db2/TWS/data/db2tws/NODE0000/SQL00001/TWS_DATA
The following path is for the TWS_LOG table space
/db2/TWS/data/db2tws/NODE0000/SQL00001/TWS_LOG
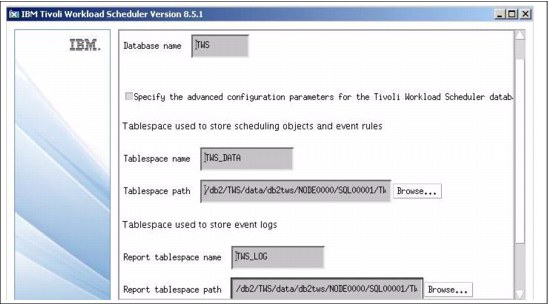
Figure 26-7 Tivoli Workload Scheduler setup, 5
13. Do not select the Enable the dynamic scheduling capability check box. See Figure 26-8. The Dynamic Workload Broker Component is configured separately. Click Next.

Figure 26-8 Tivoli Workload Scheduler setup, 6
14. Verify all settings. Click Next.
15. Click Finish when the installation is complete.
16. Upgrade the master domain manager to Fix Pack 1.
17. After the setup, stop the embedded WebSphere Application Server instance on twspoc1, as shown in Example 26-8.
Example 26-8 Stopping embedded WebSphere Application Server instance on twspoc1
$ conman 'stopappserver;wait' 2>/dev/null
%stopappserver;wait
AWSBHU622I A stop command was issued for the application server on workstation "TWSPOC1".
26.4.3 Configuring HADR and ACR
Perform the following steps as db2tws on twspoc1:
1. Update the location of the log files and archived log files, as shown in Example 26-9.
Example 26-9 Updating location of log files and archived log files
$ db2 update db cfg for TWS using NEWLOGPATH /db2/TWS/log_dir
DB20000I The UPDATE DATABASE CONFIGURATION command completed successfully.
$ db2 update db cfg for TWS using LOGARCHMETH1 DISK:/db2/TWS/log_arch
DB20000I The UPDATE DATABASE CONFIGURATION command completed successfully.
2. Set the LOGINDEXBUILD parameter so that index creation, re-creation, or reorganization operations are logged. See Example 26-10.
Example 26-10 Enabling LOGINDEXBUILD
$ db2 update db cfg for TWS using LOGINDEXBUILD ON
DB20000I The UPDATE DATABASE CONFIGURATION command completed successfully.
3. Back up the Tivoli Workload Scheduler database, as illustrated in Example 26-11.
Example 26-11 Backing up DB2 database
$ db2 backup db TWS to /tmp
Backup successful. The timestamp for this backup image is : 20100519203148
4. Copy the backup image to twspoc2, for example using secure copy (SCP).
On twspoc2, perform the following steps as db2tws.
1. Restore the Tivoli Workload Scheduler database, as outlined in Example 26-12.
Example 26-12 Restoring DB2 database
$ db2 restore db TWS from /tmp replace history file
DB20000I The RESTORE DATABASE command completed successfully.
2. Configure HADR, as shown in Example 26-13.
Example 26-13 Configuring HADR on twspoc2
$ db2 update db cfg for TWS using HADR_LOCAL_HOST twspoc2
DB20000I The UPDATE DATABASE CONFIGURATION command completed successfully.
$ db2 update db cfg for TWS using HADR_LOCAL_SVC 55002
DB20000I The UPDATE DATABASE CONFIGURATION command completed successfully.
$ db2 update db cfg for TWS using HADR_REMOTE_HOST twspoc1
DB20000I The UPDATE DATABASE CONFIGURATION command completed successfully.
$ db2 update db cfg for TWS using HADR_REMOTE_SVC 55001
DB20000I The UPDATE DATABASE CONFIGURATION command completed successfully.
$ db2 update db cfg for TWS using HADR_REMOTE_INST db2tws
DB20000I The UPDATE DATABASE CONFIGURATION command completed successfully.
$ db2 update db cfg for TWS using HADR_TIMEOUT 10
DB20000I The UPDATE DATABASE CONFIGURATION command completed successfully.
$ db2 update db cfg for TWS using HADR_PEER_WINDOW 120
DB20000I The UPDATE DATABASE CONFIGURATION command completed successfully.
3. Configure ACR, as illustrated in Example 26-14.
Example 26-14 Configuring ACR on twspoc2
$ db2 update alternate server for db TWS using hostname twspoc1 port 50000
DB20000I The UPDATE ALTERNATE SERVER FOR DATABASE command completed
successfully.
4. Restart DB2, using db2stop and db2start.
Example 26-15 Starting HADR on twspoc2
$ db2 start hadr on db TWS as standby
DB20000I The START HADR ON DATABASE command completed successfully.
On twspoc1, perform the following steps as db2tws:
1. Configure HADR, as illustrated in Example 26-16.
Example 26-16 Configuring HADR on twspoc1
$ db2 update db cfg for TWS using HADR_LOCAL_HOST twspoc1
DB20000I The UPDATE DATABASE CONFIGURATION command completed successfully.
$ db2 update db cfg for TWS using HADR_LOCAL_SVC 55001
DB20000I The UPDATE DATABASE CONFIGURATION command completed successfully.
$ db2 update db cfg for TWS using HADR_REMOTE_HOST twspoc2
DB20000I The UPDATE DATABASE CONFIGURATION command completed successfully.
$ db2 update db cfg for TWS using HADR_REMOTE_SVC 55002
DB20000I The UPDATE DATABASE CONFIGURATION command completed successfully.
$ db2 update db cfg for TWS using HADR_REMOTE_INST db2tws
DB20000I The UPDATE DATABASE CONFIGURATION command completed successfully.
$ db2 update db cfg for TWS using HADR_TIMEOUT 10
DB20000I The UPDATE DATABASE CONFIGURATION command completed successfully.
$ db2 update db cfg for TWS using HADR_PEER_WINDOW 120
DB20000I The UPDATE DATABASE CONFIGURATION command completed successfully.
2. Configure ACR, as shown in Example 26-17.
Example 26-17 Configuring ACR on twspoc1
$ db2 update alternate server for db TWS using hostname twspoc2 port 50000
DB20000I The UPDATE ALTERNATE SERVER FOR DATABASE command completed successfully.
3. Restart DB2, using db2stop and db2start.
4. Start HADR on twspoc1 as primary, as shown in Example 26-18.
Example 26-18 Starting HADR on twspoc1
$ db2 start hadr on db TWS as primary
DB20000I The START HADR ON DATABASE command completed successfully.
5. As db2tws, verify that the status of the HADR pair is Peer, as illustrated in Example 26-19 on page 773.
Example 26-19 Verifying HADR status
$ db2pd -d TWS –hadr | grep –p ‘HADR Information’
HADR Information:
Role State SyncMode HeartBeatsMissed LogGapRunAvg (bytes)
Primary Peer Nearsync 0 0
On twspoc2, perform a takeover on the Tivoli Workload Scheduler database as db2tws, as outlined in Example 26-20.
Example 26-20 Performing HADR takeover on twspoc2
DB20000I The TAKEOVER HADR ON DATABASE command completed successfully.
26.4.4 Installing the Backup Master Domain Manager
Perform the following steps on twspoc2 as root.:
1. Start the setup.
2. Select the language for the installer. Click Next.
3. Click Next on the welcome window.
4. Accept the license agreement. Click Next.

Figure 26-9 Tivoli Workload Scheduler setup, 7
6. Specify the Tivoli Workload Scheduler user and password. Click Next.
7. Specify the company name, workstation name (TWSPOC2), and Master Domain Manager (TWSPOC1).
8. Specify the install location (/TWA). Click Next.
9. Select DB2 Database Enterprise Edition. Click Next.
10. Specify the DB2 search path (/db2/TWS/sqllib). Click Next.
11. Enter the DB2 instance details (name, port, instance owner, password). Click Next.
12. The table space details cannot be altered during the installation of the backup master domain manager. Click Next to continue.
13. Do not select Enable the dynamic scheduling capability, as shown in Figure 26-10 on page 774. The Dynamic Workload Broker Component server is configured separately. Click Next.

Figure 26-10 Tivoli Workload Scheduler setup, 8
14. Verify all settings. Click Next.
15. Click Finish when the installation is complete.
16. Upgrade the backup master domain manager to Fix Pack 1.
17. After the setup, stop the embedded WebSphere Application Server instance on twspoc2, as shown in Example 26-21.
Example 26-21 Stopping embedded WebSphere Application Server instance on twspoc2
$ conman 'stopappserver;wait' 2>/dev/null
%stopappserver;wait
AWSBHU622I A stop command was issued for the application server on workstation "TWSPOC2".
18. Finally, as db2tws, perform a takeover on the Tivoli Workload Scheduler database on twspoc1, as illustrated in Example 26-22.
Example 26-22 Performing HADR takeover on twspoc1
$ db2 takeover hadr on db TWS
DB20000I The TAKEOVER HADR ON DATABASE command completed successfully.
26.5 Installing and configuring Tivoli System Automation for Multiplatforms
This section describes the steps to install and configure the Tivoli System Automation for Multiplatforms cluster. Perform the following steps on twspoc1 and twspoc2 as root.:
1. Install the Tivoli System Automation for Multiplatforms software and prepare node security, as shown in Example 26-23.
Example 26-23 Tivoli System Automation for Multiplatforms installation
# ./prereqSAM
prereqSAM: All prerequisites for the ITSAMP installation are met on operating system: AIX 6100-04
# ./installSAM
SAM is currently not installed.
. . .
installSAM: All packages were installed successfully.
# preprpnode twspoc1 twspoc2
2. Add CT_MANAGEMENT_SCOPE=2 to /etc/environment and start a new shell. This environment variable determines the scope of the cluster. If set to 2, all nodes in the cluster are in scope.
3. Install the HADR scripts for Tivoli System Automation for Multiplatforms, as shown in Example 26-24.
Example 26-24 Installing HADR scripts for Tivoli System Automation for Multiplatforms
DBI1099I The DB2 HA scripts for the SA MP Base Component were
successfully installed in /usr/sbin/rsct/sapolicies/db2.
...
The DB2 installer successfully installed the DB2 HA scripts.
On twspoc1, run the following tasks as root:
1. Create and start the Tivoli System Automation for Multiplatforms cluster, as illustrated in Example 26-25.
Example 26-25 Creating and starting the Tivoli System Automation for Multiplatforms cluster
# mkrpdomain TWS twspoc1 twspoc2
# startrpdomain TWS
2. Verify the state of the cluster, as illustrated in Example 26-26.
Example 26-26 Verifying the state of the Tivoli System Automation for Multiplatforms cluster
# lsrpdomain
Name OpState RSCTActiveVersion MixedVersions TSPort GSPort
TWS Online 2.5.5.1 No 12347 12348
# lsrpnode
Name OpState RSCTVersion
twspoc1 Online 2.5.5.1
twspoc2 Online 2.5.5.1
3. Create a network tie breaker for the cluster, as shown in Example 26-27.
Example 26-27 Creating network tie breaker for the cluster
# mkequ VLAN1 IBM.NetworkInterface:en0:twspoc1,en0:twspoc2
# mkrsrc IBM.TieBreaker Type="EXEC" Name="NETWORKTB" DeviceInfo='PATHNAME=/usr/sbin/rsct/bin/samtb_net Address=192.168.1.1 Log=1' PostReserveWaitTime=30
# chrsrc -c IBM.PeerNode OpQuorumTieBreaker="NETWORKTB"
26.6 Integrating DB2 HADR and Tivoli System Automation for Multiplatforms
This section integrates the existing DB2 HADR pair in the Tivoli System Automation for Multiplatforms cluster using db2haicu (DB2 High Availability Instance Configuration Utility). This tool automatically creates the required DB2 HADR resources in the cluster based on an XML input file, as shown in Example 26-28 on page 776.
Example 26-28 XML input file for db2haicu
<?xml version="1.0" encoding="UTF-8"?>
<DB2Cluster xmlns:xsi="http://www.w3.org/2001/XMLSchema-instance" xsi:noNamespaceSchemaLocation="db2ha.xsd" clusterManagerName="TSA" version="1.0">
<ClusterDomain domainName="TWS">
<ClusterNode clusterNodeName="twspoc1"/>
<ClusterNode clusterNodeName="twspoc2"/>
</ClusterDomain>
<FailoverPolicy>
<HADRFailover/>
</FailoverPolicy>
<DB2PartitionSet>
<DB2Partition dbpartitionnum="0" instanceName="db2tws"/>
</DB2PartitionSet>
<HADRDBSet>
<HADRDB databaseName="TWS" localInstance="db2tws" remoteInstance="db2tws" localHost="twspoc1" remoteHost="twspoc2"/>
<VirtualIPAddress baseAddress="192.168.1.202" subnetMask="255.255.255.0" networkName="VLAN1"/>
</HADRDBSet>
</DB2Cluster>
Run the following commands on twspoc2 as db2tws:
1. Verify that twspoc2 is the standby node in the HADR pair, as shown in Example 26-29.
Example 26-29 Verifying HADR standby node
$ /db2/TWS/sqllib/bin/db2 get snapshot for database on TWS | grep Role
Role = Standby
2. Run the db2haicu setup, as illustrated in Example 26-30.
Example 26-30 The db2haicu setup
$ /db2/V9.5/bin/db2haicu -f ./db2haicu.xml
Welcome to the DB2 High Availability Instance Configuration Utility (db2haicu).
. . .
Adding DB2 database partition 0 to the cluster ...
Adding DB2 database partition 0 to the cluster was successful.
. . .
All cluster configurations have been completed successfully.
db2haicu exiting ...
Run the following commands on twspoc1 as db2tws.
1. Verify that twspoc1 is the primary node in the HADR pair, as shown in Example 26-31.
Example 26-31 Verifying HADR primary node
$ /db2/TWS/sqllib/bin/db2 get snapshot for database on TWS | grep Role
Role = Primary
Example 26-32 The db2haicu setup
$ /db2/V9.5/bin/db2haicu -f ./db2haicu.xml
Welcome to the DB2 High Availability Instance Configuration Utility (db2haicu).
. . .
Adding DB2 database partition 0 to the cluster ...
Adding DB2 database partition 0 to the cluster was successful.
Adding HADR database TWS to the domain ...
Adding HADR database TWS to the domain was successful.
All cluster configurations have been completed successfully.
db2haicu exiting ...
Example 26-33 Output of lssam command
Online IBM.ResourceGroup:db2_db2tws_db2tws_TWS-rg Nominal=Online
|- Online IBM.Application:db2_db2tws_db2tws_TWS-rs
|- Online IBM.Application:db2_db2tws_db2tws_TWS-rs:twspoc1
'- Offline IBM.Application:db2_db2tws_db2tws_TWS-rs:twspoc2
'- Online IBM.ServiceIP:db2ip_192_168_1_202-rs
|- Online IBM.ServiceIP:db2ip_192_168_1_202-rs:twspoc1
'- Offline IBM.ServiceIP:db2ip_192_168_1_202-rs:twspoc2
Online IBM.ResourceGroup:db2_db2tws_twspoc1_0-rg Nominal=Online
'- Online IBM.Application:db2_db2tws_twspoc1_0-rs
'- Online IBM.Application:db2_db2tws_twspoc1_0-rs:twspoc1
Online IBM.ResourceGroup:db2_db2tws_twspoc2_0-rg Nominal=Online
'- Online IBM.Application:db2_db2tws_twspoc2_0-rs
'- Online IBM.Application:db2_db2tws_twspoc2_0-rs:twspoc2
Online IBM.Equivalency:db2_db2tws_db2tws_TWS-rg_group-equ
|- Online IBM.PeerNode:twspoc1:twspoc1
'- Online IBM.PeerNode:twspoc2:twspoc2
Online IBM.Equivalency:db2_db2tws_twspoc1_0-rg_group-equ
'- Online IBM.PeerNode:twspoc1:twspoc1
Online IBM.Equivalency:db2_db2tws_twspoc2_0-rg_group-equ
'- Online IBM.PeerNode:twspoc2:twspoc2
As a result, Tivoli System Automation for Multiplatforms fully control the Tivoli Workload Scheduler database. If a problem occurs with the DB2 primary node, Tivoli System Automation for Multiplatforms automatically performs a failover to the DB2 standby node.
|
Note: The virtual IP address is collocated with the DB2 primary node.
|
26.7 Integrating Tivoli Workload Scheduler and Tivoli System Automation for Multiplatforms for high availability
This section integrates Tivoli Workload Scheduler and Tivoli System Automation for Multiplatforms. Each Tivoli Workload Scheduler component is described separately.
26.7.1 The embedded WebSphere Application Server
On twspoc1 and twspoc2, perform the following steps as root.
1. Create a file (/tmp/ds.txt) that contains the entries shown in Example 26-34. DB2Type4ServerName will contain the virtual IP address of the DB2 primary node.
Example 26-34 Updating DataSourceProperties, 1
DB2Type4ServerName=192.168.1.202
DB2Type4DbFailOverEnabled=true
2. Update the data source properties, as illustrated in Example 26-35.
Example 26-35 Updating DataSourceProperties, 2
# /TWA/wastools/changeDataSourceProperties.sh /tmp/ds.txt
...
Configuring JDBC Path Variables...
Configuring DB2 Type2 DataSource...
Configuring DB2 Type4 DataSource...
Configuring Oracle Type2 DataSource...
Configuring Oracle Type4 DataSource...
Configuring JNDI Names...
Saving data...
|
Note: Enabling the DB2Type4DbFailOverEnabled custom property instructs the JDBC driver of the embedded WebSphere Application Server to retry the connection to the database DB2Type4ConnRetriesDuringDBFailover times (default 100). The interval is regulated by the DB2Type4ConnRetryIntervalDuringDBFailover option (default is3000 ms).
|
As twsusr on twspoc1 and twspoc2, disable the auto restart option of the embedded WebSphere Application Server in the localopts file (Appserver auto restart = no). The reason is because Tivoli System Automation for Multiplatforms will be responsible for monitoring and managing the embedded WebSphere Application Server instance.
Next, the Tivoli System Automation for Multiplatforms resources, resource groups and equivalencies for the embedded WebSphere Application Server instances are created.
Run the following commands on twspoc1 as root:
1. Create resources and resource groups for the embedded WebSphere Application Server instances, as shown in Example 26-36.
Example 26-36 Creating resources and resource groups for the eWAS instances
# mkrsrc -f ./eWAS_twspoc1-rs.def IBM.Application
# mkrsrc -f ./eWAS_twspoc2-rs.def IBM.Application
# mkrg -n twspoc1 eWAS_twspoc1-rg
# mkrg -n twspoc2 eWAS_twspoc2-rg
# addrgmbr -g eWAS_twspoc1-rg IBM.Application:eWAS_twspoc1-rs:twspoc1
# addrgmbr -g eWAS_twspoc2-rg IBM.Application:eWAS_twspoc2-rs:twspoc2
# resetrsrc -s 'Name == "eWAS_twspoc1-rs"' IBM.Application
# resetrsrc -s 'Name == "eWAS_twspoc2-rs"' IBM.Application
2. Create managed relations for the embedded WebSphere Application Server instances, as illustrated in Example 26-37.
Example 26-37 Creating managed relations for the eWAS instances
# mkrel -p StartAfter -S IBM.ResourceGroup:eWAS_twspoc1-rg -G IBM.ResourceGroup:db2_db2tws_db2tws_TWS-rg
# mkrel -p StartAfter -S IBM.ResourceGroup:eWAS_twspoc2-rg -G IBM.ResourceGroup:db2_db2tws_db2tws_TWS-rg
3. Create shadow resources and a shadow equivalency for the embedded WebSphere Application Server instances, as shown in Example 26-38.
Example 26-38 Creating shadow resources and shadow equivalency for the eWAS instances
# mkrsrc -f ./eWAS_twspoc1_shadow-rs.def IBM.Application
# mkrsrc -f ./eWAS_twspoc2_shadow-rs.def IBM.Application
# mkequ -p A,NoControl eWAS_shadow-equ IBM.Application:eWAS_twspoc1_shadow-rs:twspoc1,eWAS_twspoc2_shadow-rs:twspoc2
4. Start the resource groups for the embedded WebSphere Application Server instances, as illustrated in Example 26-39.
Example 26-39 Starting eWAS resource groups
# chrg -o online eWAS_twspoc1-rg
# chrg -o online eWAS_twspoc2-rg
The creation of the Tivoli System Automation for Multiplatforms objects for the embedded WebSphere Application Server instances results in the output of the lssam command, as shown in Example 26-40.
Example 26-40 Output of lssam command
Online IBM.ResourceGroup:eWAS_twspoc1-rg Nominal=Online
'- Online IBM.Application:eWAS_twspoc1-rs:twspoc1
Online IBM.ResourceGroup:eWAS_twspoc2-rg Nominal=Online
'- Online IBM.Application:eWAS_twspoc2-rs:twspoc2
Online IBM.Equivalency:eWAS_shadow-equ
|- Online IBM.Application:eWAS_twspoc1_shadow-rs:twspoc1
'- Online IBM.Application:eWAS_twspoc2_shadow-rs:twspoc2
Figure 26-11 shows the setup of the embedded WebSphere Application Server and DB2 instances.

Figure 26-11 DB2 and embedded WebSphere Application Server setup
26.7.2 Engine
This section focuses on the Tivoli Workload Scheduler engine. Perform the following steps on twspoc1 as twsusr:
1. Enable Switch Fault Tolerance, as shown in Example 26-41.
Example 26-41 Enabling Switch Fault Tolerance
$ optman chg enSwFaultTol=YES
AWSJCL050I Command "chg" completed successfully.
2. Create the virtual master workstation by using Composer command line, as shown in Example 26-42.
Example 26-42 Creating the virtual master workstation
CPUNAME XA_VMDM
OS UNIX
NODE NotApplicable TCPADDR 31111
FOR MAESTRO HOST $MASTER ACCESS "unixlocl"
TYPE X-AGENT
AUTOLINK OFF
BEHINDFIREWALL OFF
FULLSTATUS OFF
END
3. Create the CPU definition for the backup master domain manager by using composer, as illustrated in Example 26-43 on page 781. Note that the FULLSTATUS flag is enabled for the backup master domain manager workstation.
Example 26-43 Creating CPU definition for the backup master domain manager
CPUNAME TWSPOC2
OS UNIX
NODE twspoc2 TCPADDR 31111
DOMAIN MASTERDM
FOR MAESTRO
TYPE FTA
AUTOLINK ON
BEHINDFIREWALL OFF
FULLSTATUS ON
END
4. Add the FINAL stream to the database by using composer, as shown in Example 26-44.
Example 26-44 Adding the FINAL stream to the database
SCHEDULE XA_VMDM#FINAL
ON RUNCYCLE RULE1 "FREQ=DAILY;INTERVAL=1"
AT XXXX
CARRYFORWARD
FOLLOWS XA_VMDM#FINAL.@ PREVIOUS
:
XA_VMDM#MAKEPLAN
SCRIPTNAME "/TWA/TWS/MakePlan"
STREAMLOGON twsusr
TASKTYPE UNIX
RCCONDSUCC "(RC=0) OR (RC=4)"
RECOVERY STOP
XA_VMDM#SWITCHPLAN
SCRIPTNAME "/TWA/TWS/SwitchPlan"
STREAMLOGON twsusr
TASKTYPE UNIX
RECOVERY STOP
FOLLOWS LOCKRESOURCEGROUPS
XA_VMDM#CREATEPOSTREPORTS
SCRIPTNAME "/TWA/TWS/CreatePostReports"
STREAMLOGON twsusr
TASKTYPE UNIX
RECOVERY CONTINUE
FOLLOWS SWITCHPLAN
XA_VMDM#UPDATESTATS
SCRIPTNAME "/TWA/TWS/UpdateStats"
STREAMLOGON twsusr
TASKTYPE UNIX
RECOVERY CONTINUE
FOLLOWS SWITCHPLAN
XA_VMDM#LOCKRESOURCEGROUPS
SCRIPTNAME "/usr/sbin/rsct/sapolicies/tws/lockResourceGroups.ksh"
STREAMLOGON twsusr
TASKTYPE UNIX
RECOVERY STOP
FOLLOWS MAKEPLAN
XA_VMDM#UNLOCKRESOURCEGROUPS
SCRIPTNAME "/usr/sbin/rsct/sapolicies/tws/unlockResourceGroups.ksh"
STREAMLOGON twsusr
TASKTYPE UNIX
RECOVERY STOP
FOLLOWS SWITCHPLAN
END
On twspoc1 and twspoc2, perform the following steps as twsusr:
1. Update the JnextPlan script, as shown in Example 26-45.
Example 26-45 Updating JnextPlan script
. . .
#conman “startappserver; wait”
MakePlan $*
/usr/sbin/rsct/sapolicies/tws/lockResourceGroups.ksh
SwitchPlan
/usr/sbin/rsct/sapolicies/tws/unlockResourceGroups.ksh &
. . .
2. Disable mm resolve master in the localopts file.
On twspoc1, perform the following steps as twsusr.
1. Create the initial plan, using the JnextPlan script.
2. Set the limit for the workstations, as shown in Example 26-46.
Example 26-46 Setting the limit for the workstations
$ conman ‘lc @;limit 10;noask’
%lc @;limit 10;noask
Command forwarded to batchman for TWSPOC1
Command forwarded to batchman for TWSPOC2
Command forwarded to batchman for XA_VMDM
Finally, stop the Tivoli Workload Scheduler engine on twspoc1 and twspoc2 by running the conman stop and conman shut commands.
Next, the Tivoli System Automation for Multiplatforms resources, resource groups and equivalencies for the engine are created. Perform the following steps on twspoc1 as root:
Example 26-47 Creating resources and resource groups for the engine processes
# mkrsrc -f ./netman_twspoc1-rs.def IBM.Application
# mkrsrc -f ./netman_twspoc2-rs.def IBM.Application
# mkrsrc -f ./mailman_twspoc1-rs.def IBM.Application
# mkrsrc -f ./mailman_twspoc2-rs.def IBM.Application
# mkrg -n twspoc1 fta_twspoc1-rg
# mkrg -n twspoc2 fta_twspoc2-rg
# addrgmbr -g fta_twspoc1-rg IBM.Application:netman_twspoc1-rs:twspoc1
# addrgmbr -g fta_twspoc2-rg IBM.Application:netman_twspoc2-rs:twspoc2
# addrgmbr -g fta_twspoc1-rg IBM.Application:mailman_twspoc1-rs:twspoc1
# addrgmbr -g fta_twspoc2-rg IBM.Application:mailman_twspoc2-rs:twspoc2
# resetrsrc -s 'Name == "netman_twspoc1-rs"' IBM.Application
# resetrsrc -s 'Name == "mailman_twspoc1-rs"' IBM.Application
# resetrsrc -s 'Name == "netman_twspoc2-rs"' IBM.Application
# resetrsrc -s 'Name == "mailman_twspoc2-rs"' IBM.Application
2. Create managed relations for the engine processes, as shown in Example 26-48.
Example 26-48 Creating managed relations for the engine processes
# mkrel -p StartAfter -S IBM.Application:mailman_twspoc1-rs:twspoc1 -G IBM.Application:netman_twspoc1-rs:twspoc1
# mkrel -p StartAfter -S IBM.Application:mailman_twspoc2-rs:twspoc2 -G IBM.Application:netman_twspoc2-rs:twspoc2
3. Create shadow resources and a shadow equivalency for the mailman processes, as illustrated in Example 26-49.
Example 26-49 Creating shadow resources and shadow equivalency for mailman processes
# mkrsrc -f ./mailman_twspoc1_shadow-rs.def IBM.Application
# mkrsrc -f ./mailman_twspoc2_shadow-rs.def IBM.Application
# mkequ -p A,NoControl mailman_shadow-equ IBM.Application:mailman_twspoc1_shadow-rs:twspoc1,mailman_twspoc2_shadow-rs:twspoc2
4. Start the resource groups for the engine processes, as shown in Example 26-50.
Example 26-50 Starting resource groups for engine processes
# chrg -o online fta_twspoc1-rg
# chrg -o online fta_twspoc2-rg
|
Important: The batchman and jobman processes are not monitored because mailman, batchman, and jobman act as one logical unit. If one of them terminates unexpectedly, they all stop.
|
Finally, create the following Tivoli System Automation for Multiplatforms objects for the master domain manager. Perform the following steps as root on twspoc1:
1. Create a floating resource and a resource group for the master domain manager, as illustrated in Example 26-51.
Example 26-51 Creating resources and resource groups for the master domain manager
# mkrsrc -f ./mdm-rs.def IBM.Application
# mkrg mdm-rg
# addrgmbr -g mdm-rg IBM.Application:mdm-rs
2. Create a virtual IP address which will be collocated with the master domain manager, as shown in Example 26-52. This virtual IP address will be used by the CLI tools on the FTAs.
Example 26-52 Creating virtual IP address for the master domain manager
# mkrsrc IBM.ServiceIP Name="mdm_192_168_1_203-rs" IPAddress="192.168.1.203" NetMask="255.255.255.0" NodeNameList="{'twspoc1','twspoc2'}"
# addrgmbr -g mdm-rg IBM.ServiceIP:mdm_192_168_1_203-rs
3. Create the managed relations for the master domain manager, as shown in Example 26-53.
Example 26-53 Creating managed relations for the master domain manager
# mkrel -p DependsOn -S IBM.ServiceIP:mdm_192_168_1_203-rs -G IBM.Equivalency:VLAN1
# mkrel -p DependsOn -S IBM.ServiceIP:mdm_192_168_1_203-rs -G IBM.Equivalency:eWAS_shadow-equ
# mkrel -p DependsOn -S IBM.Application:mdm-rs -G IBM.Equivalency:mailman_shadow-equ
On twspoc1 and twspoc2 as root, create a least-privilege resource that will allow twsusr to run the rgreq command, as shown in Example 26-54.
Example 26-54 Creating least-privilege resource
# mklpcmd RGREQ /usr/sbin/rsct/bin/rgreq twsusr@LOCALHOST rx
On twspoc1 as root, start the resource group for the master domain manager, as shown in Example 26-55.
Example 26-55 Starting resource group for the master domain manager
# chrg –o online mdm-rg
The creation of the Tivoli System Automation for Multiplatforms objects for the Tivoli Workload Scheduler engine results in the output of the lssam command, as shown in Example 26-56.
Example 26-56 lssam: Tivoli Workload Scheduler engine
|- Online IBM.Application:mailman_twspoc1-rs:twspoc1
'- Online IBM.Application:netman_twspoc1-rs:twspoc1
Online IBM.ResourceGroup:fta_twspoc2-rg Nominal=Online
|- Online IBM.Application:mailman_twspoc2-rs:twspoc2
'- Online IBM.Application:netman_twspoc2-rs:twspoc2
Online IBM.ResourceGroup:mdm-rg Nominal=Online
'- Online IBM.Application:mdm-rs
|- Online IBM.Application:mdm-rs:twspoc1
'- Offline IBM.Application:mdm-rs:twspoc2
'- Online IBM.ServiceIP:mdm_192_168_1_203-rs
|- Online IBM.ServiceIP:mdm_192_168_1_203-rs:twspoc1
'- Offline IBM.ServiceIP:mdm_192_168_1_203-rs:twspoc2
Figure 26-12 illustrates the setup.

Figure 26-12 FTA and MDM setup
26.7.3 Event Processor
The following subsection will focus on the Event Processor, which can be hosted by either the master domain manager or the backup master domain manager.
On twspoc1, perform the following steps as root.
1. Create a floating resource and a resource group for the Event Processor, as shown in Example 26-57.
Example 26-57 Creating floating resource and resource group for the Event Processor
# mkrsrc -f ./evtproc-rs.def IBM.Application
# mkrg evtproc-rg
# addrgmbr -g evtproc-rg IBM.Application:evtproc-rs
# resetrsrc -s 'Name == "evtproc-rs"' IBM.Application
# mkrel -p DependsOn -S IBM.Application:evtproc-rs -G IBM.Equivalency:eWAS_shadow-equ
2. Start the resource group for the Event Processor, as shown in Example 26-58.
Example 26-58 Starting resource group for the Event Processor
# chrg –o online evtproc-rg
The creation of the Tivoli System Automation for Multiplatforms objects results in the output of the lssam command, as shown in Example 26-59.
Example 26-59 The lssam command output
Online IBM.ResourceGroup:eWAS_twspoc1-rg Nominal=Online
'- Online IBM.Application:eWAS_twspoc1-rs:twspoc1
Online IBM.ResourceGroup:eWAS_twspoc2-rg Nominal=Online
'- Online IBM.Application:eWAS_twspoc2-rs:twspoc2
Online IBM.ResourceGroup:evtproc-rg Nominal=Online
'- Online IBM.Application:evtproc-rs
|- Online IBM.Application:evtproc-rs:twspoc1
'- Offline IBM.Application:evtproc-rs:twspoc2
Figure 26-13 illustrates the dependency.

Figure 26-13 Event Processor setup
26.7.4 Tivoli Dynamic Workload Console
Prepare the environment for Tivoli Workload Dynamic Console. On twspoc1, a standard volume group (tdwcvg) was created on an hdisk shared between twspoc1 and twspoc2. After, a file system for the Tivoli Dynamic Workload Console was created (/TDWC), with automount disabled. Next, the volume group was imported on twspoc2. Finally, the automatic varyon of the volume group was disabled on both nodes.
To install Tivoli Dynamic Workoad Console for high availability, perform the following steps on twspoc1 as root:
1. Install the Tivoli Dynamic Workload Console in a separate Tivoli Workload Automation instance (/TDWC).
2. Stop the Tivoli Dynamic Workload Console by using the stopWas.sh script.
3. In the serverindex.xml file, which is in the following location, locate the entries that refer to twspoc1:
/TDWC/eWAS/profiles/twaprofile/config/cells/DefaultNode/nodes/DefaultNode
Update the entries by changing them to the virtual address that will be associated with the Tivoli Dynamic Workload Console.
4. Unmount the file system and varyoff the volume group (also on twspoc2).
5. Create floating resources and a resource group for the Tivoli Dynamic Workload Console, as shown in Example 26-60.
Example 26-60 Creating resources for the Tivoli Dynamic Workload Console
# mkrg tdwc-rg
# mkrsrc -f ./tdwc-rs.def IBM.Application
# mkrsrc -f ./tdwcvg-rs.def IBM.Application
# addrgmbr -g tdwc-rg IBM.Application:tdwc-rs
# addrgmbr -g tdwc-rg IBM.Application:tdwcvg-rs
# mkrsrc IBM.AgFileSystem Name=tdwcfs-rs Vfs=JFS2 Force=1 ResourceType=1 NodeNameList='{"twspoc1","twspoc2"}' DeviceName=/dev/xxx MountPoint=/TDWC
# addrgmbr -g tdwc-rg IBM.AgFileSystem:tdwcfs-rs
# mkrsrc IBM.ServiceIP Name="tdwc_192_168_1_204-rs" IPAddress="192.168.1.204" NetMask="255.255.255.0" NodeNameList="{'twspoc1','twspoc2'}"
# addrgmbr -g tdwc-rg IBM.ServiceIP:tdwc_192_168_1_204-rs
6. Create the managed relations for the Tivoli Dynamic Workload Console, as illustrated in Example 26-61.
Example 26-61 Creating managed relations for the Tivoli Dynamic Workload Console
# mkrel -p DependsOn -S IBM.Application:tdwc-rs -G IBM.AgFileSystem:tdwcfs-rs
# mkrel -p DependsOn -S IBM.Application:tdwc-rs -G IBM.ServiceIP:tdwc_192_168_1_204-rs
# mkrel -p DependsOn -S IBM.AgFileSystem:tdwcfs-rs -G IBM.Application:tdwcvg-rs
7. Start the resource group for the Tivoli Dynamic Workload Console, as shown in Example 26-62.
Example 26-62 Starting resource group for the Tivoli Dynamic Workload Console
# chrg –o online tdwc-rg
The creation of the Tivoli System Automation objects for the Tivoli Dynamic Workload Console results in the output of the lssam command, as shown in Example 26-63.
Example 26-63 lssam: Tivoli Dynamic Workload Console
Online IBM.ResourceGroup:tdwc-rg Nominal=Online
|- Online IBM.AgFileSystem:tdwcfs-rs
|- Online IBM.AgFileSystem:tdwcfs-rs:twspoc1
'- Offline IBM.AgFileSystem:tdwcfs-rs:twspoc2
|- Online IBM.Application:tdwc-rs
|- Online IBM.Application:tdwc-rs:twspoc1
'- Offline IBM.Application:tdwc-rs:twspoc2
|- Online IBM.Application:tdwcvg-rs
|- Online IBM.Application:tdwcvg-rs:twspoc1
'- Offline IBM.Application:tdwcvg-rs:twspoc2
'- Online IBM.ServiceIP:tdwc_192_168_1_204-rs
|- Online IBM.ServiceIP:tdwc_192_168_1_204-rs:twspoc1
'- Offline IBM.ServiceIP:tdwc_192_168_1_204-rs:twspoc2
26.7.5 Dynamic Workload Broker Component
To customize the Tivoli Workload Broker Component for high availability, perform the following commands as twsusr:
1. (twspoc1) Edit the configuration file BrokerWorkstation.properties in the /TWA/TDWB/config folder, as shown in Example 26-64.
Example 26-64 BrokerWorkstation.properties on twspoc1
Broker.Workstation.Name=BROKER
Broker.Workstation.RetryLink=60
MasterDomainManager.Name=TWSPOC1
2. (twspoc2) Edit the configuration file BrokerWorkstation.properties in the /TWA/TDWB/config folder, as illustrated in Example 26-65.
Example 26-65 BrokerWorkstation.properties on twspoc2
Broker.Workstation.Name=BROKER
Broker.Workstation.RetryLink=60
MasterDomainManager.Name=TWSPOC2
3. (twspoc1) Create a workstation for the Dynamic Workload Broker Component using Composer, as shown in Example 26-66.
Example 26-66 Defining the broker workstation
CPUNAME BROKER
OS OTHER
NODE localhost TCPADDR 41114
DOMAIN MASTERDM
FOR MAESTRO
TYPE BROKER
AUTOLINK ON
BEHINDFIREWALL OFF
FULLSTATUS OFF
END
4. (twspoc1) Run JnextPlan -for 0000 command to make the broker workstation available in the plan.
5. (twspoc1) Increase the CPU limit of the broker workstation.
Perform the following steps on twspoc1 as root:
1. Create floating resources and a resource group for the Dynamic Workload Broker Component, as illustrated in Example 26-67.
Example 26-67 Creating resources for the Dynamic Workload Broker Component
# mkrg tdwb-rg
# mkrsrc -f ./tdwb-rs.def IBM.Application
# addrgmbr -g tdwb-rg IBM.Application:tdwb-rs
# mkrsrc IBM.ServiceIP Name="tdwb_192_168_1_205-rs" IPAddress="192.168.1.205" NetMask="255.255.255.0" NodeNameList="{'twspoc1','twspoc2'}"
# addrgmbr -g tdwb-rg IBM.ServiceIP:tdwb_192_168_1_205-rs
# resetrsrc -s 'Name == "tdwb-rs"' IBM.Application
# mkrel -p Collocated -S IBM.Application:tdwb-rs -G IBM.Application:mdm-rs
# mkrel -p DependsOn -S IBM.ResourceGroup:tdwb-rg -G IBM.ResourceGroup:mdm-rg
2. Start the resource group for the Dynamic Workload Broker Component, as shown in Example 26-68.
Example 26-68 Starting resource group for the Dynamic Workload Broker Component
# chrg –o online tdwb-rg
The creation of the Tivoli System Automation for Multiplatforms objects for the Dynamic Workload Broker Component results in the output of the lssam command., as shown in Example 26-69.
Example 26-69 lssam: Dynamic Workload Broker
Online IBM.ResourceGroup:tdwb-rg Nominal=Online
|- Online IBM.Application:tdwb-rs
|- Online IBM.Application:tdwb-rs:twspoc1
'- Offline IBM.Application:tdwb-rs:twspoc2
'- Online IBM.ServiceIP:tdwb_192_168_1_205-rs
|- Online IBM.ServiceIP:tdwb_192_168_1_205-rs:twspoc1
'- Offline IBM.ServiceIP:tdwb_192_168_1_205-rs:twspoc2
Figure 26-14 illustrates the dependency between the Dynamic Workload Broker Component and the master domain manager.

Figure 26-14 Dynamic Workload Broker Component dependency
Finally, update the Server Connection for the Dynamic Workload Broker Component in the Tivoli Dynamic Workload Console, as shown in Figure 26-15 on page 790.

Figure 26-15 Dynamic Workload Broker Component connection in Tivoli Dynamic Workload Console
26.8 Testing the policies
This section explains how the policies react to specific scenarios that can happen, planned or unplanned, on the master domain manager.
26.8.1 Plan extension
Both the JnextPlan script and the FINAL stream have been modified to inform Tivoli System Automation for Multiplatforms that a plan extension is occurring. As the entire network is restarted, this operation is interpreted as normal and not a failure. Therefore, during the switching of the plan, the resource groups for the master domain manager and backup master domain manager are locked, as shown in the lssam output of Example 26-70.
Example 26-70 lssam: JnextPlan, 1
Stuck online IBM.ResourceGroup:fta_twspoc1-rg Request=Lock Nominal=Online
|- Failed offline IBM.Application:mailman_twspoc1-rs:twspoc1
'- Online IBM.Application:netman_twspoc1-rs:twspoc1
Stuck online IBM.ResourceGroup:fta_twspoc2-rg Request=Lock Nominal=Online
|- Failed offline IBM.Application:mailman_twspoc2-rs:twspoc2
'- Online IBM.Application:netman_twspoc2-rs:twspoc2
Online IBM.ResourceGroup:mdm-rg Request=Lock Nominal=Online
|- Online IBM.Application:mdm-rs
|- Online IBM.Application:mdm-rs:twspoc1
'- Offline IBM.Application:mdm-rs:twspoc2
'- Online IBM.ServiceIP:mdm_192_168_1_203-rs
|- Online IBM.ServiceIP:mdm_192_168_1_203-rs:twspoc1
'- Offline IBM.ServiceIP:mdm_192_168_1_203-rs:twspoc2
If the Tivoli Workload Scheduler process tree (batchman, mailman and jobman) is not active on the master domain manager 60 seconds after SwitchPlan, Tivoli System Automation for Multiplatforms intervenes and performs a failover to the backup master domain manager as shown in Example 26-71 on page 791.
Example 26-71 lssam: JnextPlan, 2
Failed offline IBM.ResourceGroup:fta_twspoc1-rg Request=Lock Nominal=Online
|- Failed offline IBM.Application:mailman_twspoc1-rs:twspoc1
'- Offline IBM.Application:netman_twspoc1-rs:twspoc1
Online IBM.ResourceGroup:fta_twspoc2-rg Request=Lock Nominal=Online
|- Online IBM.Application:mailman_twspoc2-rs:twspoc2
'- Online IBM.Application:netman_twspoc2-rs:twspoc2
Pending online IBM.ResourceGroup:mdm-rg Request=Lock Nominal=Online
|- Pending online IBM.Application:mdm-rs
|- Offline IBM.Application:mdm-rs:twspoc1
'- Pending online IBM.Application:mdm-rs:twspoc2
'- Online IBM.ServiceIP:mdm_192_168_1_203-rs
|- Offline IBM.ServiceIP:mdm_192_168_1_203-rs:twspoc1
'- Online IBM.ServiceIP:mdm_192_168_1_203-rs:twspoc2
26.8.2 Corrupt Symphony / message files
If the Symphony file or the message files become corrupt on the master domain manager (most likely because of a full file system), batchman, mailman and jobman terminate unexpectedly. As a result, Tivoli System Automation for Multiplatforms performs a failover to the backup master domain manager.
Example 26-72 illustrates the commands that were run on the master domain manager to simulate this situation.
Example 26-72 Filling the Tivoli Workload Scheduler file system
# dd if=/dev/zero of=/TWA/TWS/bigfile bs=512 count=4194304
dd: 0511-053 The write failed.
: There is not enough space in the file system.
2526355+0 records in.
2526352+0 records out.
twspoc1:[/usr/sbin/rsct/sapolicies/tws]
# df -m /TWA/TWS
Filesystem MB blocks Free %Used Iused %Iused Mounted on
/dev/fslv06 2048.00 0.00 100% 5402 96% /TWA/TWS
The policies react to the situation as shown in Example 26-73.
Example 26-73 lssam: Corrupt Symphony/message files
Failed offline IBM.ResourceGroup:fta_twspoc1-rg Request=Lock Nominal=Online
|- Failed offline IBM.Application:mailman_twspoc1-rs:twspoc1
'- Offline IBM.Application:netman_twspoc1-rs:twspoc1
Online IBM.ResourceGroup:fta_twspoc2-rg Request=Lock Nominal=Online
|- Online IBM.Application:mailman_twspoc2-rs:twspoc2
'- Online IBM.Application:netman_twspoc2-rs:twspoc2
Pending online IBM.ResourceGroup:mdm-rg Request=Lock Nominal=Online
|- Pending online IBM.Application:mdm-rs
|- Offline IBM.Application:mdm-rs:twspoc1
'- Pending online IBM.Application:mdm-rs:twspoc2
'- Online IBM.ServiceIP:mdm_192_168_1_203-rs
|- Offline IBM.ServiceIP:mdm_192_168_1_203-rs:twspoc1
'- Online IBM.ServiceIP:mdm_192_168_1_203-rs:twspoc2
26.8.3 The embedded WebSphere Application Server crash situation
Because of the severe nature of the crash situation, Tivoli System Automation for Multiplatforms does not attempt to restart the embedded WebSphere Application Server instance on the master domain manager. Instead, the following actions are performed:
•A failover of the engine to the backup master domain manager is triggered.
•The Event Processor is switched to the embedded WebSphere Application Server on the backup master domain manager.
•The Dynamic Workload Broker Component is restarted on the backup master domain manager.
Example 26-74 shows the lssam command output after an embedded WebSphere Application Server crash on the master.
Example 26-74 lssam: eWAS crash
Failed offline IBM.ResourceGroup:eWAS_twspoc1-rg Nominal=Online
'- Failed offline IBM.Application:eWAS_twspoc1-rs:twspoc1
Online IBM.ResourceGroup:eWAS_twspoc2-rg Nominal=Online
'- Online IBM.Application:eWAS_twspoc2-rs:twspoc2
Online IBM.ResourceGroup:evtproc-rg Nominal=Online
'- Online IBM.Application:evtproc-rs
|- Failed offline IBM.Application:evtproc-rs:twspoc1
'- Online IBM.Application:evtproc-rs:twspoc2
Online IBM.ResourceGroup:tdwb-rg Nominal=Online
|- Online IBM.Application:tdwb-rs
|- Failed offline IBM.Application:tdwb-rs:twspoc1
'- Online IBM.Application:tdwb-rs:twspoc2
'- Online IBM.ServiceIP:tdwb_192_168_1_205-rs
|- Offline IBM.ServiceIP:tdwb_192_168_1_205-rs:twspoc1
'- Online IBM.ServiceIP:tdwb_192_168_1_205-rs:twspoc2
Online IBM.ResourceGroup:mdm-rg Nominal=Online
|- Online IBM.Application:mdm-rs
|- Offline IBM.Application:mdm-rs:twspoc1
'- Online IBM.Application:mdm-rs:twspoc2
'- Online IBM.ServiceIP:mdm_192_168_1_203-rs
|- Offline IBM.ServiceIP:mdm_192_168_1_203-rs:twspoc1
'- Online IBM.ServiceIP:mdm_192_168_1_203-rs:twspoc2
26.8.4 Node failure
If a hardware failure of the master domain manager occurs, Tivoli System Automation for Multiplatforms performs a failover of the following resource groups to the backup master domain manager:
•“DB2 Primary” resource group: db2_db2tws_db2tws_TWS-rg
•“Event Processor” resource group (if it was running on the master): evtproc-rg
•“Master Domain Manager” resource group: mdm-rg
•“Dynamic Workload Broker Component server” resource group: tdwb-rg
•“Tivoli Dynamic Workload Console” resource group: tdwc-rg
..................Content has been hidden....................
You can't read the all page of ebook, please click here login for view all page.