The 4 Cs
A Quick and Remarkably Effective Instructional Design Process
We are not, cannot be, about designing content.
A fundamental perspective I want you to take away
is that we are designing experiences.
A fundamental perspective I want you to take away
is that we are designing experiences.
Clark Quinn
Engaging Learning, 2005, p. 10
CONNECTIONS

One-Minute Connection: Fast Pass
When you create a new learning experience, that is, a class, lesson, workshop, presentation, or training, which sentence best describes what you do? Circle one, or write in your own answer:
• I just put it all together without any formal plan.
• I use an instructional design model I was taught.
• I make up my own instructional design plan and use it.
• Someone else has done the design; I just teach the material.
• I haven’t a clue - I just do it and have never thought much about it.
• Another answer: _______________________________________________
You need to be aware of how you currently design training so that, after reading this chapter, you’ll know what you want to continue doing, and what you want to change. This chapter introduces you to the 4 Cs, a four-step instructional design and delivery process that is easy, takes little time to learn and apply, and is simple enough to remember. You can use this process with any training topic or audience, and whenever you plan any kind of information-delivery program.
Many trainers design training without any formal process or procedure. Or, if they learned a specific method, they may not use it because it isn’t easy, time-relevant, or memorable enough. The 4 Cs is the answer to these issues.
Imagine That . . .
You are attending Don’s community college night class titled “An Introduction to Financial Investment.” As you walk into the room, Don greets you and hands you an index card that reads: “New to financial investing? Please stand by the wall on your right. Have some experience at investing? Please stand by the wall on your left. Then introduce yourself to three other people and tell them what you want to learn from this class.” Two groups of students begin to form, and you join the less-experienced one. You spend a few minutes chatting with the others; then Don instructs you to find someone from the opposite group to be a learning partner for the class. You and your partner sit at a table with two other pairs of students—a pleasant mix of more-experienced and less-experienced investors.
After Don introduces himself, he asks the table groups to work together to quickly sort a pile of index cards that are on each table. Each card is printed with a statement related to financial investment, and your group has to sort the cards into two piles: a “Myth” pile and a “Fact” pile. Following this quick card-sorting activity, Don says that you will find out if your group sorted the cards correctly by listening for that information in his introductory lecture. He passes out an interesting note-taking page labeled “Concept Map” and directs you to take notes as he speaks. He pauses after short segments of information so that you can jot down some notes and so that your table group can check its Myth/Fact cards. At the end of the short lecture, your table group has changed a few of the cards from one pile to the other. In addition, you have filled in the note-taking page with the learning outcomes of the class, as well as some introductory investment information.
Then Don announces that you will spend the next fifty minutes at Concept Centers around the room. He draws your attention to a number of tables set up along the walls. Each table is marked with a number and a title: #1—Stocks; #2—Bonds; #3—Mutual Funds; #4—Annuities; #5—Money Markets. You join a Concept Centers group and spend about ten minutes at each center, learning about different investment options from the handouts, discussion questions, games, and short quizzes found on the tables. The hour passes quickly, as you rotate from center to center, participating in a quick overview of each investment option. The activity ends with a discussion of what students learned from the centers that they didn’t know before.
Following the Concept Center activity, Don hands out printed case studies to each table group. He explains that your table group is a financial planning company that has to give investment advice to the person in the case study. Your group will discuss the case, agree on the best advice to give, and then present this information to the class. The class will have a chance to discuss the advice and offer any comments or suggestions. Don will give his advice too. This practice activity lasts about forty-five minutes.
Finally, before the class ends for the evening, Don instructs you to fill out a “Learning Log”—sort of a journal page—of what you learned, questions you have for the next class, and possible ways you might use this new information.
There is an excited buzz among students as you walk out the door. You realize that Don’s design of the class made all the difference between a topic that could have been dull and boring and a topic that ended up being fascinating and engaging from beginning to end.
Let’s step back and take a look at what Don did to keep you actively engaged for three full hours. He designed and delivered the class using a powerful, four-step instructional method called the 4 Cs:
1. First, you made meaningful connections to the topic and to the other students with the Where Do You Stand and Myth/Fact activities.
2. Second, you were actively involved as you learned a number of investment concepts, first by taking notes on a Graphic Organizer, and then by participating in Concept Centers.
3. Third, you discussed and presented the case studies with your table group, a concrete practice strategy that was relevant and useful.
4. Fourth, you and the other students reached your own conclusions about what you learned as you used a Learning Log to summarize and evaluate your own learning progress.
CONCEPTS
The 4 Cs instructional design process is easy for trainers to remember and use, and it’s a training delivery process that is brain-friendly for learners as well. In fact, that is what makes it different from so many other instructional design models: Its steps are both design and delivery guides. They go hand-in-hand. As you design, you are creating the delivery at the same time—sort of a two-for-one approach that saves you time while integrating the two processes—design and delivery—into one seamless whole.
Here is a short description of each of the four design and delivery steps, and what learners will be doing during each step:
1. Connections. This is the beginning or opening of a training. It can also include pre-training time as well. During the Connections step, learners make connections with what they already know, or think they know, about the training topic. They also make connections with what they will learn or want to learn with other learners in the training group, and with you, the trainer. Part One of this book gives you more details about this step, as well as fifteen Connection activities.
2. Concepts. This is the direct instruction, lecture, or presentation part of a training. During the Concepts step, learners take in new information in multi-sensory ways: hearing, seeing, discussing, writing, reflecting, imagining, participating, and teaching it to others. Part Two of this book gives you more information about Concepts, as well as twenty activities.
3. Concrete Practice. This is the active review that usually follows information-delivery. During the Concrete Practice step, learners actively practice a skill using the new information, participate in an active review of what they have learned, and again teach others what they know or can now do. Part Three of this book offers you detailed information and fifteen activities for this step.
4. Conclusions. This is the wrap-up or closing part of a training. It can also include post-training time as well. During the Conclusions step, learners summarize what they have learned, evaluate it, make a commitment to use it at work or in their lives, and end with a short celebration of their learning experience. Part Four of this book includes detailed information and fifteen activities for this step.
The 4 Cs and Accelerated Learning
The 4 Cs instructional design and delivery process has its roots in educational and psychological research, which began in the latter half of the 20th century. More recently, discoveries in the field of neuroscience, as well as availability of new information on learning styles, learning modalities, and multiple intelligences, have all contributed to an approach to teaching and training that we now call Accelerated Learning (International Alliance for Learning, The History of Accelerated Learning, www.ialearn.org,/ALHistory.php).
Dave Meier, the director for The Center for Accelerated Learning in Lake Geneva, Wisconsin, synthesized the best of the research from the past five decades in his book The Accelerated Learning Handbook (2000). According to Meier, the following are the basic tenets of Accelerated Learning:
• Learning involves the body as well as the mind.
• Learning is fundamentally an act of creation, not consumption of information.
• Learning takes place on many levels at once in the human brain, and is not a linear, one-thing-at-a-time brain activity.
• Collaboration increases learning; isolation and competition decrease it.
• Learning occurs through active doing, with time for reflection and feedback, not through passive listening.
• Positive emotions and mental imagery improve learning; the lack of both inhibits learning.
(pp. 9-10)
Accelerated Learning, therefore, is a brain-friendly approach to teaching and learning. The brain-friendly training elements from the previous chapter (listed below as a reminder) are also elements of Accelerated Learning:
1. Positive emotional experiences
2. Multi-sensory stimulation and novelty
3. Instructional variety and choices
4. Active participation and collaboration
5. Informal learning environments
From the Accelerated Learning research, as well as work done by others in the fields of education and psychology, came a four-step instructional design and delivery model based on the way most people learn best. The model has been adapted by many educators and trainers, as they adjust it to fit the needs of their own training programs and learners.
Try This
An AL Data Hunt. If you are interested in learning more about the 20th century research on Accelerated Learning, or more about brain research in general, browse the Great Resources section in the back of this book for an anecdotal list of some of the best. Also, do an Internet search with the following keywords, and see what you find:
• Accelerated Learning
• Brain-Based Learning and Training
• Brain-Friendly Learning and Training
• The Learning Cycle
• Neuroscience and Learning
The best Internet resource for Accelerated Learning information is www.alcenter.com, the official website for The Center for Accelerated Learning. You’ll find free tips, as well as information about one of the most outstanding reference tools available: The Accelerated Learning Coursebuilder (1999), authored and compiled by the Center’s co-director, Tom Meier. The Coursebuilder covers all aspects of Accelerated Learning, and includes hundreds of useful learning activities and dozens of examples of the four-step instructional design and delivery model.
In his book, Meier titled the model “the four-phase learning cycle” (p. 53), with the following labels for each step:
• Phase One: Preparation—the arousal of interest and opening up to learning
• Phase Two: Presentation—the encounter of new knowledge or skills
• Phase Three: Practice—the integration of what has been learned
• Phase Four: Performance—the application of the new knowledge or skills in real life
In The Ten-Minute Trainer, I called the model “The Training Map” and gave the four steps these labels:
• Step One: Making the Connections
• Step Two: Explaining the Concepts
• Step Three: Practicing the Skills
• Step Four: Celebrating the Learning
In this book, the 4 Cs is my current adaptation of the research, with simpler labels for each of the four steps, to make them easier to remember and apply.
I point this out only to illustrate that the labels serve to help you remember the design and delivery process. It doesn’t really matter what you call each step. In fact, as you familiarize yourself with the model, you will probably create your own version of it, one that fits both your expertise as a trainer and the learning needs of your training participants. Many participants in my train-the-trainer programs have already shortened the 4 Cs words (Connections, Concepts, Concrete Practice, Conclusions) to the simpler C1, C2, C3, and C4. It still works.
In The Accelerated Learning Coursebuilder (1999, p. 19), Tom Meier summarizes the four steps by saying, “This four-part model is universal. It applies to children . . . teenagers . . . workers . . . people of all ages. Unless all four of these phases are present in one form or another in a learning program, fast and effective learning cannot occur.”
Design and Delivery Reminders
Here are a few general suggestions to keep in mind as you experiment with this design and delivery model:
• Begin with the end in mind. This reminder is from Stephen Covey’s The Seven Habits of Highly Effective People (2004). The quote applies to effective training as well. What do you want your learners to be able to do with what they learn? Put another way, what are the observable behaviors, also called learning outcomes or objectives, that will show you (or your company/institution) that training participants “got it”? Make a list, then tie everything in the training to this list. An example of an observable learning outcome is: In an insect abatement class, technicians will demonstrate appropriate insecticide spraying procedures. An unobservable learning outcome is: Technicians will know the spraying procedures. For more detailed information about writing effective learning outcomes, see the chapter in this book titled “Begin with the End: A Fresh Approach to Learning Outcomes.”
• Teach only the need-to-knows. One of the most challenging things for trainers to do is to sort out the concepts learners need to know from the nice-to-know but unessential information. All too often, trainers assume that all the conceptual details are equally important and must be taught. Here is an example: In using a new database program, company employees need to know how to log on, log off, and when the security codes will change—these are important facts, without which they cannot do their jobs. Unessential information might be why the company decided to change the database program, and the extra benefits of using the new program versus the old one. Regarding your own training programs, ask yourself, “What it is the learners need to know in order to do their jobs better, or in order to improve their lives?” A more specific question is, “What is it that employees need to know, the lack of which could cost them their jobs?” This is the information you design into the concepts segment of the 4 Cs. You put all the other nice-to-know information into handouts or resource materials, or save it for later in the training when there is extra time to cover it.
• Design out of order. It doesn’t matter how you put the pieces together. Some trainers list all the concepts, then decide the practice activities, connections, and conclusions. Other trainers design in order, beginning with connections and moving through the other three steps. Still others brainstorm a dozen or so instructional activities, then choose from this list the ones to put into the design steps. You can design the pieces that are the most interesting first, or the most difficult, or the ones you already have information or activities for. Do what is easiest or works best for you.
• Play with the pieces. As you put the design elements together, play with a variety of options before making a final decision as to what you will include in each step. One way you can do this is to write down all the important topic-related concepts and a number of topic-related activities, each on a different piece of paper or sticky note. After that, move pieces around, and figure out what goes together and what to let go of. For example, if a game you love doesn’t really fit into the time allotted or the concepts being learned, don’t include the game. Save it for another training. Here is another example: In a customer service training, it makes sense to follow the lecture on effective customer service with skits (role plays) in which learners practice the service procedures. It doesn’t make sense to immediately begin the next lecture segment on Point of Service (POS) procedures without reviewing the first lecture segment. It also doesn’t make sense to include concepts that aren’t part of the learning outcomes. Remember to align every concept and activity with the learning outcomes of the training.

• Work out the flow. Once you have all the pieces in place, then imagine how they would flow together, how one piece fits with the other, and how they segue from one to the other. If they seem disjointed or fragmented, change them so that each step links to the next. At this point, you can even change the order of the steps, if that seems to work better. For example, you might begin with connections, then flip back and forth between concepts and concrete practice as you cover a number of content pieces. Then you wrap the whole training up with conclusions. Here is a more specific example: In a job search training, learners first decide the kind of jobs they want to apply for (Connections). Then they learn and practice how to fill out the application, write a resume, call for an appointment, go to a job interview, and follow up afterwards (Concepts and Concrete Practice go hand in hand here). Finally, they actually experience a real job interview and assess how they did (Conclusions).
• Deliver in order. Once you have designed each of the four steps and have included learner activities in each step, you will actually deliver the training in the order the steps naturally flow: Connections, Concepts, Concrete Practice, Conclusions. As I mentioned above, sometimes you’ll vary the order by going back and forth between two steps, or you’ll combine two steps (Concepts and Concrete Practice often work better this way). This is totally acceptable. Generally, though, your delivery will be sequential. The timing of each step will depend on many variables: the length of the training, the amount of information to be taught, group size, access to resources, and specific learning outcomes, to name a few.
• Hand over as much of it as you can. Consider the option of letting learners teach some of the content to each other. Also allow them to lead as many of the review activities as possible. With a little preparation (and ideas from Parts One, Two, Three, and Four of this book), you will be surprised at how effective learners are at teaching and learning from each other.
• If it doesn’t work, change it. The saying “Nothing works all the time” holds true for instructional design as well. Although the 4 Cs will work most of the time for most of your learners, sometimes even the best planned training will hit unexpected bumps. Be flexible and ready to change the plan if you need to.
• Step aside and let them learn. Remind yourself that, the more your learners talk (read that: discuss, write, move, create, question, participate, practice, and teach each other), the more they will learn. Make sure you have created opportunities for their active involvement during each step of the design and delivery process.
CONCRETE PRACTICE
Bringing It Home
Let’s put the 4 Cs into practice with a topic you teach. If you decide to do this activity, allow yourself about ten minutes. Your time will be well spent because, at the end of the activity, you will
• Have completed an instructional design piece you can use the next time you train.
• Have experienced the instructional design process using material that is meaningful to you.
• Be able to duplicate the process more easily the next time you use it.
• Be able to explain the process to colleagues when they ask you how you design training.
In order to do this exercise, you’ll need a dozen index cards or medium-size Post-it® Notes, five sheets of blank printer paper, and a pen or pencil. Once you’ve gathered the materials, work through the following steps (the italicized steps are those that were listed earlier in this chapter):
1. In large print, label one paper “Topic and Learning Outcomes.” Label each of the four other sheets with one of each of the 4 Cs steps: Connections, Concepts, Concrete Practice, and Conclusions. Lay the sheets of paper out on the table in front of you.
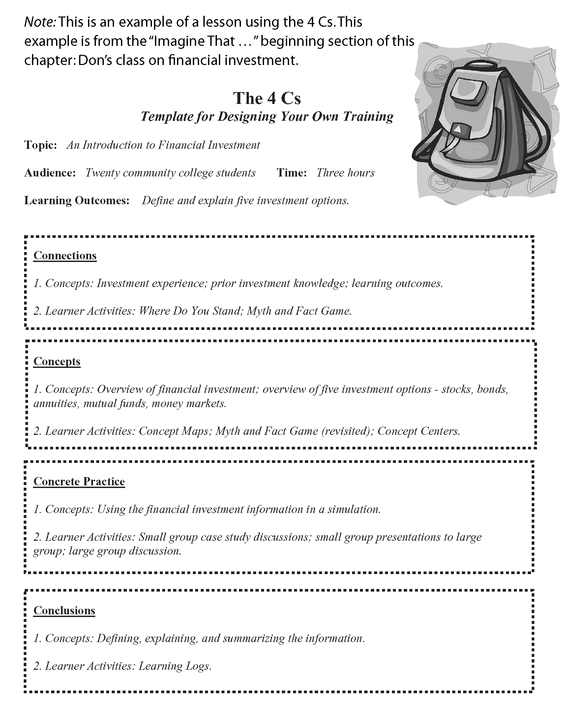
2. Think of a topic you teach. For example, your topic might be customer service skills, using a company database program, new hire orientation, safety on the job, leadership, or others. Write one topic on one index card and lay it on the Topic and Learning Outcomes paper. (The topic card from Don’s financial investment class, the example that began this chapter, reads: “ An Introduction to Financial Investment.”)
3. Begin with the end in mind. Think of one learning outcome, that is, one observable behavior you want your learners to be able to demonstrate by the end of the training. Although there can be many learning outcomes for one topic, just choose one outcome for now. You can go back and write the others later. A reminder: Learning outcomes must be observable, so do not use the words “know,”“understand,” or “learn.” Write the learning outcome on another index card and put it below your topic card on the Topic and Learning Outcomes paper. Everything you do from this point on will be tied to this learning outcome. (Don’s learning outcome card reads: “Define and explain five investment options.”)
4. Teach only the need-to-knows. Write down a few topic-related concepts, one per card. Place these on the Concepts paper. This is the need-to-know information that you’ll cover during the training. (Don’s concept cards read: “Overview of financial investment; investment options: stocks, bonds, annuities, mutual funds, money markets—definitions, descriptions, examples.”)
5. Design out of order. Think of some ways you might involve learners as you teach them the concepts. Jot these down on index cards as well and place them on the Concepts paper, along with the concepts cards.Your activities can be ones you’ve used before, ones you’ve seen other trainers use, or ones listed in Part Two of this book. (For Don, these cards read: “Concept Map note-taking page; Concept Centers.” Both activities are from Part Two of this book.)
6. Fill in one or two concrete practice cards and put them on the Concrete Practice paper. Remember, these will be the skills practice or review activities to follow the concepts step. You can use activities from Part Three of this book. (Don’s practice cards read: “Small group case study discussions; small group presentations to large group; large group discussion.”)
7. Now that you have the concepts and concrete practice pieces planned, in your mind return to the beginning of the training. Think about the connections to the topic and to each other that learners need to make during the opening. Again, you can choose activities you’re familiar with, ones you’ve seen used, or ones from Part One of this book. Jot down your connection activities on index cards and place them on the Connections paper. You can choose just one activity, or more than one, if you have time for others. (Don’s cards read:“Where Do You Stand” and “Myth/Fact activities.” Both are from Part One of this book.)
8. Think about how you want learners to summarize, evaluate, and use what they’ve learned. Write out another card or two that describe the conclusion pieces, and place these on the Conclusions paper. (Don’s conclusion card reads:“Learning Logs”—from Part Four of this book.)
9. Play with the pieces and work out the flow. Imagine how the training would flow from step to step as you orchestrate the 4 Cs’ concepts and activities. Imagine how it would feel to be a learner as each step is implemented. Ask yourself the following questions; then rearrange the index cards as necessary:
• What can I add or change so that the training flows easily from one step to the next?
• Am I teaching only the need-to-know information?
• What can I hand over to the learners to teach?
• Are all the steps tied to the learning outcome?
• Are learners engaged during every step of the process?
10. Deliver in order. Now that you have all the pieces filled in, put the entire training process in order by rearranging the papers and cards to read: Topic and Learning Outcomes, Connections, Concepts, Concrete Practice, Conclusions.
11. Hand over as much of it as you can, then step aside and let them learn. Enough said!
You’re done with your design. All that remains is to translate the training design into a printable form that works for you. Type it into your computer and print it out, outline it on paper, arrange the index cards into a sequential stack, script it—do whatever works so that you’ll have it ready to go. You’ll also need to list the details later:training materials, slides, handouts, timeline, and all the training essentials. But you have the basic design and delivery process outlined from this exercise. And you’ve created a brain-friendly training, one that engages learners during the entire experience, in a very short period of time. Give yourself a pat on the back. Then go deliver the training and record the results.
CONCLUSIONS
This chapter has given you an overview of the 4 Cs instructional design and delivery process. Because the model is based on Accelerated Learning, it is a brain-friendly and whole-brain approach to designing and delivering effective training. This process also ensures that participants will be engaged and involved during the entire learning experience, which ultimately increases retention and application of learned material.
At the end of this chapter you will find:
• 4 Cs reference guide and job aid
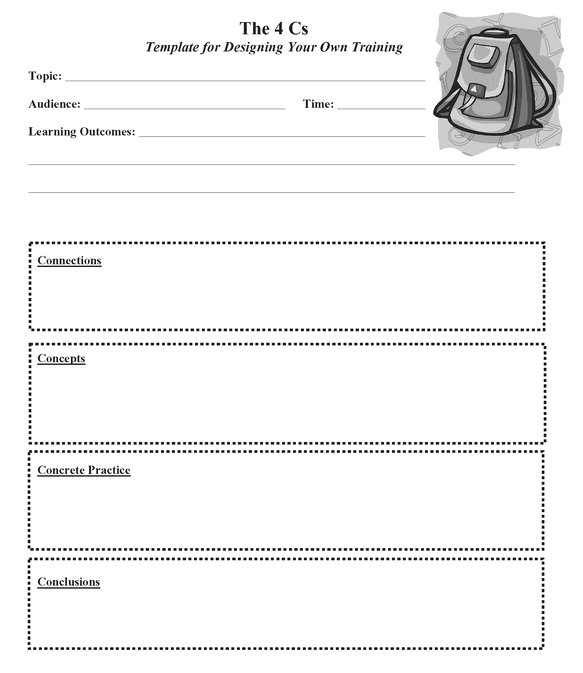
• 4 Cs template for designing your own training
• 4 Cs example with a classroom lesson
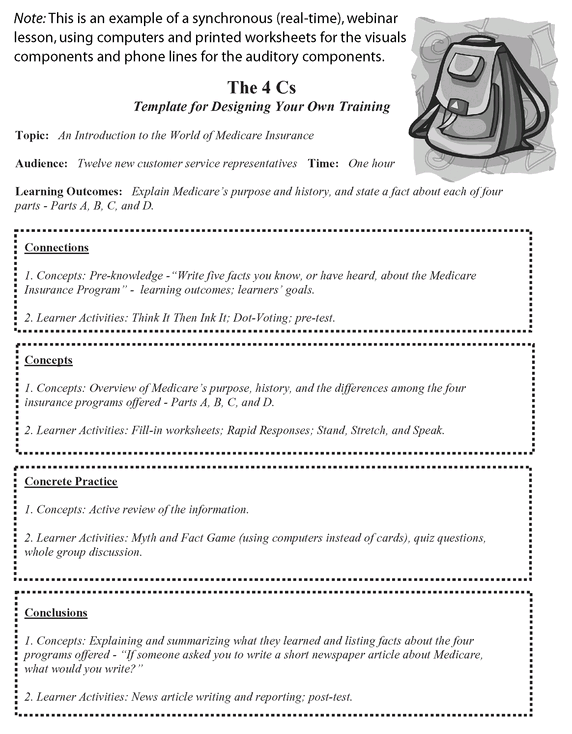
• 4 Cs example with a webinar lesson
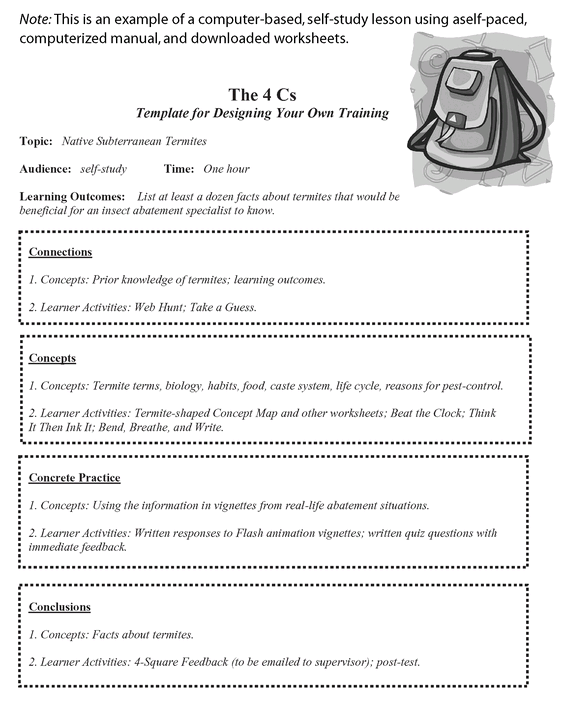
• 4 Cs example with a computer-based self-study lesson
The next four parts of the book give you detailed definitions and explanations of each of the four steps in this design and delivery model. In addition, these four parts also give you sixty-five instructional strategies to choose from as you design each step. You’ll find plenty of guidance, suggestions, activities, resources, tips, and more, to help you use this easy and remarkably effective instructional design process.
What if students everywhere,
in addition to just reading books,
listening to lectures, and writing homework papers,
truly engaged (and ultimately created)
wondrous new [learning] environments?
in addition to just reading books,
listening to lectures, and writing homework papers,
truly engaged (and ultimately created)
wondrous new [learning] environments?
Clark Quinn
Engaging Learning, 2005, p. 271
Engaging Learning, 2005, p. 271
Trainer’s Toolbox
Look back through this chapter for ideas and strategies you might use in your own training. By writing them here, you increase the likelihood that you will remember and use them later. Don’t forget to flag this page.
The 4 Cs Instructional Design Model
This is a reference page and a training job aid. Use it whenever you design a training, presentation, workshop, class, or lesson.


Learners make connections with what they already know or think they know about the training topic, with what they will learn, with what they want to learn, and with each other.
Learners take in new information in multisensory ways: hearing, seeing, discussing, writing, reflecting, imagining, participating, and teaching it to others.
Learners actively practice the new skills, or they participate in an active review of the new knowledge they have learned.

Learners summarize what they have learned, evaluate it, celebrate it, and create action plans for how they plan to use the new knowledge or skills after the training is over.
..................Content has been hidden....................
You can't read the all page of ebook, please click here login for view all page.
