
This recipe presents the steps to create the 2DSpaceGirl mini-game, on which all the recipes of this chapter are based.
For this recipe, we have prepared the images you need in a folder named Sprites in the 1362_02_01 folder. We have also provided the completed game as a Unity package in this folder named Simple2DGame_SpaceGirl.
To create the simple 2D mini-game Space Girl follow these steps:
- Create a new, empty 2D project.
- Import supplied folder
Spritesinto your project. - Convert each sprite image to be of type Sprite (2D and UI). To do this, select the sprite in the Project panel, then, in the Inspector, change choose Sprite (2D and UI) from the drop-down menu Texture Type, and click on the Apply button, as shown in the following screenshot:

- Set the Unity Player screen size to 800 x 600: choose the Edit | Project Settings | Player menu, then for option Resolution and Presentation uncheck
Default is Full Screen,and set the width to800and height to600, as shown in the following screenshot: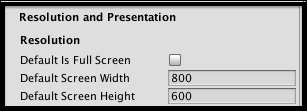
- Select the Game panel; if not already chosen, then choose Standalone (800 x 600) from the drop-down menu, as shown in the following screenshot:

- Display the Tags & Layers properties for the current Unity project. Choose menu Edit | Project Settings | Tags and Layers. Alternatively, if you are already editing a GameObject, then you can select the Add Layer… menu from the Layer drop-down menu at the top of the Inspector panel, as shown in the following screenshot:

- The Inspector should now being displaying the Tags & Layers properties for the current Unity project. Use the expand/contract triangle tools to contract Tags and Layers, and to expand Sorting Layers.
- Use the plus sign + button to add two new sorting layers, as shown in the following screenshot: first, add one named Background, and next, add one named Foreground. The sequence is important, since Unity will draw items in layers further down this list on top of items earlier in the list.

- Drag the sprite
background-bluefrom the Project panel (folderSprites) into either the Game or Hierarchy panel to create a GameObject for the current scene. - Set the Sorting Layer of GameObject
background-blueto Background (in the Sprite Renderer component). - Drag sprite
starfrom the Project panel (folderSprites) into either the Game or Hierarchy panel to create a GameObject for the current scene. - In the Inspector panel, add a new tag Star by selecting the Add Tag… option from the Tag drop-down menu at the top of the Inspector panel, as shown in the following screenshot:

- Apply the Star tag to GameObject
starin the Hierarchy scene. - Set the Sorting Layer of GameObject
starto Foreground (in the Sprite Renderer component). - Add to GameObject
stara Box Collider 2D (Add Component | Physics 2D | Box Collider 2D) and check itsIs Trigger, as shown in the following screenshot:
- Drag sprite
girl1from the Project panel (folderSprites) into either the Game or Hierarchy panel to create a GameObject for the player's character in the current scene. Rename this GameObjectplayer-SpaceGirl. - Set the Sorting Layer of GameObject
player-SpaceGirlto Foreground (in the Sprite Renderer component). - Add to GameObject
player-SpaceGirla Box Collider 2D (Add Component | Physics 2D | Box Collider 2D). - Add to GameObject
player-SpaceGirla RigidBody 2D (Add Component | Physics 2D | Rigid Body 2D). Set its Gravity Scale to zero (so it isn't falling down the screen due to simulated gravity), as shown in the following screenshot:
- Create a new folder for your scripts named
Scripts. - Create the following C# Script
PlayerMove(in folderScripts) and add an instance as a component to GameObjectplayer-SpaceGirlin the Hierarchy:using UnityEngine; using System.Collections; public class PlayerMove : MonoBehaviour { public float speed = 10; private Rigidbody2D rigidBody2D; void Awake(){ rigidBody2D = GetComponent<Rigidbody2D>(); } void FixedUpdate(){ float xMove = Input.GetAxis("Horizontal"); float yMove = Input.GetAxis("Vertical"); float xSpeed = xMove * speed; float ySpeed = yMove * speed; Vector2 newVelocity = new Vector2(xSpeed, ySpeed); rigidBody2D.velocity = newVelocity; } } - Save the scene (name it Main Scene and save it into a new folder named
Scenes).
You have created a player character in the scene, with its movement scripted component PlayerMove. You have also created a star GameObject (a pickup), tagged Star and with a 2D box collider that will trigger a collision when the player's character hits it. When you run the game, the player-SpaceGirl character should move around using the W A S D, arrow keys, or joystick. Currently, nothing will happen if the player-SpaceGirl character hits a star since that has yet to be scripted.
You have added a background (GameObject background-blue) to the scene, which will be behind everything since it is in the rearmost sorting layer Background. Items you want to appear in front of this background (the player's character and the star so far) are placed on sorting layer Foreground. Learn more about Unity tags and layers at http://docs.unity3d.com/Manual/class-TagManager.html.