
In this recipe, we'll learn to animate the hat of the Unity bean-man character in response to a jump event.
To animate body parts for character movement events, follow these steps:
- Create a new Unity 2D project.
- Import the provided package
BeanManAssets, by choosing menu: Assets | Import Package | Custom Package …, and then click the Import button to import all these assets into your Project panel. - Increase the size of the Main Camera to
10. - Let's setup the 2D gravity setting for this project – we'll use the same setting as from Unity's 2D platform tutorial, a setting of Y=
-30. Set 2D gravity to this value by choosing menu: Edit | Project Settings | Physics 2D, and then at the top change the Y value to-30. - Drag an instance of the BeanMan character2D from the Project | Prefabs folder into the scene. Position this GameObject at (
0,3,0). - Drag an instance of the sprite platformWallBlocks from the Project | Sprites folder into the scene. Position this GameObject at (
0,-4,0). - Add a Box Collider 2D component to GameObject platformWallBlocks by choosing menu: Add Component | Physics 2D | Box Collider 2D.
- We now have a stationary platform that the player can land upon, and walk left and right on. Create a new Layer named Ground, and assign GameObject platformWallBlocks to this new layer, as shown in the following screenshot. Pressing the Space key when the character is on the platform will now make him jump.

- Currently the BeanMan character is animated (arms and legs moving) when we make him jump. Let's remove the Animation clips and Animator controller and create our own from scratch. Delete folders Clips and Controllers from Project | Assets | PotatoMan2DAssets | Character2D | Animation, as shown:

- Let's create an Animation clip (and its associated Animator controller) for our hero character. In the Hierarchy panel select GameObject hero. Ensuring GameObject character2D is selected in the Hierarchy, open the Animation panel, and ensure it is in Dope Sheet view (this is the default).
- Click the empty dropdown menu in the Animation panel (next to the greyed out word
Samples), and choose menu item [Create New Clip]:
- Save the new clip in the Character2D | Animation folder, naming it as character-beanman-idle. You've now created an Animation clip for the 'idle' character state (which is not animated).
- Looking at the Character2D | Animation folder in the Project panel you should now see both the Animation clip you have just created (character-beanman-idle) and also a new Animator controller, which has defaulted to the name of your GameObject character2D:

- Ensuring GameObject character2D is selected in the Hierarchy, open the Animator panel and you'll see the State Machine for controlling the animation of our character. Since we only have one Animation clip (character-beanman-idle) then upon entry the State Machine immediately enters this state.

- Run your scene – since the character is always in the 'idle' state, we see no animation yet when we make it jump.
- Now we'll create a 'jump' Animation clip which animates the hat. Click the empty dropdown menu in the Animation panel (next to the greyed out word 'Samples'), and create a new clip in your Animation folder, naming it character-beanman-jump.
- Click button Add Property, and chose Transform | Position of the hat child object, by clicking its '+' plus-sign button. We are now recording changes to the (X, Y, Z) position of GameObject hat in this animation clip:

- You should now see 2 'keyframes' at 0.0 and at 1.0. These are indicated by diamonds in the Timeline area in the right-hand-section of the Animation panel.
- Click to select the first keyframe (at time 0.0). Now in the Scene panel move the hat up and left a little, away from the head. You should see that all three X, Y, Z values have a red background in the Inspector – this is to inform you that the values of the Transform component are being recorded in the animation clip:

- Since 1 second is perhaps too long for our jump animation, drag the second keyframe diamond to the left to a time of 0.5.
- We now need to define when the character should Transition from the 'idle' state to the 'jump' state. In the Animator panel select state character-beanman-idle, and create a transition to the state character-beanman-jump by right-mouse-clicking and choosing menu Make Transition, then drag the transition arrow to state character-beanman-jump, as shown:

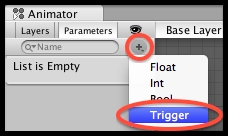
- Now let's add a Trigger parameter named 'Jump', by clicking on the add parameter plus-sign "+" button at the top-left of the Animator panel, choosing Trigger, and typing the name Jump:
- We can now define the properties for when our character should Transition from idle to jump. Click the Transition arrow to select it, and set the following 4 properties in the Inspector panel:
- Has Exit Time: uncheck
- Transition Duration:
0.01 - Interruption State:
Current State - Conditions: Add
Jump(click plus-sign '+' button at bottom)

- Save and run your scene. Once the character has landed on the platform and you press the SPACE key to jump, you'll now see the character's hat jump away from his head, and slowly move back. Since we haven't added any transition to ever leave the Jump state, this Animation clip will loop, so the hat keeps on moving even when the jump is completed.
- In the Animator panel select state character-beanman-jump and add a new Transition back to state character-beanman-idle. Select this Transition arrow and in the Inspector panel sets its properties as follows:
- Has Exit Time: (leave as checked)
- Exit time:
0.5(this needs to be the same time value as the second keyfame of our Jump animation clip) - Transition Duration:
0.01 - Interruption State:
Current State
- Save and run your scene. Now when you jump the hat should animate once, after which the character immediately returns to its Idle state.
You have added an Animation controller State Machine to GameObject character2D. The two Animation clips you created (idle and jump) appear as States in the Animator panel. You created a Transition from Idle to Jump when the 'Jump' Trigger parameter is received by the State Machine. You created a second Transition, which transitions back to the Idle state after waiting 0.5 seconds (the same duration between the 2 keyframes in our Jump Animation clip).
Note that the key to everything working for the bean-man character is that when we make the character jump with the SPACE key, then code in the PlayerControl C# scripted component of GameObject character2D, as well as making the sprite move upwards on screen, also sends a SetTrigger(…) message to the Animator controller component, for the Trigger named Jump.
Note
The difference between a Boolean Parameter and a Trigger is that a Trigger is temporality set to True and once the SetTrigger(…) event has been 'consumed' by a state transition it automatically returns to being False. So Triggers are useful for actions we wish to do once and then revert to a previous state. A Boolean Parameter is a variable, which can have its value set to true/or False at different times during the game, and so different Transitions can be created to fire depending on the value of the variable at any time. Note that Boolean parameters have to have their values explicitly set back to False with a SetBool(…).
The following screenshot highlights the line of code that sends the SetTrigger(…) message:

State Machines for animations of a range of motions (running/walking/jumping/falling/dying and so on.) will have more states and transitions. The Unity-provided bean-man character has a more complex State Machine, and more complex animations (of hands and feet, and eyes and hat and so on, for each Animation clip), which you may find useful to explore.
Learn more about the Animation view on the Unity Manual web pages at http://docs.unity3d.com/Manual/AnimationEditorGuide.html.