
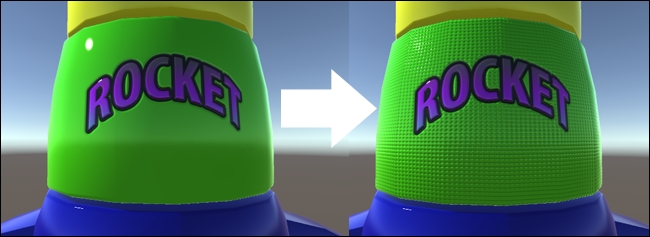
When creating a large object, there is not only the desire to texture it as a whole, but also to add details that can make it look better at closer distances. To overcome the need for gigantic texture maps, the use of Detail maps can make a real difference. In this recipe, we will add Detail maps to a rocket toy by applying a Detail mask and a Detail Normal map. In our case, we want to add a textured quality (and a stripe pattern) to the green plastic, except in the region where there is a battery compartment and the toy's logo:
For this recipe, we have prepared a Unity package, containing the prefab for a rocket toy. The prefab includes the 3D model and a material, featuring a Diffuse map and a Normal map (made from a Heightmap). The file can be found in the 1362_04_06 folder.
To add the Detail maps to your object, follow these steps:
- Import the
rocket.unitypackagefile into your project. Then, select the prefab namedrocketToyfrom the Assets folder, in the Project view, and place it in your scene. - From the Hierarchy view, expand the rocketToy GameObject and select its child called rocketLevel1. Then, scroll down the Inspector view to the Material component. Observe that it uses the
DIFF_shiptexture as the Diffuse map. Duplicate this file and rename the new copyCOPY_ship. - Open
COPY_shipin your image editor. Select all the solid green pixels around the logo and battery compartment (in Photoshop, this can be done with the Magic Wand tool, keeping the Shift key pressed while selecting multiple areas):
- Keeping your selection active, access the image Channels window (in Photoshop, this can be done by navigating to Window | Channels). Click on New Channel. This will be our Alpha channel:

- Hide the Red, Green and Blue channels. Select the Alpha channel and paint the selection white. Then, select the area of the battery compartment and paint it grey (R, G and B:
100):
- Save it in the TIFF format as
MASK_ship.TIF, in theAssetsfolder. Make sure that you include Alpha Channels:
- Now that we have the mask, let's create a diffuse map for our detail. In your image editor, create a new image with the following dimensions: width:
64, and height:64. - Fill the new image with grey (R, G and B:
128). Then, use shapes or rectangular fills to create a dark grey (R, G, and B:100) horizontal line that is about 16 pixels tall:
- Save the image as
DIFF_detail.PNGin theAssetsfolder. - Create a new 64 x 64 image. Use a Gradient tool to create a black and white Radial Gradient (in Photoshop, this can be done with the Gradient Tool in Radial mode):

- Save the image as
HEIGHT_detail.PNGin theAssetsfolder. - Go back to Unity. From the
Assetsfolder, selectHEIGHT_detail. Then, from the Inspector view, change its Texture Type to Normal map, check the Create from Grayscale option, adjust Bumpiness to0.25, and set Filtering tosmooth. Click on Apply to save the changes:
- From the Hierarchy view, expand the rocketToy GameObject and select its child called rocketLevel1. Then, scroll down the Inspector view to the Material component. Assign
MASK_shipto the Detail Mask slot;DIFF_detailas Secondary Maps | Detail Diffuse x 2; andHEIGHT_detailas Secondary Maps | Normal Map. Also, turn the Normal Map intensity down to0.6. - In the Secondary Maps section, change the Tiling values to X:
200, and Y:50. You might notice that the pattern is not seamless. This is because we are using the same UV Set from our Diffuse texture. However, the object has been assigned to two different UV channels (back when it was being modeled). While UV channel 1 contains the mapping for our Diffuse map, UV channel 2 uses a basic cylindrical mapping. We need to change the Secondary Maps section's UV Set from UV0 to UV1. The Detail map for your material is ready:
When in use, Secondary Maps are blended onto the material's primary Diffuse and Normal maps (that's why our object is green even after the Detail Diffuse is applied: the grey tones are superimposed on the original Diffuse texture). By using a Detail Mask, the artist defines which areas of the object should be affected by Secondary Maps. This is great for customization, and also for creating nuances (like the semi-bumped battery compartment in our example).
Another helpful feature is the possibility of using a separate UV channel for Details maps and Tiling. Besides adding variation to texture mapping, this allows us to paint the details that can be perceived even at a very close distance by dramatically enhancing the visual quality of our objects.